[Skip to main content](#vessel-content)
# Set up a WordPress marketplace with the Halle theme
Details Written by: Administrator Category: [Templates](/support/documentation/templates) Published: 09 November 2026 Hits: 2
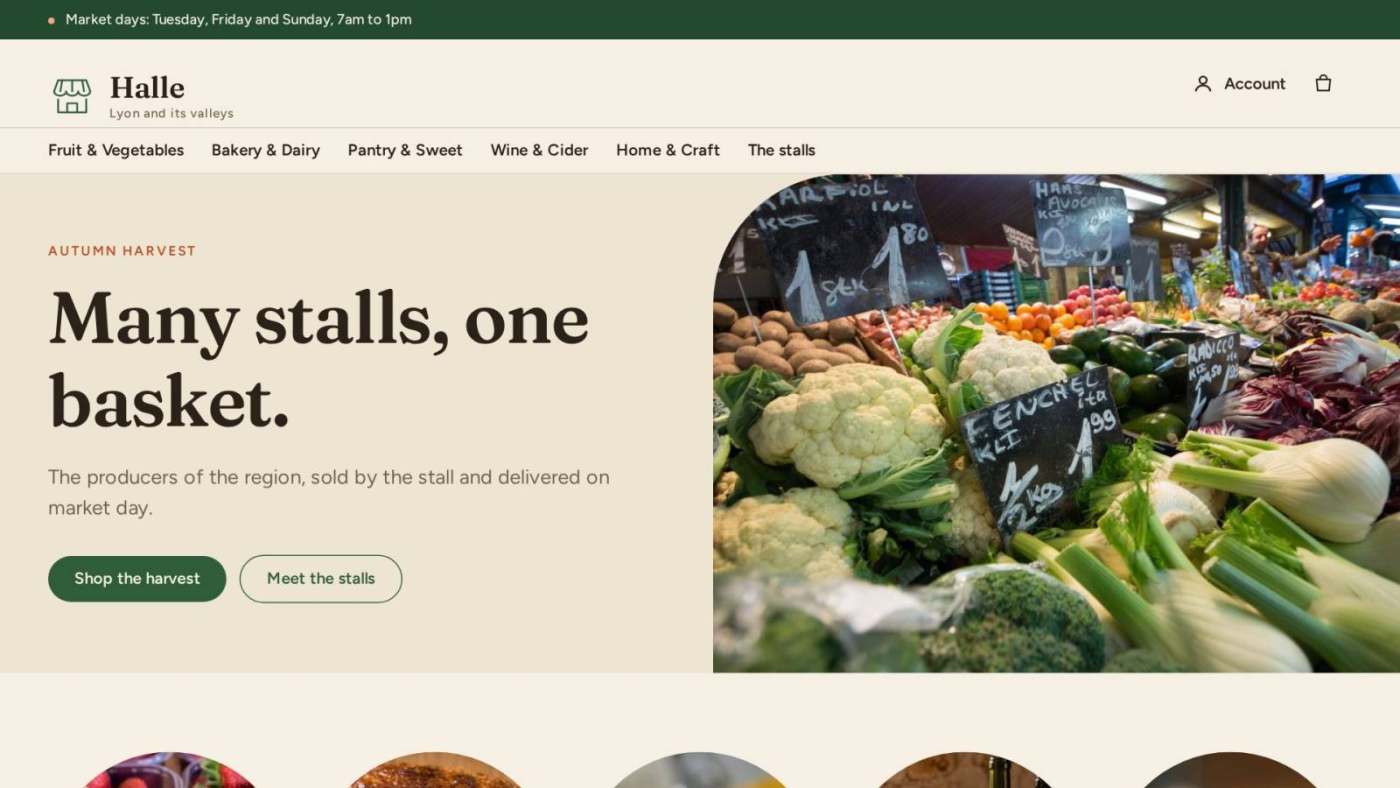
This guide takes a WordPress website from nothing to a marketplace of regional and local products: HikaShop for the shop, HikaMarket Multivendor for the stalls, and the Halle theme, the WordPress edition of the Halle template, a block theme. It installs the three, makes the home page in the Site Editor, creates the menu, and sets up the marketplace itself: the vendors and their stalls, the vendor registration, the delivery of each stall and the free delivery. Every screenshot was taken on a real site while following these steps. You can see Halle on the [Halle demo](https://halle.demo.hikashop.com/).
[](/images/doc/templates/halle/wp-30-home-top.jpg)
- [Before you start](#before)
- [1. Install HikaShop](#hikashop)
- [2. Install HikaMarket Multivendor](#hikamarket)
- [3. Install and activate Halle](#halle)
- [4. The name and the logo of your market](#identity)
- [5. Choose a style: colours and fonts](#styles)
- [6. Create the menu](#menu)
- [7. The home page](#home)
- [The hero](#home_hero)
- [The departments](#home_categories)
- [The promises](#home_promises)
- [The stalls](#home_stalls)
- [The picks of the week](#home_picks)
- [The map of the stalls](#home_map)
- [8. The strip, the header and the footer](#footer)
- [9. Set up the marketplace with HikaMarket](#market)
- [The market options](#market_options)
- [The fields of a stall](#market_fields)
- [The vendors and their stalls](#market_vendors)
- [Vendor registration and the vendor area](#market_register)
- [Products and the front of a stall](#market_products)
- [Fees and payments](#market_fees)
- [Delivery, and free delivery per stall](#market_shipping)
- [10. The settings of the market look](#settings)
- [11. HikaShop settings for the look of the shop](#hikashop_settings)
- [12. Before you sell](#sell)
- [13. Your own CSS](#css)
- [Questions](#faq)
### Before you start
- **WordPress 6.7** or later and **PHP 8.1** or later. Halle for WordPress is a block theme: you set it up in **Appearance > Editor** (the Site Editor), not in the Customizer.
- **HikaShop** for WordPress and **HikaMarket Multivendor**, in their latest versions. Halle works with the Starter, Essential and Business editions of HikaShop; the vendor features (the stalls, the vendor lines on the products, the vendor pages, the map and the cart grouped by stall) need HikaMarket Multivendor.
- The packages, from your downloads on our website: the **HikaShop** zip, **com\_hikamarket\_multivendor.zip** (HikaMarket, which installs as a WordPress plugin) and **halle.zip** (the WordPress theme of Halle; tpl\_halle.zip is the Joomla template).
- If you are changing the theme of a site that is already online, make a backup first, and do the work on a copy of the site if you can.
In this guide the market is called Halle and its eight stalls are those of our demo. The screenshots show the demo's products: yours will show your own.
### 1. Install HikaShop
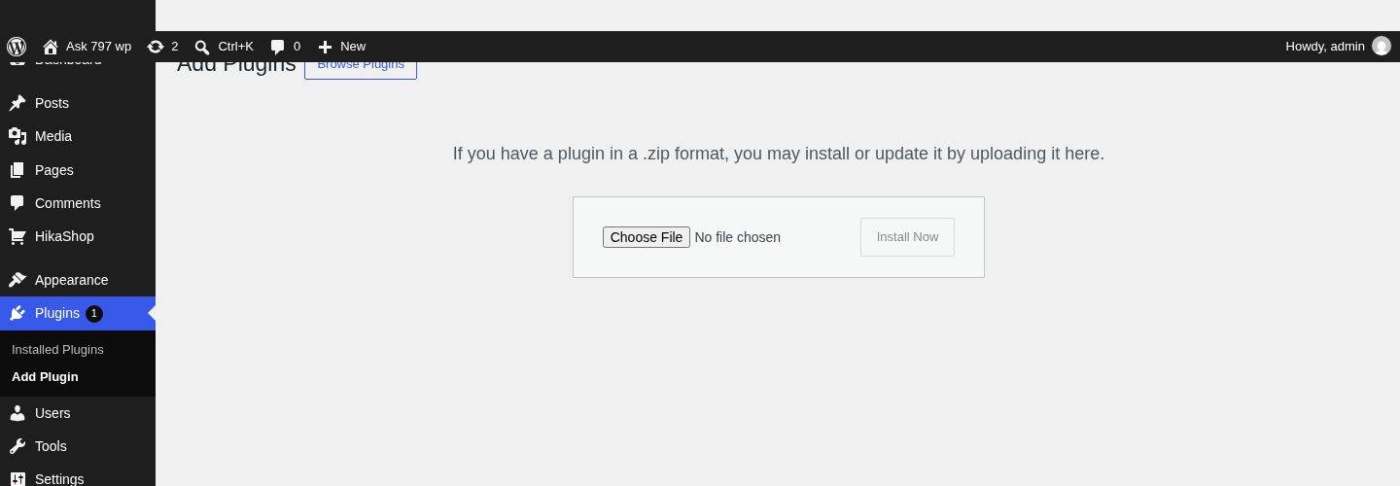
1. In the WordPress administration, open **Plugins > Add Plugin**, click **Upload Plugin**, choose the HikaShop zip and click **Install Now**.
2. Click **Activate Plugin**. A **HikaShop** menu appears in the administration.
[](/images/doc/templates/halle/wp-01-upload-plugin.jpg)
On activation HikaShop creates the pages of the shop: **Shop** (your categories and products, at /shop/), **Checkout**, **My Account** and **Register**. Add your categories and products in **HikaShop > Products** and **HikaShop > Categories** (see [Create your first product](https://www.hikashop.com/support/documentation/256-create-your-first-product.html)), with a picture each: the home page and the listings of Halle are built around pictures.
### 2. Install HikaMarket Multivendor
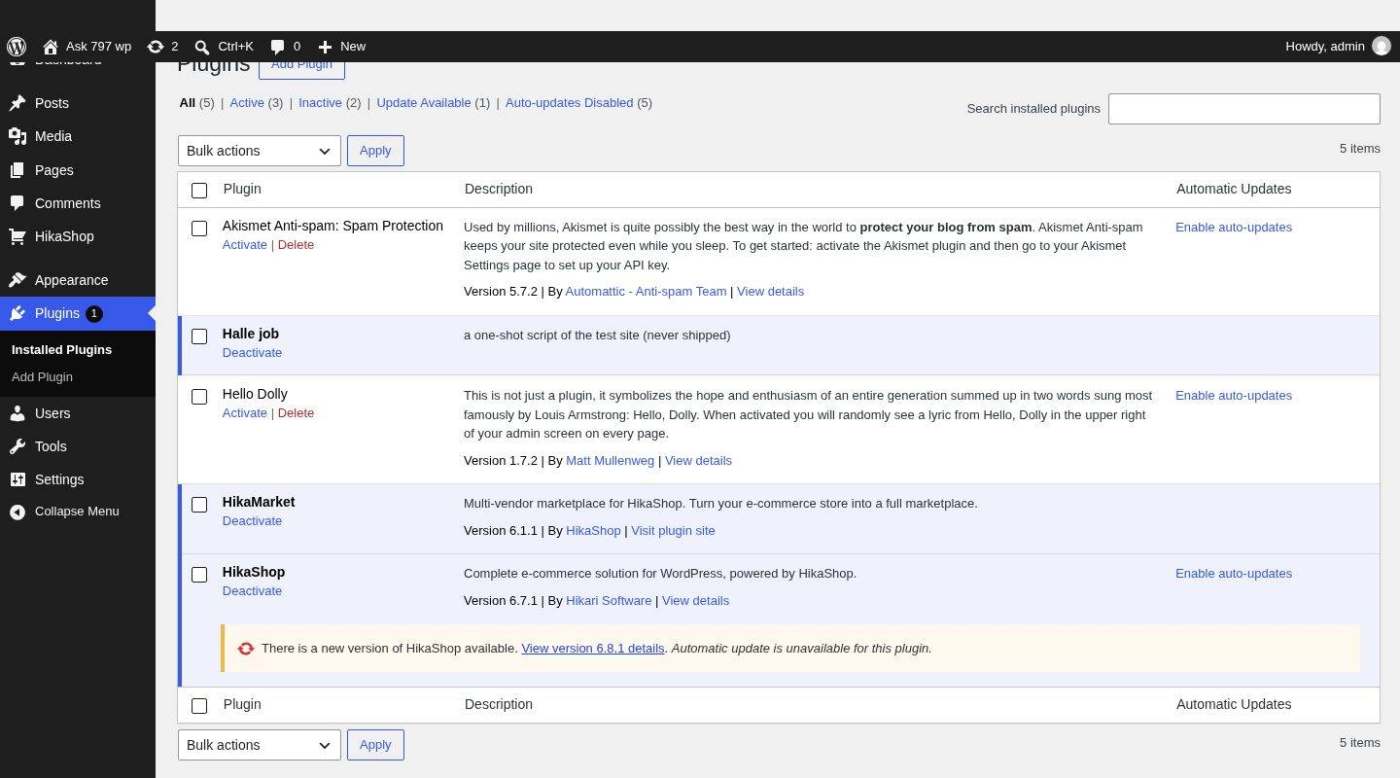
1. Open **Plugins > Add Plugin > Upload Plugin**, choose **com\_hikamarket\_multivendor.zip**, **Install Now**, then **Activate Plugin**. A **Vendors** entry appears in the HikaShop menu.
2. HikaMarket creates two pages: **Vendor registration** ("Become a vendor") and **Vendor cpanel** (the vendor area). Open **Pages** and check that both are published; rename them as you like. The page **The stalls**, the directory of the vendors, is a page with the **Vendors** block of HikaMarket: create it in step 6.
[](/images/doc/templates/halle/wp-02-plugins.jpg)
More about HikaMarket: [the Multivendor tutorial](https://www.hikashop.com/support/documentation/164-hikamarket-multi-tutorial.html) and [the configuration page](https://www.hikashop.com/support/documentation/143-hikamarket-config.html).
### 3. Install and activate Halle
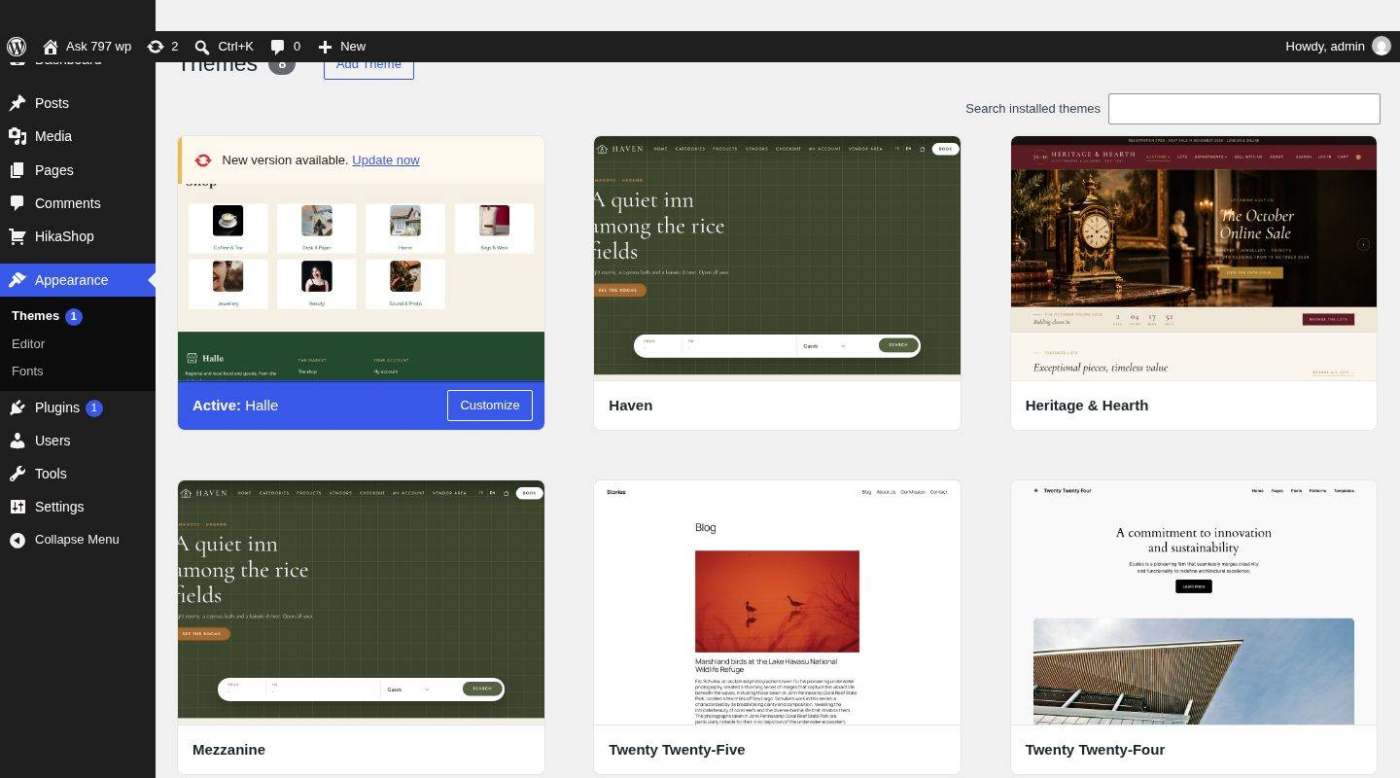
1. Open **Appearance > Themes**, click **Add New Theme**, then **Upload Theme**, choose **halle.zip** and click **Install Now**.
2. Click **Activate**.
[](/images/doc/templates/halle/wp-03-themes.jpg)
Your site now has Halle's strip, header and footer, and a home page made of the hero, the departments, the promises, the stalls, the picks of the week and the map. This home page is Halle's **Front Page** template: it is used as soon as the theme is active, with no page to create and nothing to set in **Settings > Reading**. You change it in the Site Editor (step 7).
### 4. The name and the logo of your market
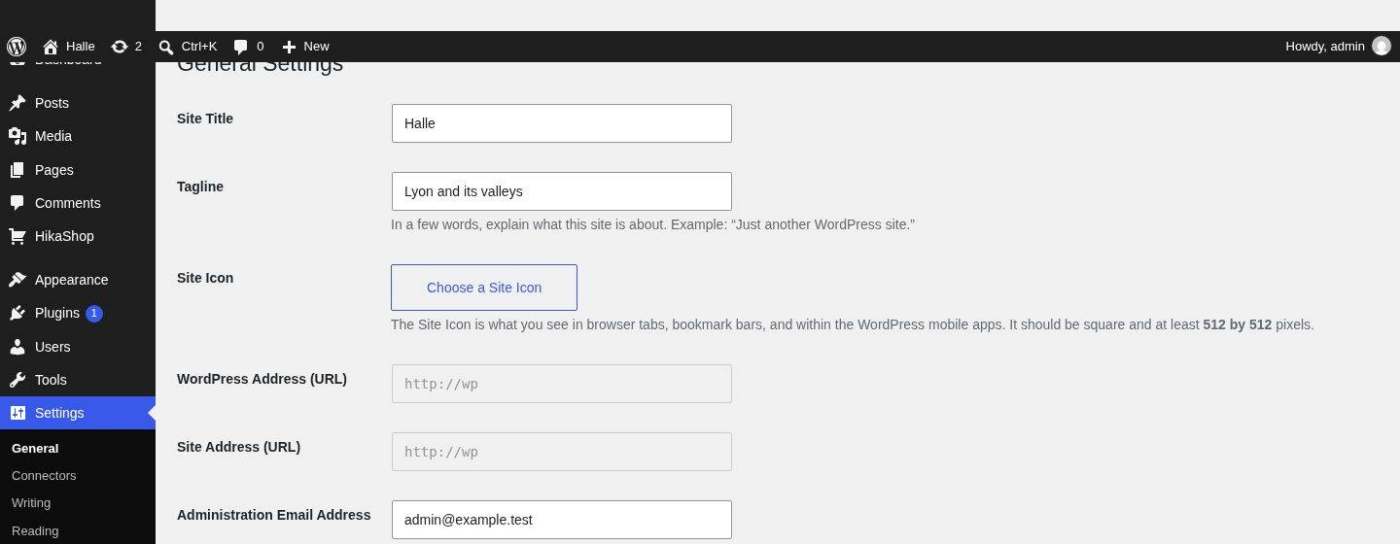
Open **Appearance > Editor**, click **Identity** (or **Settings > General**):
- **Site title**: the name of your market, written next to the mark in the header and in the copyright line of the footer.
- **Site tagline**: a short line under the name in the header (for example the town).
- **Site logo**: your logo. Once you choose one, it replaces the mark of Halle and the name in the header.
- **Site icon**: the icon of the browser tab, square, at least 512 x 512 pixels.
[](/images/doc/templates/halle/wp-05-general.jpg)
### 5. Choose a style: colours and fonts
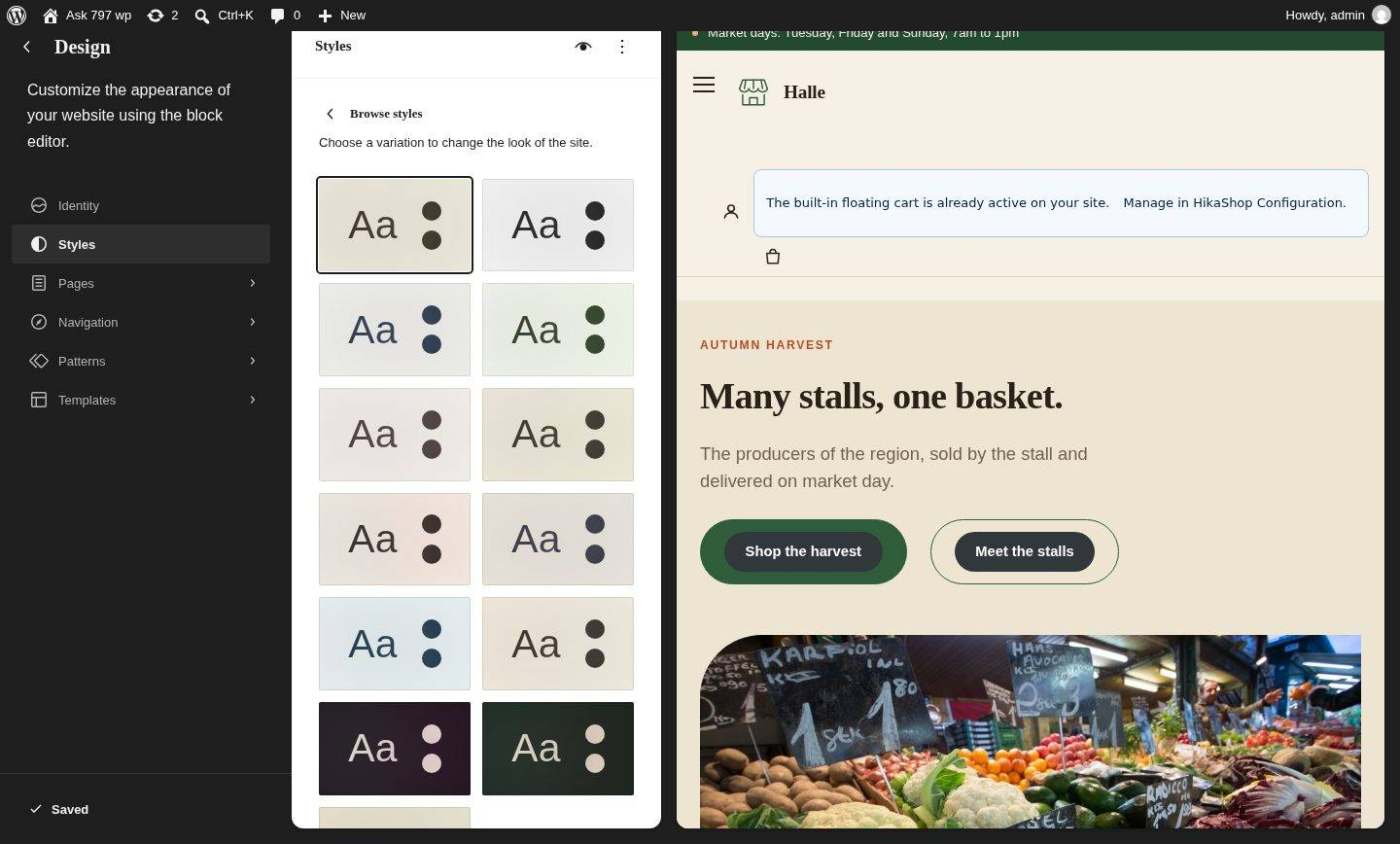
In **Appearance > Editor**, click **Styles**, then **Browse styles**. Halle has 13 styles, the same presets as the Joomla template, two of them with a dark page: Halle (cream paper, market green and terracotta), Étal, Farmers market, Art market, Makers and craft, Christmas market, Spanish market, Japan market, Italian mercato, Flower market, Flea market, Night market and Seafood market. Each one sets the colours, the two fonts, the corners (rounded or square), the look of a stall's card (plain, awning or photo) and the hero (over a picture, beside it, or a table of produce) together. Click one to see your site with it on the right, then click **Save**. You can compare them on the [Halle demo](https://halle.demo.hikashop.com/) with its "Use your own style" button.
[](/images/doc/templates/halle/wp-06-browse-styles.jpg)
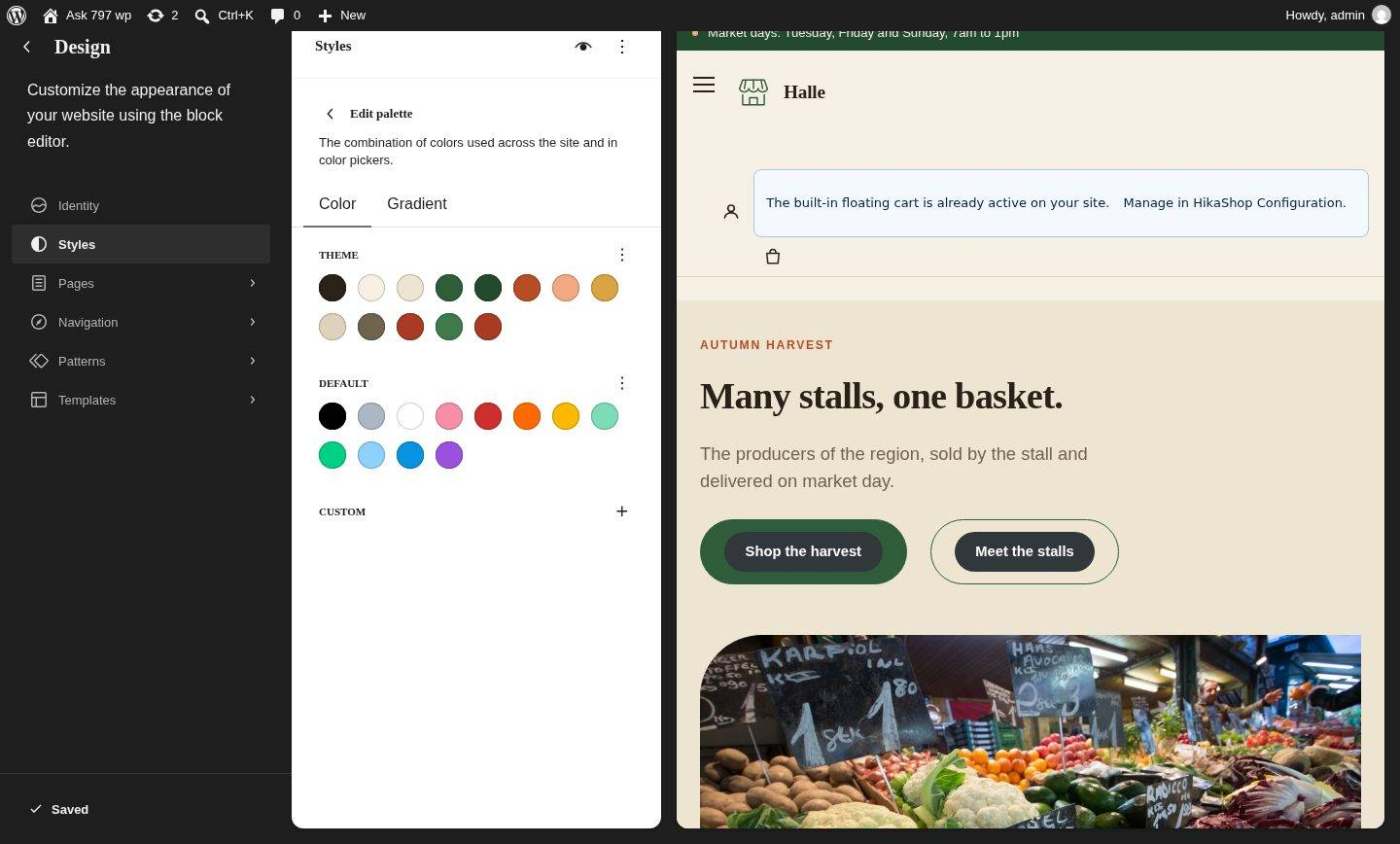
- **Your own colours**: in **Styles > Colors > Edit palette**, the **Theme** colours are the ones Halle draws with: **Ink** for the text, **Paper** for the page, **Surface** for the cards and the bands, **Brand** for the buttons and the bars, **Brand, deep** for the buttons pressed and the footer, **Accent** for offers and labels, **Accent on dark** for the accent on the footer, **Sun** for the stripes of a stall's awning and the badges, **Line** for the borders, **Muted** for the secondary text, **Alert**, **Success** and **Danger**. Click a colour to change it. Start from the style closest to what you want, then adjust. A dark Paper works too: the HikaShop boxes (cart, checkout, account) follow it.
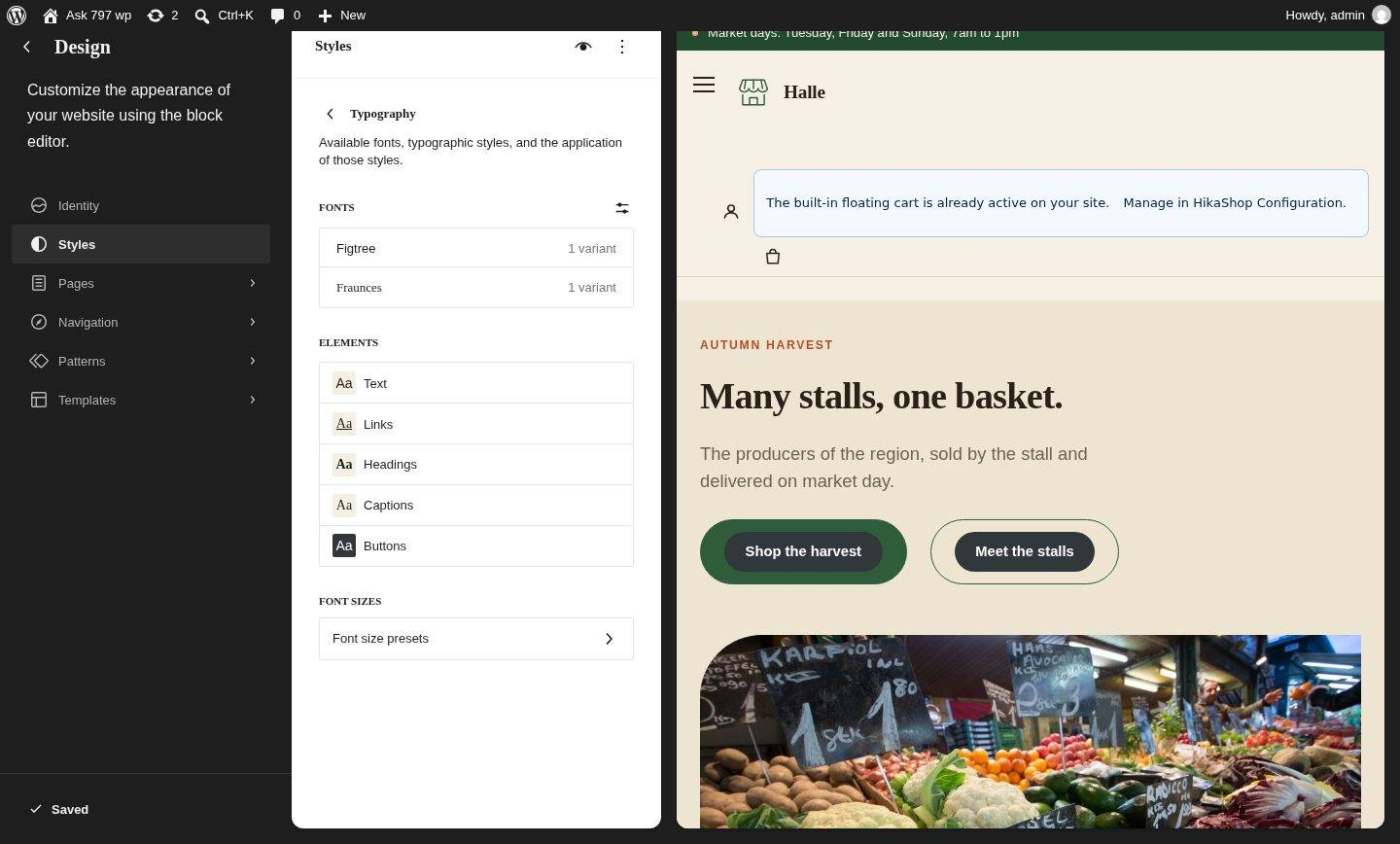
- **The fonts**: Halle uses two, a headline font (**Serif** in the list) and an interface font (**Sans**), in **Styles > Typography**. They change with the style you pick: to get other fonts, pick the style that has them.
- Halle downloads the two fonts once to your site (in wp-content/uploads/halle-fonts/), so your visitors' browsers never contact Google Fonts.
[](/images/doc/templates/halle/wp-07-palette.jpg)
[](/images/doc/templates/halle/wp-08-typography.jpg)
### 6. Create the menu
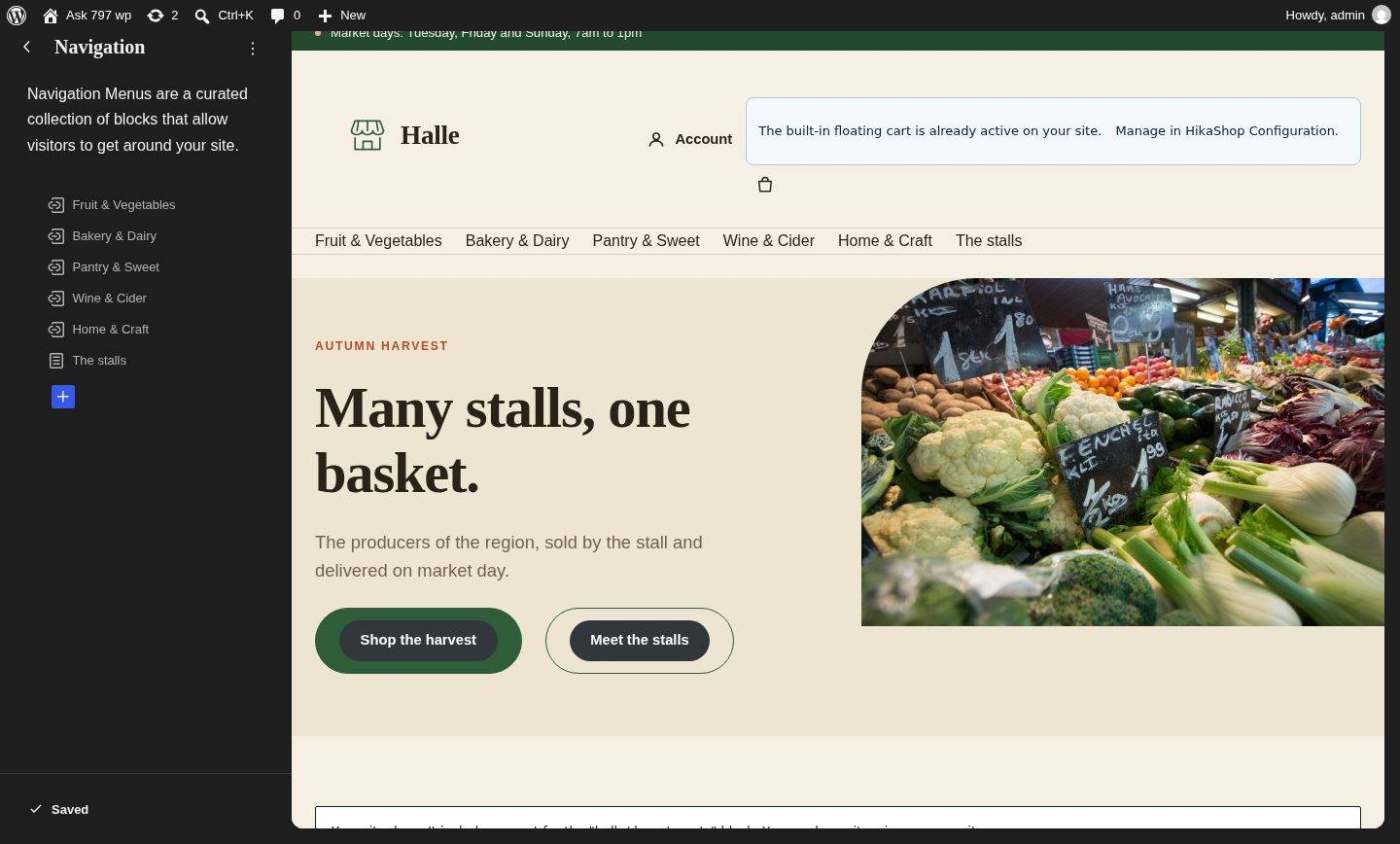
The header menu is a WordPress navigation menu. Create the pages you need first (**Pages > Add Page**): **The stalls**, with the HikaMarket **Vendors** block (the directory of the stalls), and the pages of the footer (about, delivery, FAQ, contact, terms, privacy). Then open **Appearance > Editor > Navigation**, click the menu, then **Edit**, and in the editor:
- remove the pages a visitor does not need in the header (Sample Page, Register, My Account: the account has its link on the right of the header);
- with the **+** button, add a link per department (open a category on your site and paste its address, for example /shop/category/12-fruit-vegetables/), then **The stalls**;
- drag the items in the order you want, then **Save**.
[](/images/doc/templates/halle/wp-09-navigation.jpg)
### 7. The home page
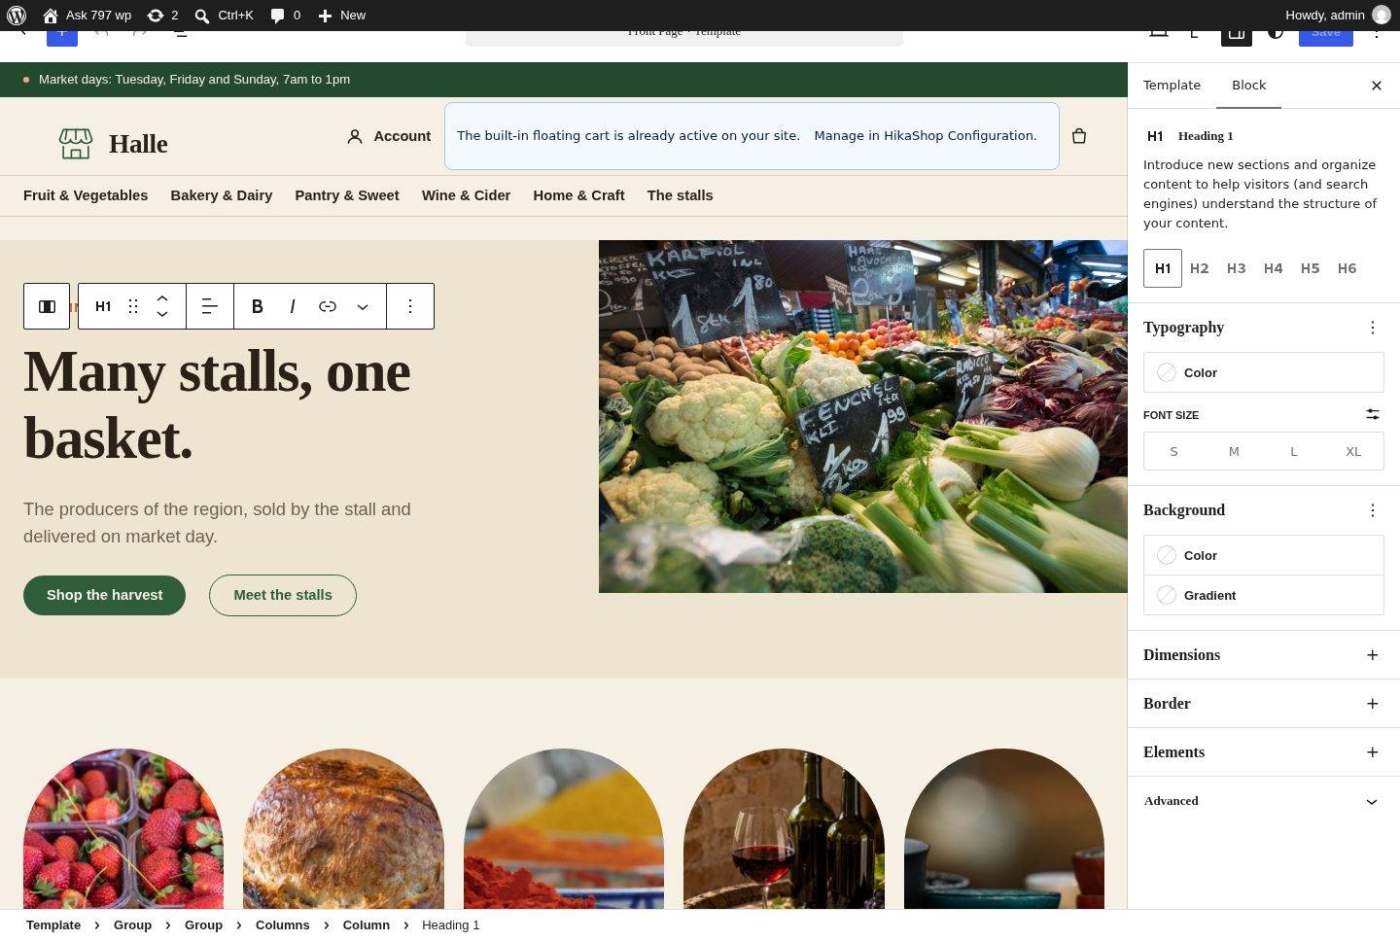
Open **Appearance > Editor > Templates** and click **Front Page**, then the pencil. The home page is a stack of sections (groups of blocks); click any block to change it, select a section (the **Group** around it, with the breadcrumb at the bottom of the editor) and press the Delete key to remove it. **Save** when you are done.
[](/images/doc/templates/halle/wp-10-front-page.jpg)
#### The hero
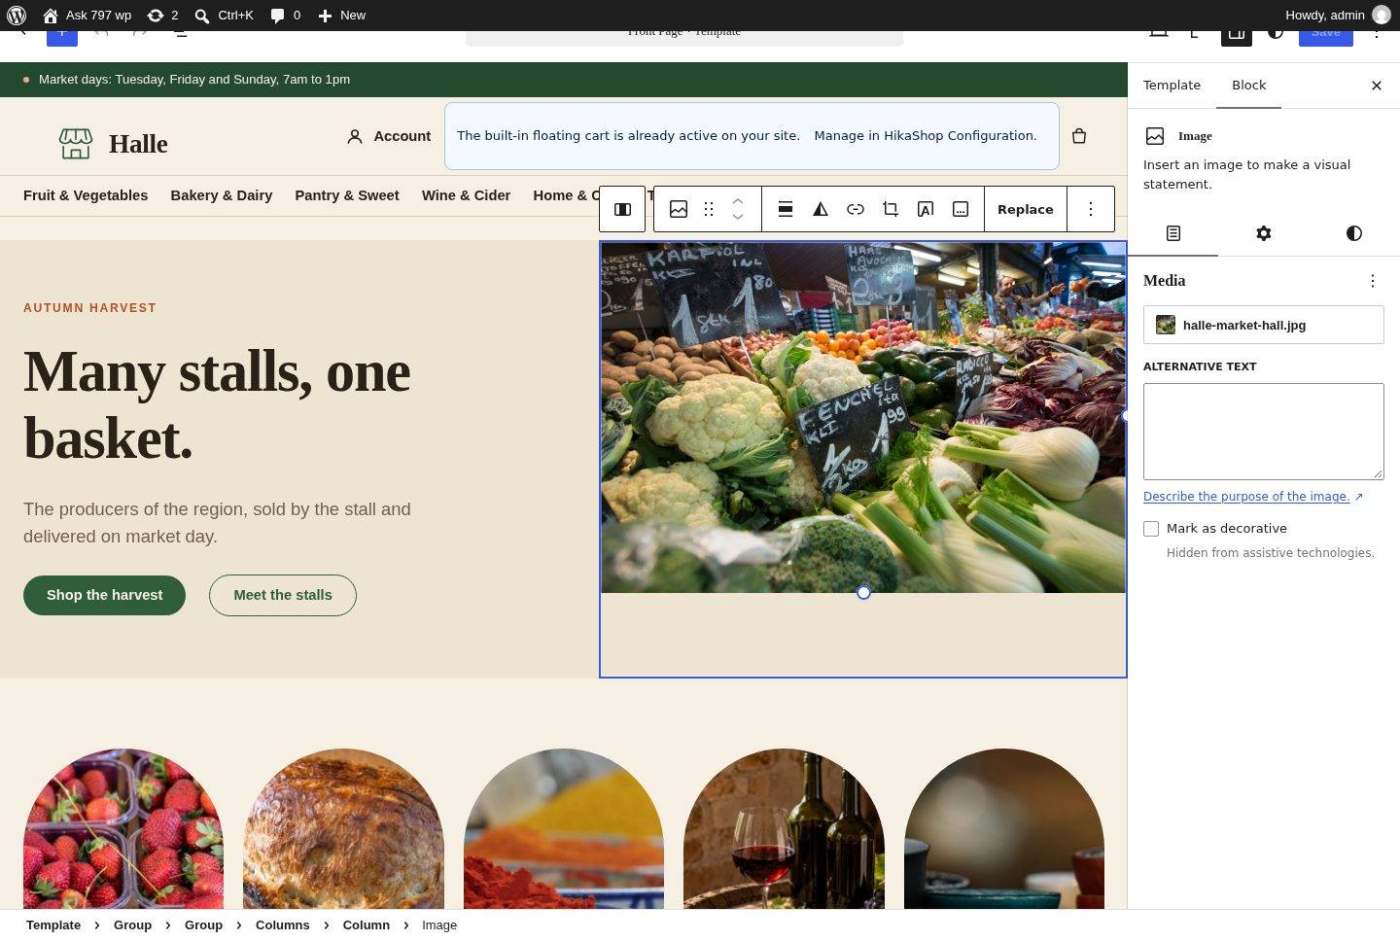
A small line, a large title, a text, two buttons and a picture. Click each text to write yours. Click a button, then the link icon of its toolbar, to point it to your products (the **Shop** page) and to the page of the stalls. Click the picture, then **Replace** in its toolbar, and choose a photograph of your market in the Media Library (a landscape picture; the hero crops it). The style decides whether the hero sits over the picture, beside it or as a table of produce. Without a picture the hero is only the text.
[](/images/doc/templates/halle/wp-11-hero-image.jpg)
#### The departments
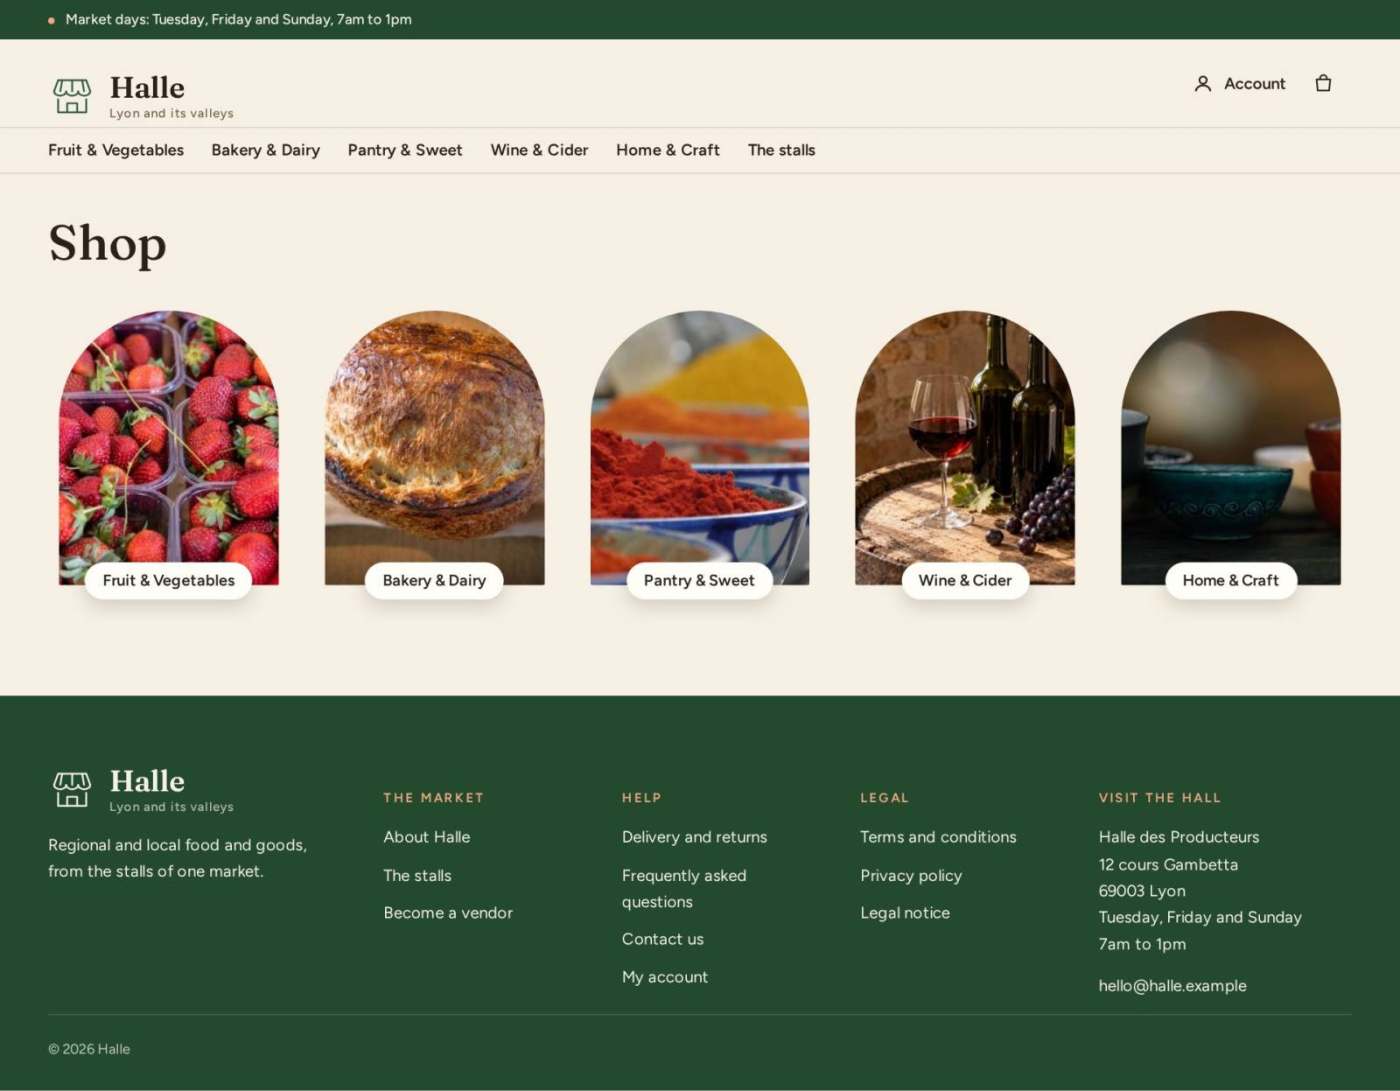
The block **Halle: the departments**: the first categories of your shop as arched tiles, with their pictures. Select it and, in the sidebar, choose how many (5 by default). The departments are the first categories under your products in **HikaShop > Categories**; give each one a picture.
#### The promises
A **Custom HTML** block with three promises. Click it and write your own, keeping the structure:
```
- Direct from the stallEvery product is sold by the person who made it.
- Seasonal, within 80 kmWhat is picked this week, nothing flown in.
- Delivered on market dayEach stall delivers on its own day, or keep it for pick-up at the hall.
```
#### The stalls
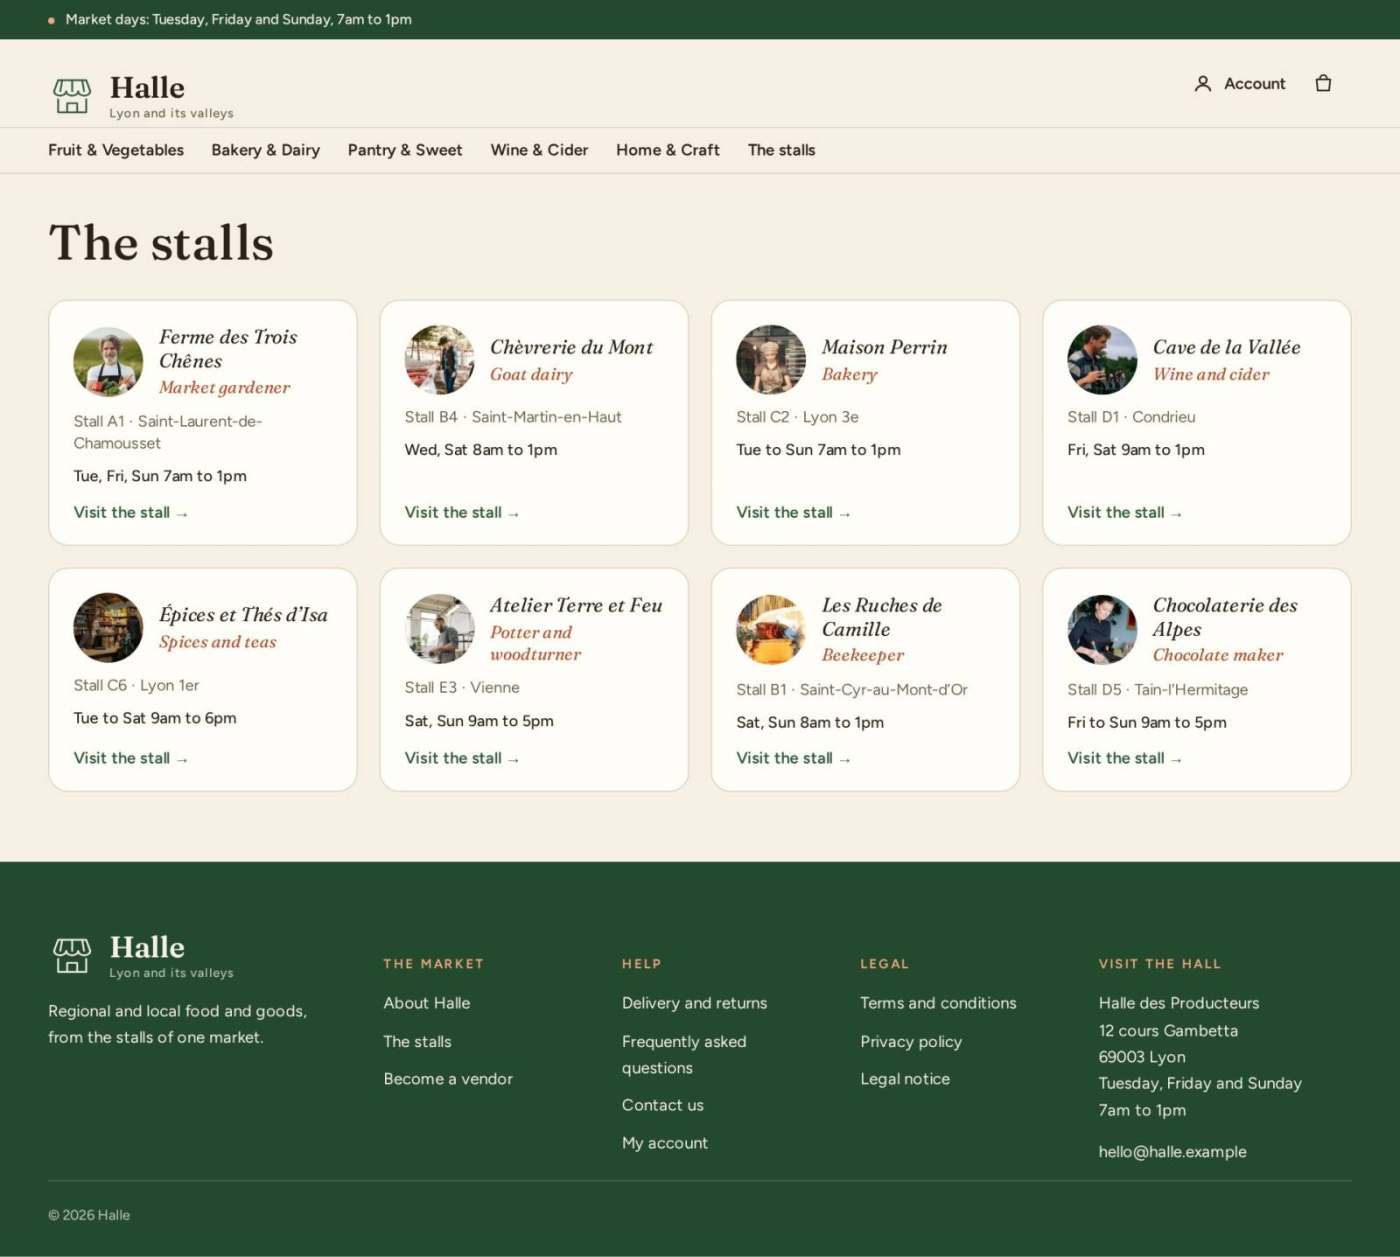
The block **Halle: the stalls** shows the vendors of HikaMarket as stall cards: the portrait, the name, the trade, the stall number and place, the opening hours and a link to the front of the stall. In the sidebar choose the number of columns (4) and the number of stalls (8).
[](/images/doc/templates/halle/wp-31-stalls.jpg)
#### The picks of the week
A **HikaShop Products** block. Select it and, in the sidebar, set what it shows: **Type of content** = Product, the latest first, 4 columns and 2 rows, the layout **Image and title**. Halle gives this block its settings when you activate the theme (the latest 8 products); change them as you like. See [Content module instance Edit](https://www.hikashop.com/support/documentation/46-hikashop-modules-form.html) for the options of a HikaShop block.
#### The map of the stalls
The block **HikaMarket Vendor Map** draws a map with one pin per stall, from the **Vendor location** of each vendor (step 9). The section is only in the pattern when HikaMarket provides the block.
### 8. The strip, the header and the footer
Open **Appearance > Editor > Patterns**, then **Template parts**:
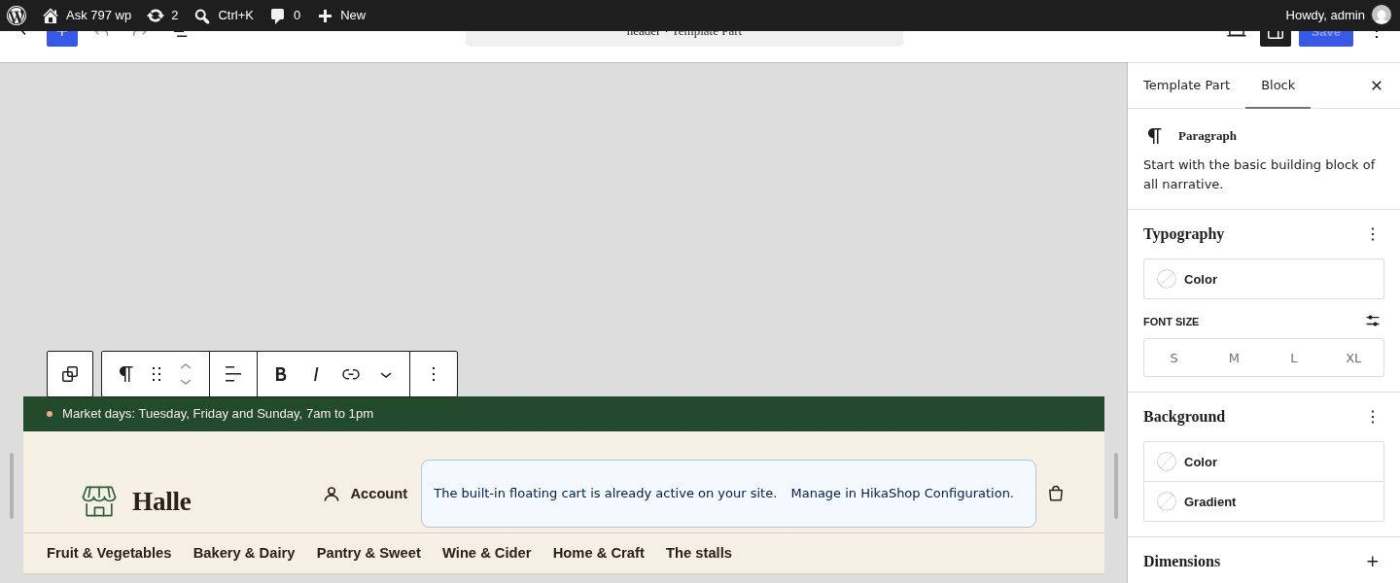
- **Header**: the strip above it carries a line with the market days ("Market days: Tuesday, Friday and Sunday, 7am to 1pm"): click it and write yours (an offer, the delivery threshold: it is a text you write by hand). The logo, the account link and the cart are blocks of the part; the menu is the navigation of step 6.
- **Footer**: the brand and a few words, three columns of links (the market, help, legal) and the address of the market are HTML blocks: click one, then edit the HTML (**three dots > Edit as HTML**) and replace the names and the links with the pages of your site. The copyright line takes the name of your market and the year by itself.
[](/images/doc/templates/halle/wp-12-header-strip.jpg)
### 9. Set up the marketplace with HikaMarket
HikaMarket turns the shop into a market: each product belongs to a vendor, the cart and the checkout are split by vendor, each vendor has a front page, and each vendor ships its own goods. The tutorial [HikaMarket Multivendor Tutorial](https://www.hikashop.com/support/documentation/164-hikamarket-multi-tutorial.html) explains every mode of a marketplace. These are the settings of a market of independent stalls that deliver on their own, as in Halle.
#### The market options
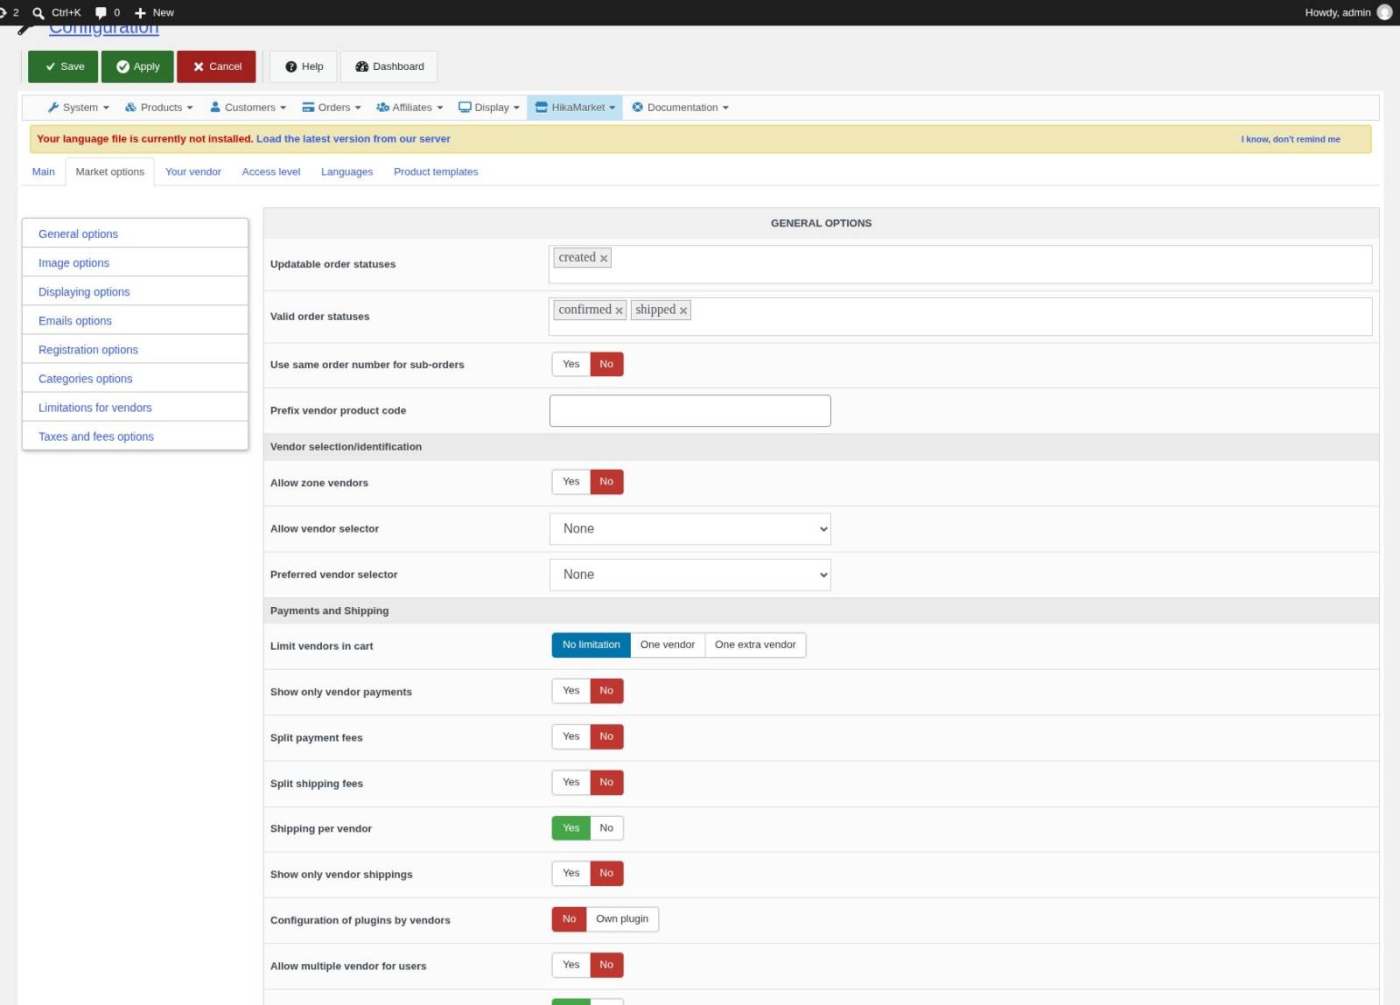
Open **HikaShop > Vendors**, then **HikaMarket > Configuration** (menu at the top of the page), tab **Market options**. The ones a market of stalls needs:
- **Payments and Shipping** (in **General options**): **Shipping per vendor** = **Yes** (the default): each stall offers its own shipping methods and its own price, and the customer chooses one per stall. **Limit vendors in cart** = **No limitation** to let one basket hold goods of several stalls. **Show only vendor payments** = No while the market takes the payment for the stalls.
- **Registration options**: **Allow vendor registration** (**Manual validation** lets you visit a farm or a workshop before a stall opens) and what the registration form asks for.
- **Categories options**: **Create categories for vendors** and **Change vendor root category**.
- **Taxes and fees options**: the commission of the market.
[](/images/doc/templates/halle/wp-21-market-shipping.jpg)
#### The fields of a stall
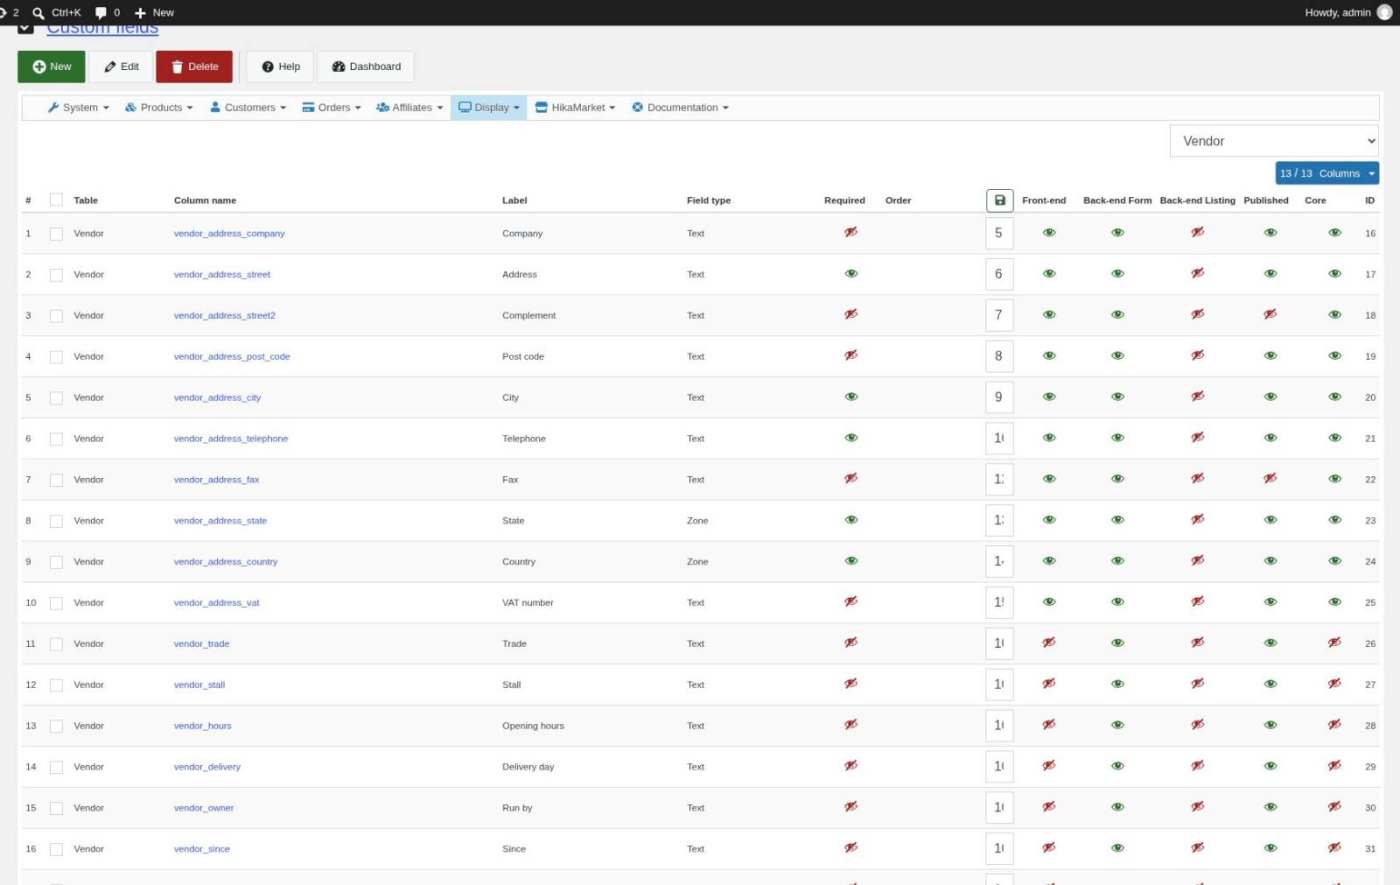
The stall cards, the vendor line, the stall's front page and the product page use four vendor fields: the trade, the stall number, the opening hours and the delivery day. Create them in **HikaShop > Display > Custom fields** with **New**: **Table** = **Vendor**, **Field type** = **Text**, and these column names: `vendor_trade` (label "Trade", for example "Goat dairy"), `vendor_stall` ("Stall", for example "B4"), `vendor_hours` ("Opening hours", for example "Wed, Sat 8am to 1pm") and `vendor_delivery` ("Delivery day", for example "Saturday"). The demo has three more, shown on a stall's front: `vendor_owner` ("Run by"), `vendor_since` ("Since") and `vendor_labels` ("Labels"). Other names work too, if you tell Halle in its settings (step 10). See [HikaMarket Vendor edition](https://www.hikashop.com/support/documentation/149-hikamarket-vendor-form.html).
[](/images/doc/templates/halle/wp-23-vendor-fields.jpg)
#### The vendors and their stalls
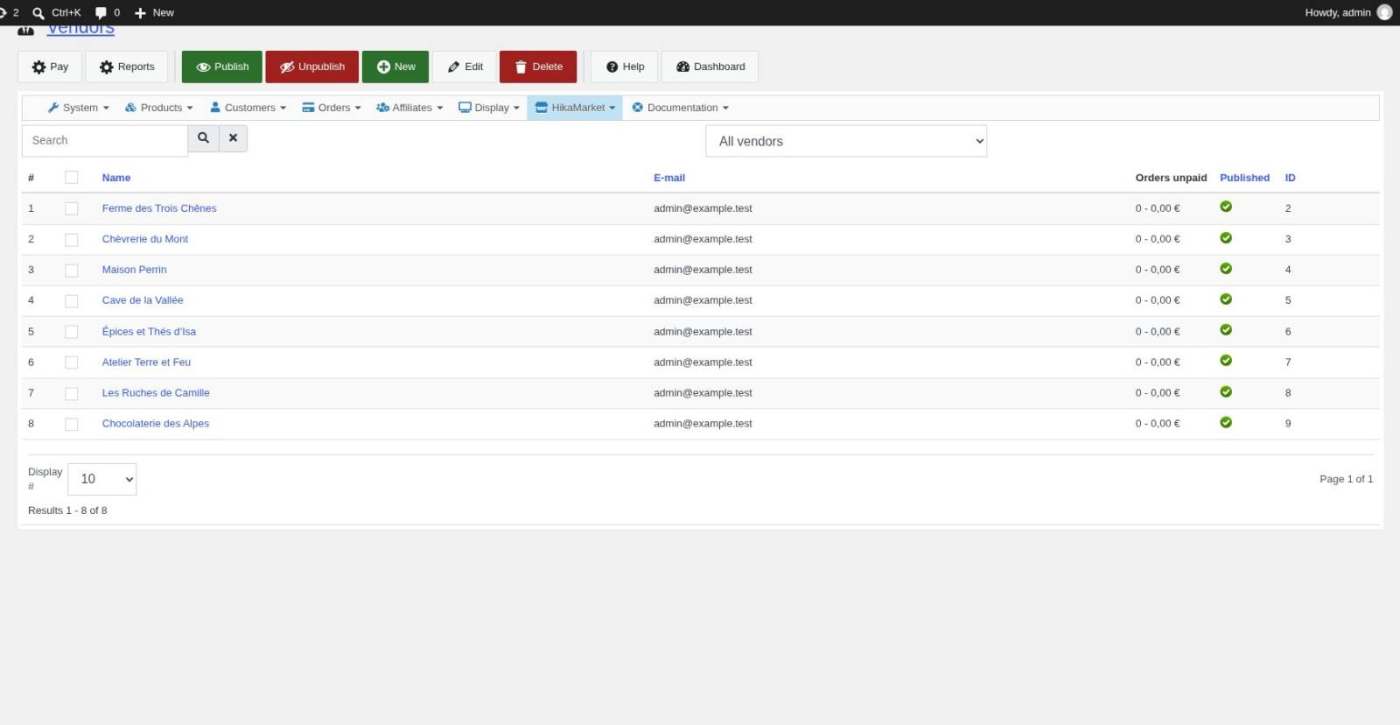
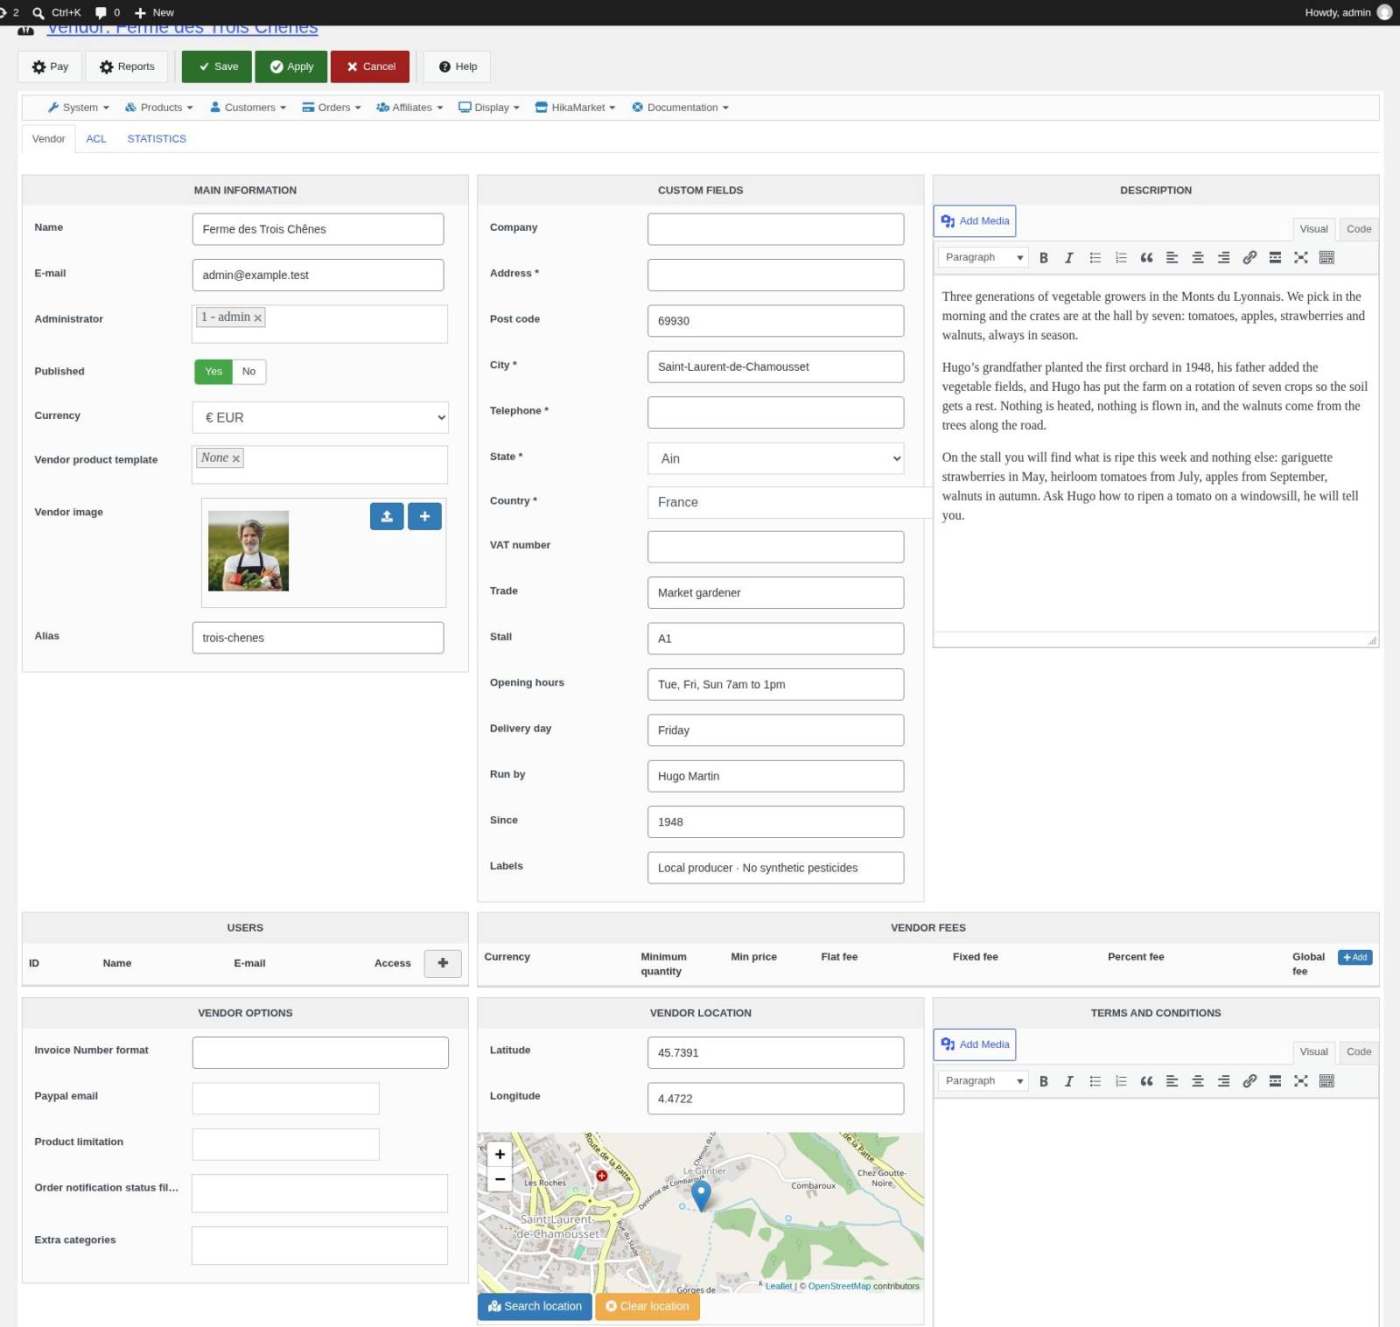
Open **HikaShop > Vendors > Vendors** and click **New**, or let the vendors register (next part) and validate them here. A vendor's form holds the **Name** and **Alias** (the end of the address of its front page), the **Administrator** (the WordPress user who manages the stall), the **Vendor image** (the portrait shown on the stall card, on the product cards and in the cart: a square picture), the custom fields (address and the four fields of Halle), the **Description** (the story of the stall, shown on its front page; the first paragraph is shown larger), the **Vendor location** (a latitude and a longitude, or **Search location** and move the pin: the map uses it) and the **Vendor fees**.
[](/images/doc/templates/halle/wp-24-vendors.jpg)
[](/images/doc/templates/halle/wp-24b-vendor-edit.jpg)
#### Vendor registration and the vendor area
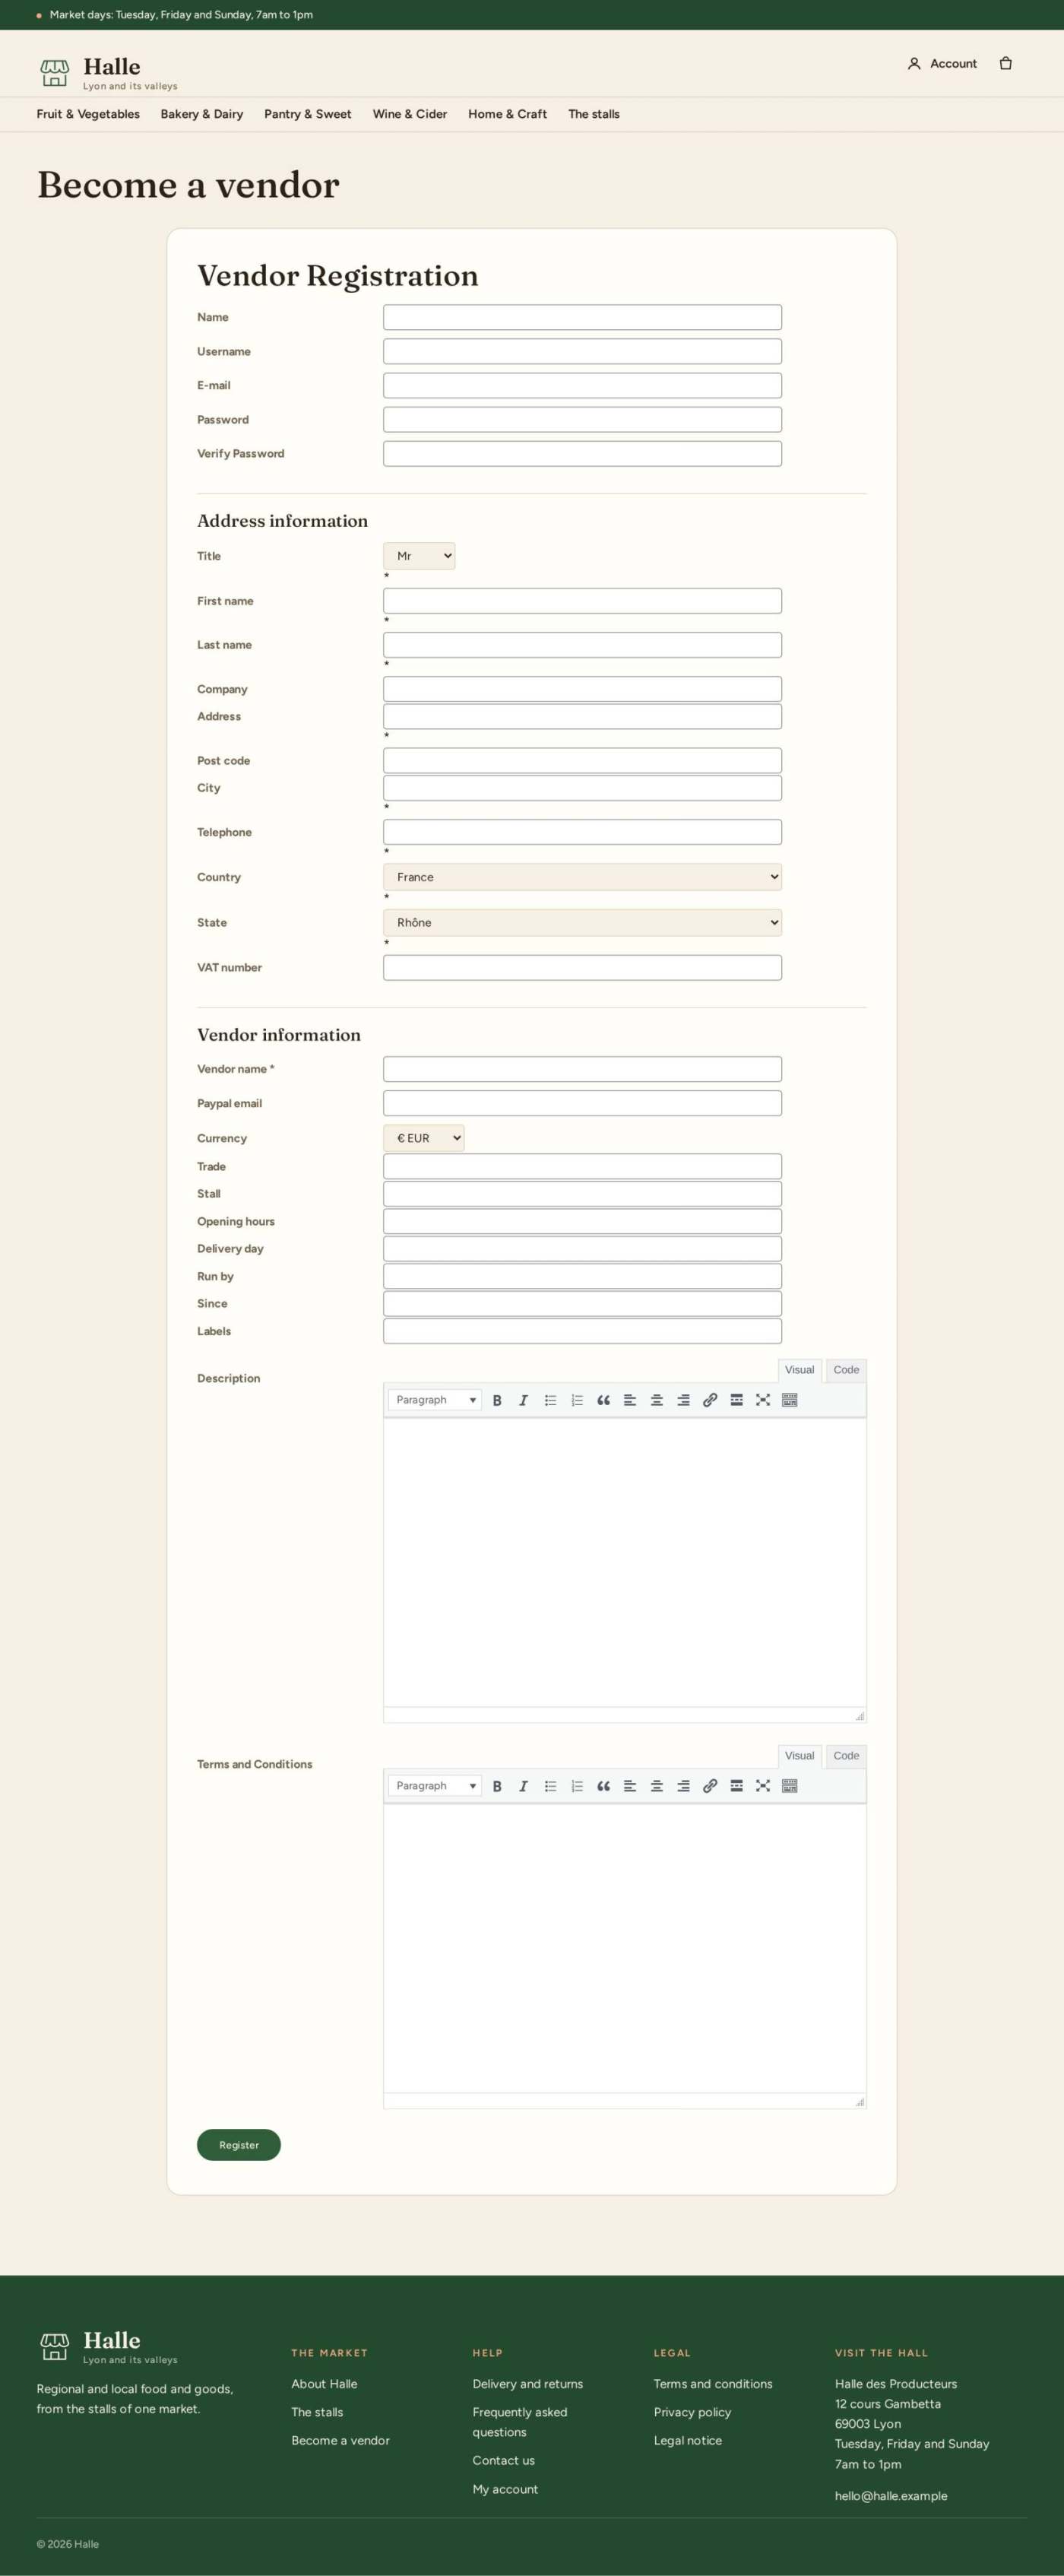
A producer who wants a stall registers on the page **Vendor registration** ("Become a vendor"): their account, their address, the fields of the stall and their description. With **Allow vendor registration** on manual validation, the new vendor waits for your approval in **HikaShop > Vendors > Vendors**. Once the stall is open, its vendor reaches the vendor area (the page **Vendor cpanel**, with the vendor's login): its statistics, its products, its orders and its customers, its categories and its discounts, in the look of the theme. Link the two pages in the footer ("Become a vendor") and in the account menu.
[](/images/doc/templates/halle/wp-33-vendor-registration.jpg)
#### Products and the front of a stall
- A vendor creates its products in its vendor area; you can also edit a product in **HikaShop > Products** and choose its **Vendor** in the **Main information** box. Each product shows "Sold by" with its stall's portrait, in the listings, on its page and in the cart.
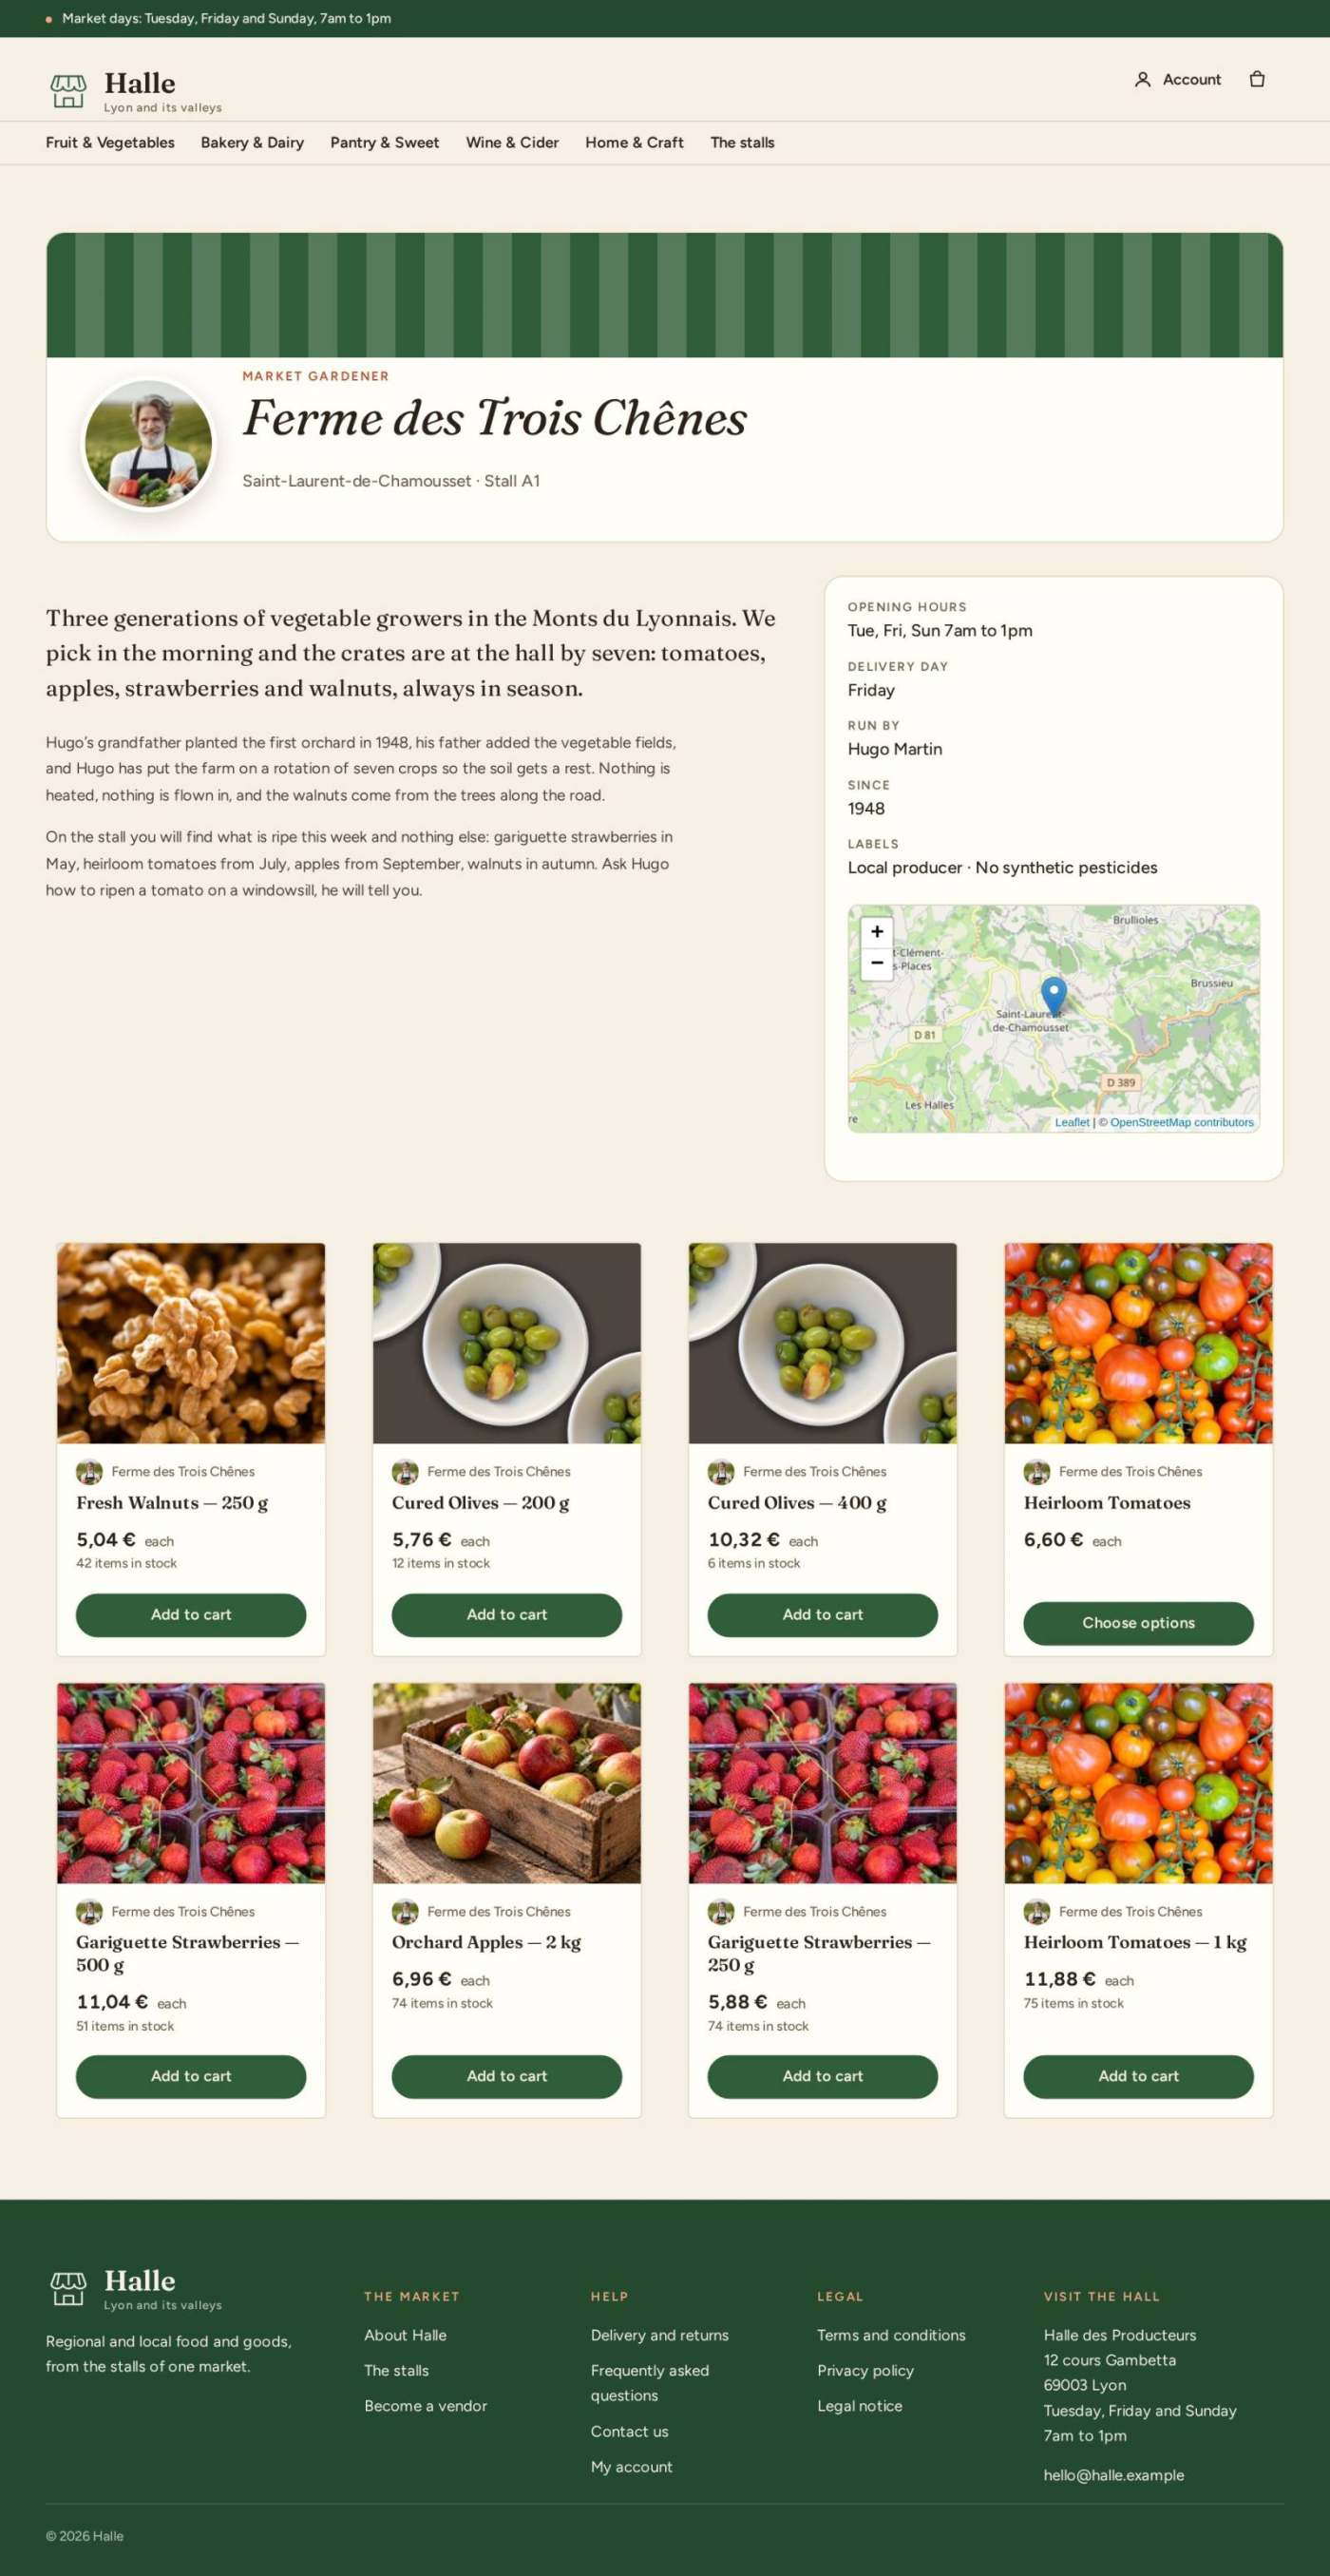
- **The front of a stall** shows the stall's portrait, its trade, its words, its facts (opening hours, delivery day, run by, since, labels), a map, then its products, and only its own: Halle puts a HikaShop Products block in it, set to the vendor of the page, when you activate the theme.
[](/images/doc/templates/halle/wp-32-stall-page.jpg)
#### Fees and payments
The market lives on a commission. **Taxes and fees options** of the Market options (and **Vendor fees** of each vendor, and of each product) hold the rules: a percentage, a fixed fee, a minimum price. Read [HikaMarket fees](https://www.hikashop.com/support/documentation/259-hikamarket-fees.html) before you set them. Who is paid, and when, depends on the market mode: the market takes the payment and pays its vendors later (the mode of Halle's demo), or the vendors are paid directly (HikaMarket has payment plugins for that); see the Multivendor tutorial.
#### Delivery, and free delivery per stall
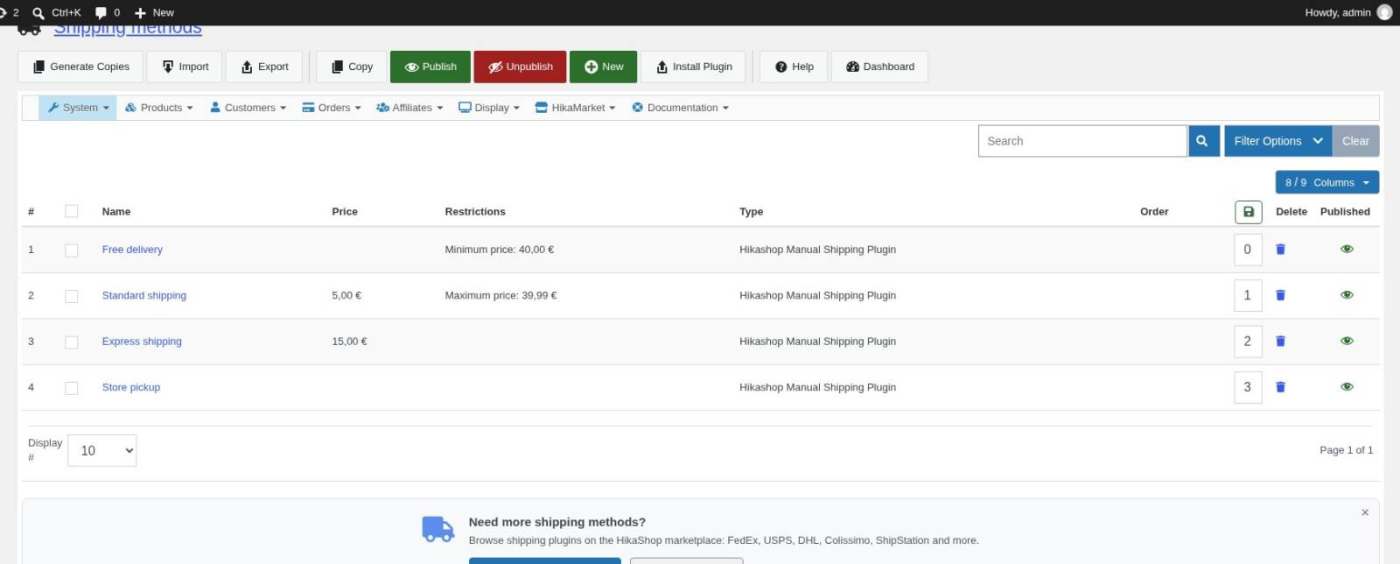
With **Shipping per vendor**, the checkout asks one shipping method **per stall**: each stall has its block, with the methods it offers and their price, and a delivery note (the delivery day of the stall). The shipping methods are those of **HikaShop > Shipping**; each is a normal HikaShop method, whose restrictions are checked against the goods of one stall at a time. See [Shipping method Add/Edit](https://www.hikashop.com/support/documentation/31-hikashop-shipping-manual-form.html).
**Free delivery is a shipping method at 0 € with a minimum price, per stall.** It is not a setting of the theme, and the theme has no free delivery bar. To offer it:
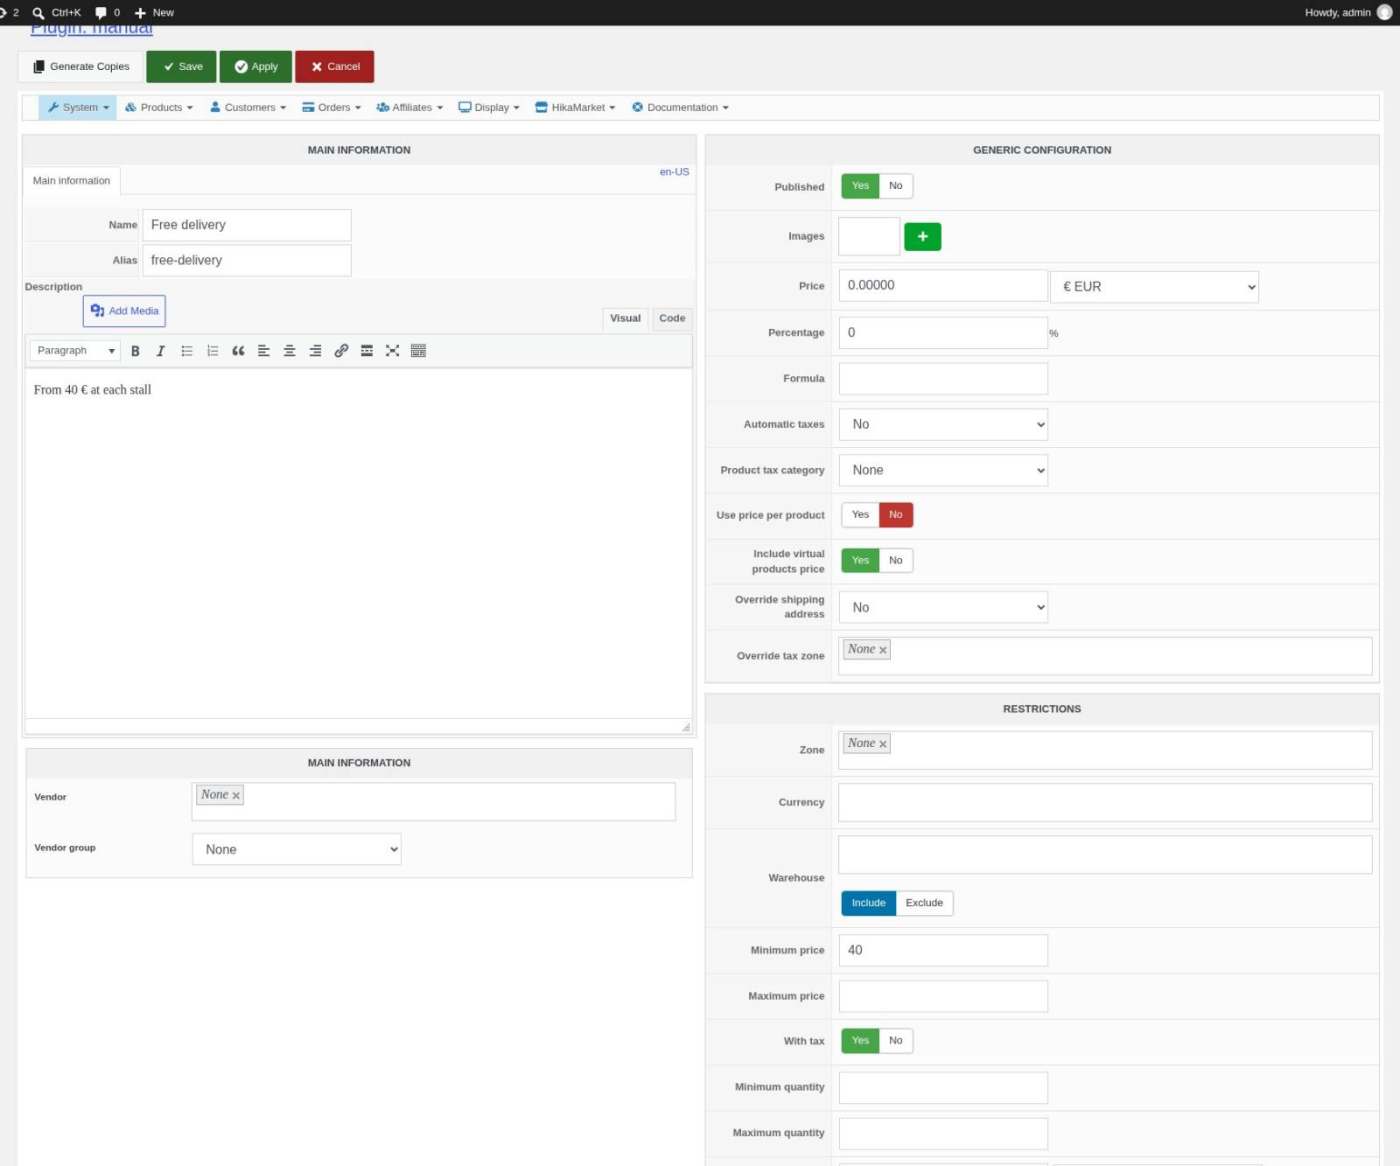
1. Create a **manual** shipping method called "Free delivery": **Price** 0, **Minimum price** 40 (the threshold, per stall), **With tax** = Yes when your prices are shown with tax (the threshold is then compared with the subtotal of the stall with its taxes).
2. Give your **paying** method (here "Standard shipping", 5 € before tax) a **Maximum price** of 39.99, so that a stall whose goods reach 40 € no longer offers it and a stall under 40 € does. Express shipping and pick-up have no limit.
3. Write the threshold in the strip of the header (step 8) and in your delivery page, so that they say the same as the shipping methods.
[](/images/doc/templates/halle/wp-25-shipping-list.jpg)
[](/images/doc/templates/halle/wp-26-free-delivery.jpg)
In a basket with goods from two stalls, the stall that reaches 40 € offers **Free delivery**, **Express shipping** and **Store pickup**, and the one under 40 € offers **Standard shipping**, **Express shipping** and **Store pickup**. The shipping total adds the choice of each stall.
### 10. Halle settings
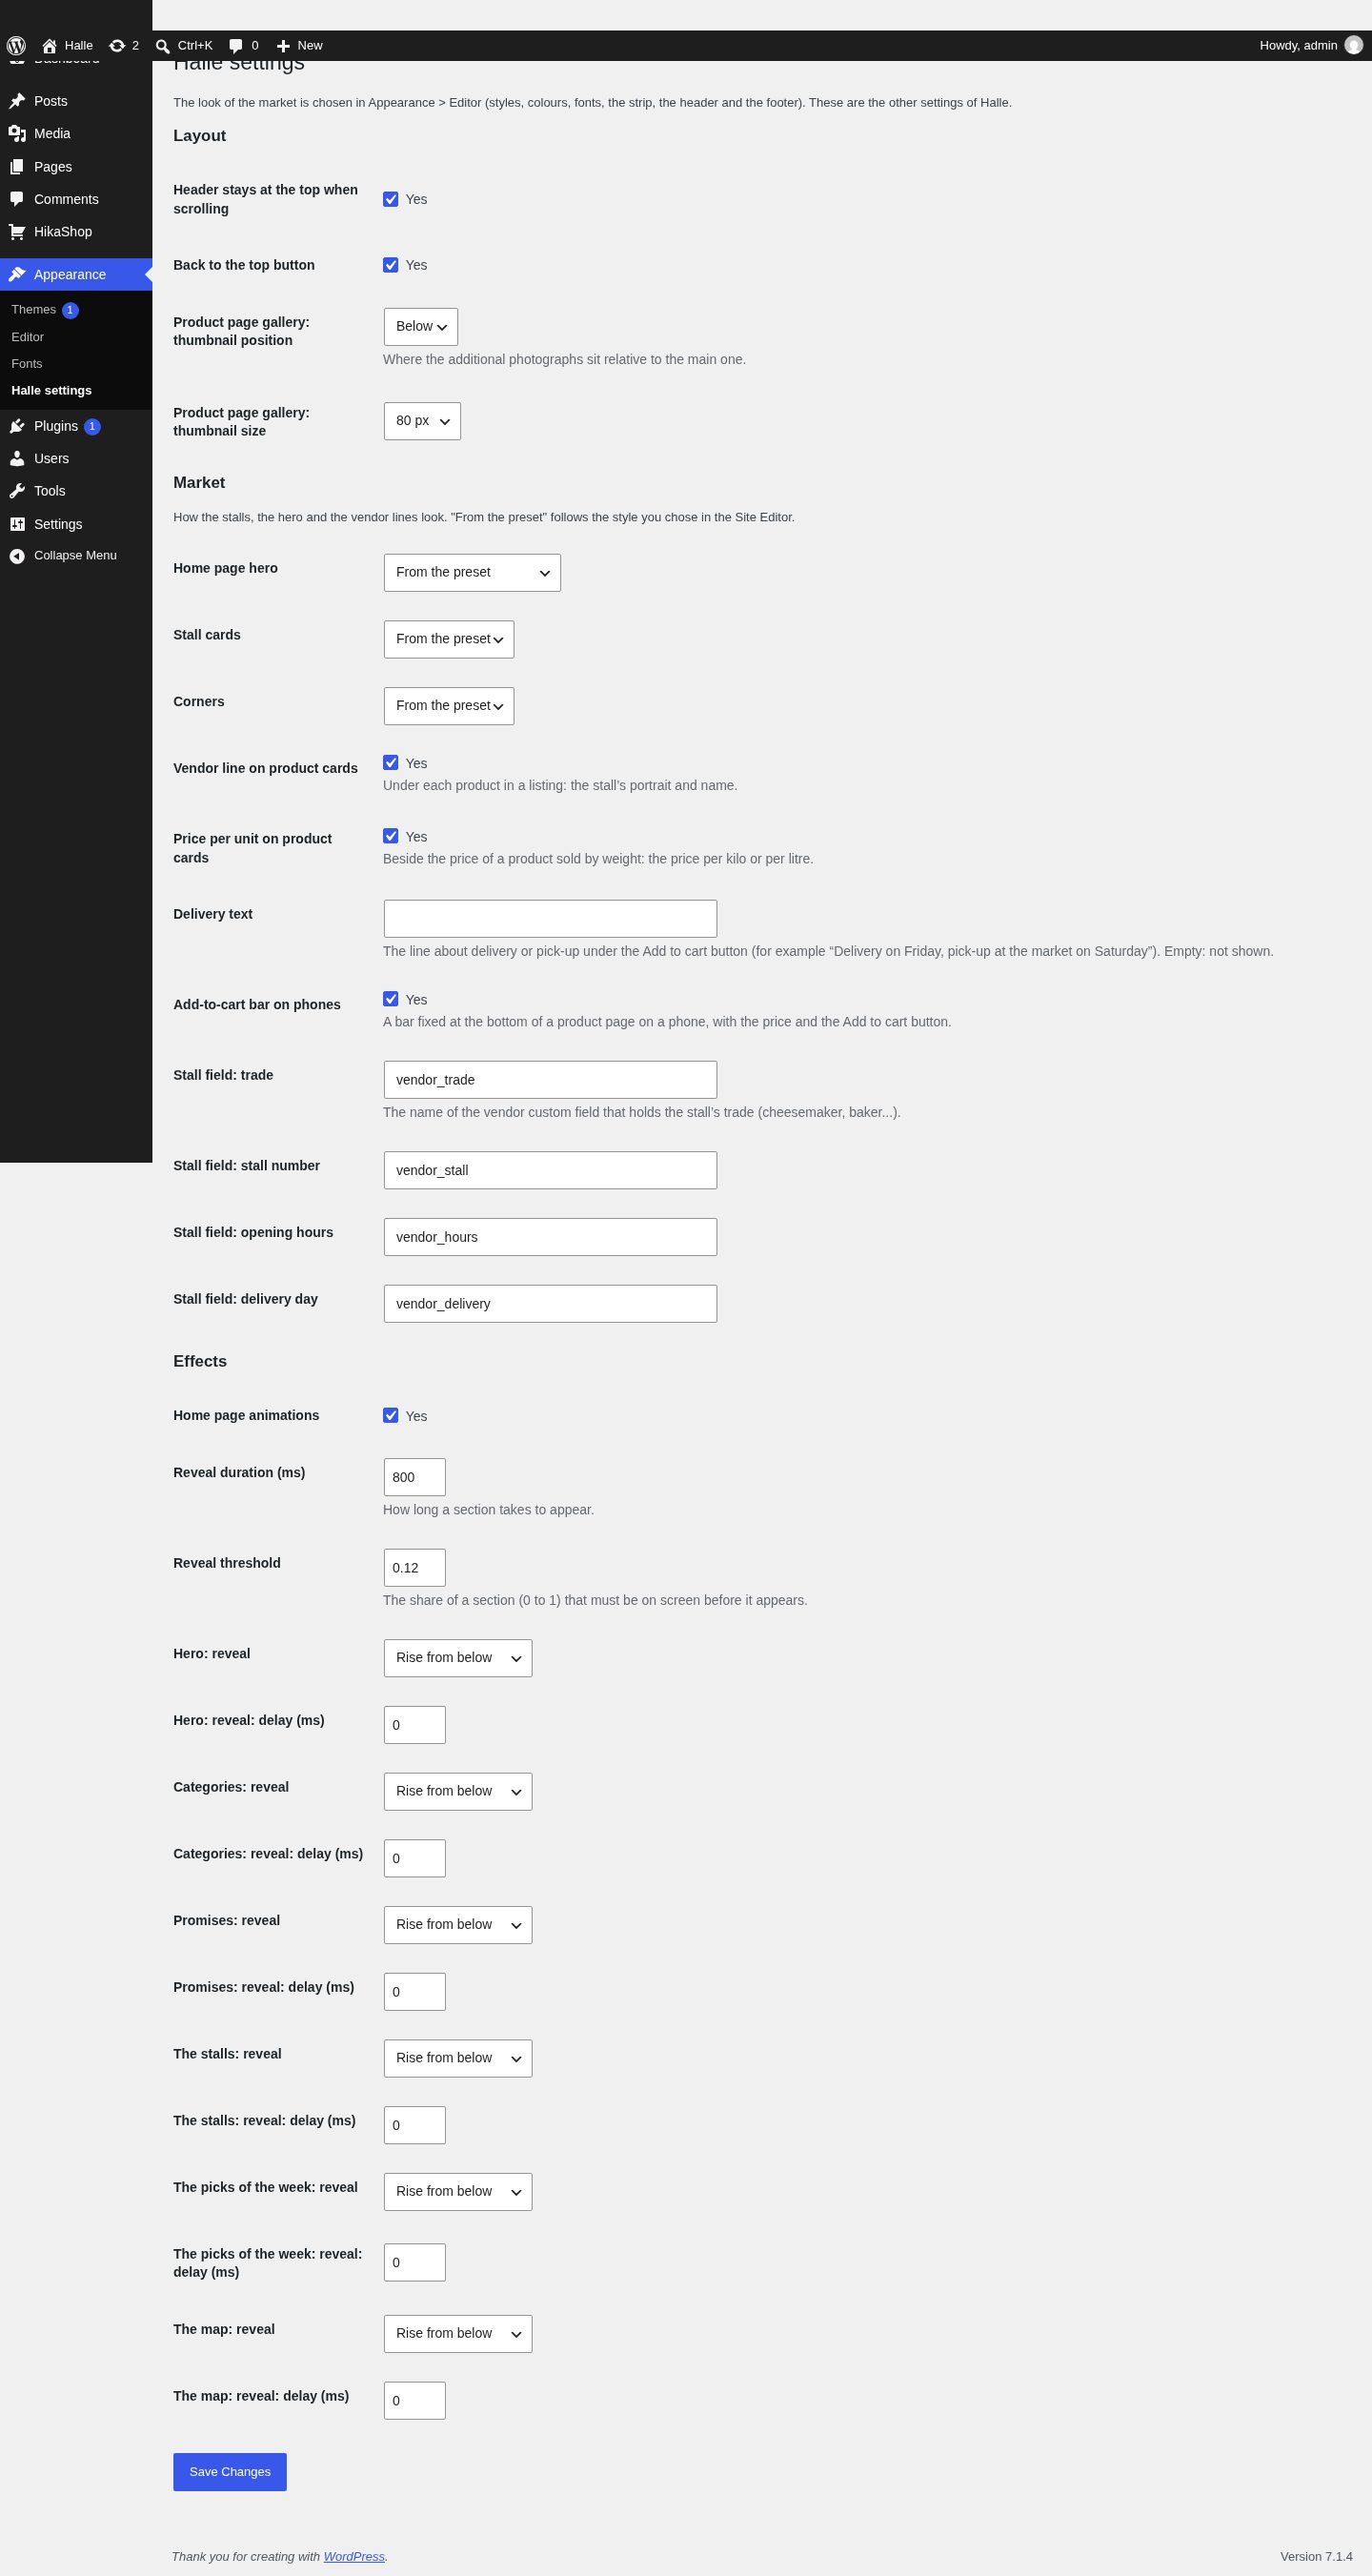
The Joomla template has Layout and Market tabs for the options that are not about colours and fonts. On WordPress they are in **Appearance > Halle settings**:
- **Layout**: **Header stays at the top when scrolling**, **Back to the top button**, and the **position** (below, above, left or right of the main picture) and **size** of the thumbnails of the product page gallery.
- **Market**: **Home page hero**, **Stall cards** and **Corners** (*From the preset* follows the style of step 5, or choose), **Vendor line on product cards** (the stall's portrait and name under each product), **Price per unit on product cards**, **Delivery text** (the line about delivery under the Add to cart button, for a stall that has no delivery day of its own), **Add-to-cart bar on phones**, and the four names of the vendor fields of step 9 (`vendor_trade`, `vendor_stall`, `vendor_hours`, `vendor_delivery`).
- **Effects**: **Home page animations** (on or off), the **reveal duration** and the **reveal threshold**, and for the hero and each section of the home page its **reveal** (rise, fall, slide from the left or the right, or none) and its **delay**.
[](/images/doc/templates/halle/wp-14-halle-settings.jpg)
The strip above the header, the hero's texts and picture, the header and the footer are blocks: you change them in the Site Editor (steps 7 and 8).
### 11. HikaShop settings for the look of the shop
Open **HikaShop > Configuration**, tab **Main**:
- **Thumbnail (width x height)** and **Product page image (width x height)**: the demo uses 560 x 420 for the cards and 720 x 720 for the product page. Do not go smaller.
- **Force images size** = Yes and **Image scale mode** = **Crop (outside)**: every card has the same shape.
- **Show taxed prices**: the demo shows its prices with tax from the listing to the checkout, as a consumer market does. Give each product a tax category and have a tax rule for the customer's country.
[](/images/doc/templates/halle/wp-34-shop.jpg)
### 12. Before you sell
- Place a test order with each payment method, and watch the emails: the vendors get theirs.
- Check the shop on a phone: the menu folds behind a button, the product page has its add-to-cart bar, the cart drawer groups the goods by stall.
- Replace the sample pages (terms, privacy, legal notice) with your own.
- Check the taxes, the shipping methods and the free delivery threshold, and that the strip says the same.
### 13. Your own CSS
Open **Appearance > Editor > Styles**, the three dots, then **Additional CSS**: your rules are saved with your styles and an update of Halle never overwrites them.
### Questions
**The editor says it does not support a Halle block.** Update to the latest Halle: its blocks (the stalls, the departments, the page title) are known to the editor.
**The stalls block, or the map, is empty.** They need HikaMarket active, with vendors; the pins come from the Latitude and Longitude of each vendor.
**A stall card has no portrait.** Add the Vendor image in its form. The names, trade and places come from the vendor fields: check their column names (step 9 and step 10).
**A stall offers no shipping method.** Each stall is checked against the restrictions of the method (zone, minimum and maximum price, weight). With **Shipping per vendor**, the maximum price of Standard shipping hides it from a stall whose goods reach it: another method must be available at that price (the free delivery).