


|
|
Description
This tutorial will explain how to find the elements you want to customize and how to customize them.
If you need to change the CSS properties of an element, then you have to follow the CSS Edition part.
For additional information about the most common changes please see our FAQ: Here
To move an element in the page, or add something in it, follow the Layout customizations part.
For additional information about the most common changes please see our FAQ: Here
Where to add custom CSS
There are several ways to add custom CSS to your website. While HikaShop provides its own mechanism, we recommend using your Joomla template's custom CSS facility whenever possible. Centralizing all your site-wide styling in one location makes maintenance much easier and ensures consistency.
1. Joomla Template (Recommended)
Most modern Joomla templates provide a dedicated way to add custom CSS without modifying the theme's core files:
- Cassiopeia (Default Joomla Template): Use the
user.cssfile. View Guide - Helix Ultimate: Create a
custom.cssfile in the/cssfolder of your template or use theCustom Codetab in the Template Options. View Guide - Gantry 5: Create a
custom.scssfile in the/custom/scss/folder of your template. View Guide - Astroid Framework: Create a
custom.cssfile in the/cssfolder or use theCustom Codetab in the Template Options. View Guide - T4 Framework: T4 templates allow adding custom CSS/SCSS through the template settings. View Guide
- YOOtheme Pro: For more advanced styling, Child Themes can be used. View Guide
- Custom CSS Plugins: If your template doesn't offer an easy way, you can use a dedicated custom CSS plugin. View Guide
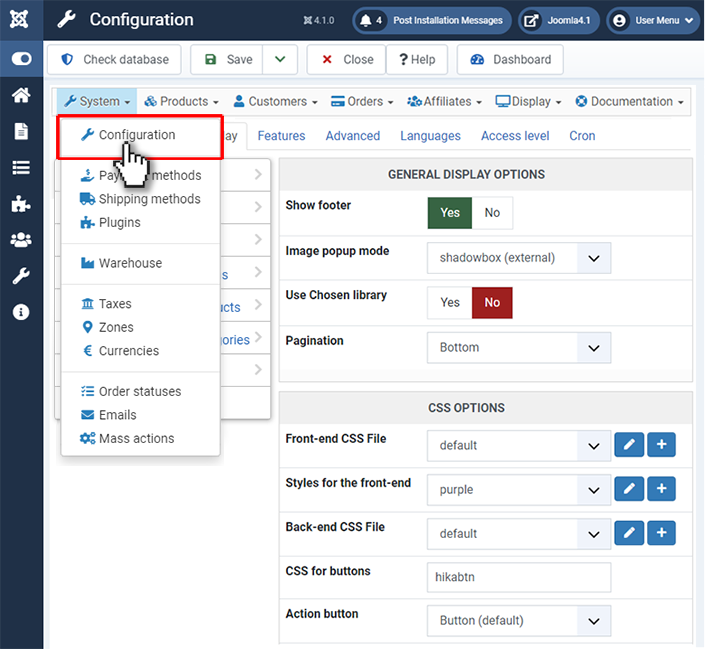
2. HikaShop Configuration
If you prefer to keep HikaShop-specific styles separate or if your template doesn't support custom CSS, you can use the HikaShop settings:
In System > Configuration > Display > CSS, you can edit the "Styles for frontend" file. Add your custom CSS code at the end of this file. This ensures your custom code overrides the default styles and remains safe during updates.
How to find the CSS to change
To change the size and the color of an element (like the price on a product listing), you first need to identify the element's distinct class or ID. You can do this using your browser's developer tools (often accessible by pressing F12).
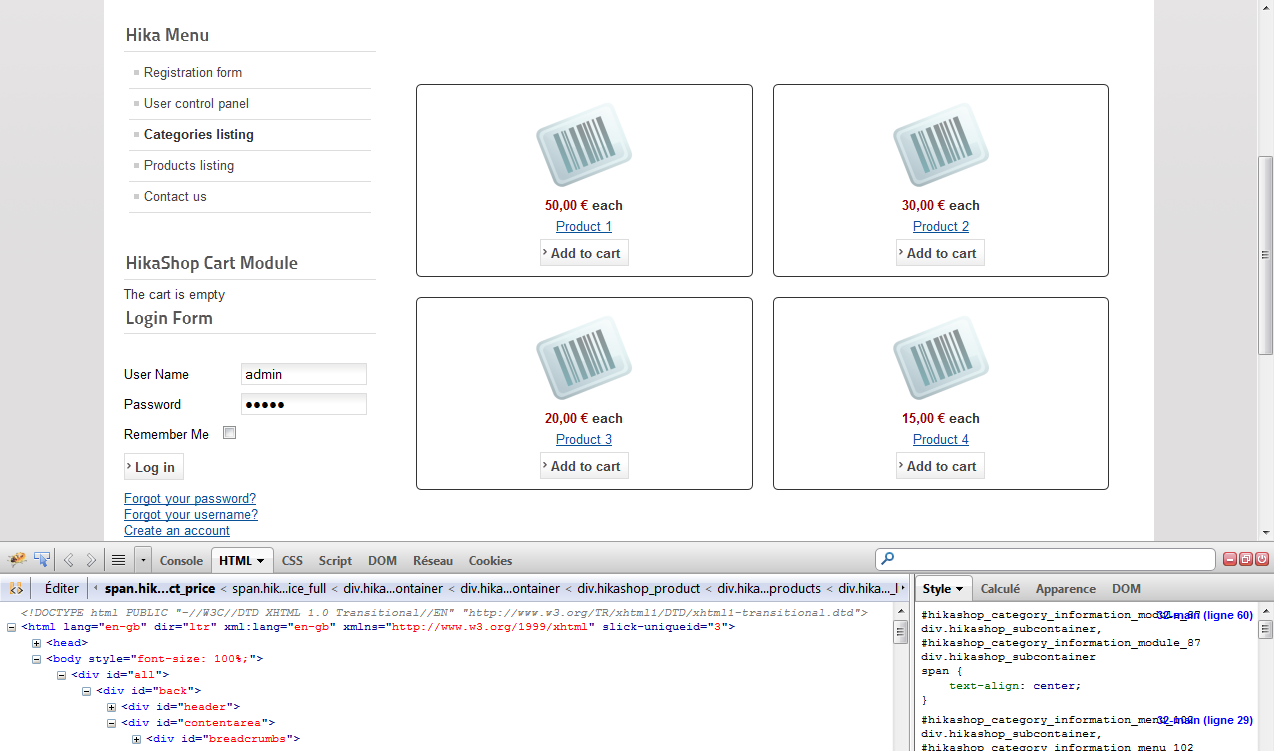
Right-click on the element you want to customize and choose "Inspect" or "Inspect element".
A panel will open displaying the HTML structure. Look for the class="..." or id="..." attributes of the element.
For instance, the price usually has the class "hikashop_product_price".
Common CSS Examples
1. Change price color and size:
.hikashop_product_price {
    color: #99cc00;
    font-size: 18px;
}
2. Hide the price:
.hikashop_product_price {
    display: none;
}
3. Customize the "Add to cart" button:
.hikashop_cart_input_button {
    background-color: #333333; /* Dark background */
    color: #ffffff; /* White text */
    border-radius: 5px; /* Rounded corners */
    border: none;
    padding: 10px 20px;
}
.hikashop_cart_input_button:hover {
    background-color: #555555; /* Lighter background on hover */
}
4. Target a specific module only:
If you want to apply changes only to a specific module, prepend the module's ID.
#module_25 .hikashop_product_price {
    color: #ff0000;
}
(Replace #module_25 with the actual ID of your module).
To learn more about CSS, you can visit these websites:
- http://www.w3schools.com/css/
- https://developer.mozilla.org/en-US/learn/css
- https://css-tricks.com/specifics-on-css-specificity/
If your custom CSS isn't working, it's often due to CSS Specificity (priority). Try making your selector more specific by adding a parent ID, for example:
#hikashop_checkout_content .hikashop_product_price { color: red; }. As a last resort, you can use !important.
Responsive Customization
HikaShop is natively responsive, but you might want to adjust the display for specific screen sizes using CSS Media Queries. This allows you to hide elements on mobile or change your layout for different devices.
Example: Hide the product description on mobile
@media (max-width: 480px) {
    .hikashop_product_description_main {
        display: none;
    }
}
Example: Change font size only on tablets
@media (min-width: 481px) and (max-width: 1024px) {
    .hikashop_product_name {
        font-size: 1.5em;
    }
}
Changing Text Labels (Language Overrides)
Customizing the display often involves changing text labels like "Add to cart" or "VAT". Instead of editing HikaShop core files, you should use Language Overrides. This ensures your changes are preserved during updates. For more details on how to do this, please see our Language Overrides Guide.
Common HikaShop CSS Classes
Here are some of the most common classes you might want to target for customization:
| Class Name | Description |
|---|---|
.hikashop_product_name | The title/name of the product on listings and details. |
.hikashop_product_price | The area where the price is displayed. |
.hikashop_product_description_main | The main description of the product. |
.hikashop_cart_input_button | The main "Add to cart" button. |
.hikashop_product_stock | The stock level/availability information. |
.hikashop_product_image_main | The main image container for a product. |
Layout customizations
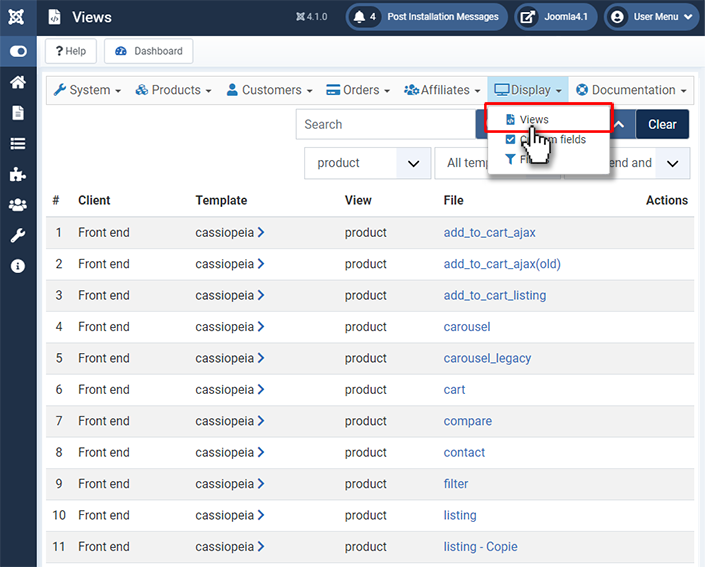
To go further with customization, you can override the view files of HikaShop via the menu Display>Views.
We highly recommend that you edit the view files of HikaShop via that menu as explained below and not directly. That way, you won't lose your changes when updating your HikaShop.
templates/[YOUR_TEMPLATE]/html/com_hikashop/.To know which view you have to edit, just set the "Display view files" setting to "all" under the "Advanced" tab of the HikaShop configuration.
This will add dashed borders around each view file used with the name of the view file used on the top left corner of the view file. It will have 2 parts separated by a /. The left part will be the view name and the right part will be the file name so you'll be able to easily find what you need to edit.
Note: Since HikaShop 6.3.0, enabling "Display view files" also adds an edit icon next to the view names on the frontend, allowing for quick access to the view editor.
View Builder
HikaShop includes a "view builder" system which allows you to move, swap or delete different elements in most of the frontend views without needing deep HTML or PHP knowledge. When a view supports drag & drop, a "view builder" area will appear on top of the code editor. This editor will dynamically modify the code below as you drag and drop elements. Once finished, just save your changes to validate them.
The View Builder experience has been refined with a cleaner interface and auto-scroll support when dragging elements.
Developers and integrators will also appreciate a new workflow improvement: when the "Display view files" setting is activated, an edit icon now appears next to the view file names on the frontend. Clicking it opens a popup with the view edit form immediately, saving you from searching for the specific view file in the backend.

In the edition page, you can also find all the different parts between the HTML comments.
<!-- ... -->
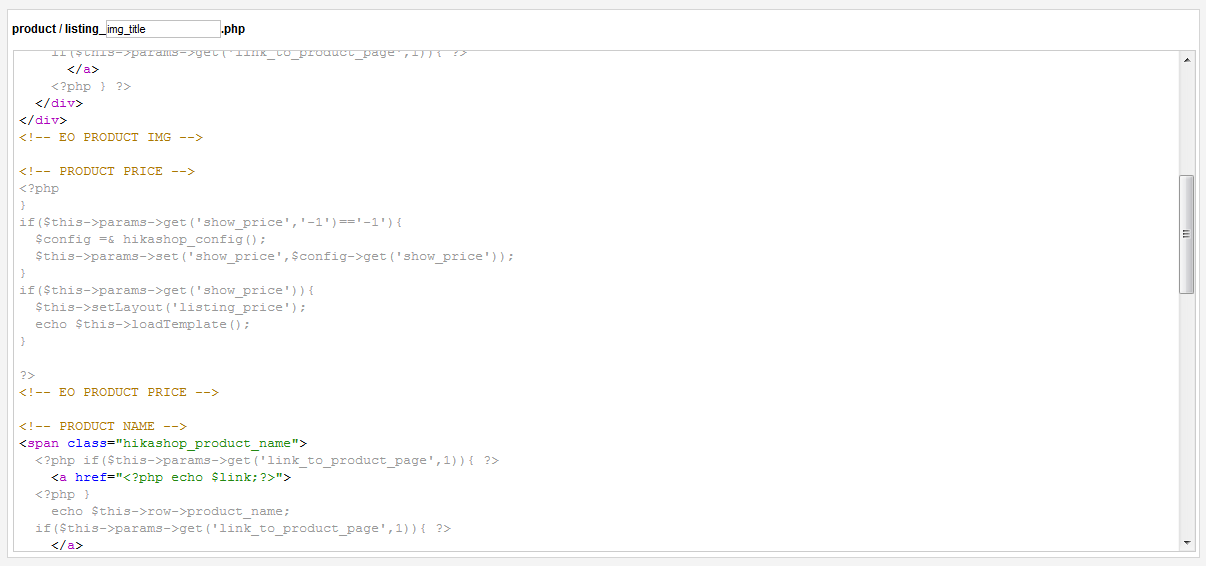
Now you just have to cut and paste the part for the product name before the product image part.
And "voilà" you have moved the name before the picture of the product.
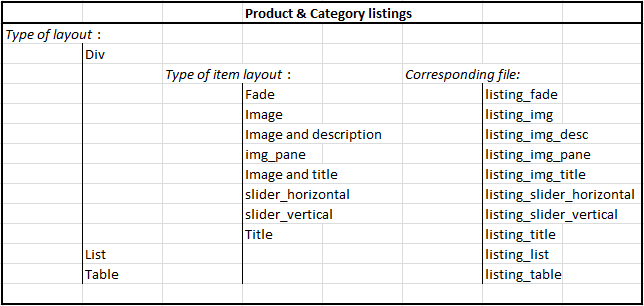
Listing types:
By checking the following tab you'll be able to know which file to edit via "Hikashop->Display->Views" regarding the value of the "Type of layout" and "Type of item layout" options.
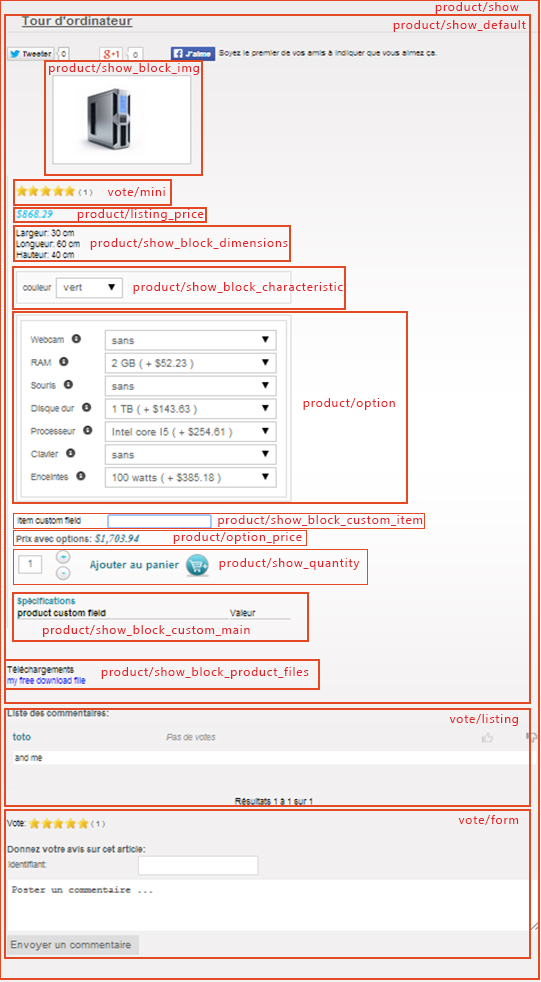
Product page customization:
By checking the following picture you'll be able to know which file to edit via "Hikashop->Display->Views" regarding what you exactly want to change on product page.
To change the cart module display, you have to edit the view "product / cart". If you want to customize the emails, you have to go in HikaShop > System > Emails, only available in the business edition of HikaShop.
If you need more customizations, it requires HTML and probably PHP skills. If you don't have enough knowledge you can learn these programming languages on the web. You can also post a request on the Commercial Jobs section of our forum if you need to find a third party developer to help you personalize HikaShop if you don't know PHP.

