


|
Description
This documentation will explain how to create a Paypal Adaptive Application and how retrieve the information to fill the payment plugin.
Requirements
If you want to create a sandbox paypal application, you will need a classical sandbox paypal account. Thanks to it you can create paypal emails for your sandbox environement but you can also create application like the adaptive one.
In production mode, you will need a verified paypal business account with your API credentials.
The API credentials are composed of a Username, a Password and a Signature ; all provided by Paypal.
You can find these credentials in the paypal website, once logged with your Paypal account, under the tab "My Account" then "Profile", you will be able to request for API credentials in the "Account Information" section.
Sandbox - Create of the accounts
To create sandbox accounts for Paypal adaptive, you first need to go in Paypal Sandbox website : https://developer.paypal.com/webapps/developer/applications/accounts Then, you will have to go in the section "Sandbox accounts" and create a least 2 accounts.
-
One "Business-Pro" account for the store account (the one who will have the adaptive credentials).
This account must be verified. - One "Personal" account for your test vendor (and more accounts if you want to configure more vendors in your test website).
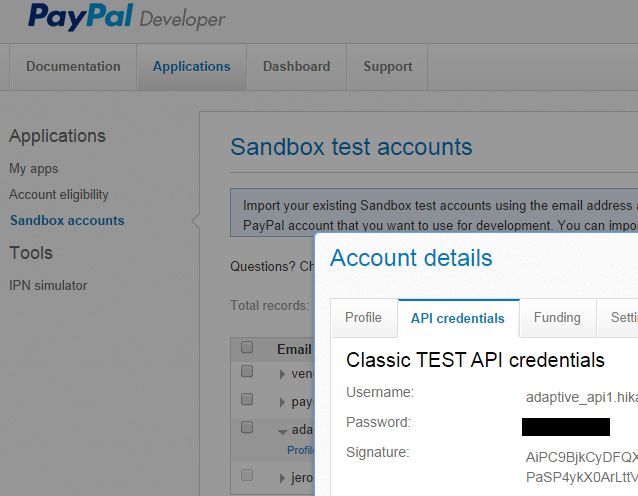
Once the Business account is configured, you can access to his "profile" and then in the tab "API credentials" you will see the sandbox credentials for the paypal adaptive plugin.
Live - Create the application
To submit an Application, you need to use go in the Paypal Application website : https://apps.paypal.com/user/my-account/applications
- Click on "My Application > New App"
- Provide a title and a description for your new application.
- In the "Servies used by App" you have to select
- Basic Payments (you can check all sub options)
- Chained Payments
-
Select the chained payment mode and the chained payment options.
You will have to choose the primary receiver. It will highly influence the rest of your website.
In most cases, you want to be the primary receiver and place your vendors as secondary receiver, specially if you will accept several vendors in a single order. - Indicate the funding sources you support, some estimation about the payment volume and the responsible for chargebacks or refunds (prefer: "Merchant")
- In the section "Adaptive Accounts", the easier is to check all features for your application.
-
For the testing information, you have to provide some information about your website, like his url.
The field "Supply test account name and passwordquot; is there to let paypal use a test account in your website to be able to login and see your website in action (and make a test purchase if required).
The "Step-by-step" text area is there to explain how to perform a test order, how find a product to add in the cart and go in the checkout to finish the order. - Once the form is ready, you can submit your paypal application !

