
|
|
Description
This screen enables you to edit the content module instances. HikaShop introduces a new way of creating and tweaking the front end of your store by integrated with joomla as much as possible. Using a generic content module, which is installed by default in HikaShop, you will be able to create new instances of it, enabling you to display products or categories using lots of options. You will be able to create a module showing related products to the currently displayed product, or products in the same categories. You will be able to display a list of the main product categories of your store in another module so that customers can jump to them directly from wherever in your store. Or you might want to display 5 random products in all the categories and subcategories of the currently displayed category or a default category and its subcategories, if the user is not displaying a category page.
On top of that, you will not only be able to define the content to display, but also the way to display it with options related to the display: using a list type display or a div type, setting a number of columns, displaying prices or not, etc. Finally, you will be able you include those modules in your Joomla template, as any Joomla module, or under the product page (for related products for instance) or under a category or product listing page accessed via a Joomla menu.
You will also be able to configure the cart module which uses the same interfaces as it has a lot of common options with the content module.
Note also that you can customize any view, even the content module views thanks to the views management screen so that if you need a special behavior which is not possible by default, you can always customize the view, even though it will require you to know a bit of PHP and HTML.
Toolbar

- Joomla module options : Go to the Joomla options of the module. It will be handy for positioning the module and set restrictions of access on the module thanks to the standard Joomla module options. If you are creating a new module instance, this button will be hidden.
- Save : Save the content module instance and return to the content module instances Management screen.
- Apply : Apply the modifications to the content module instance and stay on the same screen.
- Cancel : Return to the previous screen without saving the modifications.
- Help : This button enables you to turn ON/OFF the help section, this screen will appear or disappear.
Details
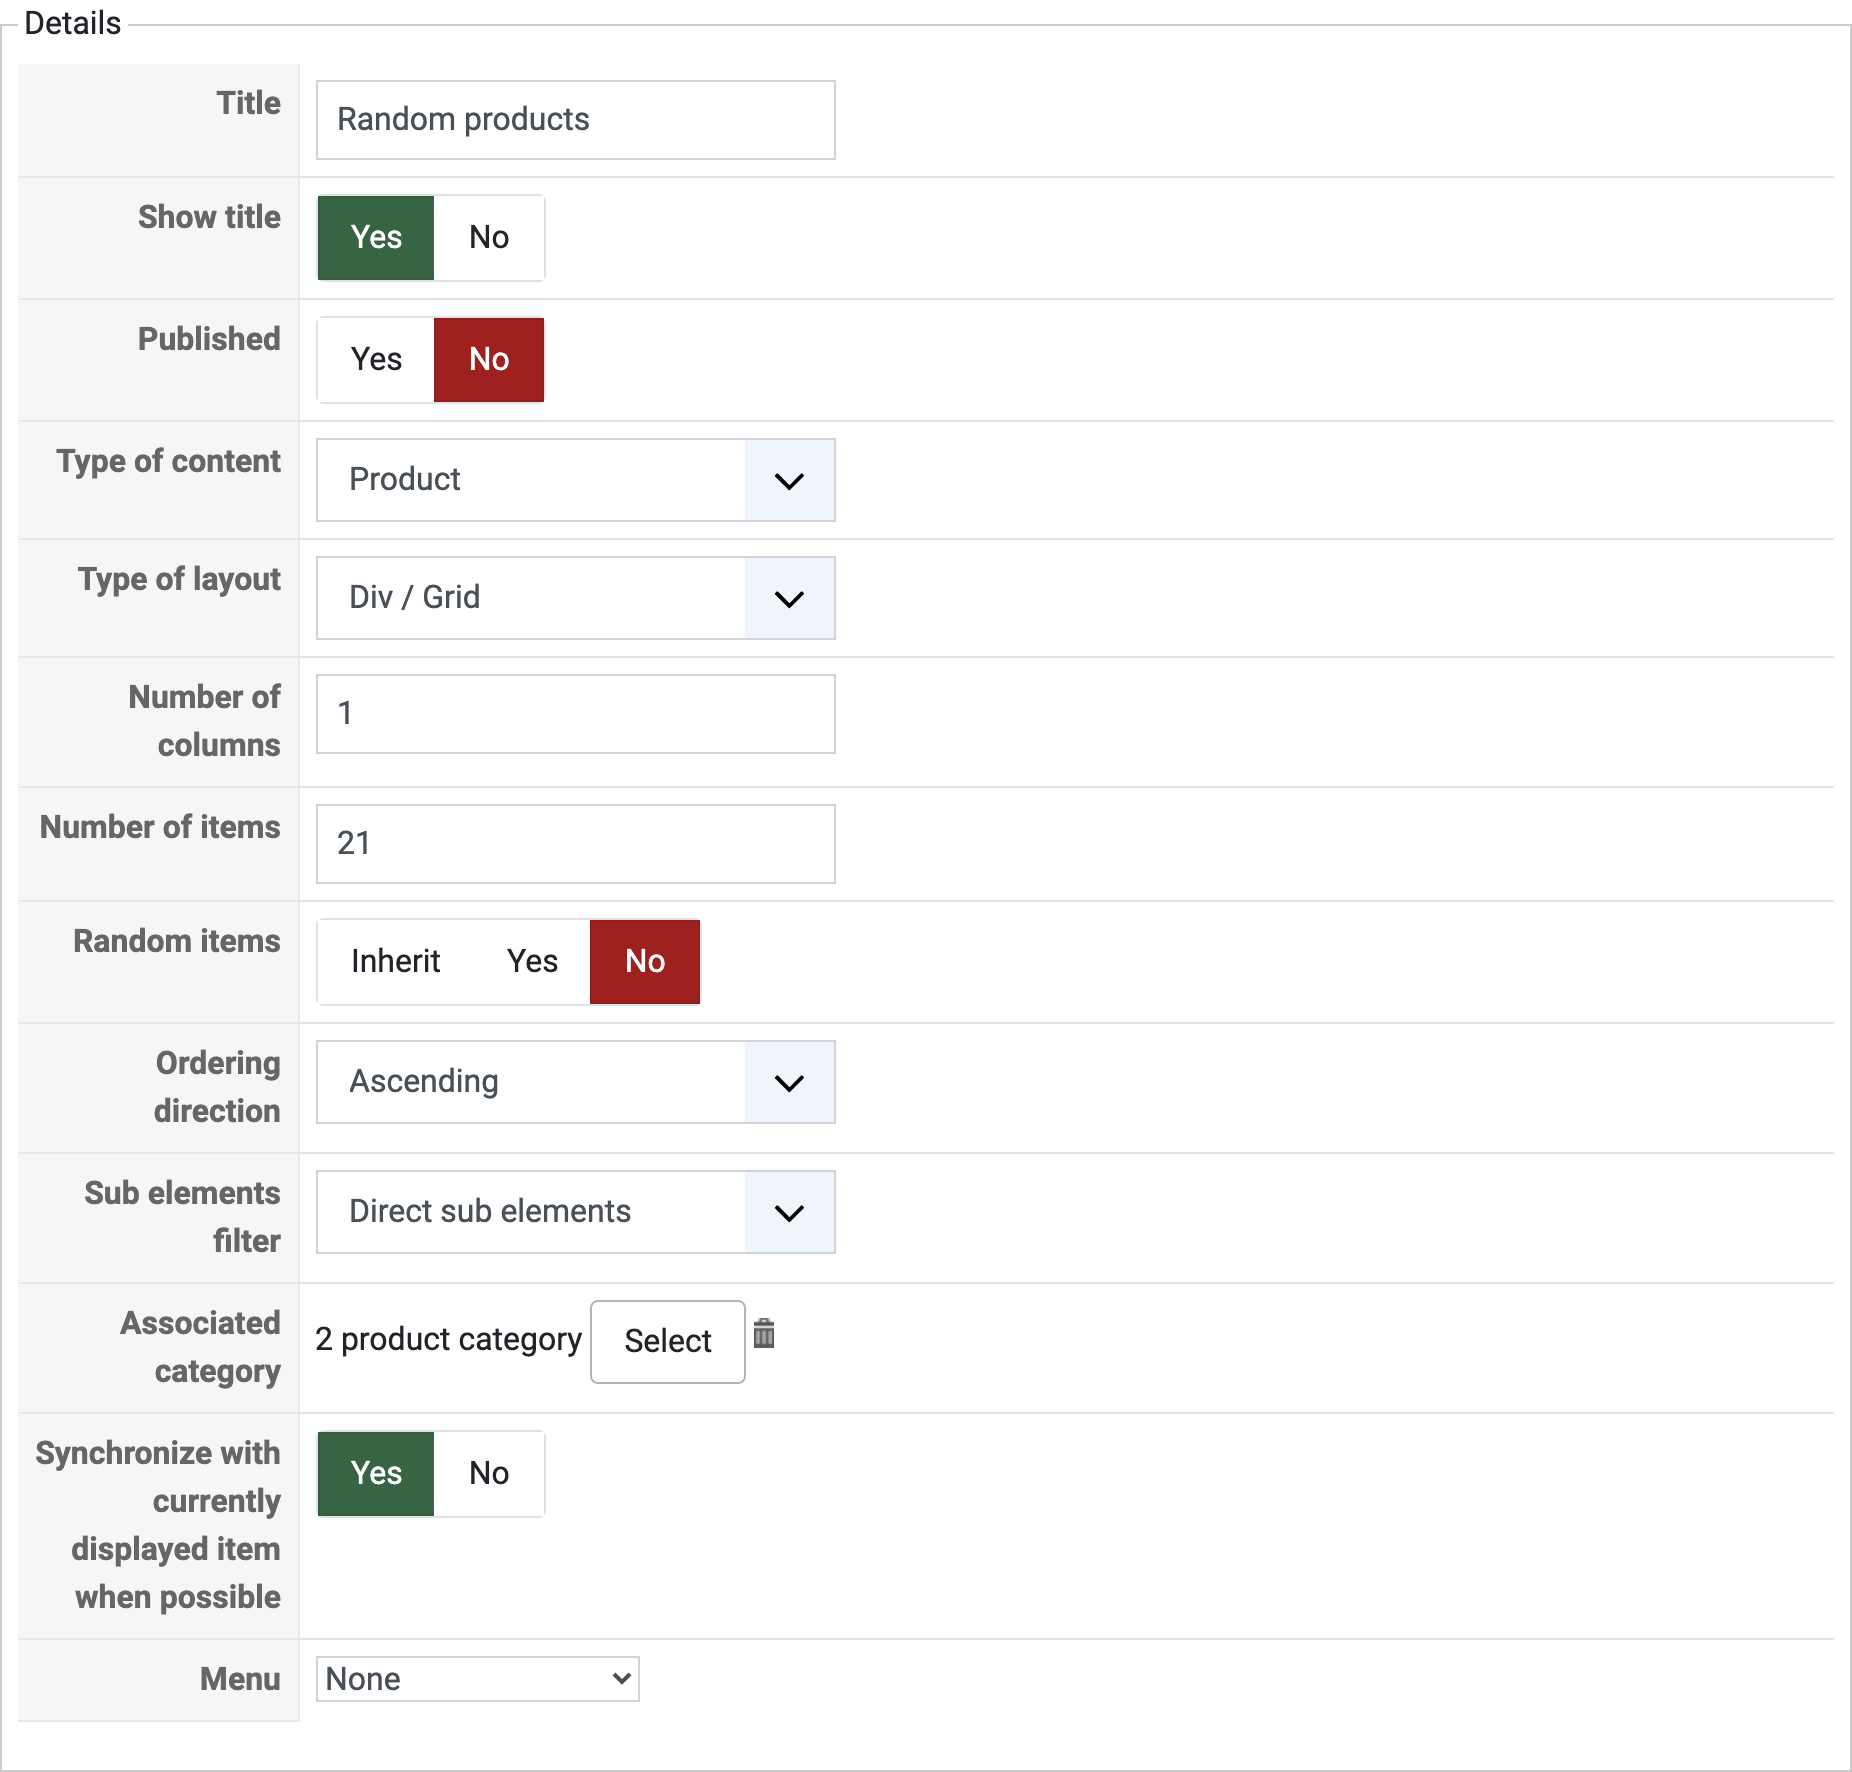
- Title : The title of the module. That is the same option as the one in the Joomla options.
- Show title : You can display the module title or not with this option.
- Published : If a content module instance is published it means that it will be displayed by Joomla on the position you set for it in your template. Note that HikaShop won't take into account this parameter so you can still display module instances which are unpublished at the bottom of your categories or products listing accessed via a menu.
- Type of content : You can select what content to display in the module : products or categories. Based on your choice, different options will be displayed to you on the right part of the screen.
- Type of layout : You can select how to display the content in the module : using DIVs or lists. Based on your choice, different options will be displayed to you on the right part of the screen.
- Number of columns : The numbers of columns in your module to display your content items in. For a left or right module, you will usually set only 1 column. For modules under the main content or with an horizontal display you will want to set several columns.
- Number of items : The maximum number of items to display. If you have three columns set and you limit the items to 6, it means that you will have 2 rows of three items each.
- Random items: The displayed items will be selected randomly.
- Ordering direction : You can set a direction for the ordering. For example, if you are loading categories based on their category_created column, if you set the direction to ascending, you will always get the firstly added sub categories displayed in the module, where if you set the direction to descending, you will always get the latest created categories displayed.
- Sub elements filter : For categories, you can choose to only display direct sub categories of the current category or all sub categories regardless of their depth. For products, you choose to only display products in the current category or in all the sub categories of the current category regardless of their depth.
- Associated category : You can select a static category here. If you synchronize your module this parameter won't be used when the module is displayed on a page where it can synchronize with the category displayed, but it will still use it otherwise. If you don't synchronize your module, it will always use this category as the start point for the data gathering. When you click on the select button, a popup will open to enable you to choose among the categories of your store. You can also click on the delete button to remove the parent category. IF you don't set any, the main "product categories" will be used as starting point of the data load.
- Synchronize with currently displayed item when possible : This option will define in which categories to pick items from.
- For categories, when synchronized :
- On the product page, it will display categories based on the product categories. If the product isn't linked to any category, it will be based on the parent category option.
- On a category listing page, it will be based on the current category.
- On other pages, it will be based on the parent category.
- On the product page, it will display categories based on the product categories. If the product isn't linked to any category, it will be based on the parent category option.
- For products, when synchronized :
- On the product page, it will depend on the option "Content on product page".
- On a category listing page, it will be based on the current category.
- On other pages, it will be based on the parent category.
- For categories or products, when not synchronized, it will always be based on the parent category.
- For categories, when synchronized :
- Menu : By default, the links of a HikaShop content module will go to a page displaying the listing to sub elements (products or categories). This page won't have any content configuration attributed unless you choose here a HikaShop Joomla menu here where you will be able to configure its options and thus add there a listing of products, etc.
If you are editing the cart module, you will find slightly different options :
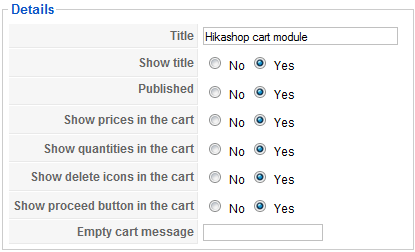
- Title : The title of the module. That is the same option as the one in the Joomla options.
- Show title : You can display the module title or not with this option.
- Published : If the cart module is published it means that it will be displayed by Joomla on the position you set for it in your template.
- Mini cart : Reduces the module to the total amount, without listing the products in it. The settings below, which say what to show for each product, then have nothing to act on. On a wishlist module the same setting reads "Mini wishlist".
- Display image in cart : Shows the picture of each product next to its line in the cart.
- Show proceed button in the cart : Shows the button which takes your customer to the checkout.
- Show products name in the cart : Shows the name of each product. Turned off, the cart is reduced to its quantities and its total, which is what a small module in a corner of the page wants.
- Show quantities in the cart : Shows how many of each product are in the cart.
- Show delete icons in the cart : Lets your customers remove a product from the cart without going to the cart page.
- Show coupon in the cart : Shows the coupon field, so that a code can be entered without leaving the page.
- Show shipping in the cart : Shows the shipping cost on its own line in the totals.
- Empty cart message override : Replaces the message displayed when the cart is empty with your own.
- Itemid for the 'Show the wishlist' button redirect : The menu item the wishlist button leads to, so that the wishlist opens on the page you meant rather than wherever HikaShop can find one.
Those settings say what the cart module lists. The rest of its appearance, the picture of its icon, whether it opens as a drawer and on which side, whether it opens by itself when something is added, the padding around it and whether it shows prices, taxes and payment, belongs to the cart module itself and is set on its own options screen rather than here.
Product options
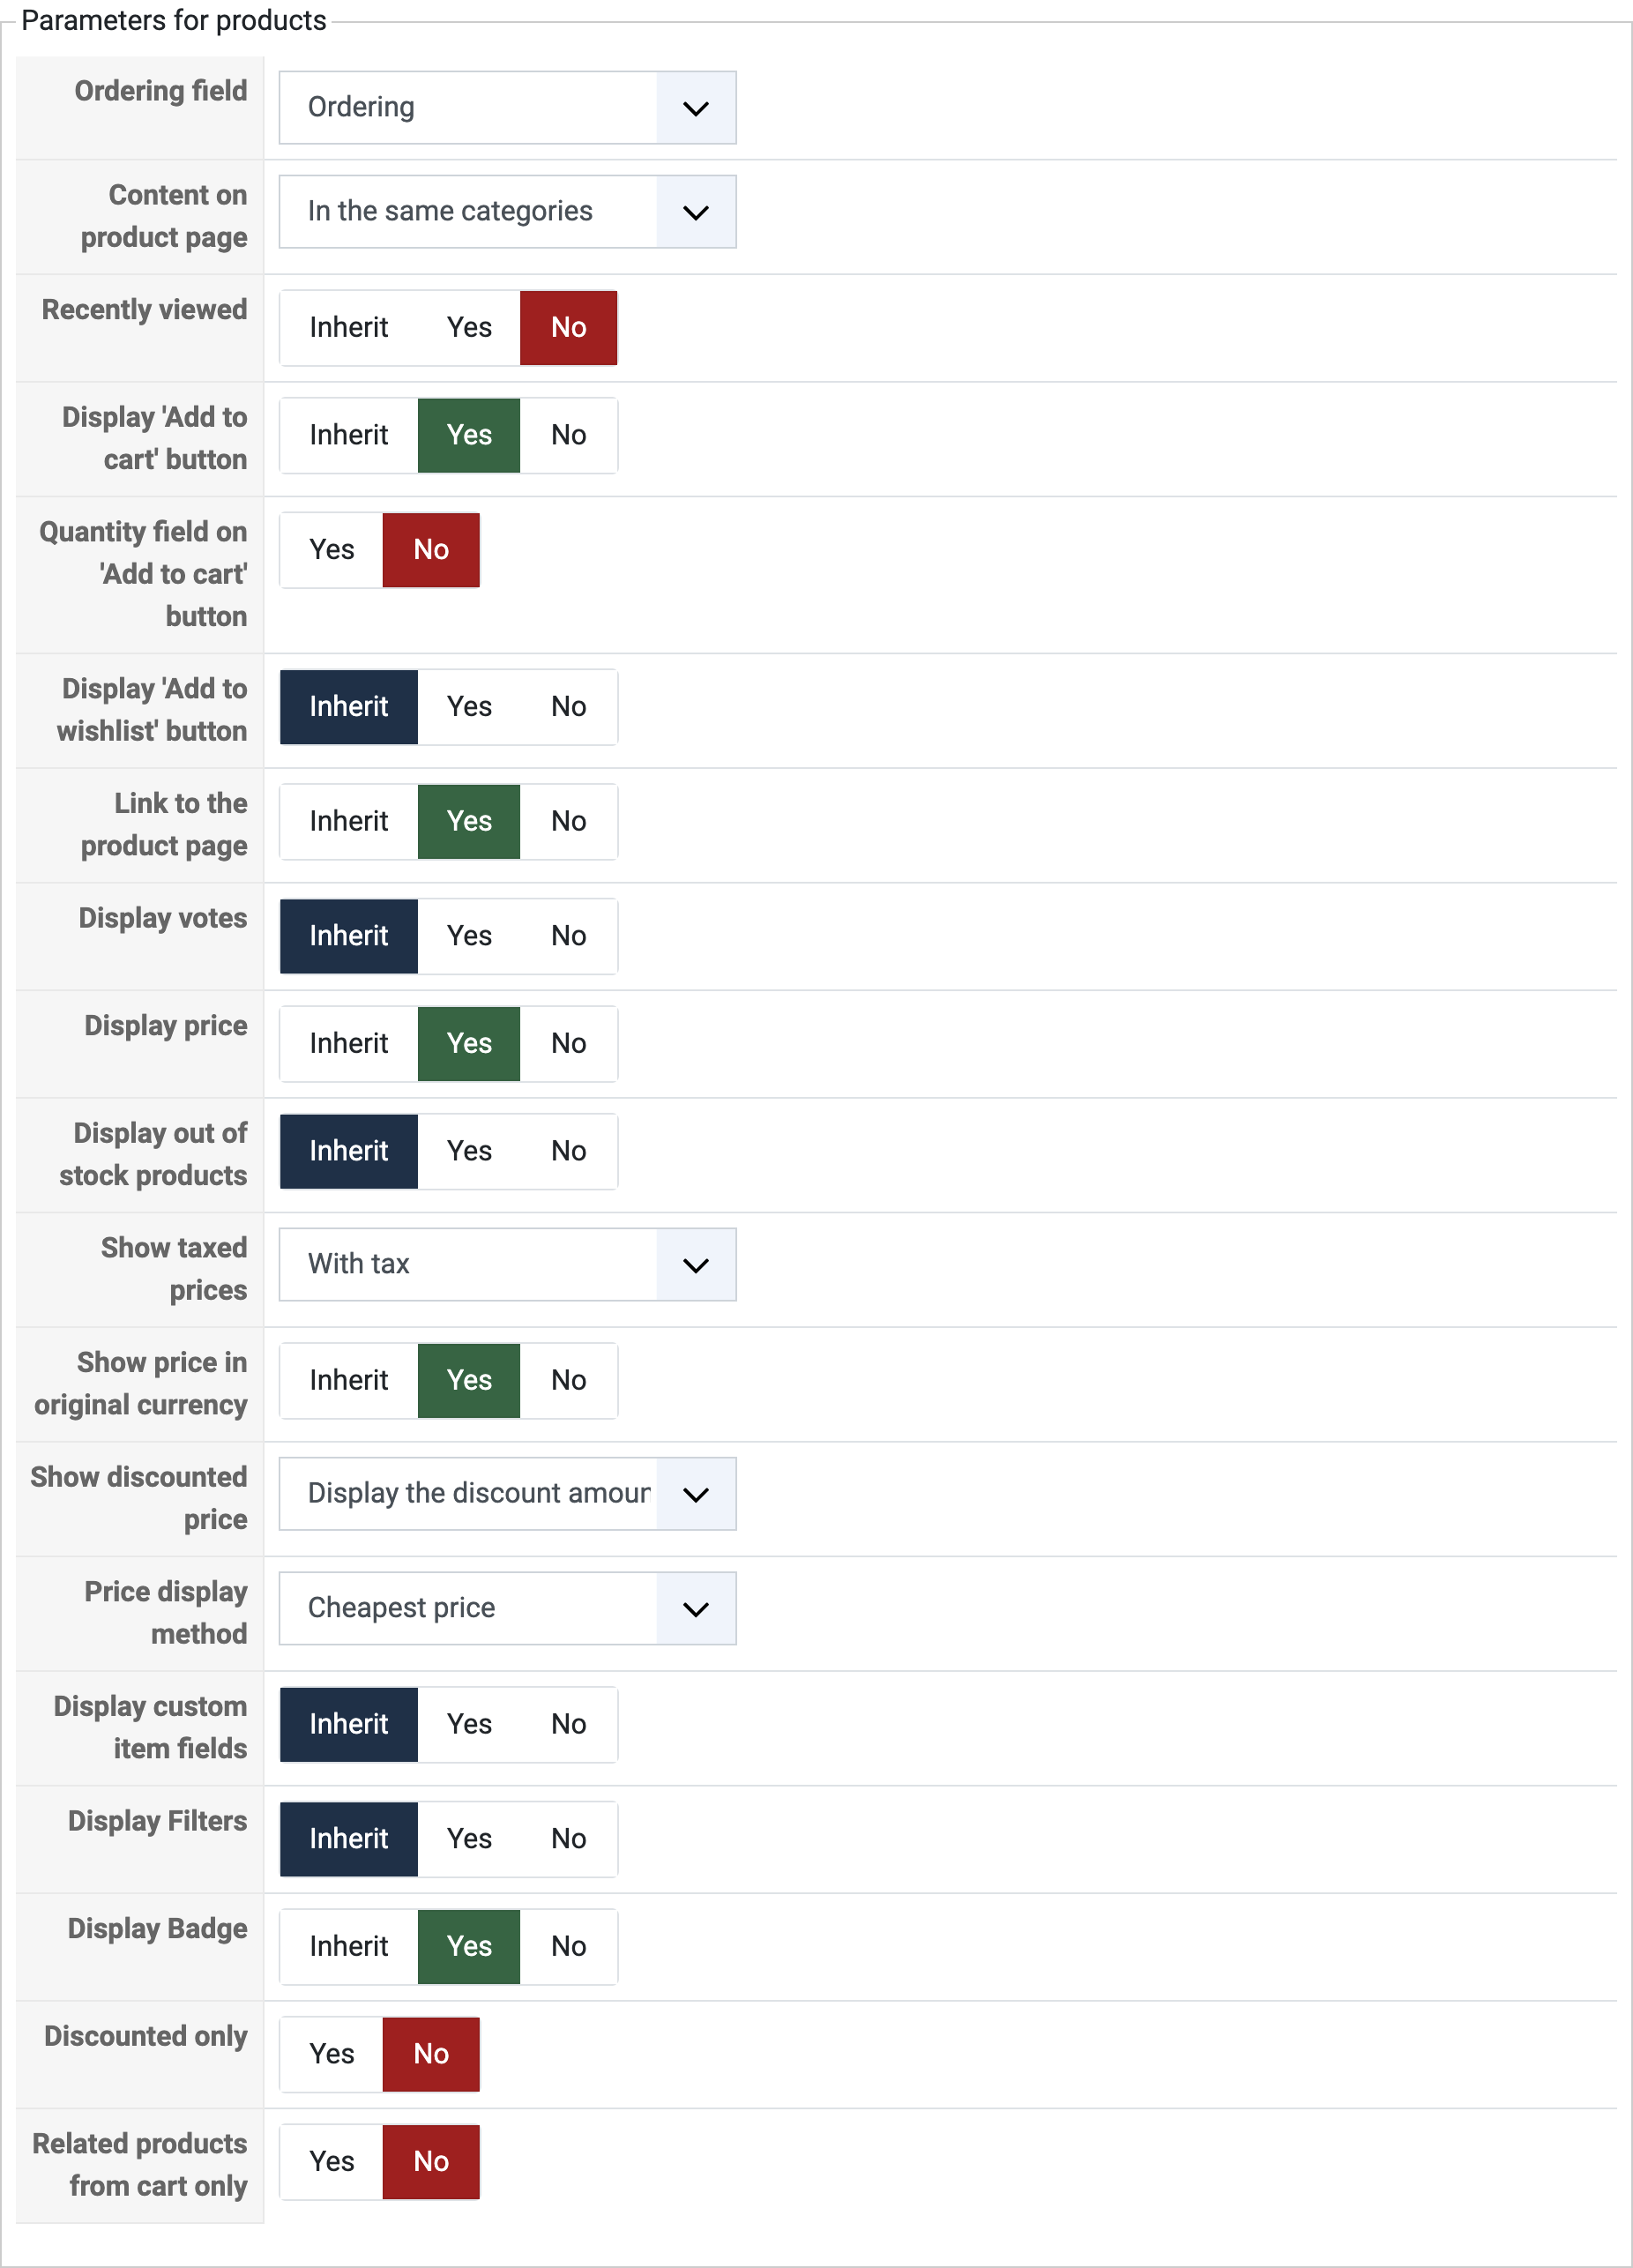
- Ordering field : You can select a field on which the products will be ordered. By default the products will be ordered using the ordering field which enables you to set a specific order of display between all the products directly linked to a category.
- Content on product page : This field will only be useful if you set the synchronization on in the left part of the screen.
- Recently viewed: If you want, you can have your recently viewed products selected in all the products matching the options.
- Display 'Add to cart' button : If you want, you can add an "add to cart" button under each product so that your customers won't have to go to the product details page to add a product to the cart.
- Quantity field on 'Add to cart' button : Adds the quantity box next to the add to cart button, so that a customer can take several without opening the product.
- Display 'Add to wishlist' button : If you want, you can add an "add to wishlist" button under each product so that your customers won't have to go to the product details page to add a product to the wishlist.
- Link to the product page : You can choose to disable the links to the product page (really useful in combination with the option above).
- Display votes: Enable or disable the votes for the products displayed by this module.
- Display price : You can choose to display or not the prices of products in the module.
- Show taxed prices : This option enables you to display either the prices without taxes, or the prices with taxes, or both.
- Show price in original currency : Based on how you configured your store, HikaShop might have to convert prices dynamically. When doing so, it can add the original price to the converted price.
- Show discounted price : If HikaShop needs to apply discounts to the prices displayed in the module, it can also show the price before the discount was applied as an incentive for your customers to buy the products.
- Price display method : When you have several prices in the same currency for the same product, the system needs to decide what to display. That will be the case for prices based on the quantity. Show you will either be able to display the lowest of all the prices, or display the price for buying only one item, or the lowest and highest prices as a range of prices.
- Display out of stock products : Whether the products with no stock left appear in the module at all.
- Display Filters : Shows the filters you configured above the listing the module displays.
- Display Badge : Shows the badges of a product, the "new" or "sale" markers you set on it.
- Discounted only : Keeps the module to the products which carry a discount, which is what a "current offers" module is.
- Related products from cart only : For a module displaying related products, takes them from what is already in the cart rather than from the product being looked at.
- Display custom item fields: Select if you want to display the custom item fields in the products of this module.
If you are editing the cart module, you will find slightly different options :
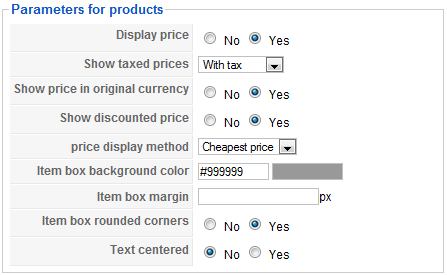
- Display price : You can choose to display or not the prices of products in the module.
- Show taxed prices : This option enables you to display either the prices without taxes, or the prices with taxes, or both.
- Show price in original currency : Based on how you configured your store, HikaShop might have to convert prices dynamically. When doing so, it can add the original price to the converted price.
- Show discounted price : If HikaShop needs to apply discounts to the prices displayed in the module, it can also show the price before the discount was applied as an incentive for your customers to buy the products.
- Price display method : When you have several prices in the same currency for the same product, the system needs to decide what to display. That will be the case for prices based on the quantity. Show you will either be able to display the lowest of all the prices, or display the price for buying only one item, or the lowest and highest prices as a range of prices.
- The option below will be useful only for defining the buttons style of the cart if you set in the configuration to display them as rounded :
- Item box background color : The color of the button.
- Item box margin : The margin of the button.
- Item box border: Display or not a border around your item.
- Item box rounded corners : Set it to yes if you want your button to have rounded corners.
- Text centered : Set it to yes if you want the text inside the button to be centered.
- UL class name : A CSS class added to the list the module writes, for when your template needs one to style it.
- Display in simplelist (ul/li) : Writes the items as a plain list rather than in the grid HikaShop normally builds, which is what a menu-like module wants.
- Item box background color : The color of the button.
Category options
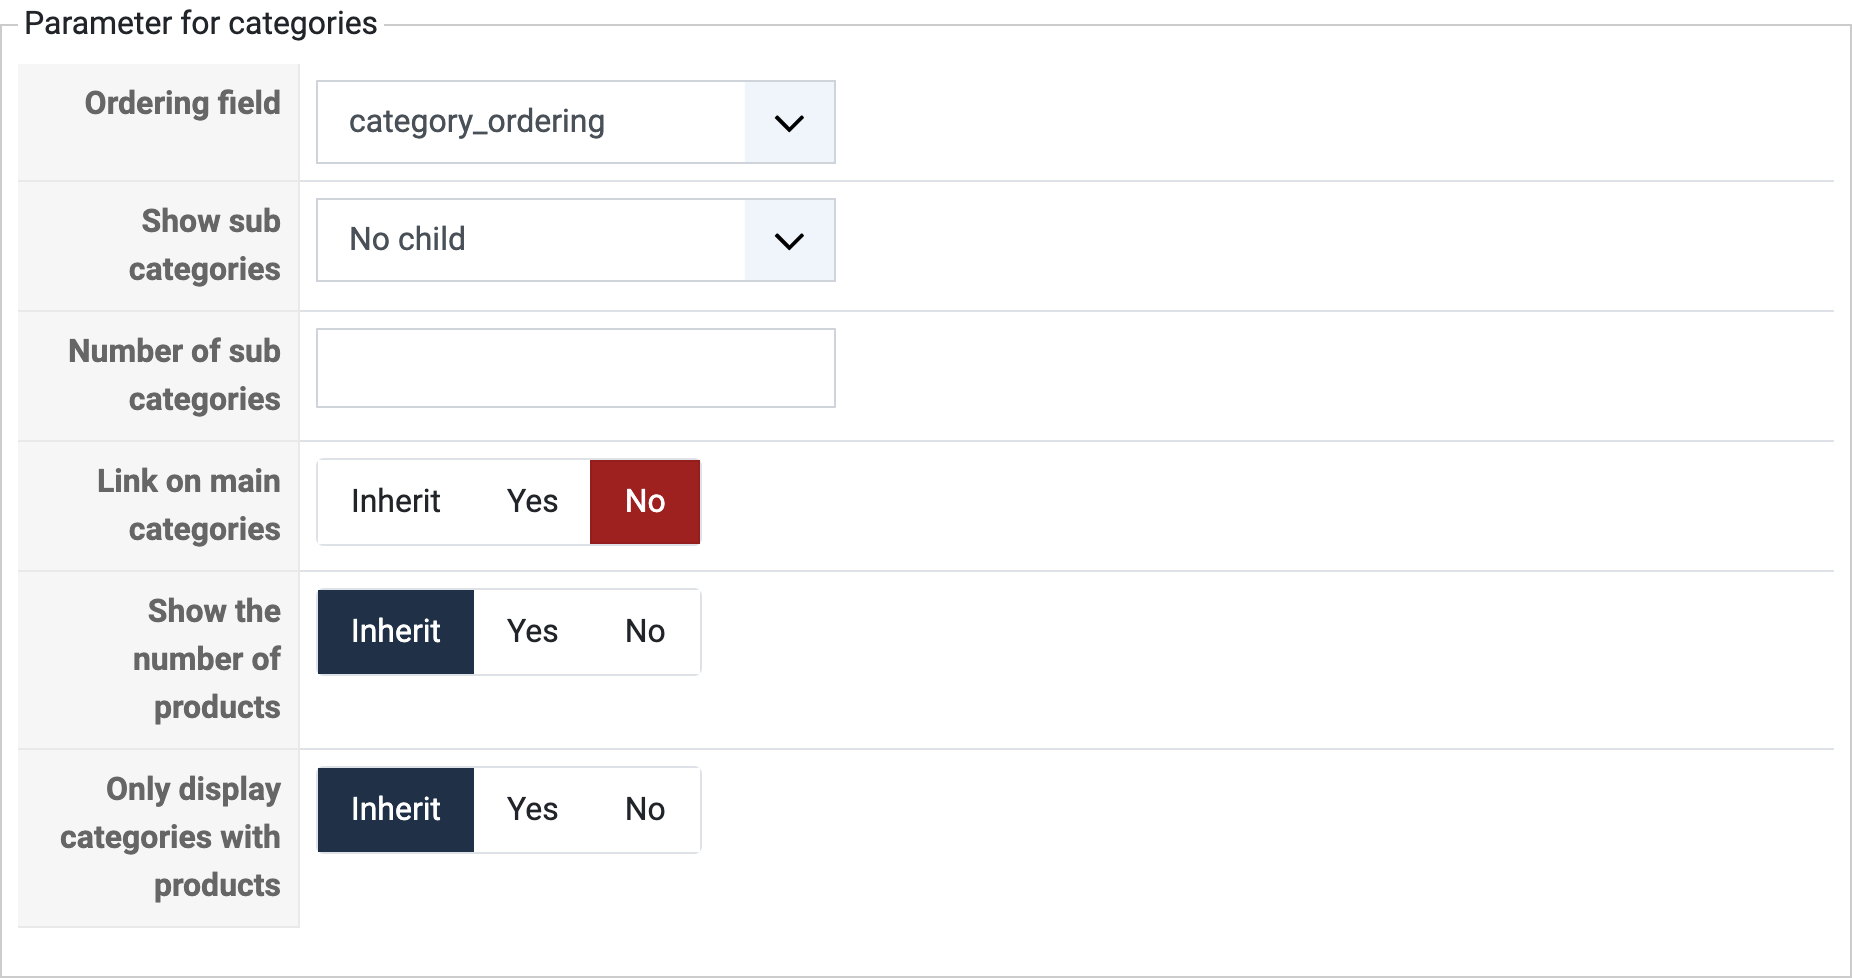
- Ordering field : You can select a field on which the categories will be ordered. By default the categories will be ordered using the category_ordering field which enables you to set a specific order of display between all the sub categories of a category.
- Show sub categories : This field will only be useful if you display categories with a list. It will enable you to display subcategories under each category displayed in the listing.
- Number of sub categories : You will be able to restrict the sub categories to only a certain number in order to avoid having too much of them displayed.
- Link on main categories : This option enables you to activate the links on the main categories displayed by the module when displaying it in list layout with the "show sub categories" option turned on.
- Show the number of products: You can display or not the number of products contained in the categories listing.
- Only display categories with products: Select if you want to show the empty categories.
DIV options
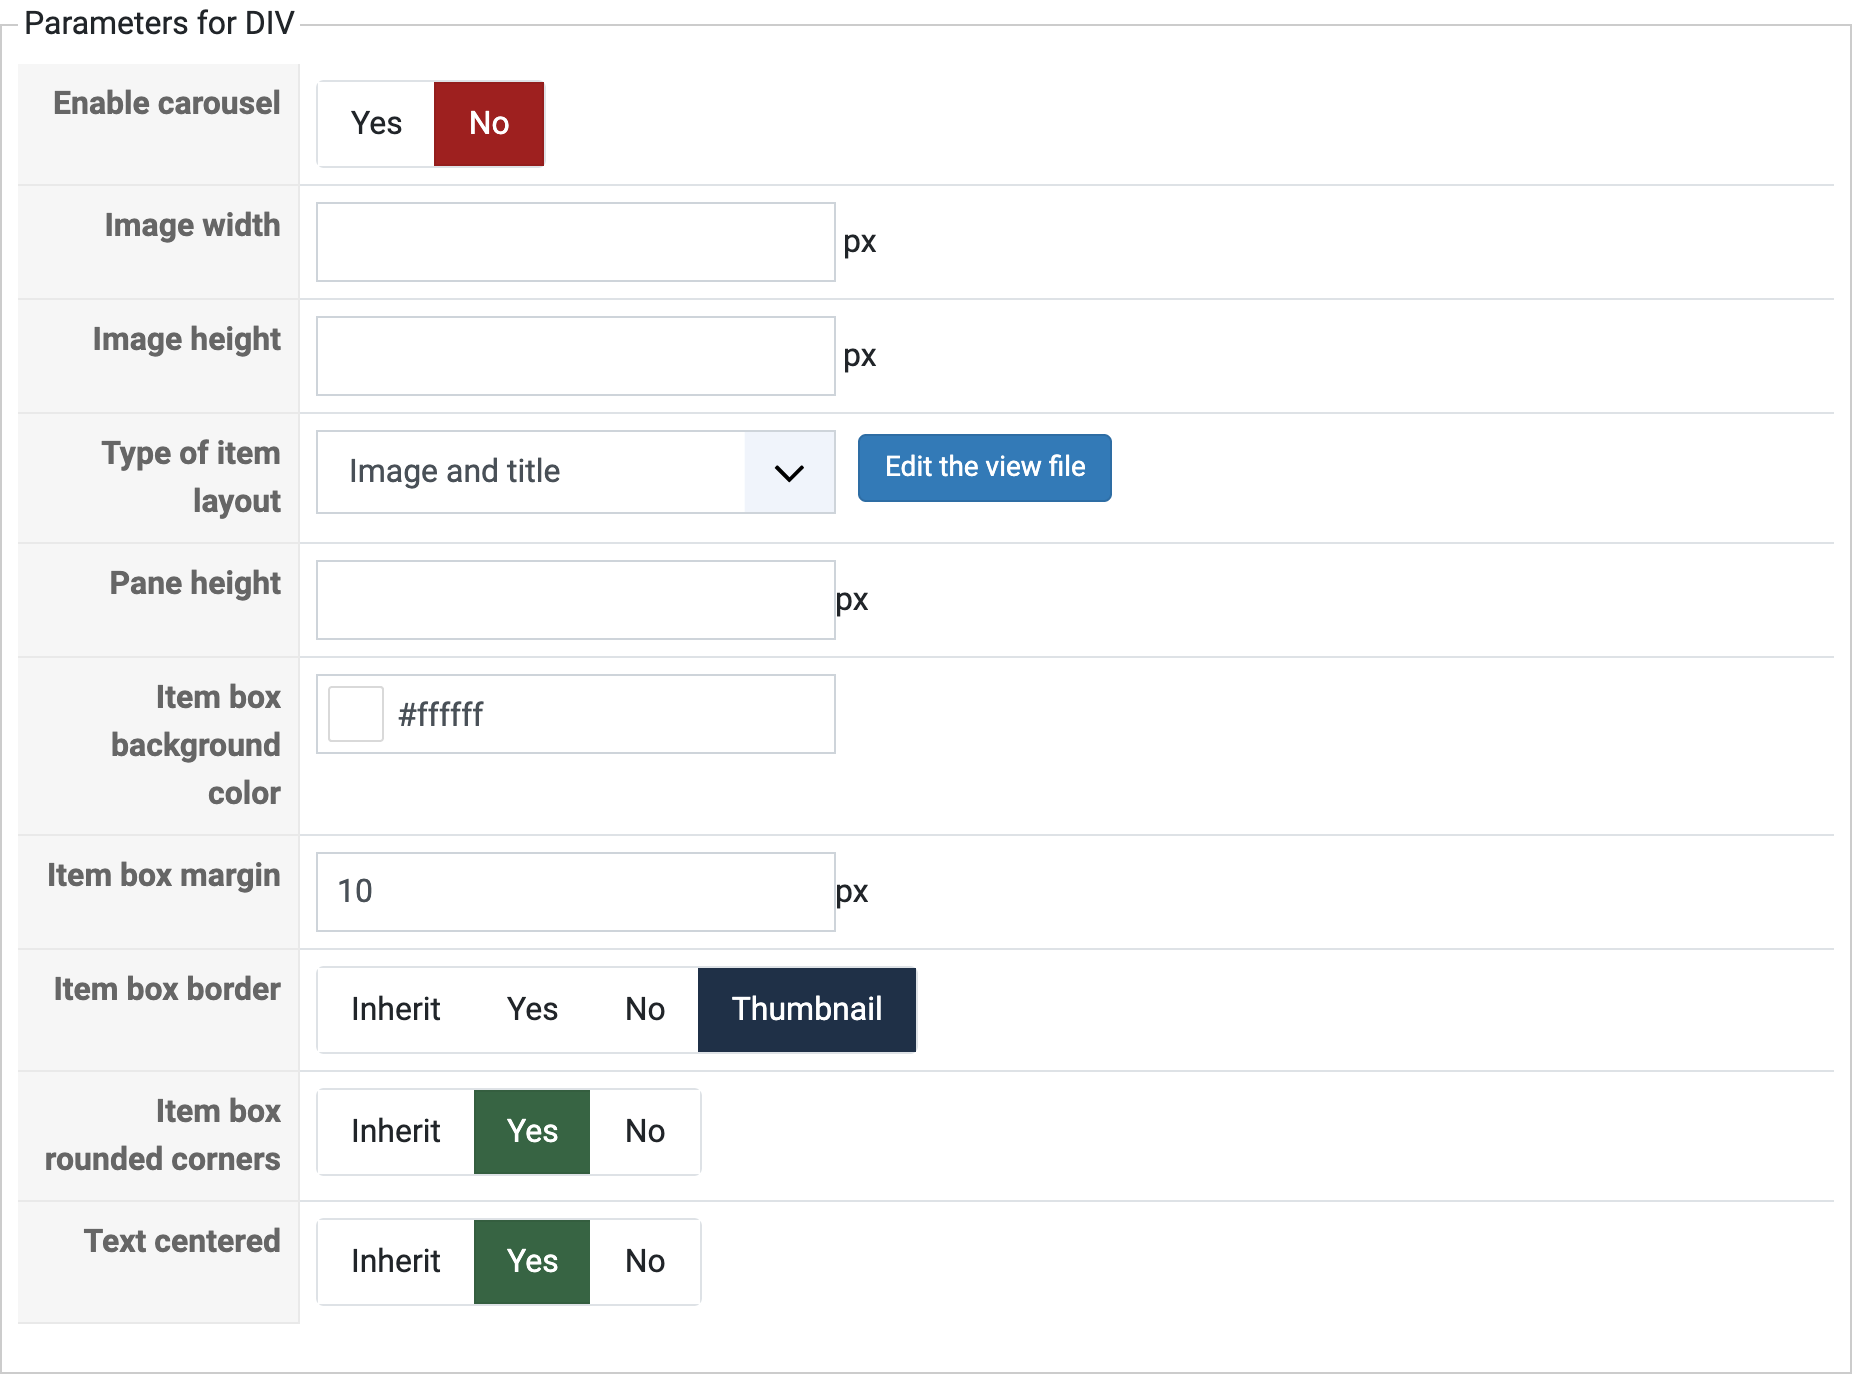
- Enable carousel: This option is only available in Hikashop Business. You can choose here to enable or not the carousel. If you activate this option, a lot of parameters will appear in order to configure the carousel. You can see different examples of carousels on the Hikashop demo website.
- Type of carousel effect: Select an effect between slide and fade to animate your carousel.
- Slide direction: The direction of your carousel transition. This parameter will also define the arrows position (For example if you select a Fade effect).
- Transition effect: This option is displayed only if you have selected a slide effect. This parameter will define the evolution of the speed of your transition. For example, if you choose "Linear", the slide speed will be constant.
- Carousel effect duration: Define here the duration of your effect (in ms).
- Product per slide: This parameter allows you to define the number of products per slide in your carousel. This option can be used with the number of columns option to organize your items like you want.
- Slide one by one: This option is only used if you have selected a slide effect. With this option you can choose to make your carousel slide product by product. If your carousel is multi-dimensional (2 columns to display 4 products), the slide will be column by column or line by line.
- Auto-slide: If this option is enabled, your carousel will slide automatically when the page is loaded.
- Time between two auto-slide: Specify here the duration between two auto-slides. Note that this duration includes the effect duration. So, if you specify the same duration for the auto-slide and for the effect duration, your carousel will slide without stopping (in this case, you need a "Linear" transition for a better result).
- Pagination type: Select here the kind of pagination you want to display.
- Thumbnail width : If you have chosen a thumbnail pagination, you can determine here the dimension of these thumbnails.
- Thumbnail height : The height of those thumbnails.
- Pagination: Select here the position of your pagination.
- Display carousel button: If this option is enabled, the arrows to slide manually be displayed.
- Image width : With this option, you can specify the dimensions of the displayed items. Note that if one the parameters is empty, the other one will be automatically calculated to get the best result possible.
- Image height : The height of those images.
- Type of item layout: You can select a template which will be used for each item display. You will be able to customize them in the views management screen ( front end, category or product views, listing_* layouts ). You can also create new ones by adding new files (listing_*) to the front end category/product tmpl folder as standard joomla views and they will be automatically available here. Note that if you have Hikashop Business you have three more layouts with effect that you can choose here.
- Item effect transition: Only if you have selected vertical_slider or horizontal_slider as layout. Just like for the carousel, choose here the transition type.
- Item effect duration: Only if you have selected vertical_slider or horizontal_slider as layout. Specify here the duration of the effect.
- Pane height : The height of the area the items are displayed in, which is what keeps a carousel from changing height as it slides.
- Item box background color : The color of each item box.
- Item box margin : The margin of each item box.
- Item box rounded corners : Set it to yes if you want each item box to have rounded corners.
- Text centered : Set it to yes if you want the text inside each item box to be centered.