
3D Model
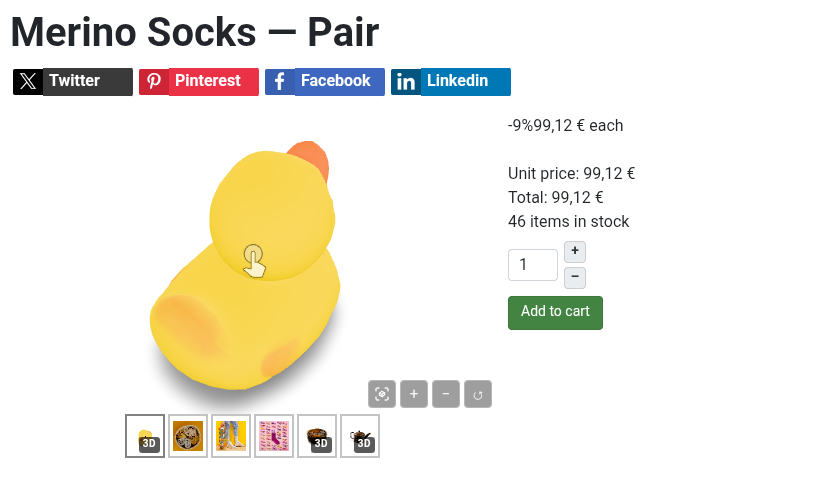
This plugin puts a 3D model of your product on the product page. Your customers turn it around with the mouse or a finger, zoom on it, and on a phone or a tablet they can place it in their own room in augmented reality, to see how big it really is and whether it fits.
You do not need to own the model. If you have one, add it in the product's images. If you do not, the plugin can build one from the photographs you already have: pick the photos on the product edit page, and a minute or two later the model is there.
Features- A 3D model is added in the product's images, next to its photos, and behaves like one: same place, same drag and drop to order them, same delete.
- When you add one, you are asked to turn it to the side your customers should see first. That view is used as the product image everywhere the shop shows one, and the model opens the same way round on the product page.
- On the product page, hovering the model's thumbnail shows the model itself, exactly as hovering a photo shows that photo. Models can also be placed above or below the image, or at the bottom of the page.
- Turn, zoom and pan, with the mouse, with a finger, and with the keyboard, plus buttons on the model to zoom in, zoom out, and put it back the way it was.
- "See it in your room" in augmented reality on both Android and iPhone, with no application to install.
- The picture of the model is shown while the model itself downloads, so the page never looks empty.
- Nothing is loaded on the pages of products that have no model, so your other product pages are exactly as fast as before.
- The model is only downloaded when the customer asks to see it.
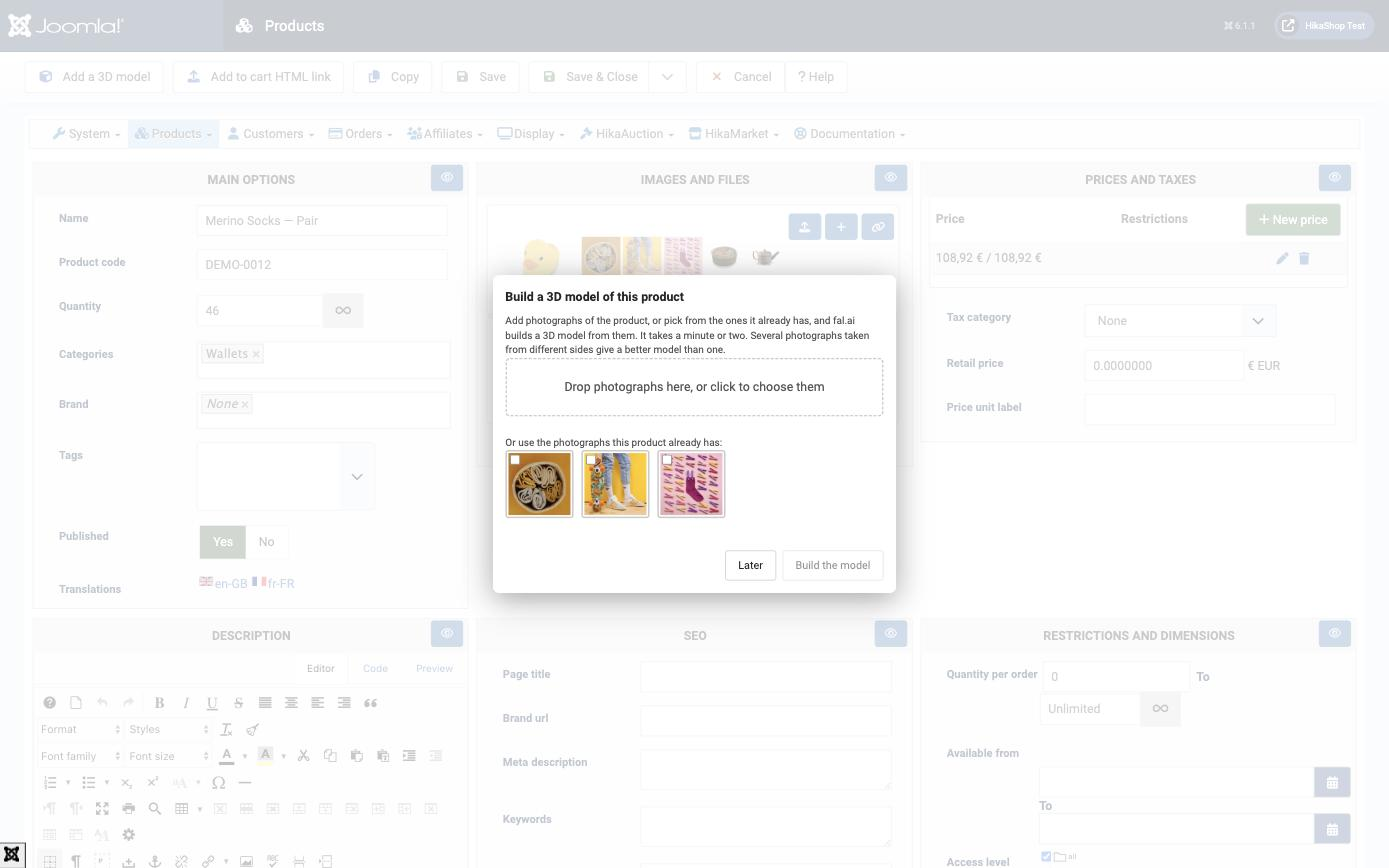
- An "Add a 3D model" button on the product edit page opens a window where you drop photographs of the product, or pick from the ones it already has, and an image-to-3D service builds a model from them. It costs a few cents a model, and it picks back up if you close the page.
On the product page the model sits where the photograph would, with its own thumbnail among them. Your customers turn it, zoom on it, and on a phone place it in their room.
No model of your own? The "Add a 3D model" button opens this: drop photographs of the product, or pick the ones it already has, and a model is built from them.
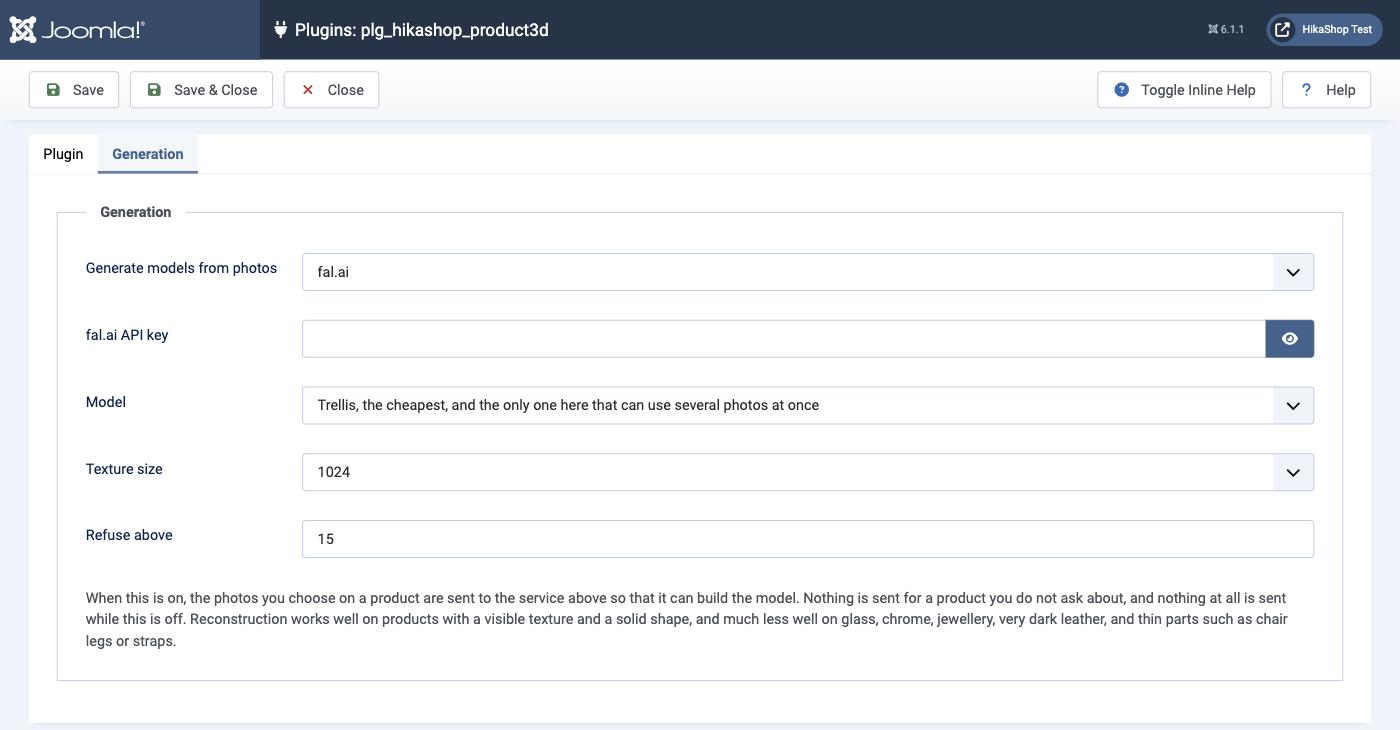
Building models from photographs is off until you choose a service and enter the key of your account with it. Until then nothing about your products leaves your website.
 Installation
- 1) Download the plugin from our website.
- 2) Install it on your Joomla website (extension manager).
- 3) Publish it from the Joomla plugin manager (type "hikashop", name "3D product display").
- 4) Edit a product and drop its 3D model in the product's images, next to the photos.
GLB is the format of 3D on the web, and what every 3D tool and every phone scanning application exports. You may already have models without knowing it: manufacturers and suppliers often provide them with their product data.
You can also add STL, PLY, OBJ and FBX files. No browser can show those, so your own browser turns them into a GLB when you add them, on your machine, and that is what your shop then serves. STL and PLY carry no colours or materials, so those models are shown in plain grey, which is the same way a 3D printing program shows them. An OBJ arrives without the separate material file that usually comes with it.
If you do not have one, a phone is enough. Free applications photograph an object from all sides and produce a GLB from it in a few minutes. Reconstruction works well on products with a visible texture and a solid shape, and much less well on glass, chrome, jewellery, very dark leather, and on thin parts such as chair legs or straps, which usually come out broken.
Building a model from your photosTurn this on in the settings of the plugin by choosing a service and entering the key of your account with it. fal.ai is offered, which gives you a choice of several reconstruction models, from about two cents a model, paid per use with no subscription and no minimum. Until you do that, nothing about your products ever leaves your website, and the feature is not displayed at all.
Once it is on, an "Add a 3D model" button appears in the toolbar of the product edit page. It opens a window where you drop photographs taken from several sides, or pick among the photographs the product already has, or both. Photographs you drop there are only sent to the service; they are not added to your product. Several from different sides give a better model than one, when the model you chose can take several. Reconstruction works well on products with a visible texture and a solid shape, and much less well on glass, chrome, jewellery, very dark leather, and thin parts such as chair legs or straps, which usually come out broken. What comes back is added to the images of the product like any other model, and you are asked to turn it to the angle your customers should see first.
Keeping your pages fastA 3D model is much heavier than a photograph, and a model straight out of a 3D tool is usually far heavier than a shop needs. Aim for under 5 MB and under 100,000 triangles, with textures at 1024 pixels, which is enough to look right on a product page. The product edit page tells you when a model is above the size you set in the plugin settings.
Settings- Display the model: in the image gallery (the default), above or below the product image, or at the bottom of the product page.
- Augmented reality: whether customers can place the product in their own room from a phone or a tablet.
- Turn on its own: the model slowly turns by itself until the customer takes hold of it.
- Height of the viewer: the height in pixels of the area the model is displayed in.
- Warn above: the size in MB above which the product edit page warns you that a model may be slow to load on a phone.
- Generate models from photos: the service that builds a model from your photographs, off by default, with the key of your account with it, the reconstruction model to use, the texture size, and the size above which a generated model is refused.
- The models belong to the product, and are shown whichever variant the customer has selected.
- Models are ordered with the photos, by dragging them in the product's images, since that is what they are.
- Displaying the model in the image gallery needs HikaShop 6.6.0 in build number 2609081328 or above. Your build number is written at the top of the HikaShop configuration page, next to your version. On an earlier build, or with a customised product page template, the model is displayed above the product image instead.
- The 3D viewer is Google's model-viewer, published under the BSD 3-Clause licence, and the conversion uses three.js, published under the MIT licence. Both are included in the plugin, so your product pages load nothing from an external service and nothing about your visitors leaves your website.
- The only thing that ever leaves your website is a photograph you have chosen for a model to be built from, and only once you have entered the key of an account with that service.
- The conversion is only downloaded when you actually add a file that needs it, so it costs nothing on a shop that uses GLB files.
1.0.1 on the 14th of October 2026
- When the preview picture of a model is made, the WebP and AVIF copies of the placeholder it replaces are now removed with its thumbnails, also with the HikaShop versions that name these copies after the whole name of the image (model.png.webp). Before, with those versions, the product listings and pages could keep showing the placeholder to the browsers that use WebP or AVIF.
1.0.0 on the 8th of September 2026
- First release: 3D models on the product page, turnable and zoomable, with augmented reality on a phone or a tablet. Add a model in the product's images, choose the angle it should be shown at, and STL, PLY, OBJ and FBX files are converted for the web as you add them. If you have no model, the plugin can build one from the photographs of the product through an image-to-3D service you connect with your own account.

- Type
- Payment plugin