- Details
- Written by: Administrator
- Category: Integrations
- Hits: 42871
|
|

Description
The HikaShop plugin for Social Networks enables you to display Facebook, Twitter and Google +1 buttons on your product pages. You can access its options via the Joomla plugins manager.
Result
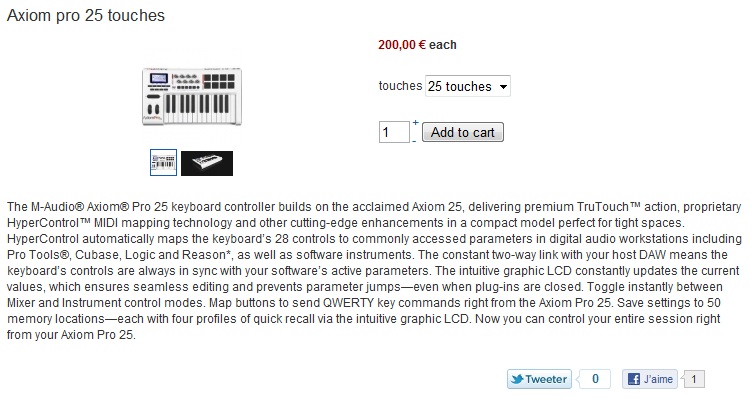
- Here is an example of what you could see:
Settings
- You can set some parameters in order to tweak the display of the buttons of the plugin :
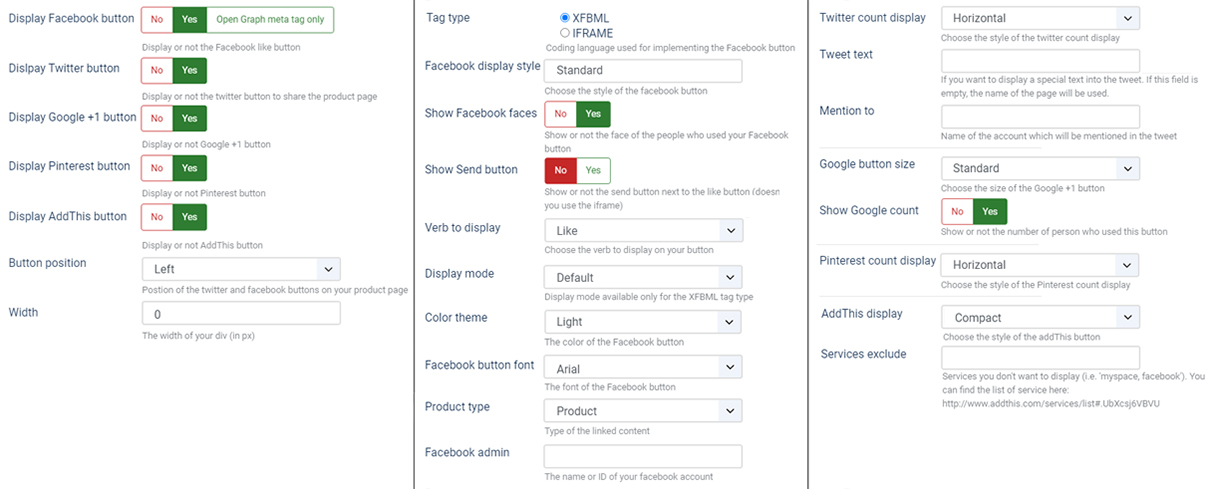
- Display Facebook button: Display or not the Facebook like button.
- Display Twitter button: Display or not the Twitter button.
- Display Printerest button: Display or not the Printerest button.
- Display Google +1 button: Display or not the Google +1 button.
- Display AssThis button: Display or not the addThis button.
- Button position: You can choose here the postion of the Twitter and Facebook buttons on your product page.
- Width: Specify here the width of your div (in px). You can use it to position your buttons as you wish (for example in the middle). When the width is 0, the width will be equal to 100%.
- Tag type: Allow you to define wich code type will be used to add the Facebook button on your website.
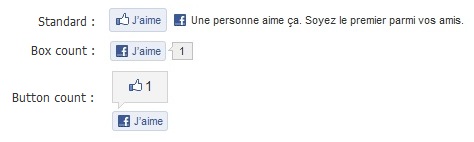
- Facebook display style: Choose the style of the Facebook button. Here are the different possibilities:
- Show Facebook faces : Show or not the face of the people who used your Facebook button.
- Show Send Button : Choose to display or not the send button next to the Facebook Like button.
Note : Take care to use the the Iframe code, or the Send button won't work.
- Verb to display: Choose the verb to display on your button, Recommend or Like.
- Color theme: You can choose here the color of the Facebook button (light or dark).
- Facebook button Font: The font of the Facebook button.
- Product type: Type of the linked content.
- Facebook admin: The ID of your Facebook account or your Product page, you can find this ID in the URL bar of your profile. This parameter is very important in order to display the product information. If this field is empty, the meta-data will not be transmitted (and the like box will link to your home page). If you want to use a Facebook application account, you have to follow this procedure:
https://webkul.com/blog/how-to-generate-facebook-app-id/
- Twitter count display: Choose the style of the Twitter count display. Here are the different possibilities:
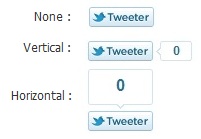
- Tweet text: If you want to display a special text into the tweet. If this field is empty, the name of the page will be used.
- Mention to: Name of the account which will be mentioned in the tweet.
- Google button size: Choose the style of the Google +1 button. Here are the different possibilities:
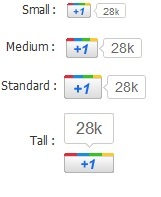
- Show Google count: Show or not the count.
- addThis display : Choose the style of the addThis button. There are the different possibilities:
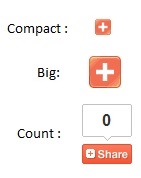
- Services exclude : You can type here the services you want to exclude of the addThis button. For example, setting this to 'facebook,myspace' would hide Facebook and MySpace on the menus.
Integration with Facebook Connect for registration
If you want to smooth out your registration process for your customers, you can allow them to use their facebook account to register during the Checkout. That will make it easier for them.
First, you need to setup the Joomla FaceBook Connect extension on your website: http://extensions.joomla.org/extensions/social-web/facebook-integration/7215
Then, you can add a new view of the type "text" in the Checkout workflow editor under the Checkout tab of the HikaShop configuration. In the text field of that new view, you can then add the tag {JFBCLogin} and then move the view where you want it on your checkout.
- Details
- Written by: Administrator
- Category: Integrations
- Hits: 45275
|
|

Description
The HikaShop plugin for Google Products enables you to download a XML file in order to add to your Google Merchant account. You can also automatically upload this file with this plugin. Additionally, the plugin can generate a JSON feed compatible with OpenAI's ChatGPT Shopping, allowing your products to appear in ChatGPT search results. This plugin is only available in our commercial editions. It is installed automatically with them. It is a great way of marketing your products by reaching all the users of the Google Products service and ChatGPT Shopping.
Once your Google Merchant account will be setup, your products will be listed in the Google Shopping service: https://shopping.google.com/
This plugin also works with Facebook's Commerce Manager in order to upload / synchronize your products with Facebook and Instagram. You can find the instructions for the setup in Commerce Manager here
Note that if you want to use the auto update, you first need to configure the cron task in your HikaShop configuration and then setup a new feed in your Google Merchant account where you will specify a file name that you will have to put in the "File Name" option of this plugin.
Please note that if you want to use the auto update feature of this plugin, you will need to make sure that your hosting company allows outgoing connections from your website, otherwise, it won't work.
Please note that this plugin is available only with the Essential and the Business editions of HikaShop.
Settings
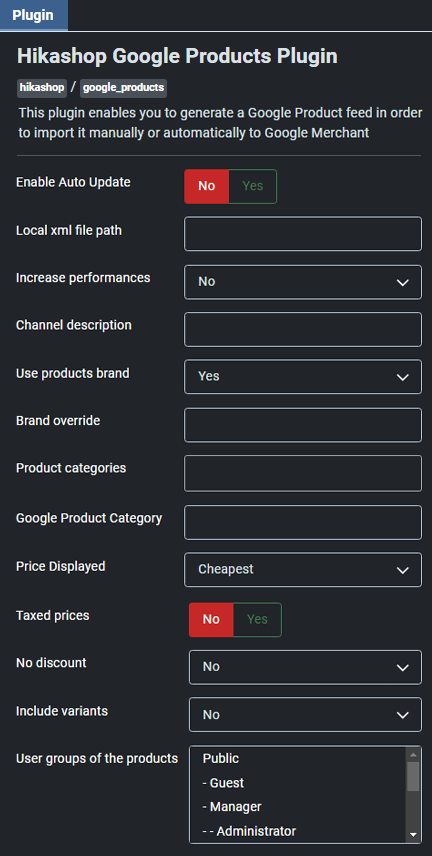
- You can set some parameters into the HikaShop Google product plugin:
- Enable Auto Update: Automatically update your Google merchant feed via SFTP. When you use this option, you also have to complete the 3 next fields.
- Local xml file path: XML for inventory feeds path (generate an XML file of your content). For example, if you put "myfolder/myfile.xml" there and your website is https://mywebsite.com , the XML file will be available at https://mywebsite.com/myfolder/myfile.xml
- Increase performances: Use this setting if you have issues with memory limits or timeouts when using Google plugin, you can turn on that option.
- Channel description: Define the main description of your shop, you can leave it empty, the description of your website from your Joomla configuration will be automatically used.
- Use products brand: Use the brand [brand] attribute to indicate the product's brand name. The brand is used to help identify your product and will be shown to customers.
- Brand override: You can override here the products brand (the brand setting of the products won't be used). You can either enter here a brand name, or the column name of the product custom field with the brand name set for each product.
- Product categories: If you want to restrict the XML feed to only some categories, please select them in this setting
- Google Product Category: Your products' category (optional except for : 'Apparel and Accessories', 'Media', and 'Software'). If you enter here the column name of a custom product field, it will use the value of the custom field for each product allowing you to have a different category for each product. Note that you need to use the category names or ids defined by Google: https://support.google.com/merchants/answer/6324436?hl=en
- Price Displayed: Choose which price you want to provide in the XML file.
- Taxed prices: Should the prices have tax applied
- No discount: Use discount OR not.
- Include variants: If your products have variants and you want to export the variants as separate products instead of exporting only the main product data, you need to activate this option. Note that loading the variants data will require between several times and 100 times more processing for the plugin in order to generate the XML feed. So it might not be viable or require at least the increase of the performances with the corresponding setting of the plugin.
- User groups of the products: If no user group is selected here, the plugin will only list the products with their 'access level' setting set to 'all'. And if you select user groups here, it will also list products with one of these user groups selected.
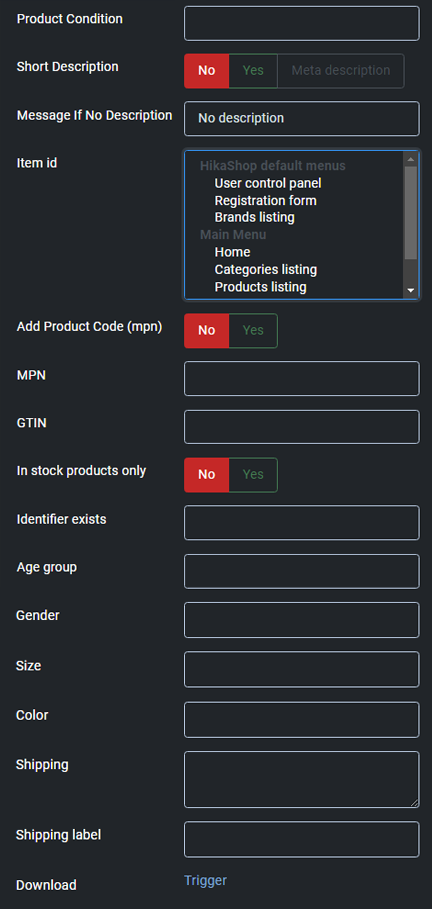
- Product Condition: Your products condition ( you can use either 'used', 'new' or 'refurbished' and no other value is allowed). If you enter here the column name of a custom product field, it will use the value of the custom field for each product allowing you to have a different condition for each product.
- Short Description: Do not add the full description of the product but only up to the read more tag.
- Message if No Description: Message displayed if a product doesn't have a description.
- Item id: If you want to display your products in a special context you can add here a menu id.
- Use product code as mpn: Display or not the product code as MPN in the XML feed
- MPN: If you enter here the column name of a custom product field, it will use the value of the custom field for each product allowing you to have a MPN for each products for which the custom field is filled. If you leave this field empty, no MPN will be added to the feed unless you turn on the 'Add Product Code (mpn)' setting above.
- GTIN: If you enter here the column name of a custom product field, it will use the value of the custom field for each product allowing you to have a GTIN for each products for which the custom field is filled. If you leave this field empty, no GTIN will be added to the feed.
- In Stock Products Only: Do not add the products without any stock to the feed.
- Identifier exists: Tells google if an identifier (brand, gtin, mpn) exists for your products (you can use either 'TRUE' or 'FALSE' and no other value is allowed). If you enter here the column name of a custom product field, it will use the value of the custom field for each product allowing you to have a identifiers for some products and not for others.
- Age Group: Your products' age group (you can use either 'Adult', 'Kids', 'Toddler', 'Infant' or 'Newborn' and no other value is allowed). If you enter here the column name of a custom product field, it will use the value of the custom field for each product allowing you to have a different age group for each product.
- Gender: Your products' gender (you can use either 'Male','Female' or 'Unisex' and no other value is allowed). If you enter here the column name of a custom product field, it will use the value of the custom field for each product allowing you to have a different gender for each product.
- Size: Your products' size. If you enter here the column name of a custom product field, it will use the value of the custom field for each product allowing you to have a different size for each product.
- Color: Your products' color. If you enter here the column name of a custom product field, it will use the value of the custom field for each product allowing you to have a different color for each product.
- Shipping: The shipping rules for your product. Rules must be separated by a comma. Each rule has four variables separated by a colon. For example, if you want two shipping methods for France, a standard one at 5 euros and an express one at 10 euros you should write: FR::Standard:5.00 EUR,FR::Express:10.00 EUR . If you enter here the column name of a custom product field, it will use the value of the custom field for each product allowing you to have different shipping rules for each product.
- Shipping label: The shipping label for your products. If you enter here the column name of a custom product field, it will use the value of the custom field for each product allowing you to have a different shipping label for each product. You can read more about shipping labels here: https://support.google.com/merchants/answer/7050921
- Download: Download the XML file. Then, you can import it manually in your Google account or Facebook Merchants central.
If you have the error message "Invalid attribute: price", it means that the main currency configured in HikaShop is not the currency of the country selected in your data feed options, in your Google Merchant center account. You either need to change the currency in HikaShop or the country in your feed.
Before setting up the synchronization, make sure that you can manually import the XML file. Google and Facebook will check that what you have in the XML file matches with your situation. Different types of products might require different fields to be filled, and it can change also based on where your shop is located. So it's important that the XML file is accepted with a manual import first. Also, before setting up the synchronization, please make sure that your cron task is up and running.
OpenAI / ChatGPT Shopping
Starting with HikaShop 6.4.0, the Google Products plugin can also generate a product feed in JSON format compatible with OpenAI's ChatGPT Shopping. This allows your products to appear in ChatGPT search results and potentially be purchased directly through ChatGPT.
The plugin reuses the same product data already loaded for the Google Shopping XML feed, so enabling this feature has minimal performance impact. When both feeds are enabled and the cron runs, the product data is loaded only once and shared between both generators.
The JSON feed is saved as a static file on your server (e.g. in the media/com_hikashop/ folder) so that OpenAI can crawl it at a publicly accessible URL. No additional frontend controller or endpoint is needed.
Setup
- Go to the Google Products plugin settings in HikaShop's plugin manager.
- In the OpenAI JSON file path field, enter a path relative to your Joomla root where the JSON feed will be saved, for example:
media/com_hikashop/openai_feed.json - Once this path is set, additional OpenAI-specific settings will appear.
- Configure the settings as needed (see below).
- Make sure your cron task is configured. The JSON feed will be regenerated each time the cron runs.
- You can also use the Download OpenAI JSON button to manually download the feed file.
- Register the public URL of your JSON file with OpenAI so that ChatGPT can index your products.
OpenAI-specific settings
- OpenAI JSON file path: The local file path where the JSON feed will be saved (relative to your Joomla root). For example,
media/com_hikashop/openai_feed.jsonwould make the feed accessible athttps://yoursite.com/media/com_hikashop/openai_feed.json. Leave empty to disable OpenAI feed generation. - Store country: The ISO 3166-1 alpha-2 country code of your store (e.g. US, FR, DE). This tells ChatGPT where your store is located.
- Target countries: A pipe-separated list of ISO 3166-1 alpha-2 country codes for the countries you ship to (e.g. FR|BE|CH). This helps ChatGPT show your products to relevant users.
- Return policy: The URL of your return policy page, or a short text describing your return policy.
- Eligible for search: Whether your products should appear in ChatGPT search results. Enabled by default.
- Eligible for checkout: Whether your products can be purchased directly through ChatGPT. Disabled by default.
- Include reviews: When enabled, the feed will include the review count and average star rating for products that have reviews. This data comes from HikaShop's built-in voting system at no additional performance cost.
- Download OpenAI JSON: Manually generate and download the JSON feed file.
Feed contents
The OpenAI JSON feed includes the following information for each product:
- Title, description, URL, and images (main image and up to 9 additional images)
- Price and currency (with sale price when applicable)
- Availability (in_stock, out_of_stock, preorder, backorder)
- Brand, MPN, GTIN, condition
- Product weight and dimensions when available
- Seller name and URL (from your Joomla site configuration)
- Store country, target countries, and return policy
- Review count and star rating (when the "Include reviews" option is enabled)
- Variant information: when the "Include variants" option is enabled, each variant is exported as a separate product entry with a
group_idlinking it to the parent product and avariant_dictcontaining the characteristic names and values (e.g.{"Color":"Red","Size":"M"})
All the existing Google Products plugin settings (product categories, price options, variant handling, custom fields, etc.) apply equally to the OpenAI feed, since both feeds share the same underlying product data.
- Details
- Written by: Administrator
- Category: Integrations
- Hits: 30510
Please be aware that this payment method is now deprecated
|
|

Description
This screen enables you to edit the AlphaUserPoints payment method options but also the points earning settings of the AUP integration. Payment methods will be filtered on checkout based on the zone you set for them, if any. Then, they will be displayed to the user for him to choose which payment method he prefers for his order.
This plugin requires that you first install the extension AlphaUserPoints on your website.
The plugin is only available in our commercial editions.
Toolbar
- Save : Save the AlphaUserPoints payment method options and return to the payment methods Management screen.
- Apply : Apply the modifications to the AlphaUserPoints payment method and stay on the same screen.
- Cancel : Return to the previous screen without saving the modifications.
- Help : This button enables you to turn ON/OFF the help section, this screen will appear or disappear.
Main Information
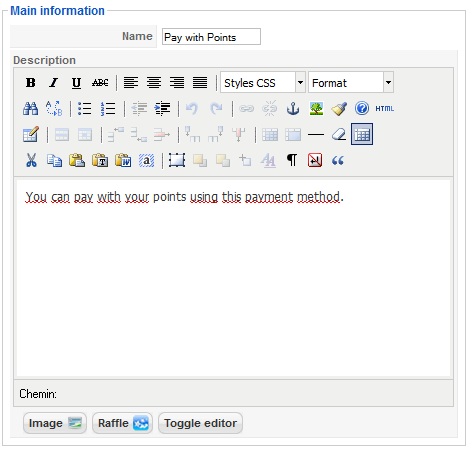
If you use one of our commercial versions, you will be able to enter the name and description in different languages. This feature requires to have joomfish installed and can be activated in the configuration page, in the display tab. The languages available will be the ones in joomfish. If you don't enter something for a translation, it will just use the default information in the Main information tab instead. After you click on save or apply an additional publish icon will appear next to the fields where you entered something in the languages tabs so that you can easily enable or disable them.
Payment Options
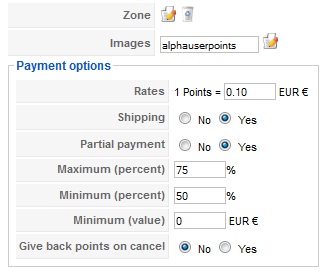
- In this part, you will be able to set the payment options of the AlphaUserPoints plugin. When a customer doesn't have enough points to respect one of these rules, the payment method will not be visible:
- Zone : You can restrict the AlphaUserPoints payment method to a zone. By clicking on the edit icon, a popup will open enabling you to select a zone. You can also remove this limitation by clicking on the delete icon.
- Images : You can click on the edit icon to select one or several images to display next to the name of the AlphaUserPoints payment method during the checkout process. Those images are stored in the folder media/com_hikashop/images/payment so you can easily add more of them by uploading your images to this folder via FTP.
- Shipping method : With this option you can select the shipping method for which this payment method will be available. For example, if you choose UPS, this payment method will only be usable if UPS is selected as shipping method. If an other shipping method is selected, this payment method will not be displayed. Note: if you selected "None" or don't select any shipping method, this payment method will always be available.
- Rates: You can define here the monetary value of a point. When a customer will pay, each point will allow him to pay the defined value.
- Group points by : With that option, you can force users to only be able to use their points by packs of X points.
- Maximum points : When you want to limit the maximum number of points users can use, enter the value here.
- Shipping: Allow or not the shipping fees payment with points. In this case, the shipping fees will be payed with another payment method and a coupon will be generated for the points.
- Partial payment: Allow or not the partial payment of an order. If the partial payment is active, you are able to set a Maximum percentage of the order payable with points. When a partial payment is made, a coupon is generated for the order and the user will have to pay with another payment method the remaining amount.
- Minimum percentage: Define the minimum percentage of the order which have to be paid with points.
- Minimum value: Define the minimum amount of an order which have to be reached to pay with points.
- Give back points on cancel: You can choose here whether to give back or not the points which have been used to pay an order when the order is cancelled. (Note: when an order is cancelled, points which have been earned by the user are ALWAYS deleted).
- Give points on statuses : With that option, you can override the statuses for which the points are given to users.
- Use virtual points : If you turn on that option, the points which would be earned by the user when finishing the order can directly be used (along with the points already on the user's account) to pay/get a discount on the current cart.
- Use virtual coupons : When that option is activated, instead of using an auto generated coupon during the checkout in order to use the points, the points will be added as an additional line before the final total. That means that users can use at the same time points and a coupon.
- Group points: Warning level : This option is used when the "Group points by" option is set. It allows you to display a message to the user when he doesn't have enough points to use his points because it didn't reach the minimum required points based on that "Group points by" option.
Points Earning Options
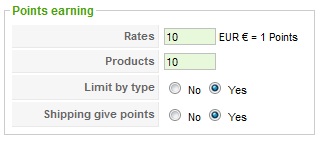
- Here you can define how points are given after an order, the titles of this sections are green:
- Rates: This basic rule define the rate between points and your currency so that the user will be given points based on the amount of his order.
- Products: Here you can choose to give a certain number of points for each product in an order.
- Limit by type: If you activate this option, the defined points above will be given only once for each kind of product. Else, each product will give the defined number of points (for example, 4 T-shirt will give here 40 points).
- Shipping gives points: If this option is activated, the number of points earned will be calculated on the final order price (with shipping).
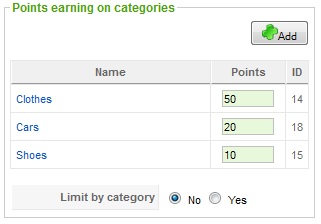
- This section gives you the possibility to define a specific number of point for each category of products:
- Just click on the "Add" button to select a category and set a specific number of points earned when customers buy a product of this category. This tool is really helpful if you want to make some products more attractive.
- Limit by category: You can also choose to limit the number of points earned to one category. If a product is in many categories, the most interesting one will be chosen.
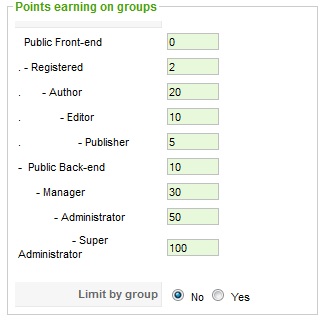
- This section allows you to give a specific number of points to users according to their group:
- Just set a number of point for your users and they will automatically earn these points when they make an order.
- Limit by group: You can also choose to limit the number of points earned to one group (if one of your customer is in many groups, the most interesting will be chosen) or to sum all the points of all the groups the user is in ( you can only have several groups for a user in Joomla 1.6 ).
- Details
- Written by: Administrator
- Category: Integrations
- Hits: 39095
|
|

Description
The HikaShop plugin for OSMap, mapX and Xmap 2.x (not available anymore) enables you to show your products and your categories into the OSMap, mapX, or Xmap site map.
Install the plugin
- First, you need to install and configure OSMap. You can download it here.
- Then, download the plugin: Get the plugin on our marketplace
- Log in to your backend and click on the menu "Extensions -> Install/Update".
- Browse for the HikaShop plugin you just downloaded and then click on the button "Upload File & Install".
- You should now see the HikaShop Plugin in the Joomla plugins manager. Now, you have to publish the HikaShop plugin and your products and categories should be visible in your site map.
- Here is a complete tutorial on setting up OSMap with this plugin.
Result
- For each HikaShop menu you have in your website, OSMap will display a list of products and categories. Here is an example of what you could see:
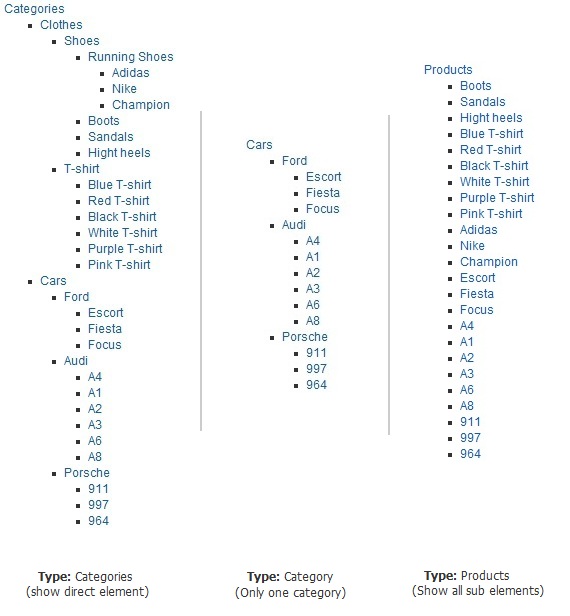
Settings
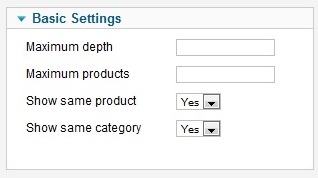
- You can set some parameters into the HikaShop plugin to display your site map:
- Maximum depth: Define the number of child categories you want to display from the main category
- Maximum products: Maximum number of products you want to display in your site map.
- Show same category: You can choose here if categories have to be displayed each time or only once.
- Show same product: You can choose here if products have to be displayed each time or only once.
- Priority: The priority enables the crawlers to know which pages of your site are the most important.
- Change Frequency:This parameter defines the frequency at which your products page is changing (for example, if your products are changing often, you can set it to weekly. If your products never change, set it to monthly or yearly).
- Details
- Written by: Administrator
- Category: Integrations
- Hits: 30498
 |
Description
The HikaShop plugin for Community Builder enables your users to access their orders on their profile.
Install the plugin
- Download CB Plugin
- Log in to your backend and click on the menu "Components -> Community Builder -> Plugin Management".
- At the bottom of the Plugin Management page of Community Builder, you will see an area enabling you to upload a new plugin.
- Browse for the HikaShop plugin you just downloaded and then click on the button "Upload File & Install".
- You should now see the HikaShop Plugin part of the Community Builder Plugins. Don't forget to publish the HikaShop plugin and verify that the tab of the plugin is also published on the tabs management interface of Community Builder.
Result
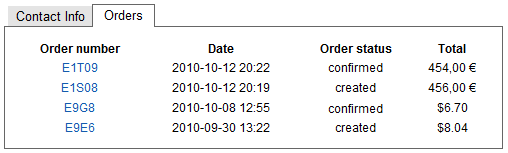
- A new tab on the CB User profile will be displayed. This way, the user will have access to his orders easily. By clicking on the order number, the user will go to the detail of the order.