
Razorpay
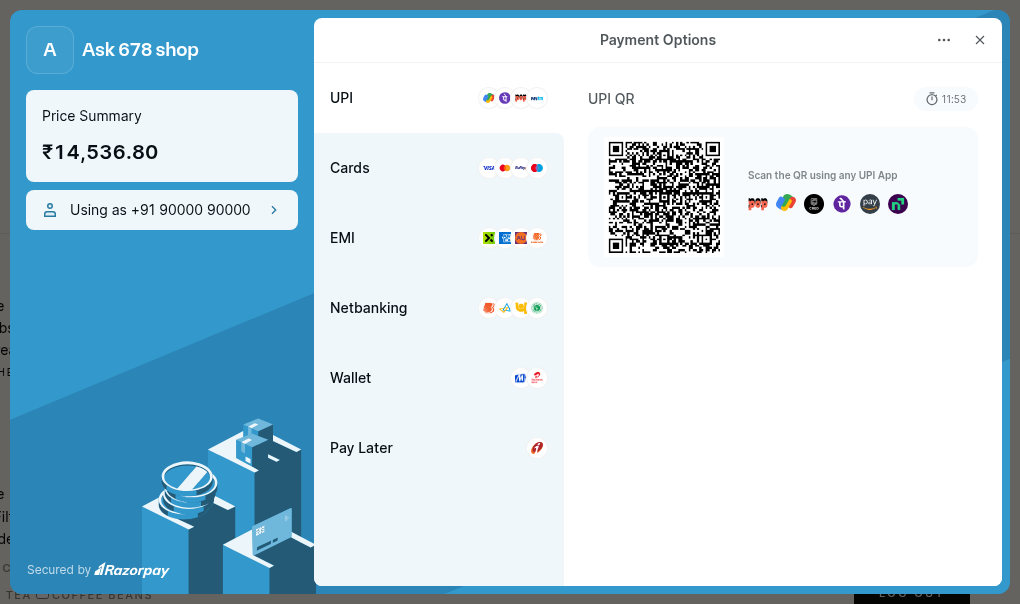
This plugin adds Razorpay payments to your HikaShop store. At the end of the checkout the Razorpay checkout opens on your page, and your customer pays the way India pays: UPI, RuPay and other cards, netbanking, wallets, EMI or pay later. The order is confirmed in your shop as soon as Razorpay has the money.
Features- UPI (by QR code or with the customer's UPI app), cards (Visa, Mastercard, RuPay, American Express, Diners) with their 3-D Secure, netbanking with the Indian banks, wallets, and the EMI and pay later offers of your Razorpay account.
- The checkout opens over your own page, with your shop's name, logo and colour, and the customer's name, email address and phone number already filled in.
- Orders in rupees, and in the other currencies of Razorpay's list once international payments are activated on your account. Use the currency restriction of the payment method to offer it only in the currencies your account takes.
- A failed payment stays in the checkout so the customer can try again with another method; closing the checkout cancels the order and brings the customer back to your shop.
- The order is confirmed both when the customer comes back and when Razorpay sends its webhook, whichever comes first, and once only. A payment left authorized is captured by the plugin.
- The answer of the checkout and every webhook are checked against their signatures, and the payment is always read back from Razorpay, so a payment cannot be faked.
- Moving an order to the refunded status refunds what is left of its payment on Razorpay; a refund Razorpay refuses leaves the status of the order unchanged.
- With the test keys of your Razorpay account the whole checkout runs in test mode, with Razorpay's test cards. The payment method then shows "test mode" at the checkout.
 How it works
- 1. The customer confirms the order and the Razorpay checkout opens on the last page of your checkout.
- 2. They pay by UPI, card, netbanking, wallet, EMI or pay later; Razorpay handles the bank pages and the apps.
- 3. The checkout hands the payment back to your shop, which asks Razorpay whether the order is paid and confirms it.
- 4. If the customer closes the browser before coming back, Razorpay's webhook confirms the order.
- 1) Open a Razorpay account at razorpay.com. Razorpay opens accounts to businesses of India, and through its local sites to those of Malaysia (Curlec), Singapore and the United States. The test mode is there from the sign-up; live payments start once Razorpay has activated your account.
- 2) Download the Razorpay plugin from our website, install it on your website and enable it.
- 3) In the Razorpay dashboard, Account & Settings, API Keys, generate a key. Copy the Key Id and the Key Secret: Razorpay shows the secret only once. Test mode keys (rzp_test_...) take no real payment, live mode keys (rzp_live_...) do.
- 4) In HikaShop, go to System > Payment methods, create a Razorpay payment method and paste the Key Id and the Key Secret.
- 5) In the Razorpay dashboard, Account & Settings, Webhooks, add a webhook with the Webhook URL shown in the settings of the method, a secret of your own, and the events payment.authorized, payment.captured, payment.failed and order.paid. Type the same secret in the Webhook secret setting and save. Do it in test mode and in live mode: each has its own webhooks.
- 6) Leave the automatic capture of payments on, in Account & Settings, Payment capture (Razorpay's default).
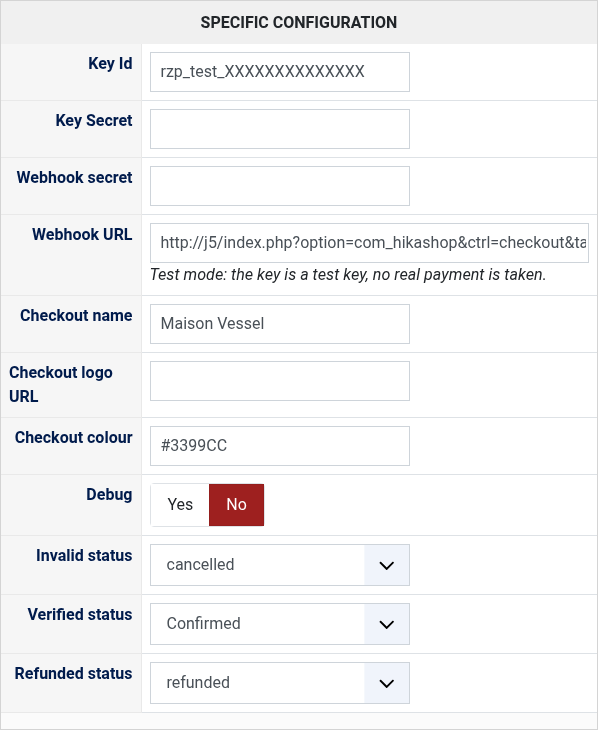
- Key Id: from Account & Settings, API Keys. A test key puts the method in test mode, a live key takes real payments.
- Key Secret: the secret generated with the Key Id. Without it nothing can be paid.
- Webhook secret: the secret you typed for the webhook of step 5. Without it, the webhooks are refused and an order whose customer did not come back stays unconfirmed.
- Webhook URL: the address to paste in Account & Settings, Webhooks.
- Checkout name: the name shown at the top of the Razorpay checkout; the name of your site when empty.
- Checkout logo URL: the full address (https://...) of the logo shown in the checkout; none when empty.
- Checkout colour: the colour of the checkout, as a hex code such as #3399CC; Razorpay's own when empty.
- Debug: writes every exchange with Razorpay in the payment log of HikaShop.
- Invalid status, Verified status and Refunded status: the status of an order whose payment failed or was abandoned, of a paid order, and the status that refunds the payment on Razorpay.
- "The payment could not be started" with Razorpay's reason: the reason says what to change, for instance "Authentication failed" for a Key Id and Key Secret that do not go together, or a currency your account has not activated.
- The checkout asks the customer for their mobile number: Razorpay does so when the number of the billing address does not look like a real one.
- A paid order that stays unconfirmed: check that the webhook is added in the Razorpay dashboard, in the same mode as the keys, with the right address and the secret of the settings. The payment log of HikaShop says why a webhook was refused.
- A refund refused by Razorpay leaves the order in its status, with Razorpay's reason in the payment log, for instance when the payment was already partly refunded from the Razorpay dashboard.
Use
- Compatible with all the editions of HikaShop
- Requires a Razorpay account (India, Malaysia, Singapore or the United States)
- Requires the PHP cURL extension
- Requires a website reachable from the internet so Razorpay can send it its webhooks
- In English
- Compatible with PHP 7.4 minimum
- Compatible with Joomla and WordPress
- No limit of time
- No limit of use
Changelog
1.0.0 on the 28th of October 2026
- First version.
Free
The add to cart button will appear once you select the values above
- Type
- Payment plugin