1) Open a Razorpay account at razorpay.com. Razorpay opens accounts to businesses of India, and through its local sites to those of Malaysia (Curlec), Singapore and the United States. The test mode is there from the sign-up; live payments start once Razorpay has activated your account.
2) Download the Razorpay plugin from our website, install it on your website and enable it.
3) In the Razorpay dashboard, Account & Settings, API Keys, generate a key. Copy the Key Id and the Key Secret: Razorpay shows the secret only once. Test mode keys (rzp_test_...) take no real payment, live mode keys (rzp_live_...) do.
4) In HikaShop, go to System > Payment methods, create a Razorpay payment method and paste the Key Id and the Key Secret.
5) In the Razorpay dashboard, Account & Settings, Webhooks, add a webhook with the Webhook URL shown in the settings of the method, a secret of your own, and the events payment.authorized, payment.captured, payment.failed and order.paid. Type the same secret in the Webhook secret setting and save. Do it in test mode and in live mode: each has its own webhooks.
6) Leave the automatic capture of payments on, in Account & Settings, Payment capture (Razorpay's default).
Configuration
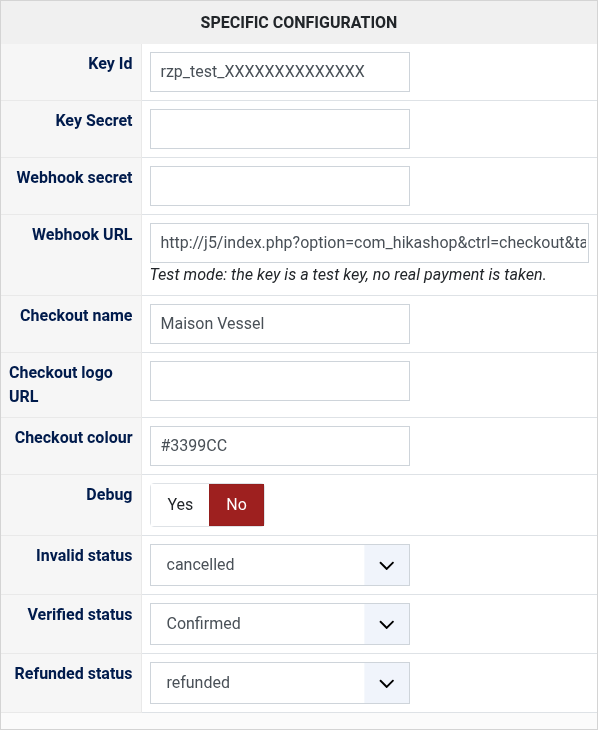
Key Id: from Account & Settings, API Keys. A test key puts the method in test mode, a live key takes real payments.
Key Secret: the secret generated with the Key Id. Without it nothing can be paid.
Webhook secret: the secret you typed for the webhook of step 5. Without it, the webhooks are refused and an order whose customer did not come back stays unconfirmed.
Webhook URL: the address to paste in Account & Settings, Webhooks.
Checkout name: the name shown at the top of the Razorpay checkout; the name of your site when empty.
Checkout logo URL: the full address (https://...) of the logo shown in the checkout; none when empty.
Checkout colour: the colour of the checkout, as a hex code such as #3399CC; Razorpay's own when empty.
Debug: writes every exchange with Razorpay in the payment log of HikaShop.
Invalid status: the status of an order whose payment failed or was abandoned.
Verified status: the status of a paid order.
Refunded status: moving an order to this status refunds the payment on Razorpay.
Troubleshooting
"The payment could not be started" with Razorpay's reason: the reason says what to change, for instance "Authentication failed" for a Key Id and Key Secret that do not go together, or a currency your account has not activated.
The checkout asks the customer for their mobile number: Razorpay does so when the number of the billing address does not look like a real one.
A paid order that stays unconfirmed: check that the webhook is added in the Razorpay dashboard, in the same mode as the keys, with the right address and the secret of the settings. The payment log of HikaShop says why a webhook was refused.
A refund refused by Razorpay leaves the order in its status, with Razorpay's reason in the payment log, for instance when the payment was already partly refunded from the Razorpay dashboard.