
- Details
- Written by: Administrator
- Category: Payment plugins
- Hits: 21419
| {img} |
Description
This screen enables you to edit the payment method options. Payment methods will be filtered on checkout based on the zone you set for them, if any. Then, they will be displayed to the user for him to choose which payment method he prefers for his order.
Note that the payment method can probably support only a limited number of currencies.
Toolbar

- Save & Close : Save the payment method options and return to the payment methods Management screen.
- Save : Apply the modifications to the payment method and stay on the same screen.
- Cancel : Return to the previous screen without saving the modifications.
- Help : This button enables you to turn ON/OFF the help section, this screen will appear or disappear.
Main Information
If you use one of our commercial versions, you will be able to enter the name and description in different languages. This feature requires to have joomfish installed and can be activated in the configuration page, in the display tab. The languages available will be the ones in joomfish. If you don't enter something for a translation, it will just use the default information in the Main information tab instead. After you click on save or apply an additional publish icon will appear next to the fields where you entered something in the languages tabs so that you can easily enable or disable them.
Generic information
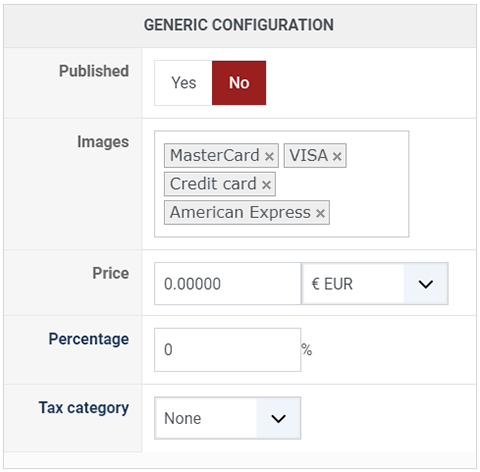
- Published : This option allows you to publish or not the payment method.
- Images : Select here the desired images to be displayed for this payment method. If you want to add additional images, you can upload them via FTP into the folder media/com_hikashop/images/payment/ of your website and you will then be able to select them in that option.
- Price : You can set the payment fee in this field, and select the currency of the fee.
- Percentage : The percentage allows you to define a payment fee depending on the total amount of the products in the cart.
-
Tax category : Select among your tax category, the category you want apply on your payment method cost.

Additional Information
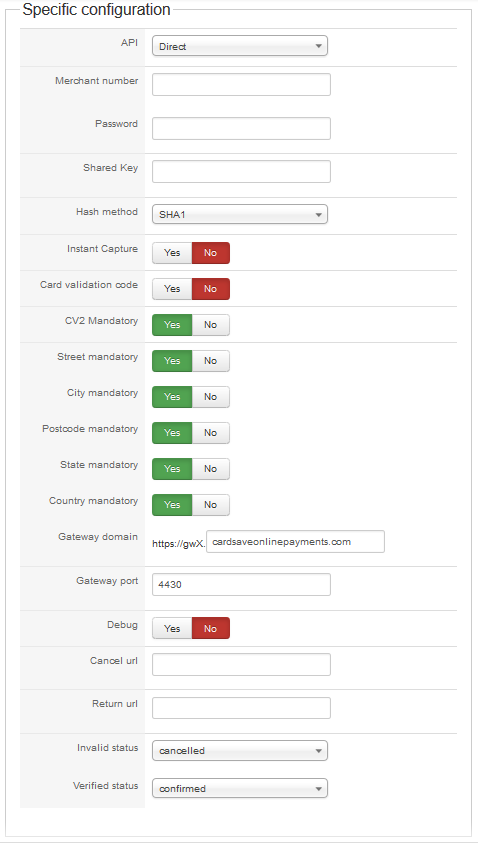
- API : You can choose here the API you to use for your payment. With the hosted mode, the customer is sent on a different web page where he will give his credit card information. With the direct mode (you will need SOAP installed in this case), everything will happen on your website and the user will enter his credit card information directly during the checkout.
- Merchant number : Your merchant number (given by CardSave)
- Password : The password of your CardSave account.
- Shared Key : You have to put here the shared key that you can found in your CardSave account (Account Settings > PreShared Key):
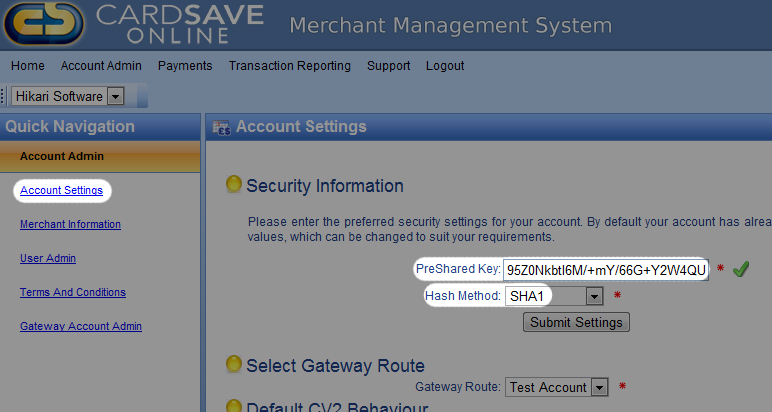
- Hash method : The Hash method you specified in your CardSave account (Account Settings > Hash method)
- Instant capture : You can choose here to validate the transaction automatically when the payment is done. If this option is not selected, you will have to validate manually every payment made on your website.
- Card Validation code: Choose here if the C2V must be asked to customers during the transaction (C2V are the 3 digits you can found at the back of a credit card).
- CV2 Mandatory: If the option is checked, the CV2 will be verified by CardSave to be sure it correspond to the credit card number.
- Street mandatory: If the option is checked, the Street will be verified by CardSave to be sure it correspond to the credit card number.
- City mandatory: If the option is checked, the City will be verified by CardSave to be sure it correspond to the credit card number.
- Postcode mandatory: If the option is checked, the Postcode will be verified by CardSave to be sure it correspond to the credit card number.
- State mandatory : If the option is checked, the State will be verified by CardSave to be sure it correspond to the credit card number.
- Country mandatory: If the option is checked, the Country will be verified by CardSave to be sure it correspond to the credit card number.
- Gateway domain: This parameter is necessary only if you have chosen the Hosted API. You have to put here the name of your gateway domain.
- Gateway port: This parameter is necessary only if you have chosen the Hosted API. The Gateway port for tests is currently 4430 and the port for real payments is 443.
- Debug: .You have to turn on this option for your tests.
- Cancel url : Set here the url where customers will be send after having abandoned the transaction.
- Return url : The url you want your users to be redirected to when they finish their payment on the CardSave interface. By default, they will be redirected to the after_end page of the checkout process which will thank them for their order.
- Invalid status : Here, you can select the status to set to an order if the plugin receives a notification from CardSave for an order with an amount different from the order total or in a different currency. In that case, we highly recommend you to check your CardSave account, the order information, and maybe contact your customer, and decide yourself what to do with the order.
- Pending status : Here, you can select the status to set to an order if the plugin receives a pending notification from CardSave for an order. A pending notification means that the customer entered his payment information but that CardSave could not yet receive the funds. In that case, we highly recommend you to check your CardSave account, the order information, and maybe contact your customer, and decide yourself what to do with the order.
- Verified status : Here, you can select the status to set to an order if the plugin receives a successful completion notification from CardSave for an order.
Restrictions
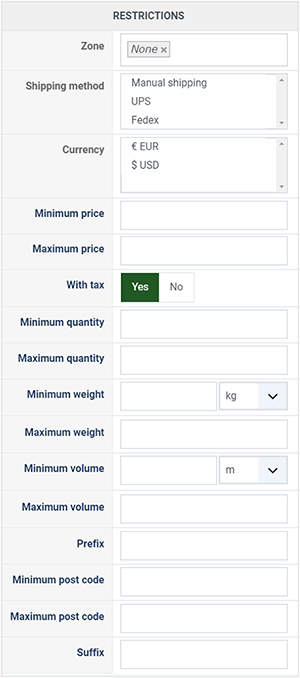
- Zone : You can restrict the check payment method to a zone. By clicking on the edit icon, a popup will open enabling you to select a zone. You can also remove this limitation by clicking on the delete icon.
- Shipping method : With this option you can select the shipping method for which this payment method will be available. For example, if you choose UPS, this payment method will only be usable if UPS is selected as shipping method. If an other shipping method is selected, this payment method will not be displayed. Note: if you selected "None" or don't select any shipping method, this payment method will always be available.
- Currency: Choose the currencies allowed by this payment method.
- Minimum price : The payment method can be available for only orders above a minimum price. This price uses the payment method price currency even if the price is 0.
- Maximum price : The payment method can be available for only orders below a maximum price. This price uses the payment method price currency even if the price is 0.
- With tax : Display the payment method only for products with tax.
- Minimum quantity : If the order has a price lower than the price set in this field, so this payment method will not be available.
- Maximum quantity : If the order has a price upper than the price set in this field, so this payment method will not be available.
- Minimum weight : You can set a minimum weight so that orders below it won't be able to be paid with the current payment method. The weight of the order will be calculated based on the weight of each products in it.
- Maximum weight : You can set a maximum weight so that orders over it won't be able to be paid with the current payment method. The weight of the order will be calculated based on the weight of each products in it.
- Minimum volume : You can set a minimum volume so that orders below it won't be able to be paid with the current payment method. The volume of the order will be calculated based on the volume of each products in it. The volume is calculated with the width, height and length of the products.
- Maximum volume : If the order has a volume upper than the price set in this field, so this payment method will not be available.
- Prefix : You can restrict your payment methods to only post codes including such prefix with this option.
- Minimum post code : You can restrict your payment methods to only post codes within a certain range whereby this is the minimum possible value
- Maximum post code : You can restrict your payment methods to only post codes within a certain range whereby this is the maximum possible value
- Suffix : You can restrict your payment methods to only post codes including such suffix with this option.
Access level
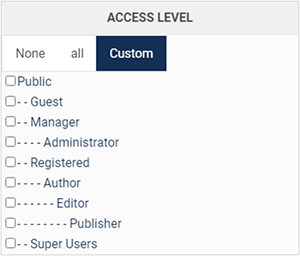
The ACLs are available in the business edition of HikaShop.
- None : When "none" is selected, the payment method will never be displayed.
- All : "All" allow you to display the payment method for all the type of users. All groups are allowed to pay via this payment method.
- Custom : Here you can select which groups can use this payment method. All the checked groups will be able to use this method.
Note about Access level :
-
Access level : With the business edition of HikaShop, you will be able to limit a coupon or a discount to specific users.
-
Access level : With the business edition of HikaShop, you will be able to limit a coupon or a discount to joomla groups of users.
FAQ
I don't see any payment methods during the checkout, or I don't see some of them, what is the problem ?
There are several things which you could have missed.
- 1/ Check that the payments plugins are installed and published
- 2/ Check that you have configured your payment plugins (edit it and save its configuration)
- 3/ Check that your template is able to display error messages: hikashop.com/documentation
- 4/ Check that you have the payment view in the checkout workflow option of the configuration
- 5/ If you restricted your payment methods to zones, check that the address you're using is inside those zones ! Otherwise the payment methods will be filtered out.
- 6/ Check that the currency you're using is supported by the payment plugins you're using. Some payment plugins only supports a limited number of currencies. You should check that with the support of the payment gateways you're using.
- 7/ Please make sure that you didn't change the currency code of your currency. Otherwise, the payment plugins won't recognize your currency. If you want to change the display of your currency, we invite you to use the "format" option on the right of the currency options screen as well as the symbol field.
- 8/ When you select a currency or a shipping method in the options of the payment method, the payment method won't display unless that currency or shipping method is selected during the checkout. In most cases, these parameters shouldn't be selected so make sure they are unselected. To unselect them, you need to press the ctrl key and click on the selected currencies or shipping methods. Also remember if you selected one or several shipping methods here, when you add a new shipping method later on, you will want to go in the payment plugins options and select that new shipping method or it won't display any payment method for that new shipping method.
- 9/ Please check that you didn't set the access option of the plugin (via the plugins manager of Joomla) to something else than public.
- 10/ It can happen that the plugin's access is not set properly in the database. Please go in the Joomla plugins manager and edit the plugin and save it. That will sett the access if not present and might help solve your problem.
- Details
- Written by: Eliot
- Category: Payment plugins
- Hits: 31874
| {img} |
Description
This screen enables you to edit the payment method options. Payment methods will be filtered on checkout based on the zone you set for them, if any. Then, they will be displayed to the user for him to choose which payment method he prefers for his order.
Note that the payment method can probably support only a limited number of currencies.
Toolbar
- Save & Close : Save the payment method options and return to the payment methods Management screen.
- Save : Apply the modifications to the payment method and stay on the same screen.
- Cancel : Return to the previous screen without saving the modifications.
- Help : This button enables you to turn ON/OFF the help section, this screen will appear or disappear.
Main Information
If you use one of our commercial versions, you will be able to enter the name and description in different languages. This feature requires to have joomfish installed and can be activated in the configuration page, in the display tab. The languages available will be the ones in joomfish. If you don't enter something for a translation, it will just use the default information in the Main information tab instead. After you click on save or apply an additional publish icon will appear next to the fields where you entered something in the languages tabs so that you can easily enable or disable them.
Generic information
- Published : This option allows you to publish or not the payment method.
- Images : Select here the desired images to be displayed for this payment method. If you want to add additional images, you can upload them via FTP into the folder media/com_hikashop/images/payment/ of your website and you will then be able to select them in that option.
- Price : You can set the payment fee in this field, and select the currency of the fee.
- Percentage : The percentage allows you to define a payment fee depending on the total amount of the products in the cart.
-
Tax category : Select among your tax category, the category you want apply on your payment method cost.
Additional Information
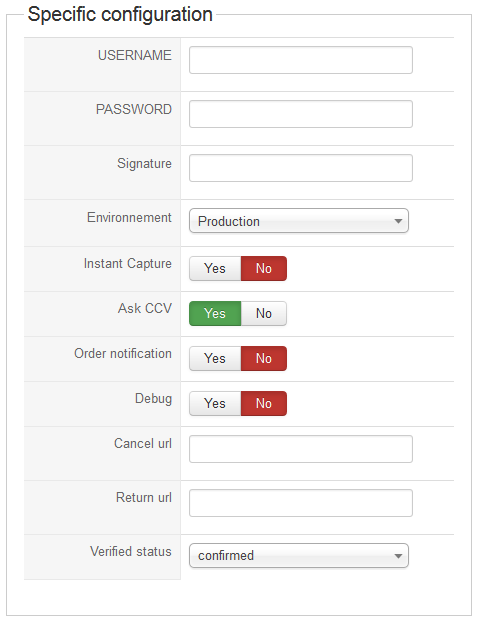
- Username : Your PayPal Pro Username.
- Password : The password of your PayPal Pro account.
- Signature : You have to write here the signature code which is given by Paypal Pro (You probably have received an e-mail with this signature).
- Environment : You can choose here the the environment to use. Sandbox is used for testing the Paypal Pro payment method, so that you can check if your parameters are right and see if data are transmitted. This environment is used during the test phase and transactions will appear in your Paypal pro account but will not be credited, once your method is rightly configured, you can switch to the production mode. In this mode, payment will be truly executed.
- Instant capture : You can choose here to validate the transaction automatically when the payment is done. If this option is not selected, you will have to validate manually every payment on your website.
- Ask CCV : Choose here if the CVV have to be ask to customers during the transaction (CCV are the 3 digits you can find at the back of a credit card).
- Debug : You can activate the debug mode of the PayPal Pro payment plugin. If you do so, informations about each transaction made with PayPal Pro will be logged in the payment log file. You can see and modify the location of this file in the configuration page of HikaShop.
- Cancel url : The url you want your users to be redirected to when they cancel the order from the PayPal Pro interface. By default, they will be redirected to the first step of the checkout process.
- Return url : The url you want your users to be redirected to when they finish their payment on the PayPal Pro interface. By default, they will be redirected to the after_end page of the checkout process which will thank them for their order.
- Verified status : Here, you can select the status to set to an order if the plugin receives a successful completion notification from PayPal Pro for an order.
Restrictions
- Zone : You can restrict the check payment method to a zone. By clicking on the edit icon, a popup will open enabling you to select a zone. You can also remove this limitation by clicking on the delete icon.
- Shipping method : With this option you can select the shipping method for which this payment method will be available. For example, if you choose UPS, this payment method will only be usable if UPS is selected as shipping method. If an other shipping method is selected, this payment method will not be displayed. Note: if you selected "None" or don't select any shipping method, this payment method will always be available.
- Currency: Choose the currencies allowed by this payment method.
- Minimum price : The payment method can be available for only orders above a minimum price. This price uses the payment method price currency even if the price is 0.
- Maximum price : The payment method can be available for only orders below a maximum price. This price uses the payment method price currency even if the price is 0.
- With tax : Display the payment method only for products with tax.
- Minimum quantity : If the order has a price lower than the price set in this field, so this payment method will not be available.
- Maximum quantity : If the order has a price upper than the price set in this field, so this payment method will not be available.
- Minimum weight : You can set a minimum weight so that orders below it won't be able to be paid with the current payment method. The weight of the order will be calculated based on the weight of each products in it.
- Maximum weight : You can set a maximum weight so that orders over it won't be able to be paid with the current payment method. The weight of the order will be calculated based on the weight of each products in it.
- Minimum volume : You can set a minimum volume so that orders below it won't be able to be paid with the current payment method. The volume of the order will be calculated based on the volume of each products in it. The volume is calculated with the width, height and length of the products.
- Maximum volume : If the order has a volume upper than the price set in this field, so this payment method will not be available.
- Prefix : You can restrict your payment methods to only post codes including such prefix with this option.
- Minimum post code : You can restrict your payment methods to only post codes within a certain range whereby this is the minimum possible value
- Maximum post code : You can restrict your payment methods to only post codes within a certain range whereby this is the maximum possible value
- Suffix : You can restrict your payment methods to only post codes including such suffix with this option.
Access level
The ACLs are available in the business edition of HikaShop.
- None : When "none" is selected, the payment method will never be displayed.
- All : "All" allow you to display the payment method for all the type of users. All groups are allowed to pay via this payment method.
- Custom : Here you can select which groups can use this payment method. All the checked groups will be able to use this method.
Note about Access level :
-
Access level : With the business edition of HikaShop, you will be able to limit a coupon or a discount to specific users.
-
Access level : With the business edition of HikaShop, you will be able to limit a coupon or a discount to joomla groups of users.
FAQ
I don't see any payment methods during the checkout, or I don't see some of them, what is the problem ?
There are several things which you could have missed.
- 1/ Check that the payments plugins are installed and published
- 2/ Check that you have configured your payment plugins (edit it and save its configuration)
- 3/ Check that your template is able to display error messages: hikashop.com/documentation
- 4/ Check that you have the payment view in the checkout workflow option of the configuration
- 5/ If you restricted your payment methods to zones, check that the address you're using is inside those zones ! Otherwise the payment methods will be filtered out.
- 6/ Check that the currency you're using is supported by the payment plugins you're using. Some payment plugins only supports a limited number of currencies. You should check that with the support of the payment gateways you're using.
- 7/ Please make sure that you didn't change the currency code of your currency. Otherwise, the payment plugins won't recognize your currency. If you want to change the display of your currency, we invite you to use the "format" option on the right of the currency options screen as well as the symbol field.
- 8/ When you select a currency or a shipping method in the options of the payment method, the payment method won't display unless that currency or shipping method is selected during the checkout. In most cases, these parameters shouldn't be selected so make sure they are unselected. To unselect them, you need to press the ctrl key and click on the selected currencies or shipping methods. Also remember if you selected one or several shipping methods here, when you add a new shipping method later on, you will want to go in the payment plugins options and select that new shipping method or it won't display any payment method for that new shipping method.
- 9/ Please check that you didn't set the access option of the plugin (via the plugins manager of Joomla) to something else than public.
- 10/ It can happen that the plugin's access is not set properly in the database. Please go in the Joomla plugins manager and edit the plugin and save it. That will sett the access if not present and might help solve your problem.
- Details
- Written by: Administrator
- Category: Payment plugins
- Hits: 23751
| {img} |
Description
This screen enables you to edit the payment method options. Payment methods will be filtered on checkout based on the zone you set for them, if any. Then, they will be displayed to the user for him to choose which payment method he prefers for his order.
Note that the payment method can probably support only a limited number of currencies.
Toolbar
- Save & Close : Save the payment method options and return to the payment methods Management screen.
- Save : Apply the modifications to the payment method and stay on the same screen.
- Cancel : Return to the previous screen without saving the modifications.
- Help : This button enables you to turn ON/OFF the help section, this screen will appear or disappear.
Main Information
If you use one of our commercial versions, you will be able to enter the name and description in different languages. This feature requires to have joomfish installed and can be activated in the configuration page, in the display tab. The languages available will be the ones in joomfish. If you don't enter something for a translation, it will just use the default information in the Main information tab instead. After you click on save or apply an additional publish icon will appear next to the fields where you entered something in the languages tabs so that you can easily enable or disable them.
Generic information
- Published : This option allows you to publish or not the payment method.
- Images : Select here the desired images to be displayed for this payment method. If you want to add additional images, you can upload them via FTP into the folder media/com_hikashop/images/payment/ of your website and you will then be able to select them in that option.
- Price : You can set the payment fee in this field, and select the currency of the fee.
- Percentage : The percentage allows you to define a payment fee depending on the total amount of the products in the cart.
-
Tax category : Select among your tax category, the category you want apply on your payment method cost.
Install the plugin
The SagePay payment plugin was included in HikaShop packages but has been removed since HikaShop 3.0
Because SagePay has never paid and never honored their contract with HikaShop, the plugin is now sold on our website.
If you were using that plugin prior HikaShop 3.0, please contact the support team for more details and provide your website URL.
Create your account
You can use that form to create your SagePay account.
With your SagePay account, you will have your credentials (vendor name and password) and you will be able to configure this payment plugin.
Additional Information
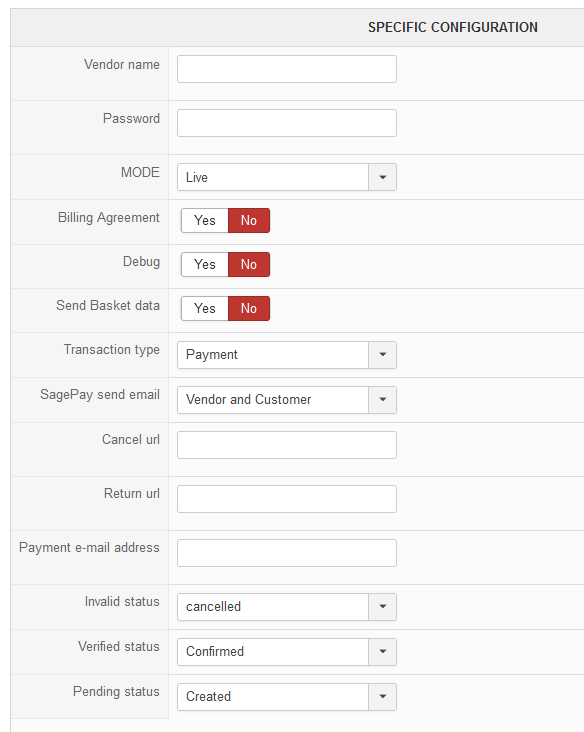
- Vendor name: Your SagePay vendor name.
- Password : The password that was sent to you by SagePay when you registered.
- Mode: You can choose here the the environment to use. Simulation is used for testing the SagePay payment method with a simulator account, so that you can check if your parameters are right and see if data are transmitted. This environment is used during the test phase and transactions will not be credited, once your method is rightly configured, you can switch to the Production/Live mode with your real account and if you have a problem, you can try the Testing/Debug mode. If you want to create a simulator account, you can use the link : https://support.sagepay.com/apply/requestsimaccount.aspx
- Debug : You can activate the debug mode of the SagePay payment plugin. If you do so, informations about each transaction made with SagePay will be logged in the payment log file. You can see and modify the location of this file in the configuration page of HikaShop.
- Cancel url : The url you want your users to be redirected to when they cancel the order from the SagePay interface. By default, they will be redirected to the first step of the checkout process.
- Return url : The url you want your users to be redirected to when they finish their payment on the SagePay interface. By default, they will be redirected to the after_end page of the checkout process which will thank them for their order.
- Invalid status : Here, you can select the status to set to an order if the plugin receives an invalid notification from SagePay for an order.
- Verified status : Here, you can select the status to set to an order if the plugin receives a successful completion notification from SagePay for an order.
Merchant acquirers
- Barclaycard Payment Acceptance
- Elavon
- Lloyds TSB Cardnet
- HSBC
- WorldPay
- FirstData
- CHASE paymentech
- JCB
- AIB
- AMERICAN EXPRESS
- Diners Club International - Elavon
Restrictions
- Zone : You can restrict the check payment method to a zone. By clicking on the edit icon, a popup will open enabling you to select a zone. You can also remove this limitation by clicking on the delete icon.
- Shipping method : With this option you can select the shipping method for which this payment method will be available. For example, if you choose UPS, this payment method will only be usable if UPS is selected as shipping method. If an other shipping method is selected, this payment method will not be displayed. Note: if you selected "None" or don't select any shipping method, this payment method will always be available.
- Currency: Choose the currencies allowed by this payment method.
- Minimum price : The payment method can be available for only orders above a minimum price. This price uses the payment method price currency even if the price is 0.
- Maximum price : The payment method can be available for only orders below a maximum price. This price uses the payment method price currency even if the price is 0.
- With tax : Display the payment method only for products with tax.
- Minimum quantity : If the order has a price lower than the price set in this field, so this payment method will not be available.
- Maximum quantity : If the order has a price upper than the price set in this field, so this payment method will not be available.
- Minimum weight : You can set a minimum weight so that orders below it won't be able to be paid with the current payment method. The weight of the order will be calculated based on the weight of each products in it.
- Maximum weight : You can set a maximum weight so that orders over it won't be able to be paid with the current payment method. The weight of the order will be calculated based on the weight of each products in it.
- Minimum volume : You can set a minimum volume so that orders below it won't be able to be paid with the current payment method. The volume of the order will be calculated based on the volume of each products in it. The volume is calculated with the width, height and length of the products.
- Maximum volume : If the order has a volume upper than the price set in this field, so this payment method will not be available.
- Prefix : You can restrict your payment methods to only post codes including such prefix with this option.
- Minimum post code : You can restrict your payment methods to only post codes within a certain range whereby this is the minimum possible value
- Maximum post code : You can restrict your payment methods to only post codes within a certain range whereby this is the maximum possible value
- Suffix : You can restrict your payment methods to only post codes including such suffix with this option.
Access level
The ACLs are available in the business edition of HikaShop.
- None : When "none" is selected, the payment method will never be displayed.
- All : "All" allow you to display the payment method for all the type of users. All groups are allowed to pay via this payment method.
- Custom : Here you can select which groups can use this payment method. All the checked groups will be able to use this method.
Note about Access level :
-
Access level : With the business edition of HikaShop, you will be able to limit a coupon or a discount to specific users.
-
Access level : With the business edition of HikaShop, you will be able to limit a coupon or a discount to joomla groups of users.
FAQ
I don't see any payment methods during the checkout, or I don't see some of them, what is the problem ?
There are several things which you could have missed.
- 1/ Check that the payments plugins are installed and published
- 2/ Check that you have configured your payment plugins (edit it and save its configuration)
- 3/ Check that your template is able to display error messages: hikashop.com/documentation
- 4/ Check that you have the payment view in the checkout workflow option of the configuration
- 5/ If you restricted your payment methods to zones, check that the address you're using is inside those zones ! Otherwise the payment methods will be filtered out.
- 6/ Check that the currency you're using is supported by the payment plugins you're using. Some payment plugins only supports a limited number of currencies. You should check that with the support of the payment gateways you're using.
- 7/ Please make sure that you didn't change the currency code of your currency. Otherwise, the payment plugins won't recognize your currency. If you want to change the display of your currency, we invite you to use the "format" option on the right of the currency options screen as well as the symbol field.
- 8/ When you select a currency or a shipping method in the options of the payment method, the payment method won't display unless that currency or shipping method is selected during the checkout. In most cases, these parameters shouldn't be selected so make sure they are unselected. To unselect them, you need to press the ctrl key and click on the selected currencies or shipping methods. Also remember if you selected one or several shipping methods here, when you add a new shipping method later on, you will want to go in the payment plugins options and select that new shipping method or it won't display any payment method for that new shipping method.
- 9/ Please check that you didn't set the access option of the plugin (via the plugins manager of Joomla) to something else than public.
- 10/ It can happen that the plugin's access is not set properly in the database. Please go in the Joomla plugins manager and edit the plugin and save it. That will sett the access if not present and might help solve your problem.
- Details
- Written by: Administrator
- Category: Payment plugins
- Hits: 24247
| {img} |
Description
This screen enables you to edit the payment method options. Payment methods will be filtered on checkout based on the zone you set for them, if any. Then, they will be displayed to the user for him to choose which payment method he prefers for his order.
Note that the payment method can probably support only a limited number of currencies.
Toolbar
- Save & Close : Save the payment method options and return to the payment methods Management screen.
- Save : Apply the modifications to the payment method and stay on the same screen.
- Cancel : Return to the previous screen without saving the modifications.
- Help : This button enables you to turn ON/OFF the help section, this screen will appear or disappear.
Main Information
If you use one of our commercial versions, you will be able to enter the name and description in different languages. This feature requires to have joomfish installed and can be activated in the configuration page, in the display tab. The languages available will be the ones in joomfish. If you don't enter something for a translation, it will just use the default information in the Main information tab instead. After you click on save or apply an additional publish icon will appear next to the fields where you entered something in the languages tabs so that you can easily enable or disable them.
Generic information
- Published : This option allows you to publish or not the payment method.
- Images : Select here the desired images to be displayed for this payment method. If you want to add additional images, you can upload them via FTP into the folder media/com_hikashop/images/payment/ of your website and you will then be able to select them in that option.
- Price : You can set the payment fee in this field, and select the currency of the fee.
- Percentage : The percentage allows you to define a payment fee depending on the total amount of the products in the cart.
-
Tax category : Select among your tax category, the category you want apply on your payment method cost.
Additional Information
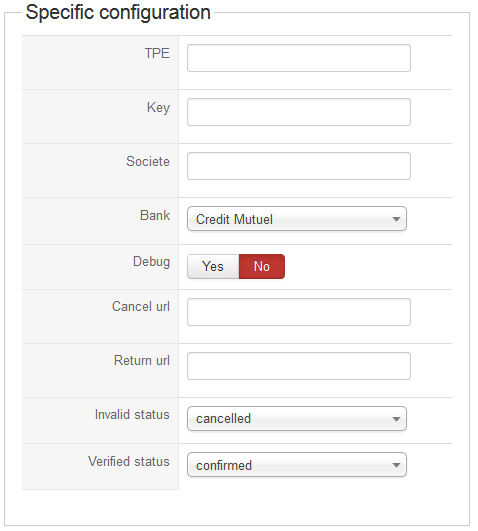
- TPE : L'identifiant TPE associé à votre boutique.
- Key : La clé secrète permettant de signer les communications avec leur plateforme.
- Societe : le code société.
- Locale : la langue à utiliser pour l'interface de paiement.
- Challenge 3DSecure : avec cette option, vous pouvez forcer ou désactiver le 3DSecure ou laisser Monetico décider de l'opportunité d'utiliser le 3DSecure pour garantir la transaction.
- Debug : Si vous activez cette option, des données de débug seront rajoutées dans le log de paiement accessible dans la configuration HikaShop.
- Sandbox : Si vous activez cette option, les transactions seront virtuelles, sur le système de test de Monetico. Lorsque cette option est désactivée les transactions réalisées seront réelles.
- URL d'annulation : à laisser vide sauf si vous voudriez rediriger l'utilisateur sur une page spécifique lors de l'annulation du paiement par l'utilisateur. Cela vous permet de créer un article joomla pour une faq par exemple. Avec le champs vide, HikaShop utilisera son comportement par défaut.
- URL de retour : à laisser vide sauf si vous voudriez rediriger l'utilisateur sur une page spécifique lors du retour depuis le site de paiement. Cela vous permet de créer un article joomla pour remercier l'utilisateur
- Statut vérifié : Le statut à attribuer à la commande lors de la réception du paiement.
- Statut invalide : Le statut à attribuer à la commande lors d'un soucis avec le paiement.
L'activation du mode "sandbox" permet d'utiliser leur plateforme de test (donc très important).
Ainsi, pour passer en production, une fois que votre compte à été correctement modifié par le Crédit Mutuel (ou CIC), vous n'avez qu'à enlever le mode "sandbox" pour passer en production (appelé aussi "mode réel" par les banques).
Le passage en production peut être un peu complexe administrativement parlant. Nous avons eu des soucis lors de nos tests pour bien faire comprendre que nous voulions passer en production pour faire de vrai paiements donc veillez à bien insister.
Au niveau de la configuration côté Monetico, vous devez leur fournir "l'url de retour".
Il s'agit d'une page web qui sera appelée par leur plateforme de paiement pour valider les transactions de manière sécurisé, de serveur à serveur.
L'url à leur fournir est de la forme :
- Details
- Written by: Eliot
- Category: Payment plugins
- Hits: 37220
| {img} |
Description
This screen enables you to edit the payment method options. Payment methods will be filtered on checkout based on the zone you set for them, if any. Then, they will be displayed to the user for him to choose which payment method he prefers for his order.
Note that the payment method can probably support only a limited number of currencies.
Toolbar
- Save & Close : Save the payment method options and return to the payment methods Management screen.
- Save : Apply the modifications to the payment method and stay on the same screen.
- Cancel : Return to the previous screen without saving the modifications.
- Help : This button enables you to turn ON/OFF the help section, this screen will appear or disappear.
Main Information
If you use one of our commercial versions, you will be able to enter the name and description in different languages. This feature requires to have joomfish installed and can be activated in the configuration page, in the display tab. The languages available will be the ones in joomfish. If you don't enter something for a translation, it will just use the default information in the Main information tab instead. After you click on save or apply an additional publish icon will appear next to the fields where you entered something in the languages tabs so that you can easily enable or disable them.
Generic information
- Published : This option allows you to publish or not the payment method.
- Images : Select here the desired images to be displayed for this payment method. If you want to add additional images, you can upload them via FTP into the folder media/com_hikashop/images/payment/ of your website and you will then be able to select them in that option.
- Price : You can set the payment fee in this field, and select the currency of the fee.
- Percentage : The percentage allows you to define a payment fee depending on the total amount of the products in the cart.
-
Tax category : Select among your tax category, the category you want apply on your payment method cost.
Additional Information
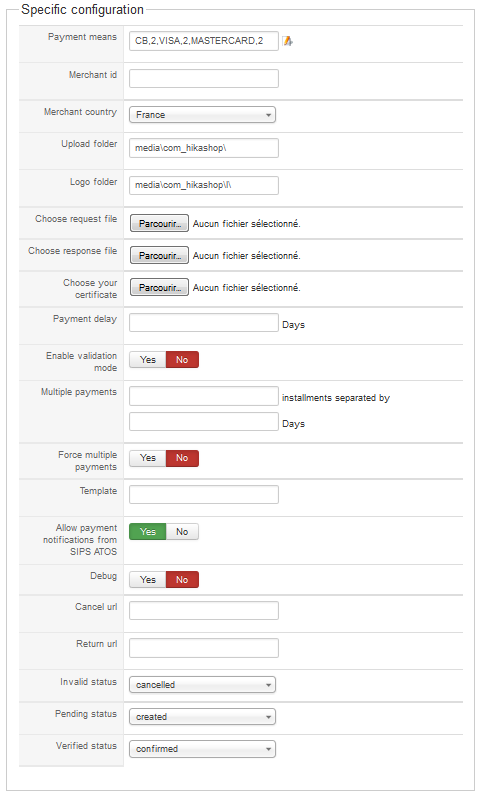
- In this part, we will see the primordial options of the ATOS SIPS payment method. To make your life easier, you will not have to upload the pathfile and paramcom files. The only things you will need are the request and response binaries for the Operating System of your server, and your merchant certificate:
- Payment means : You can select here the different cards you want to be usable with your ATOS SIPS merchant account. If a card is not checkable, it's because the logo of this card has not been found. ATOS displays these logos as a unique way for customers to choose the type of the card they want to use. So what you have to do is to copy the logo of the card you want to make usable into the logos folder. Note: the logos have to be named with the card's name and have to be a .GIF (for example if you want to active the COFINOGA_MONOPRIX card, you have to copy the logo of this card with the name COFINOGA_MONOPRIX.GIF). Once the logo is present into the folder, the card type will be checkable.
- Merchant id : Just put your merchant id in this field. This id should have a 15 characters length and is given by your bank.
- Merchant country : Choose your country into the list.
- In this part, you will upload your binary and parameters files into specifics folders. Note: these options are displayed only when the safe mode of php is not activated.
- Upload folder : You have to specify here the path to the folder where the parameters files will be uploaded and generated by HikaShop. Note: You can write a relative or an absolute path but this path has to be shorter than 78 characters !
- Logo folder : Put here the path to the folder where cards' logos will be copied. Note: You can write a relative or an absolute path but this path has to be shorter than 78 characters and has to be inside your website folder !
- Request file : Select the request binary file given to you by your bank. (it could be "request" or "request.exe" based on whether you're on windows or linux). Once the file has been uploaded, its path will be displayed above the input field.
- Response file : Select the response file given by your bank. (it could be " response" or " response.exe" based on whether you're on windows or linux). Once the file has been uploaded, its path will be displayed above the input field.
- Certificate : Select the certificate file given by your bank. Once the file has been uploaded, its path will be displayed above the input field.
- If you want to know more about these files, you can look at the step by step configuration.
- You will here set the different options which are proposed by your bank:
- Payment delay : You can choose here to delay of capture of the payments of your clients by a certain number of days. For example if you set this parameter to 6, the transaction will be effective 6 days after the checkout.
- Enable validation mode : This mode allows you to validate or not a payment. When this mode is enabled, the order takes the pending status and you have to manually validate the payment from your bank interface.
- Multiple payments : You can choose here to allow multiple payments for your customers. Just set a number of installments (3 maximum) and the number of days between this installments. When this option is activated and if you don't force the multiple payment (see next), an option will be display during the checkout. If you don't want to use this option, just leave the fields blank.
- Force multiple payments : Select yes if you want your customers to force your customers to pay with the multiple payment option. If this option is activated, the above option will not be displayed during the checkout.
- Template : You can set here the name of the template you want to use on the credit card input interface of SIPS. If this field is blank, no template will be use. As an example, to use the default template of e-transaction solution (Crédit Agricole) you have to write "template_ca_fr". Templates can be created on your end and then forwarded to your bank so that you can use them. There is a complete tutorial (in French) on creating SIPS templates on that page: http://thierry-godin.developpez.com/php/atos/#LIII
- Allow payment notifications from SIPS ATOS : If this option is enable, the automatic response of your bank server will be treated to update the order status. For example, if the payment has been refused, the order status will be the specified invalid status. But if the payment has been completed correctly, the order status will be the specified verified status.
- Debug : You can here enable the debug option of the API. Don't enable this one if you don't have to look into the API's configuration
- Cancel url : Set here the url where customers will be send after having abandoned the transaction.
- Return url : Set here the url where customers will be send after having completed the transaction.
- Invalid status : Here, you can select the status to set to an order if the plugin receives a notification from ATOS SIPS for an invalid transaction. In this case, you will receive an email with an error message and his code. Contact your bank for more information about this problems.
- Pending status : Here, you can select the status to set to an order if the plugin receives a pending notification from ATOS SIPS for an order. A pending notification means that the customer entered his payment information but that ATOS SIPS could not yet receive the funds. In that case, we highly recommend you to check your ATOS SIPS account, the order information, and maybe contact your customer, and decide yourself what to do with the order.
- Verified status : Here, you can select the status to set to an order if the plugin receives a successful completion notification from ATOS SIPS for an order.
Step by step configuration

- In order to use the ATOS SIPS payment method, you have to possess some informations that your bank should have given to you. As we said above, if the php safe mode option is not activated, you will just need 3 files and your merchant id.
- The first thing you have to do is to enter you merchant id and choose your country. Note: if your certificate file is named like this: certif.[merchant_country].[merchant_id], this information will be automatically filled by the plugin when you upload the certificate file so you can skip this step.
- Next, you have to upload some files by using the file chooser. The two first files are the binaries named request and response (or request.exe and response.exe on windows), these files are used by ATOS and have to be in an executable folder. If your safe mode isn't active, a new folder named "b" (for binaries) will be created into the specified upload folder. The other file you will need is your merchant certificate. This certificate should be named certif.[merchant_country].[merchant_id] but it could have an other name. This certificate will be uploaded in the same folder as the binaries in order to protect it (a .htaccess is automatically generated into this folder). When this files are uploaded, the parameters files (pathfile, parmcom.[service] and parmcom.[merchant_id]) will be automatically completed and generated by the plugin.
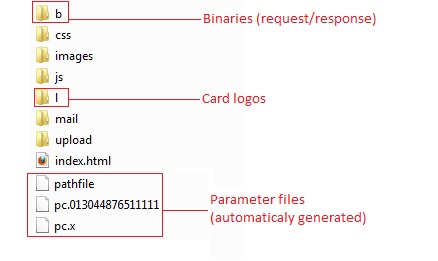
Inside the /media/com_hikashop folder
- Once your plugin is configured properly, you will probably want to try it. Before switching to the production phase, you should be able to make test payments with ATOS SIPS. The capture will not be done and you should see a confirmation ticket proving you that everything works ok and if the payment is accepted, your order will take the specified verified status automatically (you need to have your website online for that as ATOS needs to notify it of the payment). Note: During this phase, the transaction will not be displayed on your bank account.

After the checkout, customers have to choose a card
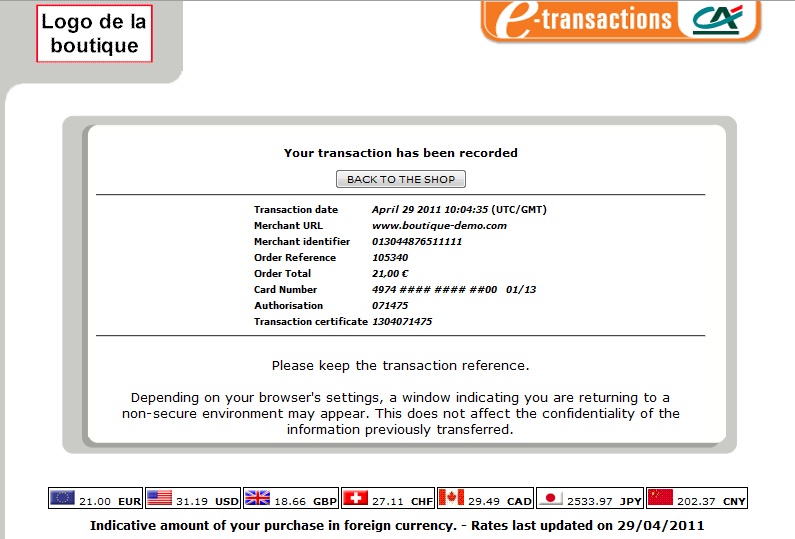
If the payment is valid, you should see this ticket. If you get it, the plugin is configured properly!
Php safe mode

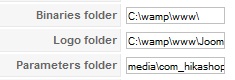
- If the php safe mode is active, the ATOS SIPS plugin will not be able to create the parameter files (pathfile, parcom.[service] and parmcom.[merchant_id]). But in order to help you as much as possible, a certain number of messages will be displayed in order to guide you.
- You will have first have to specify some folders.
- Binaries folder : Here you have to specify the path to the folder where you will upload yourself your request and response binary files and your merchant certificate. This path will be use by the ATOS SIPS plugin later for the payment transaction. Note: This folder have to be authorized to run binaries, and usually, the cgi-bin folder is recommended. You also need to check the files permissions which should allow their execution.
- Logo folder : As said previously, card logos are very important to make this payment method usable. So you have to put here the path to the folder where you have uploaded these logos. If the folder is empty, a message will be displayed.
- parameters folder : Specify here the folder where you have uploaded your parameters files: parcom.[service] (for example parmcom.e-transaction), pathfile and parmcom.[merchant_id] (for example parmcom.013044876511111). This path will be used to check if the informations you wrote in your pathfile are the same as in the ATOS SIPS plugin. Note: Do not upload the pathfile if you didn't configured it properly before! See the next point to learn how to configure this file.

- In safe mode, you will probably have a lot of error messages. Don't be affraid, these messages are here to help you configure your ATOS SIPS plugin. The main problem here is that you have to manually upload (via FTP for example) and configure all the files given to you by your bank.
- Once your files have been uploaded into the specified folder (exepted the pathfile), you have to edit the pathfile(for example with notepad). Four lines are important in this file:
- DEBUG : Just set it to yes if you want to enable the debug mode.
- D_LOGO : Here you have to put the path to the logo folder. Note: This path have to be form the website folder. For example if your logo folder is like that "www.website.com/images/logos", you have to write "/images/logo"
- F_DEFAULT : Write here the absolute path to the parmcom.[service] file. The absolute path is from the root folder of your server (for example: /var/www/website/media/com_hikashop/parmcom.e-transaction )
- F_PARAM : Write here the absolute path to the parmcom.[merchant_id]. Note: Do not write the full name of this file, just write '"parmcom". For example: /var/www/website/media/com_hikashop/parmcom .
- F_CERTIFICATE : Write here the absolute path to the certificate file without the merchant coutry and id. For example: /var/www/website/media/com_hikashop/certif
- IMPORTANT: All this parameters have to be separated by "!". Here is an example of what you pathfile should look like:
DEBUG!NO!
D_LOGO!/Joomla_1_5/media/com_hikashop/l/!
F_DEFAULT!/var/www/Joomla_1_5/media/com_hikashop/parmcom.e-transactions!
F_CERTIFICATE!/var/www/Joomla_1_5/media/com_hikashop/certif!
F_PARAM!/var/www/Joomla_1_5/media/com_hikashop/parmcom!
- Once the pathfile is well configured, you can upload it and try the ATOS SIPS plugin
Restrictions
- Zone : You can restrict the check payment method to a zone. By clicking on the edit icon, a popup will open enabling you to select a zone. You can also remove this limitation by clicking on the delete icon.
- Shipping method : With this option you can select the shipping method for which this payment method will be available. For example, if you choose UPS, this payment method will only be usable if UPS is selected as shipping method. If an other shipping method is selected, this payment method will not be displayed. Note: if you selected "None" or don't select any shipping method, this payment method will always be available.
- Currency: Choose the currencies allowed by this payment method.
- Minimum price : The payment method can be available for only orders above a minimum price. This price uses the payment method price currency even if the price is 0.
- Maximum price : The payment method can be available for only orders below a maximum price. This price uses the payment method price currency even if the price is 0.
- With tax : Display the payment method only for products with tax.
- Minimum quantity : If the order has a price lower than the price set in this field, so this payment method will not be available.
- Maximum quantity : If the order has a price upper than the price set in this field, so this payment method will not be available.
- Minimum weight : You can set a minimum weight so that orders below it won't be able to be paid with the current payment method. The weight of the order will be calculated based on the weight of each products in it.
- Maximum weight : You can set a maximum weight so that orders over it won't be able to be paid with the current payment method. The weight of the order will be calculated based on the weight of each products in it.
- Minimum volume : You can set a minimum volume so that orders below it won't be able to be paid with the current payment method. The volume of the order will be calculated based on the volume of each products in it. The volume is calculated with the width, height and length of the products.
- Maximum volume : If the order has a volume upper than the price set in this field, so this payment method will not be available.
- Prefix : You can restrict your payment methods to only post codes including such prefix with this option.
- Minimum post code : You can restrict your payment methods to only post codes within a certain range whereby this is the minimum possible value
- Maximum post code : You can restrict your payment methods to only post codes within a certain range whereby this is the maximum possible value
- Suffix : You can restrict your payment methods to only post codes including such suffix with this option.
Access level
The ACLs are available in the business edition of HikaShop.
- None : When "none" is selected, the payment method will never be displayed.
- All : "All" allow you to display the payment method for all the type of users. All groups are allowed to pay via this payment method.
- Custom : Here you can select which groups can use this payment method. All the checked groups will be able to use this method.
Note about Access level :
-
Access level : With the business edition of HikaShop, you will be able to limit a coupon or a discount to specific users.
-
Access level : With the business edition of HikaShop, you will be able to limit a coupon or a discount to joomla groups of users.
FAQ
I don't see any payment methods during the checkout, or I don't see some of them, what is the problem ?
There are several things which you could have missed.
- 1/ Check that the payments plugins are installed and published
- 2/ Check that you have configured your payment plugins (edit it and save its configuration)
- 3/ Check that your template is able to display error messages: hikashop.com/documentation
- 4/ Check that you have the payment view in the checkout workflow option of the configuration
- 5/ If you restricted your payment methods to zones, check that the address you're using is inside those zones ! Otherwise the payment methods will be filtered out.
- 6/ Check that the currency you're using is supported by the payment plugins you're using. Some payment plugins only supports a limited number of currencies. You should check that with the support of the payment gateways you're using.
- 7/ Please make sure that you didn't change the currency code of your currency. Otherwise, the payment plugins won't recognize your currency. If you want to change the display of your currency, we invite you to use the "format" option on the right of the currency options screen as well as the symbol field.
- 8/ When you select a currency or a shipping method in the options of the payment method, the payment method won't display unless that currency or shipping method is selected during the checkout. In most cases, these parameters shouldn't be selected so make sure they are unselected. To unselect them, you need to press the ctrl key and click on the selected currencies or shipping methods. Also remember if you selected one or several shipping methods here, when you add a new shipping method later on, you will want to go in the payment plugins options and select that new shipping method or it won't display any payment method for that new shipping method.
- 9/ Please check that you didn't set the access option of the plugin (via the plugins manager of Joomla) to something else than public.
- 10/ It can happen that the plugin's access is not set properly in the database. Please go in the Joomla plugins manager and edit the plugin and save it. That will sett the access if not present and might help solve your problem.