
- Details
- Written by: Lavocat
- Category: Payment plugins
- Hits: 12072
| {img} |
Description
This screen enables you to edit the payment method options. Payment methods will be filtered on checkout based on the zone you set for them, if any. Then, they will be displayed to the user for him to choose which payment method he prefers for his order.
Note that the payment method can probably support only a limited number of currencies.
Toolbar

- Save & Close : Save the payment method options and return to the payment methods Management screen.
- Save : Apply the modifications to the payment method and stay on the same screen.
- Cancel : Return to the previous screen without saving the modifications.
- Help : This button enables you to turn ON/OFF the help section, this screen will appear or disappear.
Main Information
If you use one of our commercial versions, you will be able to enter the name and description in different languages. This feature requires to have joomfish installed and can be activated in the configuration page, in the display tab. The languages available will be the ones in joomfish. If you don't enter something for a translation, it will just use the default information in the Main information tab instead. After you click on save or apply an additional publish icon will appear next to the fields where you entered something in the languages tabs so that you can easily enable or disable them.
Generic information
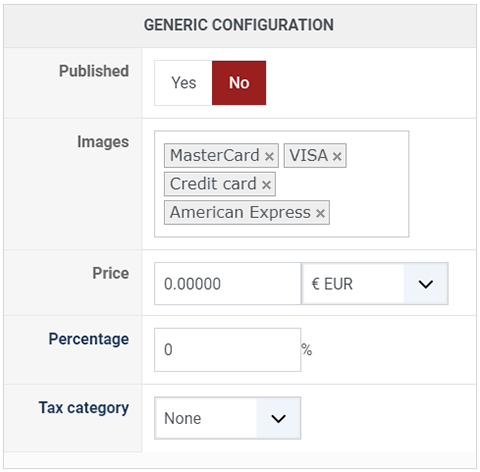
- Published : This option allows you to publish or not the payment method.
- Images : Select here the desired images to be displayed for this payment method. If you want to add additional images, you can upload them via FTP into the folder media/com_hikashop/images/payment/ of your website and you will then be able to select them in that option.
- Price : You can set the payment fee in this field, and select the currency of the fee.
- Percentage : The percentage allows you to define a payment fee depending on the total amount of the products in the cart.
-
Tax category : Select among your tax category, the category you want apply on your payment method cost.
Install the plugin
In order to get the Westpac Api payment method, you need to download the payment plugin here : Download Westpac Api Plugin
Additional Information
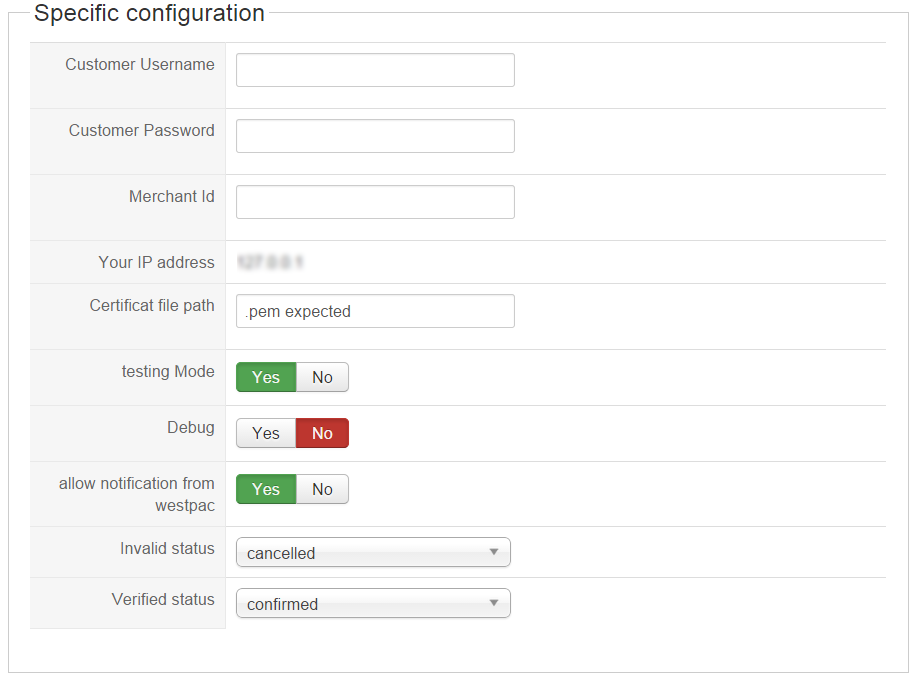
In this part, we will see the main options of the Westpac API payment method. The only things you will need are your Customer Username, Customer Password and, for the production phase, your Customer Merchant. Don't forget to download your personal certificate.
First, you must go on payway.com.au and create your account and get your merchant references on the Westpac/Payway security page.
Later, go back on your HikaShop Westpac API specific configuration plugin and fill in the required input fields.
NOTE In order to learn more about the security settings page click here: Security page.
- Customer Username : Just put your Customer Username in this field. This identifier is a code made of characters (number and letter).
- Customer Password : Like the Customer Username. You will find it on the payway account settings page.
- Customer Merchant : Just put your Customer Merchant in this field, especially for the production phase. (Not required in testing mode)
- Your IP address : Here, you can see your IP address, that will be useful to set your Westpac/Payway settings page. Payway will only accept payment requests originating from this IP Address
- Certificate file path : You must put the path to your personal certificate that you get on the payway settings page.
Security page :
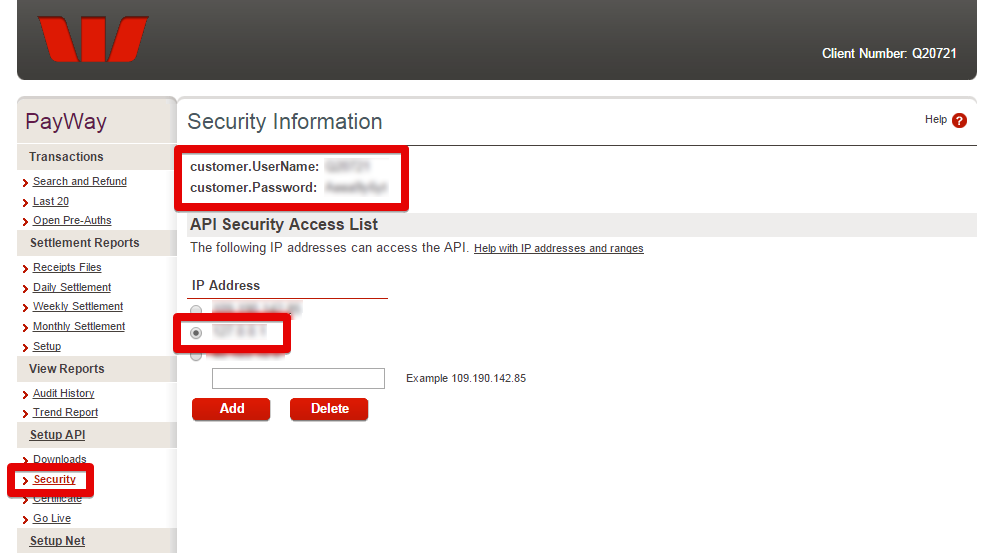
To go to the Westpac/Payway Security page, go on payway.com.au log in, and click on Setup Api, then Security. You will now see your Customer Username, your Customer Password, and the Customer Merchant (not visible on the picture)
The second step is to fill in and add your website IP address.
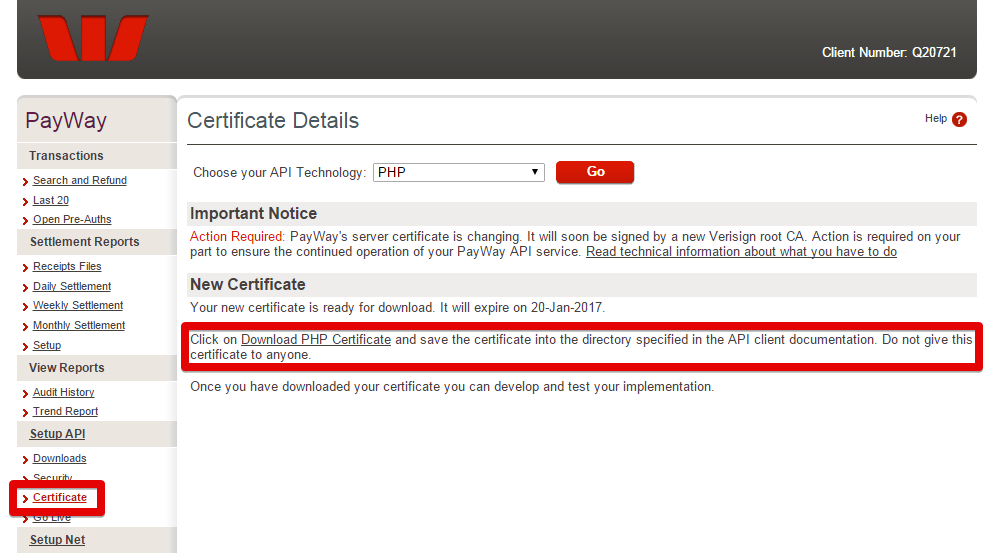
Certificate page :
In order to get your certificate, log in to your account on the payway.com.au website and click on Setup Api, then on Certificate, and download your PHP Certificate
Be sure, to put it on a secure folder on your website.
The different options:
- Debug : Here, you can enable the debug option of the API. Don't enable this one if you don't have to debug the API's configuration
- Allow notifications from Westpac Api : If this option is enable, the automatic response of Westpac Api server will be treated to update the order status. For example, if the payment has been completed correctly, the order status will be the specified verified status.
- Testing Mode : You can choose here to switch between the testing mode (in order to use the Westpac Api sandbox) and the production phase. Don't forget to fill in your Customer Merchant if you didn't.
- Invalid status : Here, you can select the status to an order if the plugin receives a invalid completion notification from Westpac Api for an order.
- Verified status : Same idea than "invalid".
Closer Look on the checkout
When customers will proceed to the checkout, he will have to log in, and Westpac Api will call the Hikashop Credit Card Form to collect the required credit card information.
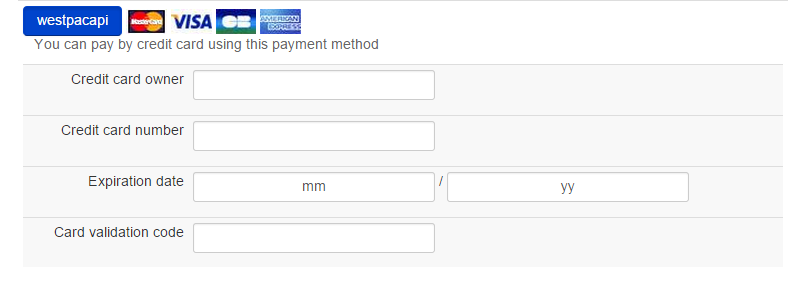
The customer will then see the transaction result from Westpac at the end of the checkout.
Restrictions
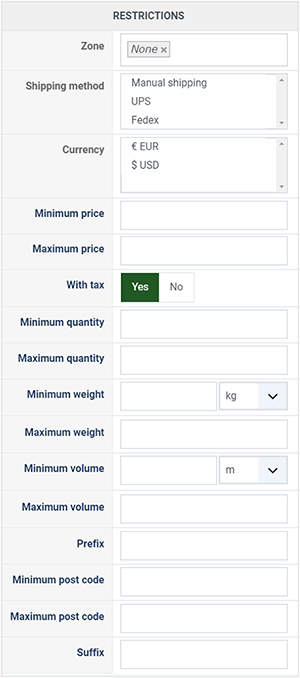
- Zone : You can restrict the check payment method to a zone. By clicking on the edit icon, a popup will open enabling you to select a zone. You can also remove this limitation by clicking on the delete icon.
- Shipping method : With this option you can select the shipping method for which this payment method will be available. For example, if you choose UPS, this payment method will only be usable if UPS is selected as shipping method. If an other shipping method is selected, this payment method will not be displayed. Note: if you selected "None" or don't select any shipping method, this payment method will always be available.
- Currency: Choose the currencies allowed by this payment method.
- Minimum price : The payment method can be available for only orders above a minimum price. This price uses the payment method price currency even if the price is 0.
- Maximum price : The payment method can be available for only orders below a maximum price. This price uses the payment method price currency even if the price is 0.
- With tax : Display the payment method only for products with tax.
- Minimum quantity : If the order has a price lower than the price set in this field, so this payment method will not be available.
- Maximum quantity : If the order has a price upper than the price set in this field, so this payment method will not be available.
- Minimum weight : You can set a minimum weight so that orders below it won't be able to be paid with the current payment method. The weight of the order will be calculated based on the weight of each products in it.
- Maximum weight : You can set a maximum weight so that orders over it won't be able to be paid with the current payment method. The weight of the order will be calculated based on the weight of each products in it.
- Minimum volume : You can set a minimum volume so that orders below it won't be able to be paid with the current payment method. The volume of the order will be calculated based on the volume of each products in it. The volume is calculated with the width, height and length of the products.
- Maximum volume : If the order has a volume upper than the price set in this field, so this payment method will not be available.
- Prefix : You can restrict your payment methods to only post codes including such prefix with this option.
- Minimum post code : You can restrict your payment methods to only post codes within a certain range whereby this is the minimum possible value
- Maximum post code : You can restrict your payment methods to only post codes within a certain range whereby this is the maximum possible value
- Suffix : You can restrict your payment methods to only post codes including such suffix with this option.
Access level
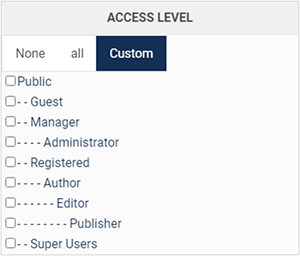
The ACLs are available in the business edition of HikaShop.
- None : When "none" is selected, the payment method will never be displayed.
- All : "All" allow you to display the payment method for all the type of users. All groups are allowed to pay via this payment method.
- Custom : Here you can select which groups can use this payment method. All the checked groups will be able to use this method.
Note about Access level :
-
Access level : With the business edition of HikaShop, you will be able to limit a coupon or a discount to specific users.
-
Access level : With the business edition of HikaShop, you will be able to limit a coupon or a discount to joomla groups of users.
FAQ
I don't see any payment methods during the checkout, or I don't see some of them, what is the problem ?
There are several things which you could have missed.
- 1/ Check that the payments plugins are installed and published
- 2/ Check that you have configured your payment plugins (edit it and save its configuration)
- 3/ Check that your template is able to display error messages: hikashop.com/documentation
- 4/ Check that you have the payment view in the checkout workflow option of the configuration
- 5/ If you restricted your payment methods to zones, check that the address you're using is inside those zones ! Otherwise the payment methods will be filtered out.
- 6/ Check that the currency you're using is supported by the payment plugins you're using. Some payment plugins only supports a limited number of currencies. You should check that with the support of the payment gateways you're using.
- 7/ Please make sure that you didn't change the currency code of your currency. Otherwise, the payment plugins won't recognize your currency. If you want to change the display of your currency, we invite you to use the "format" option on the right of the currency options screen as well as the symbol field.
- 8/ When you select a currency or a shipping method in the options of the payment method, the payment method won't display unless that currency or shipping method is selected during the checkout. In most cases, these parameters shouldn't be selected so make sure they are unselected. To unselect them, you need to press the ctrl key and click on the selected currencies or shipping methods. Also remember if you selected one or several shipping methods here, when you add a new shipping method later on, you will want to go in the payment plugins options and select that new shipping method or it won't display any payment method for that new shipping method.
- 9/ Please check that you didn't set the access option of the plugin (via the plugins manager of Joomla) to something else than public.
- 10/ It can happen that the plugin's access is not set properly in the database. Please go in the Joomla plugins manager and edit the plugin and save it. That will sett the access if not present and might help solve your problem.
- Details
- Written by: Lavocat
- Category: Payment plugins
- Hits: 4545
| {img} |
Description
This screen enables you to edit the payment method options. Payment methods will be filtered on checkout based on the zone you set for them, if any. Then, they will be displayed to the user for him to choose which payment method he prefers for his order.
Note that the payment method can probably support only a limited number of currencies.
Toolbar
- Save & Close : Save the payment method options and return to the payment methods Management screen.
- Save : Apply the modifications to the payment method and stay on the same screen.
- Cancel : Return to the previous screen without saving the modifications.
- Help : This button enables you to turn ON/OFF the help section, this screen will appear or disappear.
Main Information
If you use one of our commercial versions, you will be able to enter the name and description in different languages. This feature requires to have joomfish installed and can be activated in the configuration page, in the display tab. The languages available will be the ones in joomfish. If you don't enter something for a translation, it will just use the default information in the Main information tab instead. After you click on save or apply an additional publish icon will appear next to the fields where you entered something in the languages tabs so that you can easily enable or disable them.
Generic information
- Published : This option allows you to publish or not the payment method.
- Images : Select here the desired images to be displayed for this payment method. If you want to add additional images, you can upload them via FTP into the folder media/com_hikashop/images/payment/ of your website and you will then be able to select them in that option.
- Price : You can set the payment fee in this field, and select the currency of the fee.
- Percentage : The percentage allows you to define a payment fee depending on the total amount of the products in the cart.
-
Tax category : Select among your tax category, the category you want apply on your payment method cost.
Additional Information
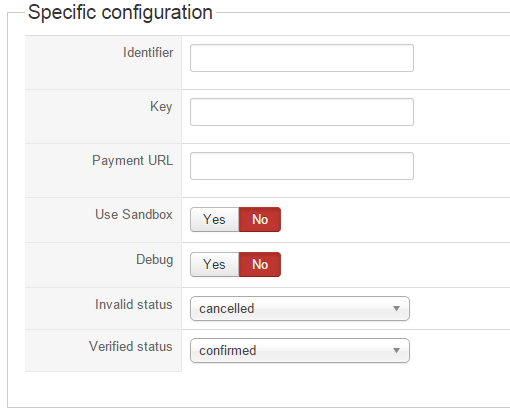
- In this part, we will see the primordial and required options of the Paygate payment method. The only things you will need are your Identifier, your Key, and to set your Payment URL.
- Identifier : Just put your Paygate Store Identifier in this field.
- Key : Just put your Paygate Key in this field.
- Payment URL : The Paygate payment page where the data of the order will be sent. By default that value is https://www.paygate.co.za/PayWebv2/process.trans and should not be changed unless you know what you're doing.
The different options:
- Use Sandbox : You can choose here to switch to use the Paygate Sandbox or not. If not you will be in production mode.
- Debug : If that options is activated, the plugin will store data and error messages in the payment log file accessible under the Files section of the configuration. That will help you understand issues with payment notifications if necessary.
- Invalid status : Here, you can define the status you want for an order when a payment notification is received with an invalid status for it from Paygate.
- Verified status : Same idea as the "Invalid status" option above, but for verified status payment notification received from Paygate.
Step by step configuration
- You have to enter your Identifier and your Key in your Paygate Specific Configuration.
- Switch on the Sandbox mode or not based on what you want to use. For the first use, we recommend to test the integration between your website and Paygate with the Sandbox mode.
- Once your plugin is configured properly, you will probably want to try it. Before switching to the production mode ("Use Sandbox: No"), you should be able to make test payments and in that case, The capture of the funds will not be done. At the end of the test, you will just return to your website and see the thank you page, proving you that everything is working ok. And if the payment is accepted, your order will take on the specified verified status automatically (you need to have your website online for that as Paygate needs to notify it of the payment).
- If you switch on the debug mode ("Debug: Yes"), you can also check data received from Paygate during the payment notification, in the payment log file.
Restrictions
- Zone : You can restrict the check payment method to a zone. By clicking on the edit icon, a popup will open enabling you to select a zone. You can also remove this limitation by clicking on the delete icon.
- Shipping method : With this option you can select the shipping method for which this payment method will be available. For example, if you choose UPS, this payment method will only be usable if UPS is selected as shipping method. If an other shipping method is selected, this payment method will not be displayed. Note: if you selected "None" or don't select any shipping method, this payment method will always be available.
- Currency: Choose the currencies allowed by this payment method.
- Minimum price : The payment method can be available for only orders above a minimum price. This price uses the payment method price currency even if the price is 0.
- Maximum price : The payment method can be available for only orders below a maximum price. This price uses the payment method price currency even if the price is 0.
- With tax : Display the payment method only for products with tax.
- Minimum quantity : If the order has a price lower than the price set in this field, so this payment method will not be available.
- Maximum quantity : If the order has a price upper than the price set in this field, so this payment method will not be available.
- Minimum weight : You can set a minimum weight so that orders below it won't be able to be paid with the current payment method. The weight of the order will be calculated based on the weight of each products in it.
- Maximum weight : You can set a maximum weight so that orders over it won't be able to be paid with the current payment method. The weight of the order will be calculated based on the weight of each products in it.
- Minimum volume : You can set a minimum volume so that orders below it won't be able to be paid with the current payment method. The volume of the order will be calculated based on the volume of each products in it. The volume is calculated with the width, height and length of the products.
- Maximum volume : If the order has a volume upper than the price set in this field, so this payment method will not be available.
- Prefix : You can restrict your payment methods to only post codes including such prefix with this option.
- Minimum post code : You can restrict your payment methods to only post codes within a certain range whereby this is the minimum possible value
- Maximum post code : You can restrict your payment methods to only post codes within a certain range whereby this is the maximum possible value
- Suffix : You can restrict your payment methods to only post codes including such suffix with this option.
Access level
The ACLs are available in the business edition of HikaShop.
- None : When "none" is selected, the payment method will never be displayed.
- All : "All" allow you to display the payment method for all the type of users. All groups are allowed to pay via this payment method.
- Custom : Here you can select which groups can use this payment method. All the checked groups will be able to use this method.
Note about Access level :
-
Access level : With the business edition of HikaShop, you will be able to limit a coupon or a discount to specific users.
-
Access level : With the business edition of HikaShop, you will be able to limit a coupon or a discount to joomla groups of users.
FAQ
I don't see any payment methods during the checkout, or I don't see some of them, what is the problem ?
There are several things which you could have missed.
- 1/ Check that the payments plugins are installed and published
- 2/ Check that you have configured your payment plugins (edit it and save its configuration)
- 3/ Check that your template is able to display error messages: hikashop.com/documentation
- 4/ Check that you have the payment view in the checkout workflow option of the configuration
- 5/ If you restricted your payment methods to zones, check that the address you're using is inside those zones ! Otherwise the payment methods will be filtered out.
- 6/ Check that the currency you're using is supported by the payment plugins you're using. Some payment plugins only supports a limited number of currencies. You should check that with the support of the payment gateways you're using.
- 7/ Please make sure that you didn't change the currency code of your currency. Otherwise, the payment plugins won't recognize your currency. If you want to change the display of your currency, we invite you to use the "format" option on the right of the currency options screen as well as the symbol field.
- 8/ When you select a currency or a shipping method in the options of the payment method, the payment method won't display unless that currency or shipping method is selected during the checkout. In most cases, these parameters shouldn't be selected so make sure they are unselected. To unselect them, you need to press the ctrl key and click on the selected currencies or shipping methods. Also remember if you selected one or several shipping methods here, when you add a new shipping method later on, you will want to go in the payment plugins options and select that new shipping method or it won't display any payment method for that new shipping method.
- 9/ Please check that you didn't set the access option of the plugin (via the plugins manager of Joomla) to something else than public.
- 10/ It can happen that the plugin's access is not set properly in the database. Please go in the Joomla plugins manager and edit the plugin and save it. That will sett the access if not present and might help solve your problem.
- Details
- Written by: Lavocat
- Category: Payment plugins
- Hits: 9152
| {img} |
Description
This screen enables you to edit the payment method options. Payment methods will be filtered on checkout based on the zone you set for them, if any. Then, they will be displayed to the user for him to choose which payment method he prefers for his order.
Note that the payment method can probably support only a limited number of currencies.
Toolbar
- Save & Close : Save the payment method options and return to the payment methods Management screen.
- Save : Apply the modifications to the payment method and stay on the same screen.
- Cancel : Return to the previous screen without saving the modifications.
- Help : This button enables you to turn ON/OFF the help section, this screen will appear or disappear.
Main Information
If you use one of our commercial versions, you will be able to enter the name and description in different languages. This feature requires to have joomfish installed and can be activated in the configuration page, in the display tab. The languages available will be the ones in joomfish. If you don't enter something for a translation, it will just use the default information in the Main information tab instead. After you click on save or apply an additional publish icon will appear next to the fields where you entered something in the languages tabs so that you can easily enable or disable them.
Generic information
- Published : This option allows you to publish or not the payment method.
- Images : Select here the desired images to be displayed for this payment method. If you want to add additional images, you can upload them via FTP into the folder media/com_hikashop/images/payment/ of your website and you will then be able to select them in that option.
- Price : You can set the payment fee in this field, and select the currency of the fee.
- Percentage : The percentage allows you to define a payment fee depending on the total amount of the products in the cart.
-
Tax category : Select among your tax category, the category you want apply on your payment method cost.
Install the plugin
In order to use the Pagseguro plugin you need to download it here and then install it via the Joomla extensions installer : Download Pagseguro Plugin
Additional Information
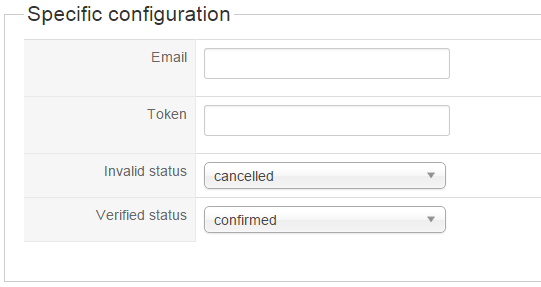
- In this part, we will see the main options of the Pagseguro payment method. The only things you will need are your Email and your secret Token.
- Email : Just put here the Email address which you used for your Pagseguro merchant account.
- Token : Just put your Pagseguro Token in this field.
Note: Generate a security token in your PagSeguro control panel:
Log in to your PagSeguro admin backend
Navigate to Integrações → Token de segurança
Click 'Gerar novo token'
The different options:
- Invalid status : You can choose here to select the status of the order when an invalid status is received from the Pagseguro gateway.
- Verified status : Here, like for the invalid status option, you can select the status of the orders when a verified status is received.
Here we are, your plugin is configured properly, you can use it.
Restrictions
- Zone : You can restrict the check payment method to a zone. By clicking on the edit icon, a popup will open enabling you to select a zone. You can also remove this limitation by clicking on the delete icon.
- Shipping method : With this option you can select the shipping method for which this payment method will be available. For example, if you choose UPS, this payment method will only be usable if UPS is selected as shipping method. If an other shipping method is selected, this payment method will not be displayed. Note: if you selected "None" or don't select any shipping method, this payment method will always be available.
- Currency: Choose the currencies allowed by this payment method.
- Minimum price : The payment method can be available for only orders above a minimum price. This price uses the payment method price currency even if the price is 0.
- Maximum price : The payment method can be available for only orders below a maximum price. This price uses the payment method price currency even if the price is 0.
- With tax : Display the payment method only for products with tax.
- Minimum quantity : If the order has a price lower than the price set in this field, so this payment method will not be available.
- Maximum quantity : If the order has a price upper than the price set in this field, so this payment method will not be available.
- Minimum weight : You can set a minimum weight so that orders below it won't be able to be paid with the current payment method. The weight of the order will be calculated based on the weight of each products in it.
- Maximum weight : You can set a maximum weight so that orders over it won't be able to be paid with the current payment method. The weight of the order will be calculated based on the weight of each products in it.
- Minimum volume : You can set a minimum volume so that orders below it won't be able to be paid with the current payment method. The volume of the order will be calculated based on the volume of each products in it. The volume is calculated with the width, height and length of the products.
- Maximum volume : If the order has a volume upper than the price set in this field, so this payment method will not be available.
- Prefix : You can restrict your payment methods to only post codes including such prefix with this option.
- Minimum post code : You can restrict your payment methods to only post codes within a certain range whereby this is the minimum possible value
- Maximum post code : You can restrict your payment methods to only post codes within a certain range whereby this is the maximum possible value
- Suffix : You can restrict your payment methods to only post codes including such suffix with this option.
Access level
The ACLs are available in the business edition of HikaShop.
- None : When "none" is selected, the payment method will never be displayed.
- All : "All" allow you to display the payment method for all the type of users. All groups are allowed to pay via this payment method.
- Custom : Here you can select which groups can use this payment method. All the checked groups will be able to use this method.
Note about Access level :
-
Access level : With the business edition of HikaShop, you will be able to limit a coupon or a discount to specific users.
-
Access level : With the business edition of HikaShop, you will be able to limit a coupon or a discount to joomla groups of users.
FAQ
I don't see any payment methods during the checkout, or I don't see some of them, what is the problem ?
There are several things which you could have missed.
- 1/ Check that the payments plugins are installed and published
- 2/ Check that you have configured your payment plugins (edit it and save its configuration)
- 3/ Check that your template is able to display error messages: hikashop.com/documentation
- 4/ Check that you have the payment view in the checkout workflow option of the configuration
- 5/ If you restricted your payment methods to zones, check that the address you're using is inside those zones ! Otherwise the payment methods will be filtered out.
- 6/ Check that the currency you're using is supported by the payment plugins you're using. Some payment plugins only supports a limited number of currencies. You should check that with the support of the payment gateways you're using.
- 7/ Please make sure that you didn't change the currency code of your currency. Otherwise, the payment plugins won't recognize your currency. If you want to change the display of your currency, we invite you to use the "format" option on the right of the currency options screen as well as the symbol field.
- 8/ When you select a currency or a shipping method in the options of the payment method, the payment method won't display unless that currency or shipping method is selected during the checkout. In most cases, these parameters shouldn't be selected so make sure they are unselected. To unselect them, you need to press the ctrl key and click on the selected currencies or shipping methods. Also remember if you selected one or several shipping methods here, when you add a new shipping method later on, you will want to go in the payment plugins options and select that new shipping method or it won't display any payment method for that new shipping method.
- 9/ Please check that you didn't set the access option of the plugin (via the plugins manager of Joomla) to something else than public.
- 10/ It can happen that the plugin's access is not set properly in the database. Please go in the Joomla plugins manager and edit the plugin and save it. That will sett the access if not present and might help solve your problem.
- Details
- Written by: Lavocat
- Category: Payment plugins
- Hits: 13040
| {img} |
Description
This screen enables you to edit the payment method options. Payment methods will be filtered on checkout based on the zone you set for them, if any. Then, they will be displayed to the user for him to choose which payment method he prefers for his order.
Note that the payment method can probably support only a limited number of currencies.
Toolbar
- Save & Close : Save the payment method options and return to the payment methods Management screen.
- Save : Apply the modifications to the payment method and stay on the same screen.
- Cancel : Return to the previous screen without saving the modifications.
- Help : This button enables you to turn ON/OFF the help section, this screen will appear or disappear.
Main Information
If you use one of our commercial versions, you will be able to enter the name and description in different languages. This feature requires to have joomfish installed and can be activated in the configuration page, in the display tab. The languages available will be the ones in joomfish. If you don't enter something for a translation, it will just use the default information in the Main information tab instead. After you click on save or apply an additional publish icon will appear next to the fields where you entered something in the languages tabs so that you can easily enable or disable them.
Generic information
- Published : This option allows you to publish or not the payment method.
- Images : Select here the desired images to be displayed for this payment method. If you want to add additional images, you can upload them via FTP into the folder media/com_hikashop/images/payment/ of your website and you will then be able to select them in that option.
- Price : You can set the payment fee in this field, and select the currency of the fee.
- Percentage : The percentage allows you to define a payment fee depending on the total amount of the products in the cart.
-
Tax category : Select among your tax category, the category you want apply on your payment method cost.
Install the plugin
In order to get the Cielo payment method, you need to download the payment plugin here : Download Cielo Plugin
Additional Information
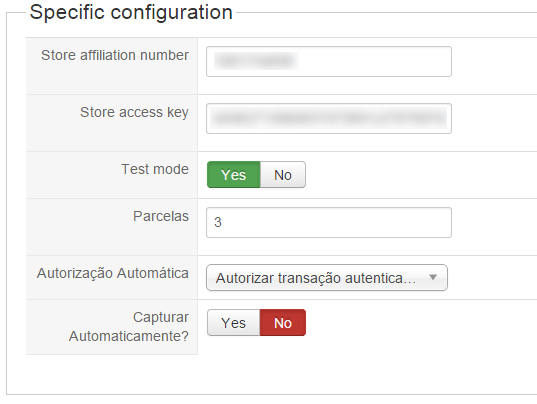
NOTE : Beware that the Cielo payment gateway only works with the currencies Réal and US dollar.
- In this part, we will see the main options of the Cielo payment method. The only things you will need are your Store affiliation number and your Store access key.
- Store affiliation number : Just put your Store affiliation number that you got from Cielo.
- Store access key : Just put your Store access key that you got from Cielo.
The different options:
- Test Mode : Before switching to the production phase, you should be able to make test payments with Cielo Sandbox. The capture will not be done and you should see a confirmation ticket proving you that everything works ok and if the payment is accepted, your order will take the specified verified status automatically (you need to have your website online for that as Cielo needs to notify it of the payment).
- Parcelas : Here, you set the maximum number of installments.
- Autorização Automática : If this option is enable, the automatic response of Cielo server will be treated to update the order status. For example, if the payment has been completed correctly, the order status will be the specified verified status.
- Capturar Automaticamente? : Here, you can select if Cielo will capture the payment automatically or simply authorize it.
Step by step configuration
- You have to enter your Store affiliation number and your Store access key in your Cielo Specific Configuration.
- Choose to switch on the test mode OR not "production phase".
- Once your plugin is configured properly, you will probably want to try it. Before switching to the production phase ("Test Mode: Off"), you should be able to make test payments so that the capture will not be done and you should see a confirmation ticket proving you that everything works ok in your Cielo merchant account. Then, if the payment is accepted, your order will take the specified verified status automatically (you need to have your website online for that as Cielo needs to notify it of the payment).
At the end of the Hikashop Checkout with Cielo, customers will see this:
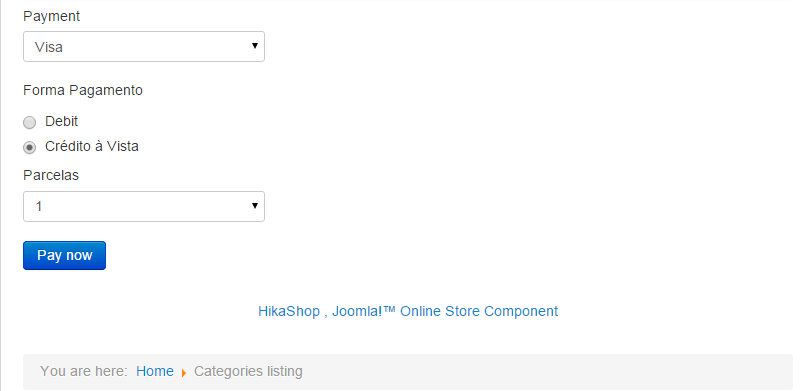
View on Cielo Purchase
- Let's have a look at the payment interface, just after the customer clicked on the pay now button.
After the checkout, customers will be redirected to the Cielo payment window.
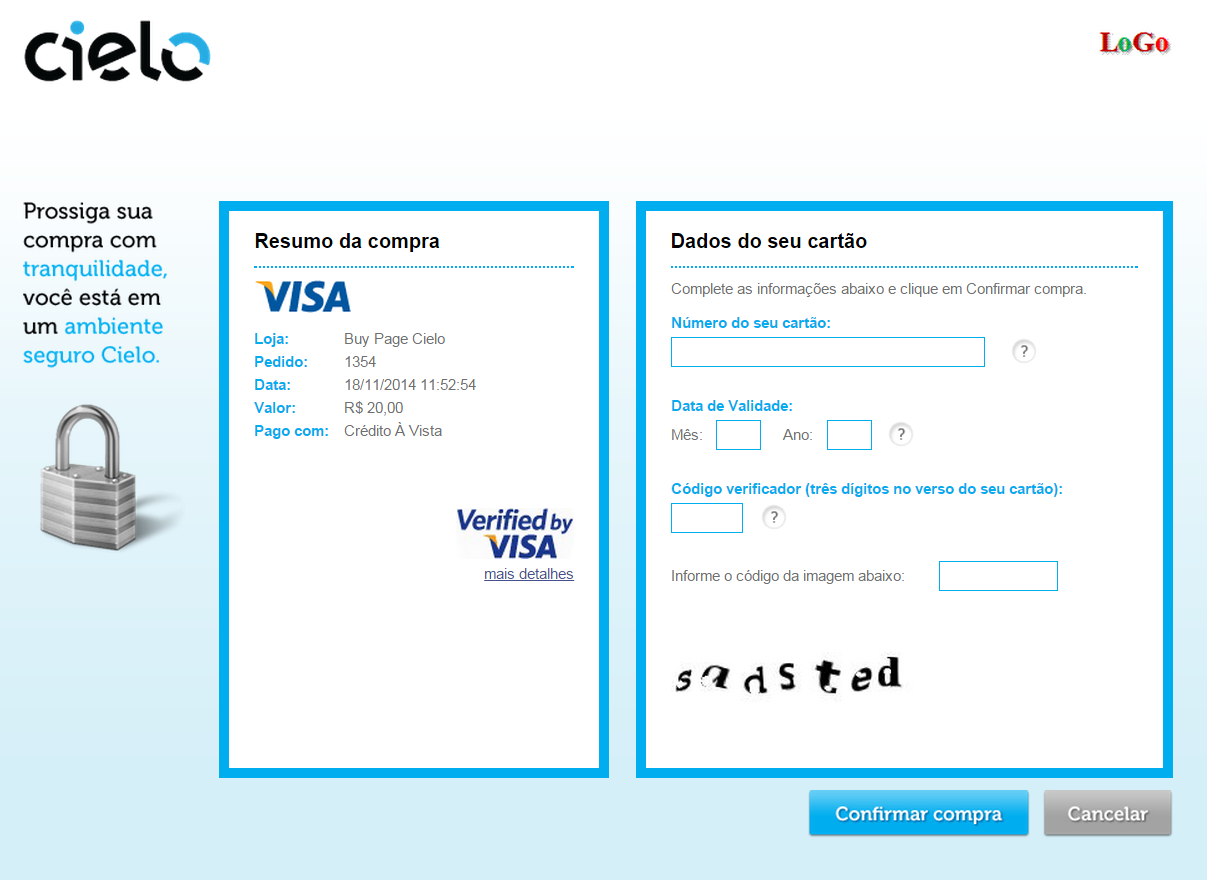
For the end of the operation
- Customer have to validate his purchase on the Cielo platform by completing the credit card form.
Later, the payment notification will be received by the Cielo payment plugin and the order status will be updated by Hikashop if the payment is successful.
Restrictions
- Zone : You can restrict the check payment method to a zone. By clicking on the edit icon, a popup will open enabling you to select a zone. You can also remove this limitation by clicking on the delete icon.
- Shipping method : With this option you can select the shipping method for which this payment method will be available. For example, if you choose UPS, this payment method will only be usable if UPS is selected as shipping method. If an other shipping method is selected, this payment method will not be displayed. Note: if you selected "None" or don't select any shipping method, this payment method will always be available.
- Currency: Choose the currencies allowed by this payment method.
- Minimum price : The payment method can be available for only orders above a minimum price. This price uses the payment method price currency even if the price is 0.
- Maximum price : The payment method can be available for only orders below a maximum price. This price uses the payment method price currency even if the price is 0.
- With tax : Display the payment method only for products with tax.
- Minimum quantity : If the order has a price lower than the price set in this field, so this payment method will not be available.
- Maximum quantity : If the order has a price upper than the price set in this field, so this payment method will not be available.
- Minimum weight : You can set a minimum weight so that orders below it won't be able to be paid with the current payment method. The weight of the order will be calculated based on the weight of each products in it.
- Maximum weight : You can set a maximum weight so that orders over it won't be able to be paid with the current payment method. The weight of the order will be calculated based on the weight of each products in it.
- Minimum volume : You can set a minimum volume so that orders below it won't be able to be paid with the current payment method. The volume of the order will be calculated based on the volume of each products in it. The volume is calculated with the width, height and length of the products.
- Maximum volume : If the order has a volume upper than the price set in this field, so this payment method will not be available.
- Prefix : You can restrict your payment methods to only post codes including such prefix with this option.
- Minimum post code : You can restrict your payment methods to only post codes within a certain range whereby this is the minimum possible value
- Maximum post code : You can restrict your payment methods to only post codes within a certain range whereby this is the maximum possible value
- Suffix : You can restrict your payment methods to only post codes including such suffix with this option.
Access level
The ACLs are available in the business edition of HikaShop.
- None : When "none" is selected, the payment method will never be displayed.
- All : "All" allow you to display the payment method for all the type of users. All groups are allowed to pay via this payment method.
- Custom : Here you can select which groups can use this payment method. All the checked groups will be able to use this method.
Note about Access level :
-
Access level : With the business edition of HikaShop, you will be able to limit a coupon or a discount to specific users.
-
Access level : With the business edition of HikaShop, you will be able to limit a coupon or a discount to joomla groups of users.
FAQ
I don't see any payment methods during the checkout, or I don't see some of them, what is the problem ?
There are several things which you could have missed.
- 1/ Check that the payments plugins are installed and published
- 2/ Check that you have configured your payment plugins (edit it and save its configuration)
- 3/ Check that your template is able to display error messages: hikashop.com/documentation
- 4/ Check that you have the payment view in the checkout workflow option of the configuration
- 5/ If you restricted your payment methods to zones, check that the address you're using is inside those zones ! Otherwise the payment methods will be filtered out.
- 6/ Check that the currency you're using is supported by the payment plugins you're using. Some payment plugins only supports a limited number of currencies. You should check that with the support of the payment gateways you're using.
- 7/ Please make sure that you didn't change the currency code of your currency. Otherwise, the payment plugins won't recognize your currency. If you want to change the display of your currency, we invite you to use the "format" option on the right of the currency options screen as well as the symbol field.
- 8/ When you select a currency or a shipping method in the options of the payment method, the payment method won't display unless that currency or shipping method is selected during the checkout. In most cases, these parameters shouldn't be selected so make sure they are unselected. To unselect them, you need to press the ctrl key and click on the selected currencies or shipping methods. Also remember if you selected one or several shipping methods here, when you add a new shipping method later on, you will want to go in the payment plugins options and select that new shipping method or it won't display any payment method for that new shipping method.
- 9/ Please check that you didn't set the access option of the plugin (via the plugins manager of Joomla) to something else than public.
- 10/ It can happen that the plugin's access is not set properly in the database. Please go in the Joomla plugins manager and edit the plugin and save it. That will sett the access if not present and might help solve your problem.
- Details
- Written by: Lavocat
- Category: Payment plugins
- Hits: 12982
| {img} |
Description
This screen enables you to edit the payment method options. Payment methods will be filtered on checkout based on the zone you set for them, if any. Then, they will be displayed to the user for him to choose which payment method he prefers for his order.
Note that the payment method can probably support only a limited number of currencies.
Toolbar
- Save & Close : Save the payment method options and return to the payment methods Management screen.
- Save : Apply the modifications to the payment method and stay on the same screen.
- Cancel : Return to the previous screen without saving the modifications.
- Help : This button enables you to turn ON/OFF the help section, this screen will appear or disappear.
Main Information
If you use one of our commercial versions, you will be able to enter the name and description in different languages. This feature requires to have joomfish installed and can be activated in the configuration page, in the display tab. The languages available will be the ones in joomfish. If you don't enter something for a translation, it will just use the default information in the Main information tab instead. After you click on save or apply an additional publish icon will appear next to the fields where you entered something in the languages tabs so that you can easily enable or disable them.
Generic information
- Published : This option allows you to publish or not the payment method.
- Images : Select here the desired images to be displayed for this payment method. If you want to add additional images, you can upload them via FTP into the folder media/com_hikashop/images/payment/ of your website and you will then be able to select them in that option.
- Price : You can set the payment fee in this field, and select the currency of the fee.
- Percentage : The percentage allows you to define a payment fee depending on the total amount of the products in the cart.
-
Tax category : Select among your tax category, the category you want apply on your payment method cost.
Additional Information
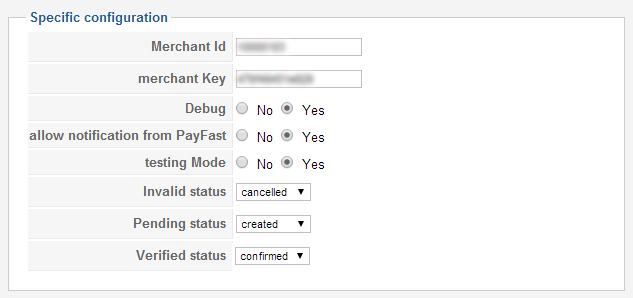
- In this part, we will see the primordial options of the PayFast payment method. The only things you will need are your Merchant Id and your Merchant Key.
- Merchant Id : Just put your Merchant Id in this field. This identifier is given by PayFast.
- Merchant Key : Just put your Merchant Key in this field. This code is given by PayFast.
Note: If you want to know more about these PayFast settings, you can look at the step by step sandbox setting page.
The different options:
- Debug : You can here enable the debug option of the API. Don't enable this one if you don't have to look into the API's configuration
- Allow notifications from PayFast : If this option is enable, the automatic response of PayFast server will be treated to update the order status. For example, if the payment has been completed correctly, the order status will be the specified verified status.
- Testing Mode : You can choose here to switch in test mode (for use the PayFast sandbox) or in production phase.
- Invalid status : Here, you can select the status to an order if the plugin receives a invalid completion notification from PayFast for an order.
- Pending status : Like, for "invalid status"you can set to an order if the plugin receives a pending completion notification from PayFast for an order.
- Verified status : Same idea than "invalid" and "pending" status.
Step by step configuration
- In order to use the PayFast payment method, you have to possess some informations that PayFast should have given to you,your Merchant Id and Merchant Key, so you must create an account on PayFast to get this information and be able to reach your PayFast setting page.
- After this, you have to enter your Merchant Id and your Merchant Key in your PayFast Specific Congiguration.
- Choose to switch on the testing mode OR not ("production phase") and your plugin will automatically send the needed data to the right PayFast page.
- Once your plugin is configured properly, you will probably want to try it. Before switching to the production phase ("Testing Mode: Off"), you should be able to make test payments with PayFast Sandbox. The capture will not be done and you should see a confirmation ticket proving you that everything works ok and if the payment is accepted, your order will take the specified verified status automatically (you need to have your website online for that as PayFast needs to notify it of the payment).
View on PayFast Purchase
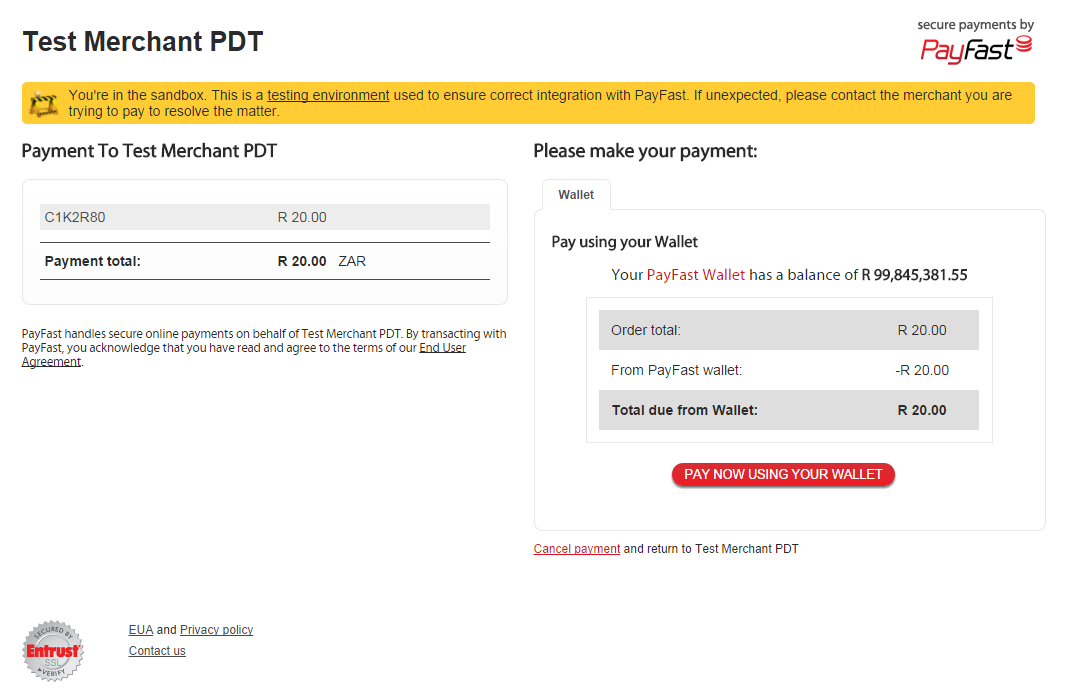
- Let's have a look just after the customer click on the finish button.
After the checkout, customers will be redirected to the PayFast payment window (here in testing mode).
For the end of the operation
- Customer have to validate to validate his purchase on the PayFast platform.
Later, the order status will be get and save by Hikashop.
Restrictions
- Zone : You can restrict the check payment method to a zone. By clicking on the edit icon, a popup will open enabling you to select a zone. You can also remove this limitation by clicking on the delete icon.
- Shipping method : With this option you can select the shipping method for which this payment method will be available. For example, if you choose UPS, this payment method will only be usable if UPS is selected as shipping method. If an other shipping method is selected, this payment method will not be displayed. Note: if you selected "None" or don't select any shipping method, this payment method will always be available.
- Currency: Choose the currencies allowed by this payment method.
- Minimum price : The payment method can be available for only orders above a minimum price. This price uses the payment method price currency even if the price is 0.
- Maximum price : The payment method can be available for only orders below a maximum price. This price uses the payment method price currency even if the price is 0.
- With tax : Display the payment method only for products with tax.
- Minimum quantity : If the order has a price lower than the price set in this field, so this payment method will not be available.
- Maximum quantity : If the order has a price upper than the price set in this field, so this payment method will not be available.
- Minimum weight : You can set a minimum weight so that orders below it won't be able to be paid with the current payment method. The weight of the order will be calculated based on the weight of each products in it.
- Maximum weight : You can set a maximum weight so that orders over it won't be able to be paid with the current payment method. The weight of the order will be calculated based on the weight of each products in it.
- Minimum volume : You can set a minimum volume so that orders below it won't be able to be paid with the current payment method. The volume of the order will be calculated based on the volume of each products in it. The volume is calculated with the width, height and length of the products.
- Maximum volume : If the order has a volume upper than the price set in this field, so this payment method will not be available.
- Prefix : You can restrict your payment methods to only post codes including such prefix with this option.
- Minimum post code : You can restrict your payment methods to only post codes within a certain range whereby this is the minimum possible value
- Maximum post code : You can restrict your payment methods to only post codes within a certain range whereby this is the maximum possible value
- Suffix : You can restrict your payment methods to only post codes including such suffix with this option.
Access level
The ACLs are available in the business edition of HikaShop.
- None : When "none" is selected, the payment method will never be displayed.
- All : "All" allow you to display the payment method for all the type of users. All groups are allowed to pay via this payment method.
- Custom : Here you can select which groups can use this payment method. All the checked groups will be able to use this method.
Note about Access level :
-
Access level : With the business edition of HikaShop, you will be able to limit a coupon or a discount to specific users.
-
Access level : With the business edition of HikaShop, you will be able to limit a coupon or a discount to joomla groups of users.
FAQ
I don't see any payment methods during the checkout, or I don't see some of them, what is the problem ?
There are several things which you could have missed.
- 1/ Check that the payments plugins are installed and published
- 2/ Check that you have configured your payment plugins (edit it and save its configuration)
- 3/ Check that your template is able to display error messages: hikashop.com/documentation
- 4/ Check that you have the payment view in the checkout workflow option of the configuration
- 5/ If you restricted your payment methods to zones, check that the address you're using is inside those zones ! Otherwise the payment methods will be filtered out.
- 6/ Check that the currency you're using is supported by the payment plugins you're using. Some payment plugins only supports a limited number of currencies. You should check that with the support of the payment gateways you're using.
- 7/ Please make sure that you didn't change the currency code of your currency. Otherwise, the payment plugins won't recognize your currency. If you want to change the display of your currency, we invite you to use the "format" option on the right of the currency options screen as well as the symbol field.
- 8/ When you select a currency or a shipping method in the options of the payment method, the payment method won't display unless that currency or shipping method is selected during the checkout. In most cases, these parameters shouldn't be selected so make sure they are unselected. To unselect them, you need to press the ctrl key and click on the selected currencies or shipping methods. Also remember if you selected one or several shipping methods here, when you add a new shipping method later on, you will want to go in the payment plugins options and select that new shipping method or it won't display any payment method for that new shipping method.
- 9/ Please check that you didn't set the access option of the plugin (via the plugins manager of Joomla) to something else than public.
- 10/ It can happen that the plugin's access is not set properly in the database. Please go in the Joomla plugins manager and edit the plugin and save it. That will sett the access if not present and might help solve your problem.