
Pther extensions
- Details
- Written by: Administrator
- Category: Pther extensions
- Hits: 4
Installation
- 1) Download the plugin on our website via the download link provided to you after the purchase.
- 2) Install it on your Joomla website via the extension manager, or via the "install plugin" button of System > Plugins on WordPress, and enable it.
- 3) Install and enable the HikaShop Booking plugin (1.3.0 or later) and the cart reservation plugin, and make your shows events with their dates.
- 4) Draw the plan of your hall, then attach it to a show.
- 5) For tickets: the Seat ticket generator of HikaSerial comes in this plugin's package and is installed and enabled with it. In HikaSerial, add a generator of the type Seat ticket, a pack that uses it, and give that pack to the show's product.
Configuration
The plugin has no settings of its own. Your halls are drawn in the Seat maps page (Products menu), and each show has its own settings on its product page.
The plan (Products > Seat maps)
- Name: the name of the plan, as you find it in the list of plans and in the product of a show.
- Picture of the hall: the picture you draw the sections and seats on (JPEG, PNG, GIF or WebP, 8 MB at most). You can change or remove it at any time.
- Size of the seats: how big the seats are drawn on the plan.
- Price categories: one row per zone price. Each has a colour, a name and a price: the price is the one every show starts with and can be changed for each show. Add a category for each kind of seat you sell at a different price.
- Name of the section and Category: the name of the block of seats or standing zone you are working on, and the price category it belongs to.
- Rows, Seats per row and Curve of the rows: the size of a block of seats, and how much its rows curve (-100 to 100). The button "Row and seat labels..." lets you change the label of any row or seat; each seat needs its own row and number.
- Capacity: for a standing zone, the number of places that can be sold.
- Kind of seat: for the selected seats, "Ordinary seat", "Wheelchair space" or "Companion seat".
- Taken out of sale: tick it to keep the selected seats from being sold.
The show (the "Seat map" block of the product page)
- Seat map: the plan of the hall for this show. The plan of a show can not be changed or removed while seats are held, ordered or sold.
- Price of each zone for this show: one price per price category of the plan, in the order of the plan. Left empty, a zone keeps the price given in the plan.
- Seats held in the cart for: how many minutes a seat stays held in a cart. Left empty, the duration of the cart reservation plugin is used, or 10 minutes when it is not installed.
- Seats at most in an order: the most seats a customer can take in one order (8 by default).
Troubleshooting
- "Order ... is confirmed again, but these seats were taken by other orders": the order was cancelled, its seats were sold to someone else, and the order has been confirmed again. Contact the customer: the order keeps the seats that were still free.
- A seat can not be picked: it is held by another cart, sold, taken out of sale, or the date is closed or cancelled.
- Details
- Written by: Administrator
- Category: Pther extensions
- Hits: 8
Installation
With Twilio:
- Open an account at Twilio (twilio.com) and upgrade it: a trial account only sends Twilio's own sample texts, to the numbers verified in it, so it cannot send your texts to your customers.
- In the Twilio Console, copy the Account SID and the Auth Token from the home page, under Account Info.
- Get a sender: a Twilio phone number, or in the countries that allow it an alphanumeric sender ID such as your shop's name, or a Messaging Service. Under Messaging, Settings, Geo permissions, allow the countries of your customers.
- Install the plugin with the HikaShop or Joomla installer and publish it.
- Open its settings, choose Twilio, paste the Account SID, the Auth Token and the sender, save, then click "Check the account".
- Check the texts by order status, save, type your own mobile number as the test number, save again and click "Send a test SMS".
With Vonage:
- Open an account at Vonage (vonage.com, the API developer dashboard) and top it up: until then the account is in demo mode and only texts the test numbers added in its dashboard, with a demo notice added to each text.
- In the Vonage dashboard, under API settings, copy the API key, the API secret and, under the signature settings, the signature secret. On the same page, set the default SMS setting to the Messages API.
- Install the plugin with the HikaShop or Joomla installer and publish it.
- Open its settings, choose Vonage, paste the API key, the API secret and the signature secret, type your sender (your shop's name, or a Vonage number), save, then click "Check the account".
- Check the texts by order status, save, type your own mobile number as the test number, save again and click "Send a test SMS".
With OVHcloud SMS:
- Order an SMS account at OVHcloud (ovhtelecom.fr) with SMS credits; a sender of your own (your shop's name) is created and validated in the account, or the messages leave from a French short number.
- Make API keys at auth.eu.ovhcloud.com/api/createToken with the rights GET /sms/* and POST /sms/*/jobs, validity unlimited, and copy the Application Key, the Application Secret and the Consumer Key.
- Install the plugin with the HikaShop or Joomla installer and publish it.
- Open its settings, choose OVHcloud SMS, paste the three keys and the name of the SMS account (sms-ab12345-1), type your sender, save, then click "Check the account".
- The message gives an address for the delivery reports: paste it as the callback URL of the SMS account in the OVHcloud Control Panel.
- Check the texts by order status, save, type your own mobile number as the test number, save again and click "Send a test SMS".
With seven.io:
- Open an account at seven.io and add credit.
- In the seven.io dashboard, under Developer, API Access, make an API key of the production environment (a sandbox key never sends anything), and under Developer, API settings, copy the signing key if your account has one.
- Install the plugin with the HikaShop or Joomla installer and publish it.
- Open its settings, choose seven.io, paste the API key and the signing key, type your sender, save, then click "Check the account".
- The message gives an address for the delivery reports: add it as a webhook in the seven.io dashboard, under Developer, Webhooks, for the SMS status reports, with the method POST.
- Check the texts by order status, save, type your own mobile number as the test number, save again and click "Send a test SMS".
Configuration
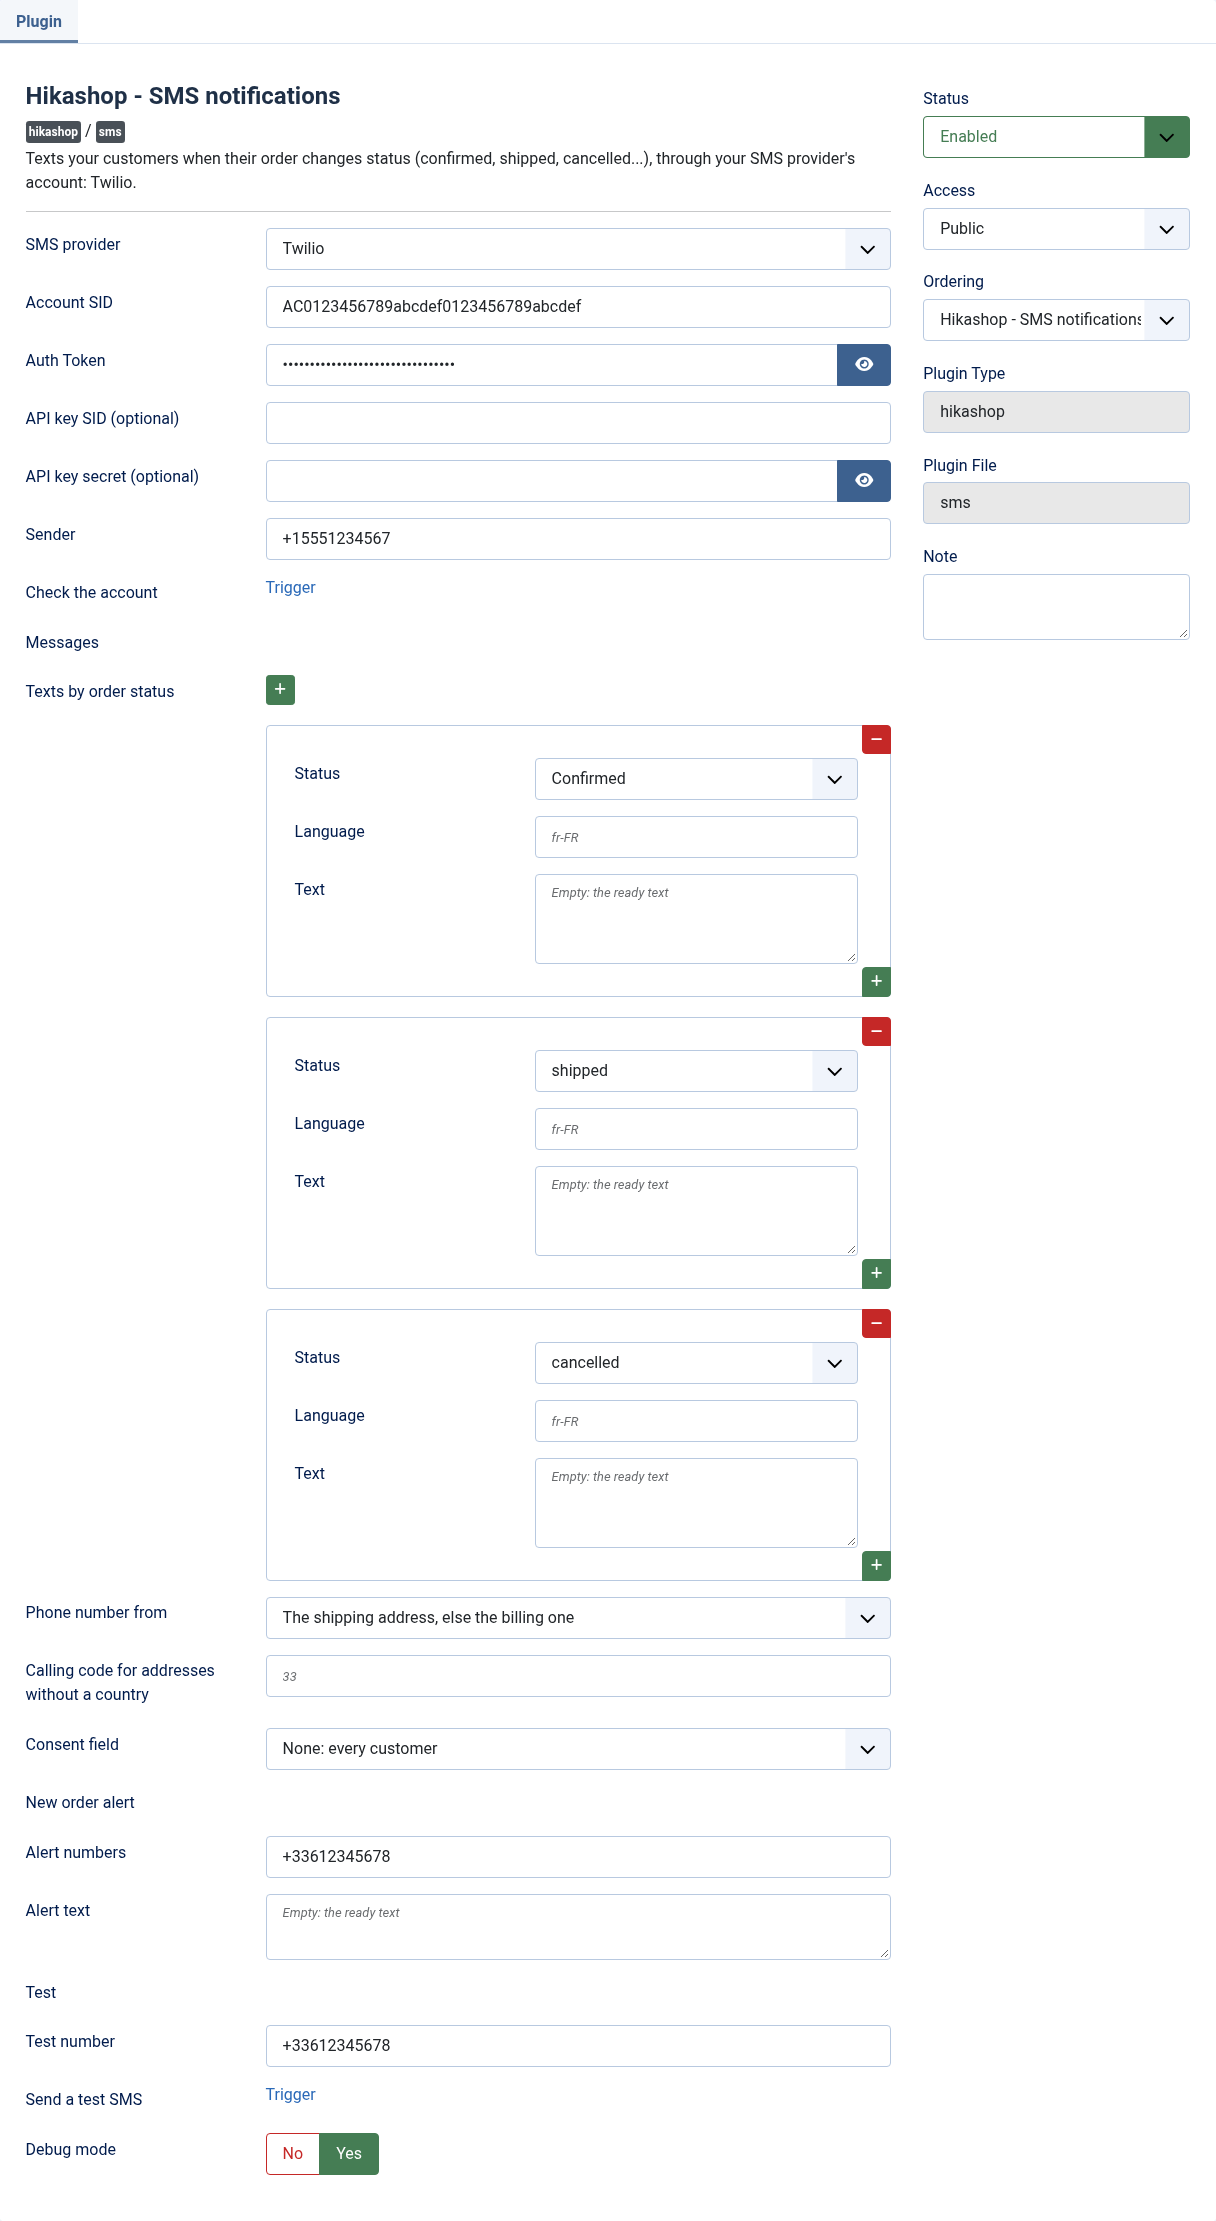
- SMS provider: the service that sends your messages: Twilio, Vonage, OVHcloud SMS or seven.io. Its own settings come below it.
- Account SID: from the home page of your Twilio Console; it starts with AC.
- Auth Token: from the same page. Always needed, even with an API key: Twilio signs its delivery reports with it.
- API key SID (optional) and API key secret (optional): an API key made in the Twilio Console under Account, API keys and tokens. When both are set, messages are sent with the key, which you can revoke on its own. Left empty, the Auth Token is used.
- Sender: one of your Twilio numbers in international format (+15551234567), an alphanumeric sender ID (up to 11 letters and digits; customers cannot reply to it), or a Messaging Service SID (starts with MG).
- API key and API secret (Vonage): from your Vonage dashboard, under API settings.
- Signature secret (Vonage): from the same page, under the signature settings. Vonage signs its delivery reports with it; left empty, the reports are refused and the SMS stay at "sent".
- Sender (Vonage): your shop's name (up to 11 letters and digits, where the country allows it; in France avoid generic names such as INFO or SMS), or one of your Vonage numbers in international format.
- OVHcloud API (OVHcloud SMS): Europe, or Canada for an account opened there.
- Application Key, Application Secret and Consumer Key (OVHcloud SMS): the API keys made with the rights GET /sms/* and POST /sms/*/jobs.
- SMS account (OVHcloud SMS): its name in the Control Panel, Telecom, SMS, such as sms-ab12345-1.
- Sender (OVHcloud SMS): a sender validated in your SMS account. Empty: the messages leave from a French short number customers can reply to, which only texts French numbers and refuses texts with a link.
- API key (seven.io): from your seven.io dashboard, Developer, API Access, a key of the production environment.
- Signing key (seven.io): from Developer, API settings. When your account has one, seven.io refuses unsigned requests and signs its delivery reports with it. Empty: nothing is signed.
- Sender (seven.io): your shop's name (up to 11 letters and digits, where the country allows it) or a phone number. Empty: seven.io's default sender.
- Check the account: save first, then click. The message says whether your provider accepts your settings, whether the account is a trial or demo one, and how many SMS each of your texts costs. With OVHcloud SMS and seven.io it also gives the address for the delivery reports: the callback URL of your OVHcloud SMS account, or the webhook of your seven.io account.
- Texts by order status: one line per status that sends an SMS; a status without a line sends nothing. Language: a language tag such as fr-FR for a text in that language only, empty for every language. Text: empty to use the ready text of confirmed, shipped and cancelled, or your own with the tags {order_number}, {order_status}, {order_full_price}, {customer_name}, {shop_name}, {order_url}, {tracking_number} and {tracking_url}.
- Phone number from: the shipping address (else the billing one), or the billing address (else the shipping one).
- Calling code for addresses without a country: numbers typed without their calling code get the one of their address's country; this code (33 for France) is used for an address without a country. Empty: such numbers are not texted.
- Consent field: a yes/no custom field of the address or of the customer that must be ticked for the customer to get SMS. None: every customer with a mobile number gets them.
- Alert numbers: your own mobile numbers, separated by commas, texted for each new order. Empty: no alert.
- Alert text: the text of that alert, with the same tags. Empty: "New order {order_number}, {order_full_price}, {customer_name}".
- Test number and Send a test SMS: your mobile in international format; save, then click to receive a test SMS and see a few seconds later whether it was delivered.
- Debug mode: writes each call to your provider, and why a delivery report was refused, in HikaShop's log file. Leave it off once things work.
Troubleshooting
- "Twilio refused the Account SID or token": copy both again from the home page of your Twilio Console, without spaces, then save.
- "Twilio refused the API key": check the key's SID and secret, or empty both fields to send with the Auth Token.
- "Your Twilio account is a trial account, which only sends Twilio's sample texts": upgrade the account. To try the plugin on a trial account, type one of Twilio's sample names as the text of a status, for instance sms_order_confirmation or sms_delivery_updates.
- "Your Twilio account is a trial account and this number is not verified in it": verify the number in the Twilio Console, or upgrade the account.
- "Your Twilio account is not allowed to send to this country": allow the country under Messaging, Settings, Geo permissions.
- "The customer replied STOP to your messages": Twilio no longer sends to that number until the customer sends START.
- "Vonage refused the API key or secret": copy both again from your Vonage dashboard, under API settings, then save.
- "Your Vonage account is in demo mode and this number is not one of its test numbers": add the number as a test number in your Vonage dashboard, or top up the account.
- "Your Vonage balance is too low to send": top up the account in your Vonage dashboard.
- "Your OVHcloud API keys do not have the rights the plugin needs": make new API keys with the rights GET /sms/* and POST /sms/*/jobs, and paste the three new values.
- "OVHcloud does not know this SMS account": check its name, such as sms-ab12345-1, in the Control Panel, Telecom, SMS.
- "Without a sender, OVHcloud's short number refuses texts with a link": the ready text of shipped has a link to the order; write your own text without {order_url}, or set a sender.
- "OVHcloud refused the customer's number": without a sender, only French mobile numbers can be texted; set a sender for the other countries.
- "seven.io refused the signature of the request": copy the signing key again from Developer, API settings, or empty the field if your account has none.
- "seven.io or the customer's carrier rejected the message": a seven.io account that is not verified yet has its SMS rejected for some countries, senders and texts with a link. Ask seven.io's support to verify the account.
- "seven.io refused the API key": copy it again from Developer, API Access.
- "SMS sent ... (test mode: nothing was sent)": the seven.io key is a sandbox key; make a key of the production environment.
- "No SMS: no valid mobile number in the order's addresses": the address has no phone number, or one that cannot be written in international format; set the calling code for addresses without a country if your addresses have none.
- An SMS stays "queued" or "sent" on the order page: your provider could not reach your site to report the delivery, or the report was refused. Your site must be reachable from the internet, without a password on the whole site; with Vonage, check the signature secret; with OVHcloud SMS, check that the callback URL of the SMS account is the address given by "Check the account"; with seven.io, check the webhook's address and the signing key.
- Details
- Written by: Administrator
- Category: Pther extensions
- Hits: 3
Installation
- 1) Have a Listmonk installation that your website can reach over the Internet, and a list in it for your customers. Choose "double opt-in" for that list if you want your customers to confirm their address.
- 2) In Listmonk, open Users, User roles, and create a role with these five permissions only: lists:get_all, lists:manage_all, subscribers:get, subscribers:get_all and subscribers:manage. Then open Users, create a user of the type API with that role, and copy its token: Listmonk shows it once. A role limited to these keeps the rest of your Listmonk out of reach of the token.
- 3) Download the plugin from our website and install it: with the Extension Manager on Joomla, with HikaShop > Plugins > Install on WordPress.
- 4) Enable the plugin (Extensions > Plugins on Joomla, the Plugins list of HikaShop on WordPress), open "Hikashop - Listmonk", enter the address of your Listmonk, the API user and its token and save. The list menu then shows the lists of your Listmonk: choose yours and save again.
- 5) Choose when to subscribe and how consent is asked, as described below.
- 6) Before going live, enter one of your own addresses in "Test on these addresses only", register with it on your shop, and check that it reaches Listmonk. Then empty the setting.
Configuration
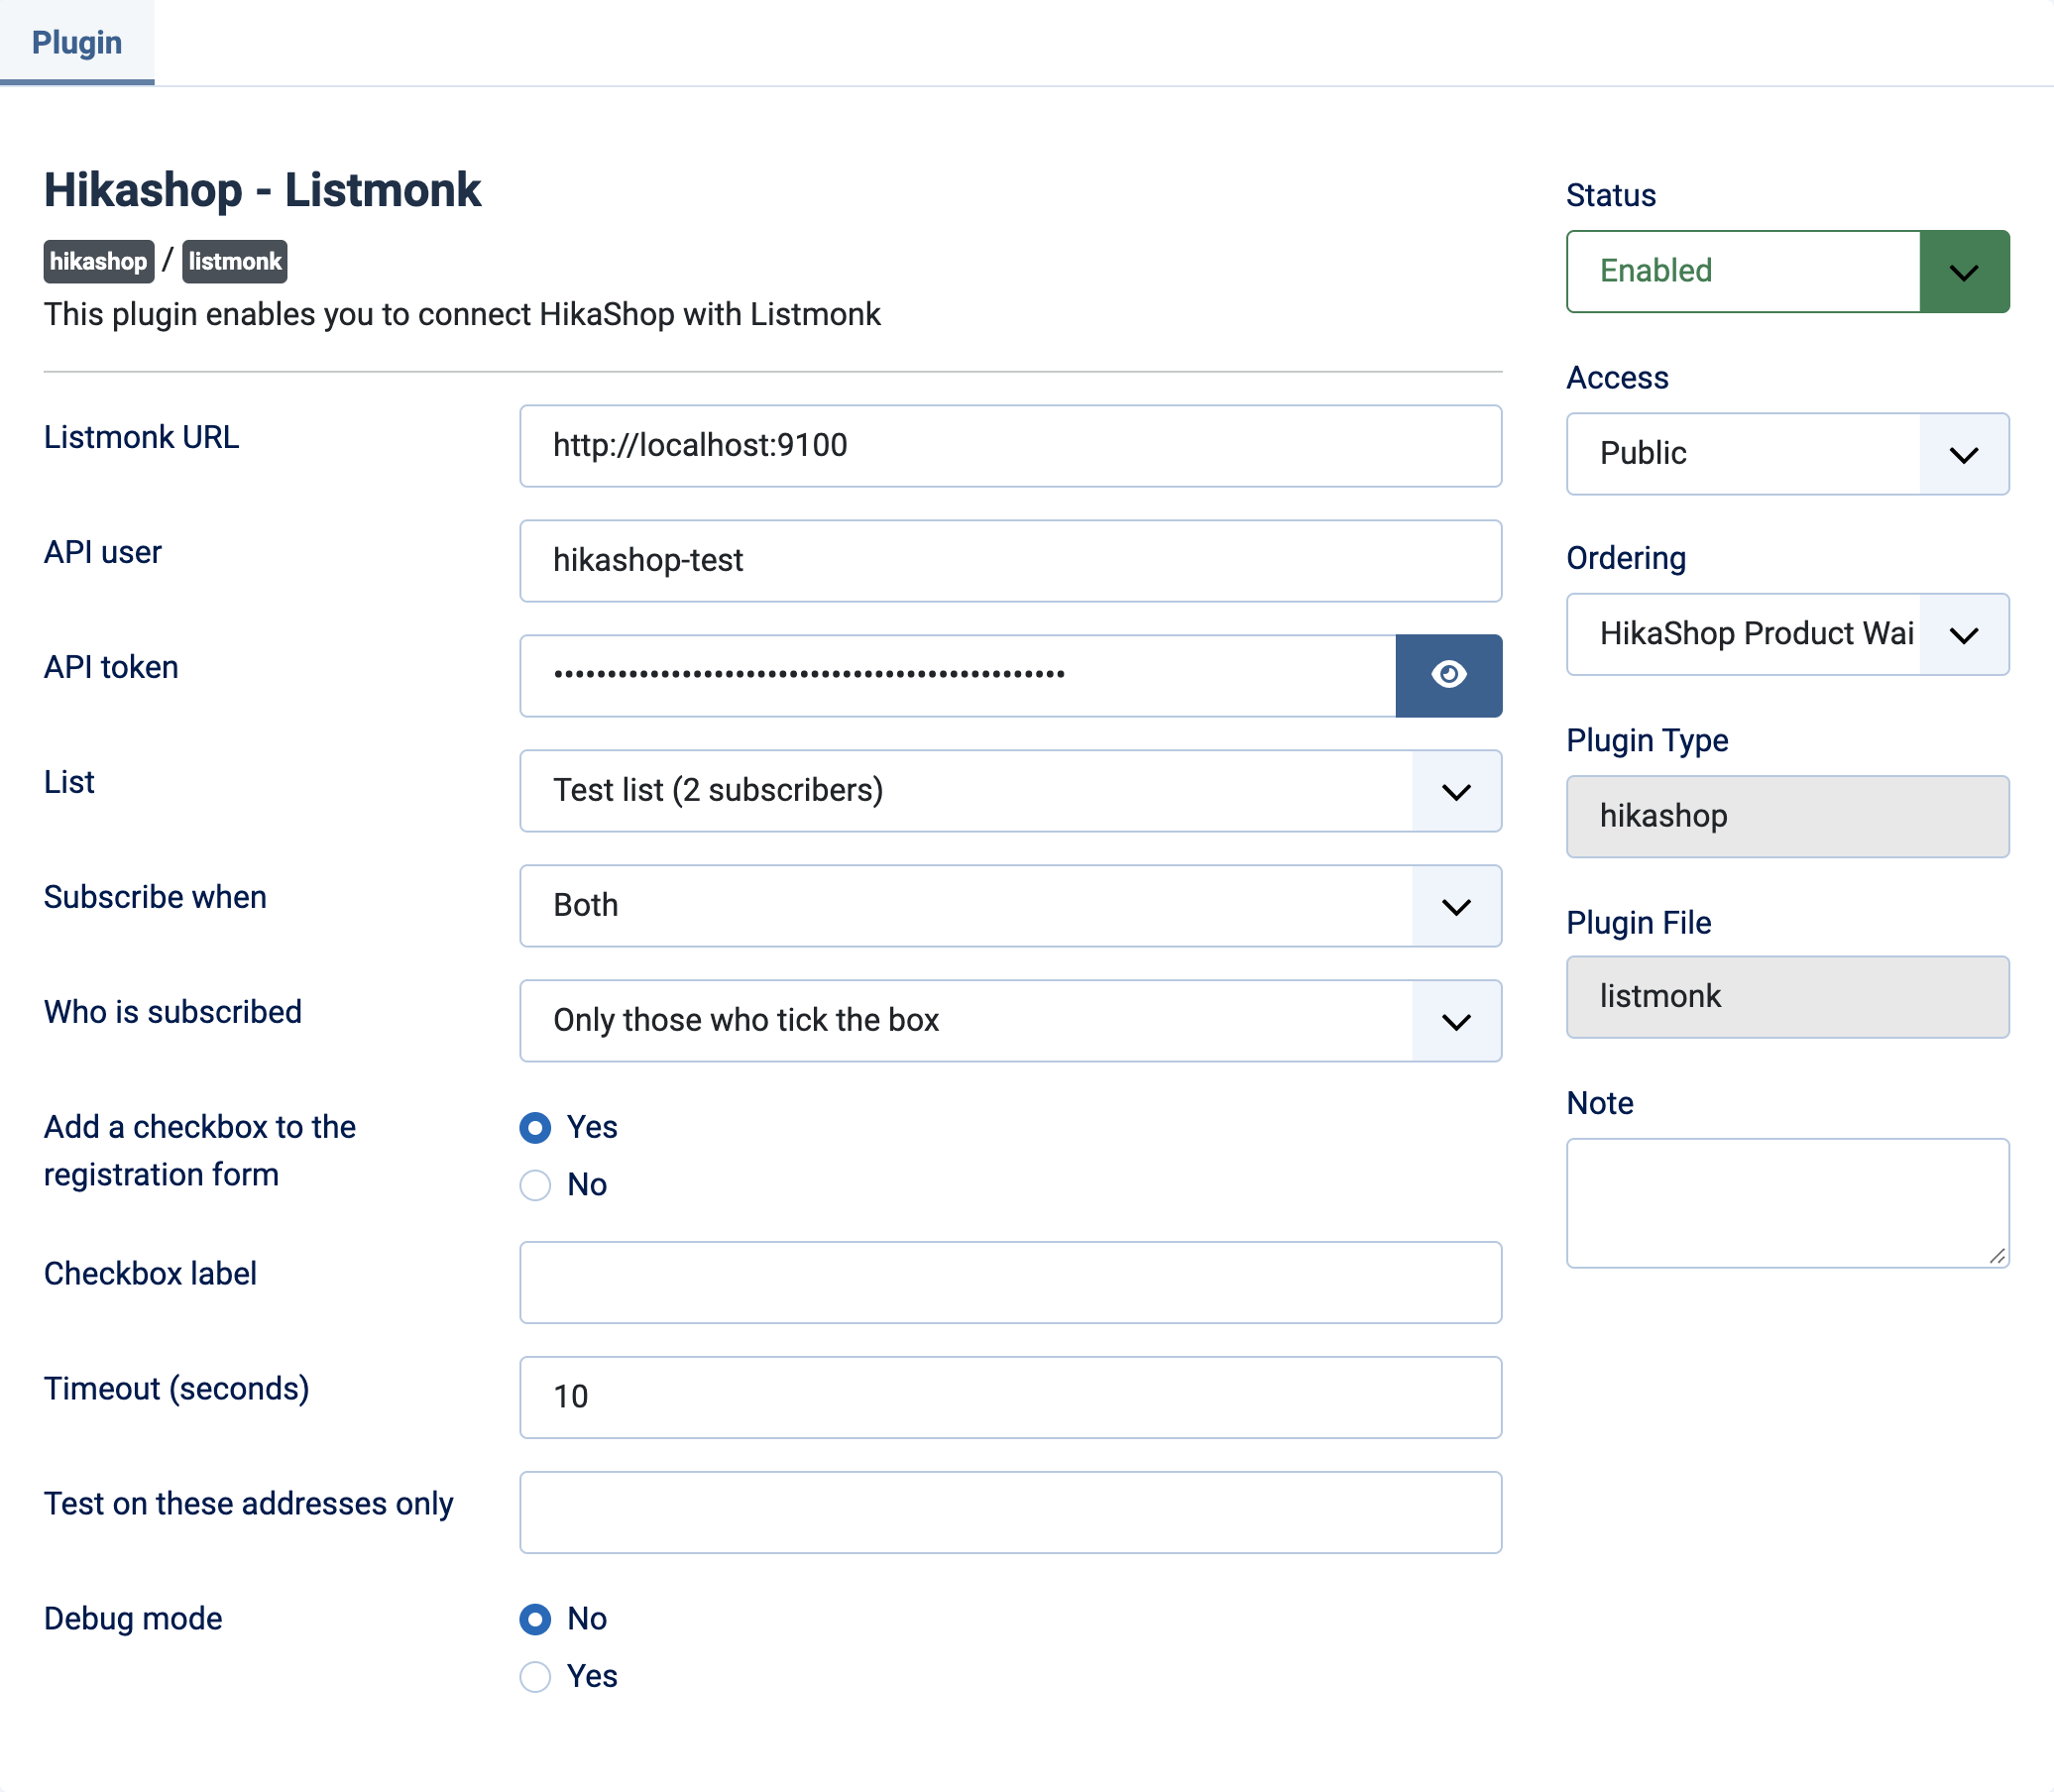
- Listmonk URL: the address of your Listmonk, for instance https://newsletter.example.com . Your website has to be able to reach it: a Listmonk on a private network does not work. Use its https:// address: with http:// the token and the addresses of your customers travel unencrypted, and the plugin tells you so.
- API user and API token: those of step 2. If you lost the token, create another API user.
- List: the list customers are added to, shown with its number of subscribers and "double opt-in" when it asks for a confirmation. It stays empty until the three settings above are saved.
- Subscribe when: "On order" (the default), "On registration" or "Both". "On order" subscribes at the first order and at each next one, which updates the figures kept on the subscriber.
- Who is subscribed: "Only those who tick the box" is the safe answer, and the one the European Union requires for marketing email. "Every customer" subscribes everybody, so use it only when you have their agreement.
- Add a checkbox to the registration form: shows the plugin's checkbox on the registration forms and at the checkout. Turn it off to use a HikaShop custom field instead.
- Checkbox label: the text next to the box. Empty, it reads "Yes, send me the newsletter".
- Consent field and Value that means yes: with the checkbox turned off, the custom field of the customer that records their agreement, and the value it has when they agreed ("1" for a checkbox).
- Timeout (seconds): how long a customer can be kept waiting for Listmonk, for the whole subscription, before the plugin gives up on it. Ten seconds is right for most shops.
- Test on these addresses only: while it is filled, only the addresses containing this text are sent to Listmonk. Empty, everybody who agreed is.
- Debug mode: writes every subscription, and every address that was skipped and why, to the HikaShop log file.
Using the figures in Listmonk
- Each subscriber carries the attributes source (always "hikashop"), orders, total_spent, last_order (a date), currency and language.
- In Listmonk, open Subscribers, Advanced, and write a query such as subscribers.attribs->>'orders' >= '2' to find the customers who ordered at least twice, then save them as a list or send a campaign to the result.
Customers you already have
- Only customers who tick the box are subscribed. Those who registered before the plugin never saw the box, and cannot be assumed to agree.
- If you do have their agreement, in a HikaShop custom field or because you are in "Every customer" mode, the file tools/backfill.txt of the plugin puts them on the list. Copy it to the root of your website under the name backfill.php and run it from a terminal with "php backfill.php" to see what would happen, then with "php backfill.php --run" to do it. It follows "Test on these addresses only" as well.
Troubleshooting
- "First, provide the URL, the API user and its token": the list menu appears when the three settings are saved. Save, then open the plugin again.
- "Could not connect to Listmonk": the address, the user or the token is wrong, or your website cannot reach your Listmonk. The message that follows says which.
- "The address answered with HTTP ... but not like a Listmonk installation": the address points to another site or to a page in front of Listmonk. Use the one you open Listmonk with, without the /admin part.
- "No lists found on your Listmonk installation": create a list in Listmonk first.
- "Permission denied" in the HikaShop log: the role of the API user misses one of the five permissions of step 2. If it names subscribers:sql_query, your Listmonk is an older one without the plain search: add that permission to the role.
- A customer does not reach Listmonk: turn on the debug mode and look at the HikaShop log file, in the logs folder of your site. It says whether the customer did not tick the box, did not match the test addresses, or was blocklisted in Listmonk.
- A customer ticked the box but received no confirmation email: the list has a double opt-in, and Listmonk sends that email with its own mail settings. Check them in Listmonk, under Settings.
- Details
- Written by: Administrator
- Category: Pther extensions
- Hits: 3
Installation
- 1) Install the plugin with Joomla's Extensions > Install. It is enabled on install.
- 2) Open it in Extensions > Plugins ("System - LLM") and choose your site type.
- 3) In the Organization tab, fill in what you want agents and search engines to know about your business. Leave empty what you do not want to publish.
- 4) Optional: put an llms.txt file at the root of your site, next to your robots.txt. The plugin links it from every page once it is there.
- 5) Check the result: add ?tmpl=markdown to the address of one of your product pages, or scan your site with one of the free agent-readiness scanners listed in our documentation page "Selling to AI shopping agents".
If RicheyWeb's System - Markdown plugin is installed, this plugin turns it off when it is installed, since both would answer the same requests. This plugin started from it, with thanks to its author.
Configuration
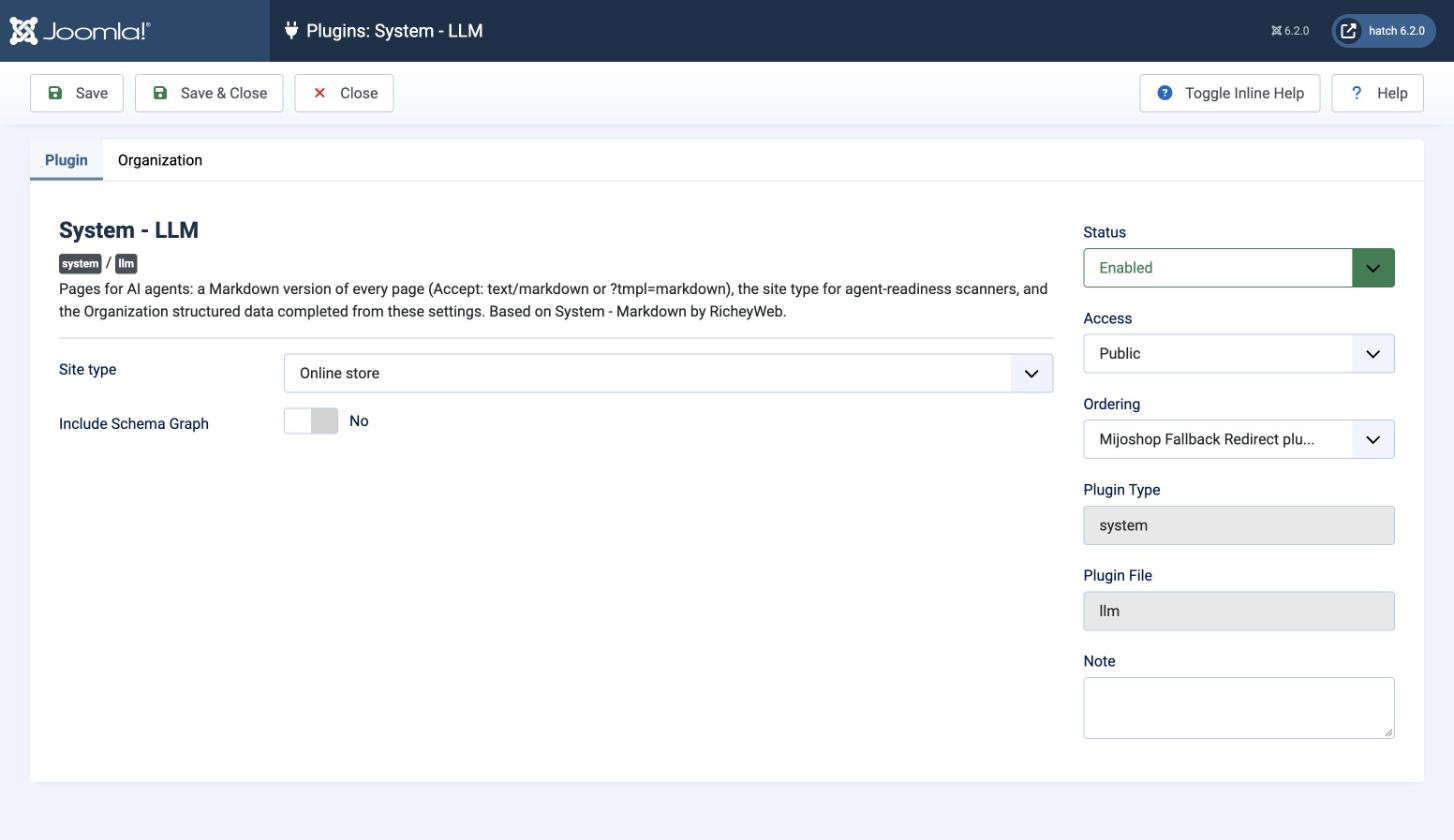
- Site type: what your site is, for the agent-readiness scanners: Online store, Company or marketing site, Documentation or content, Hosted software. It chooses which checks their report puts first, not your score. None: nothing is declared.
- Include Schema Graph: adds Joomla's schema.org data at the end of the Markdown version of a page. Leave it off unless you know an agent needs it.
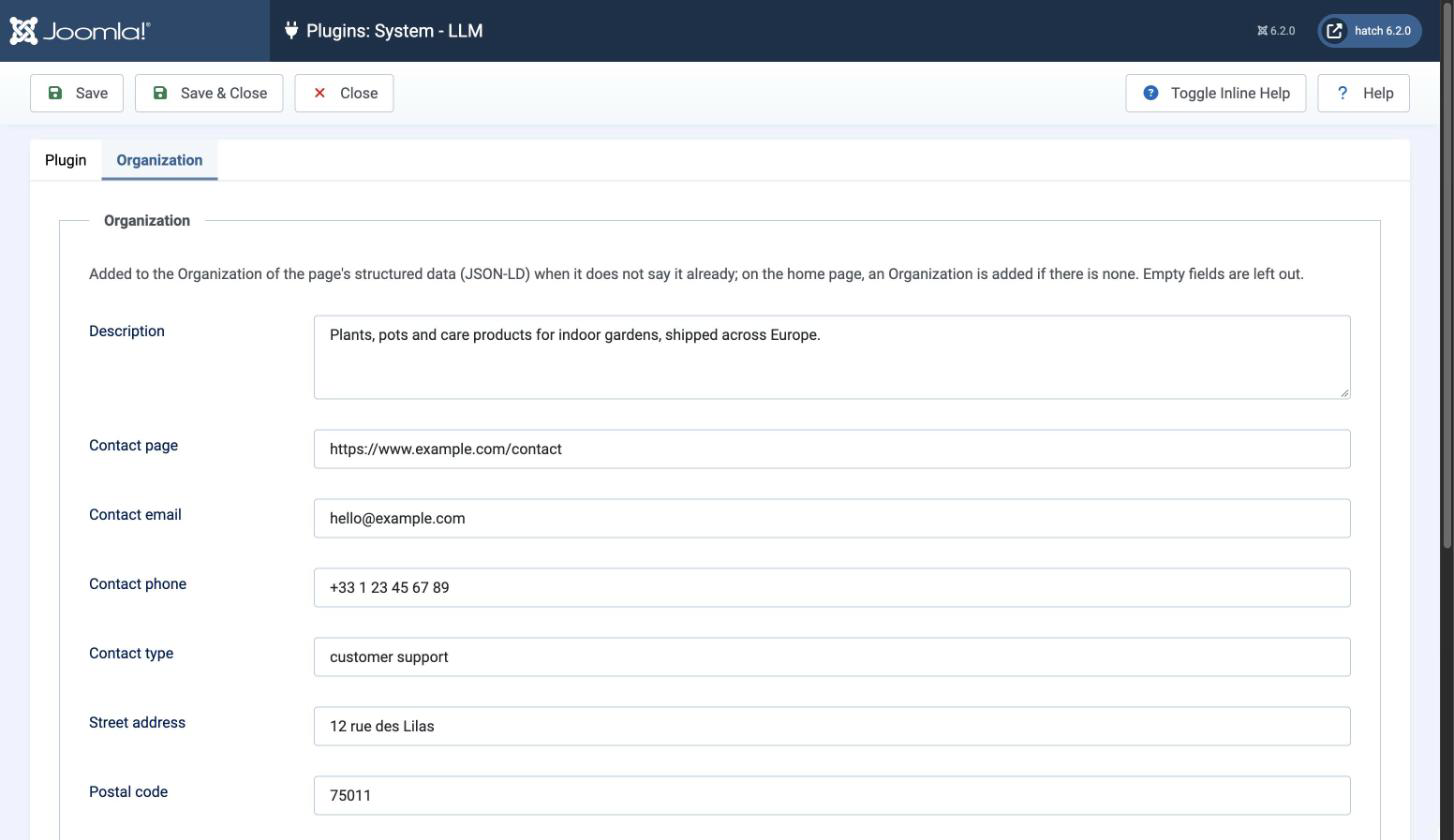
In the Organization tab, each field is added to your business's structured data when it is filled in, and left out when it is empty:
- Description: one or two sentences on what your business sells or does.
- Contact page, Contact email, Contact phone: how to reach you. The contact page alone is enough.
- Contact type: what this contact is for, "customer support" by default.
- Street address, Postal code, City, Region, Country: your business address. The country is a two-letter code, for example FR or US. The city and the country alone are enough if you do not want to publish more.
- Profiles: one address per line, your pages on other sites: social networks, directory listings, marketplaces.
Troubleshooting
- The Markdown version is the page of your template as a visitor sees it, without its header, menus, footer, pop-ups and off-canvas panels. If something useless remains (a block of your template that is not marked as header, navigation, sidebar or footer), add no-markdown to its CSS classes: the module class of a module (Advanced tab of the module), or the class of a section in your template's layout settings. In a template built with a framework such as Astroid, you can also choose header, nav, aside or footer as the HTML tag of the sections around your content.
- An agent still gets the normal page: check that it reaches your site at all. A firewall or a bot protection (a security extension, CrowdSec, your host's or Cloudflare's bot protection) may block it before Joomla answers.
- Adding ?tmpl=markdown to an address gives a 403 error while the normal page works: your security extension refuses the unknown tmpl= value. In Admin Tools, add markdown to the allowed tmpl= keywords of its Web Application Firewall settings.
- A change to a page does not show in its Markdown version: the version is kept for the time of your site's cache (System > Global Configuration > System > Cache Time). Clear the cache or wait.
- The structured data does not change on a page: the plugin only adds the fields that are missing. If your template or another extension already writes a description or an address, theirs is kept.