
Pther extensions
- Details
- Written by: Administrator
- Category: Pther extensions
- Hits: 6
Installation
- 1) Set up your rooms with the Booking plugin (1.5.0 or later): one product per room type, a date field in range mode as its booking field, the type "Stay priced per night", and a capacity equal to the number of rooms of that type.
- 2) In Beds24, create the same rooms (Settings > Properties > Rooms) with the same number of units, and connect your channels (Booking.com, Airbnb...) as Beds24 explains.
- 3) In Beds24, open Settings > Marketplace > API, click "Generate invite code" and give it the scopes bookings (all), bookings-personal (all) and properties (read). The code is valid for 24 hours.
- 4) Install this plugin, enable it in Extensions > Plugins, paste the invite code in its settings and save: the "Connection" setting then shows your properties and rooms with their ids.
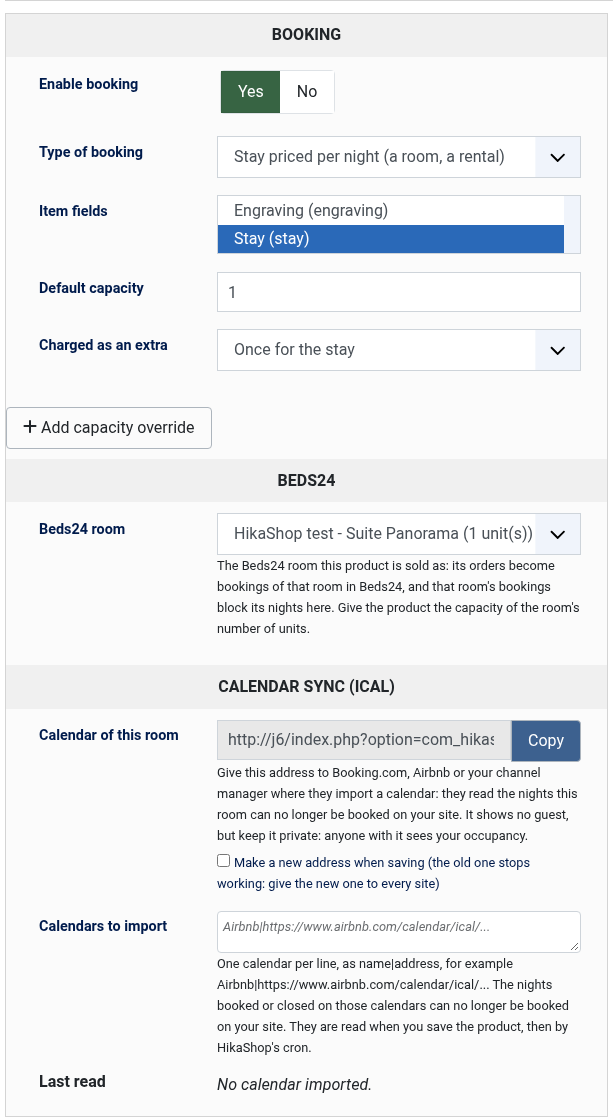
- 5) Edit each room you sell (Products > the product), and in its Booking block, under Beds24, choose its Beds24 room in the list. Save the product. The "Connection" setting of the plugin then shows each Beds24 room with its product.
- 6) Copy the "Booking webhook address" shown in the "Connection" setting into Beds24: Settings > Properties > Access > Booking Webhook.
- 7) Set up the HikaShop cron, every 15 minutes or more often.
- 8) Do not also import the iCal calendars of Booking.com or Airbnb in the Booking plugin for these rooms: Beds24 now does it for you.
Configuration
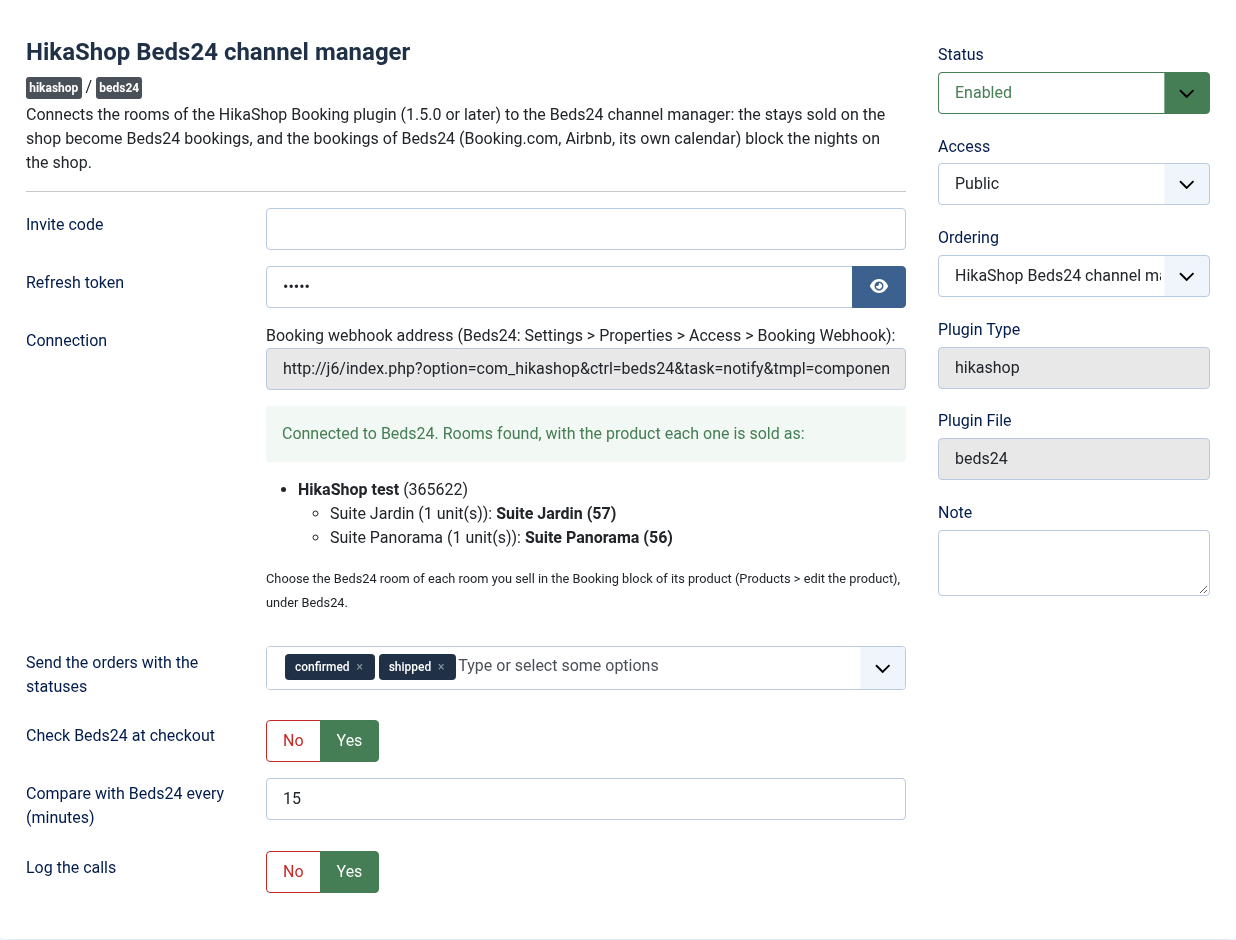
- Invite code: the code of step 3. The plugin exchanges it once for a refresh token and empties the field. Paste a new one if Beds24 ever stops answering.
- Refresh token: filled by the plugin. It stays valid as long as the plugin uses it at least once a month, which the comparison with Beds24 does.
- Connection: the address to give Beds24 for its booking notification, and the rooms the plugin reaches in Beds24, each with the product it is sold as. An error here says what Beds24 answered.
- Beds24 room (in the Booking block of each product, for a stay): the Beds24 room the product is sold as, from the list of your Beds24 rooms. Only the products with a room are synchronised; the others are left alone. A warning shows when the room's number of units and the product's capacity differ.
- Send the orders with the statuses: the order statuses that send the stays to Beds24. While none is chosen, confirmed and shipped are used. Add "created" to close the dates in Beds24 before the payment arrives, for bank transfers for example. An order that leaves these statuses has its bookings cancelled in Beds24.
- Check Beds24 at checkout: asks Beds24 at the last step of the checkout whether the nights are still free. If Beds24 does not answer within 5 seconds, the order goes through. Leave it on.
- Compare with Beds24 every (minutes): how often the HikaShop cron reads the coming bookings of your rooms in Beds24 to correct the nights blocked on your shop. 15 by default; 0 turns it off.
- Log the calls: writes each call to Beds24 and what it did in the HikaShop log file, without personal data.
- API address and Token address (Advanced tab): leave them as they are.
Troubleshooting
- "Beds24 refused the connection": the invite code was used already or is older than 24 hours, or the refresh token was not used for a month. Generate a new invite code in Beds24 and paste it.
- A booking made in Beds24 does not block the nights on the shop: check the Booking webhook address in Beds24 (step 6) and the Beds24 room chosen in the product. The comparison of the cron blocks them anyway at its next run.
- "... is no longer available on ...: it has just been booked on another site": Beds24 has a booking on those nights that the shop did not know yet. The customer chooses other dates.
- "Beds24: order ... not sent" by email: Beds24 could not be reached or refused the booking for an hour. The plugin keeps trying; the HikaShop log (with "Log the calls" on) says why.
- Beds24 allows 100 credits of API calls per 5 minutes for the whole account. The plugin makes one call per order, notification and comparison, and skips a comparison when the credits run low.
- Details
- Written by: Administrator
- Category: Pther extensions
- Hits: 5
Installation
- 1) Download the plugin on our website via the download link provided to you after the purchase.
- 2) Install it on your Joomla website via the extension manager and via the "Install plugin" button of System>Plugins on WordPress.
- 3) Enable the plugin in Extensions > Plugins.
- 4) In the plugin settings, select the order custom fields you want to use for booking capacity (e.g. delivery date, time slot).
- 5) Set the default capacity (number of bookings allowed per field combination).
- 6) For per-product booking, edit a product, enable booking in the Booking settings block, and select the item custom fields to track.
- 7) Optionally, create capacity overrides via Orders > Bookings > Capacity Overrides to define specific limits for certain field value combinations.
Configuration
- Order fields: select the order custom fields to track for booking capacity at checkout.
- Default capacity: the default number of bookings allowed per combination of field values, when no specific capacity override is defined.
- Take into account product quantity: when enabled, the stock reserved is based on the product quantities in the cart. When disabled, each order line counts as 1 regardless of quantity.
- Show availability: display availability indicators (spot count, color-coding) on the frontend next to field options.
- Sort the shows by their next date: in the listings of products, the events come first, in the order of their next date, then the other products. Choose No to keep the order of the listing.
- Show exact count: show the exact number of remaining spots. When disabled, a generic message is shown instead.
- Seasons (tab Seasons): one row per season, used by the products where "Price is per night" is on. Nights covered: one line per period, every year:
07-01..08-31(month-day to month-day,12-20..01-05runs over the new year),12-25(one day),2026-12-24..2027-01-02(this period only),friday-saturday(weekdays). Price of a night:+40%or-15%over the product's price, a price such as140, or a price per traveller category such asadult=140, child=70; prices are without tax, in the shop's main currency. A night outside every season costs the product's price; when two seasons cover a night, the one lower in the list wins. - Price is per night (in the Booking block of the product): the price of the product is the price of one night, and a stay costs the sum of its nights (the check-out day is not a night).
- Read the calendars every (minutes) (tab Calendar sync): how often the calendars the rooms import are read, 30 minutes by default, 10 at least. HikaShop's cron task must run at least as often.
- Closed nights in the calendars (tab Calendar sync): when on (the default), the calendar of a room also gives the nights a capacity override of 0 closes, so that the other sites close them too.
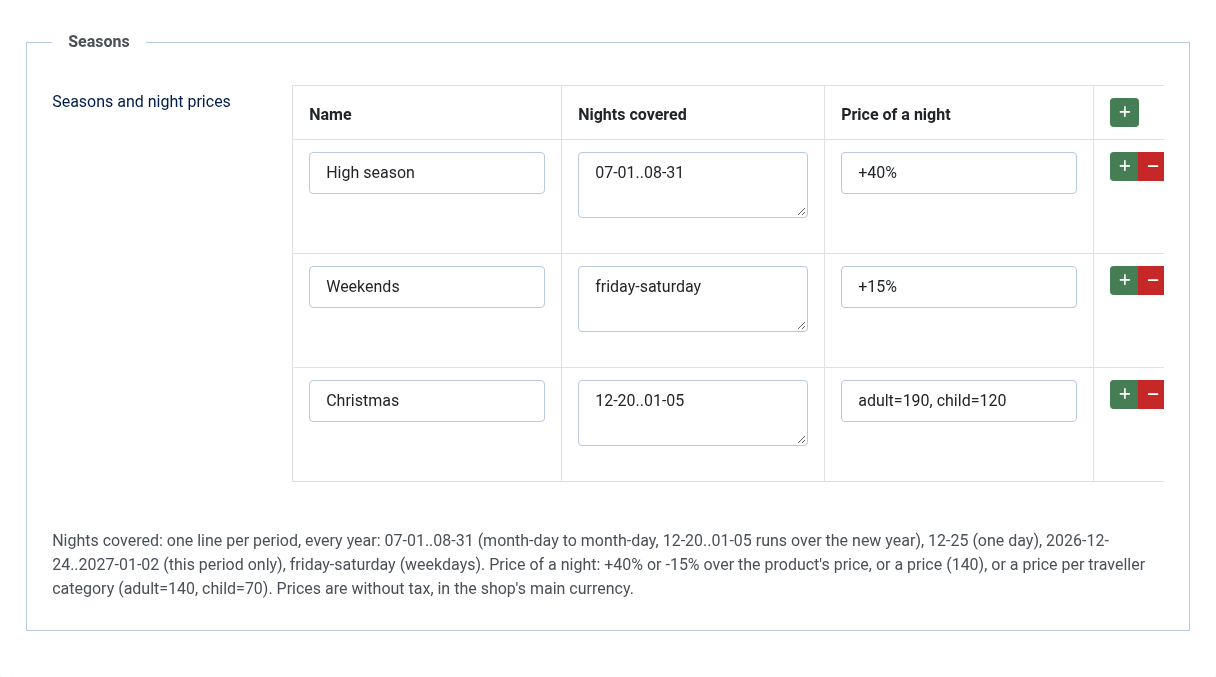
Seasons tab of the plugin: high season +40%, weekends +15%, a night price per traveller category for Christmas. They repeat every year.
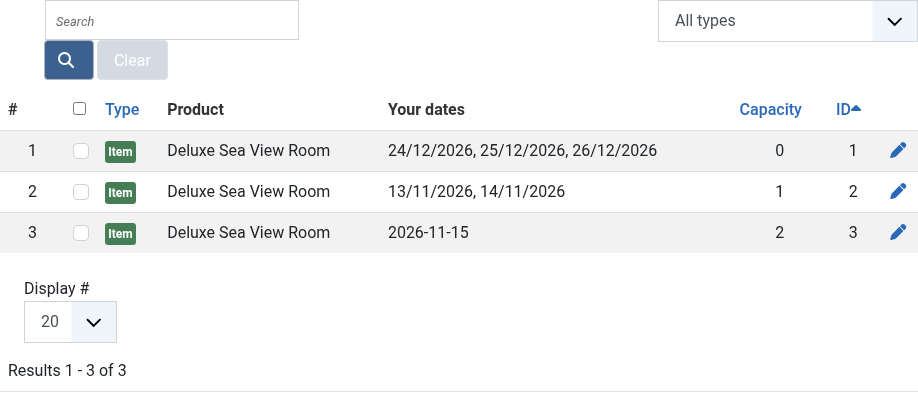
Capacity overrides: close the nights of Christmas (capacity 0) or give a limited number of spots to chosen dates, with weekday patterns and date wildcards.
Sync with Booking.com, Airbnb and channel managers
For a room whose type of booking is "Stay priced per night" and whose booking fields include a date field in range mode, the Booking block of the product shows a Calendar sync part.
- Calendar of this room: the address of the room's calendar. Paste it where the other site imports a calendar: on Airbnb, in the listing's Calendar, Availability, Connect calendars, import a calendar; on the Booking.com extranet, in Rates & Availability, Sync calendars, add a calendar connection; in Beds24, Smoobu or another channel manager, in the room's iCal import. It gives the nights the room is full on your site (by your orders and by the calendars it imports) and, if you want, the nights you closed, as "Booked" or "Closed", without any guest data. Keep it private all the same: anyone with it sees your occupancy. Tick "Make a new address when saving" to stop an address that went where it should not; then give the new one to every site.
- Address to give to a calendar you import: the same calendar without the nights imported from that site, the one to give back to it, so that its own bookings do not come back to it.
- Calendars to import: one calendar per line, as a name, a vertical bar and its address, for example
Airbnb|https://www.airbnb.com/calendar/ical/...(Airbnb gives it in Connect calendars, export the calendar; Booking.com in Sync calendars, export). Each event of those calendars blocks its nights on your site: the product page calendar shows them taken, the listing's date filter hides the room and the cart refuses them. They are read when you save the product, then by HikaShop's cron task at the interval of the settings, and the button "Read the saved calendars now" reads them at once. A calendar taken out of the list frees its nights. - Last read: for each calendar, when it was read, how many events and nights it gave, or why it could not be read. A calendar that cannot be read keeps the nights it blocked before; after three failed reads in a row, the shop's email address receives one message.
- In Orders > Bookings, the nights blocked by an imported calendar show its name instead of an order number, with a filter by source, and the CSV export has a Source column.
iCal is not instant: Airbnb reads the calendars it imports about every 3 hours, Booking.com and the channel managers on their own schedule, and your shop at the interval of its settings. A night can be booked on two sites between two reads. For a property in high demand, connect Booking.com and Airbnb to a channel manager, which takes their bookings at once, and sync your shop with the channel manager. Each event blocks one place: a room sold as several identical units blocks one unit per event.
Troubleshooting: "the room has no range date field among its booking fields": select a date field in range mode in the Booking block's item fields. "HTTP 404" or "HTTP 403": the address is wrong or was renewed on the other site; copy it again. "the address does not give a calendar": the address is a web page, not the .ics calendar. Nights that stay blocked after a booking was cancelled elsewhere are freed at the next read of that site's calendar, once that site has updated it.
Microdata settings
These settings control the structured data (JSON-LD) output on product pages for booking-enabled products. Each field mapping can be either a product custom field name (the value will be read from the product) or a hardcoded value.
- Schema type: the schema.org type to use (Hotel, HotelRoom, LodgingBusiness, BedAndBreakfast, Hostel, Resort). Leave empty to keep the default Product type. Can be overridden per product.
- Check-in time: check-in time (e.g. "14:00" or a custom product field name).
- Check-out time: check-out time (e.g. "11:00" or a custom product field name).
- Occupancy: maximum number of guests.
- Amenities: comma-separated list of amenities (e.g. "WiFi, Air Conditioning, Minibar").
- Star rating: hotel star rating (1-5).
- Bed type: type of bed (e.g. King, Queen, Twin).
- Number of beds: number of beds in the room.
- Number of rooms: number of rooms available.
- Details
- Written by: Administrator
- Category: Pther extensions
- Hits: 7
Installation
- Install the plugin with the HikaShop or Joomla installer, then publish it in the plugin manager (Hikashop - Brevo).
- In your Brevo account, open Settings, SMTP & API, API Keys, create a key (v3) and copy it.
- Open the settings of the plugin, paste the key in "API Key" and save. The "List" field then shows your Brevo contact lists: choose the one your customers must join and save again. If you have no list yet, create one in Brevo first.
- To get the unsubscribe, hard-bounce and spam events back in your shop, type a secret of your own in "Webhook secret" (any long random text) and save.
- In your Brevo account, add a webhook that points to this address, with your own domain and your secret: https://www.example.com/index.php?option=com_ajax&plugin=brevo&group=hikashop&format=raw&token=YOUR_SECRET. Choose the unsubscribe, hard bounce and spam events. Brevo sends no signature, so the secret in the address is the only protection: restrict the address to the IP ranges of Brevo too if you can.
- While you set things up, type your own address in "Test email allowlist" so that only your test orders reach Brevo. Empty it when you are ready.
The plugin needs the PHP cURL extension. For the e-commerce sync, the eCommerce section must be activated in your Brevo account.
Configuration
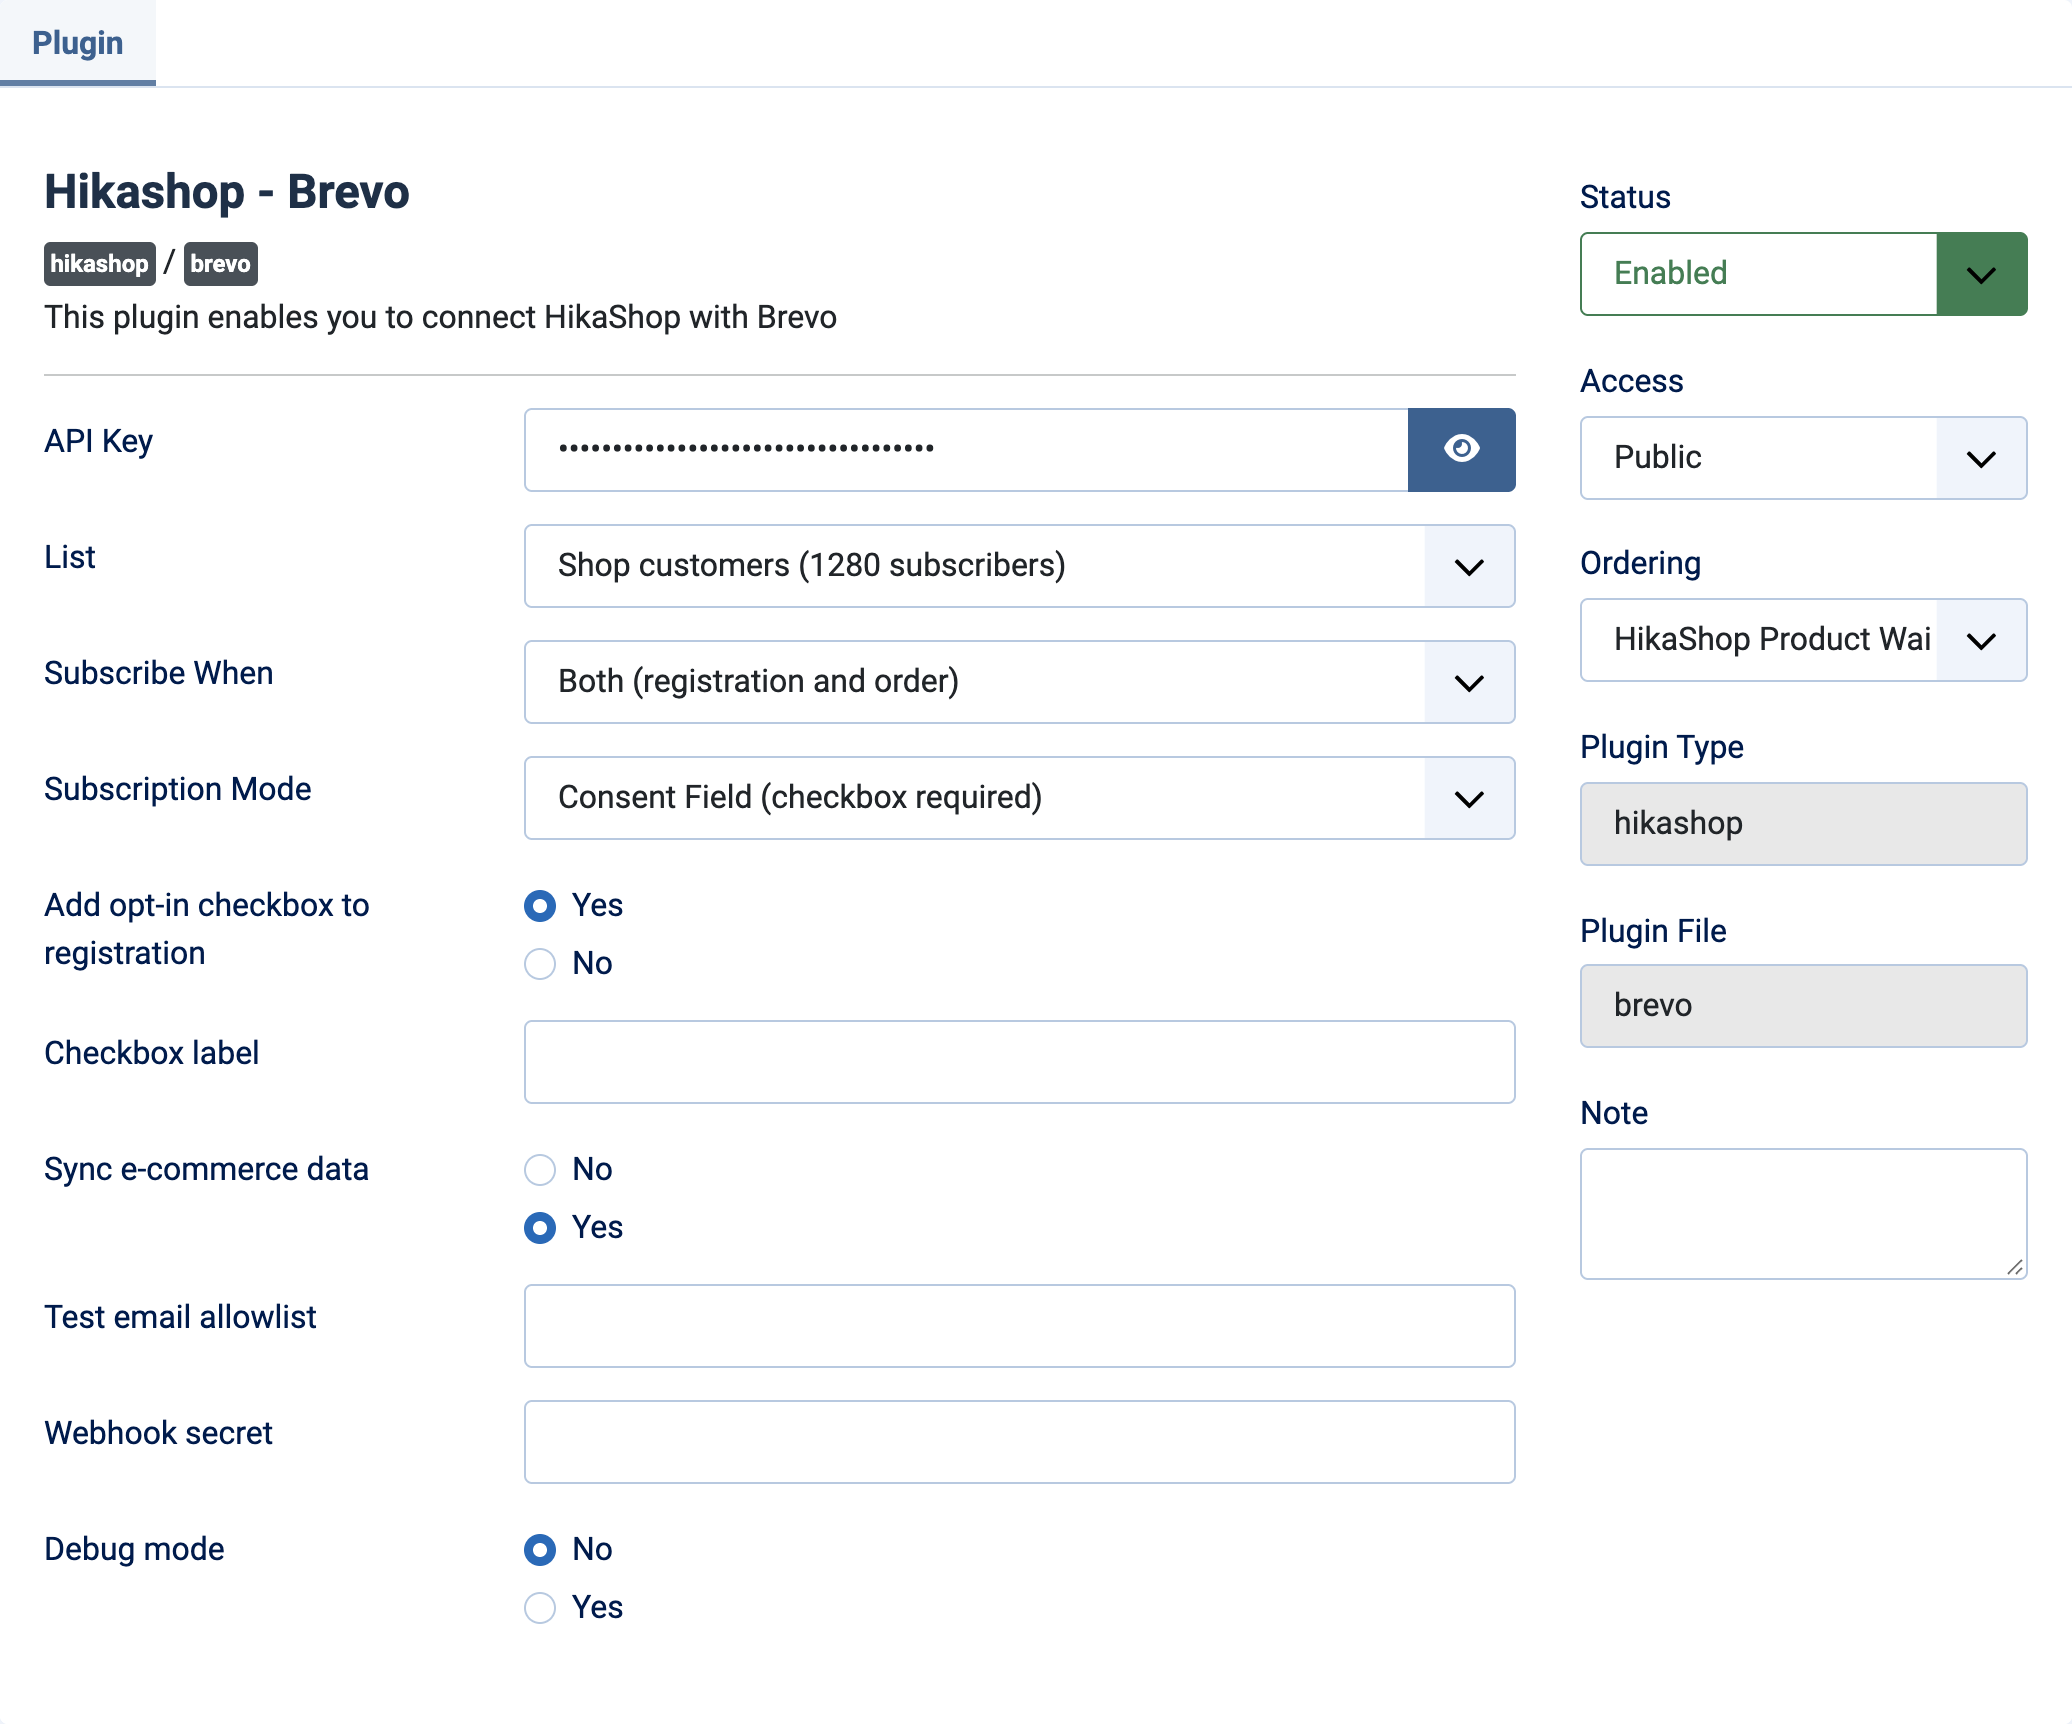
- API Key: your Brevo API key (v3). Without it nothing is sent to Brevo.
- List: the Brevo contact list the customers are subscribed to. Without a list, registrations are not subscribed.
- Subscribe When: when a customer is subscribed. On Order (default): when an order is placed. On Registration: when an account is created. Both: at each of the two.
- Subscription Mode: Automatic (default) subscribes at once. Double Opt-in has Brevo send a confirmation email and adds the contact once they click it. Consent Field only subscribes customers who gave their consent. Consent + Double Opt-in requires both.
- DOI Template ID: the number of the confirmation email template made in Brevo, under Campaigns, Templates. Shown with the two double opt-in modes. Empty, nobody is subscribed and an error is logged.
- DOI Redirect URL: the page the customer lands on after confirming. Shown with the two double opt-in modes. Empty, nobody is subscribed and an error is logged.
- Add opt-in checkbox to registration: shown with the two consent modes. Yes (default): the plugin adds its own newsletter checkbox to the registration and checkout forms, with no custom field needed. No: a HikaShop custom field is used instead.
- Checkbox label: the text next to the plugin's checkbox. Empty, the text is "Subscribe to our newsletter".
- Consent Field: with the checkbox turned off, the custom user field (checkbox, dropdown or radio) that holds the consent, made in HikaShop, System, Custom fields. Empty, nobody is subscribed. An unsubscribe received from Brevo also empties this field for the customer, so it is the field to use if you want the webhook to be reflected in your shop.
- Consent Required Value: the value of that field that means yes. Default 1; for a dropdown, the value of the yes option.
- Sync e-commerce data: Yes (default): orders, products and a purchase event are also sent to Brevo for its automations and reports. No: only the list subscription is done.
- Test email allowlist: when filled, only the customers whose email contains this text (for instance @example.com) are synced. Empty (default): everyone is.
- Webhook secret: the secret in the webhook address. Empty (default), the webhook refuses every call.
- Debug mode: No by default. Yes writes each step of the plugin (subscribed, skipped, already on the list, webhook events) to the HikaShop log.
A contact already in Brevo is never confirmed or renamed again: customers who unsubscribed (from the list or from everything) stay unsubscribed, and a customer already on the list is left as is.
Troubleshooting
- "First, provide an API key": shown instead of the lists. Paste the API key and save.
- "Could not connect to Brevo", followed by Brevo's answer: check the API key, copied again from Settings, SMTP & API, API Keys, without spaces, and that your server can reach Brevo (PHP cURL).
- "No contact lists found in your Brevo account": create a contact list in Brevo, then reload the settings.
- "Double opt-in selected but DOI template id / redirect URL are not configured" (log): fill both fields.
- "E-commerce sync skipped ... enable the eCommerce section in your Brevo account first" (log, shown in the backend when editing an order): activate the eCommerce section in Brevo, or set "Sync e-commerce data" to No.
- "Failed to subscribe ...", "Could not look up ..." or "Order ... sync failed" (log): the end of the message is Brevo's answer; it usually points to the cause (key, list or rights).
- A customer is not subscribed: turn on Debug mode and read the HikaShop log. "no consent, skipping" means the checkbox or field was not ticked, "Skipped (test allowlist)" means the address does not match the allowlist, and "Leaving ... alone" means the contact unsubscribed in Brevo.
- The webhook answers "Forbidden": the secret is empty in the plugin or differs from the token in the address given to Brevo.
- "Webhook: ... no consent field configured, opt-out not reflected locally" (log): the opt-out can only be cleared in your shop when a Consent Field is chosen; with the plugin's own checkbox it stays in Brevo only.
- Details
- Written by: Administrator
- Category: Pther extensions
- Hits: 6
Installation
- 1) Download the plugin and the countdown module on our website via the download link provided to you after the purchase.
- 2) Install both with the Joomla extension manager (System > Install > Extensions).
- 3) In System > Plugins, enable "Hikashop Cart Reservation" and set its reservation duration.
- 4) In Content > Site Modules, create a module of the type "Cart Countdown Module", choose its position (the header or the side of the checkout, for instance) and publish it on the pages where the cart is shown.
- 5) Give your products a stock quantity: a product with an unlimited stock is never reserved.
Configuration
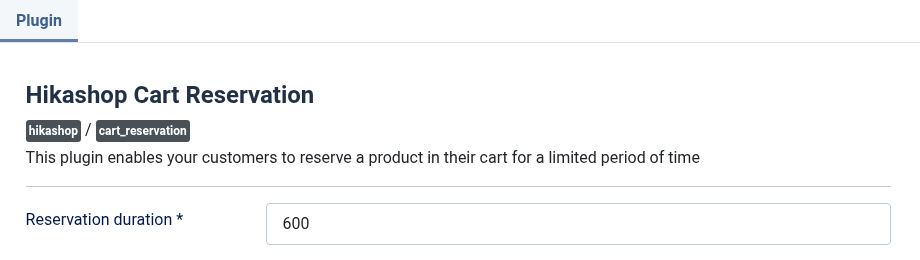
The plugin has one setting. The countdown module has its own, in its module page.
- Reservation duration: the number of seconds a product stays reserved once it is in the cart. 600 is ten minutes, 1800 half an hour. The field is required.
Cart Countdown Module
- Show a text before the time: a short sentence that tells the customer what the time is for.
- Text before the time: shown when the setting above is on. Empty, the text is "Your cart is held for".
- Show a clock: a small clock before the time. Off by default.
- Time shown: minutes and seconds, or hours, minutes and seconds for a reservation that lasts more than an hour.
- Names of the units: written in full (Minutes, Seconds), short (min, sec) or not at all.
- Size: small, medium or large text, relative to the page: small for a header, large for a cart page.
- Style: plain text, a rounded label with a light background, or the text over the time.
- Link to the checkout: the customer who clicks the time goes to the checkout. Off by default.
- Module class suffix: a CSS class to add to the module, to style it. Empty, the module has no extra class.
Troubleshooting
- "You can only add x of product y as the rest of the stock is reserved": other customers have the rest of the stock in their carts. The customer can try again when their time is over.
- "All the remaining stock of the product is currently in the cart of others": the same, with nothing left to take.
- The countdown does not show: the module is not published on that page, or the cart is empty, or the cart only holds products that keep their own time without any end to show.
- A product is never reserved: its stock is unlimited (a negative or empty quantity) or at 0. Only a product with a quantity in stock is reserved.
- Details
- Written by: Administrator
- Category: Pther extensions
- Hits: 4
Installation
- 1) Download the plugin on our website via the download link provided to you after the purchase.
- 2) Install it on your Joomla website (extension manager).
- 3) Make sure the PDF Invoice plugin is installed, enabled and configured with your company details and legal mentions, as it produces the invoice content. The email address of your company shown on the invoice must be a sending address that is active on your Chaintrust account, otherwise Chaintrust rejects the invoices.
- 4) Create your account on the Chaintrust onboarding form, and once accepted you will receive a client id and a one-time token by email. Paste the client id and the token into the plugin configuration and leave the client secret empty: the first time the plugin contacts Chaintrust, it swaps the token for your client secret and saves it.
- 5) Choose the environment (test or live) and enable the plugin.
- 6) In System > Order statuses, select which statuses should trigger the sending to Chaintrust.
Configuration
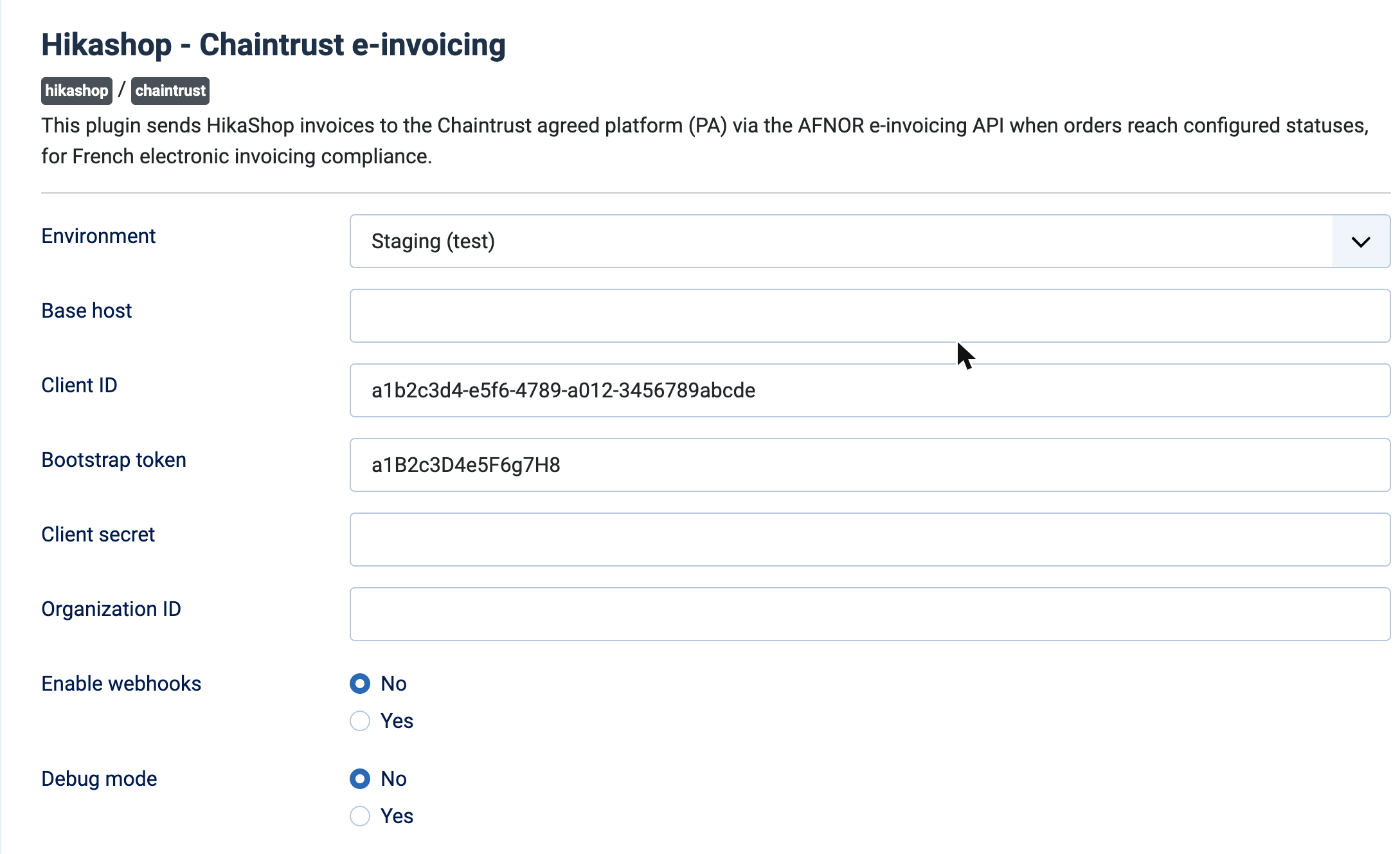
- Environment: Staging (test) sends to the Chaintrust test platform, where nothing has a legal value, so you can try the whole chain safely. Switch to Production (live) once your live account is active.
- Base host: the address of the Chaintrust platform. Leave it empty on Staging. For Production, enter the live address given by Chaintrust at go-live, as the plugin has no default for it.
- Client ID: the identifier you received by email once your Chaintrust account was accepted.
- Bootstrap token: the one-time token emailed by Chaintrust with your client id. Paste it here and leave the client secret empty: the first time the plugin contacts Chaintrust, for example when the first invoice is sent, it swaps the token for your client secret, saves it and empties this field. The token works only once.
- Client secret: the durable secret of your account. The plugin uses it, with the client id, to get an access token for every sending. Keep it private.
- Organization ID: only needed if Chaintrust gave you one for your account, for example when several companies share the same login. It is then sent with every request. Leave empty otherwise.
- Enable webhooks: Yes makes Chaintrust push the accepted or rejected result of each invoice back to your site, so the status on the order is updated as soon as it changes. It needs a site reachable from the internet. With No, the status is refreshed when you open the order in the backend.
- Debug mode: Yes writes the details of each sending to the HikaShop log file, to find out why an invoice was not sent. Keep it on No in normal use.
The order statuses that trigger the sending are chosen in System > Order statuses of HikaShop, not in these settings.