
- Details
- Written by: Xavier
- Category: Tutorials
- Hits: 35518
|
|

Description
What are the wishlists ?
The wishlists are an amazing functionality which allows your customers to create a shared list of products. This way, they can add your products in their wishlist and send the link of the wishlist to their friends.
When the friends receive the wishlist, they can buy the products and then offer them to the wishlist owner.
This tutorial will explain you how to manage the wishlists. You can also follow this tutorial for the carts management, because the usage is the same.
First, we will see how to use wishlists, and edit them. And then how to create a new wishlist.
Enable / disable the wishlists and multi-carts
By default, the wishlists and carts are enabled.
If you want to disable them, go in HikaShop > Configuration > Features and under the "Main" section you can change the options: "Enable multi carts" or "Enable the wishlists".
These options will also display or not a cart/wishlist management area that will be available via the user control panel.
Another option allow you to display or not the "Add to wishlist" button on products listings. You can find this option in the main configuration page, HikaShop > Configuration > Display under the section "Default parameters for products".
Or in the hikashop options of your menus and modules via the menus Display > Content menus/modules.

New: Allow you to create a new wishlist.
Edit: Check a wishlist in the listing of wishlists, and then click on that button to edit this wishlist.
Delete: You can check many wishlists, and then click on Delete to delete them.
Here is the listing of the wishlists:
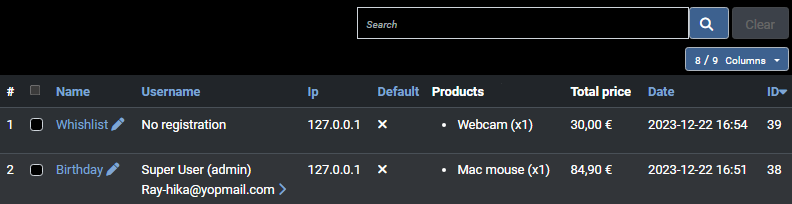
Checkbox: You can check these checkbox to do a multiple wishlist delete. Or check one of these to edit the wishlist.
Name: The name of the wishlist.
Username: The name of the user. If you have the rights, you can see the email adress and you can edit the user by clicking on the icon.
Default: Display if the wishlist is currently the main wishlist of the user.
Quantity: The quantity of products in the wishlist.
Total price: The total price of all the articles in the wishlist.
Date: The last modification date of the wishlist.
Action: You can click here to edit the wishlist.
ID: The id of the wishlist.
Editing a wishlist
To edit a wishlist, click on the edit icon on the right of the row, or check the wishlist and click on "Edit".
In the wishlist edition screen, you will have a page like this:
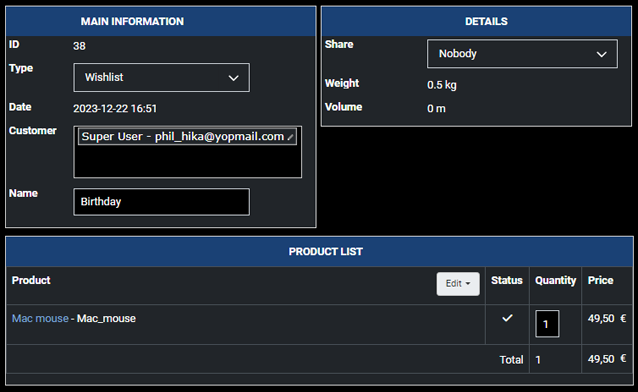
On this view, you can find the wishlist details, like the ID, the name, the type and the date.
You can edit the wishlist name and the type. If you save with the type of "cart" the wishlist will become a cart, and you will then find it in the carts menu.
Editing the wishlist user
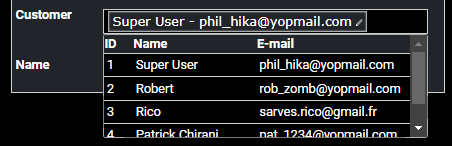
You can also change the customer of the wishlist, like in the order edition view, you just have to click in the input to see the dropdown user listing to define an other user.
Adding / editing products in the wishlist
Just click on "Add an existing product", you will see a popup like that:
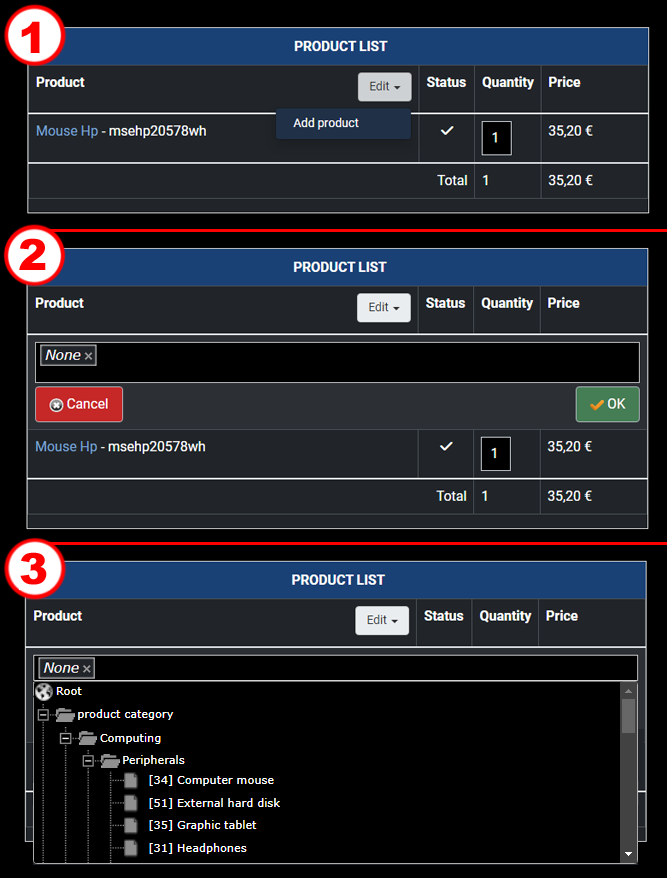
Here, you can select one or several products, change the quantity, and then click on "OK". All your selected products will be added to the wishlist.
Creating a new wishlist
To create a new wishlist, go in the wishlist listing and click on the "Add" button.
When you reach the edition form, you first have to add an existing product as explained before. And then, you can add the other information of the wishlist.
Sharing a wishlist
By using the "share" option of your wishlist page, you'll be able to share your wishlist :
- to "Nobody" (default value)
- to "Everybody"
- to "Registered users"
- Via "E-mail". In fact, after saving your wishlist the system will give you through the "Link to the wishlist" option an URL that you can send to people, so that they can have access your wishlist. Only the people with that link will be able to see your wishlist.
- Details
- Written by: Majri
- Category: Tutorials
- Hits: 48934
|
|
Description
Why products insertion/translation plugins?
HikaShop product insertion/translation plugins are functionalities which will allow you to display your HikaShop products through your Joomla articles. By this way, you'll be able to create Joomla articles about your "favorite/most popular/.." products and easily display them.
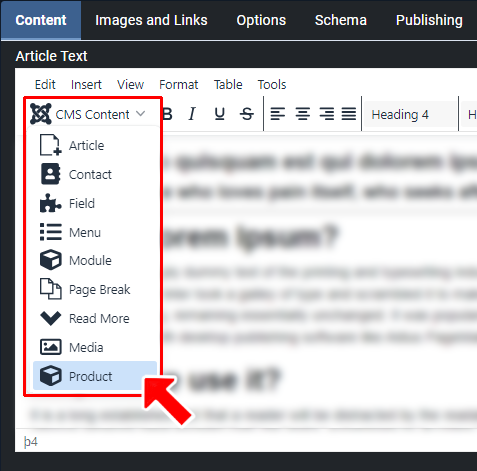
HikaShop product insertion: This plugin will be used through your Article creation page ("Content -> Articles -> 'Your article'") with the "Product" button. This "Product" button enables you to add "Product(s) TAG" to your article.
HikaShop product translation: This plugin will be automatically used through your front-end and will translate your "product(s) TAG".
This tutorial will explain how to add a HikaShop product TAG to Joomla articles and the different ways to display them.
First, we will see how to create and add them through the HikaShop product insertion plugin and how they can be translated by the HikaShop product translation plugin.
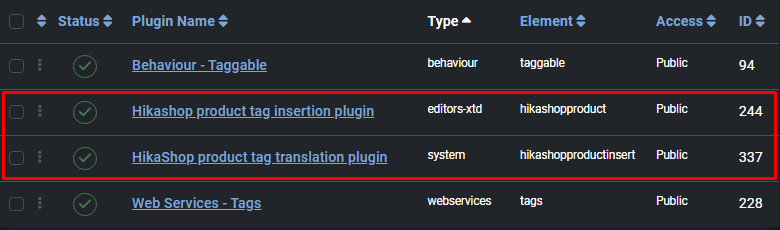
Enable / disable HikaShop product insert insertion and translation plugins
By default, these plugins are disabled.
If you want to enable them, you'll have to do it through "System -> Manage -> Plugins" (or "Extensions -> Plugins" on older Joomla versions).
Inserting a product TAG
Through your Joomla article's configuration screen, you'll be able to add products through the Product button:
Product insert button
Then, you'll find this configuration screen showing your products and some options:
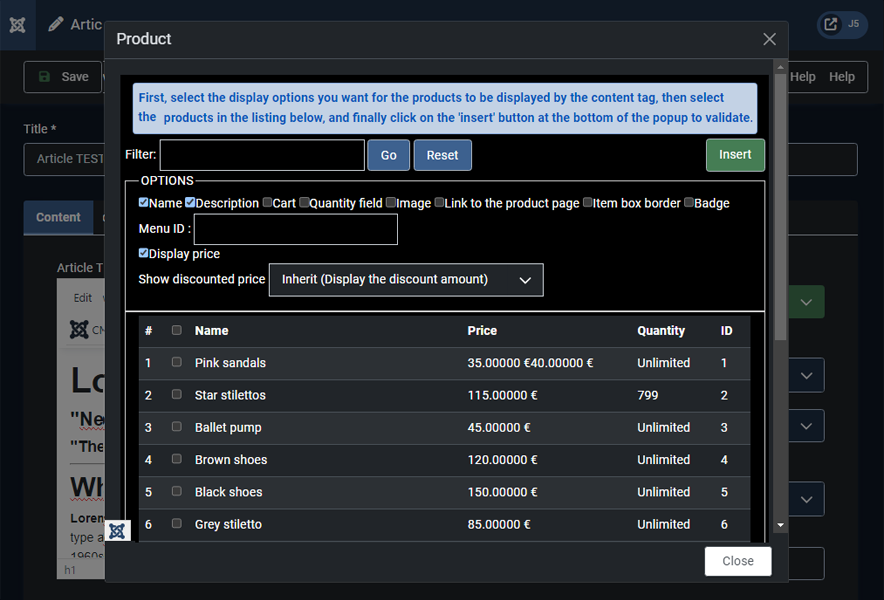
Name: Allows you to display the product's name (uses the name tag option)
Description: Allows you to display the product's description (uses the description tag option)
Cart: Allows you to display an add to cart button (uses the cart tag option)
Quantity field: Allows you to display a quantity field next to the add to cart button (uses the quantityfield tag option). Note: The quantity field won't be displayed if your products have variants.
Image: Allows you to display the product's image (uses the picture tag option)
Link to the product page: Allows you to add a link to the product page (uses the link tag option)
Item box border: Allows you to display a border around the products (uses the border tag option)
Badge: Allows you to display product badges on the product image (uses the badge tag option; requires the picture option to be enabled)
Menu ID: If you enter the id of a HikaShop menu item, the system will use the alias of that menu item instead of "component/hikashop" in the URL link (uses the menuid:X tag option where X is the menu item ID).
Display price: Allows you to display the product's price. Use pricetax1 to show prices with tax only, pricetax2 to show prices without tax only, or just price to use the HikaShop default setting.
Show discounted price: If HikaShop needs to apply discounts to the prices displayed, it can also show the price before the discount was applied as an incentive for your customers to buy the products or the discount amount
Insert: Will add the product TAG to your Joomla article editor
Quick Reference: Tag Options
| Option | Tag Syntax | Description |
|---|---|---|
| Name | name | Display product name |
| Description | description | Display product description |
| Cart button | cart | Display add to cart button |
| Quantity field | quantityfield | Display quantity input field |
| Image | picture | Display product image |
| Link | link | Link product elements to product page |
| Border | border | Display border around product |
| Badge | badge | Display product badges |
| Menu ID | menuid:X | Use menu item X for URLs |
| Price with tax | pricetax1 | Show price with tax only |
| Price without tax | pricetax2 | Show price without tax only |
| Price (default) | price | Use HikaShop default tax setting |
| Show discount | pricedis1 | Show original price |
| Show discount amount | pricedis2 | Show discount amount |
| Show both | pricedis3 | Use HikaShop default setting |
Tip: You can display multiple products in a single tag by separating product IDs with the pipe character:
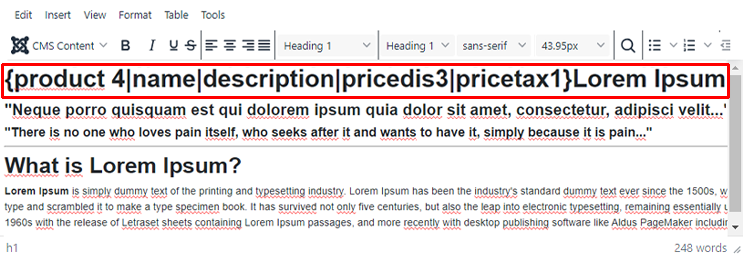
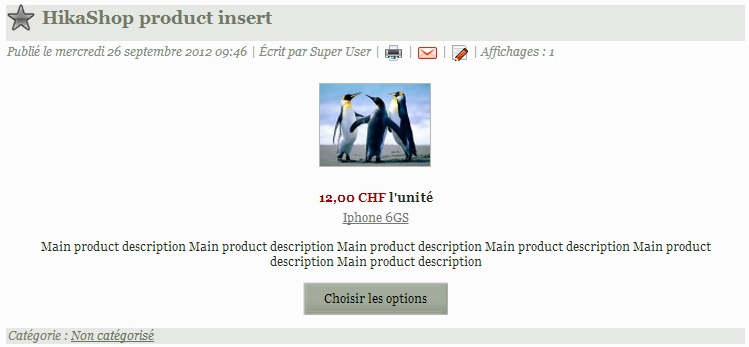
Here is the product TAG that will be displayed:
Different ways of setting up a product TAG
Here are different examples of product TAG configurations:
- Product tag example 1: € 60,00 HikaShop Essential

- Product tag example 2: € 60,00 HikaShop Essential
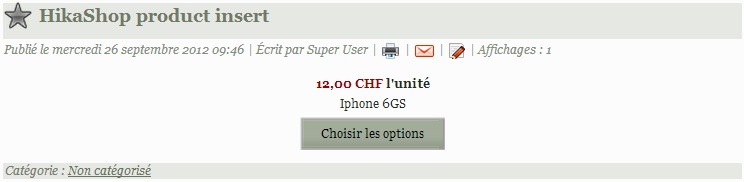
The quantity field won't be displayed if your products have variants.
- Product tag example 3:
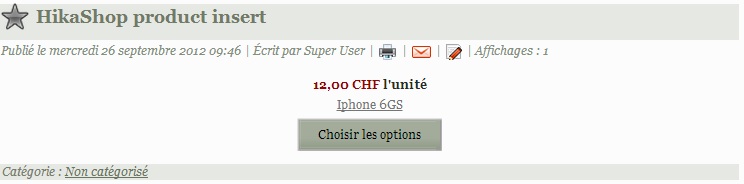
- Product tag example 4: € 60,00 HikaShop Essential

HikaShop Essential includes all the features from HikaShop Starter. * You can compare all our versions here.
* You can upgrade your version here.Features
-
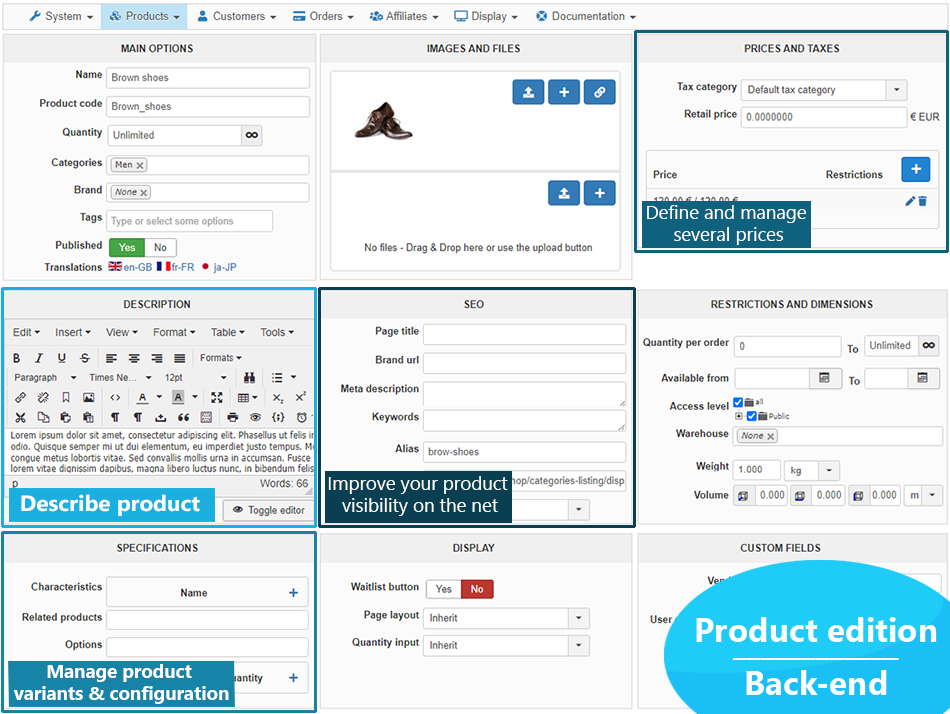
 PRODUCTS AND SALES
- Custom fields for products and user information
- Customer invoice display
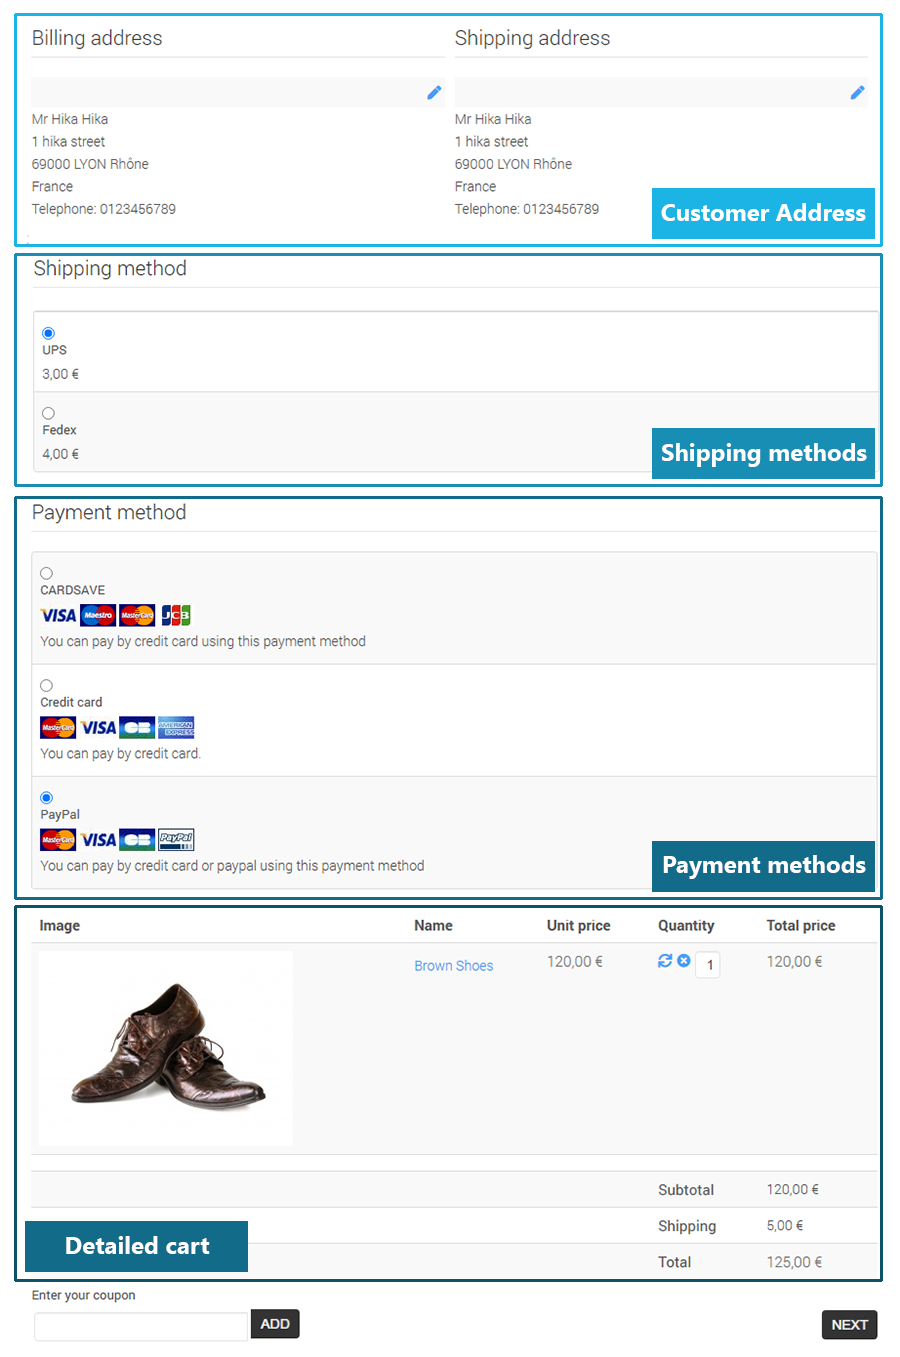
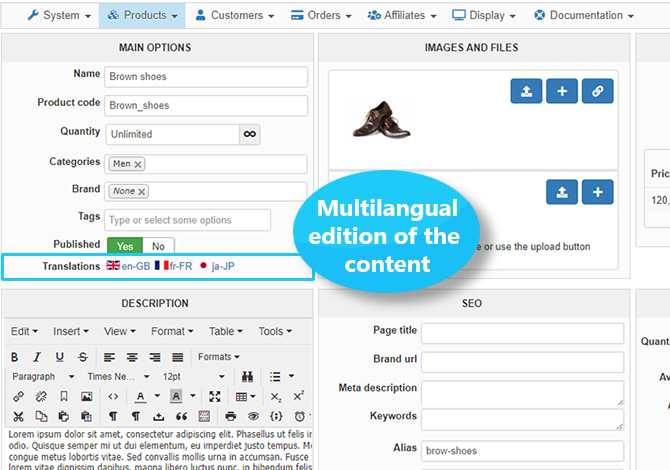
- Multilingual edition of the content
- Possibility of payment of an order later on
- Checkout without registration
- Contact us form on product pages
- Options for products
- Waiting list for products out of stock
-
 LAYOUT
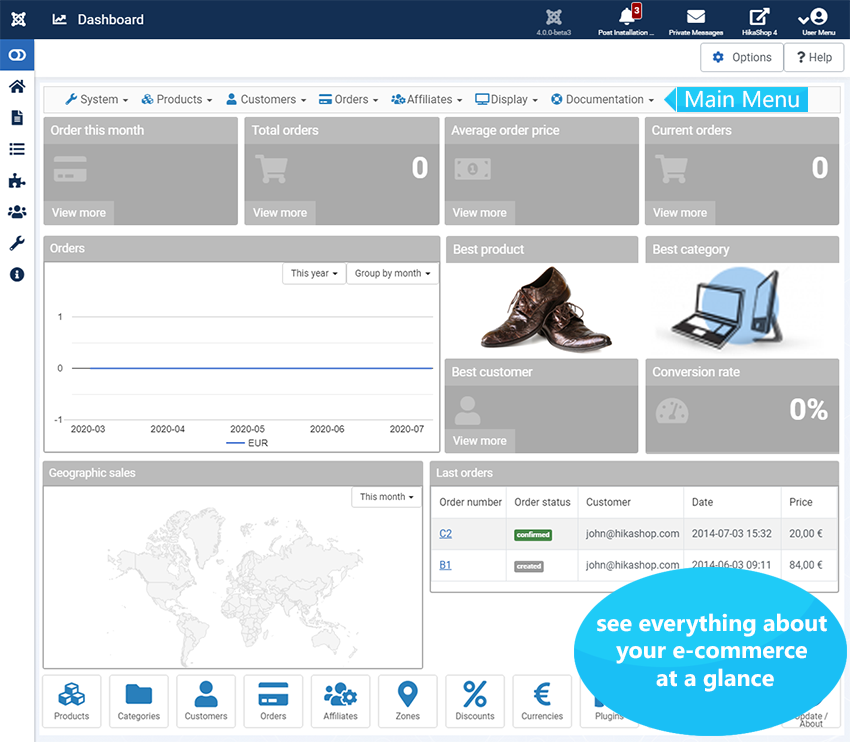
- Powerful dashboard customization
- More widgets on the dashboard
- Configurable products purchasing restrictions
(per period, per weight, per product categories, etc) - Additional product listings item layouts
- Customization of order number format
-
 MARKETING TOOLS
- Google Products integration
- Restrictions on coupons and discounts
Usage
- HikaShop is compatible with every recent versions of Joomla and WordPress.
Joomla 3.x Joomla 4.x Joomla 5.x Joomla 6.x WordPress
- GPL v3
- No limit of time
- 1 year free updates
- 1 year free HikaShop support for one website
- 1 year web cron service for one website
- HikaShop only supports MySQL (no postGreSQL or Oracle or MSSQL support)
- Installation guaranteed! If you have any problems installing HikaShop, we'll do it for you.
- 30-day money-back guarantee
- Support and access to updates can be extended for 40€/year


-
Conditional content tags
In addition to the product insertion tags, the plugin also provides conditional content tags that allow you to show or hide content based on the customer's purchase history or current cart contents.
Show/Hide based on purchase history:
- Shows content only if the user has bought any product- Shows content only if the user has bought a specific product (by code, name, or ID)Content- Shows content only if the user has never bought anythingContent- Shows content only if the user has not bought a specific productContent- Hides content if the user has bought any product- Hides content if the user has not bought a specific product
Show/Hide based on cart total:
- Shows content only if the cart total (with shipping) is at least 50Content- Shows content only if the cart total (with shipping) is at most 100- Shows content only if the products total (without shipping) is at least 30Content- Shows content only if the products total (without shipping) is at most 200
Displaying the difference:
You can use {min} or {max} placeholders inside the conditional content to display the formatted difference between the threshold and the current cart total:
You can add up to € 500,00 more before reaching the limit.
Combining conditions:
Multiple conditions can be combined in a single tag (they work as AND conditions):
Plugin settings
The HikaShop Product TAG translation plugin has configuration options available in the Joomla plugin manager (System -> Manage -> Plugins -> System - HikaShop Product TAG translation):
Menu: A global default menu item ID to use for product links. This can be overridden per-tag using the menuid:X option.
Load HikaShop on all frontend pages: When enabled, HikaShop's JavaScript and plugins will be loaded on all frontend pages. This is useful if you want cart notification popups and other HikaShop features to work on pages where products are inserted.
Order statuses for bought tag: A comma-separated list of order statuses that count as "bought" for the conditional {hkshow bought} and {hkhide bought} tags. Default is "confirmed,shipped".
Customizing the display further
If you want to go further in the customization of the inserted products display, you should copy the file plugins/system/hikashopproductinsert/hikashopproductinsert_view.php to the folder templates/YOUR_TEMPLATE/system/ via FTP and then edit the copied file. That way, your modifications won't be removed when you update HikaShop.
Alternative TAG syntax
Both of these syntaxes are supported and produce the same result:
- Details
- Written by: Administrator
- Category: Tutorials
- Hits: 34799
|
|

Description
This screen enables you to manage all your filters. In HikaShop, you will be able to create filters which will be displayed on products listings and potentially in the HikaShop filter module. That way, when you have lots of products and that the user only wants to see products with specific attributes, he can choose some filters and reduce the products listing to only the ones he is interested in. For example, in a computer shop he could select the quantity of RAM, and/or which kind of processor he would like in his computer.
Here is an example of what a simple filtering area can look like:

This screen can be accessed via the menu Display->Filters.
This feature is only available in the business edition of HikaShop.
You can also find additional display options for filters in the Display tab of the configuration of HikaShop.
And Finally, you can also display your filters as a module by configuring the HikaShop Filter module via the joomla module manager. In your filter module, don't forget to set the id of a HikaShop products listing menu id (there is already one created by default by HikaShop and called "products listing") in the "menu" option. And if you want to hide the filters at the top of the products listing, you can turn off the display filter option of your products listing menu item on the options page of your menu item that you can find via the Joomla menu manager when you edit the menu item.
Toolbar

- New : Enables you to create a new filter.
- Edit : Select a filter and then click on this button in order to edit it.
- Delete : Select one or several filters and click on this button in order to completely delete them.
- Help : This button enables you to turn ON/OFF the help section. This screen will appear or disappear.
- Dashboard : You can go back to the control panel using this button.
Column Headers
-
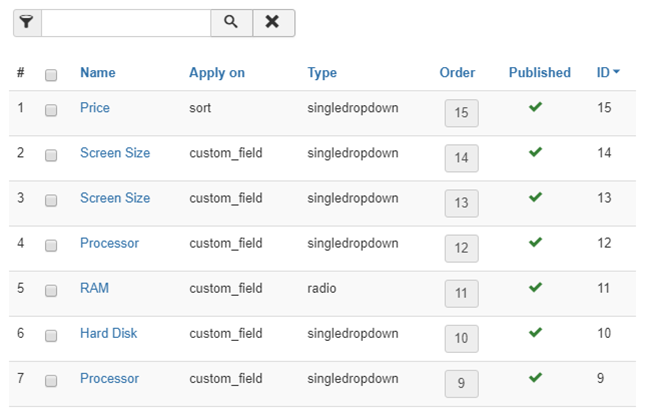
# : An indexing number automatically assigned for ease of reference.
- Checkbox : Check this box to select one or more items. To select all items, check the box in the column heading. After one or more boxes are checked, click on the delete button in order to delete the selected filters.
- Name : The name of the filter.
- Apply on: The type of information managed by your filter, like Custom Fields, Price, Category, Characteristics...
- Type: The type of the filter. That will enable you to decide how you want to show your filter (as a dropdown, or as an input box or as a text area, etc). Based on that, you might have additional options below the Apply on option.
- Order : The order will define the position of filters on forms.
- Published : If a filter is published it means that it will be used by the system, otherwise, it won't be taken into account.
- ID : This column indicates the ID of the filter.
- Details
- Written by: Administrator
- Category: Tutorials
- Hits: 56431
|
|
Description
This tutorial will explain you how to make your first order on your own store and have a feel of the HikaShop basic functionalities.
First, we will add a product to the store. Then, we will make it accessible on the front end with a Joomla menu. We will set a payment method and a shipping method and finally make an order.
Add a product
By default, a main product category already exists in HikaShop so if you're planning on selling only a few items, like we want to do in this tutorial, you don't need to add any category and you can directly start to add your products.
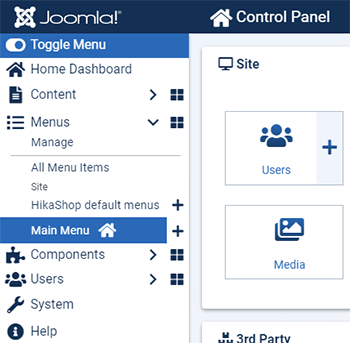
First, log in on the back-end and go to the menu Components->HikaShop->Products
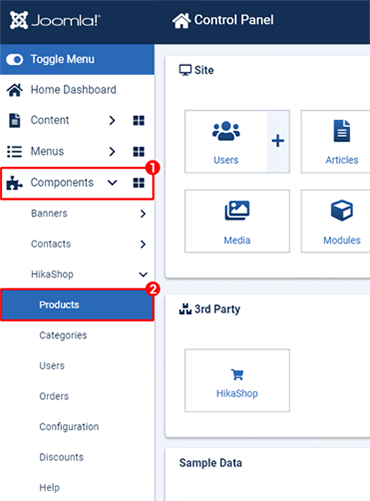
Then, click on new to create a new product

You will have to write at least a name for your product. You can also write a description, add categories, related products, images, files, characteristics, etc
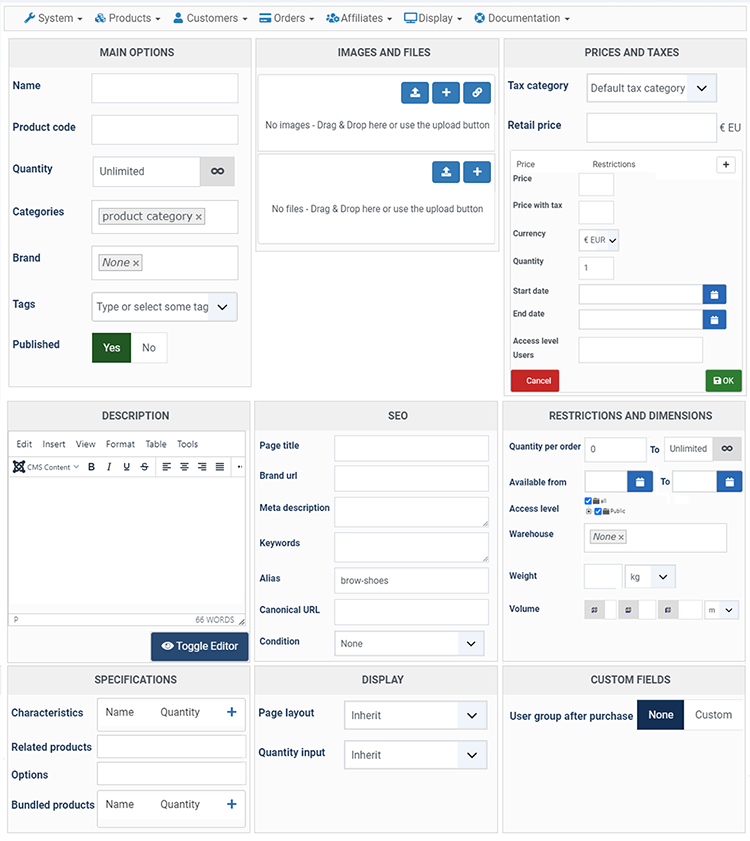
By default, the published currency is the euro. If you want to use others currencies please go to the currencies management screen ( HikaShop menu System->Currencies ) to do so.
Once you're done click on the save button.
Add a menu
Now that you have your first product created, you can add a direct link to it via a Joomla menu on the front end.
Go to the menu "Menus" and click on one of your menu areas
Then, click on new to create a new menu

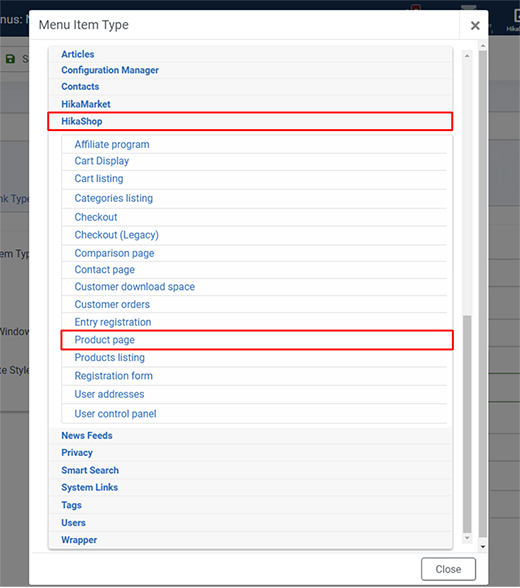
You will have to click on the menu Item Type HikaShop in order to display the list of menu types of HikaShop. Then, click on the Product "Product page" link.
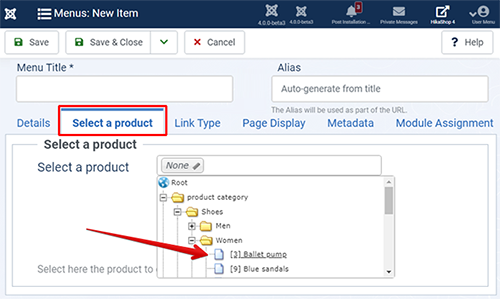
You will be able to set standard Joomla options for the menu as well as select a product to display on the right part of the screen
You're done. If your menu area is already displayed on your front end, you should already see the new menu linking to your product. If you don't see it, you might need to purge your Joomla cache before seeing it.
Payment
Now you need to configure at least one payment method so that you can display it on the checkout process when someone makes an order on your shop.
Go to the Component->HikaShop menu if you're not already in HikaShop and then go to the System->Payment methods HikaShop menu in order to access the payment management screen.
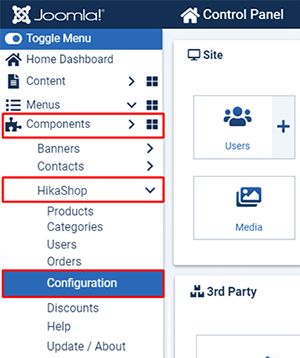
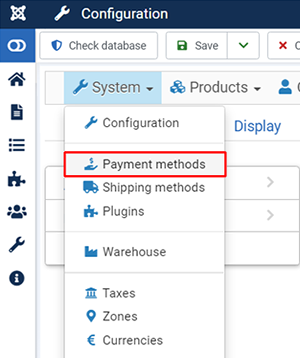
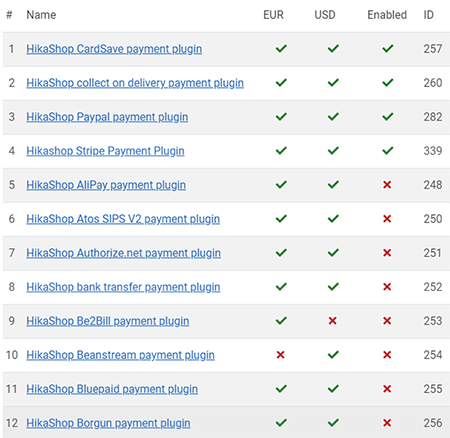
Once there you have to click on "New" in the toolbar and you should see a list of payment methods which are all unpublished. Publish one AND click on its name to edit its information. For the purpose of this tutorial we will use the payment method "bank transfer" which is easy to setup as it doesn't connect to any external payment system and thus doesn't require you to create an account on such system.
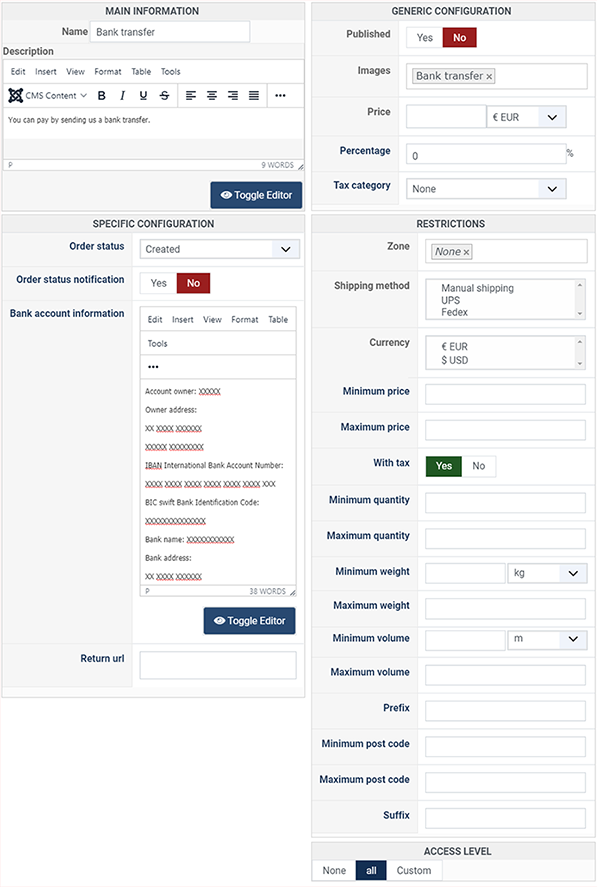
When you finish to change the default information, don't forget to enable the option "Publish" and please click on the save button. You're done with the configuration of your first payment method.
Shipping
Now you need to configure a shipping method so that you can display it on the checkout process when someone makes an order on your shop. If your products are virtual ( the weight of the products is 0), then shipping information won't be asked to the user.
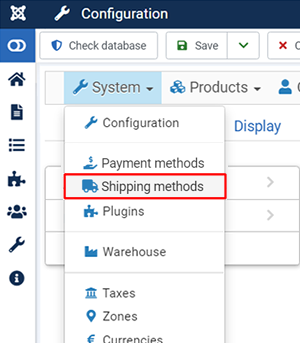
Go to the Component->HikaShop menu if you're not already in HikaShop and then go to the System->Shipping methods HikaShop menu in order to access the shipping management screen.
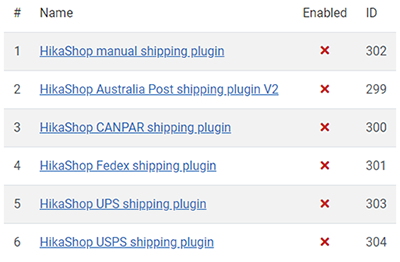
Once there you have to click on "New" in the toolbar and you should see a list of shipping methods which are all unpublished. Publish one AND click on its name to edit its information.
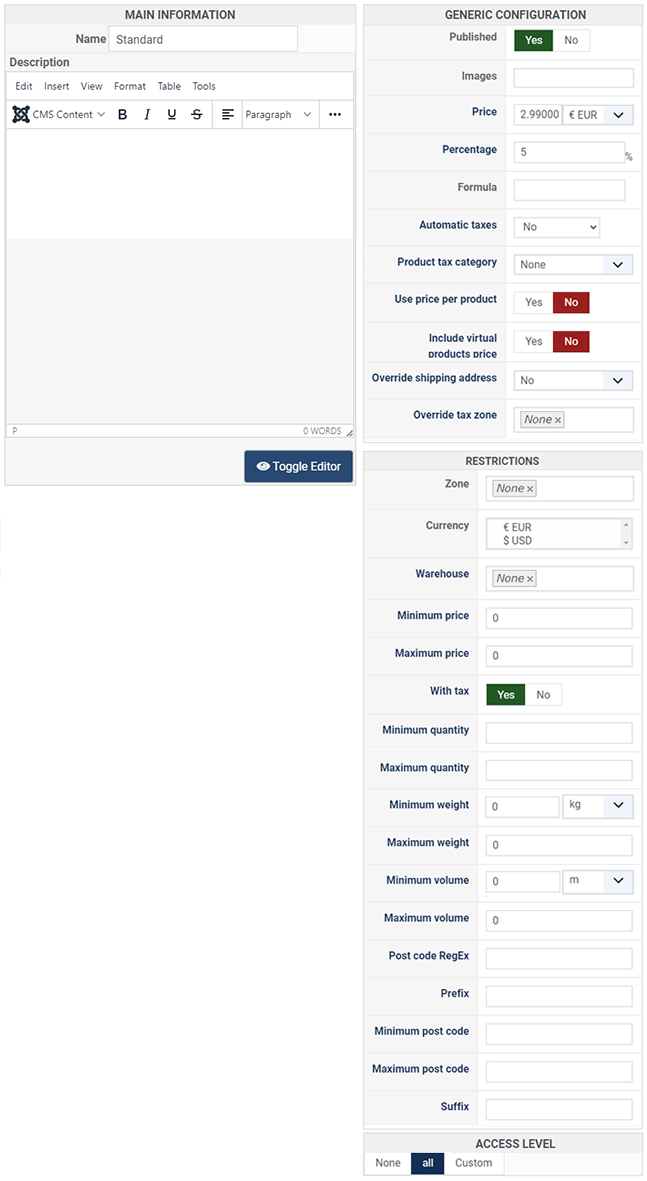
On this screen, you can enter the information of one shipping method and then click on the save button. Our demo website provides an example of shipping methods you could use on your store.
You're done with the configuration of your first shipping method
Checkout
Now, you're ready to order your first product on your store !
Go to the front end and click on the menu you created. The product page will be displayed.
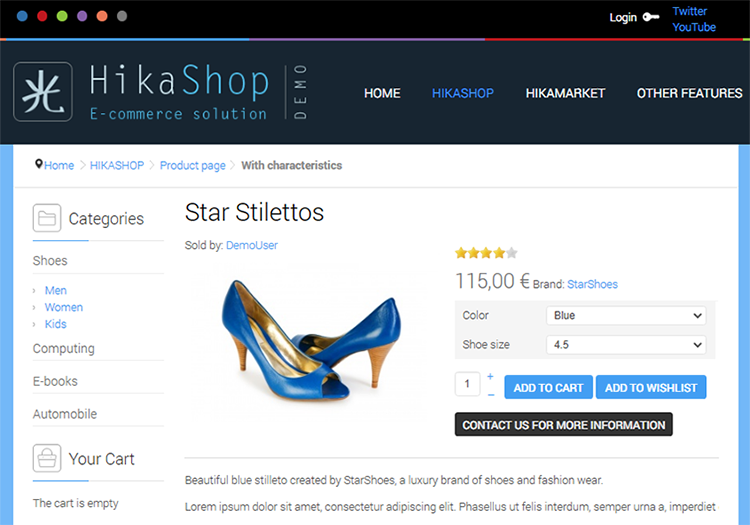
There, click on the "add to cart" button (provided that you product isn't free) which will redirect you to the first step of the checkout process unless you have the cart module displayed (in which case it might update the cart instead of directing you to the checkout based on your HikaShop configuration).
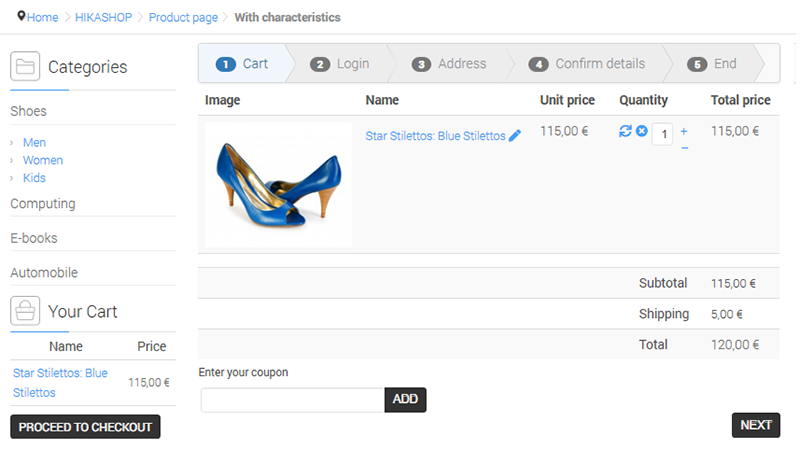
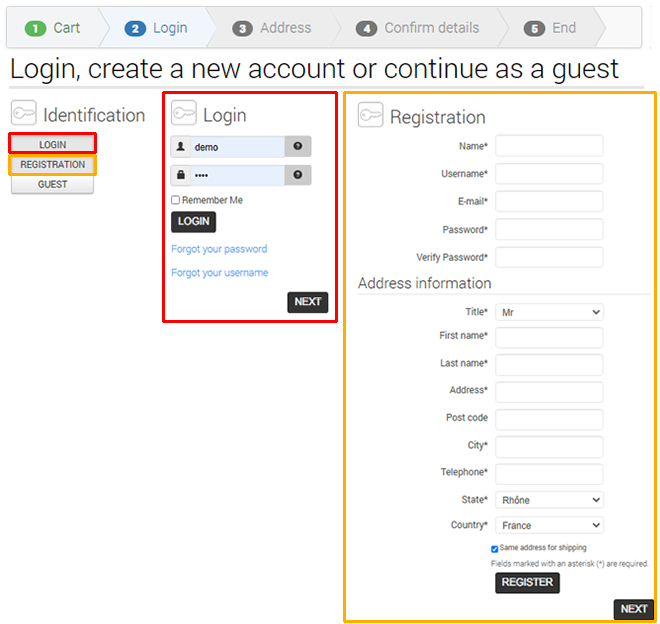
If you're not logged in, you will be asked to login or create an account. If you register, you will have to enter your address here as well which will make you skip next step.
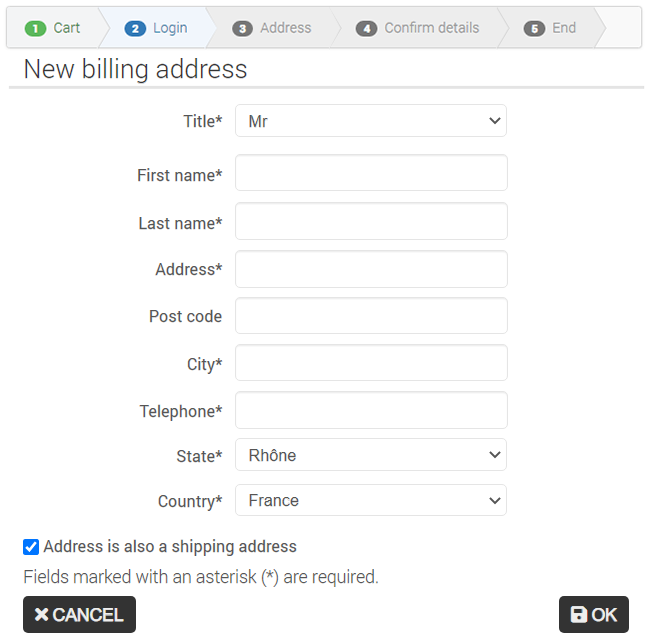
Then, you will be asked to enter an address. You can click on the new button if you don't have one already and a popup will open asking you your address information.
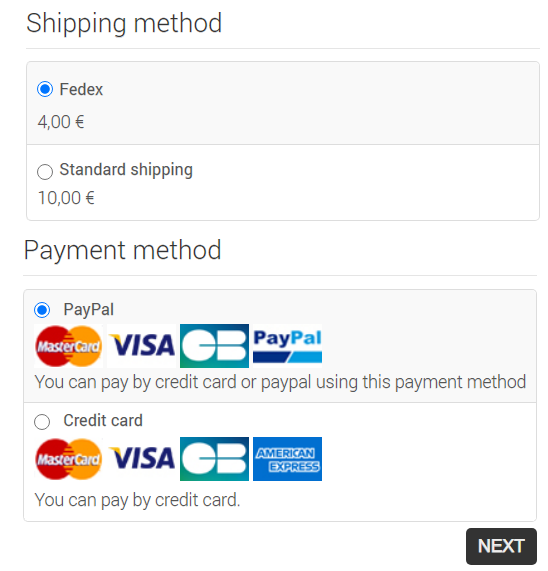
Then, you will be able to choose the payment and shipping option.
Then, you will be able to finish your order and an information screen will be displayed explaining you how to make your bank transfer if you chose this payment method.
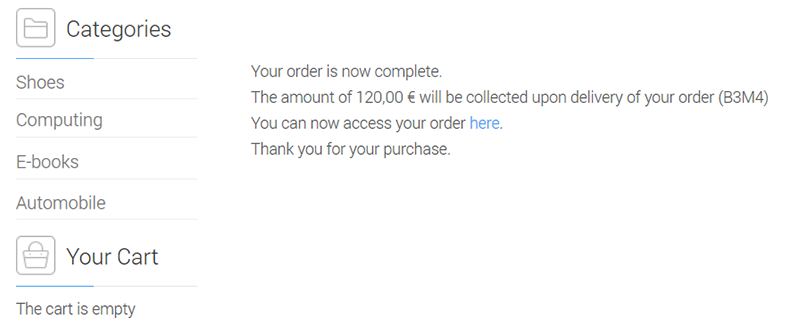
You should receive an email shortly after with the detail of the order.
Note that this workflow of the checkout can be changed to suit your shop needs and that each view of the process can be completely customized, first by editing the CSS in the configuration page of HikaShop , or also by customizing the php code of each view (require some PHP knowledge).
- Details
- Written by: Administrator
- Category: Tutorials
- Hits: 118245

Description
The HikaShop import system allows you to:
- Import products and categories from CSV files or by pasting data directly into a text area.
- Import orders from the backend orders listing.
- Import shipping and payment methods from CSV files.
- Migrate from other e-commerce systems (VirtueMart, WooCommerce, J2Store, EC-CUBE, OpenCart, RedShop, MijoShop, or another HikaShop installation). These migration tools also transfer users, addresses, and orders.
- Generate products automatically from a folder of images or files (Business edition).
- Automatically import/update products via a cron-triggered CSV import (Essential and Business editions).
You can access the import screen from the HikaShop backend via Products > Import.
Import from a CSV or from the text area
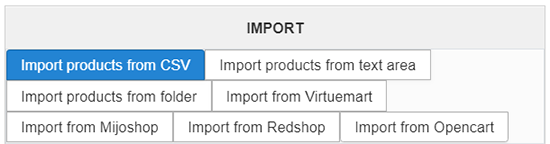
You can import data in two ways:
- Import from CSV file: upload a CSV or text file containing your data.
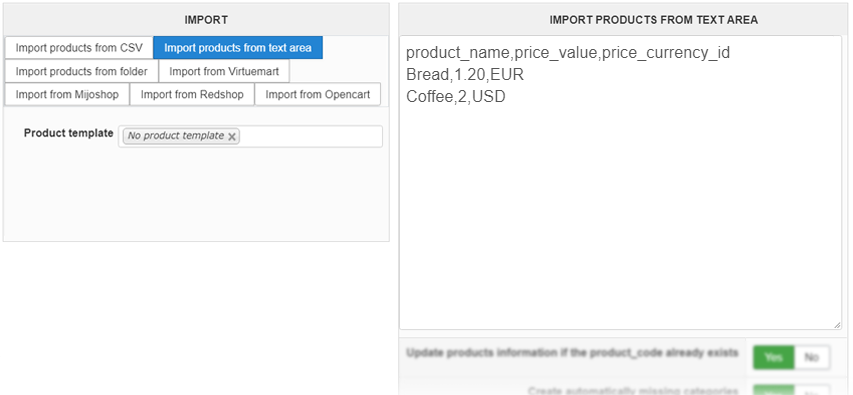
- Import from text area: copy and paste your data directly into the input box.
General information about the CSV format
The first line of your CSV file must contain the column names. These correspond to the database column names of the #__hikashop_product and #__hikashop_price tables (always in English). For example:
product_name,product_code,price_value
My Product,PROD001,29.99
Key points:
- HikaShop auto-detects the CSV separator (comma, semicolon, tab, pipe). No specific format is imposed.
- Multi-line field values (e.g. product descriptions) are supported when enclosed in double quotes.
- You only need one line per product. Do not split a product across multiple lines.
- For
price_currency_id, you can use the currency code (e.g. "EUR") instead of the numeric ID. If omitted, the store's main currency is used. - If
product_codeis not specified, it will be generated fromproduct_name. - Specify your file's character encoding so HikaShop can convert it to UTF-8. If unsure, leave it as "Unknown".
Updating existing products: set the option "Update products information if the product_code already exists" to "Yes". HikaShop will match products by their product_code and update the fields present in your CSV.
Tip: if you are unsure about column names, upload a file with only the header line or enter random text in the text area and click Import. HikaShop will display the list of valid column names.
Column Mapping
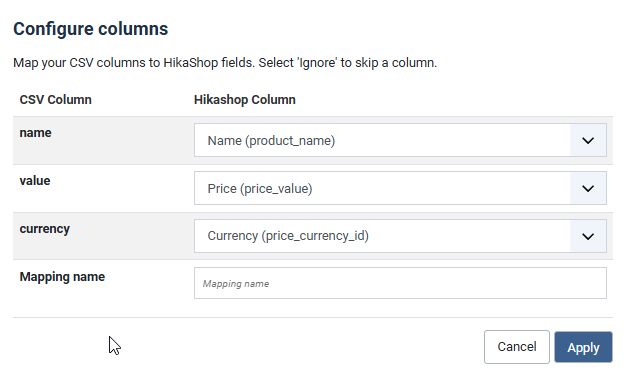
If the columns in your CSV file do not match HikaShop's column names, a mapping interface will appear. This allows you to visually map your CSV headers to HikaShop fields, eliminating the need to rename columns in your file manually.
Importing images and files
To import images or files along with your products, first place them in the upload folder configured in System > Configuration > Files. Then add an images or files column to your CSV with the filenames separated by a secondary separator (different from your main CSV separator).
Examples:
product_name,images
My product,"image_front.jpg,image_back.jpg"
or:
product_name,images
My product,image_front.jpg;image_back.jpg
Related products
Add a related column with the product_code values of related products (they must already exist or appear earlier in the same CSV file):
product_code,product_name,related
my_product_1,My first product,""
my_product_2,My second product,""
my_product_3,My third product,"my_product_1,my_product_2"
Product categories
Use a categories column with category IDs or category namekeys:
product_code,product_name,categories
my_product_1,My first product,"2,13"
You can find category IDs in the category listing under the ID column.
To create a category tree automatically, enable "Create automatically missing categories" and use a parent_category column:
parent_category,categories
product category,main category 1;main category 2;main category 3
main category 1,sub category 1;sub category 2
You can also mix products and categories in the same CSV:
product_code,parent_category,categories
,main category 1,sub category 2
my_product_1,main category 1,sub category 2
Products with variants
To import variants, use the product_parent_id column with the product_code of the main product (which must appear before the variants in the file). The main product line must include the default characteristic value. Characteristics and their values must be created beforehand via Products > Characteristics.
Example with a "size" characteristic:
product_code,product_parent_id,size,price_value
main_product,,big,
first_variant,main_product,big,15
second_variant,main_product,small,10
The default price will be 15 (for "big"). When the customer selects "small", the price changes to 10.
Products with translations
To import translations, append the language code after a pipe (|) to the column name. You must first have the corresponding languages set up in Joomla.
Example with English (main), French and Japanese translations:
product_code,product_name,product_name|fr-FR,product_name|ja-JP
my_product_1,My first product,Mon premier produit,私の初めての商品
This works for all translatable fields: product_name, product_description, and custom fields.
Other import options
If you have an Excel file, add a header row with the column names and save the file as CSV (Save As > CSV). You can open the file with a text editor to verify the format before importing.
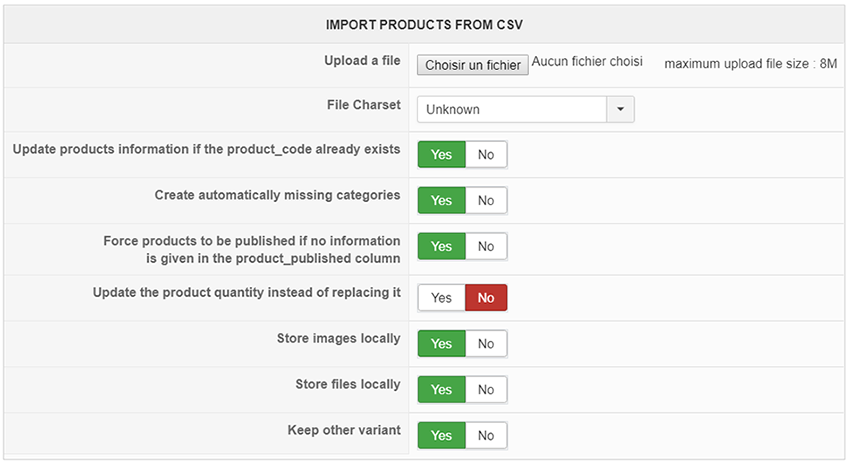
File Charset: we recommend importing UTF-8 files. If your file uses a different encoding, select it so HikaShop can convert it properly.
Store images locally: if set to "No", only the URL of the image is stored. If set to "Yes", the image is downloaded and stored on your server.
Store files locally: same as above, but for downloadable files.
Keep other variants: when updating a product that already has variants:
- "Yes": existing variants not in the CSV are kept (new variants are added).
- "No": existing variants not in the CSV are removed (only the variants in the CSV remain).
Template product (Business edition): select a product to use as a template. All fields not specified in the CSV will be automatically filled from the template product. This is useful when importing many products with the same price, tax category, or images.
You can also use the text area option to import CSV-compatible data directly without uploading a file.
Import orders
HikaShop supports importing orders from the backend. You can find the Import button on the Orders listing page in the toolbar.
The order import accepts a CSV file with columns corresponding to the #__hikashop_order and #__hikashop_order_product tables. Common columns include:
order_number: the order reference number.order_user_idoruser_email: identifies the customer. Ifuser_emailis used, HikaShop will look up or create the user.order_status: the order status (e.g. "confirmed", "shipped").order_created: the order date (Unix timestamp or date string).product_code: the product code for each order line.order_product_quantity: quantity for each order line.order_product_price: unit price for each order line.order_full_price: total order amount.order_currency_id: currency code (e.g. "EUR").
This is particularly useful when migrating from another system where you want to preserve order history, or when bulk-loading historical orders.
Import automatically from a CSV file
HikaShop Essential and Business editions include a plugin called "HikaShop Products Cron Update Plugin" that you can configure via the Joomla plugins manager. It allows you to import or update products automatically from a CSV file on a schedule.
To use it:
- Configure your HikaShop cron task.
- Go to the Joomla plugins manager, find and enable "HikaShop Products Cron Update".
- Configure the plugin settings:
- File: enter a local file path or a URL to the CSV. If a URL is provided, the plugin downloads the file each time before importing.
- Column names: map your CSV column names to HikaShop column names. For example, if your CSV uses "name" and "code" instead of "product_name" and "product_code", enter:
name:product_name;code:product_code - Charset: select the character encoding of your file.
- Frequency: the import interval in seconds (e.g. 3600 for once per hour). Note that the actual frequency depends on your cron trigger interval.
- Delete products not in CSV: removes products not present in the CSV. Use this option with extreme caution and only after the import works correctly without it.
Import shipping and payment methods
You can import shipping and payment methods from CSV files. On the System > Shipping methods or System > Payment methods listing page, click the Import button in the toolbar.
This opens an import dialog where you can upload a CSV file or paste CSV data. The import uses a column mapping interface (similar to the product import) that lets you map your CSV columns to HikaShop's shipping or payment method fields.
Common columns for shipping methods include: shipping_name, shipping_type, shipping_price, shipping_published, shipping_currency_id, and zone/weight restrictions. The shipping_type value corresponds to the plugin's folder name under plugins/hikashopshipping/ (e.g. manual for the manual shipping plugin).
Common columns for payment methods include: payment_name, payment_type, payment_price, payment_published, payment_currency_id, and zone/amount restrictions. The payment_type value corresponds to the plugin's folder name under plugins/hikashoppayment/ (e.g. banktransfer for the bank transfer plugin, paypalcheckout for PayPal Checkout).
This is useful when setting up a new store with many shipping zones or payment options, or when migrating method configurations from one site to another via CSV export/import.
Migrate from VirtueMart
You can migrate from VirtueMart to HikaShop via the import screen. Select the "Import from VirtueMart" option and click "Import". The migration tool will import categories, taxes, products, images, files, customers, and orders from VirtueMart in several steps.
The tool supports VirtueMart 1.x, 2.x, and 3.x. It automatically detects your VirtueMart version and uses the appropriate import rules.
If you encounter errors during file or image copying, make sure the destination folders have sufficient write permissions.
At the end of the import, you can publish the VirtueMart redirect plugin. This plugin redirects VirtueMart product and category URLs to their HikaShop equivalents, preserving your search engine rankings.
Migrate from WooCommerce
HikaShop includes a dedicated migration tool for WooCommerce. Select "Import from WooCommerce" in the import screen to start the migration.
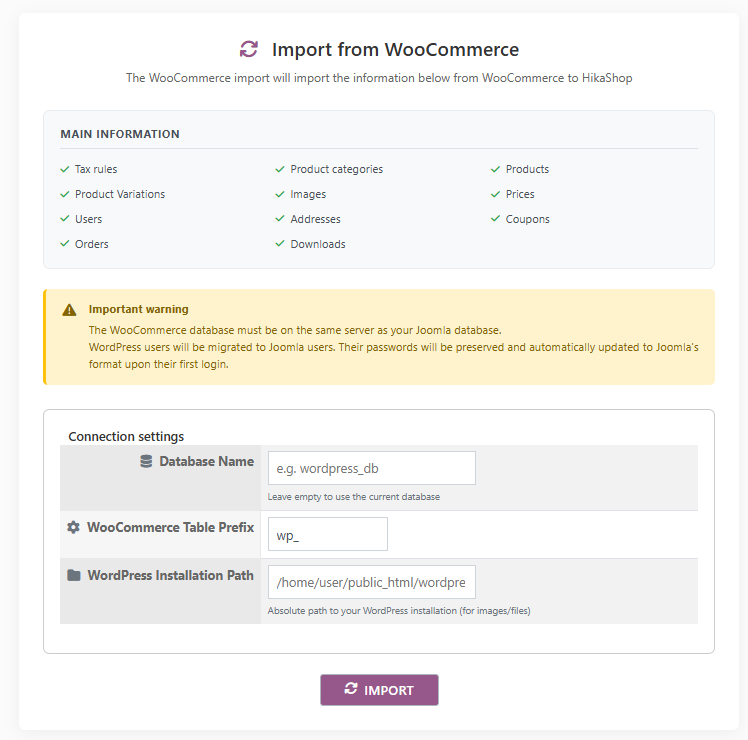
The tool imports the following data in several steps:
- Tax rates
- Categories (with hierarchy)
- Products (simple products and their data)
- Product variations (variable products with their attributes)
- Product prices
- Product images
- Users (customer accounts)
- Addresses
- Coupons
- Orders and order items
- Downloadable file assignments
- Custom fields (product meta data)
Note: payment and shipping method configurations are not migrated. You will need to set them up manually in HikaShop. However, the original payment and shipping method names are preserved in the imported orders for reference.
User accounts and passwords: Customer accounts are migrated with their original WordPress password hashes. Your customers can log in on the Joomla site with the same username and password they used on WooCommerce, without needing to reset their password. HikaShop includes a compatibility layer that can verify WordPress password formats on Joomla.
Migrate from J2Store / J2Commerce
If you are migrating from J2Store or J2Commerce, HikaShop provides a built-in migration tool. Select "Import from J2Store" in the import options to start the migration.
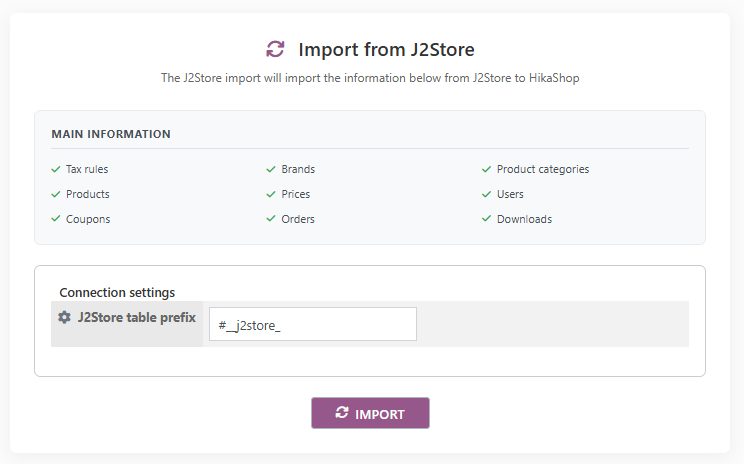
The tool imports the following data:
- Tax rates
- Manufacturers / brands
- Categories (with hierarchy)
- Products and product prices
- Product-category assignments
- Users (customer accounts)
- Coupons
- Orders and order items
- Downloadable file assignments
Note: payment and shipping method configurations are not migrated. You will need to set them up manually in HikaShop.
Migrate from another HikaShop
HikaShop includes a HikaShop-to-HikaShop migration tool, available since version 6.4.0. This allows you to migrate your shop from one installation to another, whether you are moving between Joomla sites, between WordPress sites, from Joomla to WordPress, or from WordPress to Joomla.
Select "Import from HikaShop" in the import options and enter the database connection details of the source installation. The tool imports:
- Configuration settings
- Tax rates and zones
- Categories (with hierarchy)
- Products, variants, prices, and images
- Custom fields
- Users and addresses
- Coupons
- Orders, order addresses, and order products
- Order statuses
- Warehouses
- Shipping methods and payment methods (configurations included)
This is the most comprehensive migration tool, as it transfers the full shop configuration including shipping and payment setups.
User accounts and passwords: When migrating between Joomla and WordPress (in either direction), user accounts are transferred with their original password hashes. This means your customers can log in on the new site with the same username and password they used before, without needing to reset their password. HikaShop includes a compatibility layer that can verify both Joomla and WordPress password formats, regardless of which platform the password was originally created on.
Migrate from EC-CUBE
HikaShop includes a migration tool for EC-CUBE v4.1, a popular Japanese e-commerce platform. Select "Import from EC-CUBE" in the import screen to start the migration.
The tool imports taxes, categories, products (with variants and prices), product images, customers, addresses, orders, and order items from an EC-CUBE database. It connects directly to the EC-CUBE database using the connection details you provide (host, database name, username, password, and table prefix).
Migrate from OpenCart, RedShop and MijoShop
Data from OpenCart, RedShop, and MijoShop can also be imported into HikaShop. Each migration option appears in the import screen only if the corresponding shopping cart's database tables are detected. Click the process button and follow the steps until completion.
If you encounter errors during file or image copying, make sure the destination folders have sufficient write permissions.
At the end of the import for RedShop and MijoShop, you can publish a redirect plugin that forwards old URLs to their HikaShop equivalents. For OpenCart, since it is not a Joomla extension, you will need to create your own redirect rules (via .htaccess or a SEF extension).
Third party migration services
In addition to the built-in migration tools, several third-party services support HikaShop:
- LitExtension: migration services supporting many shopping carts. They also offer a CSV import tool for HikaShop.
- Cart2Cart: automated migration from various shopping carts.
- RO CSVI: a Joomla extension specialized in CSV import and export with HikaShop integration.
Generate products from a folder
This feature is available in the Business edition of HikaShop.
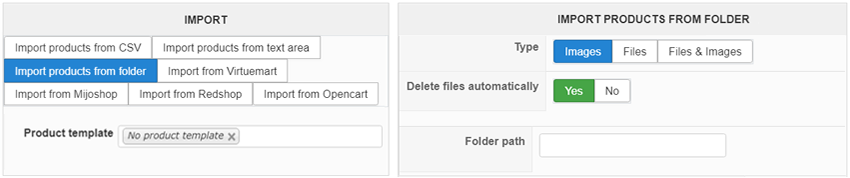
You can generate one product per file or image in a folder using the "Import products from folder" option. This is useful for shops selling images, music, or downloadable files.
Enter the path to the folder (relative to your site root or absolute). Each file in the folder will become a product, with the filename used as product_code and product_name. A copy of each file is placed in the appropriate upload folder.
You can optionally select a template product to fill in default values (price, tax category, description, etc.) for all generated products.
You can choose whether to delete the original files from the source folder after generation.