
- Details
- Written by: Administrator
- Category: Tutorials
- Hits: 22146
 |
Presentation
HikaShop supports all the existing currencies. It has a currency manager so that you can tweak each currency. It also has a currency switcher module if you want to allow your users to change the current currency. And finally, it has a system to automatically update the currency rates.
Currency Management
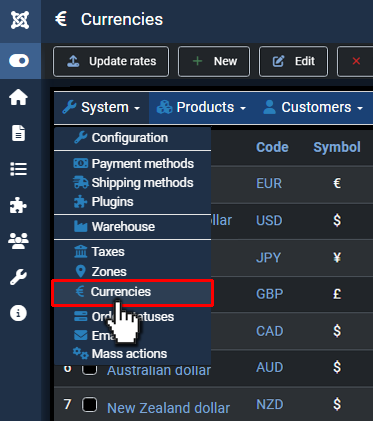
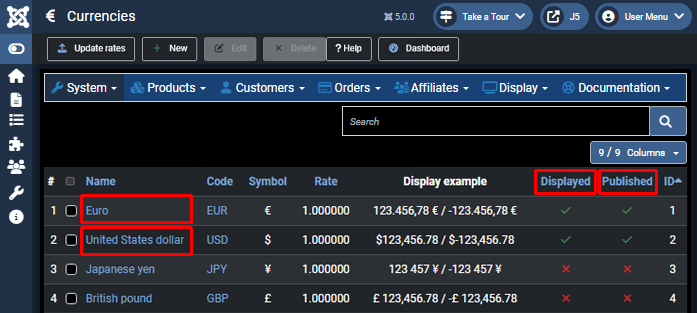
Once you are in the backend of HikaShop, you can go in the HikaShop menu System>Currencies where you will be able to manage your currencies.
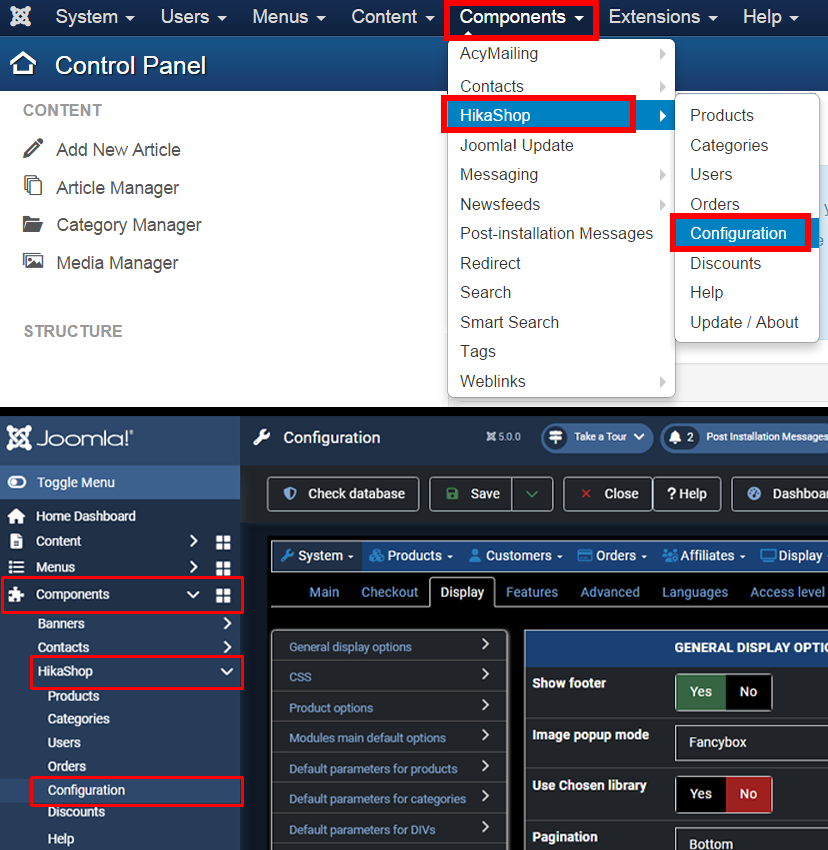
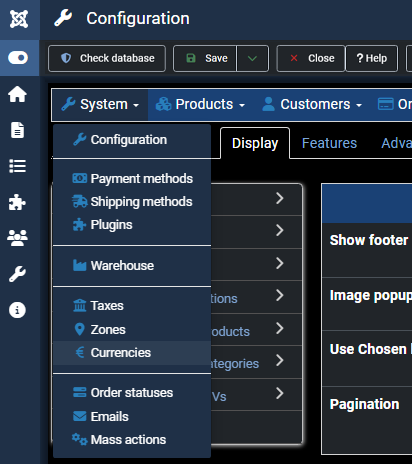
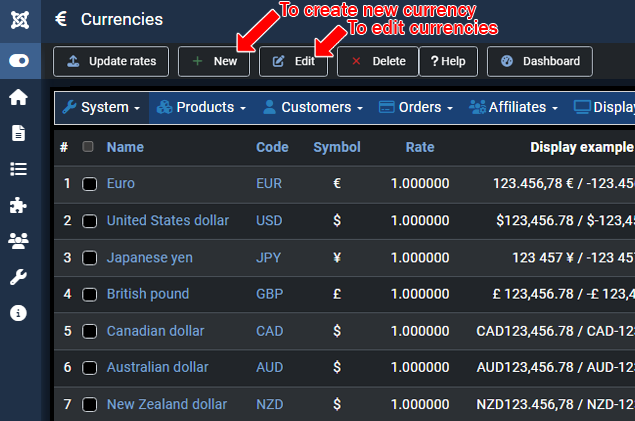
There, you will see a list of all the pre-installed currencies and you'll be able to easily enable or disable them. When you edit a currency, you'll find options to customize the display of the pricesin that currency. And you'll also be able to create new currencies on this screen.
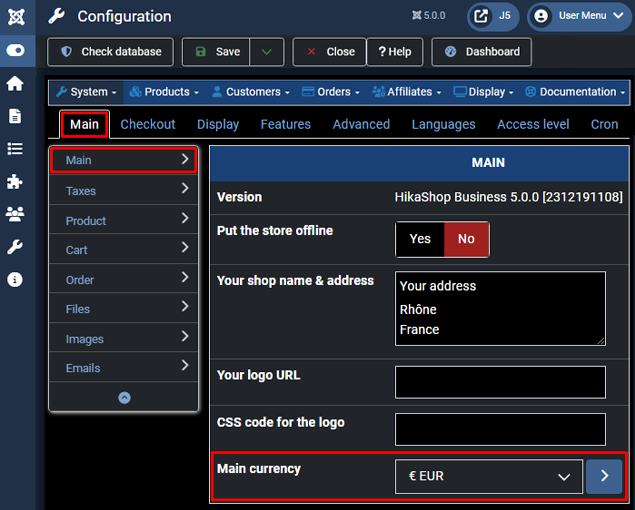
The main currency of your shop is actually set in the "Main currency" setting of the HikaShop configuration page.
Currency rates update
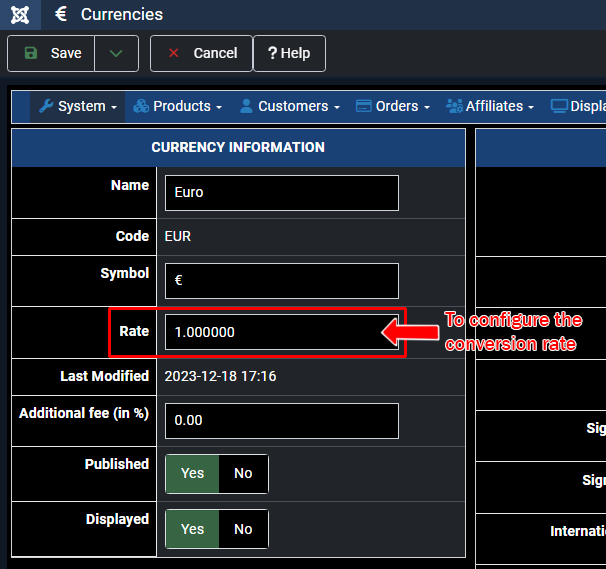
When you edit a currency via the menu System>Currencies, you can configure a conversion rate with the "Rate" option. Then, if you enter the prices of your products in one currency and that a customer looks at your shop in another currency for which you didn't configure a price, Hikashop will use the rate of the currency to convert the price automatically.
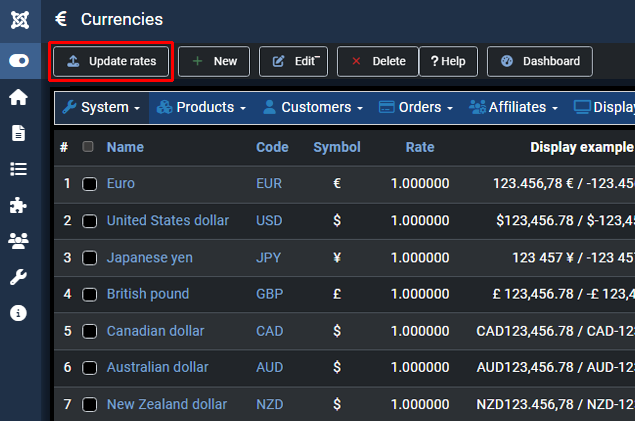
If you have the Business edition, you'll find an "update rates" button on that screen which will allow you to automatically update the currency rates when you click on it.
Furthermore, if you go in the Joomla plugins manager,
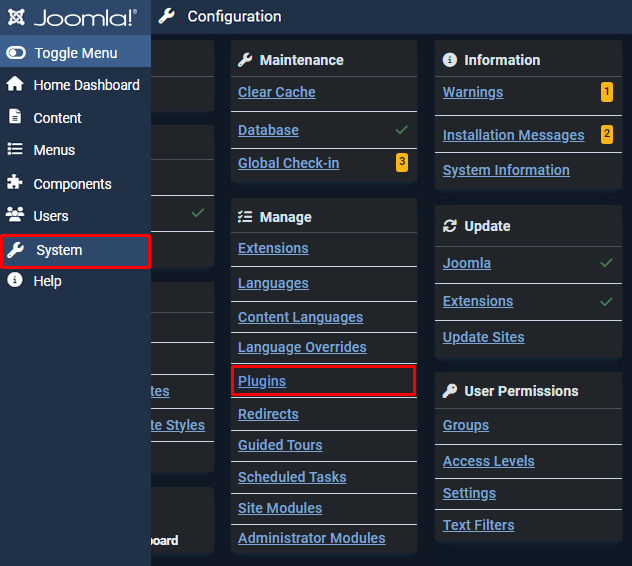
you'll find the HikaShop rates auto update plugin which you can activate and configure in order to retrieve the rates automatically at a frequency you can define.
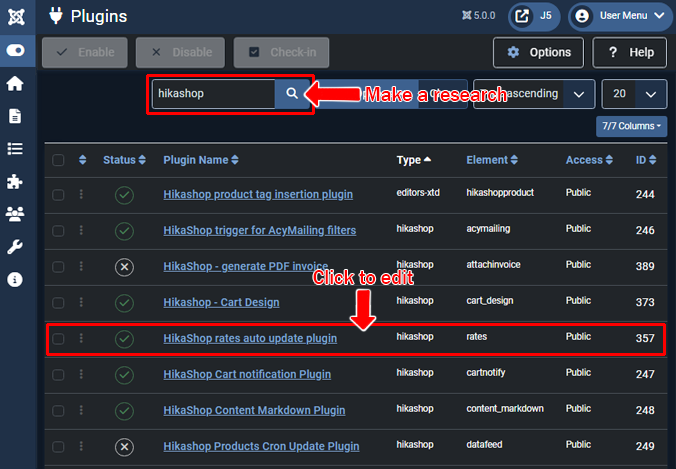
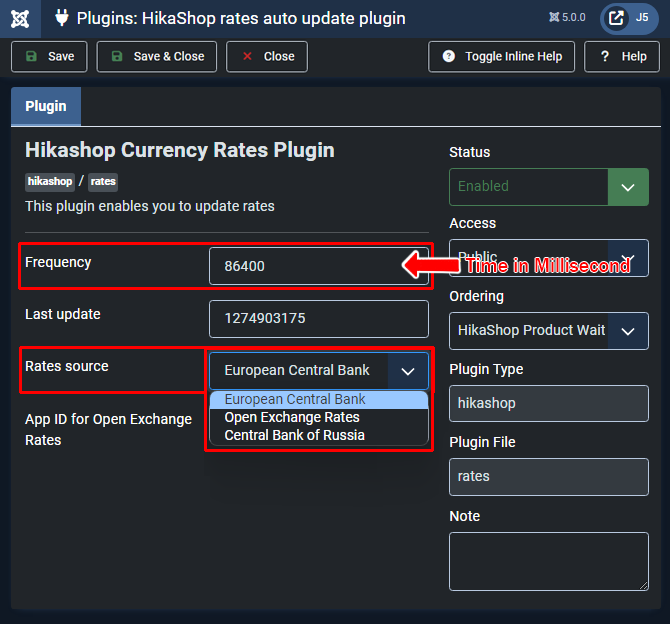
You'll be able to retrieve the rates either from the European Central Bank, or from Yahoo Finances.
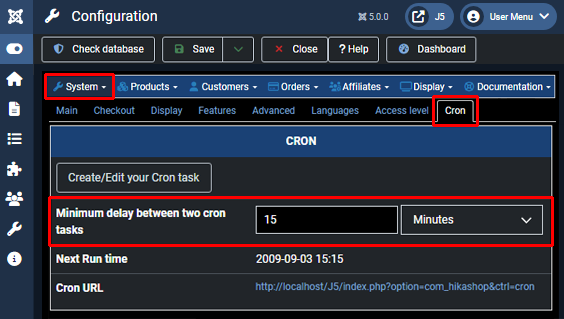
It will require that you first configure your cron task via the "Cron" tab of the HikaShop configuration.
Currency switcher
The currency switcher module of HikaShop can be activated via the Joomla modules manager. You'll be able to display it in any position of your template, like any other Joomla module
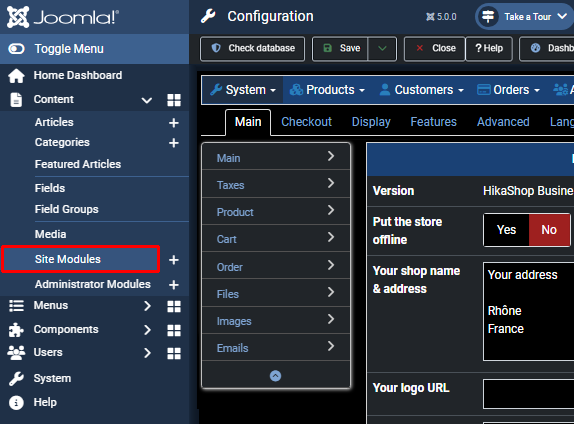
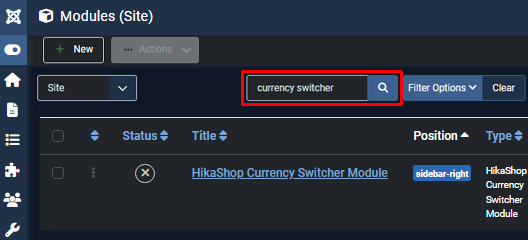
and it will display a dropdown of all the currencies which are either "published" or "displayed" in the Currencies management screen.
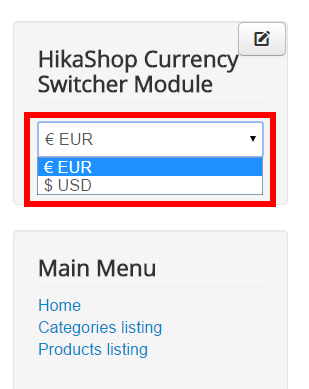
If you have currencies which are displayed but not published, the users will be able to see the prices in that currency on the products listings, products page and in the cart module.
However, they will see the prices in the main currency of your shop during the checkout. That will allow you to have users from many countries see the prices in their own currency, but have them pay in your own currency because for example your payment gateway only supports your currency.
Finally, with the Business edition, you can configure the Geolocation system in order to force the default currency on the pages to the currency of the user based on his geolocated IP address.
- Details
- Written by: Jerome
- Category: Tutorials
- Hits: 27349
Introduction
The Hika components are compatible with several point systems. The first one is Alpha User Points and it's fork Alta User Points. The second is EasySocial points. The last one is the "user_points" custom field.
Thanks to it, you can use points in your HikaShop store in different ways.
To have the different user points plugins in HikaShop, it requires the Business edition.
Please note that for all points plugins you can create several configurations and use all modes. So you can use Alpha User Points and HikaShop user points at the same time if you want to have two groups of points for example.
Configuration of the custom field
If you don't want to use Alpha User Points, Alta User Points or EasySocial points, you can use a custom field of the table "user" with the column name "user_points".
In the HikaShop backend, in the menu Display>Custom fields, you have to create a custom field and use this configuration.
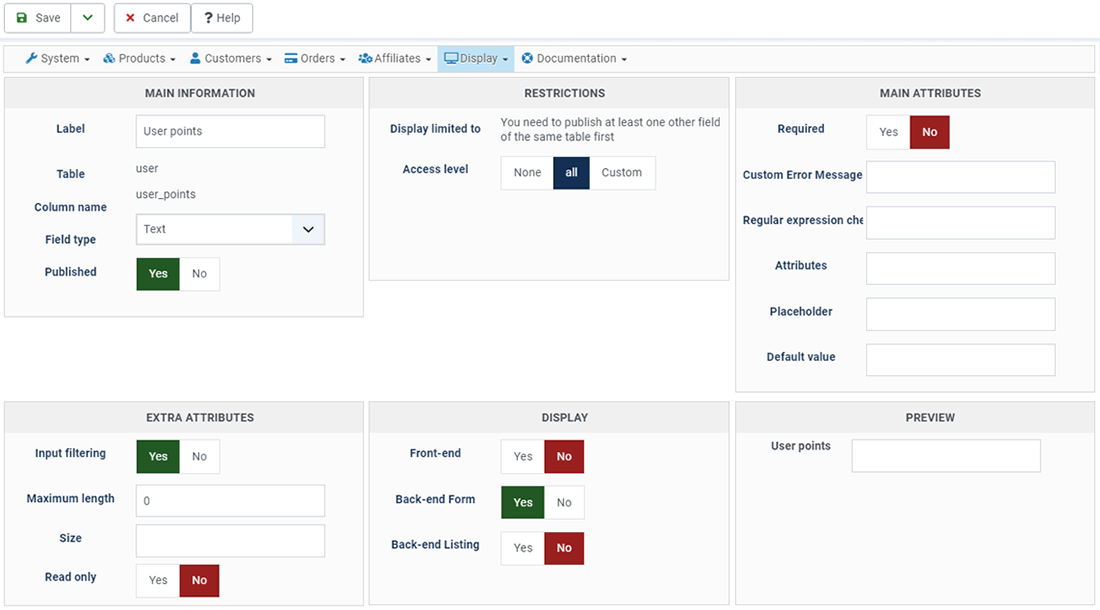
The idea is to not let the user see or edit his points in the front-end but you will be able to see and edit the points in the backend.
More configuration
If you want to go further with the user points, we will recommend you to access to configuration of the "HikaShop user points" plugin in the Joomla plugin manager.
Thanks to it, you will be able to activate some specific features like a new "checkout workflow step" which can display to the customer the number of points he got and allow him to use or not his points to create a discount. After activating the checkout workflow step, you can add it to the "Checkout Workflow" setting of the HikaShop configuration page.
Payment
HikaShop has a payment plugin which allows your customers to use their points when making an order.
The plugin can be used as a classical payment plugin but it can also be used to generate dynamic discounts.
You can configure it by selecting the "HikaShop user points plugin" after clicking on the "new" button of the System>Payment methods menu.
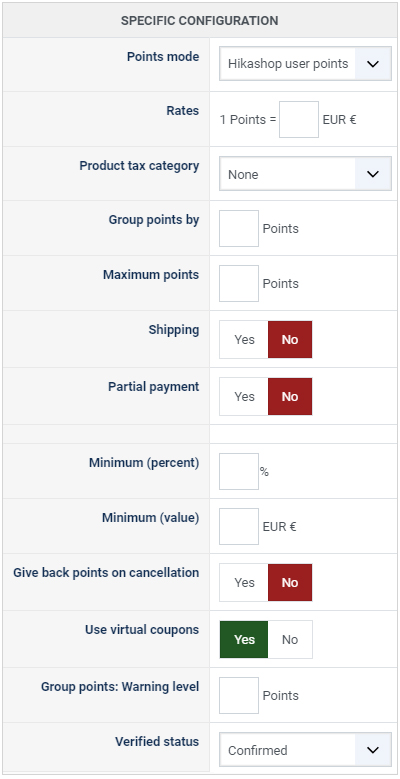
First, you have to select the Points mode. If Alpha User Points, Alta User Points or EasySocial are installed on your website, you will be able to select them here. Otherwise, you will just have HikaShop points available.
Please check that the user_points custom field is created first, otherwise the plugin won't be able to use the customer points.
The plugin has two different modes defined by the option "Use virtual coupons". This option will define how you want to use the plugin for the payments.
Please activate the "partial payment" if you activate the virtual coupon mode, otherwise the coupon mode won't be very useful.
- Points mode: Select the point methods you want to use for that method.
- Rates: You can define here the monetary value of a point. When a customer will pay, each point will allow him to pay the defined value.
- Product tax category: Indicate the tax applied on the generated discount.
- Group points by: With that option, you can force users to only be able to use their points by packs of X points.
- Maximum points: When you want to limit the maximum number of points users can use, enter the value here.
- Shipping: Allow or not the shipping fees payment with points. In this case, the shipping fees will be payed with another payment method and a coupon will be generated for the points.
- Partial payment: Allow or not the partial payment of an order. If the partial payment is active, you are able to set a Maximum percentage of the order payable with points. When a partial payment is made, a coupon is generated for the order and the user will have to pay with another payment method the remaining amount.
- Minimum percentage: Define the minimum percentage of the order which have to be paid with points.
- Minimum value: Define the minimum amount of an order which have to be reached to pay with points.
- Give back points on cancellation: You can choose here whether to give back or not the points which have been used to pay an order when the order is cancelled. (Note: when an order is cancelled, points which have been earned by the user are ALWAYS deleted).
- Use virtual coupons: When that option is activated, instead of using an auto generated coupon during the checkout in order to use the points, the points will be added as an additional line before the final total. That means that users can use at the same time points and a coupon.
- Group points: Warning level: This option is used when the "Group points by" option is set. It allows you to display a message to the user when he doesn't have enough points to use his points because it didn't reach the minimum required points based on that "Group points by" option.
- Verified status : Here, you can select the status to set to an order if the plugin process the order completely through the checkout.
Earning
HikaShop has a generic plugin which allows your customers to gain points by purchasing products on your HikaShop store.
Like shipping and payment plugins, you can create several configurations for the user points plugin in order to give more or less points depending to the products that your customers will buy.
Under the menu "HikaShop > plugins", you can create a "New" plugin instance.
You need to select "HikaShop User Points plugin" in the list to create a new configuration to let your customer earn points.
The instance configuration is similar to the configuration of payment/shipping plugins.
The important part is the "specific configuration", area where you will find all settings for the points earning.
Note : You have to configure the "Invoice" column of the menu System>Order statuses. More precisely, an order is seen as finished when an order has its status changed to one of the order statuses activated in that "Invoice" status column. Thus, if you order don't reach one of these statuses, the customer won't earn any point.
- Points mode Select the type of points that the customer will earn (HikaShop points, Alpha User Points, Alta User Points, EasySocial points...)
- Give points when using some allows you to not give points to customer when they want to use some of their pointsin an order.
- Round points down will force a round down on the number of points that the customer could earn.
- Give virtual points is a very special setting which allows the customer to use the points of the order he is currently placing on your shop in order to pay that order. We recommend not to use that setting.
- Rates indicate the conversion rate between your main currency and the points. It is the main setting of the plugin.
- Products points will affect a fixed number of points per products. That setting is useful if you don't want to use the rate conversion.
- Product categories is a filter for the previous settings. So only the products in the selected categories will be affect by the "rate"
- Limit by type when you're using points per product, that setting will account the variants of a product as one same product. So a product will be counted only once.
- Shipping gives points when you're using the conversion rate, that setting allows you to include the shipping price in the conversion
- Points earning on categories allows you to give points depending on the product categories. Using ":limit by category" the number of products in the categories won't affect the process and only the best category of each product will be used.
- Points earning on groups will give a fixed amount of points to customers depending their Joomla user group. The setting "limit by group" will select only the best group.
Generating
Thanks to HikaSerial and its plugins, you can generate a "points" serial when a specific product is bought.
The serial will be a special serial, embedding some points. The user will be able to consume the serial in order to be credited of these points on his account.
The "points generator" in HikaSerial will also allow you to generate these special serials manually, or during an AcyMailing newsletter campain.
- Details
- Written by: Charlotte
- Category: Tutorials
- Hits: 37164
Here is a quick video tutorial which explains how to create and display your first product with HikaShop.
- Details
- Written by: Eliot
- Category: Tutorials
- Hits: 57447
|
|
Description
This screen enables you to create or edit your reports. Indeed, Hikashop gives you the possibility to generate reports based on your shop data. Through graphs, tables, pies and many other charts you will be able to visualize your shop information such as the number of sales this month, the best product sold this year or the evolution of your sales during the 10 lasts days. The flexibility of this report tool will allow you to create specific reports fitting your needs.
Reports are available in both the Essential and the Business edition of HikaShop.
You can access this screen by clicking on the menu Components->HikaShop and then on the HikaShop menu Orders->Reports in your back end.
Toolbar
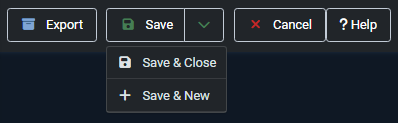
- Export : This will allow you to download a CSV file of the statistics for further processing via Microsoft Excel and other tools handling this common data format. This feature is only available with HikaShop Business.
- Save & Close : Save the report and return to the reports management screen.
- Save : Apply the modifications to the report and stay on the same screen.
- Cancel : Return to the previous screen without saving the modifications.
- Help : This button enables you to turn ON/OFF the help section, this screen will appear or disappear.
Set the main information: Current report
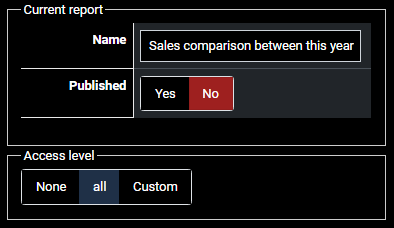
- Name : Here you have to define the name of your report.
- Published : When your report is published, it is displayed on the dashboard.
- Access level: You can restrict the report from being displayed to some joomla groups of users.
Choose your kind of report: Display
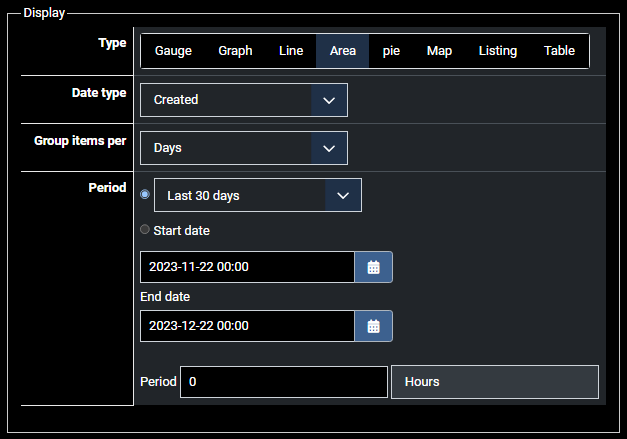
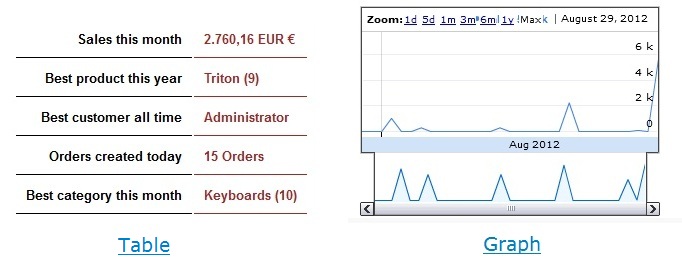
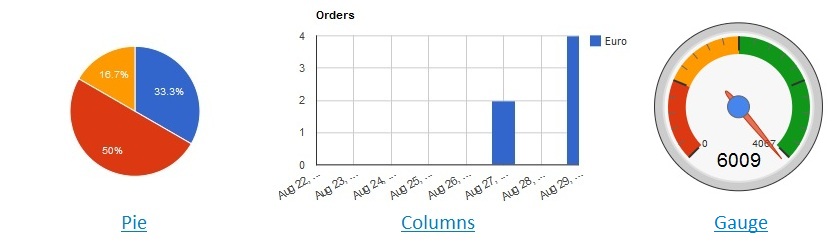
- Display Type : Define the display type of report which will be generated. See below to know what each type looks like.
- Date Type: Choose here the date type used to generate the report.
- Group items per: This option gives a more readable report by allowing you to group your items per days, months, year or hours. Thus, when you want to see you sales for the last year you can choose to group them by month in order to get a chart with 12 points or columns.
- Period: Define the period on which the report is based. You can either choose a predefined period (this year, this week...) or define a specific period.
Note : Please, make sure that your server and website are configured with the same timezone to avoid any issue. As otherwise, you might notice discrepancies in the way the date restrictions are applied
Here are the different display which are available:
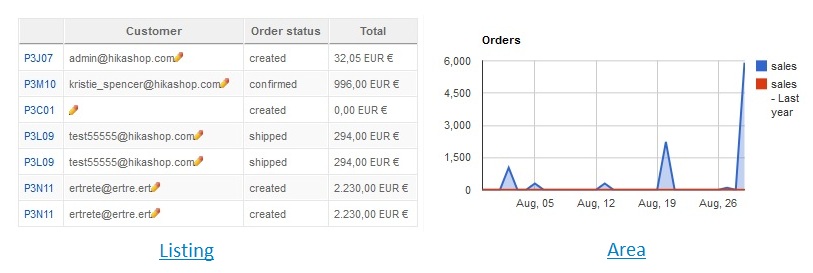
Data Type: What do you want to visualize?

- Type: In this section you have to define the type of data on which your report will be based. Since every display type doesn't present the same kind of information, some types will be available only for specific display.
- Orders: The number of orders
- Sales: The amount generated by your orders
- Taxes: The amount of tax paid on your orders
- Customers: Your customers
- Partners: Your partners
- (for those last two types you can choose among multiple sources of data)
Display options: Filters and compares
This section is the most important if you want to generate a customized report fitting your needs. Filters and compares allow you to generate a report on a specific category as well as for a specific currency or compare the sales for your 5 best products. The filter section will for example filter the data in order to use only specific elements for the chart.
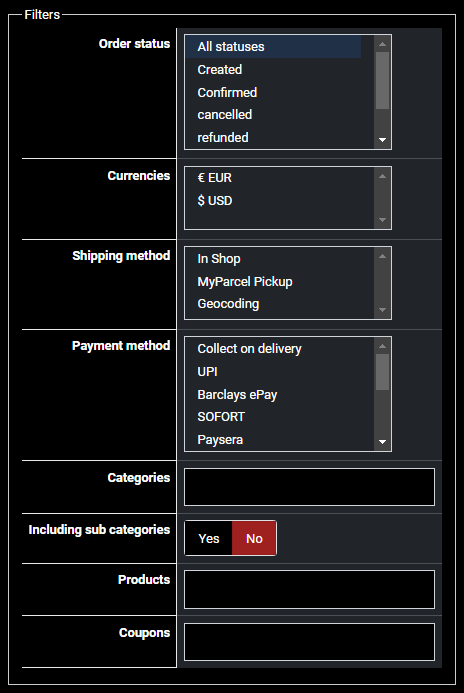
- Order Status : You can choose here the order status of the visualized orders. Indeed, you can display only the shipped or created orders as well as the confirmed orders only. You can select multiple status with the CTRL key of your keyboard.
- Currency : Display the orders paid with the selected currencies.
- Shipping method : Display the orders using the selected shipping methods.
- Payment method : Display the orders using the selected payment methods.
- Categories : Display the orders with products in the selected categories.
- Include sub categories : Include or not the sub categories of categories selected above.
- Products : Display the orders including one or more selected products.
- Coupons : Display the orders including one or more selected coupons.
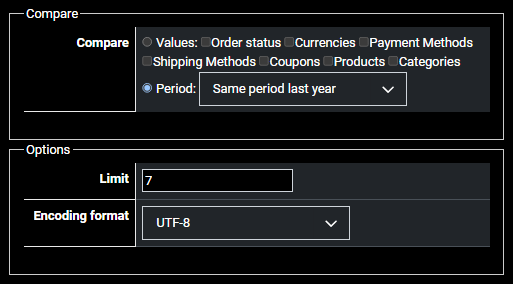
The compare section allows you to generate compared reports. Thanks to this options you will for example be able to generate a report showing the sales of this year and the sales of last year, giving you the opportunity to compare the evolution of your shop between the two years.
- Compare : You can choose to compare your data either on a period or on a value base. Values will allows to compare orders and sales dividing them on the selected criterias. If you check the products option, you will be able to see the sales of each product separately. These options are cumulative so you can see the evolution of your products' sales depending on the payment method. The period option will simply make a comparison between the sales of the chosen period (see above) and the sales made on the last same period (for example the last week if your defined period is this week) or on the same period last year.
- Limit: This option defines a limit to the number of lines/columns displayed. If you have 100 products and chose the product compare option, the report will be unreadable so you can set this option and only the best products will be displayed.
- Encoding format: Define the format of the exported csv.
Other options are available according to the selected type.
- Details
- Written by: Xavier
- Category: Tutorials
- Hits: 133746
|
|

Description
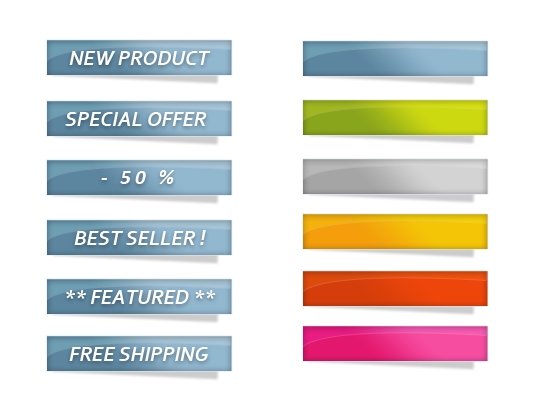
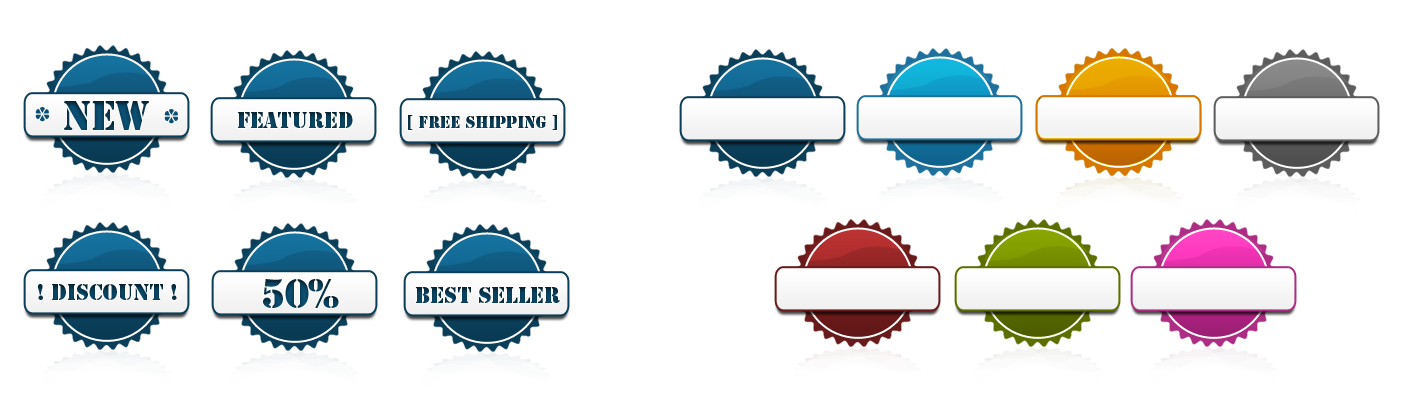
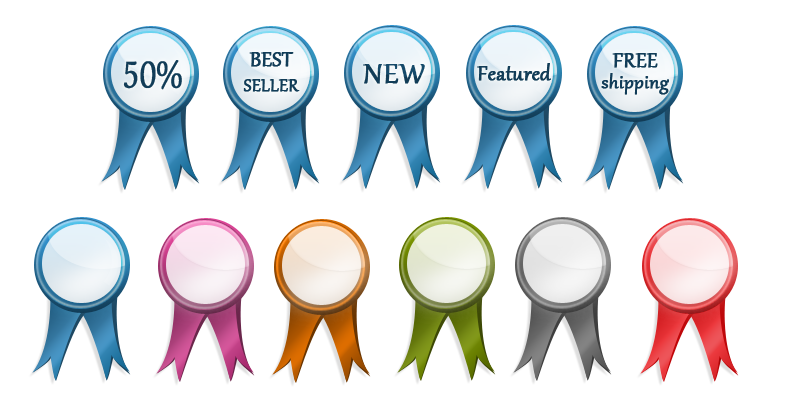
This screen enables you to edit the Badges options. In HikaShop, you will be able to create badges which will be
visible on the images of the product. That way, you can highlight some specific attributes of some products, like discounts, new products, featured products, etc.
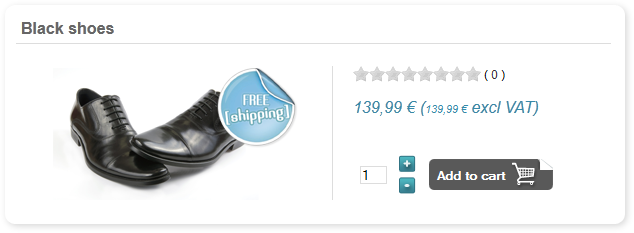
This screen can be accessed via the menu Products->Badges on your backend.
Toolbar

New: Enables you to create a new badge.
Edit: Select a badge and then click on this button in order to edit it.
Delete: Select one or several badges and click on this button in order to completely delete them.
Help: This button enables you to turn ON/OFF the help section. This screen will appear or disappear.
Control panel: You can go back to the control panel using this button.
Columns headers
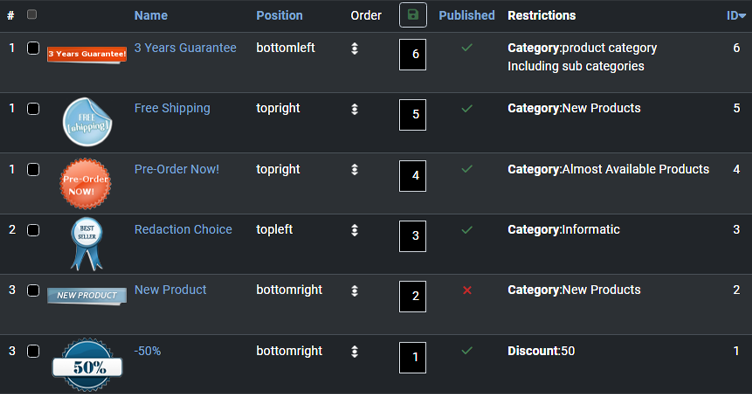
#: An indexing number automatically assigned for ease of reference.
Checkbox: Check this box to select one or more items. To select all items, check the box in the column heading. After one or more boxes are checked, click on the delete button in order to delete the selected badges.
Image: The image used for the badge.
Name: The name of the badge.
Position: The position, chosen among 4 choices, where the badge will be positionned.
Order: The order will define the priority of the badges between them.
Published: If a badge is published, it means that it will be used by the system, otherwise, it won't be taken into account.
Restrictions: Category, with or without subcategories, and/or discount on which your badges apply.
ID: This column indicates the ID of the badge.
Informations
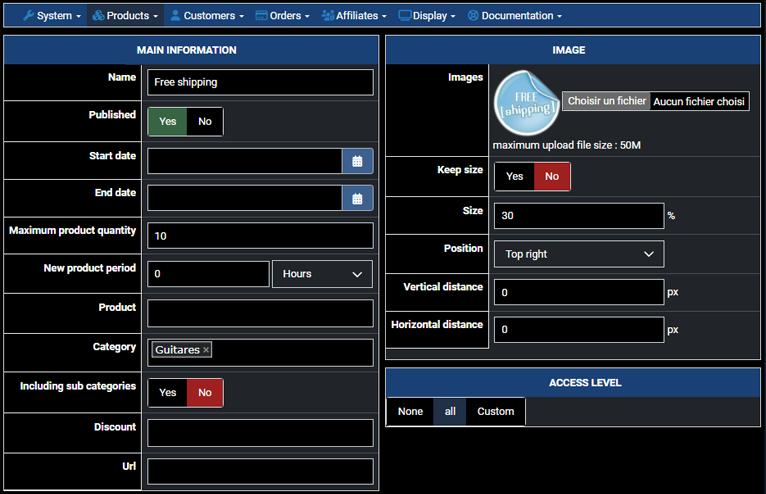
- Name: Choose here the name of the badge you are editing.
- Published: Choose to publish your badge by checking the "Yes" option here.
- Start Date: The date when the display of the badge will start.
- End Date: The date when the display of the badge will end.
- Quantity: Here if you enter a number, that will restrict the badge to only that stock amount. So for example, if you want to display a "no stock left" badge, you can put 0 in that field so that the badge display on the products image only when there is no stock left.
- Category: Choose the category on which your badge will apply.
- Including sub categories: Choose here if you want to include subcategories of the previously chosen category or, if you prefer, limit the badge only to the selected category.
- Discount: Select the discount your want to associate with the current badge. Every product with the badge will automatically assume this discount.
- Url : Fulfilling this field will make your badge clickable and redirect the customer to the given url. This option may be useful to redirect customers to a discounted category.
- Images: You can upload here the image of your badge.
- Size: This size defines the size of the badge compared to the size of the product image. It means that the badge will adapt itself automatically.
- Position: Choose here the corner of the product image where your badge will be placed.
- Vertical distance: This distance is between the top or the bottom (it depends of the corner chosen previously) of the image, and the same part of the badge. A positive distance will place badge out of product image.
- Horizontal distance: This distance is between the left or the right (it depends of the corner chosen previously) of the image, and the same part of the badge. A positive distance will place badge out of product image.
Note : Please, make sure that your server and website are configured with the same timezone to avoid any issue. As otherwise, you might notice discrepancies in the way the date restrictions are applied
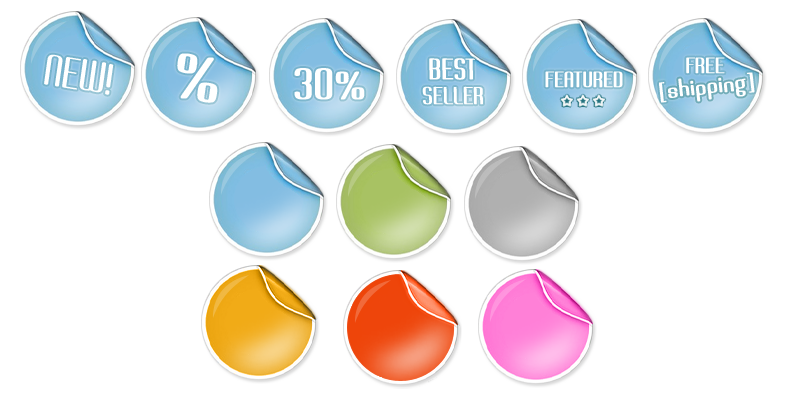
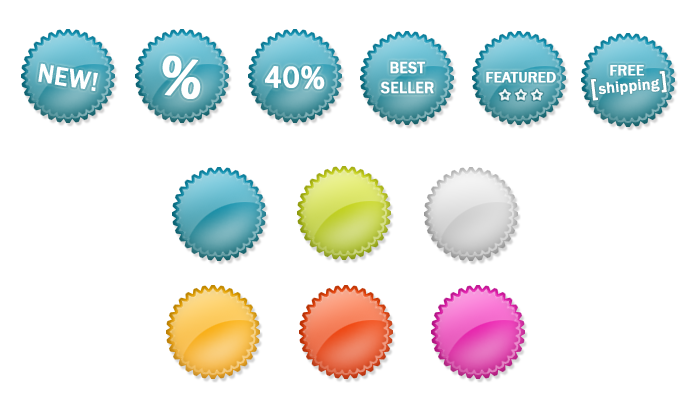
Design - Free icons
 |
||
 |
||
 |
||
 |
||
 |