- Details
- Written by: Xavier
- Category: Tutorials
- Hits: 7255
|
|
Description
The goal of this tutorial is to show how to manage the tabs in the tabular product view.
You will have to edit views, so please read the tutorial on how to customize the display: Here
The view in question is the "product / show_tabular" one.
Manage tab titles
So you have to edit the view "product / show_tabular", one on the edition page of that view, scroll down until the "hikashop_product_bottom_part".
Here you will see the div "hikashop_tabs_div" which contain all the tabs titles and contents.
To manage the titles, you can find them in the HTML "li", for example by default you have the tabs:
- hikashop_show_tabular_description_li
- hikashop_show_tabular_specification_li
- hikashop_show_tabular_comment_li
- hikashop_show_tabular_new_comment_li
There is one important thing to know here, if you add or edit a tab id, it must contain "_li" at the end, this is used by a JavaScript rule when clicking on a tab.
If you want to add a new tab, you just have to add a HTML "li" entry with the desired id ending by "_li", for example:

How to translate my tab title ?
As you can see the name which will be displayed on the product page for this tab is "My tab !". This is a text which can't be translated. To have a text which can be translated you have to use the code:
<?php echo JText::_('MY_TAB'); ?>
And add a translation like: MY_TAB="My tab !", if you don't know how the translations are working, please read that FAQ: Here
Is it possible to change the title of an existing tab ?
Of course it is, you just have to add a translation override as explained before and translate it as you want. Or you can directly change the text in the PHP JText function to something else and add you translation override.
How can I change the ordering of my tabs ?
It is easy, you just have to change the order of the "li" elements as you want.
Be careful, you have to let the "comment" tabs in the PHP if condition, else they will be displayed anytime, even if you disabled the comments in the settings.
Edit the tab content
The contents of the tabs are after the titles in the code. You can retrieve them thanks to their ids, they have the same ids as the titles but without the "_li" at the end.
So to edit the content of an existing div, you have to play with the code inside the div of the desired id.
For example the code to edit for the "description" tab is the one in the red rectangle:

To add content to the new tab, create a new div with the correct id, as my tab title id is "my_tab_li", so the div for the content must have the id "my_tab", logical, isn't it ?
For styling issues, please add the class "hikashop_tabs_content" to your new tab div, the result must something like:

This div must be inside the div with the id "hikashop_tabs_div".
Change the tab openned by default
You want that another tab be openned by default when reaching the page ?
Please scroll down to the end of the code and in the HTML tag:

Replace the "value" by the id of the desired tab. (without "_li" at the end), for example to have the new tab set as default set the value to "my_tab".
My tabs are not working
First of all, if you already had an override on the view "product / show_tabular" please back it up, then delete the override and restart from the default content of the view.
You potentially didn't had the latest version of the view.
Check if the tab titles part and the div one are presents in the div with the id "hikashop_tabs_div".
- Details
- Written by: Lavocat
- Category: Tutorials
- Hits: 11146
|
|

Description
The limit system able you to define a filter in order to set a limit through different parameters, so you can choose your period (like Cart, Daily, Weekly etc...) and the limit type (like Quantity, Price, Weight) for each limit, plus you can limit different order status type.
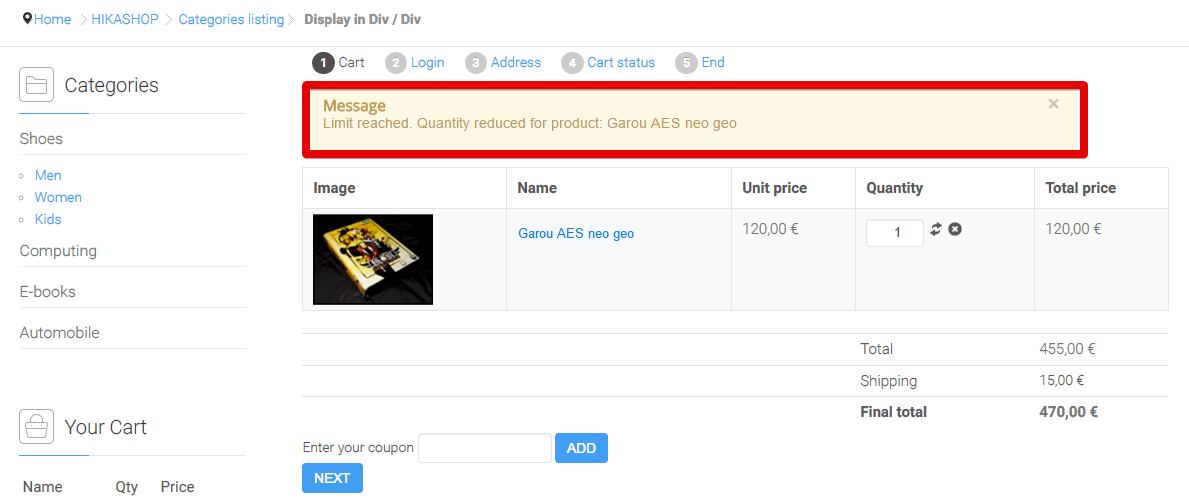
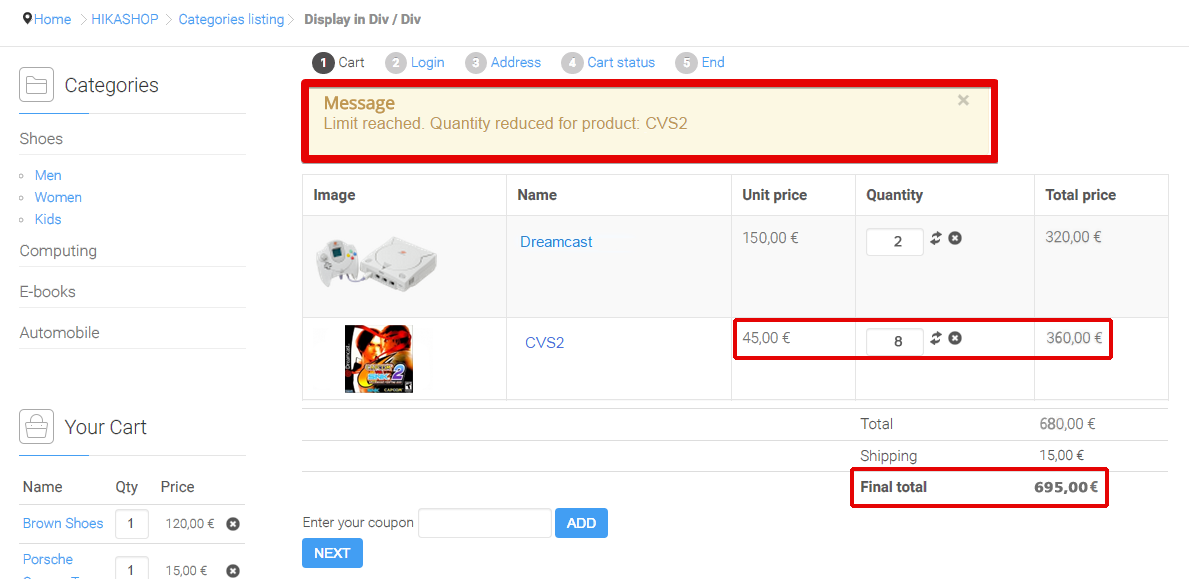
When the limit is reached, a message will be display in the checkout to inform the customer.
First, to find the Limit settings you must go to Hikashop (in components) -> Configuration
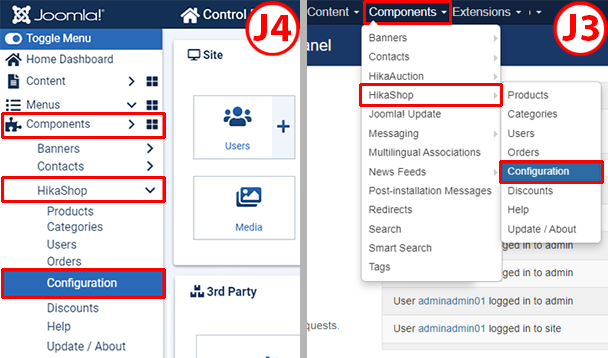
Then in configuration, go on Products -> Limit
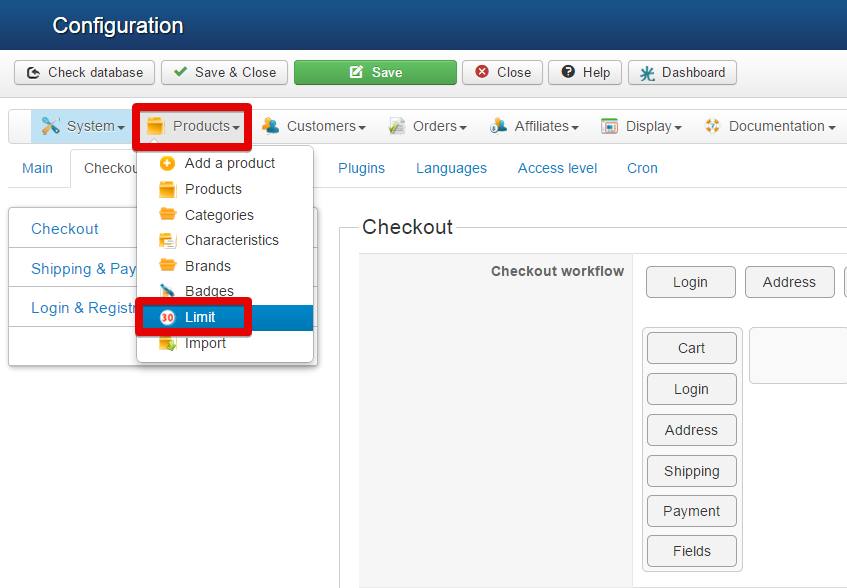
Now, you're in the Limit list, and you will just see an empty array, so click on New

Settings
You have different possible settings in this page to define your limit:
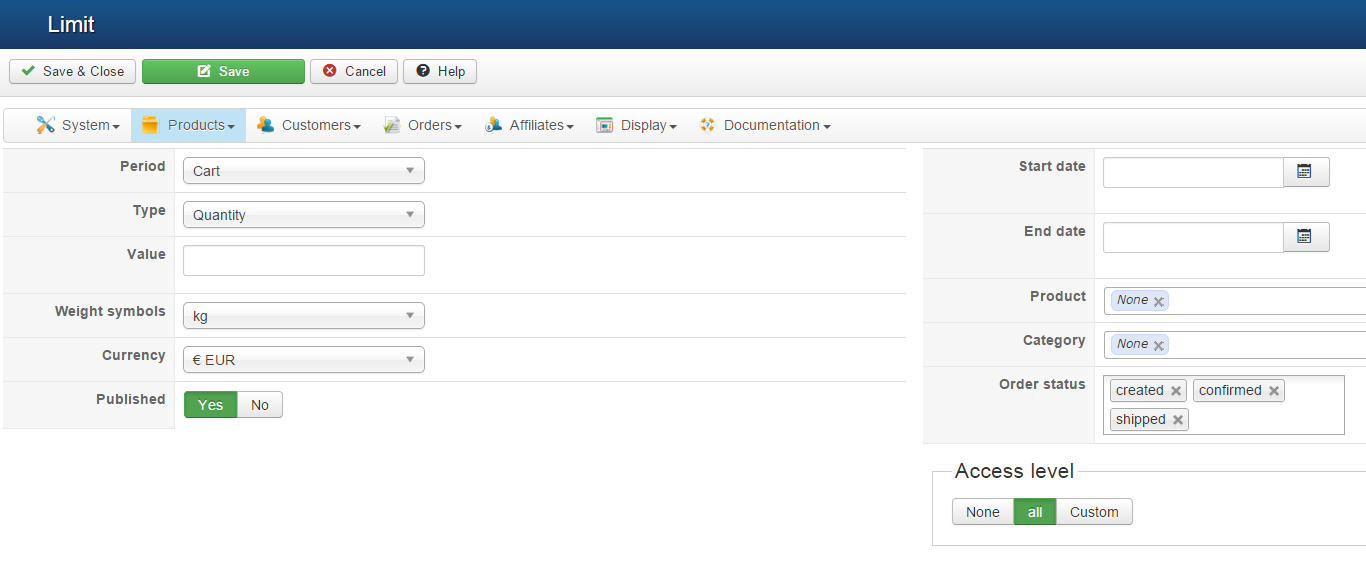
- Period : You can define on which period is base your limit, you can pick : Cart, Daily, Weekly, Monthly, Quarterly, yearly and Forever.
- Type : Choose on which eligibility criterium will be define your limit, here you have three choices : Quantity, Price and Weight.
- Value : Just type the value you want to set, for example if you picked "Quantity Type", the number of products, or if you picked "Price Type", the price without currency symbol.
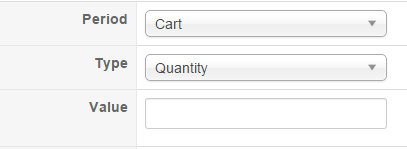
- Weight symbols : If you have picked "Weight Type" you can define symbols link to this Type.
- Currency : Same idea than Weight symbols but if you picked the "Price Type".
- Published : As usual, this is for turn On/Yes or turn Off/no the limit.
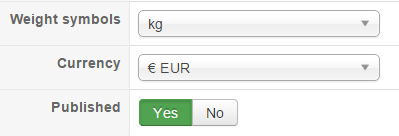
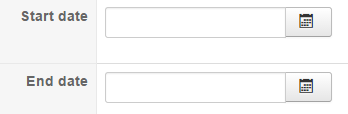
- Start date : Here you can choose the start date to enable the limit.
- End date : Same idea than above but to end the limit process.
Note : If you let these 2 dates parameters empty, the limit will be use now and until the limit is unpublished.
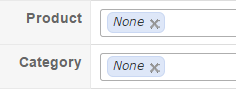
- Product : Define on which product will be used the limit.
- Category : Same idea than above but to select a category.
Note : If you let these 2 parameters empty, the limit will be use on all products and all category.
WARNING :
you MUST set ONE of these parameters "Product" or "Category".
If you set both parametersFor setting "Category", you must know that if you have set sub-category, you can only apply limitation on these sub-category.
For example :
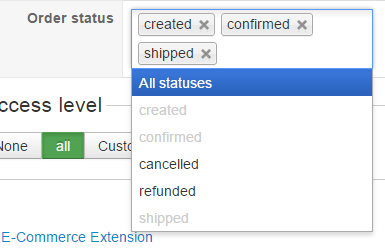
Order status : Define the order status limit to : all statuses, created, confirmed, cancelled, refunded and shipped.
Note : Thanks to the Namebox system, for select a product or a Category, you can select just by clicking in the input, OR by typing the product name!
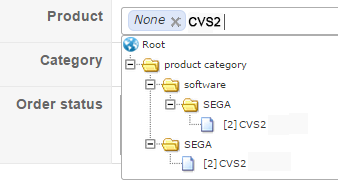
WARNING : If you select a category, which include some sub-category the limit will not be effective on these sub-categories products!
To affect sub-category products, you must select directly this sub-category.
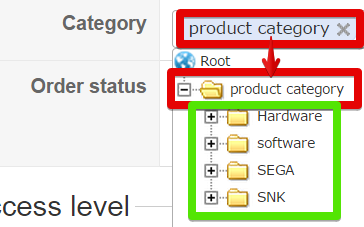
More precisely, like on this screen example (on below) we selected "product category" (here, on red), the "Hardware",
"Software", "SEGA" and "SNK" sub-category products (here, on green) will not be affected.
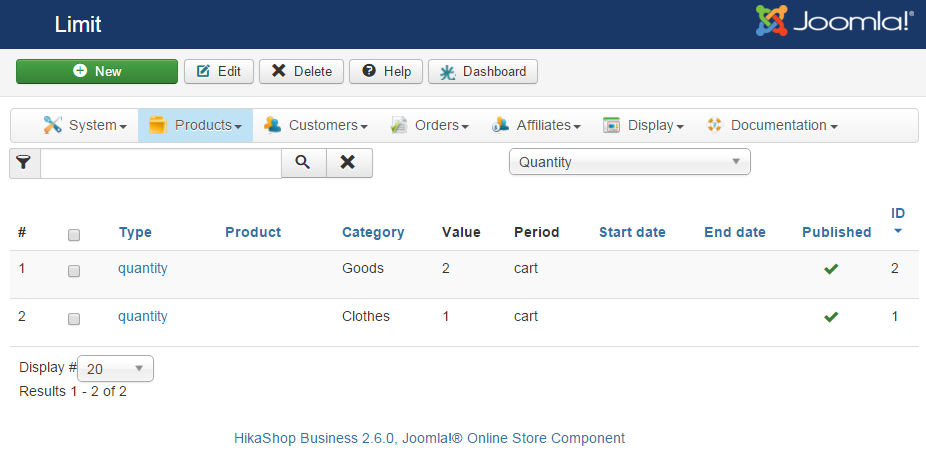
And so, if you want set limits on "Hardware" and "Software" sub-category products you have to create two limit settings like on screen below,
selected on each category.
Note : A little more explanation, the aim is for example, if you set on a long period (start with daily to forever) you can authorize just 5 quantity products with the order status "shipped".
So, if the customer order 5 products, he can order other products until the first order reach the order status "shipped"!
Note : To use the order status limit, the period can't be set on "cart", or the order status limit will be only on the created order status.
Concrete Examples
We will now see some concretes examples of Limit settings.
Price Example
Here we have set "Period" on Cart, "Type" on Price and "Value" on 400, which means that the customer can only add for 400 Euros per Cart.
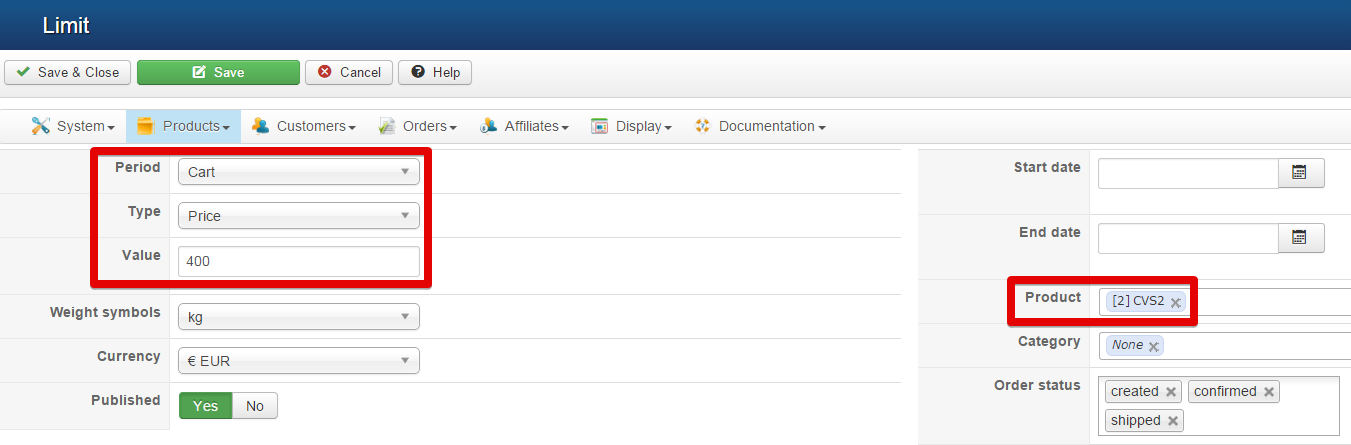
BUT the limit is set just on a product, here "jeu CVS2 Jap", so in the cart you see 504 Euros, but it's impossible for the customer to buy for more than 400 Euro of this product "jeu CVS2 Jap".
Quantity AND Dates example
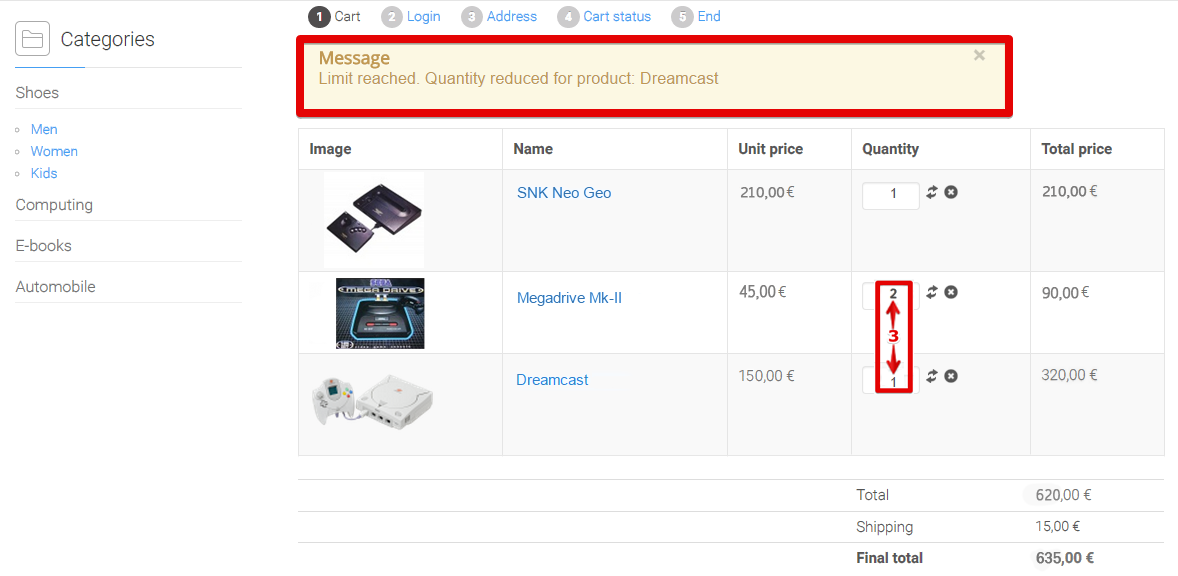
Here we have set "Period" on Cart, "Type" on Quantity and "Value" on 3, which means that the customer can only add 3 products from this category per Cart.
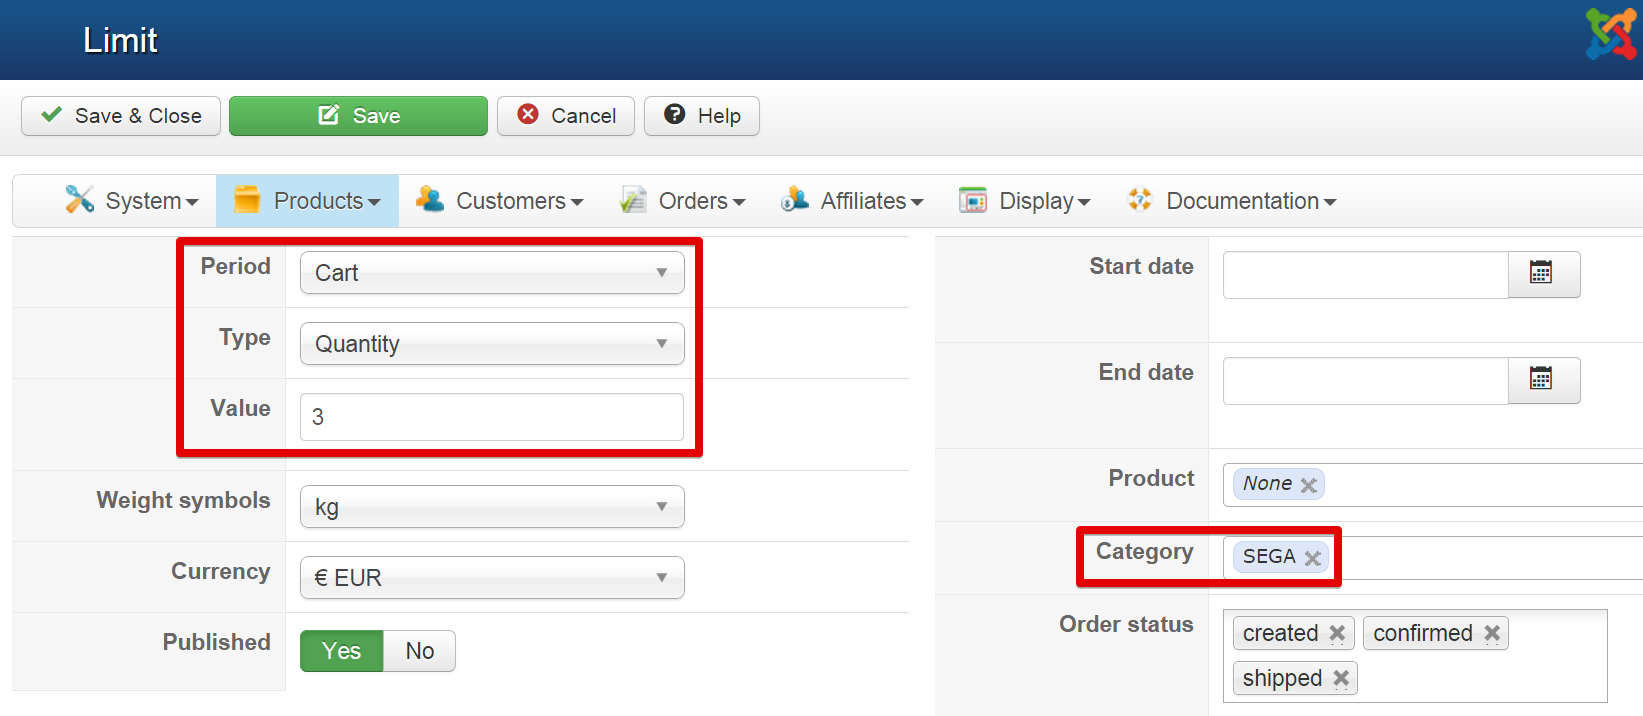
BUT the limit is set on a category, here "SEGA", so in the cart you see 4, but it's impossible for the customer to buy for more than 3 of this category "SEGA".
Period and Order Status Example
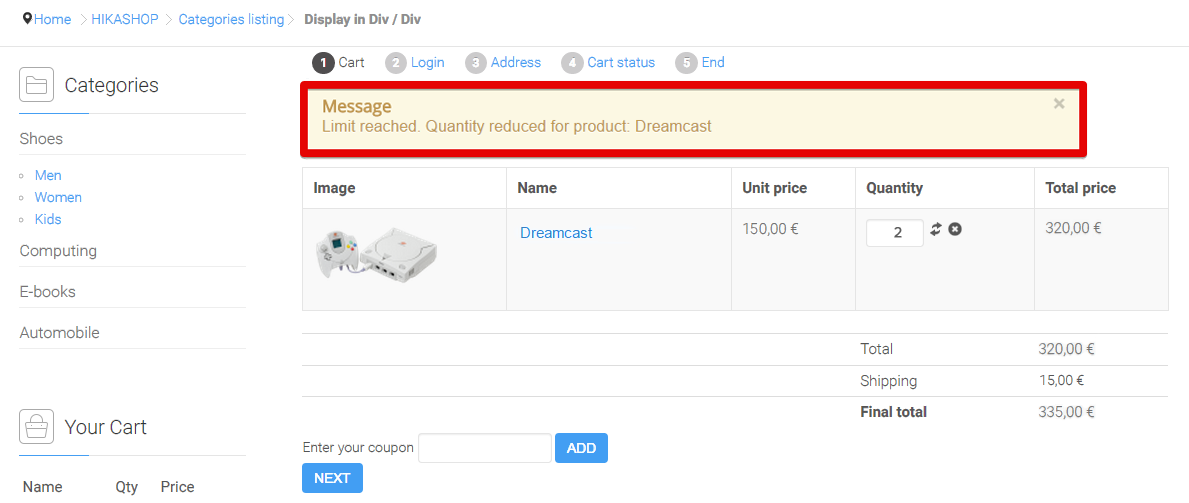
Here we have set "Period" on Weekly, "Type" on Quantity and "Value" on 5, which means that the customer can only have 5 created order status per Week.
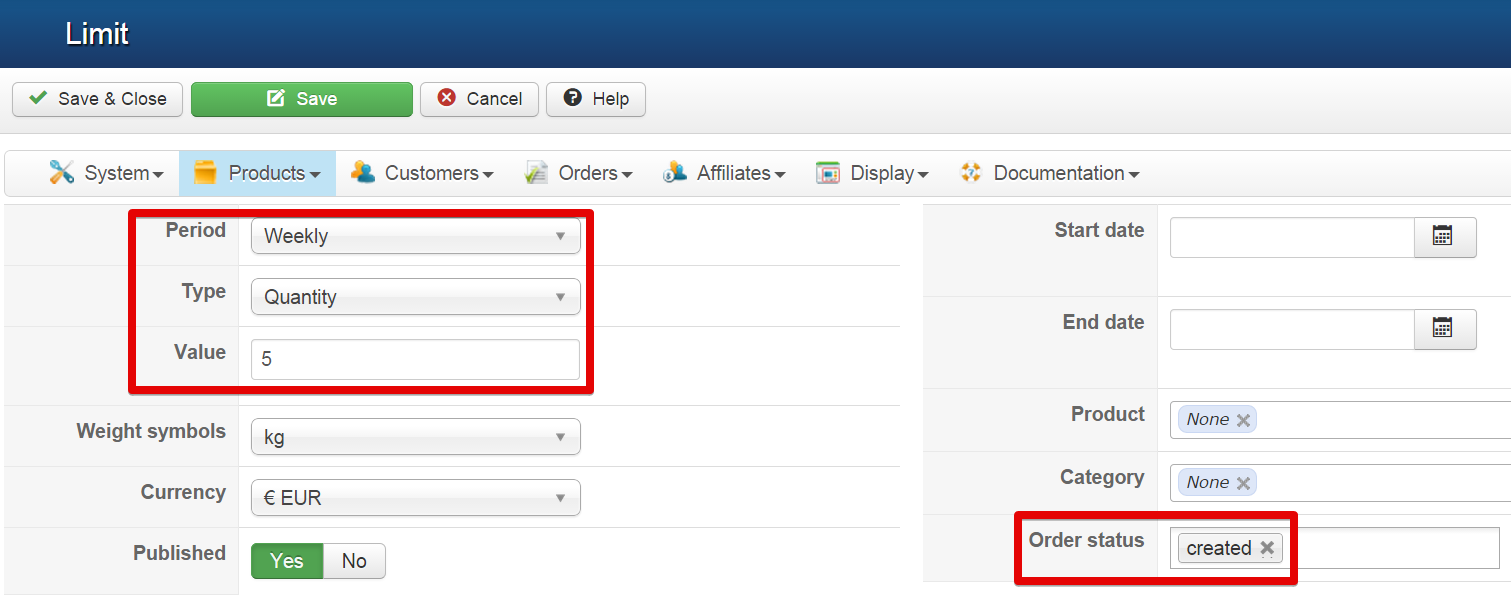
The limit is set on 5 created order statusBUT, here 2 is my limit, because I have already 3 created order status this week.
- Details
- Written by: Lavocat
- Category: Tutorials
- Hits: 17161

New European Union VAT rules
It all starts with European directive 2008/08/CE, which changes VAT rules in order to erase European disparity in e-services.
So it concerns telecommunications and of course, e-commerce.
This new rule will apply from the 01/01/2015, and from this date on, VAT rate will be determined by the customer's country, not the merchant country as it was the case for digital and telecommunication sales in the European Union.
So the customers will pay a different amount of taxes based on their country for such sales.
Of course, the price will change for the customer, and for the seller you will have to give back the VAT amount charged to the customers to each corresponding country.
In order to simplify that process, you will be able to use the MOSS single window.
The MOSS single window was created especially for collecting the VAT along with this directive.
First, it's important that you register to this MOSS if you're selling within the European Union and that this directive applies to products you're selling.
You can read more about all that on the European Commission website: ec.europa.eu
We highly encourages you to contact your local tax office to confirm that you're concerned and get the details explained to you if you think that these new rules apply to you.
What to do in HikaShop
First of all, you can download the Europe tax rules install Package.
It's a package which will add one tax rate for each European country (with the rate up to date), a tax category so that you can apply it to your products and tax rules linking the tax category, the tax rates and the countries based on the client type (individual, company, etc).
Please note that the tax rules have a starting date set on the 1st January 2015.
Install the tax rules package
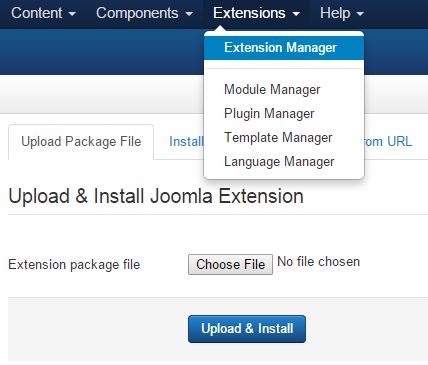
- Log in to your Joomla backend
- Click on the Joomla menu: Extensions >> Extension Manager.
- Browse for the HikaShop plugin you just downloaded.
- Click on the button Upload File & Install.
- The tax rates and rules are now added.
Adjust the configuration for your country
Since that tax package is for everyone, the tax rules are general. You'll want to edit the tax rules of your own country so that tax rate of your country applies regardless of the client type (while by default the tax rate only apply to individuals and companies without a VAT number).
Apply the new tax category to your products
You'll also want to change the tax category of all your products to the new tax category by creating a mass action.
First, you need to know the ID of the tax categories ; To see them, you need to go in the "Manage tax categories" when you edit the taxes (System > Taxes).
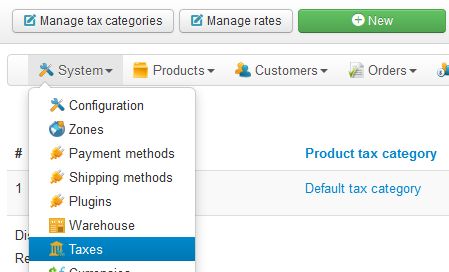
Once you got the current tax ID and the next tax ID ; you can use a "mass action" in order to change the tax for all of your products.
Via the HikaShop menu System > Mass actions, select create a Product action.
The idea is to "update the values" of the "product_tax_id" column for the new tax category value when the product is using the old tax category.
So you need to filter the product with the ID of previous category tax for the "product_tax_id" and then to update it with the new one:
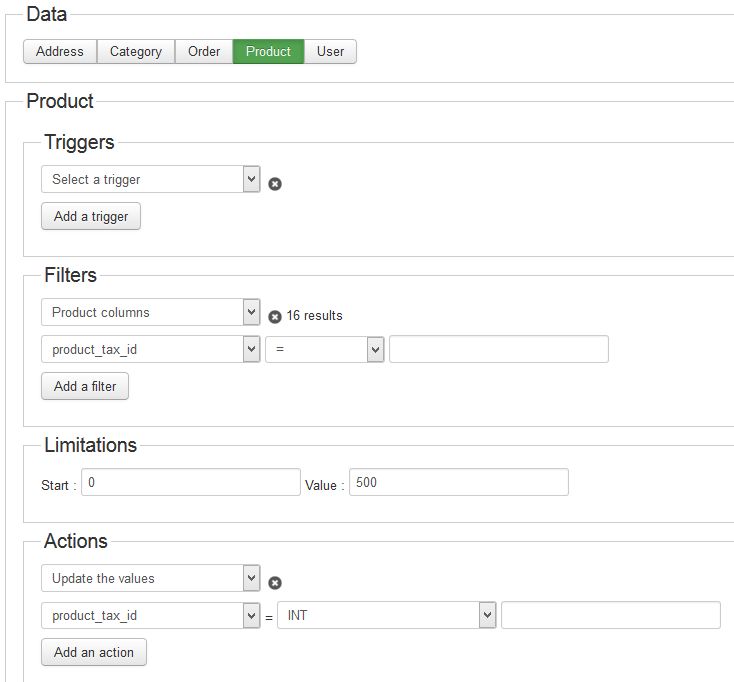
Remember that the tax rules have a start date set to the 1st of January 2015.
Floating tax prices
Finally, HikaShop 2.3.5 introduces a new option called "floating tax prices" that you can activate under the "Advanced settings" section of the HikaShop configuration.
When activated, HikaShop will use the price entered in the products as the price with taxes and will reverse calculate the taxes amount so that customers from different European countries will pay the same total price but a different amount of taxes corresponding to their country.
You do not necessarily need to use that option, but it can be handy to avoid having the prices changing between the product page and the checkout once the user enters his address and the system knows where the customer is from in order to charge his tax rate instead of the default tax rate.
Alternatively to that option, you can also configure the geolocation plugin of the Business edition to geolocate the customer's country based on his IP address until he enters his address, and thus allowing your website to display the correct prices to the customers in most cases, even before they enter their address.
Automatic tax calculations
The company PolishedGeek has been working for a few months on a solution to integrate HikaShop with the web service Avalara and should also be ready in the next few days. That solution will allow you to have your products taxes calculated automatically by Avalara based on the location of the customer. It will work with the European Union's new tax rules, but will also work for other countries.
What about the MOSS ?
Now that you have HikaShop configured to collect the appropriate tax for each customer, that you registered your company to the Mini One Stop Shop, you'll get orders with these rates, and you'll have to report the taxes you collected for each country to the MOSS.
Each country has decided to implement the MOSS in a different way. Some with an automated process with a specific format to transmit the data, some with a manual process, some with both.
The company Edwin2Win has developed an invoicing solution for HikaShop called HikaInvoices to handle invoicing in HikaShop and also handle everything related to the MOSS in your HikaShop online store. A first version is now available on http://hikainvoices.com
- Details
- Written by: Lavocat
- Category: Tutorials
- Hits: 17417
Here is a quick video tutorial which explains how to configure your checkout product with HikaShop.
- Details
- Written by: Lavocat
- Category: Tutorials
- Hits: 33593
|
|
Description
Thanks to this tutorial, you will be able to configure your products details page with a color selector.
The customer will be able to easily select his favorite color thanks to a preview of each color.
Then, we will see how to link each selectable color with the corresponding picture of your products. The aim is to see the products in different colors just by selecting a color.
Color setup
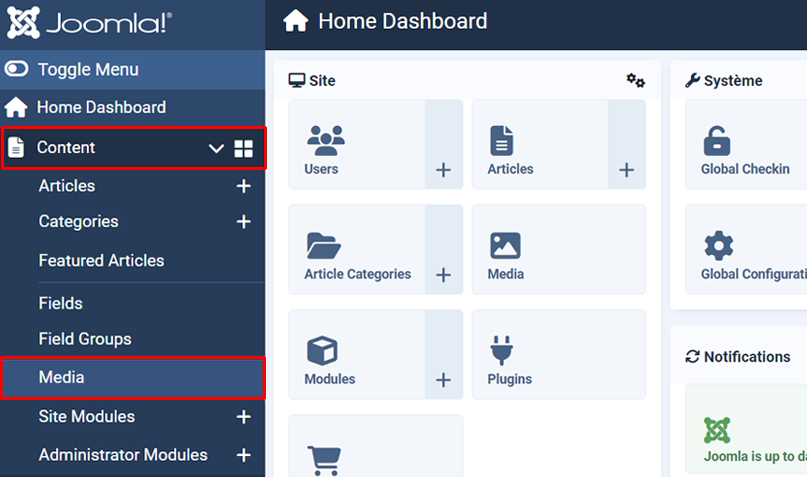
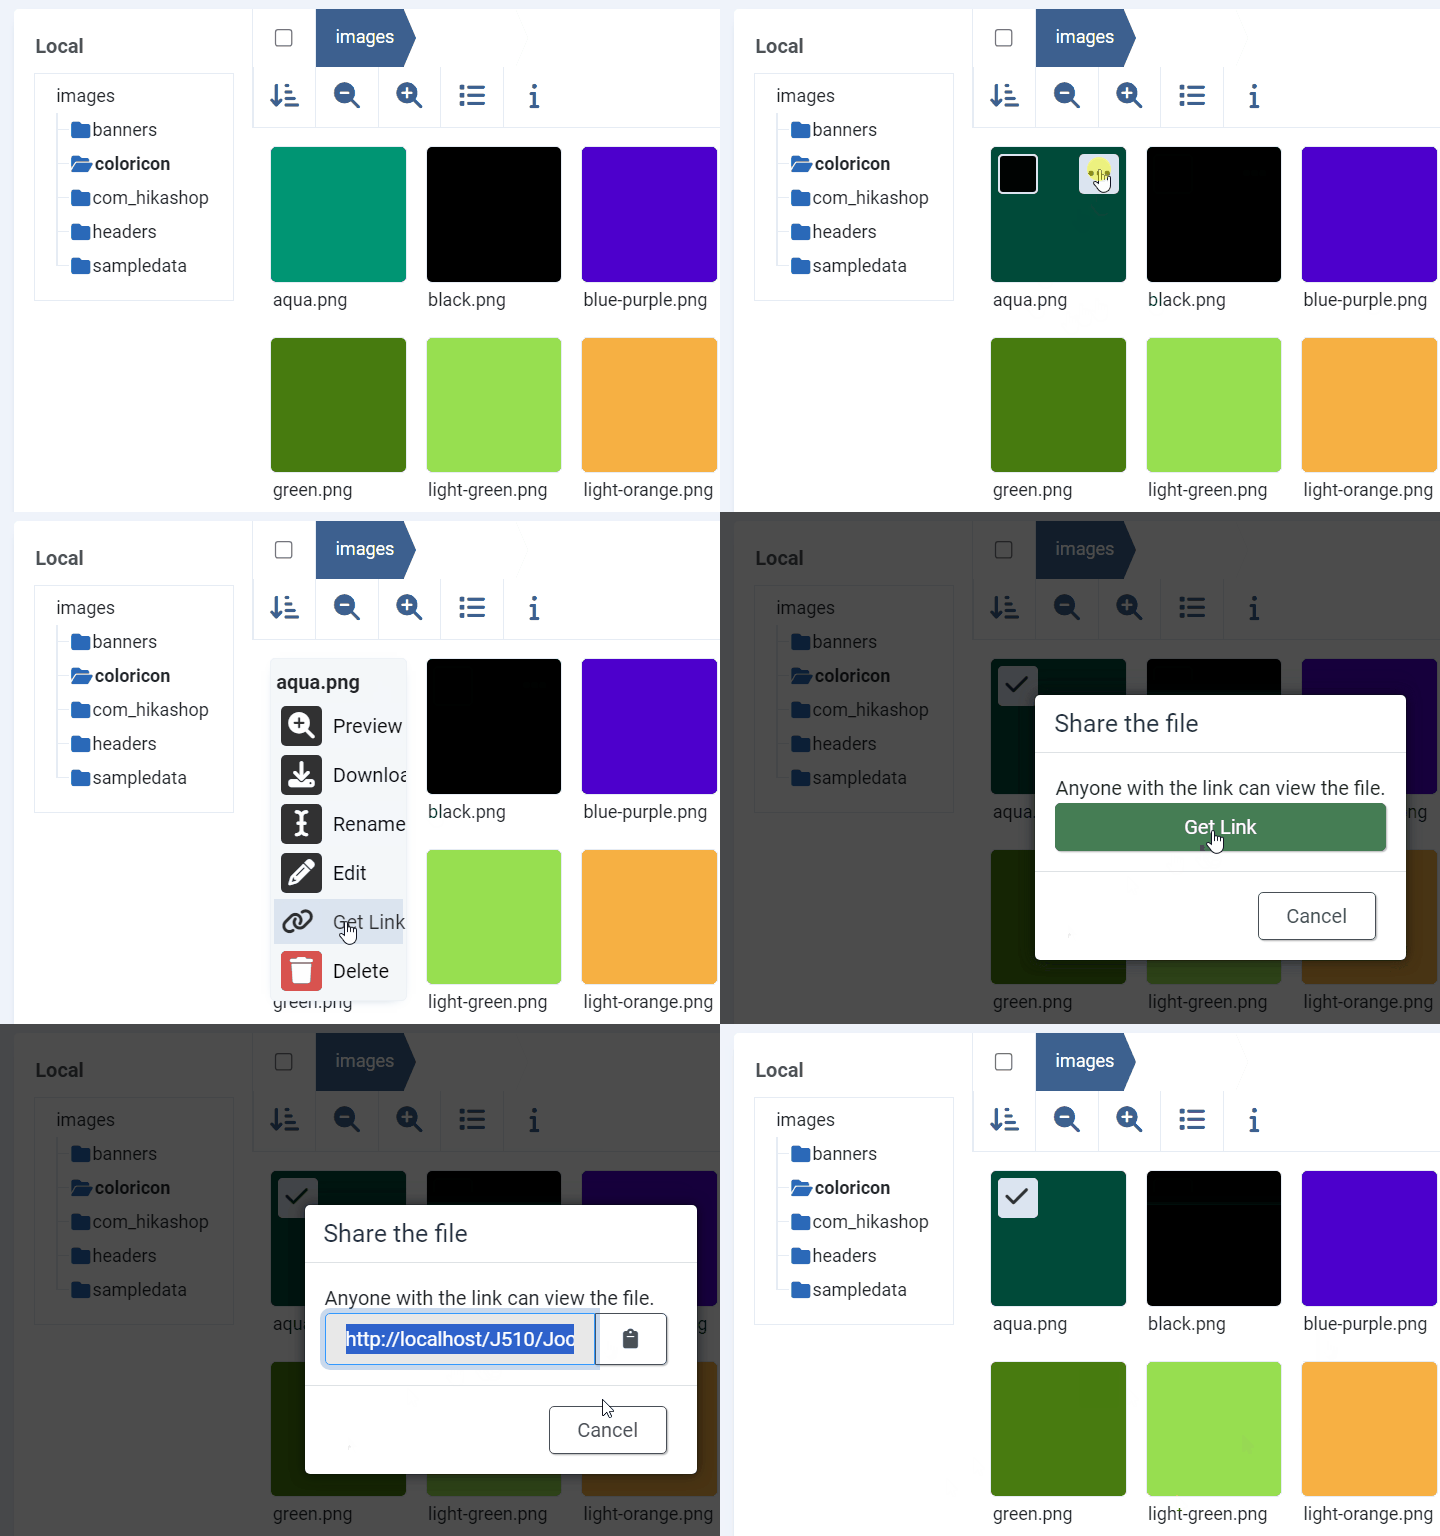
First of all, go to the Joomla media manager.
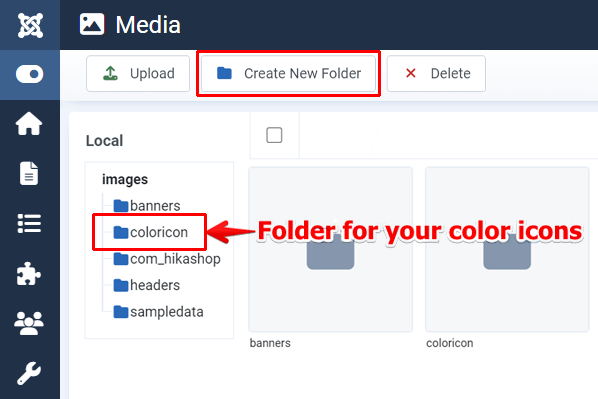
There, define where you will save your color icon, or create a new folder for this purpose.
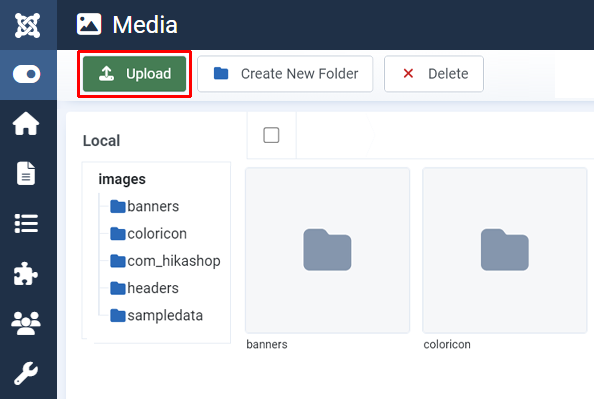
Now, you must upload your color icons. Click on the upload button.
Then, click on the "browse" button which will open the classic select window of your computer in order to pick your files (you can select several files). Once the files are selected, just click on the "start upload" button.
NOTE: You can find here, a link to an archive containing several color icons in png that you can use for this tutorial.
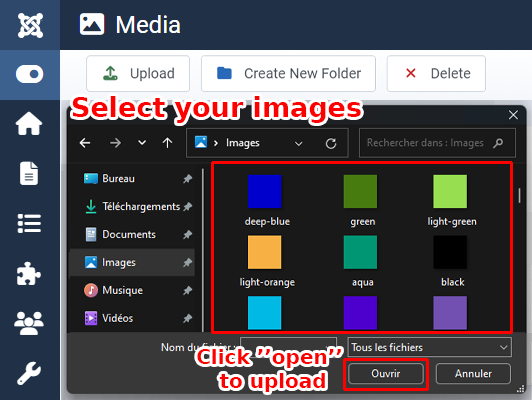
The screen let you see all your uploaded color icons. Here is a little tip, in order to make the next step easier! Right click on the needed icon to get its URL, copy it and paste it somewhere for later.
Display configuration
It's time to configure your new characteristics, so go on the Hikashop products screen.
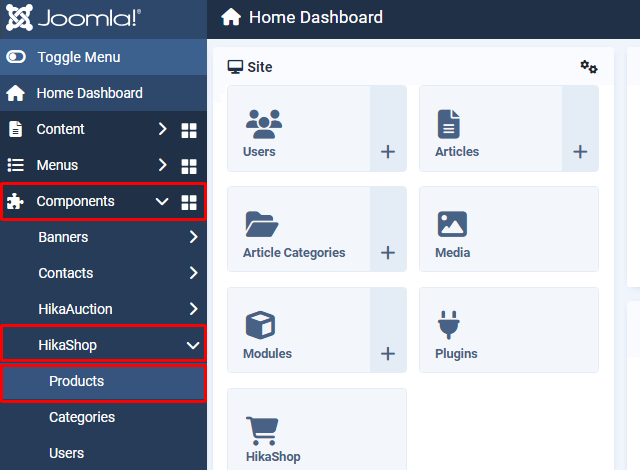
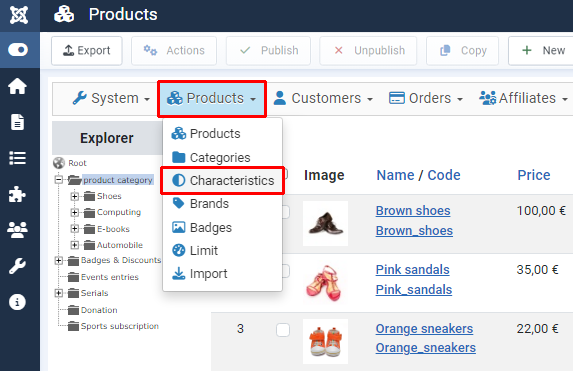
And select the Characteristics menu.
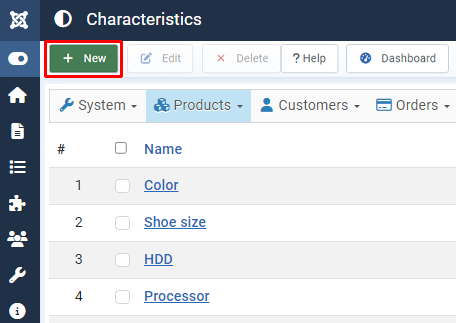
You must click on "New" button in order to create your new characteristics
Don't forget to type a name for your characteristics, then click on Add button for each possible value of your characteristic.
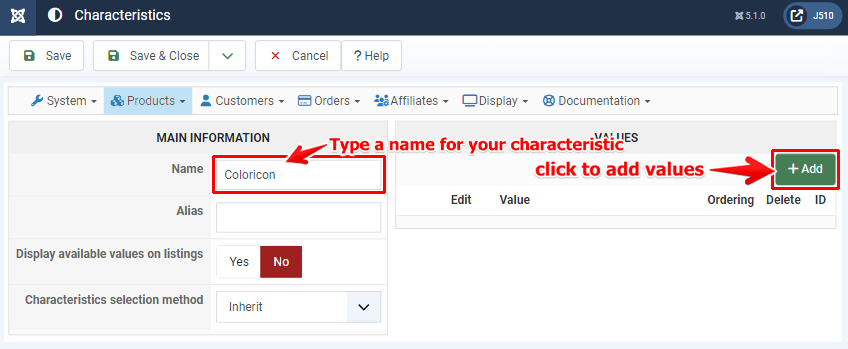
And now it's time to use the little advice I gave you sooner.
The aim here is to have your color icons added as values of your characteristics.
So here is for example the URL of your icon image:
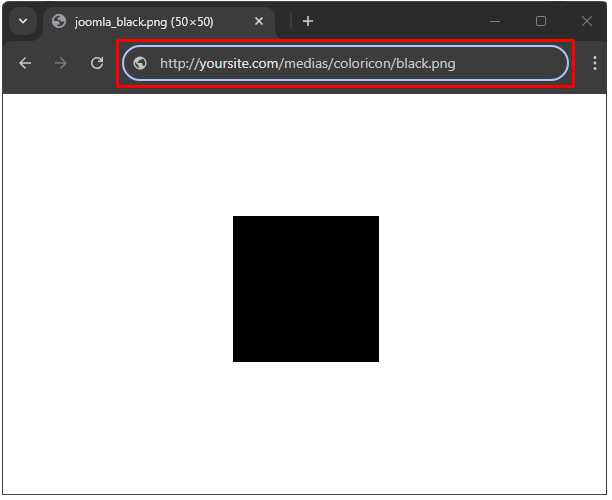
Thus, you have to use the HTML code below in your value name :
<img src="http://www.yoursite.com/medias/coloricon/black.png"/>
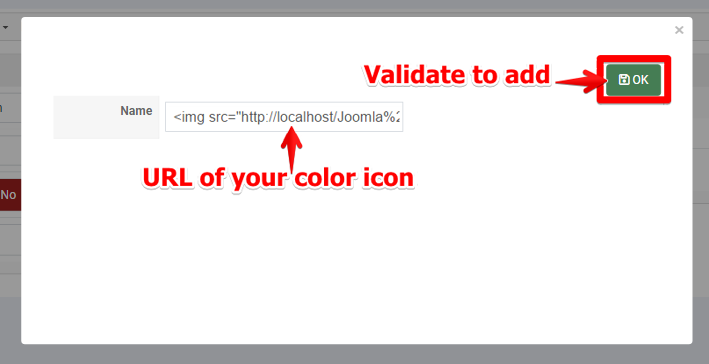
Repeat the last operation for each color icon needed. The screenshot below shows your color icon(s).
NOTE: You must create only ONE "color characteristics" but with all color needed on your website (like the picture below). Later in each product settings, you will be able to select the needed color(s) for that product.
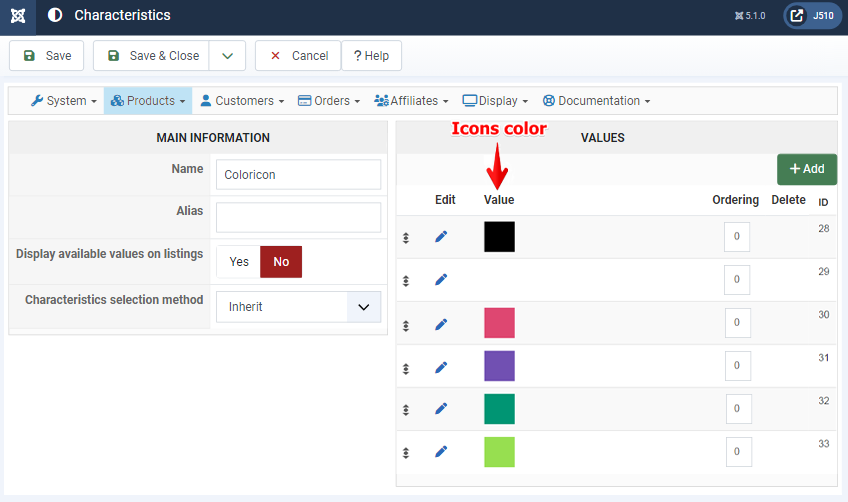
You have now finished to create your characteristic, and it's time to configure its display, so let's go to the HikaShop Configuration page.
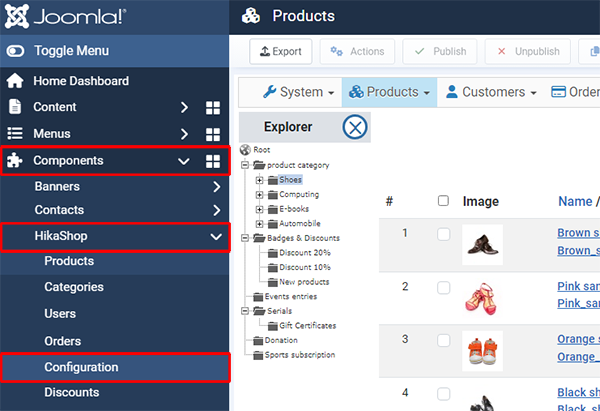
Go to the Product section, find the "characteristics selection method" option and select "Radio Button". Don't forget to save these settings after the change.
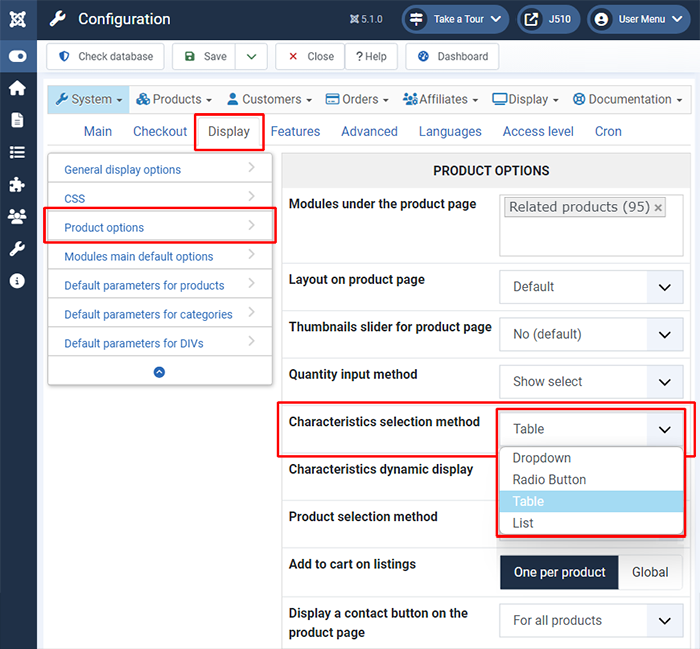
Time to configure your characteristics from your product settings, so go back to Hikashop->Products.
Click on the product for which you want a color selector.
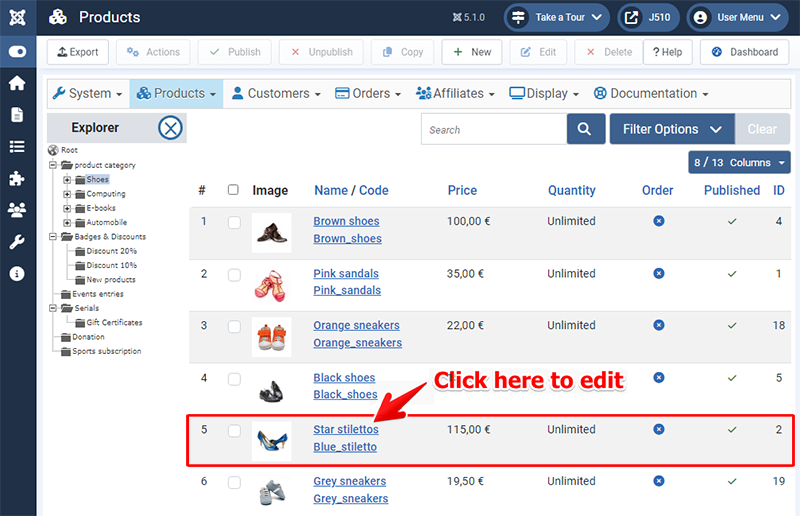
Now, in your product settings, find the Characteristics in Specifications part, and click on the Add (+) button.
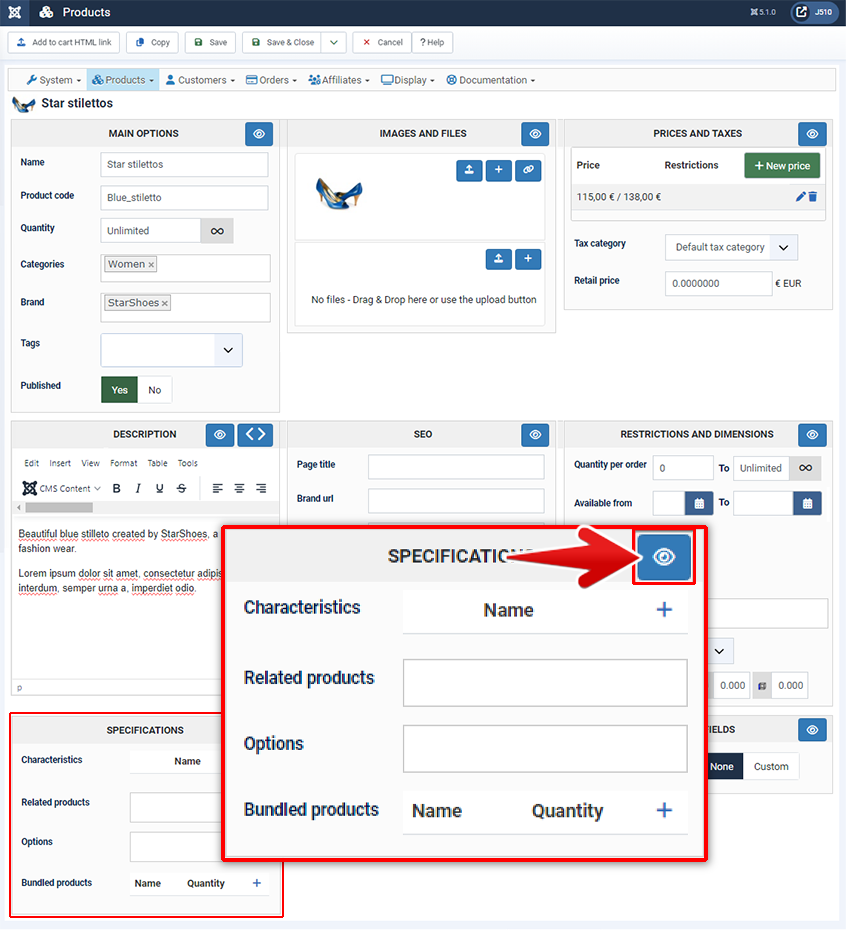
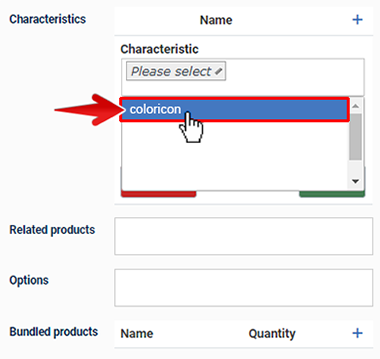
In Characteristic namebox, select your new Characteristic, here: "coloricon".
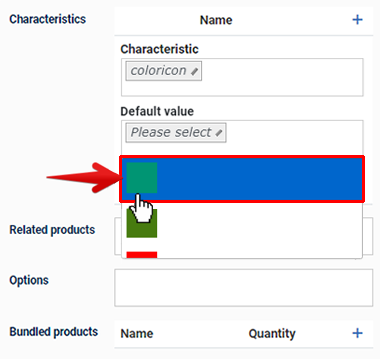
In Default value namebox, select one color, here for example : "Aqua".
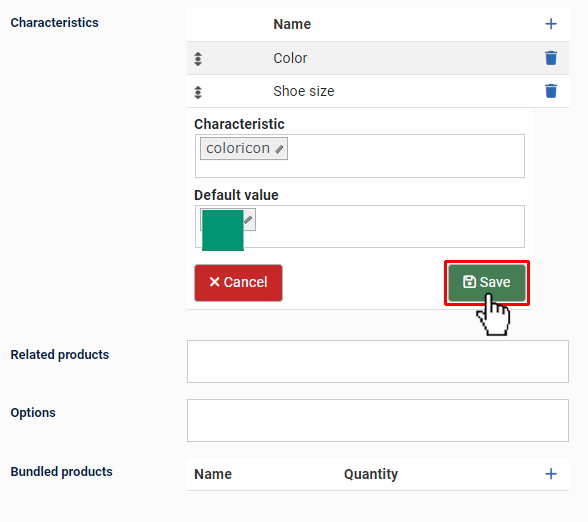
And save your Characteristics change.
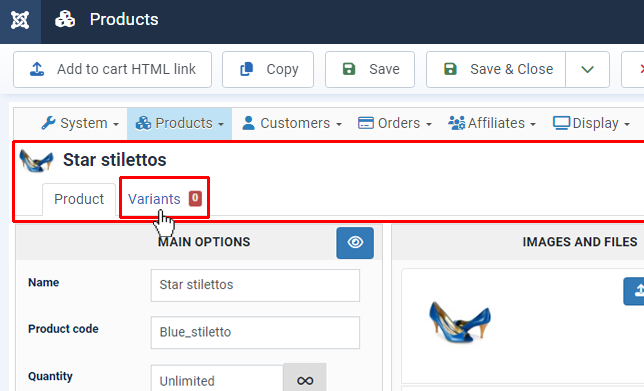
You can now see "Variants" in a new tab, that's will appear after you save your Characteristics change.
And so click, on the Variants tab.
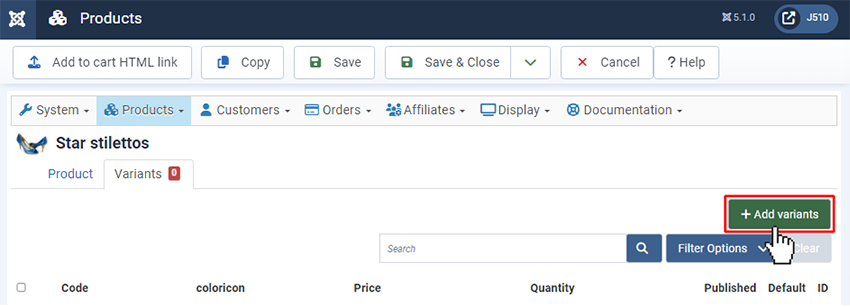
Then, click on the "Add variants" button.
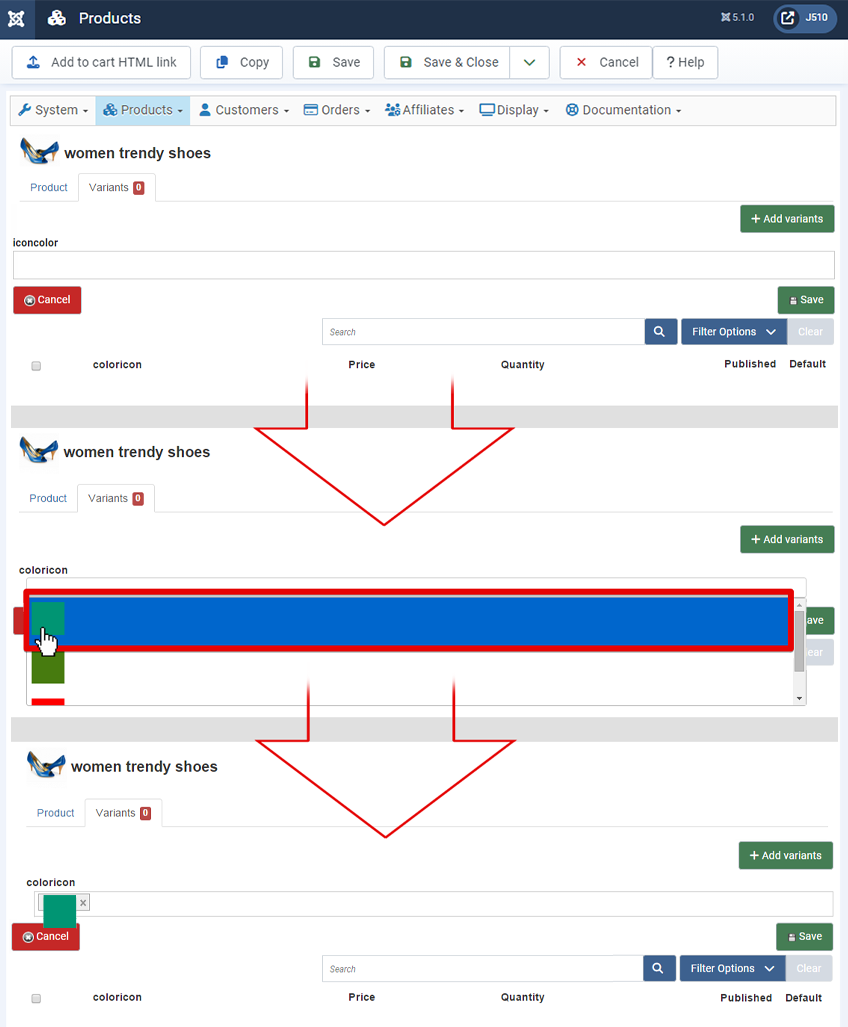
Click here, in the coloricon input (1)
In this dropdwon, you will see ALL color icon that you had added sooner, select required variant.(2)
And save! (3)
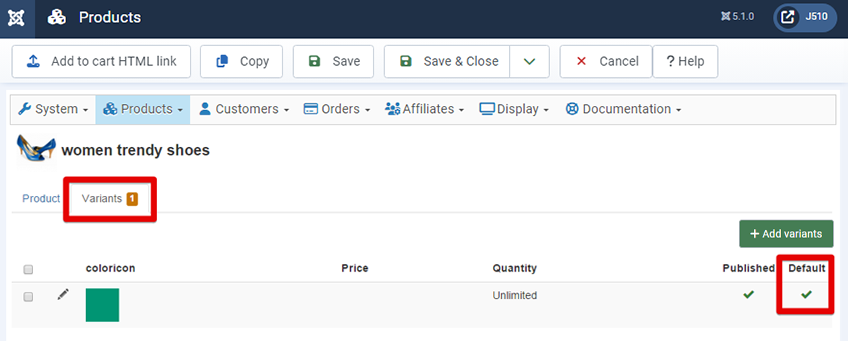
Note : Just below the "Add variants" you can see that this variant is set as the default one, it means that this default will be selected when reach the products among several variants.
You can now see "1 Variant" in the "Variants" tab.
Repeat this action for each required color for your product.
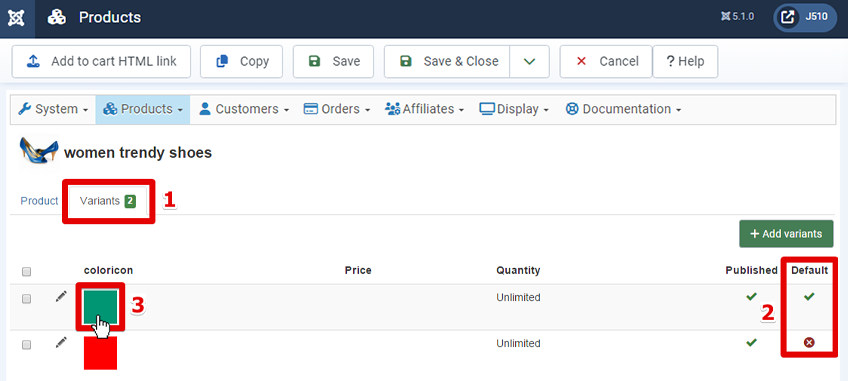
Here, we add an other variant and so, for this example we have "2 Variants" in the "Variants" tab (1).
You can define the Default value, just here (2), you can click on the little icon to change default value
We will check the default value, and so click here (3)
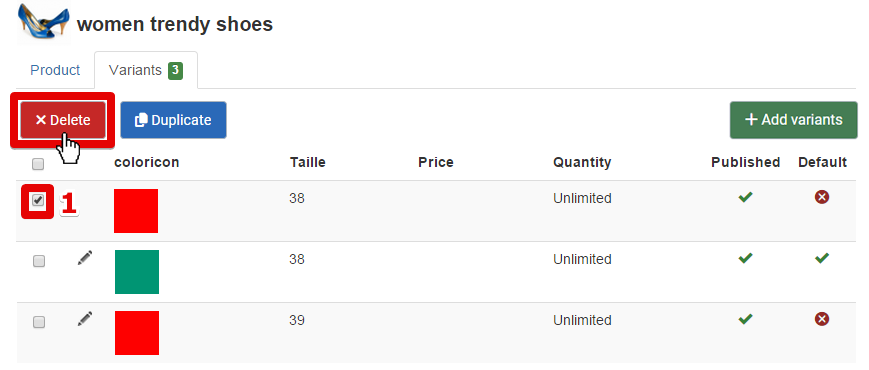
Note : To delete a variant :
select the variant by picking it (1).
And click on the delete button (2)
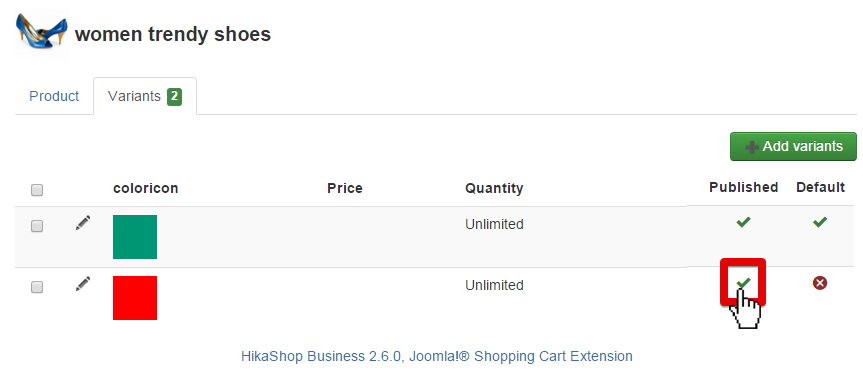
Note : To unpublished variant :
Click here, to unpublished the variant.
If you want to change the Default value you can process like for unpublished a variant.
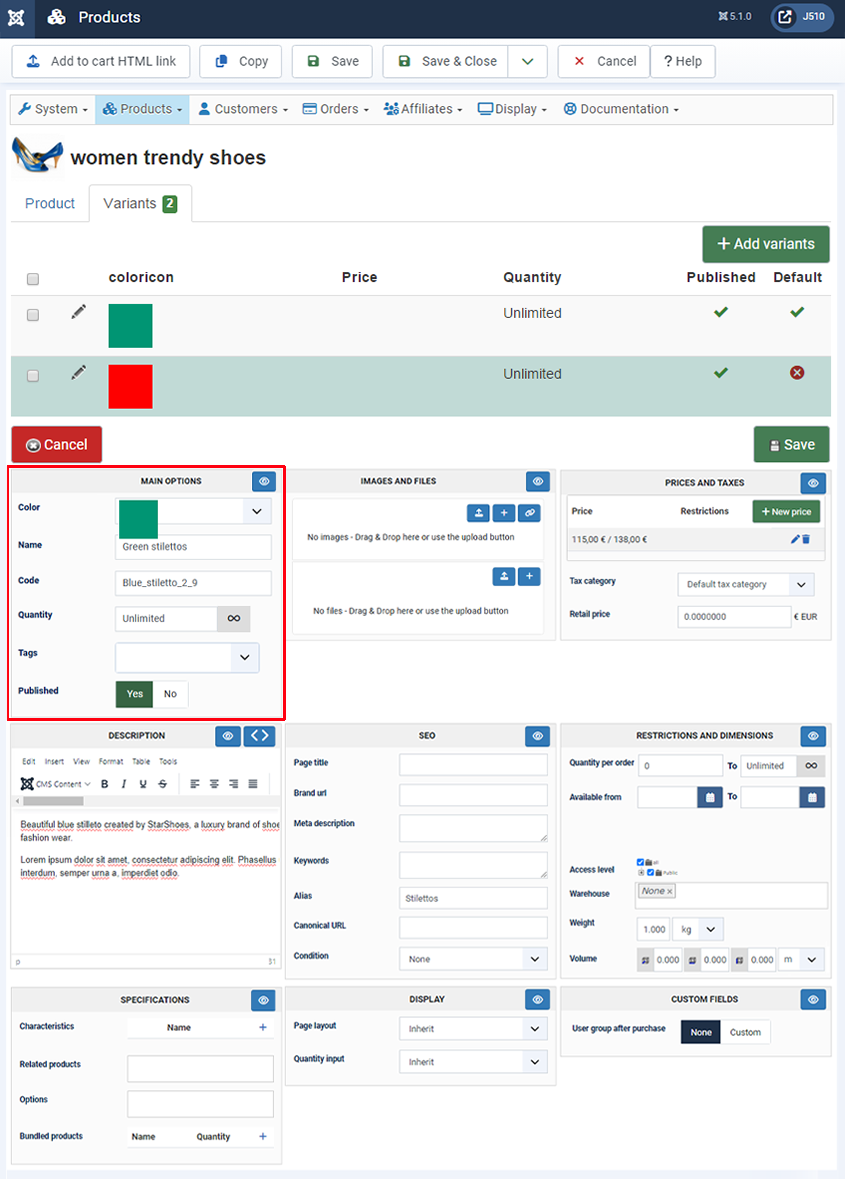
As you can see, the product variant parameters page is just as product parameter page.
You will just notice difference in Main Options
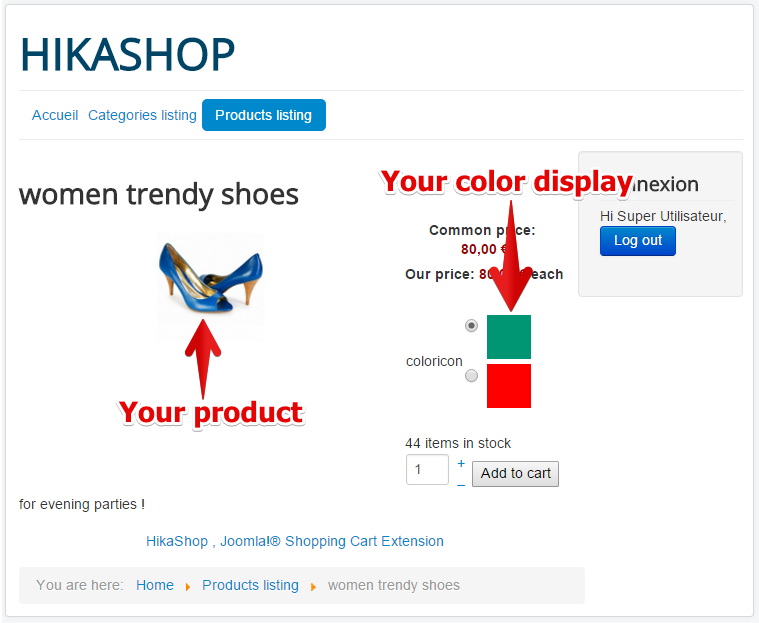
Righ now, on the frontend product page, you will see your icon color selector like this:
Link icons and pictures
Now, onto the second step. You have your color icons selector displayed, and you want to show different product pictures linked with the color selector. Return to the Hikashop -> Products menu,
...and edit again your product.
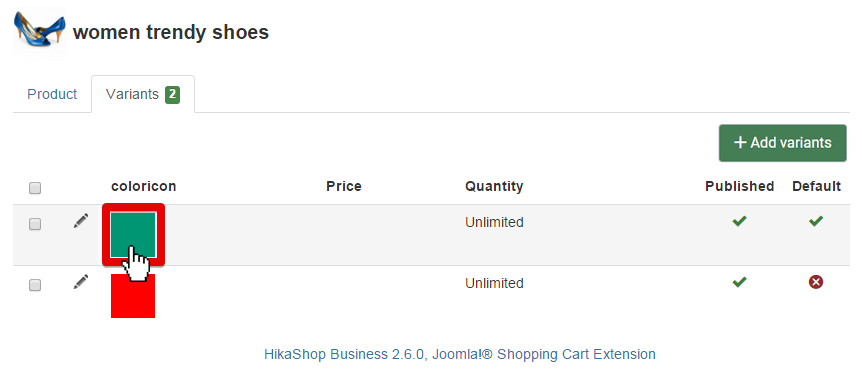
Go back to manage to the "Manage variants" menu.
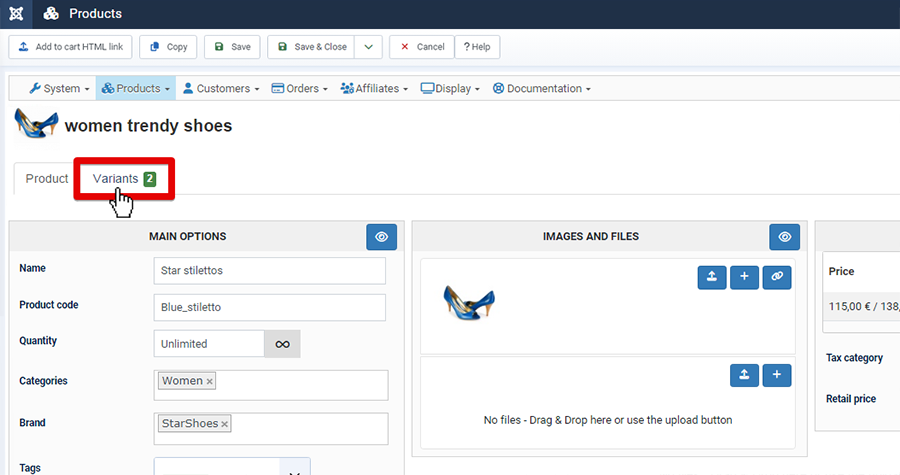
>Select your variant.
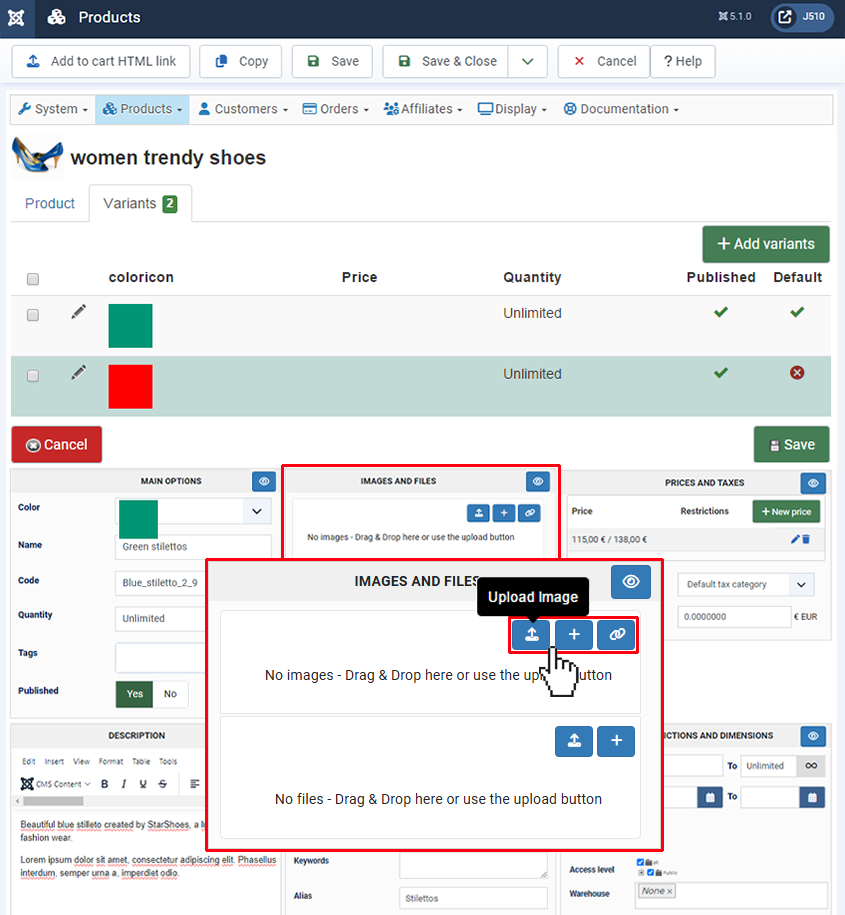
Start to focus on "Images" section. Click on the "Upload" button OR on "Add" (+), if the picture is already on your website.
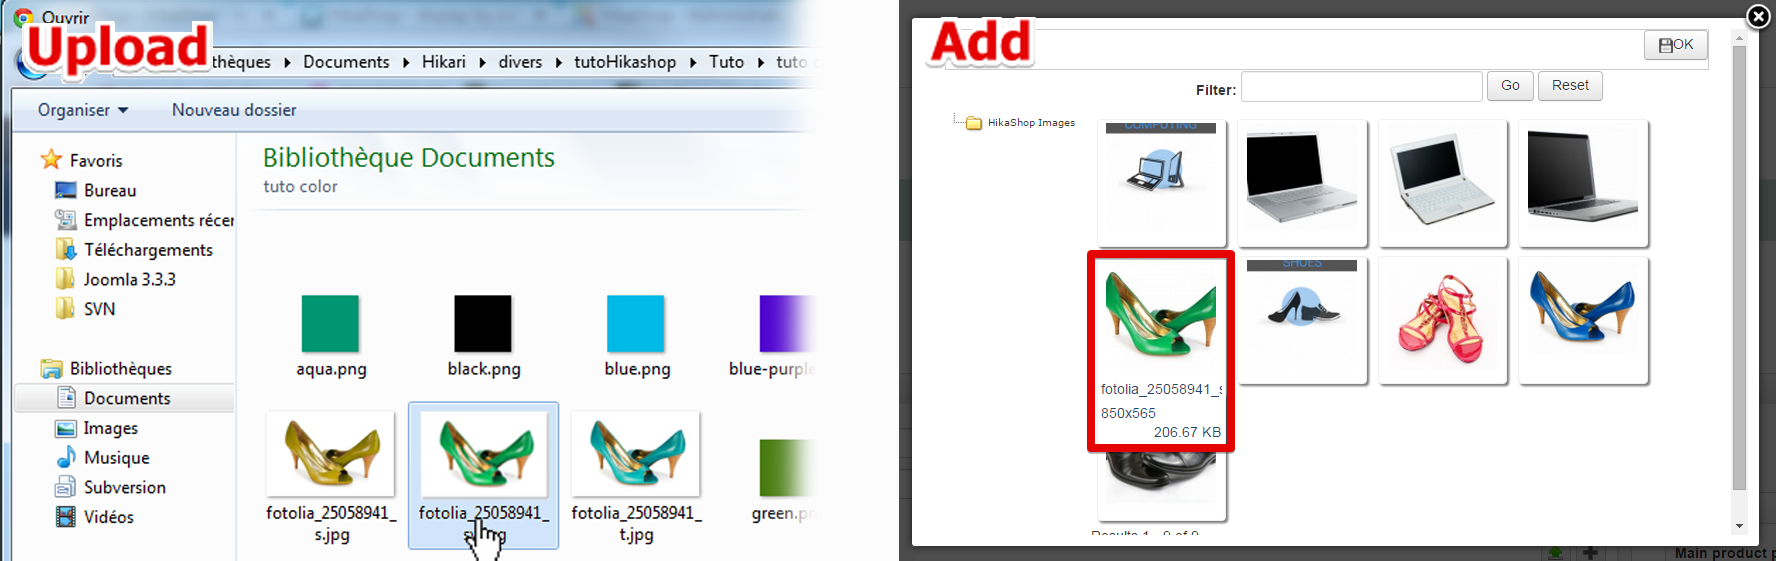
Upload : A new pop up window will be displayed, and so you have to show the path on your computer to upload your product image .
Add : A new pop up window will be displayed, and so you have to select the required image among all your website pictures .
Now you have add your new image that fit your variant color.
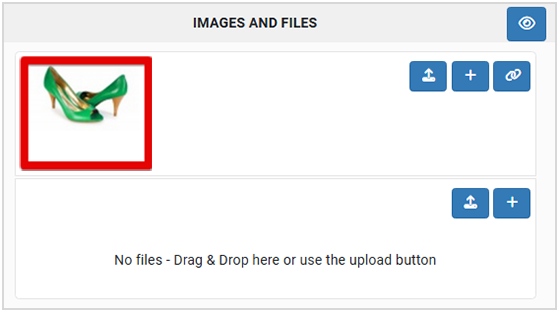
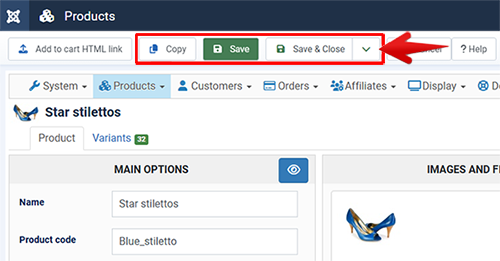
And so, don't forget to save!
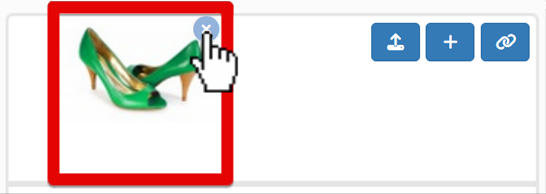
NOTE : You can have several picture for one variant and delete the picture by clicking cross logo.
Repeat these last actions for each variant so that all the variants of the product get their image.
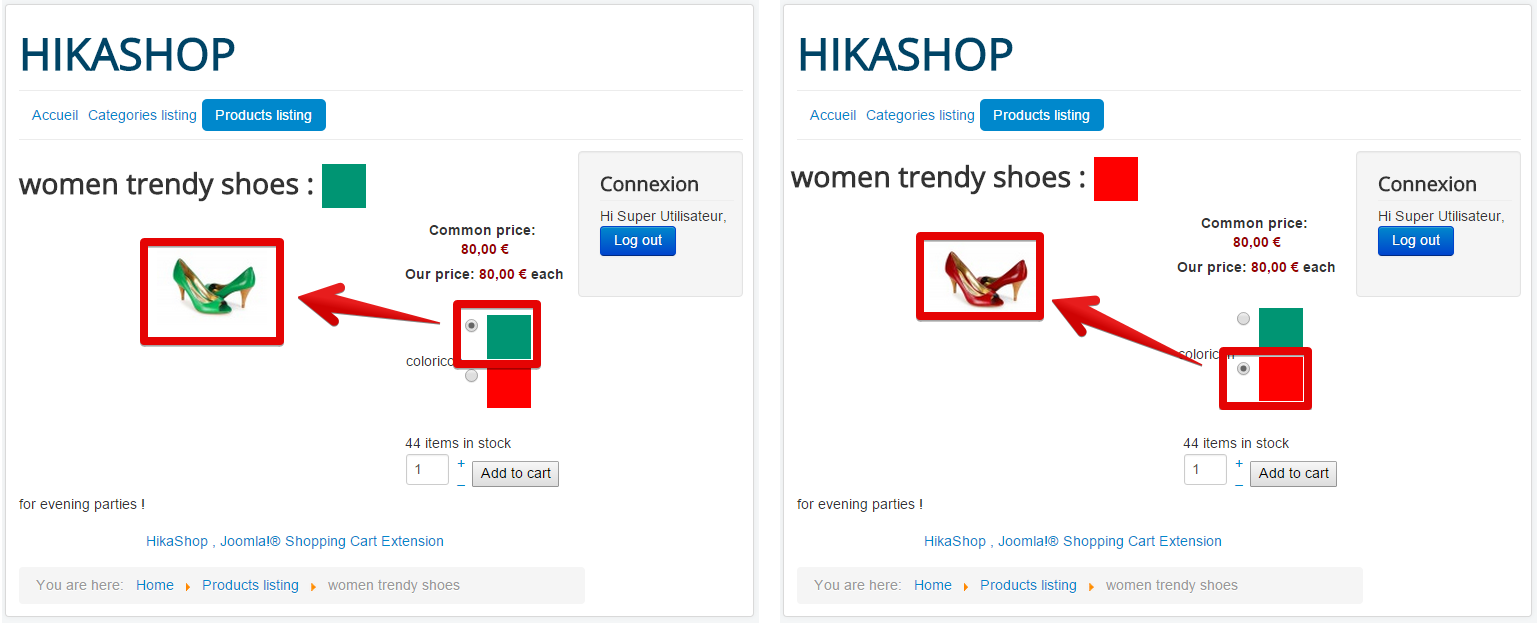
That's it, on the product front end page, when you click on a color icon, the picture of the product will change to display the relevant one:
Create a filter thanks to characteristics
Again, go to Hikashop Configuration screen.
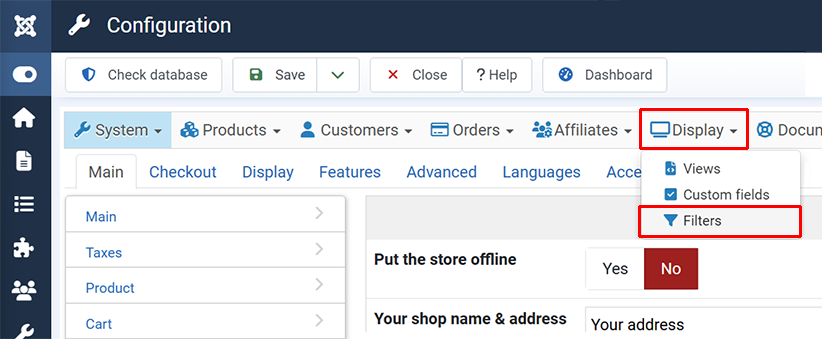
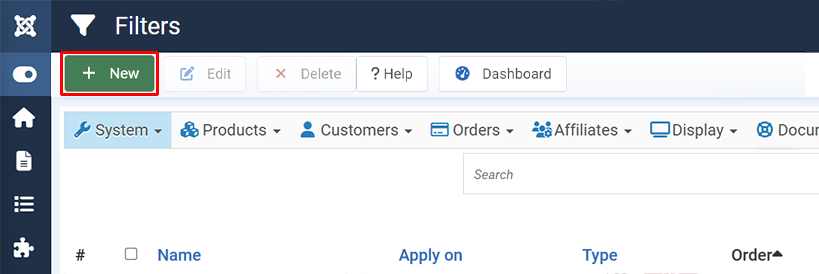
There, you have to create a new filter, so click on New.
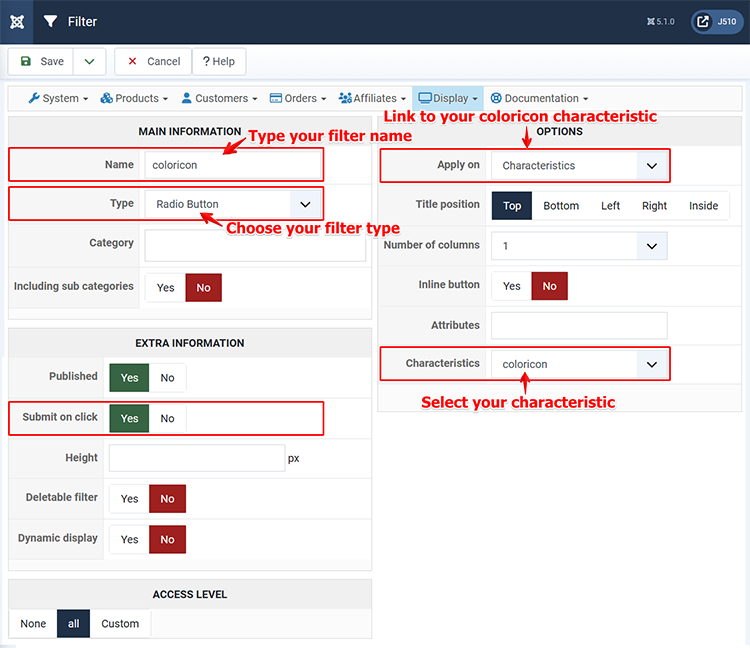
- Here, you have to do several things:
-Give a name to your new filter.
-Choose your type of filter. Here, you want to choose "radio button".
-Choose to apply your filter on "Characteristics"
-And select your characteristic, here for example: "coloricon".
-Finally, in "Extra information", switch on "yes" the "Submit on click" option - And Save.
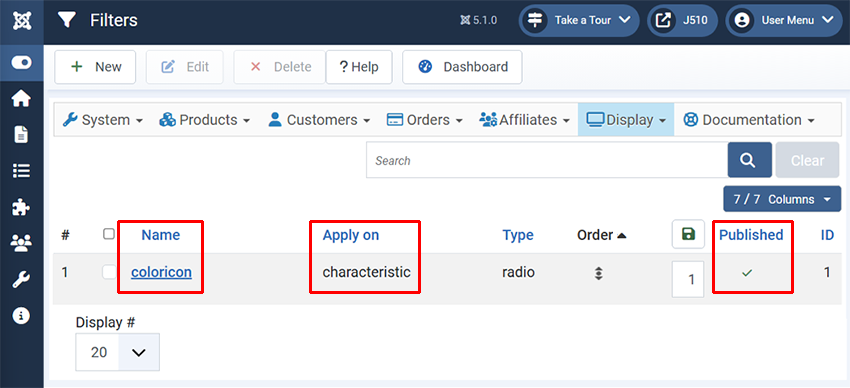
- The filter should then appear on the products listing and later, you will be able to edit it, unpublish or delete it.
Right now, on the products listing pages, customers will see all the characteristic color icons, like this :
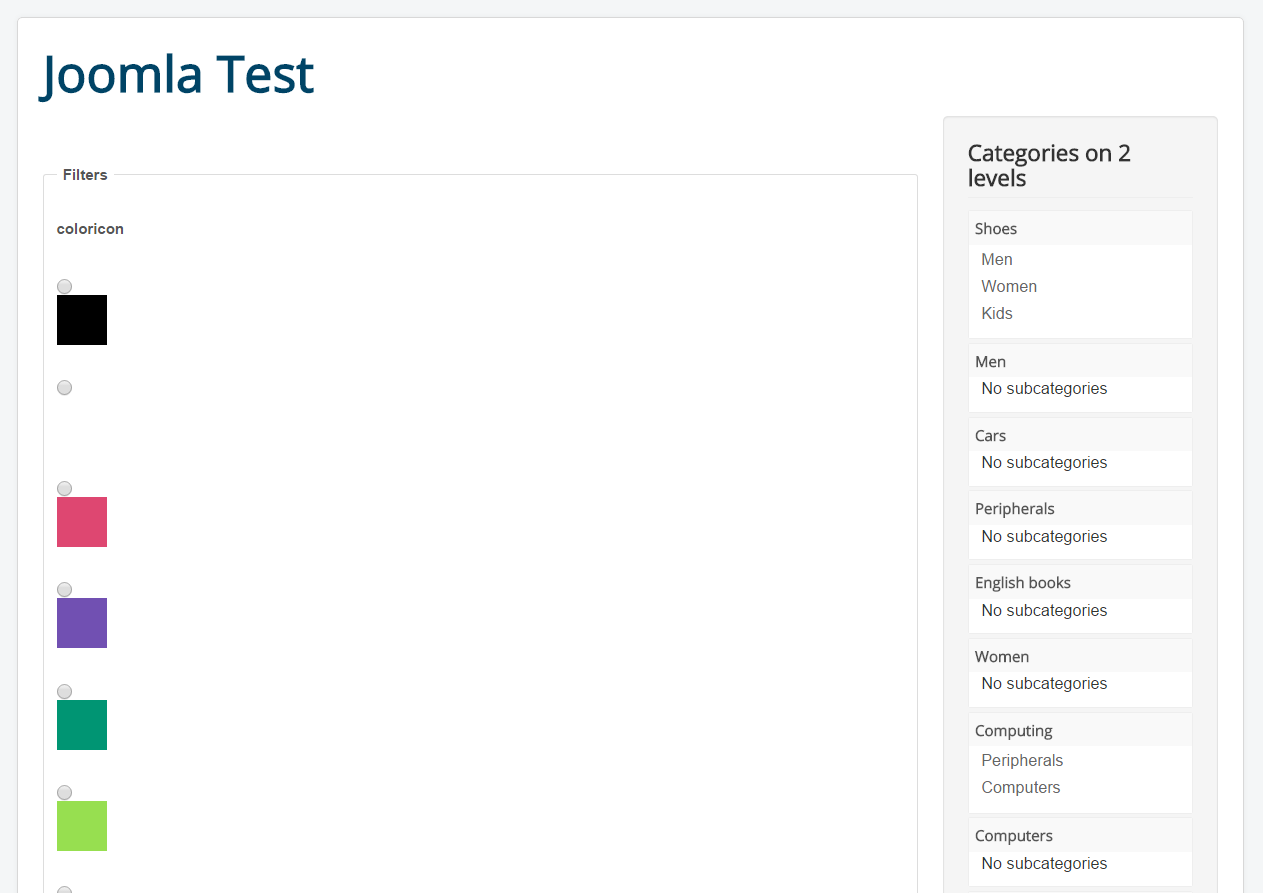
And when they will pick a color, the product(s) available with this color (or variants) will be listed. Here, only one product matches with this color :
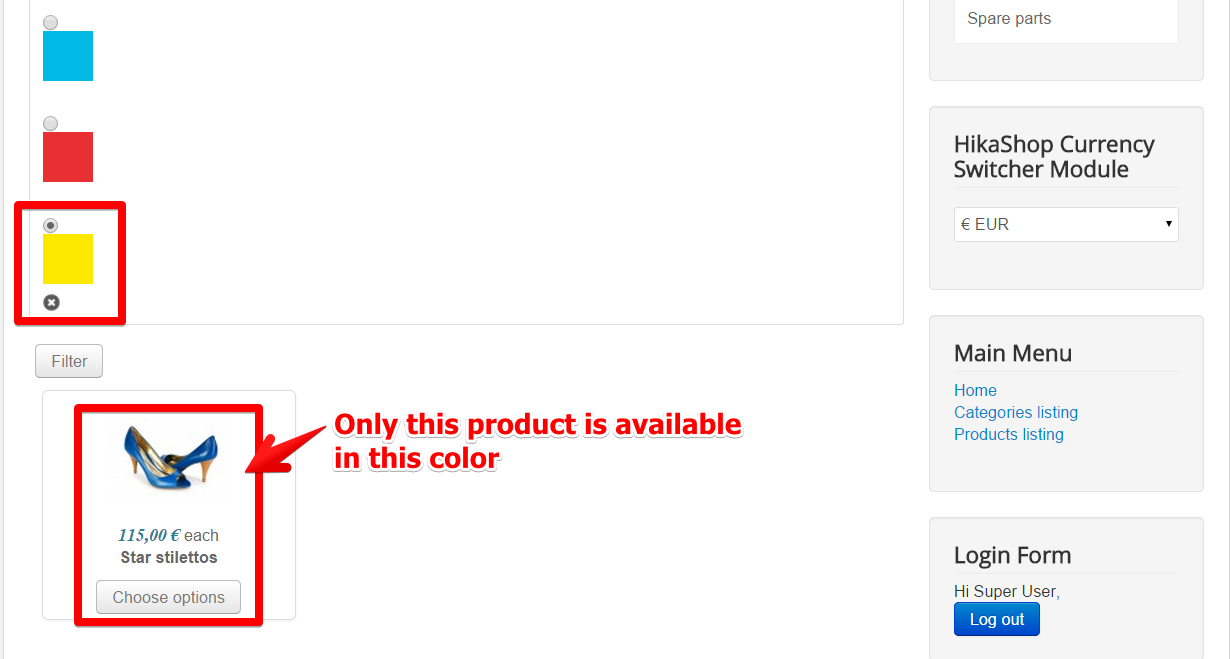
- Of course, the example is working with color icon characteristics, but all sort of characteristics can be set like size, type of product etc...So it's very usefull!
Maybe the look of this page disappoints you, especially if there are lots of different variants...Good way to speak about CSS customization !
How to customize the display
All starts with the Hikashop Configuration page.
Click on the Display tab (be careful no to go on the Display menu), and select the CSS section.
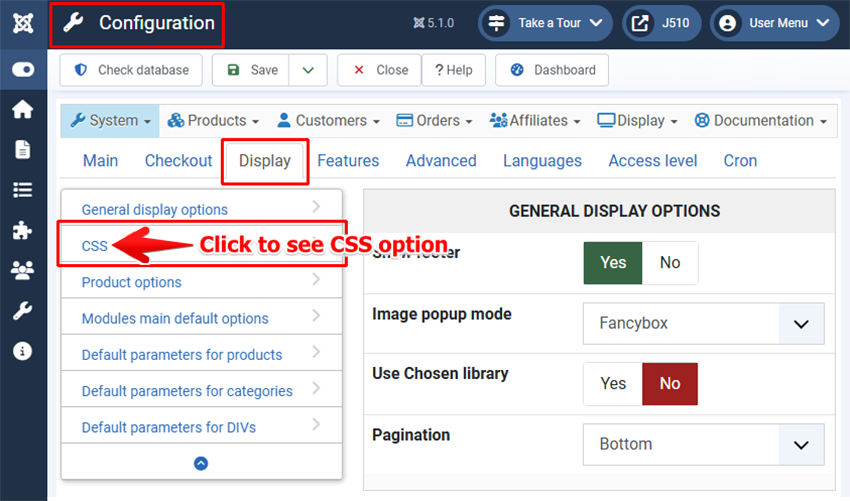
Here, you can edit the CSS just by clicking on the little pen logo.
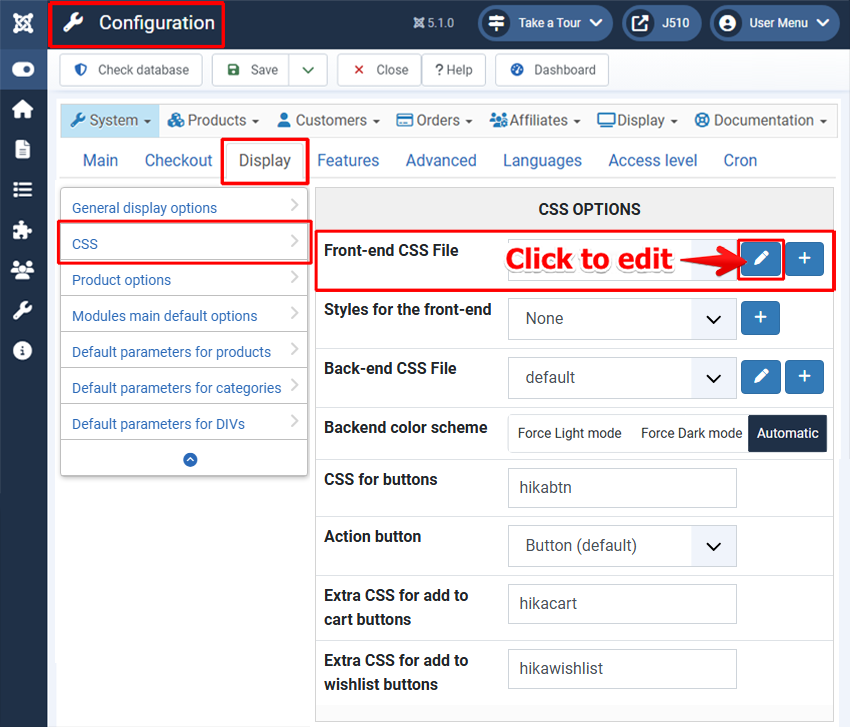
So you can read and customize the CSS !
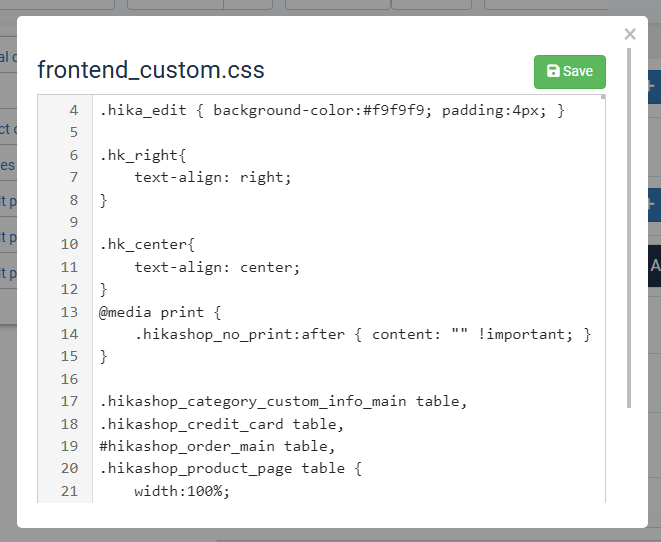
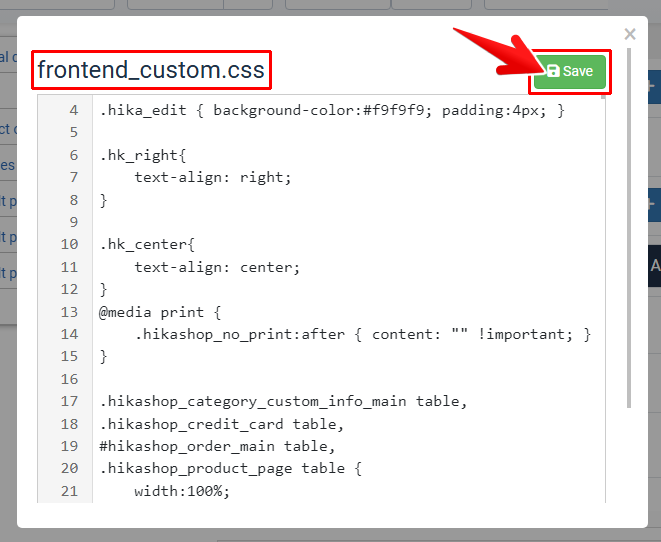
If you do some modifications, don't forget, as usual, to save them !
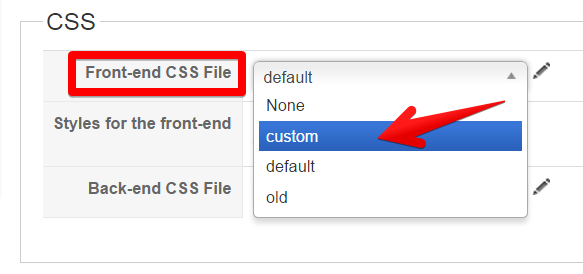
You will see that your custom CSS will then be selected automatically in the Front-end CSS File dropdown.
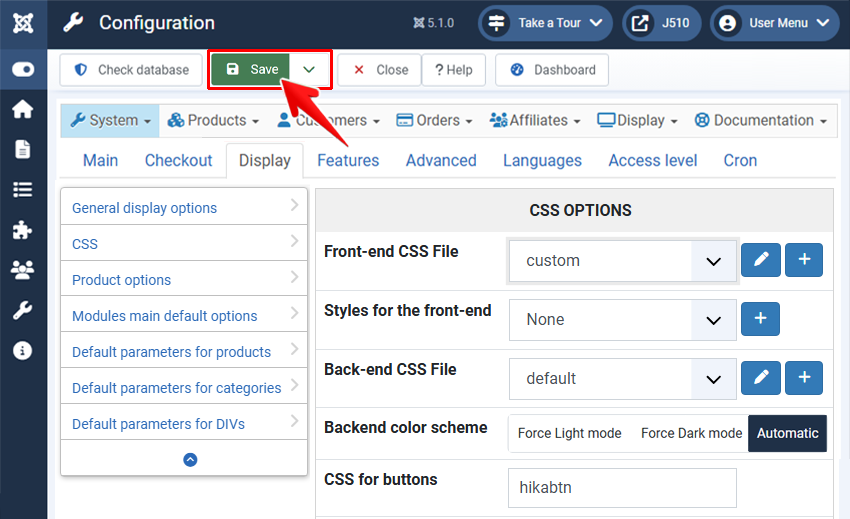
And Save the main configuration too.
Example of custom CSS
Now that we saw how to customize the CSS, we will see some examples of useful CSS modifications to optimize for example, your new color icons characteristic selector !
First, the display color in the product page:
Before: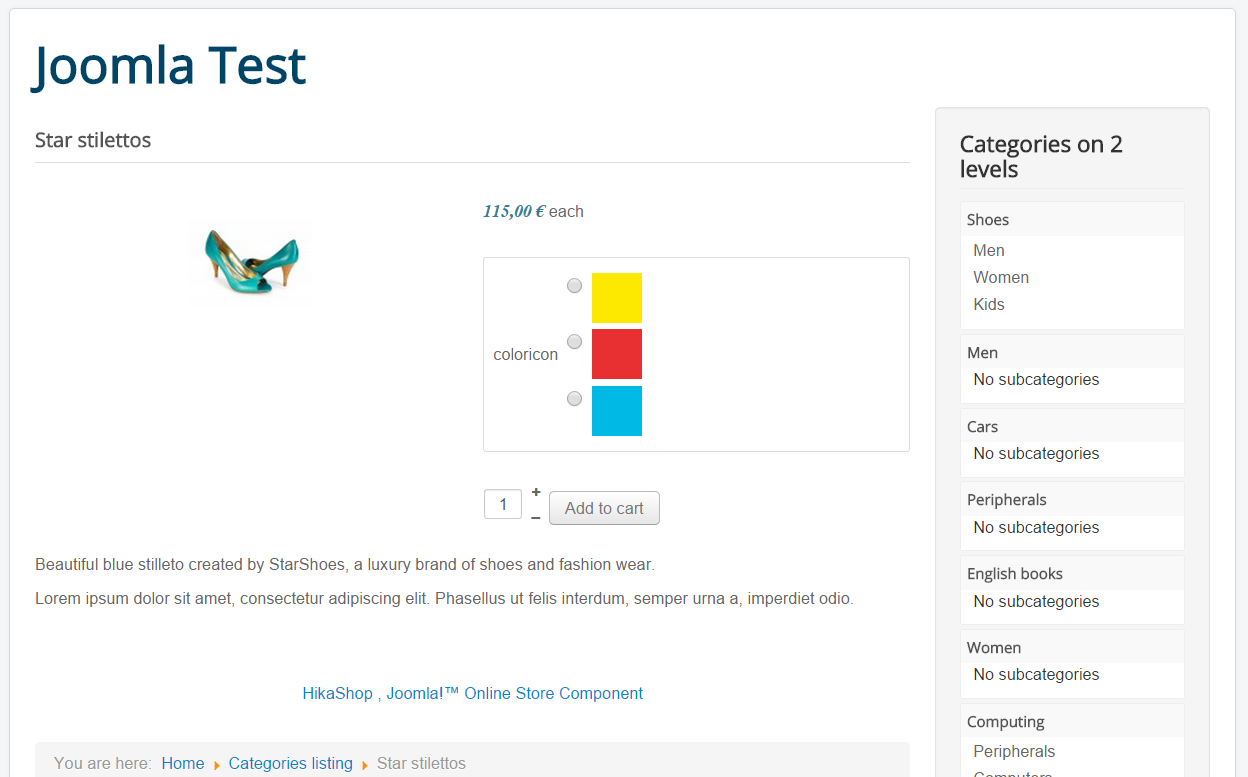
In order to change this add at the end of the Css file :
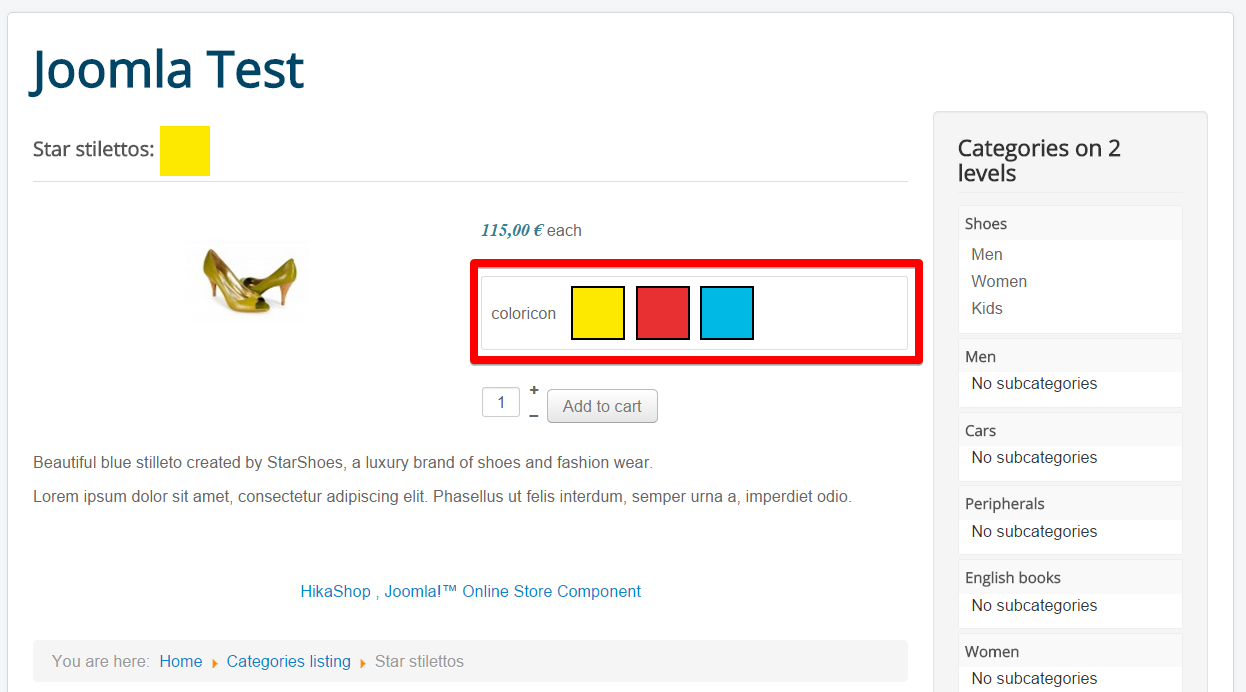
.hikashop_product_characteristics_table td .inputbox {display: none;}
.hikashop_product_characteristics_table td img {border: 2px groove black;}
.hikashop_product_characteristics_table td label {display:inline !important; padding-left: 5px;}
For Joomla 4 :
table.hikashop_product_characteristics_table input {display: none;}
table.hikashop_product_characteristics_table div {display:inline !important; padding-left: 5px;}
Edit and Save the Custom CSS and...
Result:
And now for the products listing page, the filter display:
Before:
Just add this at the end of the Css file:
.hikashop_filter_color br {
display: none;
}
.hikashop_filter_checkbox label img {
border: 2px solid black;
display: inline-block !important;
margin: 4px;
}
.input.form-check-input,
.hikashop_filter_checkbox a {
display: none;
}
.hikashop_filter_checkbox input,
.hikashop_product_characteristics_table input {
margin-right:5px;
display: none;
}
.hikashop_product_characteristics_table input:checked + label img {
border: 2px solid red;
}
Note : you can replace the "red" command for your required color, green, blue or rgb(40, 244, 244) by example.
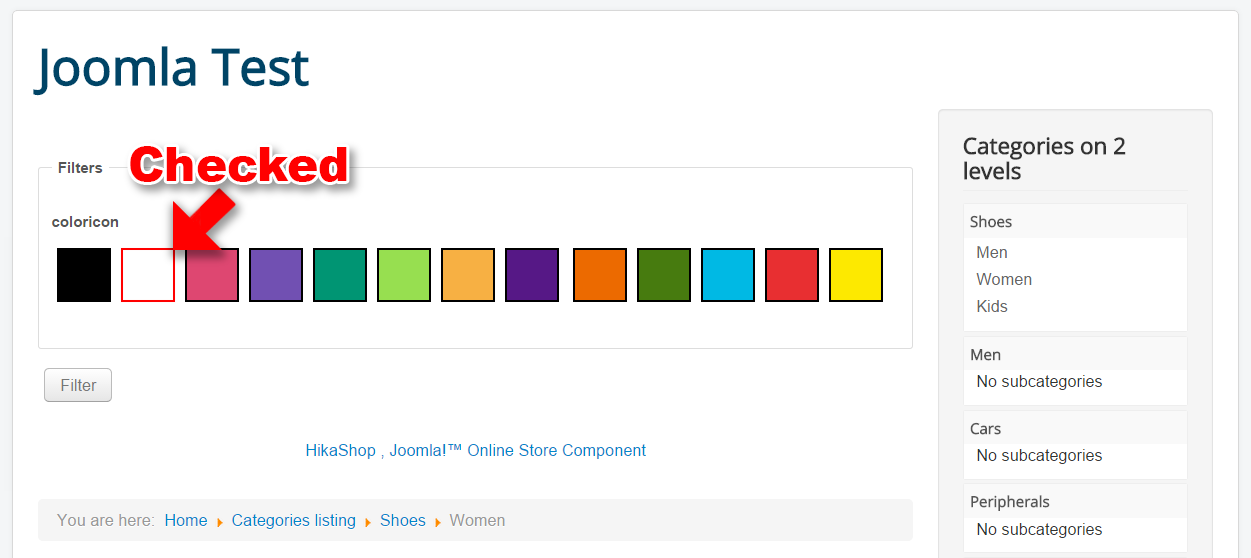
Result :