Component Installation
First, you should have a Joomla! website with HikaShop installed.
The HikaShop edition does not matter, you can use HikaShop starter, HikaShop essential or HikaShop business.
Please read the change log to check if the HikaShop version you have installed is compatible. For example, HikaMarket 1.1.3 require HikaShop 2.1.2 or newer.
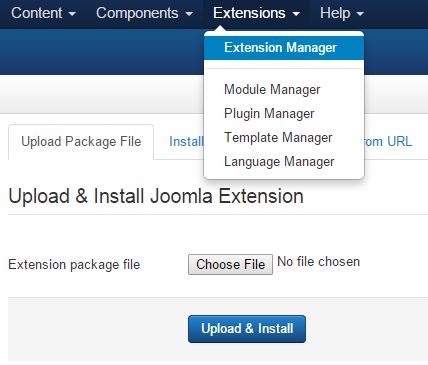
HikaMarket could be installed like a classical Joomla! component, in the Extension Manger.
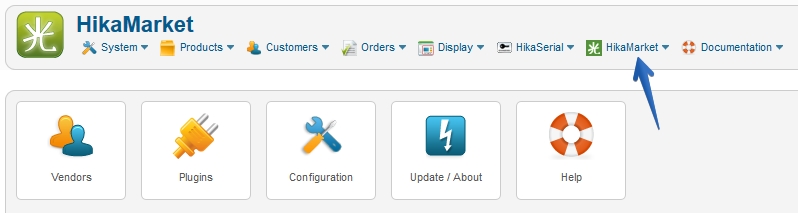
Once HikaMarket installed, his menu would be merged with the HikaShop menu. So at any time, in HikaShop or HikaMarket, you would have access to both component features.
Accessing to the configuration
Thanks for the HikaMarket item in the menu, you can access to the configuration.
In the HikaMarket (multivendor) configuration, you will have five tabs.
- Main - the general options for the HikaMarket display.
- Market - the multi-vendor specific settings.
- Your vendor - the settings for "your vendor", the entity which will allow you to manage your full store from the front-end like in the HikaShop backend.
- Languages - the interface to manage the translations used by HikaMarket.
- Product templates - the zone to manage the template for the products.
The configuration documentation page will give you the general explanation of the different settings for HikaMarket.
In the first tab of the configuration, the section Access level will be the most important for the moment.

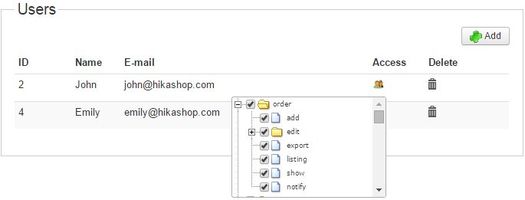
So in the first tab of the HikaMarket configuration ; you will have the Access level section.
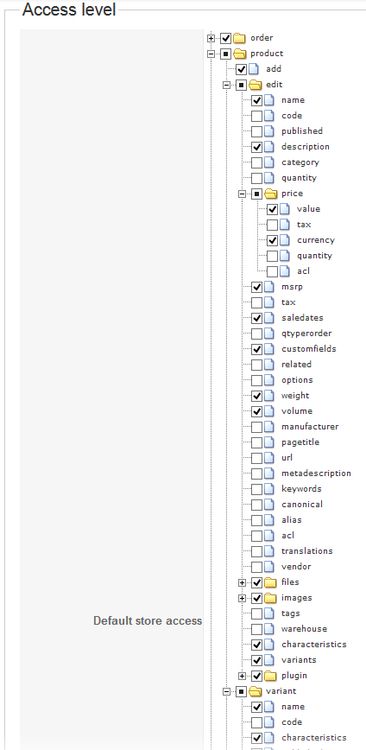
The setting Default store access will define the access rule for your store ; you can activate or deactivate features for the front-end edition thanks to the big checkbox tree.
The tree split up the different task in categories and sub-categories.
So you will find elements like: order (for managing the sales), product, category, user (for the customers), discount, etc.
Each element will be then decompose in little tasks, that is how you can allow to edit the product name ( product / edit / name ) but not to edit the product name ( product / edit / code ).
Some tasks are a little bit special ; like the order / notify one which will allow a user to be notified by email when an order is made or updated.
Some tasks are related to your main vendor only, they won't have any special effect with your vendors.
The section customers for example is only available for the main vendor.
The ACL configuration you will set for the Default store access will define the default rules for the entire store.
If you uncheck the section discount, nobody will be allow to manage the discount in the front-end.
In HikaMarket multi-vendor it is possible to override the default rules for a vendor group or for a specific vendor.
"Specific Vendor" rules > "Vendor group" rules > Default rules
Vendor ACL example
Let's considering that you just want to let your vendors have access to very few elements of products.
In a first time, the best is to change the Default store access in your HikaMarket configuration.
Here an example (click to enlarge and see it completely):
In our example, we just keep the essential elements ; we don't let the vendor edit the product code, the product alias, meta information or the taxes.
More than blocking the vendor to edit special fields, it also remove these elements from the product edition page ; making it lighter and easier to use.
Market configuration
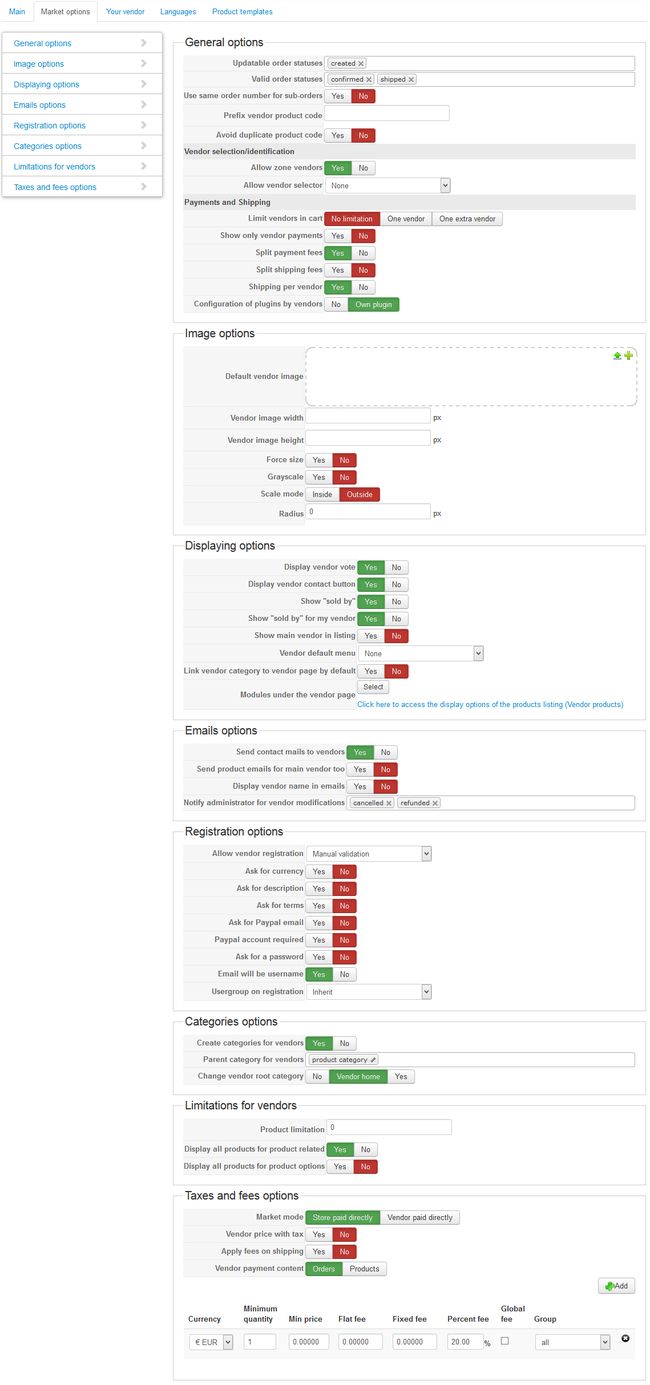
The second tab is there to configure the settings dedicated to your marketplace.
Because the component handle different use case, you have to determine which kind of multi-vendor system you want to select the right options.
We will expose some special cases managed by HikaMarket and explain the associated options.
Mode: Vendor paid directly
When you want that your vendor be paid directly, you have to limit the number of vendor in the cart.
Because the customer can make just one single payment for an order, he couldn't pay the vendor directly if there are several vendors.
So you have to set the option Limit vendors in cart to One vendor.
Then you have different solutions for the payment part.
1 - If your vendors will be paid manually by the customer ; you can create one single payment method (collect on delivery) and if it is really the one available payment method, you can set the market mode to Vendor paid directly
Please notice that if you have any other payment method which could pay your store instead of the vendor ; the vendor total will be wrong and you will have unwanted side effects. That's why you need to use that setting with very caussious.
2 - If your vendors will be paid using Paypal ; you have to create one single Paypal payment method and you have keep the market mode to store paid directly.
The plugin Paypal Adaptive have a Classical Mode where it can use the paypal email stored in the vendor profile in order to let the customer pay directly the vendor.
In the case when the vendor do not have that email filled, your store will be paid instead. That's why it is really important to not change the market mode.
Please note that Adaptive plugins (paypal adaptive, mangopay) are also working like that.
3 - If your vendors will be paid using their own payment method ; you need to activate the settings Show only vendor payments.
You can also activate eventually Configuration of plugins by vendors to let your vendor manage themselves their payment methods.
Each vendor will be able to have his own payment method with his own credentials. HikaMarket also let you set the fee mode for each payment method so you can keep a global market mode and override it when a vendor payment method will be used.
Mode: Sales repository
The sales-rep are in the section called Vendor selection/identification.
HikaMarket can use the Vendor zone or the Vendor selector using a item/order custom field.
In sale-rep mode, every products which are not assigned to a vendor will be assign dynamically to the selected vendor.
The vendor zone can be useful if you want to split the sales by country. So you can create a vendor for a specific zone and he will be notify of his sales.
Mode: Everybody is a vendor
If you want that every Joomla account in your website is also a vendor (to create a consumer-to-consumer store) if will have to use the Vendor automatic creation fo the Vendor registration.
At this moment HikaMarket will create a vendor account for every Joomla account (when the user will register or the first time he will log-in).
Mode: Vendor paid subscription
If you want something automatic where your vendor have to subscribe to become vendor ; you can use a subscription system compatible with HikaShop and an option in HikaMarket.
Subscription system can change the user group depending the user subscription. Thanks to that, HikaMarket can create/activate/deactivate a vendor.
When the option Vendor registration is set to Vendor automatic creation you can also select some Joomla user groups.
If you select nothing, HikaMarket will automatically create the vendor account (like the previous point). But if you select some Joomla user groups, it will define the vendor status on that.
Please note that HikaMarket use the Joomla trigger to be notified when a user have a group modification ; the subscription component have to use the Joomla triggers to make HikaMarket work correctly.
Mode: Limited number of vendor
For the option vendor registration, you can use No or Manual validation in order to get the control on the creation of your vendors.
Set-up the categories
When your vendor create their products in your store, they can choose (if you gave us the right to) the category where the product will be.
In the category options of HikaMarket, you can limit the categories that a vendor will have access.
If you have a limited number of vendors, you might want that the vendor have a dedicated category in your shop.
Then, the vendor would create sub categories and have his own dedicated part in your website.
Thanks to the settings Create categories for vendors you can ask HikaMarket to create a dedicated category for every vendors.
The category will be automatically create in the category selected in the setting Parent category for vendors.
By default HikaMarket create the vendors categories in the Vendor categories category. This category is not a child of the product category category.
It means that the vendor categories won't be visible by default in your front-end. The product/category listing are generally displaying elements from the Product category category.
The setting Change vendor root category is there to specify how determine the home category for your vendors.
You can have something dynamic based on the vendor category that HikaMarket created for the vendor but you can also set a specific category (using Yes value).
The Vendor default root category is a default option but can be override per vendor. Once the setting activated you will be able to configure a root category for each vendor.
Mode: Vendor products only visible thanks to the vendor page
If you only want products visible in the vendor page, it means that the vendors products shouldn't be under the product category category which is display by default for the product listings.
At this moment using the vendor category will be useful. The vendor page will display a synchronized product listing module and will be able to display the vendor products.
Mode: Vendor products visible in the product listing
In this mode the best is to to not create vendor categories but to set a root category for your vendors.
You can use the same category for every vendors (using the default setting) and change it for specific vendors (if you want to give them less or more visibility).
Configuring your fees
The HikaMarket fee system is really flexible. You can create rules in the HikaMarket configuration and override these rules per vendor and per product.
Please read the fees documentation page before starting configuring your fees.
In the Taxes and fees options you will see an option for the market mode.
This setting give the general direction of how your payments will be perform ; but you can override it for each payment method if required.
Please note that if you want that your vendors be paid directly, some other options in the general HikaMarket configuration might be activated too (like the vendor limitation in cart).
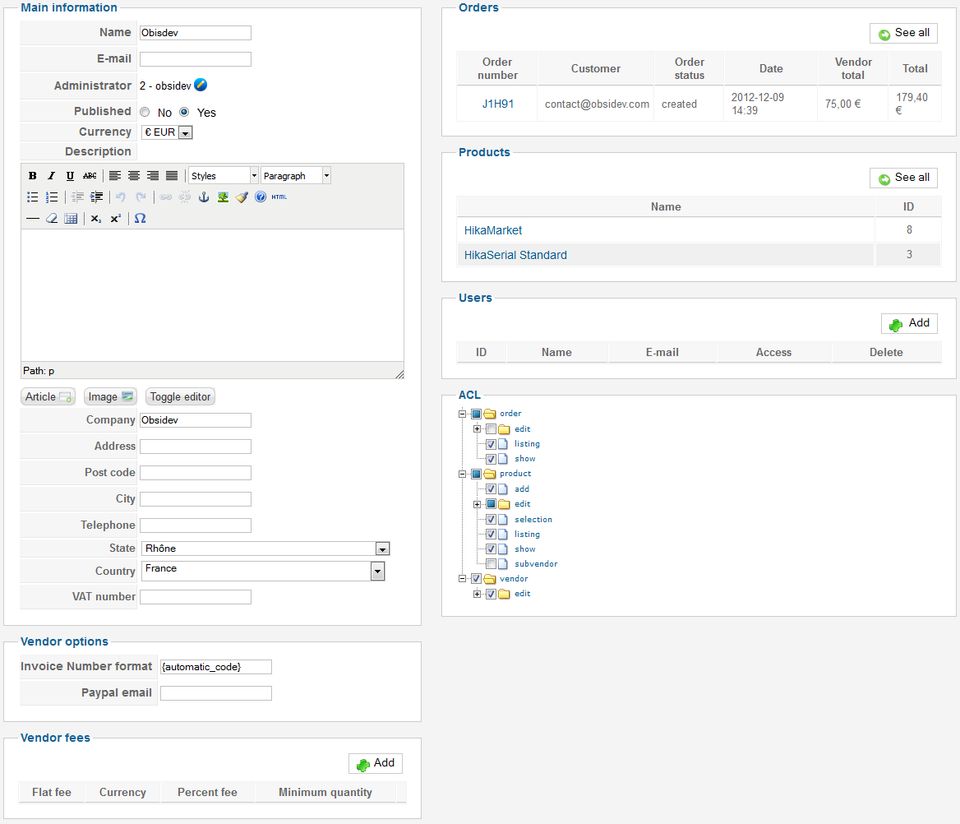
Dynamic Access levels
In the HikaMarket menu, under Configuration you will find Access.
This interface allow you to configure the ACL depending a group. So depending the vendor group or the user group, an account will have more or less rights in HikaMarket front-end interface.
The interface work in a three-state mode.
When a case have a background of the same color as the spot it means that the element as been selected. If the element does not have a colored background it indicate that the element for the group is set by inherit.
- Grey spots - means that the ACL is not override, so the default ACL will be use for that element.
- Green spots - force the authorization of an ACL for the element.
- Red spots - force the refusal of an ACL for the element.
HikaShop custom fields
Vendor fields
First, with HikaMarket you will have a new kind of custom field in your HikaShop backend ( Display > Custom fields ) : Vendor.
By default HikaMarket will create some fields for the vendor address ; but you can add some new elements to extend the vendor entity.
You can decide where the vendor fields will be available : back-end, vendor registration, vendor edition, vendor public page, etc.
When creating a new custom field, just select the table Vendor to create a vendor custom field.
Once the field is created, HikaShop will display it as plg.hikamarket.vendor (should be improve in a future update).
Extending display of HikaShop custom fields
It is possible to select each editable field for the products but HikaShop can also extend the products using custom fields.
In HikaMarket, it is regrouped in a single task: product / edit / customfields.
But if you want to go further, it is possible to configure each custom field in order to know where this field will be displayed.
Depending of the type of the custom field (address, item, order, product, user), HikaMarket will propose different choices where this custom field could be displayed in the front-end.
Thanks to that settings, you can have product custom field which won't be editable in the front-end but only in the backend.
The HikaMarket menus
You might want to create Joomla menus to access directly to a feature of HikaMarket.
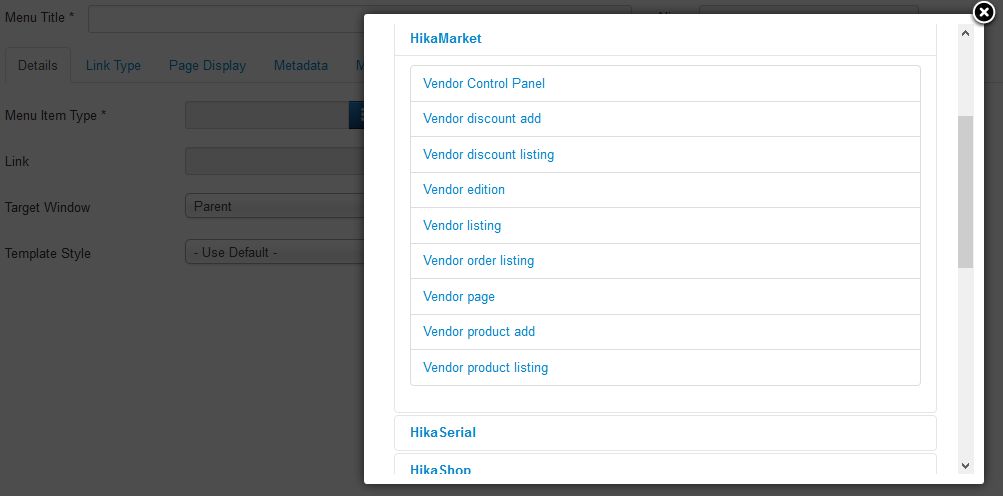
We propose several types of menus that you can use for your website:
- Vendor page - You can display a specific vendor page, you have to specify the vendor id that you want to display for the menu.
- Vendor listing - You can display a listing of vendors
-
Vendor control panel - The vendor control panel is the page where the vendor can see his statistics and access to the rest of the front-end features.
If the user is not logged as a vendor, he will be redirected to the login page that why we recommend to use an Joomla Access for that kind of menu.
-
Vendor edition - If the user is logged as a vendor, he will have access to his vendor edition page.
If the user is not logged as a vendor, HikaMarket will display the vendor registration page.
HikaMarket also have some specific pages to access directly to some vendor features.
If the user is not logged, he will be redirected to the log-in page.
If the user does not have the HikaMarket right to access to the feature, he will be redirected to the vendor control panel.
- Vendor category listing - the vendor category listing page.
- Vendor characteristic listing - the vendor characteristic listing page.
- Vendor order listing - the vendor order listing page.
- Vendor discount add - discount/coupon creation page.
- Vendor discount listing - the vendor discount listing page.
- Vendor product add - product creation page.
- Vendor product listing - vendor product listing page.
The HikaMarket registration
So thanks to the menu Vendor edition page a user can register as a vendor (depending to your Joomla and HikaMarket settings).
If the user already have a Joomla account ; the registration page will ask him only the vendor fields.
But if the visitor does not have an account, HikaMarket will allow him to register. In this particular mode, HikaMarket will create in the same time the Joomla account and the HikaMarket vendor.
HikaMarket have an option called Usergroup on registration. During the HikaMarket registration, the user that HikaMarket will create can have a special Joomla user group.
Thanks to that you can directly separate the users who have a vendor account than the others.
For example a account creating by the Joomla registration will have the user group Registered when an account creating by HikaMarket will have the user group Author.
Using special user groups for your vendors is interesting when you want to display specific menus using the Joomla Accesses.
In your Joomla backend, under Users > Access Levels, you can create a new access level named Vendors and select Author (to stay in our previous example).
You will have then a special access level for your vendors ; so you can create menus and only display these menus to your vendors.
First configuration
Before using HikaMarket multivendor, you should choose how your store will work with. HikaMarket allow you different type of organization, if you want to separate vendor products, if you want to let all your users becoming a vendor, or not.
So you have to access to the HikaMarket configuration and more precisely, the "Market options".
The main options are generic option about how your store would work.
The statuses are here to indicate when an order could be modified by a vendor and when an order is considered as valid for payments.
The split options allow you to "share" the different fees with your vendors.
The first option in the Registration options is important. You would indicate how the vendors will be create in your store.
You can decide to create all your vendors manualy, you can want to validate vendor registration or let it be complitely automatic.
The "Vendor automatic creation" does not propose any registration to your users. Each time a new user would be created in Joomla, HikaMArket would create his vendor in the same time.
The Categories options section is less complicated than it seams.
When a vendor would create a product, he would be able (depending the ACL) to select the product category. So he would be able to create a product in any category in your shop.
In order to have a clean organization of vendors and products, HikaMarket could create automatically categories for your vendors.
A vendor and his category would be linked if the option is activated. It means that if a vendor is published/unpublished, his category would be too.
The Vendor root category is an option which allow you to restrict a vendor into a category. Vendor could see everything under their root category and could not interact with others.
By creating vendor categories in the "Product Category", each vendor would have a category directly visible in your store.
With this configuration, you can set a category listing and see all your (published) vendors.
- Product category - The category listed by default in your store
- Vendor 1
- Vendor 1 product 1
- Vendor 1 product 2
- ...
- Vendor 2
- Vendor 2 product 1
- Vendor 2 product 2
- ...
- Other vendor categories with they products
- Your product 1
- Your product 2
- Your product 3
- ...
- Vendor Category - Not Used
If don't want that the vendor product would be listed in your store but only in the vendor page, you can use the "vendor category".
Because this category is not under the "Product category", products under it would not be displayed in your store except with specific modules or menus.
The Vendor page could include modules, so you would be able to set a "product listing" module which would be linked with the vendor page (showing only the products of the current vendor).
You can create menus too, so you would be able to create specific menus for your different vendors. It is not something recommend if the vendor registration is open.
- Product category - The category listed by default in your store
- Your product 1
- Your product 2
- Your product 3
- ...
- Vendor Category - Would not be displayed in your store exept with modules/menus
- Vendor 1
- Vendor 1 product 1
- Vendor 1 product 2
- ...
- Vendor 2
- Vendor 2 product 1
- Vendor 2 product 2
- ...
- Other vendor categories with they products
The Taxes and fees in this tab is the generic configuration. You can set the default rules which would be apply to all of your vendors.
You can override this configuration on a specific vendor, by editing it in the backend. You can override the fees options for a specific product too.
The Fee and Commission modes depend how the money would be collected.
-
Fee: The money would be collected by your store.
Afterwards, you would pay the vendor by sending him the money. You would pay him.
-
Commission: The money would be collected by the vendor himself.
Afterwards, you would ask for your commission so you would send him an invoice, so the vendor would pay you.
Depending on your configuration, you would require different menus in your website.
- A menu for the vendor Registration (edition), if you want to allow it.
The vendor edition page is use for registration when a user is not a vendor or as vendor edition when the user is a vendor.
- A menu for the vendor Control Panel, so your vendors can access to their dashboard.
- A menu for the vendor listing, if you want one.
- A menu for the vendor page, if you want too display a specific vendor page.
If you want to create a "vendor control panel" menu which will be only visible for your vendors, you will have to set a "Special" access for your Joomla menu.
At this moment, you can use the HikaMarket plugin "Vendor user group" which set a special user group to users who become vendors (and remove it when a vendor is unpublished).
Thanks to the Access configuration in the Joomla menu and the user group set by the plugin, you can create a menu link which will be only available for your vendors.
Vendor page
In HikaMarket, your vendor can have their vendor page. By default the page will display some vendor details that you can customize by overriding the corresponding HikaMarket view ("frontend | your frontend template | vendormarket | showcontainer_default").
The page will display the vendor image, some vendor custom fields, the vendor rate (and comments). You can also display the vendor's products.
To display products under the vendor product page, you have to display a product listing module like you can do for listing products with a category listing menu.
First, you have to create an HikaShop module, for your product listing. The important option is Synchronize with currently displayed item when possible.
This option allow Hikshop to link the module with the current item, it can be a category listing menu or a vendor page.
Click to see a product listing module sample
When your module is ready, you can configure the option Modules under the vendor page in the HikaMarket configuration (tab Market).
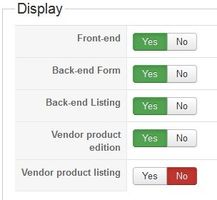
HikaMarket custom fields have special displaying option. You can configure where you want to display the custom field.
- Front-end - The custom field will be editable for the vendor
- Vendor page - The custom field will be display in the vendor page, visible for all customers
- Vendor registration - The custom field will be asked during the vendor registration. Front-end should be "yes" too.
- Vendor listing - The custom field can be displayed during vendor listing (if the listing display custom fields)
- Vendor selection (front) - The custom field can be displayed in the popup of the "vendor selector" item/order custom field.
 HIKASHOP ESSENTIAL 60€The basic version. With the main features for a little shop.
 HIKAMARKETAdd-on Create a multivendor platform. Enable many vendors on your website.
 HIKASERIALAdd-on Sale e-tickets, vouchers, gift certificates, serial numbers and more!
 MARKETPLACEPlugins, modules and other kinds of integrations for HikaShop


 The screen allow you to create a vendor payment order.