


Description
This screen enables you to create or edit mass actions. These mass actions will allow you to process almost everything in Hikashop, directly from this screen or based on a specific trigger. Thanks to this system, you can edit multiple products in one click as well as categories, orders, addresses or Hikashop users, avoiding long hours of repetitive work doing it element by element. Mass actions will for example help you move thousands of products from one category to another or change the order status for every orders of a specific customer in a few clicks. In addition to these one time processes, you will also be able to create tasks executed periodically or on a specific triggers like at the order creation or when a product is deleted, etc.
Beware that these actions may have irreversible consequences so be careful when you configure them as you could easily wipe out all your orders or products or users in a few clicks ! If unsure, please make sure that you do a backup of the website before or try first on a copy of your website.
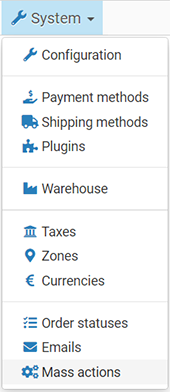
Mass Actions are available for all HikaShop versions and available via the menu System>Mass actions.
Reach Mass Actions
Go to "Components -> HikaShop -> Configuration".
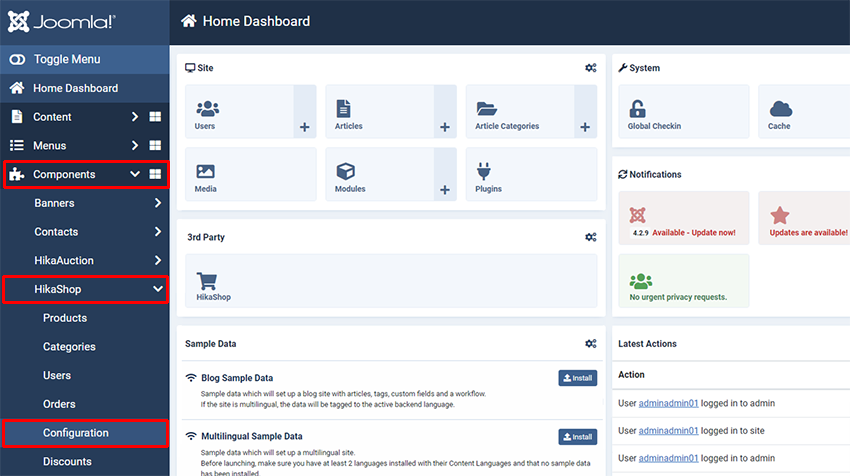
Then, click on "System", and "Mass actions".
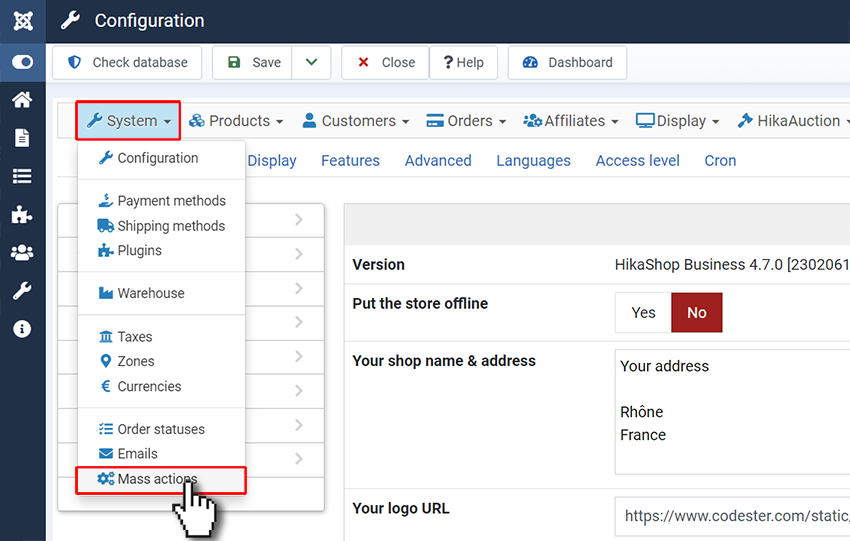
You can now, see "Mass action" screen, here for example, as no Mass actions have been configured, the listing is empty.
And so, here you can see configuration screen.

Toolbar

- Process : This button will execute the actions you defined in this view after filtering the elements as your configured.
- Save & Close : Save the mass action and return to the Management screen.
- Save & New : Save the current mass action and create a new one, redirecting you to an empty form.
- Save : Apply the modifications to the mass action and stay on the same screen.
- Cancel : Return to the previous screen without saving the modifications.
- Help : This button enables you to turn ON/OFF the help section, this screen will appear or disappear.
Set the main informations

- Name : Here you have to define the name of your mass action.
- Description : A short description of your mass action.
- Published : Publish or not the mass action. If a mass action is not published, it will not be processed on the selected trigger.
Additional Information
- Data : These buttons allow you to choose the type of data you want to work on. Each data has specific triggers, filters and actions available, enabling you to do different combinations.
- Triggers : Triggers allows you to specify when the mass action should be processed. You can either use it to execute your mass action on a regular frequency (for example you can import a csv with your products every day, updating your data according to the modification you made in the file), or execute the defined action on a given trigger like after a product is created. This way, you will be able to define for example a weight for a newly created product if you didn't specified any, avoiding shipping method errors. If you use a time trigger or click on the process button, the system will use all the data available but if you choose a trigger like "after a product is create", the mass action will run only on the data of the trigger, so only on that product in that case.
- Filters : Here you can add filters to your mass action. For instance, you can specifically select products which belong to a category or customers living in Europe. Thus, you can process actions only on the selected data. Note that the number of elements filtered will be displayed next to the dropdown, letting you know how for example much products will effectively be processed in the given category.
- Actions : This is the main part of the mass action system since it define what kind of action will be processed on the selected and filtered data. Here, you can choose to modify the data, export it as a csv, and even display the results on the current page. This last option will display the selected information in a table and give you the possibility to dynamically change the displayed values.
Detailed options
-
Filters
-
Generic
- Columns : This option allow you to filter on any column of the selected table. This take the values in the database directly.
- Limit : To have only a defined number of results, you can use this option. It is often useful when you want to export data or display them.
-
Product
- Product type : The product type option allow you to filter only the main products or the variants.
- CSV product : You can give a csv file as filter, the mass actions will take the content of the file, and filter on the given products.
- Characteristics : To filter on the characteristics, it display only the available characteristics.
- Access level : The access level filter restrict the results of the search to the defined access level.
-
Category
- Category type : Allow to filter only the selected category type, for example only the product categories.
- Access level : The access level filter restrict the results of the search to the defined access level.
-
Order
- Order status : Restrict the results to the selected order status.
- User with ACL : To get the orders where the users have the group defined.
-
User
- Don't have : Return the users which don't have the value set.
- User with ACL : To get the users with the group defined.
-
Address
- User with ACL : To get the addresses where the users have the group defined.
-
Actions
-
Generic
- Display the results : This option will display the elements previously filtered in a dynamic table, when this table is displayed a simple click on a row allow you to change the value of the selected element.
If the mass action is triggered by an event "On HTTP request (webhook)" this action will output the data as a JSON. - Export a CSV file : You can export the elements in a CSV or XLS file. Besides, you can define or not a path for this file. When a path is set, the file will automatically be saved in the specified folder. If you let the path empty, it will display the browser download bos to let you select an action, display, or save.
- Update the values : This will allow you to change a value on all the elements returned, be careful when using this option because it is irreversible.
- Delete the elements : As indicated, you can delete the filtered elements, as the previous optionit is irreversible.
- Run MySQL query : This action will allow you to run a MySQL query. You can use tags in the MySQL query which will be replaced by the system with the data from the element being processed. You can read more about it in the "Run MySQL query" section below.
- Run PHP code : This action will allow you to run PHP code. You can use tags in the PHP code which will be replaced by the system with the data from the element being processed. You can read more about it in the "Run PHP code" section below.
- Send HTTP request: This action will allow you to send a HTTP request to an API. Each option of the action comes with explanations to help you configure the action. You can read more about it in the "Send a request to an API endpoint / webhook." section below.
-
Product
- Update the categories : This will update the categories of the product, two choices are present, add to only add new categories to the product or replace, to remove the previously set categories and add the selected one. To remove all the categories, you can let the field empty and use the option "replace".
- Update the product relateds : As the categories, you can add or replace one or many related product(s) to the filtered products.
- Update the product options : This option will do the same thing as the previous one, but it is applying on the options.
-
Category
-
Order
- Change status : Easily change your order status by selecting a new one, it will change it to the triggered and/or filtered one.
- Add an existing product : To add a product, for example a gift on an order, you can do that automatically or manually with this action. You can select one or many products to add.
-
User
- Change the user group : Simply select the user group to set to the selected user(s). You can add a group or replace the current group(s) to the selected one.
-
Address
Tags:
- {time} When you have filters on columns which contain a date like product_created, product_created, order_created, order_invoice_created, etc, you can compare the value of the element to the {time} tag, which will be replaced by the current date/time. For example, if you have a filter "order_created >= {time}-2592000", it will only keep the orders which was created in the past 30 days (because 2592000 is 30 days).
- {time} When you use an "Export a CSV" action, you can include this tag in the path of the file you provide to the action. This tag will be replaced by the current date.
-
When using the action "Send an email" for the "order" data, you can use tags in the subject and the body of the email. The tags allow you to add values pertaining to the current order in the columns of the hikashop_order table in the database. For example, you could use {order_number} or {order_status} or {xxx} where xxx would be the column name of a custom order field.
Note that since the mass action only sends one email for all the orders being processed at the same time, tags will only be replaced if the mass action is processing a single order each time. That's what will happen if you use a trigger "after an order is updated" for example. -
When using the "Update the values" action, you have several modes:
- INT For which you can provide a number without decimals
- FLOAT For which you can provide a number with decimals
- STRING For which you can provide a text
- OPERATION In that case, you can provide a formula with arithmetic operations (if you're processing numbers), or text operations (if you're processing text). You can also use tags like product.product_name or price.price_value or order.order_full_price or user.user_email, etc in your operations. These tags must match with the column names in the database for the corresponding tables. For arithmetic operations, you can use the MySQL numeric functions, and for text operations, you can use MySQL string operations. This can allow you to update product prices, generate the canonical URL from the alias of the product, update stocks, automatically fill custom fields, etc.
Tutorials
Passed this overview on the different options available in the mass action system, here are several tutorials giving you an example of what can be achieved with mass actions.
Create a massaction
First, to use the mass actions you have to click on the menu "System" then "Mass actions".
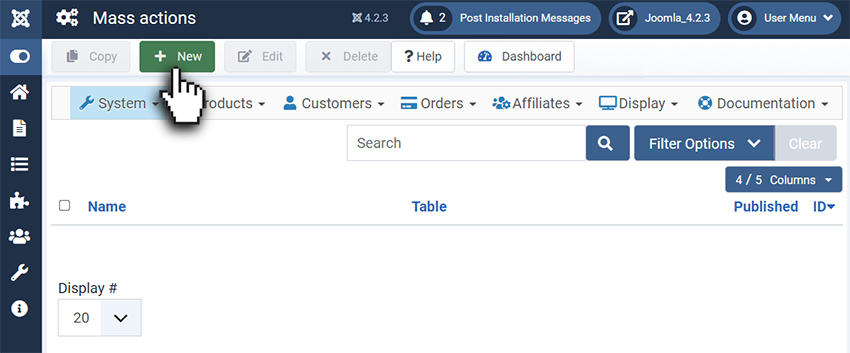
When you arrive in the mass action page, you have to click on the "New" button in the toolbar in order to create a new Mass action.

Once you are in the Mass action form, you can enter the main information relative to the mass action you're creating. The following fields allows you to set a name and a description to your mass action.
We recommend to set meaningful information, it will be easier for you to find back a mass action in the future.
As all the other features, you can publish or not the mass action. It's useful when you are using one or many triggers in the mass action.
The triggers are called generally before or after an action. For example, when you create a product, it calls the two triggers "onBeforeProductCreate", which is called before the save of the created product, and "onAfterProductCreate", which is called after the save.

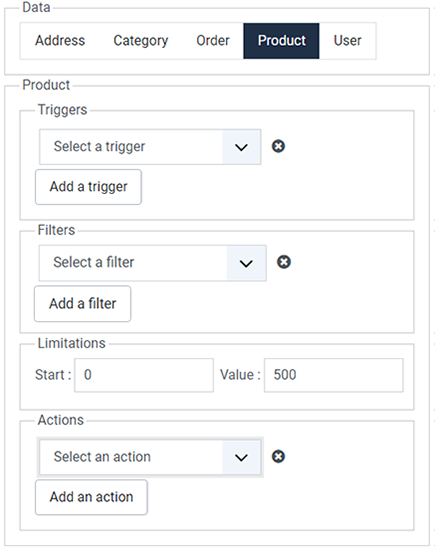
A mass action can be applied to one data type. You have to select the desired data on which you want to apply a mass action. The default possibilities are Product, Category, Order, User and Address.
If you want to create a mass action on another data type and you have some Php skills, you can code your own mass action plugin by following our developer documentation on that.
When the data is selected, you can choose one or many triggers, filters, actions. To add one of these elements, you just have to click on the corresponding "Add a ..." dropdown and to remove one of them click on the remove icon.
change the category of a product
As an example of the use of the mass action system, we will see how to move all the out of stock products into the category "Out of stock".
To do that, you can configure your mass action as the following screen shot:
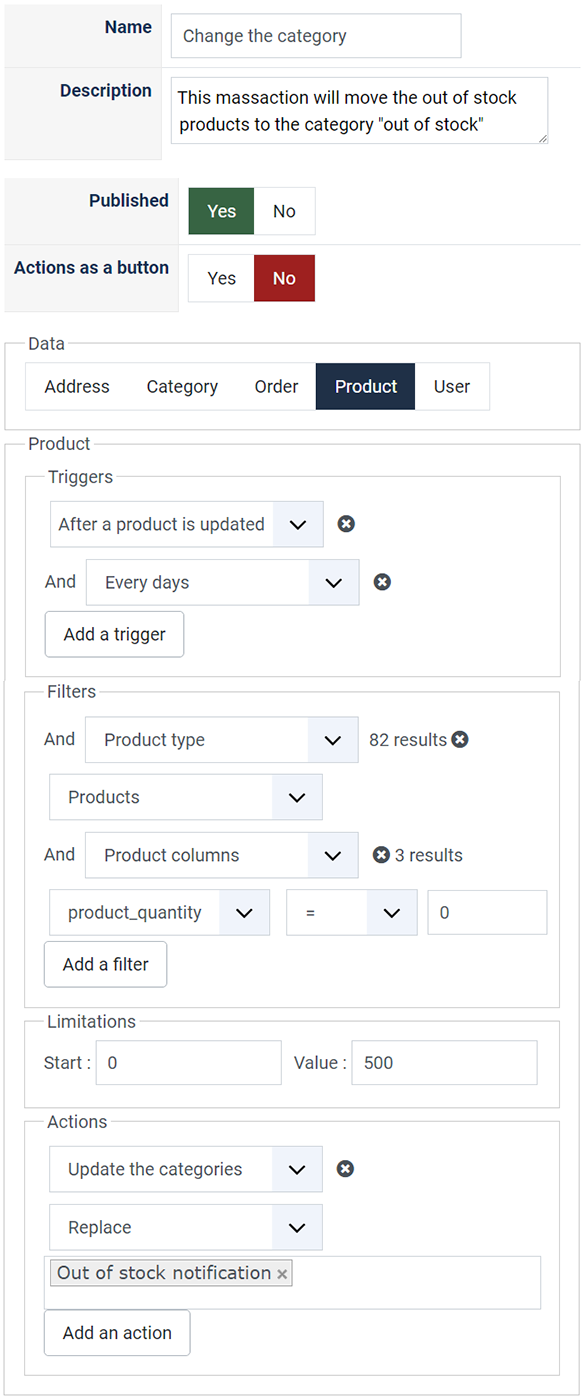
With this configuration, the mass action will be called when a product is updated and every day. The every days trigger is not required here but it can be more secure to add a check on all the products once a day like that.
This mass action will modify the categories of the product being updated when called on the "After a product is updated" trigger, and will affect all the products when called by the "Every days" trigger. Note that the first trigger passes an element to the mass action, processing only this element. At the opposite, the second trigger, since it's not applied on a specific element, will be based on all the elements.
The action will be executed on elements, but the elements must correspond to the filters. In this case, if the product(s) are in stock and/or are variants, the action will not be executed on them.
If we have at least one product which is out of stock, the action "Update the categories" will be executed on it/them. As you can see, there is a dropdown on the left of the action, it allow you to select "Add" or "Replace".
We wanted to change the category so we selected "Replace" here. To add a category beside the current categories of the product, just choose the "Add" option.
Don't forget to save the mass action. Otherwise, it will not be triggered. If you click on "Process" it will execute the mass action on all the elements corresponding to the filter but only at that moment.
Display all the product categories
This second example will show you how to display all the product categories. First, you have to select the data "Category" and configure it as the following screen shot:
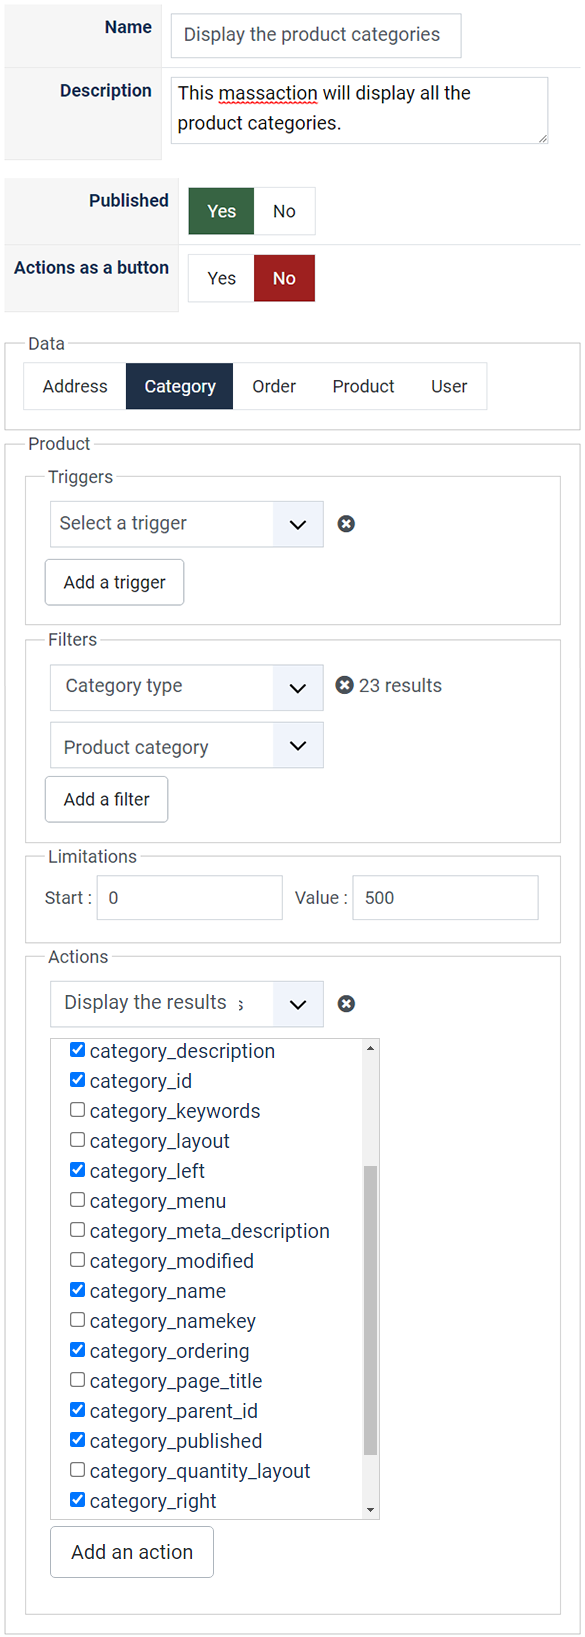
To display the products categories, you have to use the filter "Category type" and select "Product category".
Then, in the action, simply select "Display the results" and you will see the elements to display. By default, nothing is selected and you can check all the columns by clicking on "Select all".
To display the results, just click on the "Process" button and the process will execute the selected action(s), and save the current mass action.
Here is the display of a "Display the results" action:
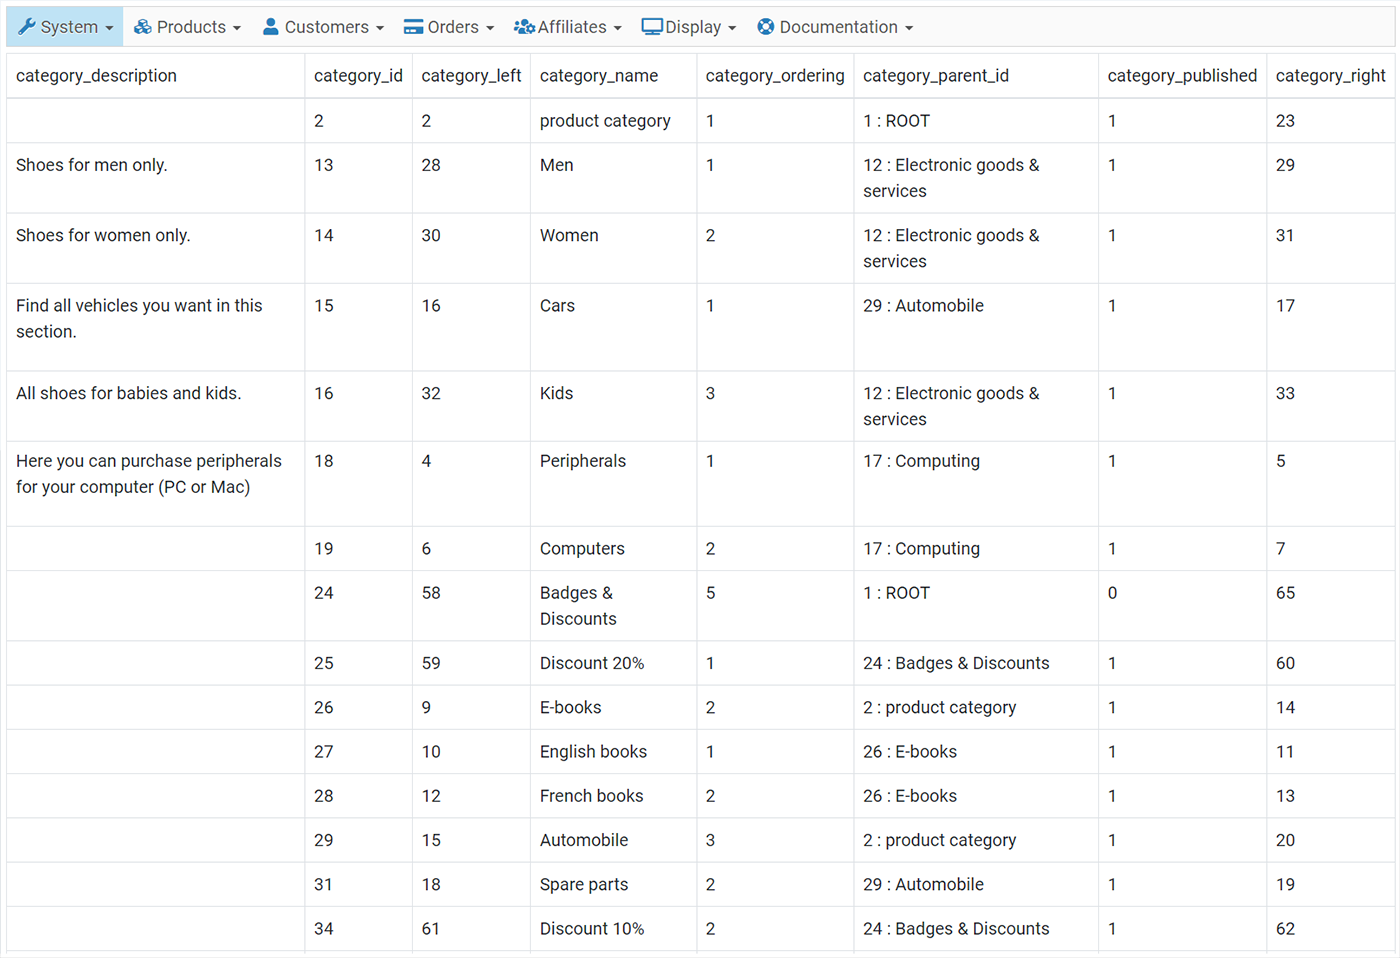
As you can see, when clicking on a cell, it becomes editable. Just edit the value and click on the save icon.
The display of the row edition change depending on the type, you can find textarea, dropdown, datepickers...
Modify several products prices through categories
Here, we will show you how to use the Massaction to increase several product price from a define category. Let's imagine, that you want increase by 10% some products price from specific category.
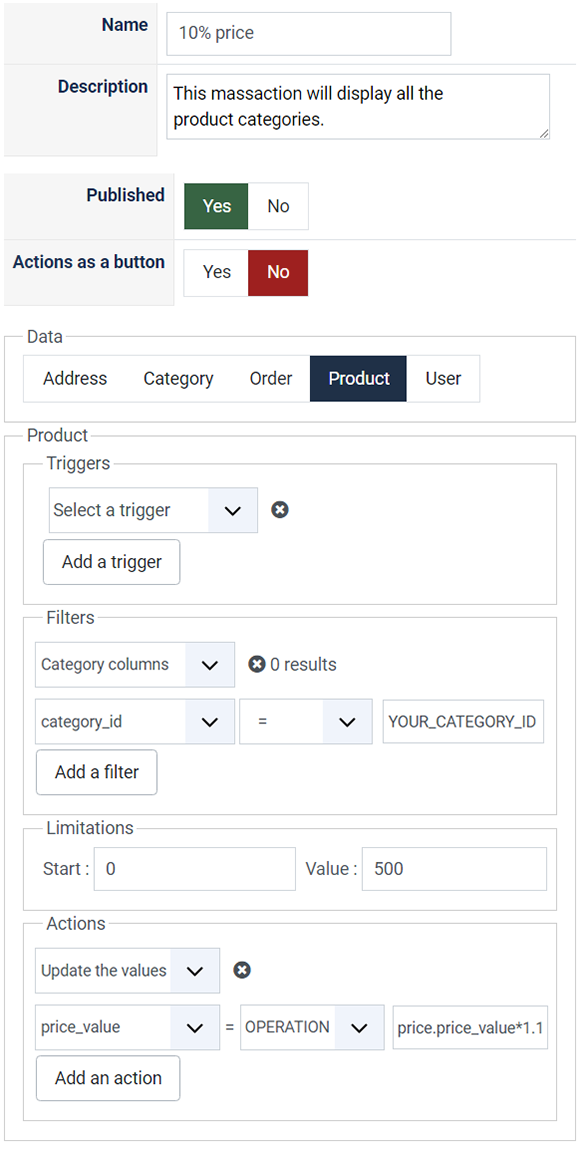
- First target in Data to apply your Massactions on Product.
- For the purpose of this example, ignore the Triggers part.
- In the Filters define required Category, and so select the Category columns.
- On this example, we select Category by his category_id.
- And so, if you have to select several category, just click on the Add a filter button.
- Like for the Triggers, ignore the Limitations part.
- And for Action, we will use the "Update the values" action on the price_value column in OPERATION mode, and then provide the operation itself in the last field.
- We type : price.price_value * 1.1, let's explain this :
- price : Allow to select the table price in the database
- price_value : Allow to select the column price_value in the price table
- *1.1 : Corresponds to a multiplication of 1.1, for the 10% addition.

And to finalize your Massaction, as we didn't set a specific trigger, clic on the Process button.
As result, your targeted products have their prices change for an 10% addition.
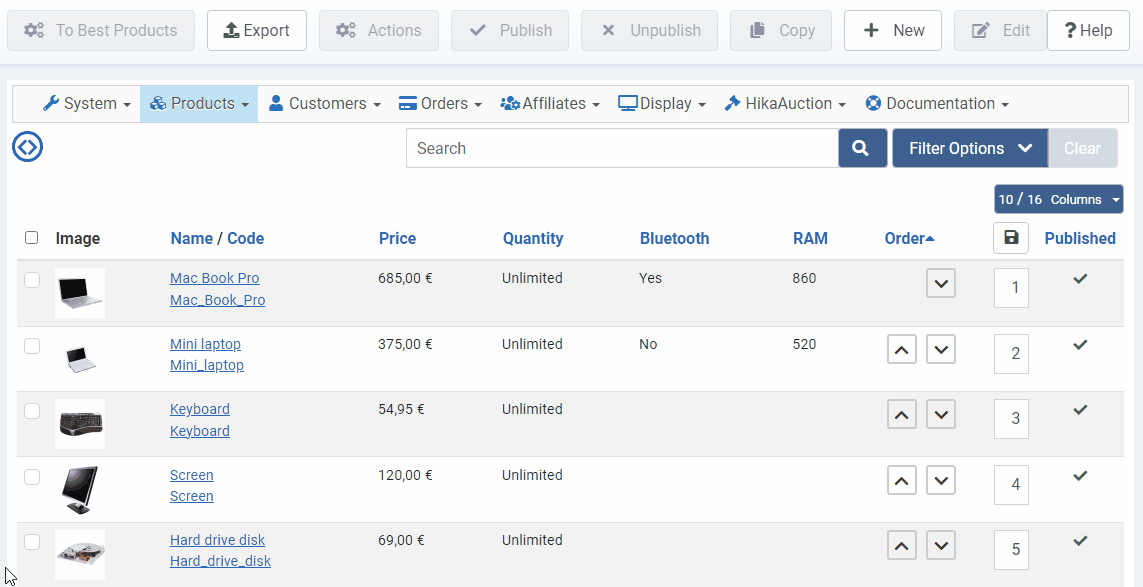
Action button example
Here, we activate the "Actions as a button"setting of the mass action.
This will add an extra button to the corresponding listing in the backend with the name of the mass action as label of the button.
When the button will be pressed, the actions of the mass action will run on the selected elements.
Warning: Triggers, filters and limitations will be ignored when the action button is pressed. Only the actions will be processed.

Results in products listing :
Then, you will see a new button with the MassAction name, this button will remain grayed out until items are selected.
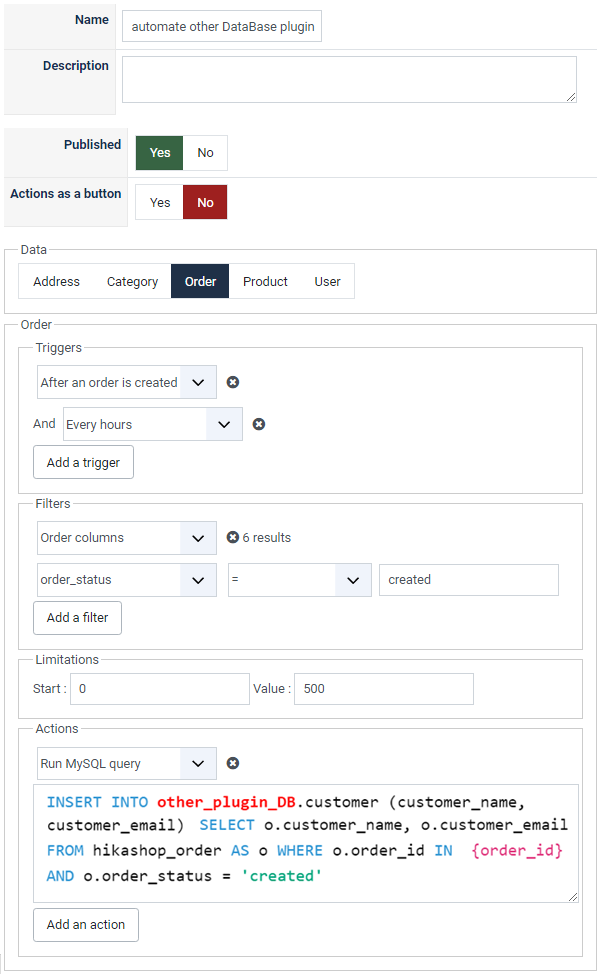
Run MySQL query
Imagine, you use a plugin associated with your HikaShop, but it's not an HikaShop plugin, you need to automate an operation from HikaShop to an operation in this third party plugin SQL dataBase.
And so, if you used to MassActions, you will think that it's not possible with the classic MassAction option.
This is precisely where you can use the "Run MySQL query" action, see the screenshot :
MassAction settings :
Here, the MassAction will select required orders with the good order status ("created"), then the Action will process the SQL operation on your "other_plugin_DB" after have selected relative customer name & customer email
Note the "{order_id}" that will dynamically be replaced by the order_id of the current order being processed by the mass action, example : (13, 54, 55, 57, 60, 61, etc...).
Run Php code
With the "Run PHP code" action, you can do actions which aren't available by default in the list of actions offered by the system. This can be helpful if you want to do an operation which is too complex to be done by a MySQL query, but you don't need dozens of lines of PHP (if you need that much PHP code, then we would recommend building a plugin and implement the corresponding event as per our developer documentation).
As with the "Run MySQL query" action, each column of the table corresponding to the data you're processing is available to you as a tag ({order_id} for the ID of the order, {order_status} for the status of the order, {product_id} for the id of the product, etc).
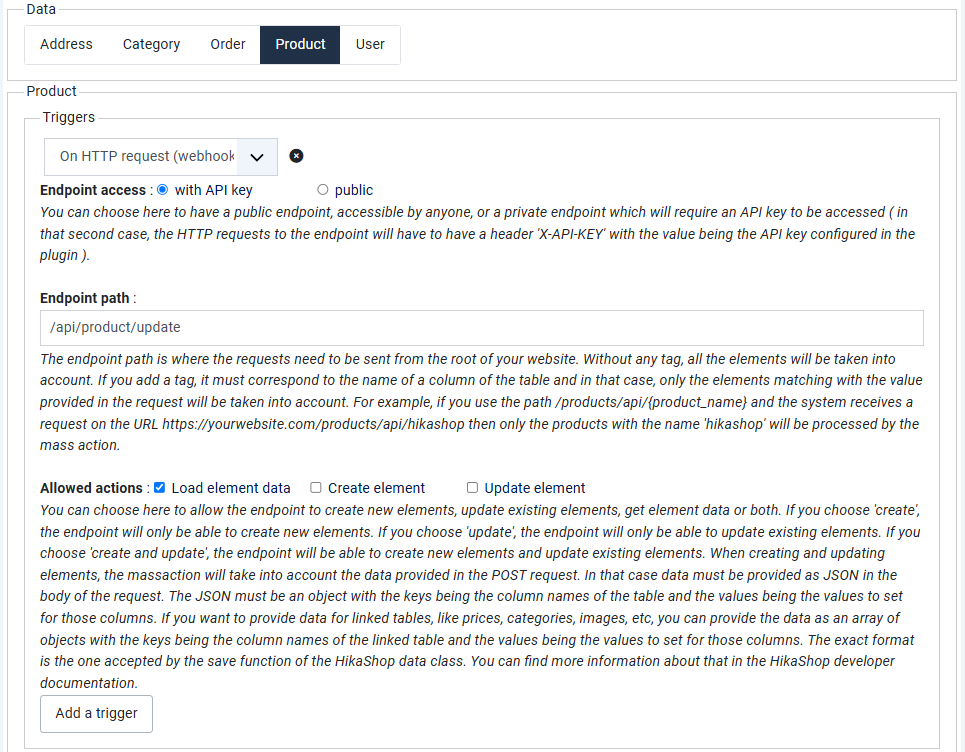
Create an end point (webhook) in order to update product information
End points (Webhooks) allow you to create URLs that external systems (ERP, CRM, accounting software, online services, etc) can hook up to in order to retreive data from your website or send data to your website. The mass actions system in HikaShop allows you to create custom webhooks. The advantage of this is that you can connect HikaShop with other tools without having to ask us to develop something specific or wihtout having to code a custom solution.
First, you will have to edit the settings of the System - HikaShop Mass Action plugin via the Joomla plugins manager. There, you'll see an "API" setting. It is deactivated by default for security reasons. That way, no attacker can go through it to try hacking your website. You'll need to activate it if you want to create webhooks for HikaShop.
Once that API option is activated, you'll see an "API key" setting below. Here, you can enter an API key that systems connecting to your end points will have to provide via a HTTP header with the name "X-API-KEY" in their HTTPS requests. Please try to provide a complex key with special characters and many characters in order to make it difficult to brute force its discovery.
Once the System - HikaShop Mass Action plugin is configured, you can create a mass action. In this example, we want to be able to update product information. This can be useful if you have an ERP and you want it to send stock data to your online shop for example. So, you want to create a mass action with the type "Product". Then, the key is the "On HTTP request (webhook)" trigger. When you select it, you'll see settings you can use to configure your webhook.
Since we're creating an endpoint which will update the data on your website, you want the "Endpoint access" setting to be set to "with API key". Otherwise, anyone could access your webhook to update your product data, and you don't want that. For the "Endpoint path", you want to enter the relative URL which will be used to access the webhook. For example, you could use "/api/product/update". Finally, you can check the "Update element" checkbox of the "Allowed actions" setting.
A simple HTTP request to this webhook could be:
POST /api/product/update HTTP/1.1
Host: example.com
Content-Type: Content-Type: application/json
X-API-KEY: xxxxxxxxxxxxxxxxxxxxxxxxxxxxxxxxxxxxxxxxxxxxxxx
Content-Length: 66

{
	"product_code": "my_product_code",
	"product_quantity": 20
}
This would update the stock of the product with the code "my_product_code" to 20. You can test your webhook with Reqbin's tool
Extra information: If you want to create a webhook which displays information from your website, you want to use the "load element data" checkbox. Then, you want to add an action "Display the results" and select the columns you want to be returned. It will output a JSON which will be an array of objects. And you can use tags in the "Endpoint path" to make it so that the HTTP request targets specific elements. For example, if you have the tag {product_id} in the path, the HTTP request will have to request that path with {product_id} being replaced by the actual id of the product it wants to target. Filters can also be configured. For example, if you only want published products to be loadable, you can add a filter on the "product_published" column being equal to 1.
Send a request to an API endpoint / webhook.
The "Send HTTP request" action allows you to send a HTTP request from your website to a receiving API / webhook for each element being processed by the mass action. For example, after a user is created, you could send the email address to an API to be added to a mailing list.
First, you want to enter the URL of the endpoint to contact. If the endpoint requires you to provide an element identification key in the URL, you can enter its corresponding tag. For example, if you have a user id that you need to provide in the URL and which is stored in the "api_id" column of the users, you can use the tag {api_id}.
Then, you can select the method to use ( GET, POST, etc ). Then, you can specify the authentication mode. If you need to provide specific headers in your HTTP request, you can specify them directly in the "Additional headers" option.
Here is an example of an action configured to send a HTTPS request to the end point http://mysecondwebsite.com/index.php/api/product/update with the product code and stock of the products being processed:
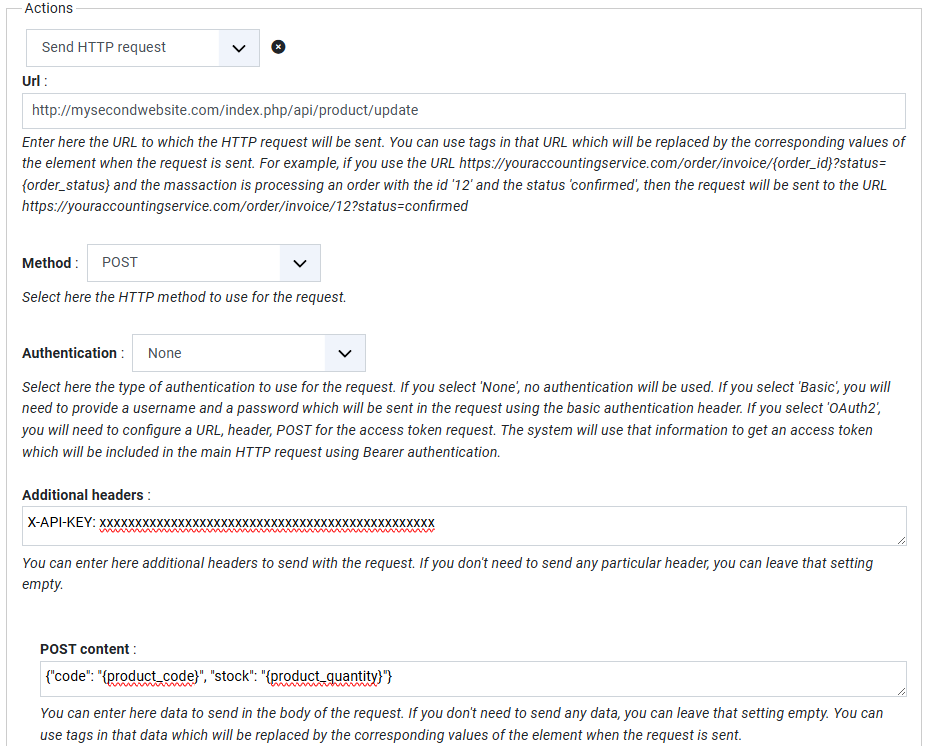
This could be combined with some event trigger or cron task in order to periodically send the stock of the products in the shop to an ERP. The resulting HTTP request would look like this:
POST index.php/api/product/update HTTP/1.1
Host: mysecondwebsite.com
X-API-KEY: xxxxxxxxxxxxxxxxxxxxxxxxxxxxxxxxxxxxxxxxxxxxxxx
Content-Length: 38

{"code": "yyyyyyyyyy", "stock": "zzz"}
Create an AI Tool (MCP)
The "On MCP request" trigger allows you to expose a Mass Action as a "Tool" to Artificial Intelligence (AI) agents (like Claude or IDE assistants) via the Model Context Protocol (MCP). This enables AIs to query your HikaShop data or perform actions on your store in a controlled, safe way.
First, you must enable the MCP Server in the plugin configuration (System - HikaShop Mass Action). It is normally ON by default. In the "Basic" tab, set "Enable MCP Server" to "Yes" and ensure an API Key is set.
Then, create a new mass action. Select the "On MCP request" trigger. You need to provide:
- Tool Name: A unique internal name (e.g., "find_products").
- Description: A clear instruction for the AI explaining what this tool does (e.g., "Search for products by name or category"). The AI uses this description to decide when to call this tool so make sure you are clear and concise.
Dynamic Filter Mapping
This feature allows the AI to filter your data. You define "arguments" that the AI can send (e.g., "product ID", "product Code / SKU", "category ID", "category name", "order ID", "order number", etc), and map them to specific HikaShop Mass Action filters (e.g., "product_id", "product_code", "category_id", "category_name", "order_id", "order_number", etc).
- Tool Argument Name: The name of the parameter the AI will send (e.g. "product code / SKU").
- Mass Action Filter: The database column to filter by (e.g. "product_code").
When the AI calls the tool with `{ "params": { "product_code ": "123" } }`, the mass action will automatically add a filter `product_code = 123` before running.
Finally, add an Action to define what to return to the AI. Typically, you will use Display the results to return a list of found elements (products, orders, etc.) as JSON data. You can select specific columns to limit what information the AI can see.
You can also use other actions to perform actions on your data. For example, you can use the Update element data action to update the stock of a product.
Server URL
Your MCP Server is available at: `https://yoursite.com/index.php/hikashop-mcp`.
The last part, `hikashop-mcp`, is the default "Slug" configured in the plugin settings. You can change this in the System - HikaShop Mass Action plugin configuration if you wish to use a different URL path. Also, the index.php part can be removed if you have activated the "Use URL Rewriting" option in the Joomla Global Configuration page.
Testing with MCP Inspector
We include a bridge script (`mcp_bridge.js`) in the plugin folder (`plugins/system/hikashopmassaction/`) that allows you to test your tools using the official MCP Inspector on a local server. This is useful for debugging.
You need to open the `mcp_bridge.js` file with a text editor and replace the following values with your own:
const httpUrl = 'https://yourwebsite.com/index.php/hikashop-mcp';
const apiKey = 'your-api-key';
Then, run the following command (requires Node.js) in the folder where the `mcp_bridge.js` file is located with the terminal:
npx @modelcontextprotocol/inspector node mcp_bridge.js
This will open a web interface where you can see your tools and execute them to verify they return the expected data.
Connecting Claude Desktop
To use your tools with the Claude Desktop app, edit your `claude_desktop_config.json` file:
{
  "mcpServers": {
    "hikashop": {
      "command": "npx",
      "args": [
        "-y",
        "@modelcontextprotocol/inspector",
        "https://yoursite.com/index.php/hikashop-mcp"
      ],
      "env": {
        "X_API_KEY": "YOUR_API_KEY"
      }
    }
  }
}
Replace https://yoursite.com/index.php/hikashop-mcp with your actual MCP Server URL and YOUR_API_KEY with the key you set in the plugin configuration.

