


|
|
Description
This screen enables you to edit the Badges options. In HikaShop, you will be able to create badges which will be
visible on the images of the product. That way, you can highlight some specific attributes of some products, like discounts, new products, featured products, etc.
![]()
This screen can be accessed via the menu Products->Badges on your backend.
Toolbar

New: Enables you to create a new badge.
Edit: Select a badge and then click on this button in order to edit it.
Delete: Select one or several badges and click on this button in order to completely delete them.
Help: This button enables you to turn ON/OFF the help section. This screen will appear or disappear.
Control panel: You can go back to the control panel using this button.
Columns headers
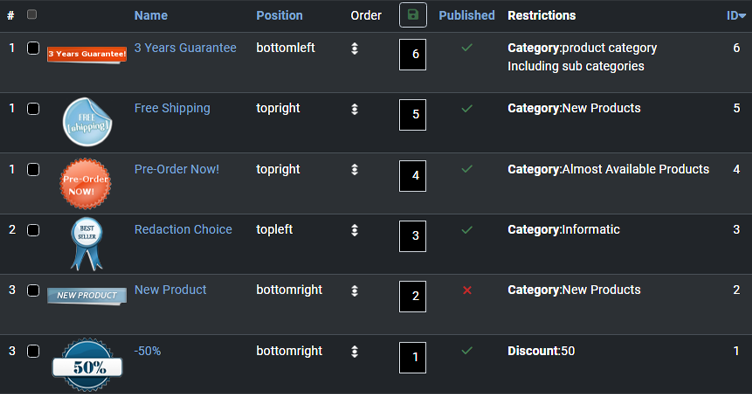
#: An indexing number automatically assigned for ease of reference.
Checkbox: Check this box to select one or more items. To select all items, check the box in the column heading. After one or more boxes are checked, click on the delete button in order to delete the selected badges.
Image: The image used for the badge.
Name: The name of the badge.
Position: The position, chosen among 4 choices, where the badge will be positionned.
Order: The order will define the priority of the badges between them.
Published: If a badge is published, it means that it will be used by the system, otherwise, it won't be taken into account.
Restrictions: Category, with or without subcategories, and/or discount on which your badges apply.
ID: This column indicates the ID of the badge.
Informations

- Name: Choose here the name of the badge you are editing.
- Published: Choose to publish your badge by checking the "Yes" option here.
- Start Date: The date when the display of the badge will start.
- End Date: The date when the display of the badge will end.
- Quantity: Here if you enter a number, that will restrict the badge to only that stock amount. So for example, if you want to display a "no stock left" badge, you can put 0 in that field so that the badge display on the products image only when there is no stock left.
- Category: Choose the category on which your badge will apply.
- Including sub categories: Choose here if you want to include subcategories of the previously chosen category or, if you prefer, limit the badge only to the selected category.
- Discount: Select the discount your want to associate with the current badge. Every product with the badge will automatically assume this discount.
- Url : Fulfilling this field will make your badge clickable and redirect the customer to the given url. This option may be useful to redirect customers to a discounted category.
- Images: You can upload here the image of your badge.
- Size: This size defines the size of the badge compared to the size of the product image. It means that the badge will adapt itself automatically.
- Position: Choose here the corner of the product image where your badge will be placed.
- Vertical distance: This distance is between the top or the bottom (it depends of the corner chosen previously) of the image, and the same part of the badge. A positive distance will place badge out of product image.
- Horizontal distance: This distance is between the left or the right (it depends of the corner chosen previously) of the image, and the same part of the badge. A positive distance will place badge out of product image.
Note : Please, make sure that your server and website are configured with the same timezone to avoid any issue. As otherwise, you might notice discrepancies in the way the date restrictions are applied

