


 |
Description
This screen enables you to edit the payment method options. Payment methods will be filtered on checkout based on the zone you set for them, if any. Then, they will be displayed to the user for him to choose which payment method he prefers for his order.
Note that the payment method can probably support only a limited number of currencies.
Toolbar
![]()
- Save & Close : Save the payment method options and return to the payment methods Management screen.
- Save : Apply the modifications to the payment method and stay on the same screen.
- Cancel : Return to the previous screen without saving the modifications.
- Help : This button enables you to turn ON/OFF the help section, this screen will appear or disappear.
Main Information
If you use one of our commercial versions, you will be able to enter the name and description in different languages. This feature requires to have joomfish installed and can be activated in the configuration page, in the display tab. The languages available will be the ones in joomfish. If you don't enter something for a translation, it will just use the default information in the Main information tab instead. After you click on save or apply an additional publish icon will appear next to the fields where you entered something in the languages tabs so that you can easily enable or disable them. The default publish status can also be changed in the configuration page of HikaShop.
Generic information
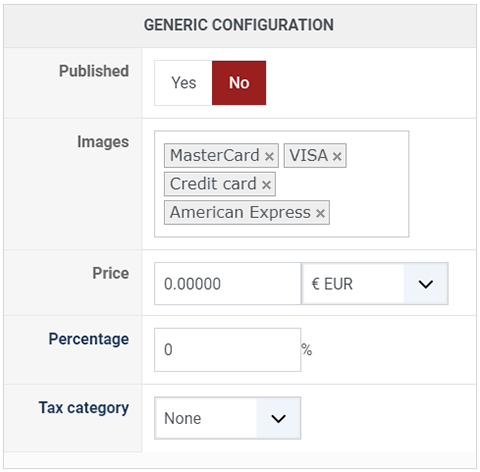
- Published : This option allows you to publish or not the payment method.
- Images : Select here the desired images to be displayed for this payment method. If you want to add additional images, you can upload them via FTP into the folder media/com_hikashop/images/payment/ of your website and you will then be able to select them in that option.
- Price : You can set the payment fee in this field, and select the currency of the fee.
- Percentage : The percentage allows you to define a payment fee depending on the total amount of the products in the cart.
-
Tax category : Select among your tax category, the category you want apply on your payment method cost.
Installation
You can download the install package of the Adyen-sha1 payment plugin on this page
Then, install it via the Joomla installer on your website. Then, go in the menu System>Payment methods, click on the new button and select that payment plugin in order to configure it.
Note : Any new Adyen merchant account will be by default in sha256 mode, and so you have to ask to Adyen to mute in sha1 mode.
Additional Information
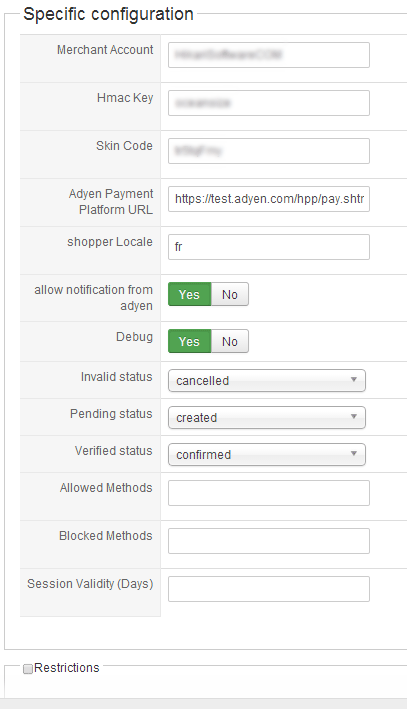
In this part, we will see the primordial options of the Adyen payment method. The only things you will need are your Merchant Account, your Hmac Key, your Skin Code and the Adyen platform Url that you need.
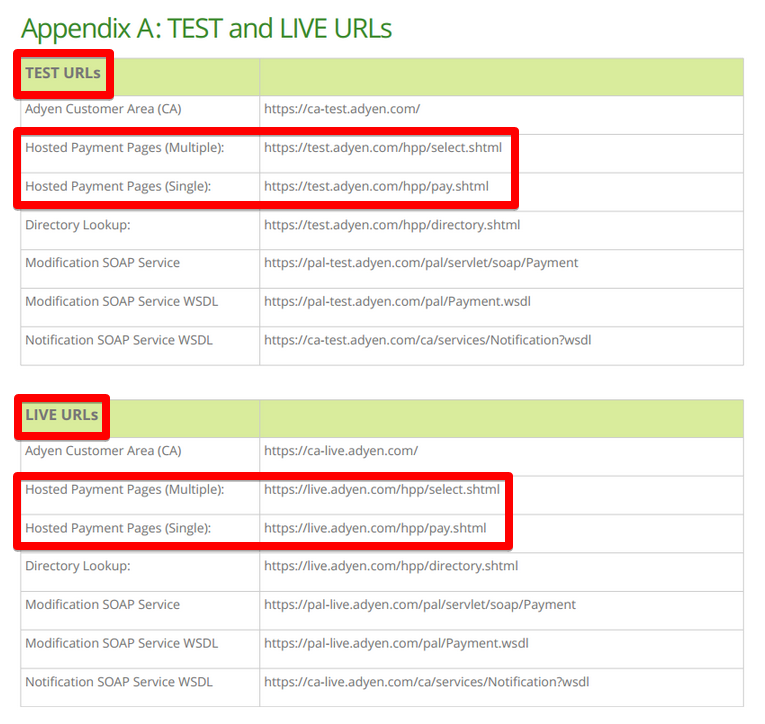
You will find 4 different Adyen platform Url:
Hosted Payment Pages (Multiple) and (single) for Test, AND for the production phase.
- Merchant Account: Just put your Merchant Account in this field. This identifier is given by Adyen.
- Hmac Key : Just put your Hmac Key in this field. This Key is define by yourself in your Adyen Sandbox Setting page.
- Skin Code : Just put your Skin Code in this field. This code is define by yourself in your Adyen Sandbox Setting page like the Hmac Key.
- Adyen Payment Platform URL: You can write here the Adyen sandbox Url (single or multiple) or the Adyen production phase Url (single or multiple).
- Shopper Locale: Just complete the Seller Nationality (French: fr).
NOTE: If you want to know more about these Adyen settings, you can look at the step by step sandbox setting page.
- Now, a little speech about the different options which are proposed by your Adyen Plugin:
- Allow payment notifications from Adyen: If this option is enable, the automatic response of Adyen server will be treated to update the order status. For example, if the payment has been completed correctly, the order status will be the specified verified status.
- Debug : You can here enable the debug option of the API. Don't enable this one if you don't have to look into the API's configuration.
- Invalid status : Here, you can select the status to an order if the plugin receives a invalid completion notification from Adyen for an order.
- Pending status : Like, for "invalid status"you can set to an order if the plugin receives a pending completion notification from Adyen for an order.
- Verified status : Same idea than "invalid" and "pending" status.
- Allowed Methods :Type here the Methods allow by your Adyen Plugin configuration
- Blocked Methods : Here, just list all forbidden payments methods by your Adyen Plugins.
- Session Validity (Days) : Define the order time validity in days.
Step by step configuration
- In order to use the Adyen payment method, you have to possess some informations that Adyen know about you, your Merchant Account and,your Hmac Key and your Skin Code, for clear you must create an Merchant Account on Adyen to be able to reach your Adyen setting page. And on this setting page you will enter your Hmac Key and your Skin Code.
- Later you will enter your Merchant Account, your Hmac Key and your Skin Code in your Adyen Specific Configuration.
- Enter the Adyen Payment Platform URL that you need among the 4 URL available, you could find these in the Adyen Integration Manual (or just after).
- Once your plugin is configured properly, you will probably want to try it. Before switching to the production phase, you should be able to make test payments with Adyen Sandbox. The capture will not be done and you should see a confirmation ticket proving you that everything works ok and if the payment is accepted, your order will take the specified verified status automatically (you need to have your website online for that as Adyen needs to notify it of the payment).
View on Adyen Purchase
- Let's have a look just after the customer click on the finish button.
After the checkout, customers should be redirected on the Adyen payment window.
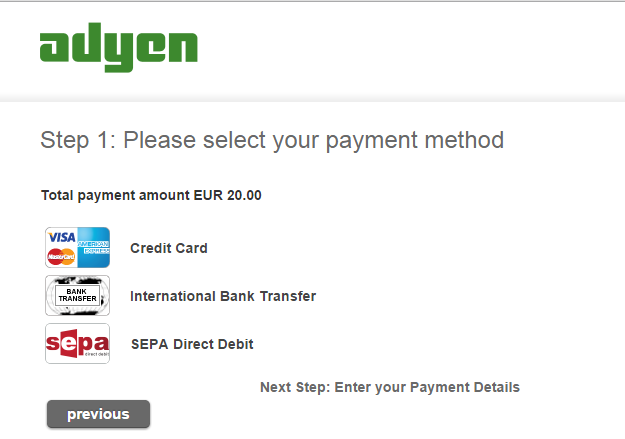
For the end of the operation
- Customer have to Choose, among this 3 choice (or less if you use the blocked method) and complete information to validate his purchase on the Adyen platform.
Later, the order status will be get and save by Hikashop.
Restrictions
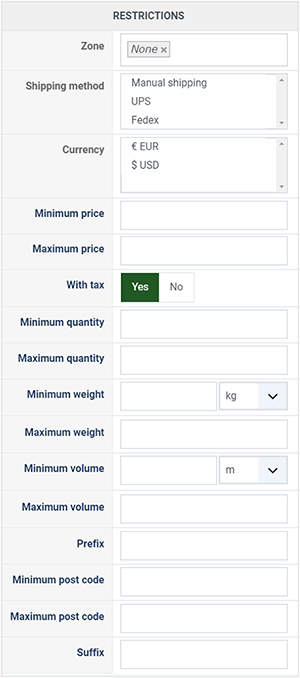
- Zone : You can restrict the check payment method to a zone. By clicking on the edit icon, a popup will open enabling you to select a zone. You can also remove this limitation by clicking on the delete icon.
- Shipping method : With this option you can select the shipping method for which this payment method will be available. For example, if you choose UPS, this payment method will only be usable if UPS is selected as shipping method. If an other shipping method is selected, this payment method will not be displayed. Note: if you selected "None" or don't select any shipping method, this payment method will always be available.
- Currency: Choose the currencies allowed by this payment method.
- Minimum price : The payment method can be available for only orders above a minimum price. This price uses the payment method price currency even if the price is 0.
- Maximum price : The payment method can be available for only orders below a maximum price. This price uses the payment method price currency even if the price is 0.
- With tax : Display the payment method only for products with tax.
- Minimum quantity : If the order has a price lower than the price set in this field, so this payment method will not be available.
- Maximum quantity : If the order has a price upper than the price set in this field, so this payment method will not be available.
- Minimum weight : You can set a minimum weight so that orders below it won't be able to be paid with the current payment method. The weight of the order will be calculated based on the weight of each products in it.
- Maximum weight : You can set a maximum weight so that orders over it won't be able to be paid with the current payment method. The weight of the order will be calculated based on the weight of each products in it.
- Minimum volume : You can set a minimum volume so that orders below it won't be able to be paid with the current payment method. The volume of the order will be calculated based on the volume of each products in it. The volume is calculated with the width, height and length of the products.
- Maximum volume : If the order has a volume upper than the price set in this field, so this payment method will not be available.
- Prefix : You can restrict your payment methods to only post codes including such prefix with this option.
- Minimum post code : You can restrict your payment methods to only post codes within a certain range whereby this is the minimum possible value
- Maximum post code : You can restrict your payment methods to only post codes within a certain range whereby this is the maximum possible value
- Suffix : You can restrict your payment methods to only post codes including such suffix with this option.
Access level
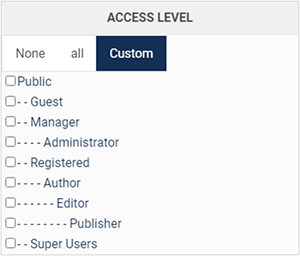
The ACLs are available in the business edition of HikaShop.
- None : When "none" is selected, the payment method will never be displayed.
- All : "All" allow you to display the payment method for all the type of users. All groups are allowed to pay via this payment method.
- Custom : Here you can select which groups can use this payment method. All the checked groups will be able to use this method.
Note about Access level :
-
Access level : With the business edition of HikaShop, you will be able to limit a coupon or a discount to specific users.
-
Access level : With the business edition of HikaShop, you will be able to limit a coupon or a discount to joomla groups of users.
FAQ
I don't see any payment methods during the checkout, or I don't see some of them, what is the problem ?
There are several things which you could have missed.
- 1/ Check that the payments plugins are installed and published
- 2/ Check that you have configured your payment plugins (edit it and save its configuration)
- 3/ Check that your template is able to display error messages: hikashop.com/documentation
- 4/ Check that you have the payment view in the checkout workflow option of the configuration
- 5/ If you restricted your payment methods to zones, check that the address you're using is inside those zones ! Otherwise the payment methods will be filtered out.
- 6/ Check that the currency you're using is supported by the payment plugins you're using. Some payment plugins only supports a limited number of currencies. You should check that with the support of the payment gateways you're using.
- 7/ Please make sure that you didn't change the currency code of your currency. Otherwise, the payment plugins won't recognize your currency. If you want to change the display of your currency, we invite you to use the "format" option on the right of the currency options screen as well as the symbol field.
- 8/ When you select a currency or a shipping method in the options of the payment method, the payment method won't display unless that currency or shipping method is selected during the checkout. In most cases, these parameters shouldn't be selected so make sure they are unselected. To unselect them, you need to press the ctrl key and click on the selected currencies or shipping methods. Also remember if you selected one or several shipping methods here, when you add a new shipping method later on, you will want to go in the payment plugins options and select that new shipping method or it won't display any payment method for that new shipping method.
- 9/ Please check that you didn't set the access option of the plugin (via the plugins manager of Joomla) to something else than public.
- 10/ It can happen that the plugin's access is not set properly in the database. Please go in the Joomla plugins manager and edit the plugin and save it. That will sett the access if not present and might help solve your problem.

