Description
This tutorial will explain different ways to easily display different content (products and categories essentially) on your front end.
Content, will be displayed using two elements : Menus and Modules. There is an extensive documentation on Joomla about menus and modules, so we highly invite you to understand these key concepts before reading this tutorial AND take time to read the "Difference between Menus and Modules" chapter, that will avoid a classic misunderstanding.
Note : You can find information about Joomla! elements anywhere like this :
Difference between Menus and Modules
An Item Menu is display on the front end in order to create a new link with the Title Item Menu, and leads to content.
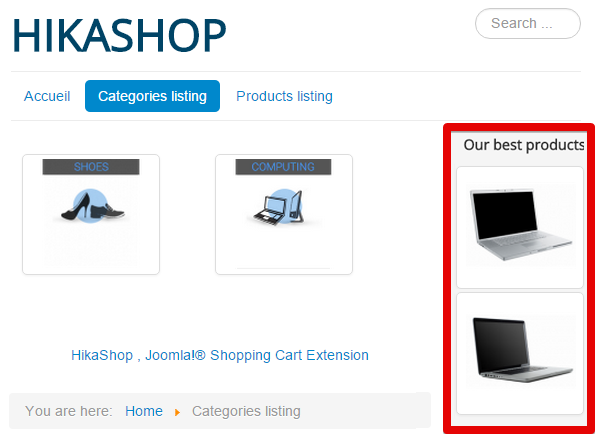
Here for this example, the content is the categories listing (Shoes and Computer).
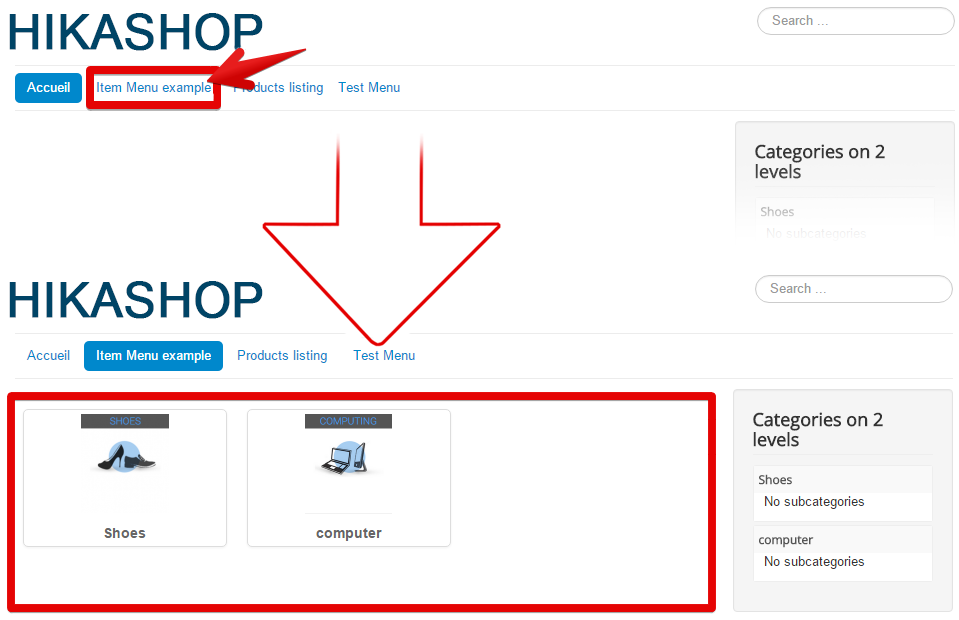
And a module, is display on the front end with by default a border AND its own sub element, each displayed element is a link to access itself.
Here like an above, the content is the categories listing (Shoes and Computer) too.
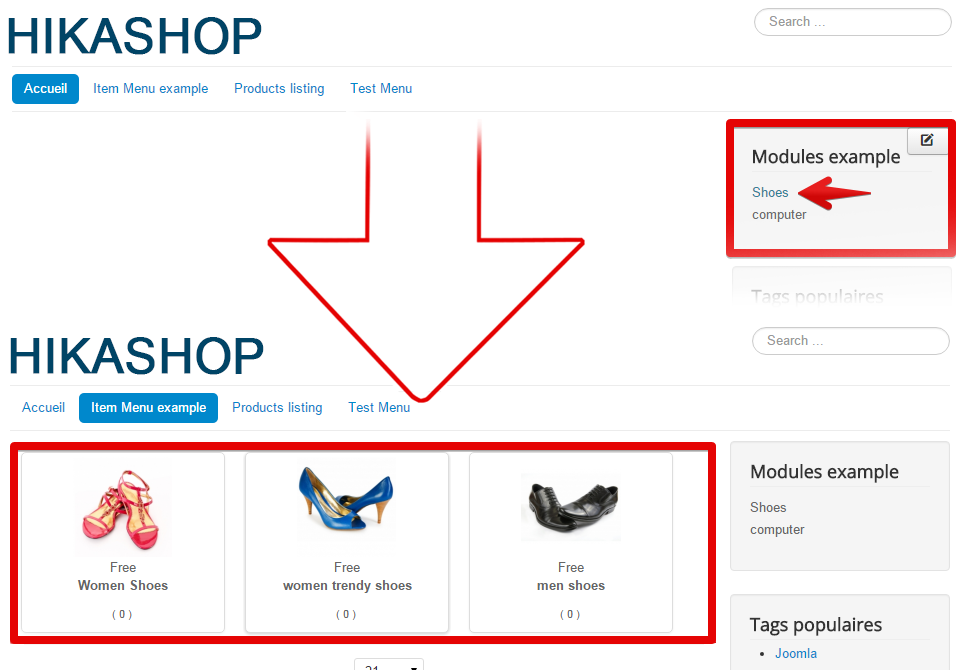
Here, we click on the sub element "Shoes".
Menus Item Options
HikaShop default menus
In this chapter, we will discover how to deal with HikaShop default item menu, they will allow you to display quickly and easily all most common HikaShop content.
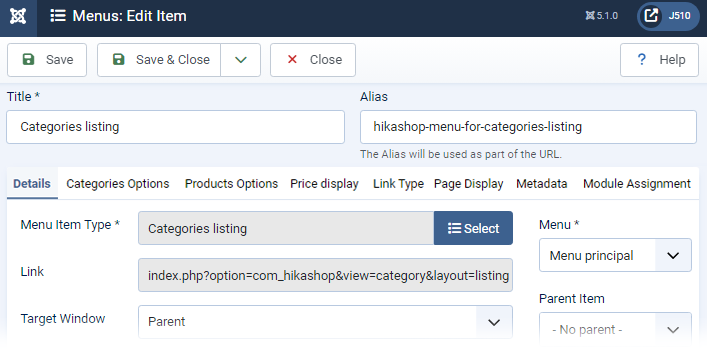
Let's see this by taking example of one of them : "Categories listing", as said above, this is a default Menus Item and so it will automatically display your created Categories on the front end in this case.
Note : The HikaShop default menu item are automatically created when you install HikaShop. They are define by default with minimum parameters, that's why just publish them can be enough.
And so, all works in the same way if you published, "Products listing" Menus Items and of course if you have created products or categories...
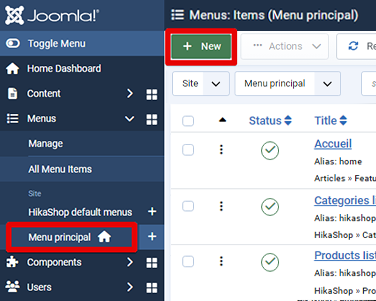
Let's start to reach the "Menu principal".
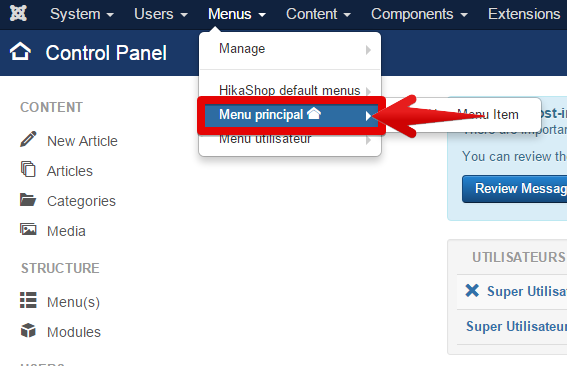
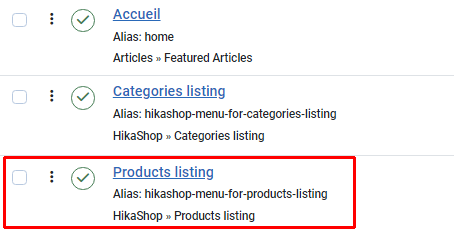
On this screen, you can see all Menu Items, here : "Accueil", "Categories listing" and "Products listing".
Note : "Menus" and "Menus Items" are a Joomla! Menu to switch between them, just click it.

Note : Menus aren't display on the front end, it's just a structural link, whereas Menus Item are display on the front end, see the screenshot below which show you the Menus Items.

In this screen parameter, you can change almost everything about your selected Menu Item AND all elements inside itself.
Note : You can learn a lot more about all these parameters here
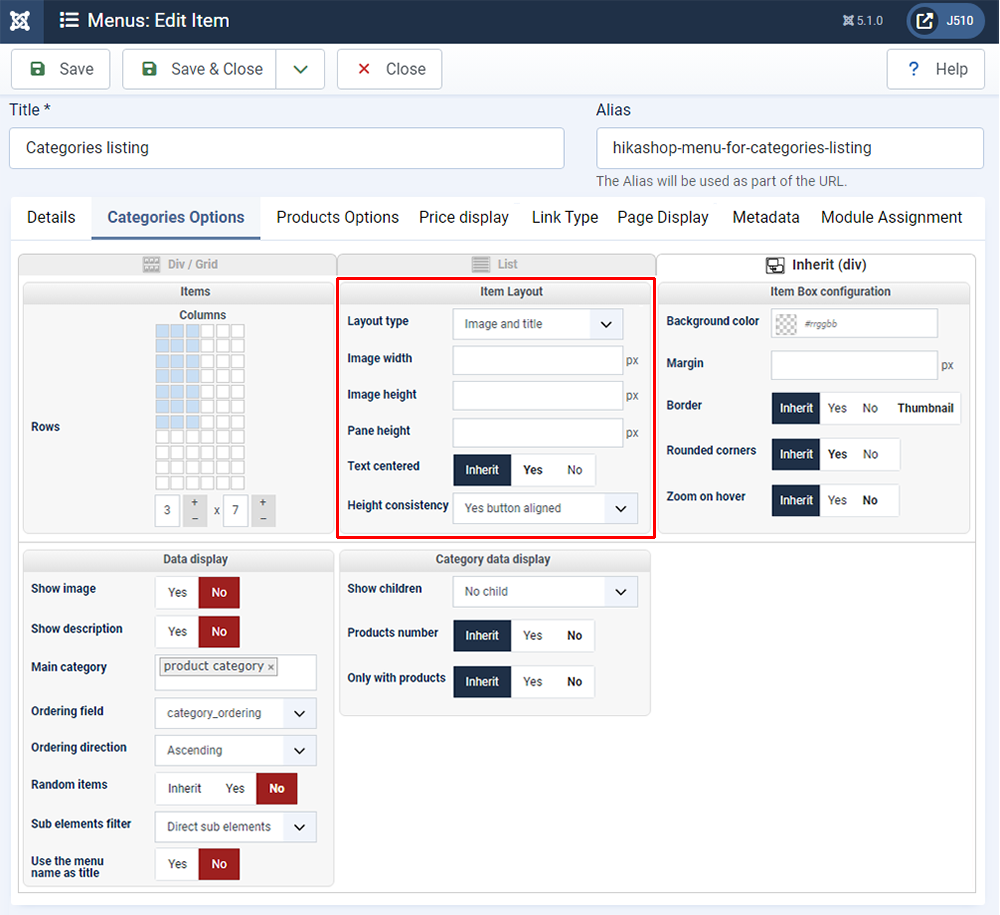
Let's just make an simple example : and so click on "Categories Options".

We will take time to explain what we see here :
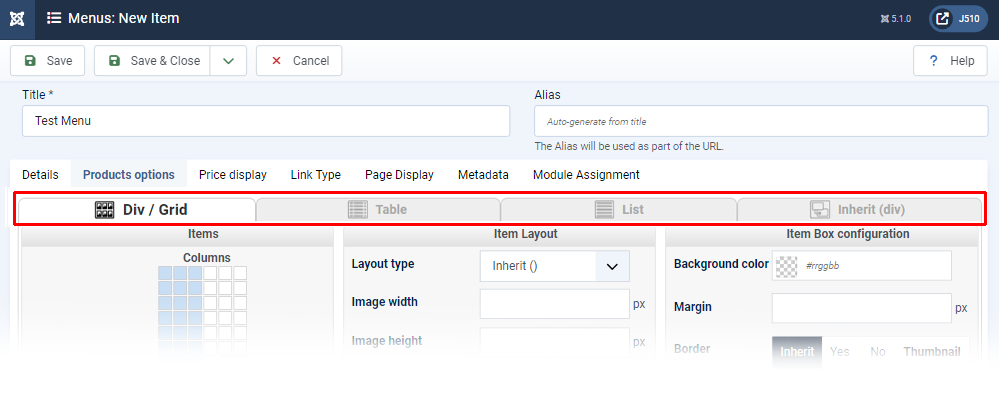
A new tab is displayed just below the previous, which able you to reach options for different display type among Div, List and Inherit.

-
Here by default we arrived in Div options.
You can see different sub elements, grouped by their kind of effects.
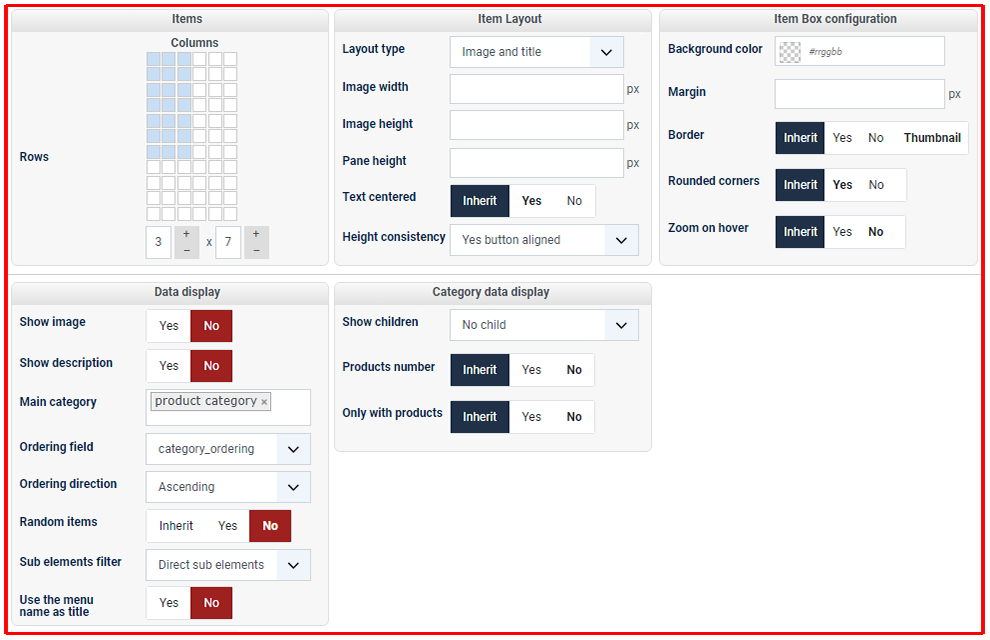
And now, we will change one of this parameters, let's focus on this part : "Items".
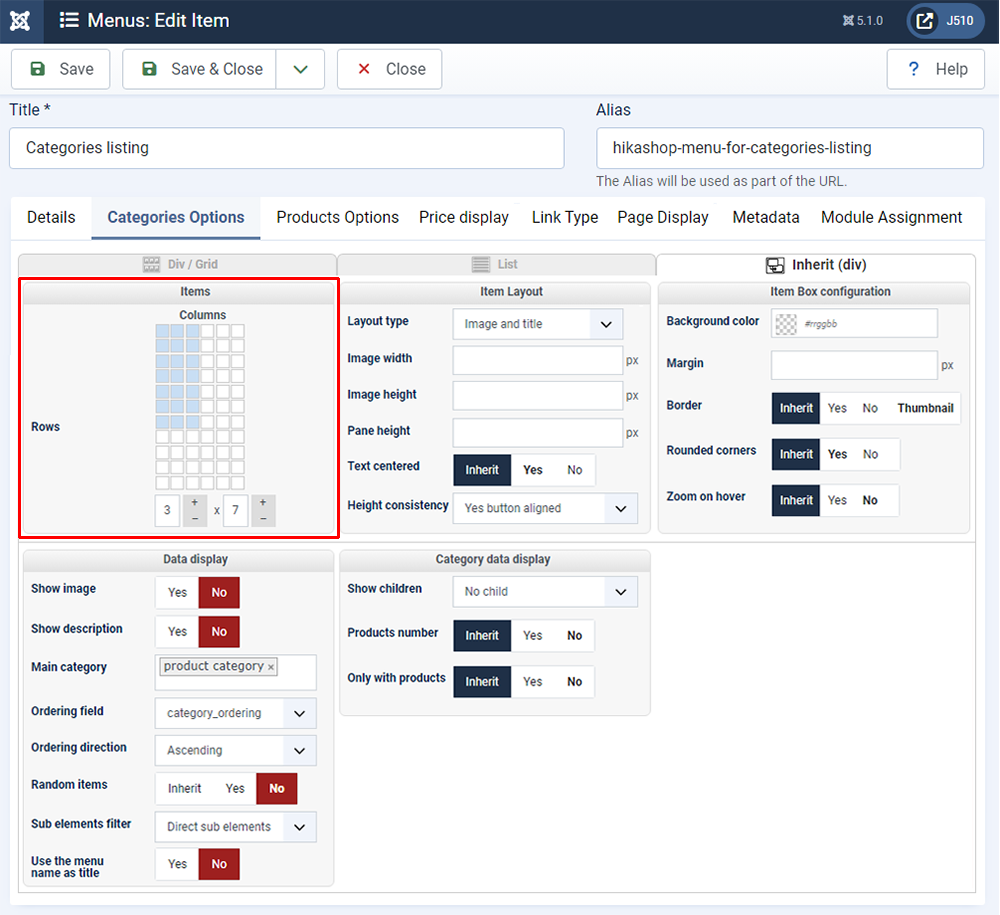
Just by clicking on this little square, like on the second picture, you will create a column type display.

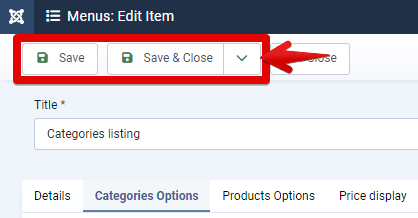
As usual, don't forget to save!
Results : In front end.
With this change in the "Items" part, your products are now displayed in column.

Let's discover other parameters and his effect :
For example to only displayed categories image (without title).
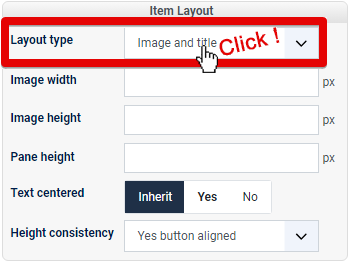
In this part : "Item Layout".
In the Item Layout part, click on "Layout type".
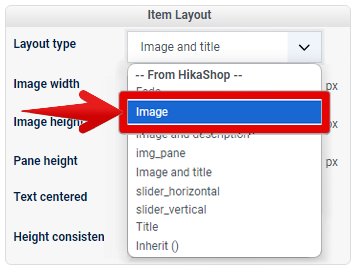
And define, on "Image" instead of "Image and title".
As usual, don't forget to save.
Results : Let's see the differences on the front end with this last change :
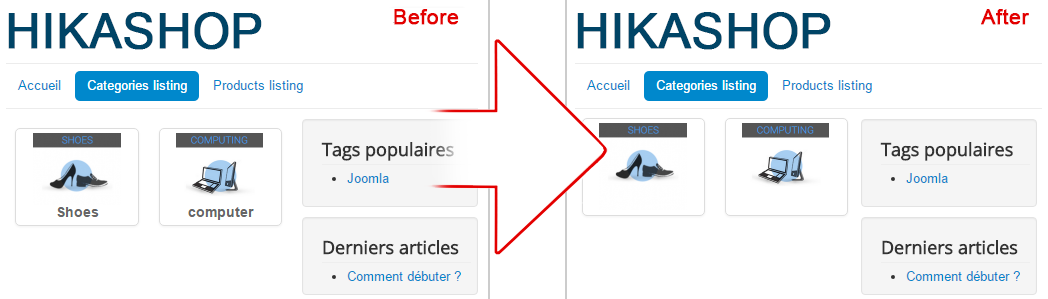
As expected, the title isn't displayed any more.
Last example with an other HikaShop default Menus item the "Products listing".
Like before, to reach Products listing options, go to "Menus" => "Menu principal".
But this time select "Products listing".
Go in "Products options".
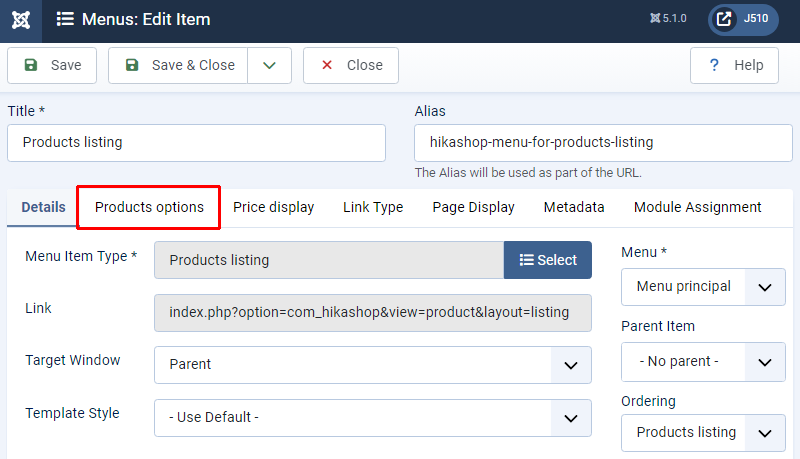
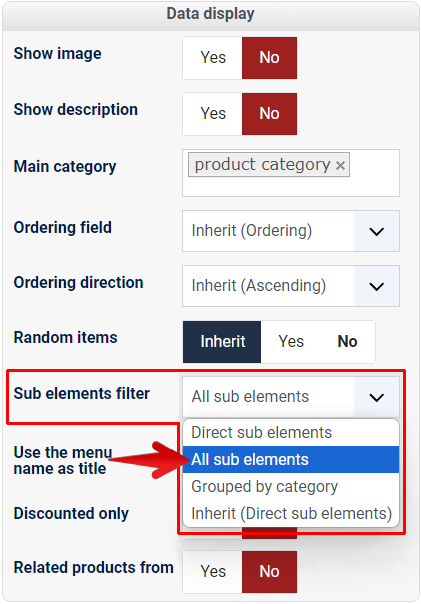
Focus on "Data display" part.
We while change, "Sub elements filter"=> "Grouped by category" .
This option define how to filter your elements (here : your products).
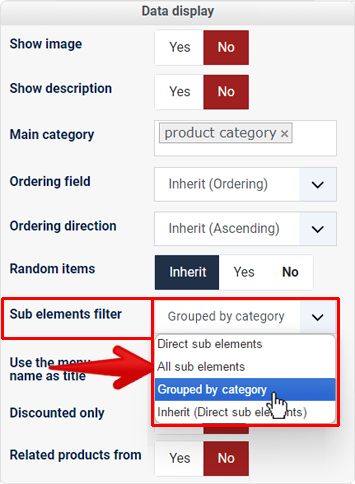
As usual, don't forget to save!
Results :
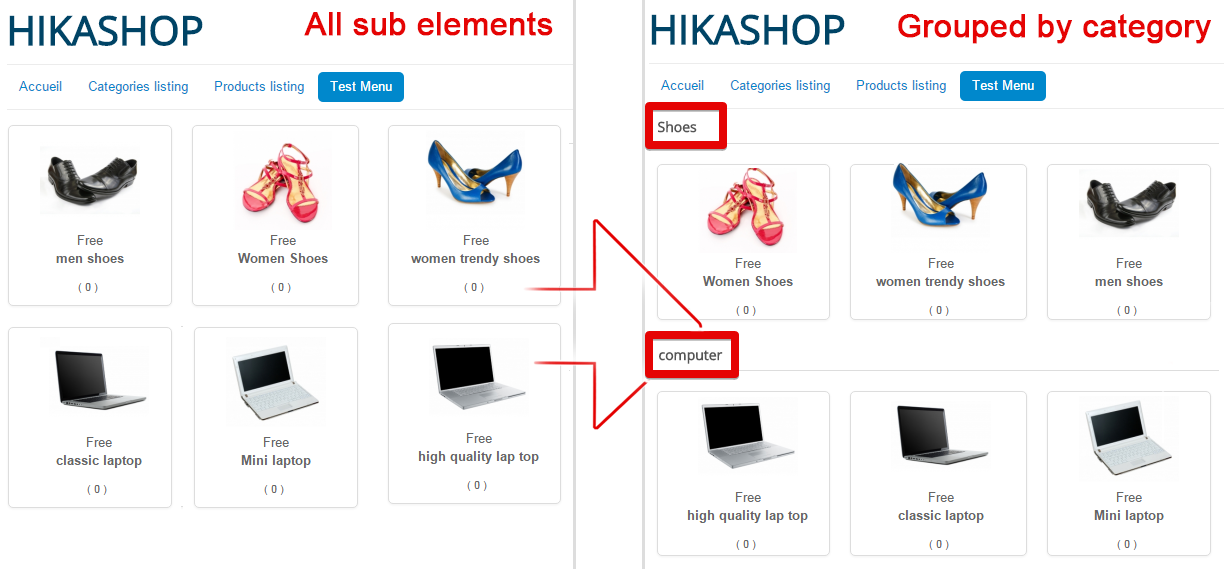
Now, your Products are displayed through their categories, and title categories is added.
Create your own menus
In this part, we will create a new Item Menu from "nothing", that will be useful if you want to create a new kind of menu, meaning different from HikaShop installed menu items.
Note : If you just need to have only classical Menu, we advice you to go, here.
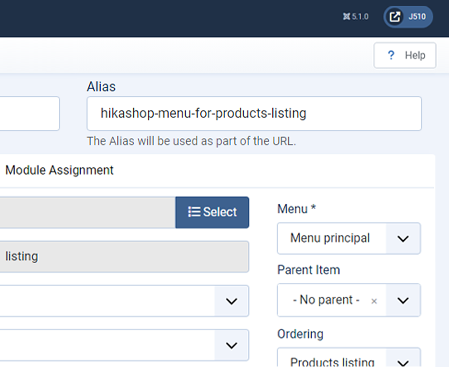
First, go to Menu Principal => Add New Menu Item.
Type your Menu Title and define your Menu Item Type by clicking on Select.
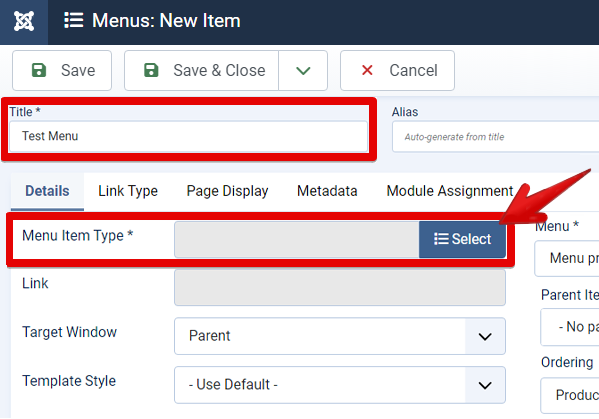
A new pop up window will be display with all your Menu Item Type grouped by different categories.
Here, for example select HikaShop categories.
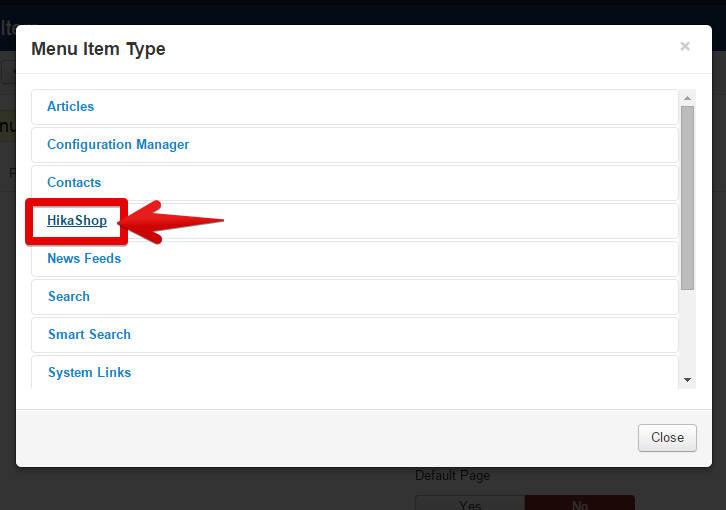
And you will see all Hikashop Menu Item Type, and so select here for example Products listing.
"Products listing"

In this case, your new item menu will display by default ALL your products.
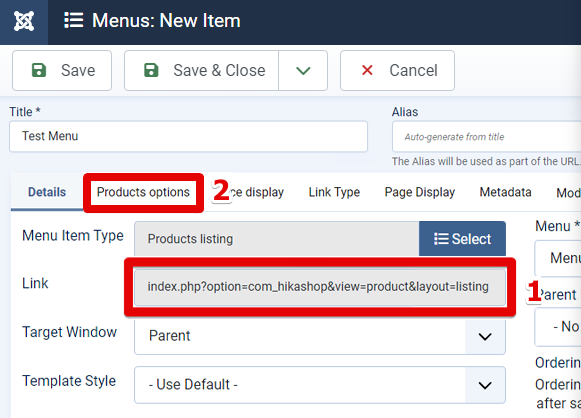
After add the Menu Item Type, you will notice that the Link will be automatically created in Link input (1).
AND new tab called "Products options" have appear after add the Menu Item Type, just beside tab "Details" (2).
Note : Don't be surprised it this configuration page is different in some.
Options aren't displayed if their is no logical link with, more precisely if you choose another a different Item Type some options won't be required.
Just below the link, an option called Target Window able you to define how the link will works.
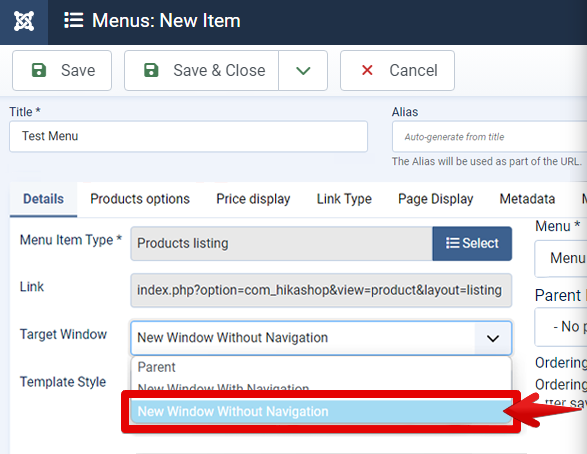
Target Window :
- Parent : To display in the same navigator window.
- New window with navigation : To display in an other navigator window AND with Navigation.
- New window without navigation : To display in an other navigator window AND without Navigation.
And Template Style which allow you to define, maybe a different template just for this page.
Now, click on "Products options".
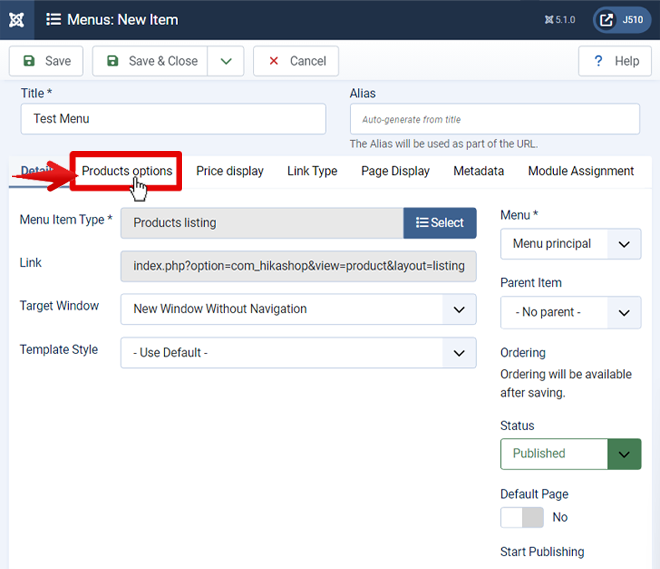
You will see your Item Menu HikaShop options.
Note : You can learn a lot more about all these options here
Focus on "Data display" part.
We while change, "Sub elements filter"=> "All sub elements" .
As usual, don't forget to save!
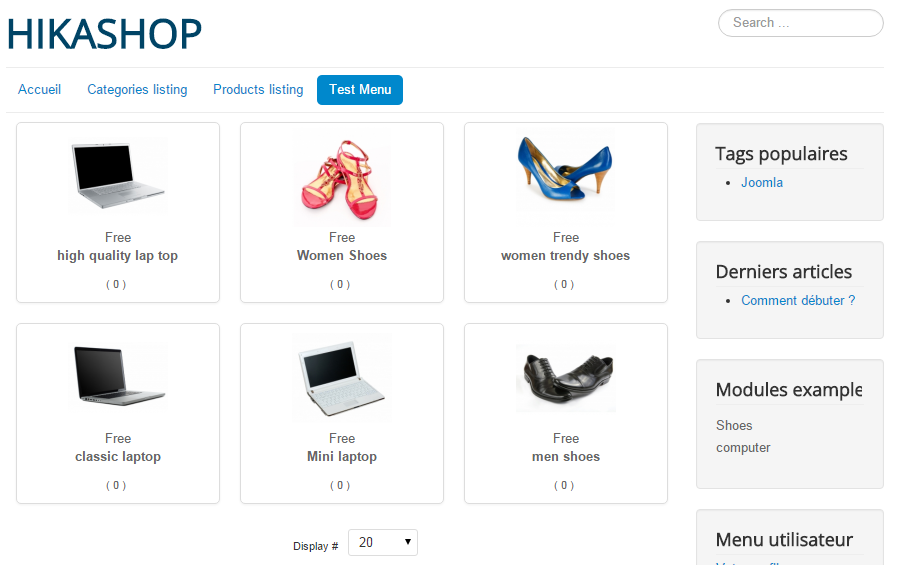
Results : Like expected all your products is display after clicking on your new menu item, here "Test Menu".
Maybe, you have already understand than like this you can create almost everything, let's make an other quick example for create a customer account page :
Go to Menu Principal => Add New Menu Item.
Define your title, for thios example : Your account, and choose your "Menu Item Type".
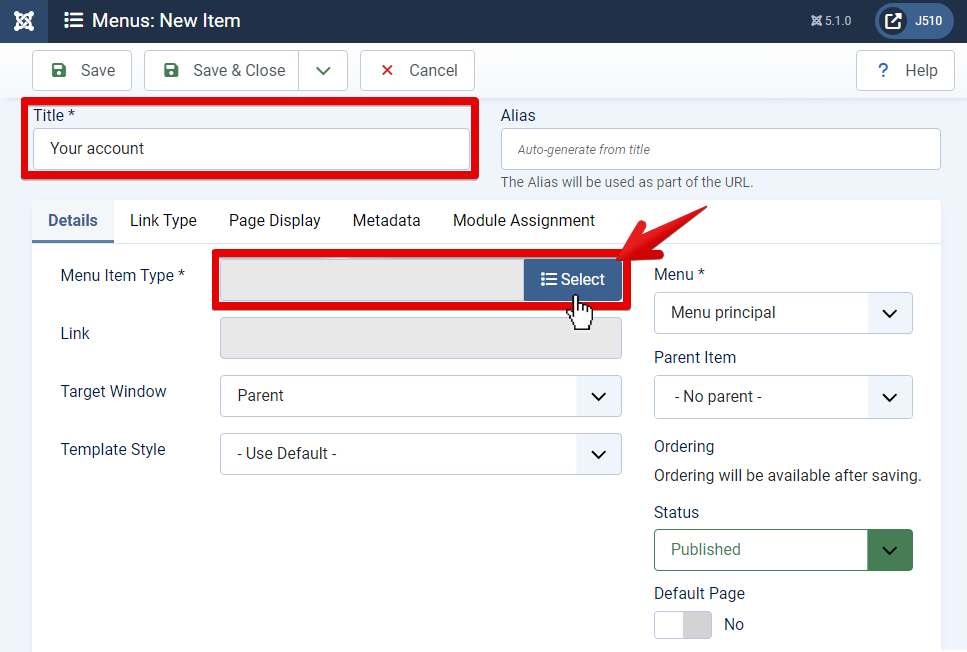
And select "Registration form".
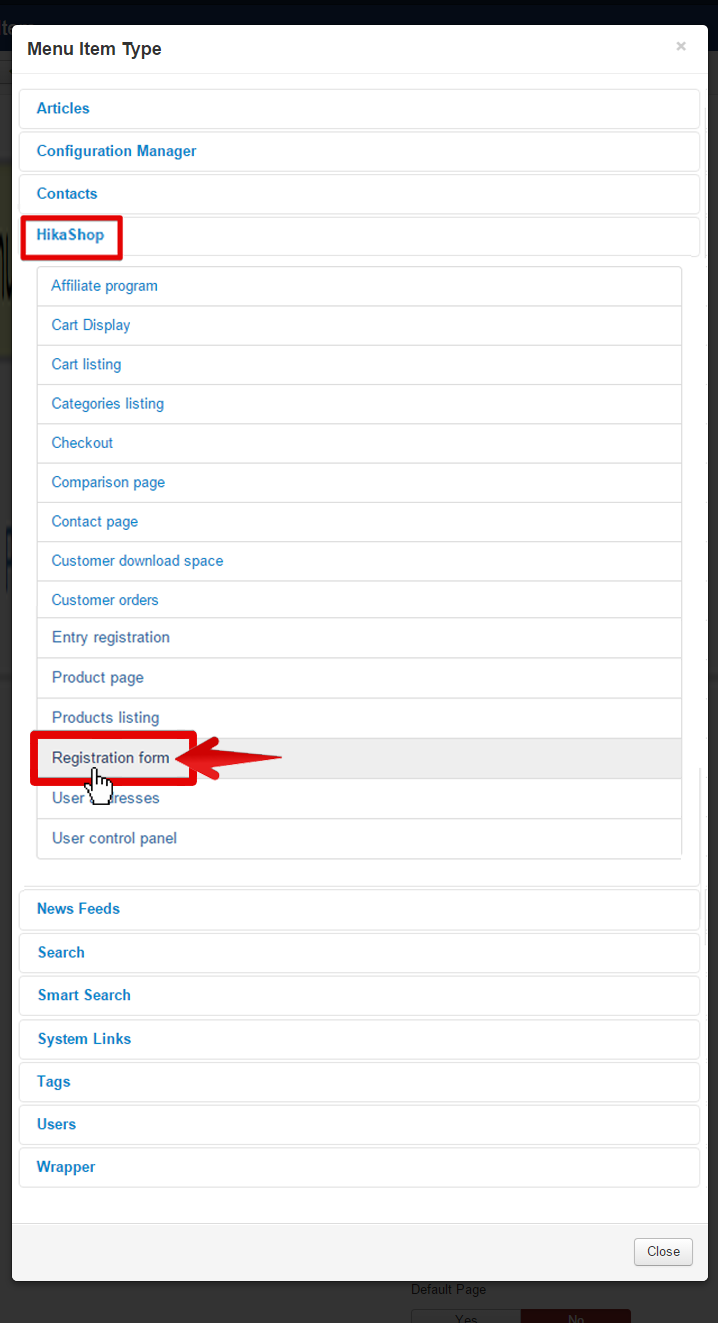
As usual, don't forget to save!
View of this page on the front end : Your user can now manage their own account just by clicking on "Your account".

Menus options Index
Note guide :
Button and Inherit :
Here, you have a button switched on "Inherit", and you can note that, here the "Yes" button is darker grey than "No" one.

It means is that the "Add to cart" parameter inherit the "Yes" value from your HikaShop configuration's default setting.
That wya, you can configure your listings differently for different categories by creating different menu items for each and configuring them differently than the default settings.
Namebox system :
The aim is to pick among different elements maybe grouped by categories, and so link or to define, which Category listing, which Products listing, or Brand listing etc etc will be selected.
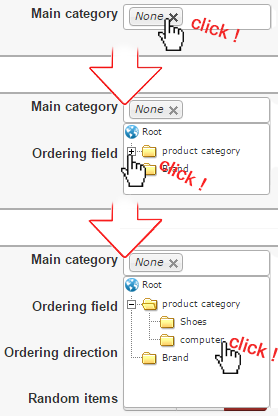
Here, in this example, we select IN the product category the computer product category.
Item Menu Tabs :
We will start from this page, it's the first you see when you reach Menu options.
You can see here, different tab to navigate through different options, and so just click to access all menu options.

Note : Take care about one point, these tab pages collect parameters from Joomla! and so you can learn all about these options by reaching Joomla! help like this :
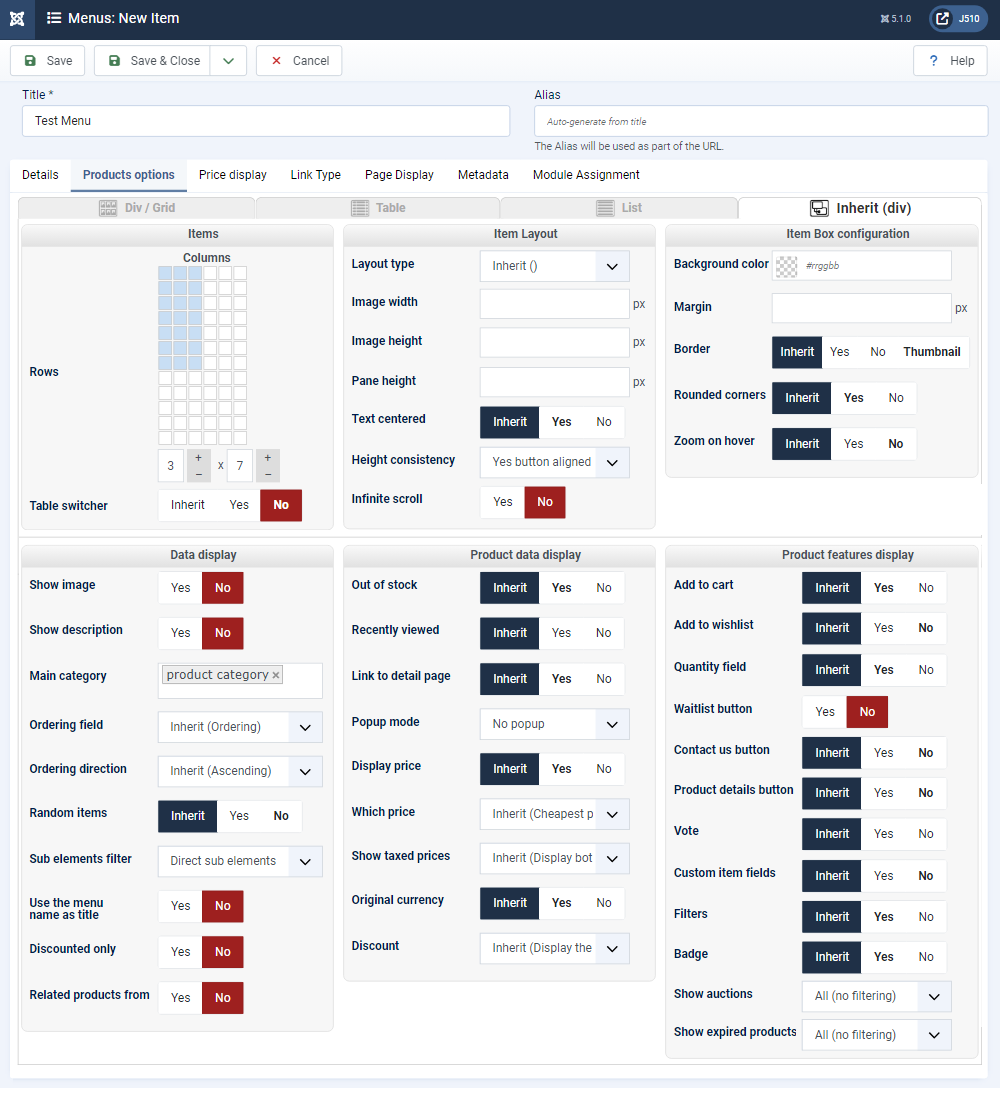
Zoom on Products options tab
Let's talk about the Products options, these option is reach by clicking on this tab.
New tabs will be displayed just below the next one.
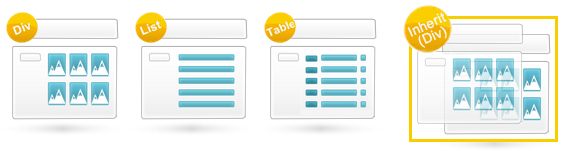
These tabs enable you to select between the different display modes.

Note : The Products options screen is dynamic and options will be displayed/hidden based on other selected options so that only the relevant ones are displayed to you.
This preview below shows the different views for "Div", "Table" and "ListdfltMenu7".
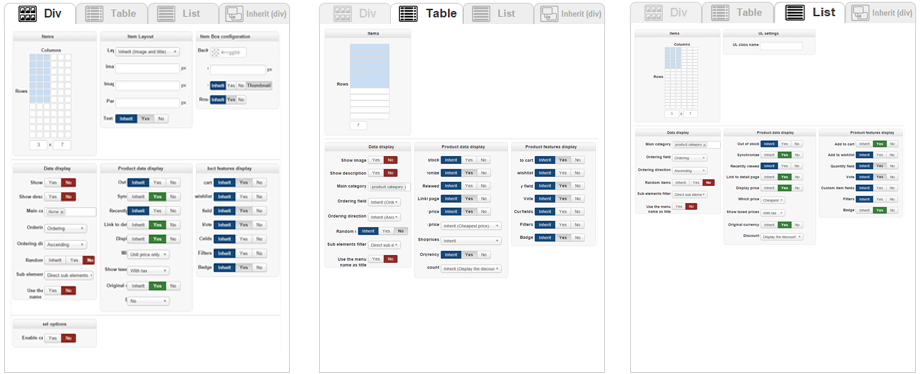
Products option tab
Here, you will find options that enable you to define the way your products are displayed in your Item Menu listing.
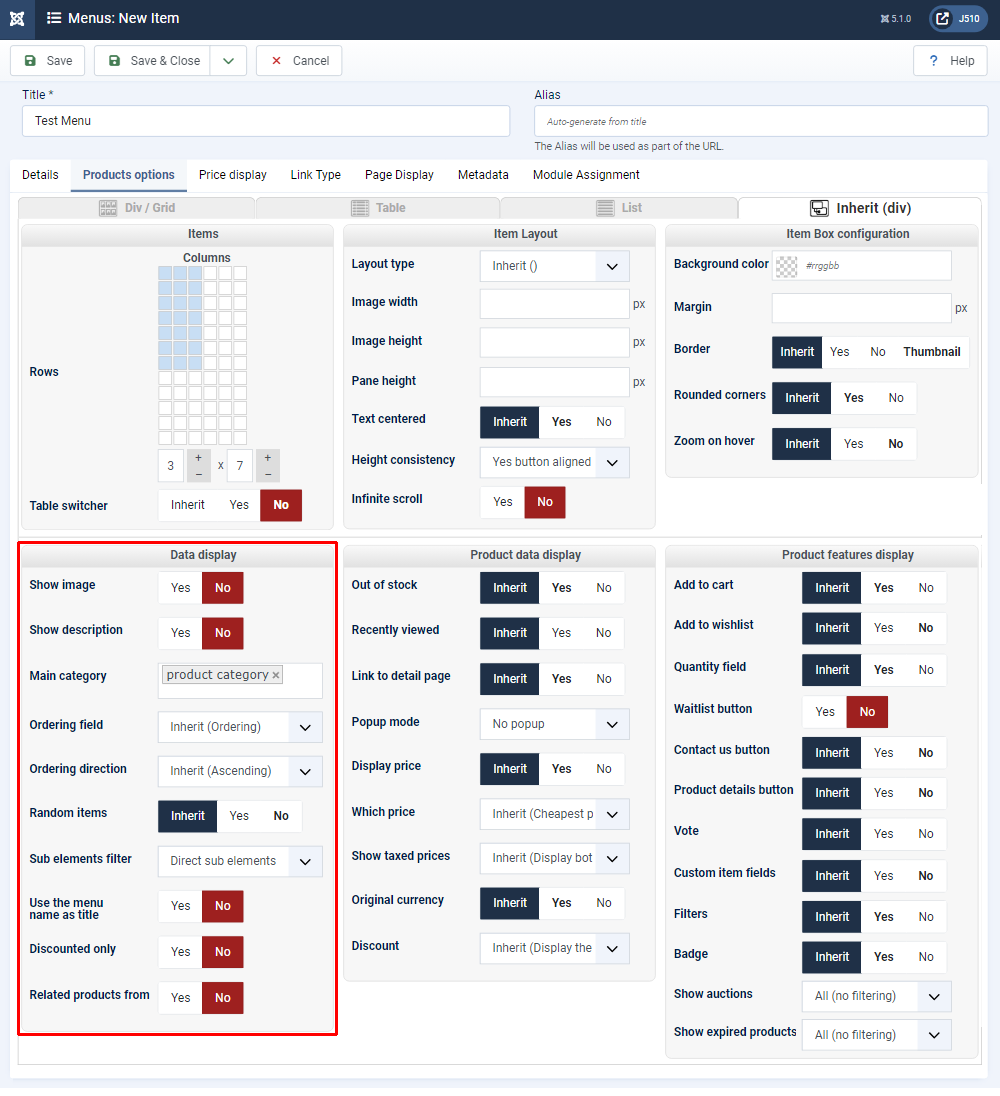
This page is organized with several parts :
- Items
- Item Layout
- Item Box configuration
- Data display
- Product data display
- Product features display
Items
The Items part is different based on whether you selected "Div", "Table" or "List".
Note : Inherit, take parameters from an higher hierarchy and send this parameters in sub element.
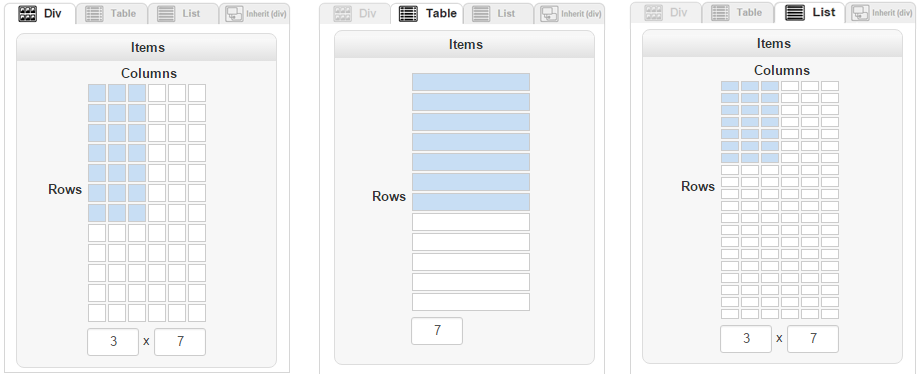
This can be configure just by clicking on it to define the way to display the menu, let's make an example with the Div version.
Just by clicking on this little square, like on the second picture, you will create a column type display.
As usual, don't forget to save!
UL settings
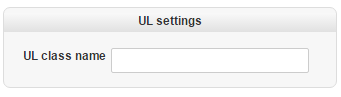
- UL class name :
Type here your UL class you want add to your listing.
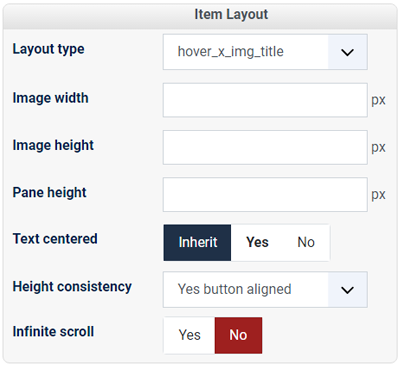
Item Layout
- Layout type : Choose among different options, the way to display the different information of each element and which information will be displayed. You wil find options like, Image, Image and title, Image and description etc...
- Image width : Define the image width by typing directly a number only, please note that this dimension use the pixel unit.
- Image height : Same idea than above but for your image height.
- Pane height : Set here the height of the overflowing panel with the product name/price which you're using the "pane" layout type.
- Text centered : Set it to yes if you want the text inside each item box to be centered.
Item Box configuration :
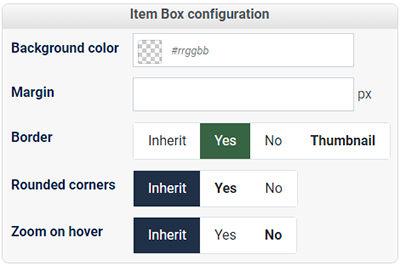
- Background color : The color of the background of each item box.
- Margin : The margin of the each item box.
- Border : Display or not a border around your item. The thumbnail option will use the "thumbnails" system of bootstrap in order to add the borders.
- Rounded corners : Set it to yes if you want each item box to have rounded corners. With the thumbnail borders, the corners and always rounded regardless of what you put here.
Data display
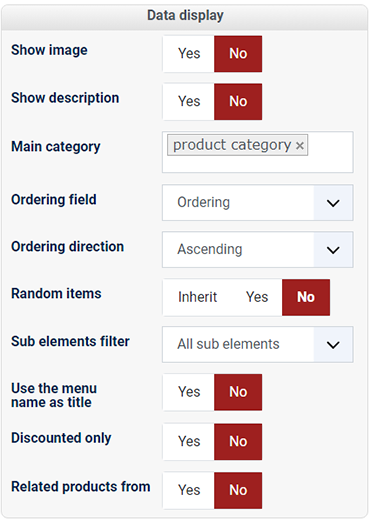
- Show image : Show the image of the main category at the top of the listing.
- Show description : Show the description of the main category at the top of the listing.
-
Main category : Use this field to select which product category will be used in your menu item. The elements displayed in it will be the children of that category.

- Ordering field : You can select a field on which the products will be ordered. By default, the products will be ordered using the ordering field which enables you to set a specific order of display between all the products directly linked to a category. You can configure that ordering by changing the "all sub elmenets" dropdown of the products listing to "direct sub elements" and then use the input box of each product on the listing to change the ordering of the products.
- Ordering direction : You can set a direction for the ordering. For example, if you are loading categories based on their category_created column, if you set the direction to ascending, you will get the products created first to be displayed first in the listing, whereas if you set the direction to descending, you will get the latest products displayed first.
- Random items : If you want, you can have your products randomly selected among all the products. That is useful when you have more items possible than what you are displaying. This will first fetch all the ids of the possible products, select randomly some ids based on the number of items to be displayed, and then retrieve their full data.
- Sub elements filter : For categories, you can choose to only display direct sub categories of the current category or all sub categories regardless of their depth. For products, you choose to only display products in the current category or in all the sub categories of the current category regardless of their depth.
- Use the menu name as title : Set it to yes if you want use menu name as title of the pages of the listing. Otherwise, it will use the name of the main category as title.
Product data display
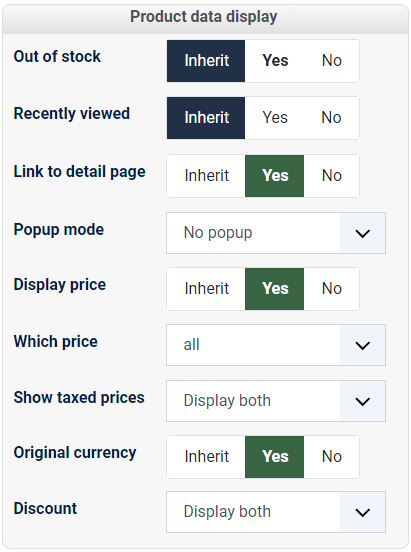
- Out of stock : Select "Yes" if you want display the products with a stock/quantity of 0 on your Menu Item.
- Recently viewed : For product listings, this option will make it so that only the products that you already saw recently will be displayed. In most case, you want to keep that option turned off.
- Link to detail page : If activated, each element of the listing will be clikable so that you can access its own page.
- Display price : You can (de)activate the display of the prices alltogether on the listing with that option.
- Which price : When you have several prices in the same currency for the same product, the system needs to decide what to display. That will be the case for prices based on the quantity. Show you will either be able to display the lowest of all the prices, or display the price for buying only one item, or the lowest and highest prices as a range of prices.
- Show taxed prices : This option enables you to display either the prices without taxes, or the prices with taxes, or both.
- Original currency : Based on how you configured your store, HikaShop might have to convert prices dynamically between the different currencies. When doing so, it can add the display of the original price next to the converted price.
- Discount : You can either display the prices with the discounts applied, with either, the dicount amount or the price before the discount crossed.
Product features display
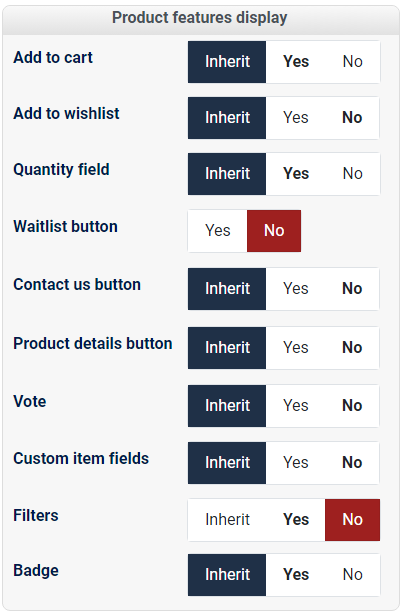
- Add to cart : Enable or disable the add to cart button for the products of this listing.
- Add to wishlist : Enable or disable the add to wishlist button for the products of this listing.
- Quantity field : Display or not the quantity input box next to the add to cart buttons.
- Vote : Enable or disable the votes for the products displayed on this listing.
- Custom item fields : Choose if you want to display or not the item custom fields on the listing. If the option is turned off and the product has custom item fields configured for it, the add to cart button will be replaced by a "choose options" button in order to access the product page.
- Filters : Display or not the filters at the top of the page. Filters can also be displayed with a HikaShop Filters module that you can configure via the Joomla modules manager.
- Badge : Display or not the badges on the images of your product elements.
Carousel options & Additional carousel options
Note : Be aware that the carousel is only available on HikaShop Business.
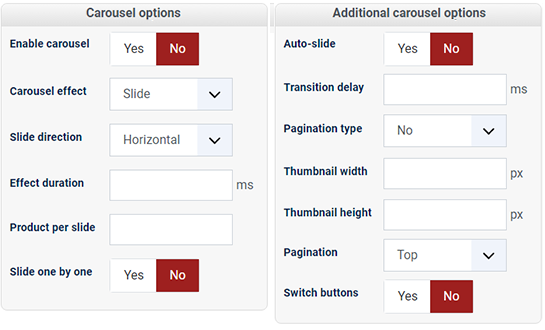
Carousel options :
You can learn a lot about this HikaShop feature on our demo website.
Note : Please, beware that right now the HikaShop carousel isn't responsive.
Modules Options
HikaShop and Joomla! default modules
Like HikaShop default menus and menus items, Joomla! has its own default modules, plus when you install HikaShop some HikaShop default modules are created.
To reach them, go to "Extension" => "Modules" .
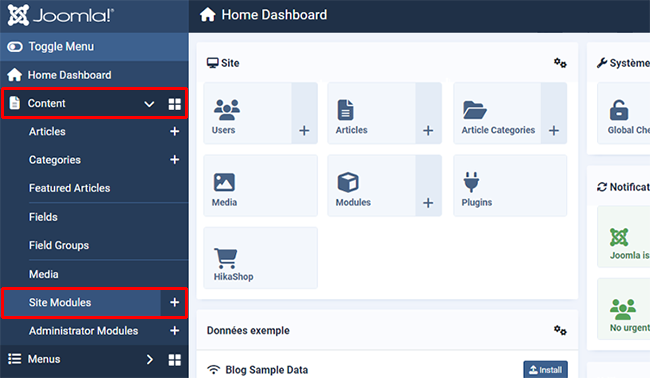
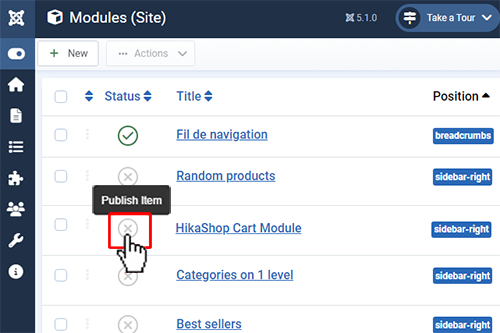
Now, you can see all modules, published and unpublished.
Note : Here, you will find different module types, some from Joomla! and other from HikaShop. And so, to understand how each module belongs to Joomla! or Hikashop, juste havea look on "Type" column.
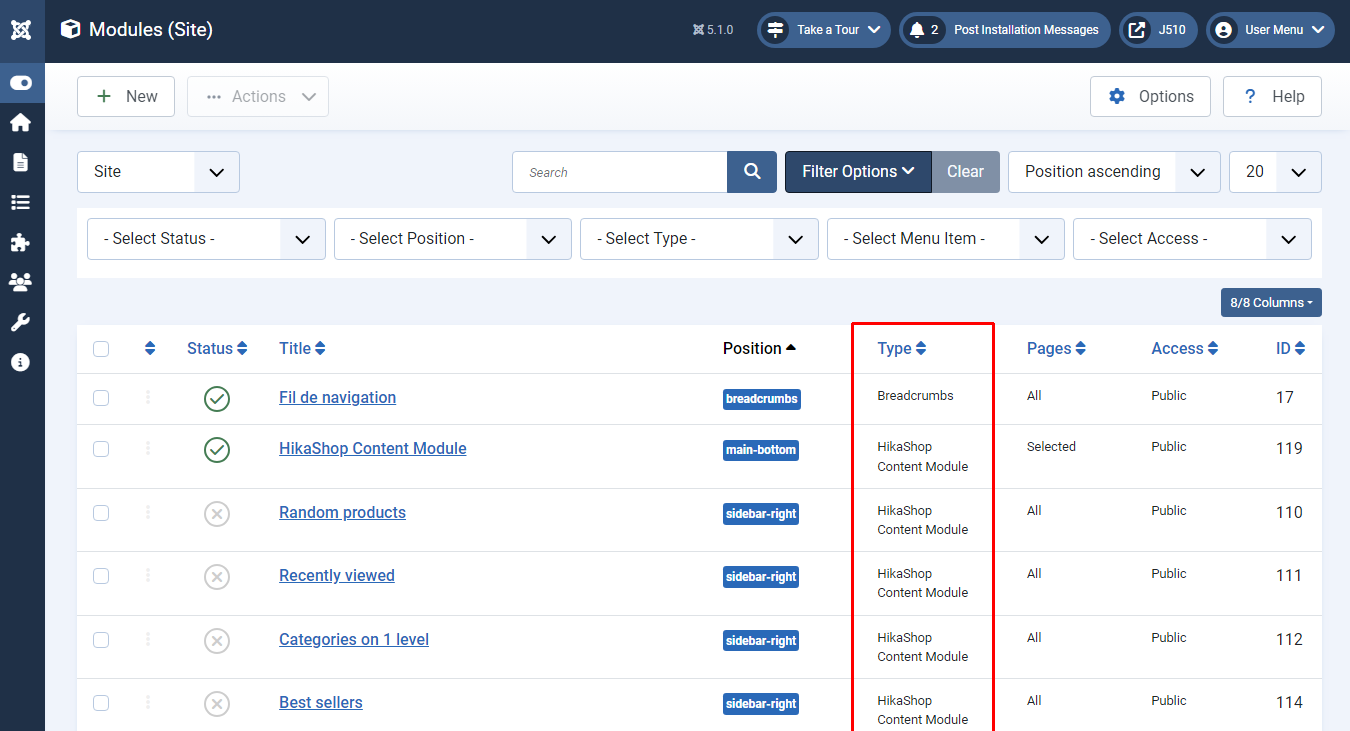
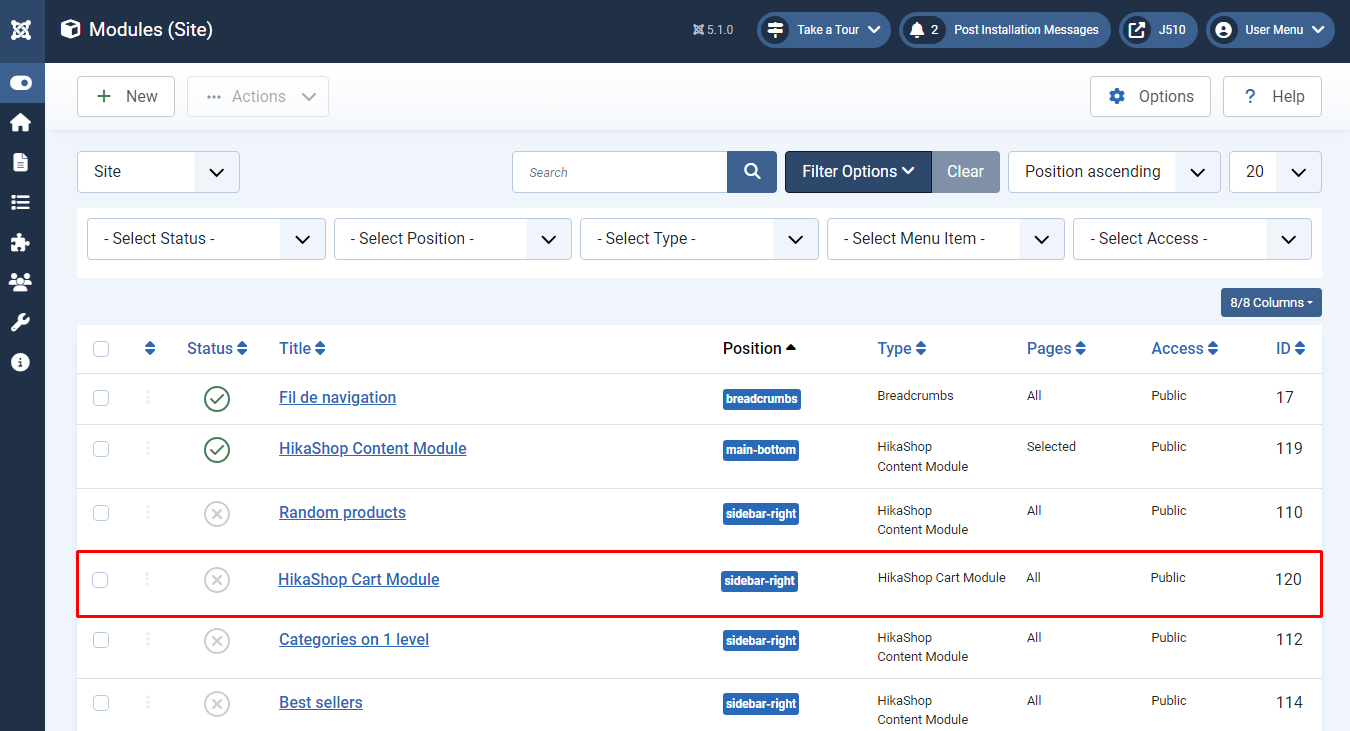
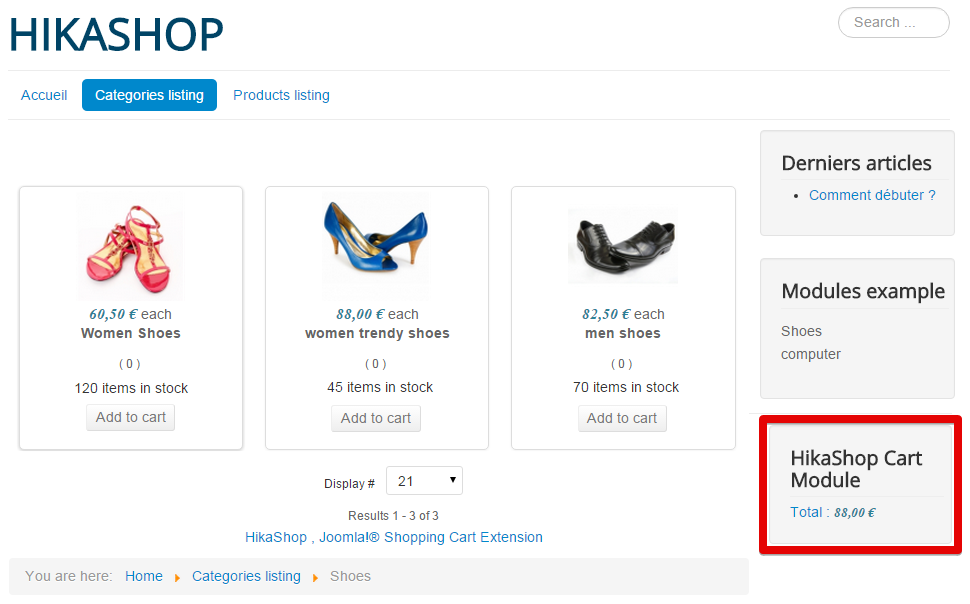
We will discover a classic example of an HikaShop default module : the HikaShop Cart Module, so first, look for it in the modules listing and click on it.
Published it.
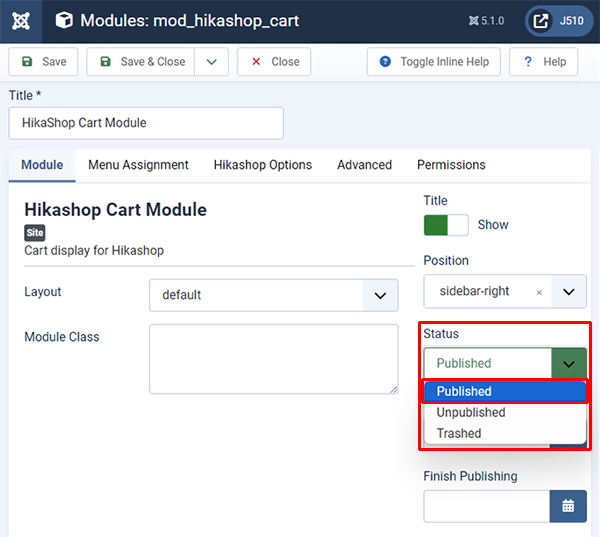
And save.

Note : You can directly publish modules by clicking here :
And now, go to the front end to see your cart module.
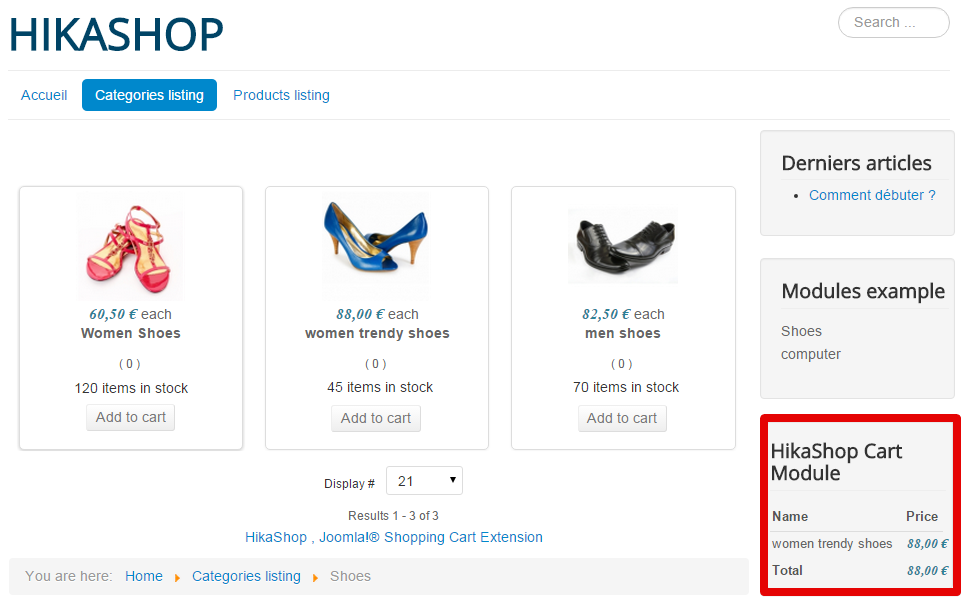
And now, you have a Cart module displayed on the side of the website.
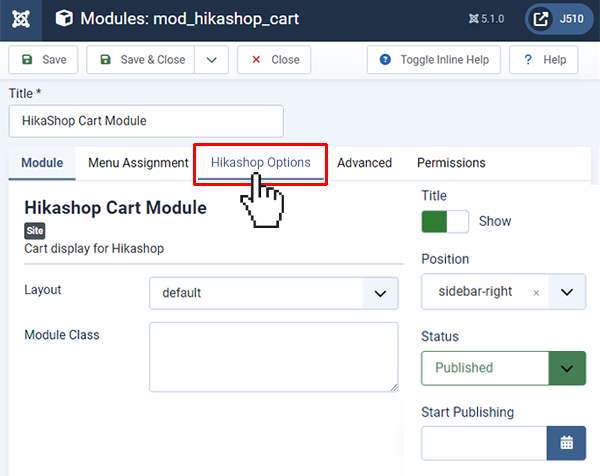
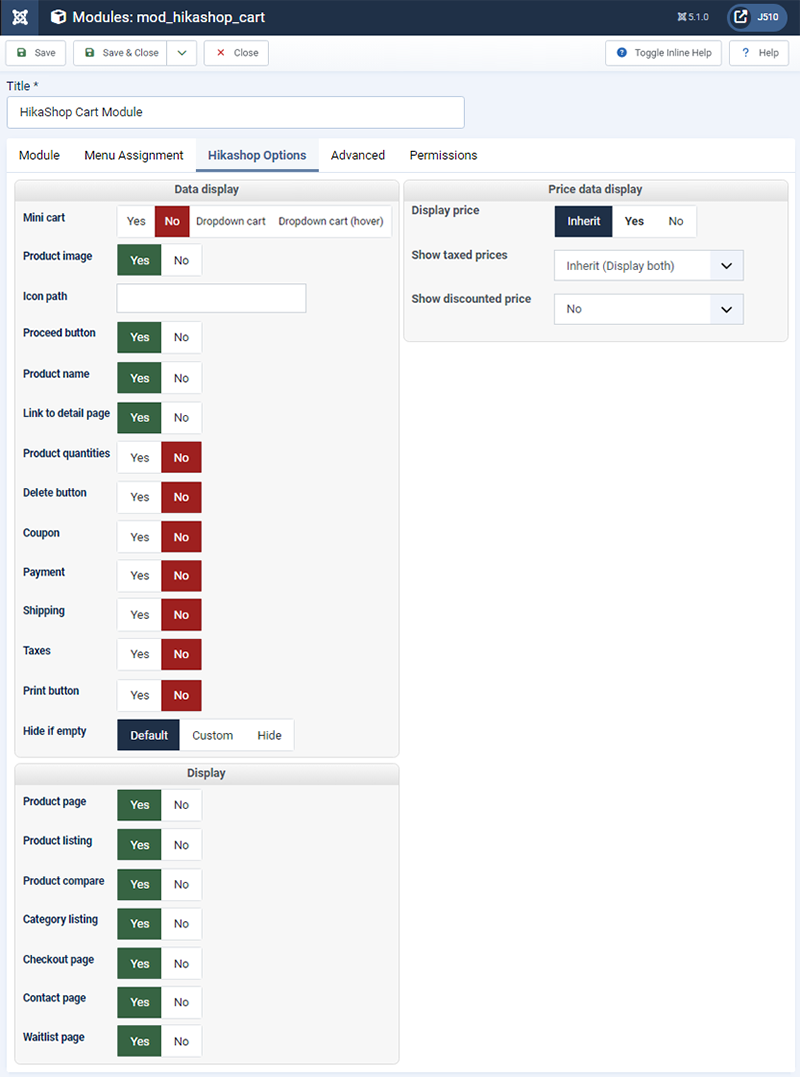
We will discover some parameters of the HikaShop Cart Module.
For this, click on "Hikashop Options" tab.
We will add some elements to your cart module.
1 : click "Yes" to "Proceed button" and 2 : click "Yes" on "Delete button".
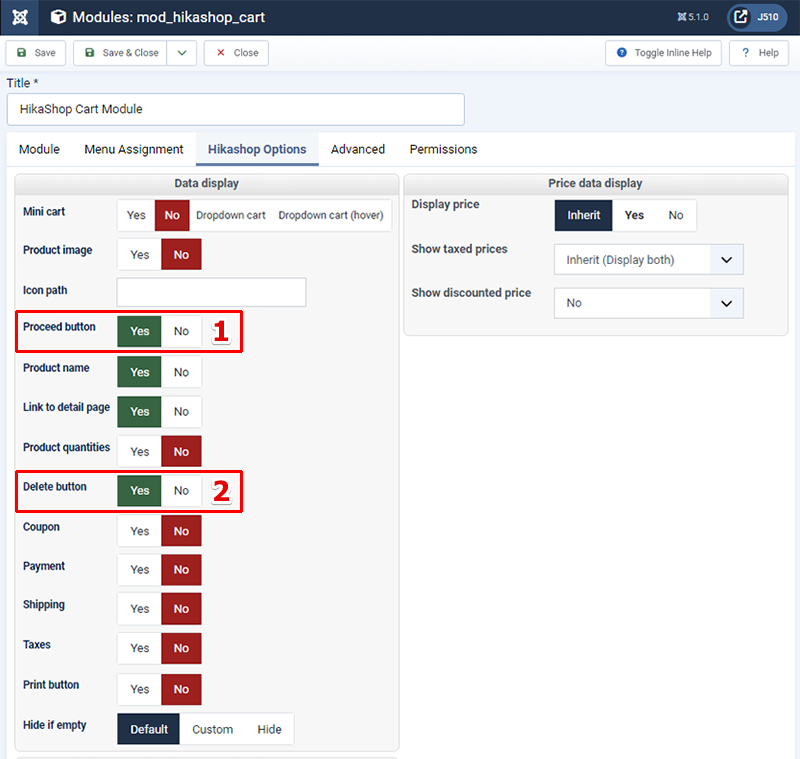
As always, don't forget to save!
Result on the front end :
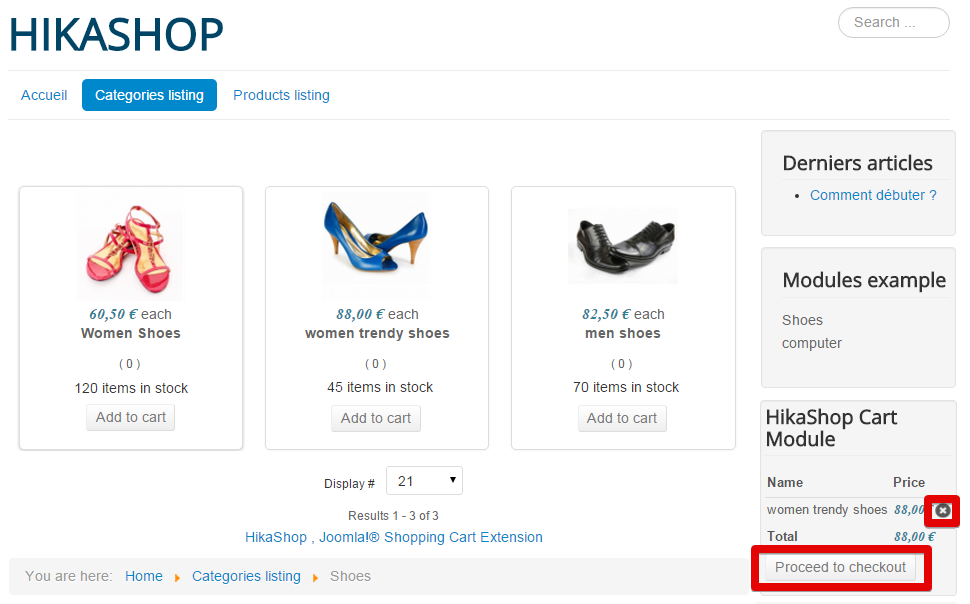
Two buttons are now added, one to delete directly a product from the cart, and the other to proceed to the checkout.
Let's see an other kind of effect to apply on your cart module.
Note : Please beware than we reset previous settings. Here, we start from the default parameters.
Go on "Mini cart" and click on "Yes" and save.
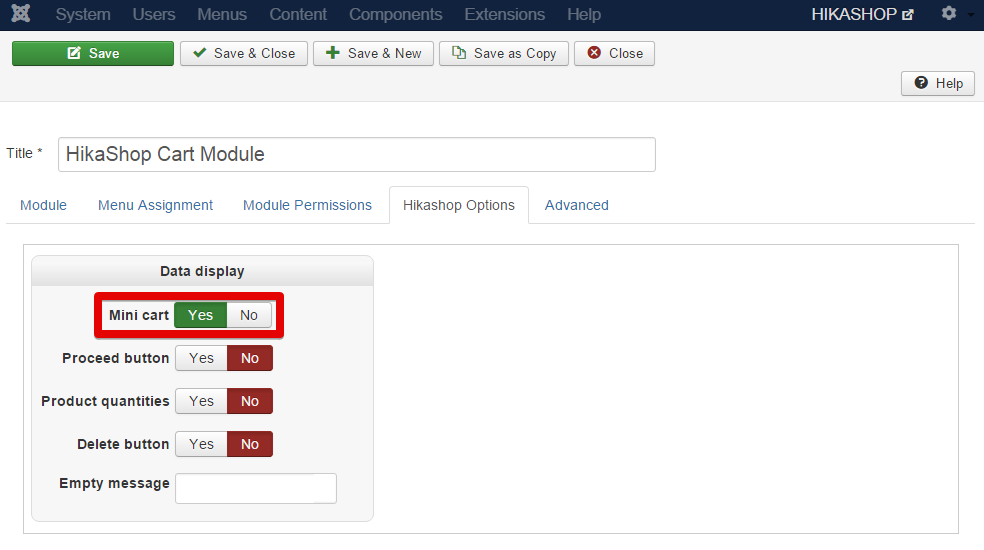
Note : When you click on "Yes" , you'll see many options disappear as they are not relevant to the mini cart mode.
Before :
After :
Create your own modules
Here, we will create our own module :
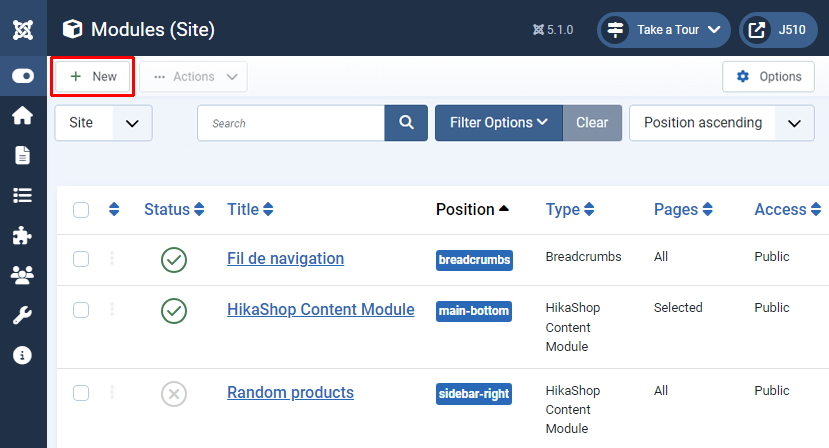
Go to "Extension" => "Modules" .
Now, to create a new module click on "New".
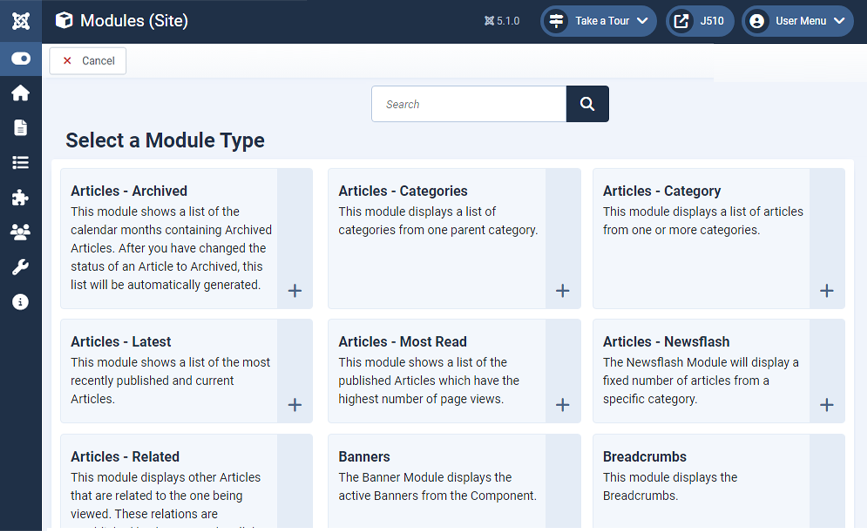
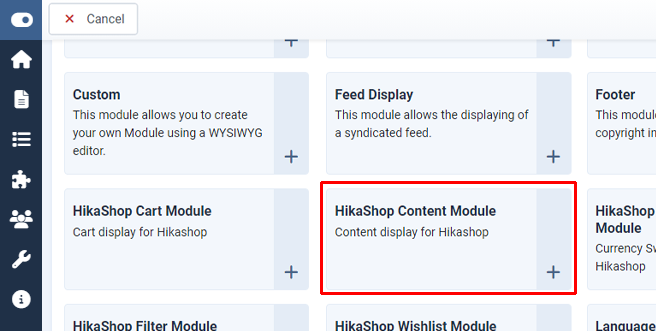
You will see all the possible Module Types, and so, for this example, we will create a module to display the products from a "best sales" category.
So, select for this purpose "HikaShop Content Module".
You then reach a settings page to configure your new module.
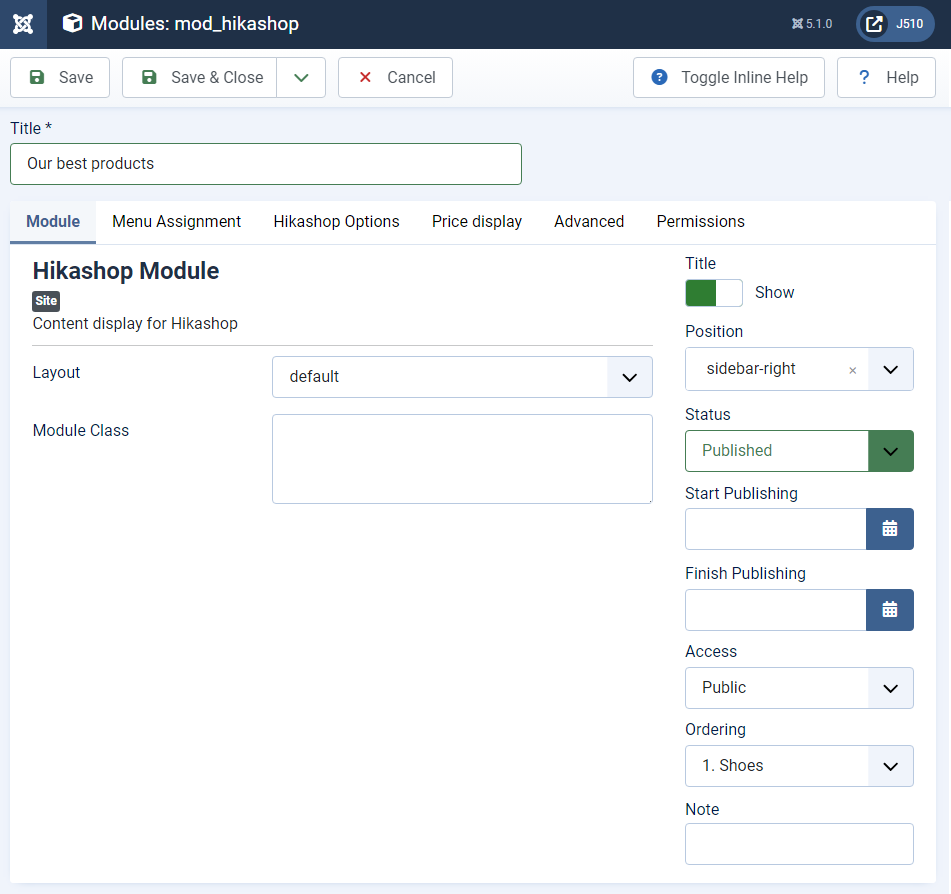
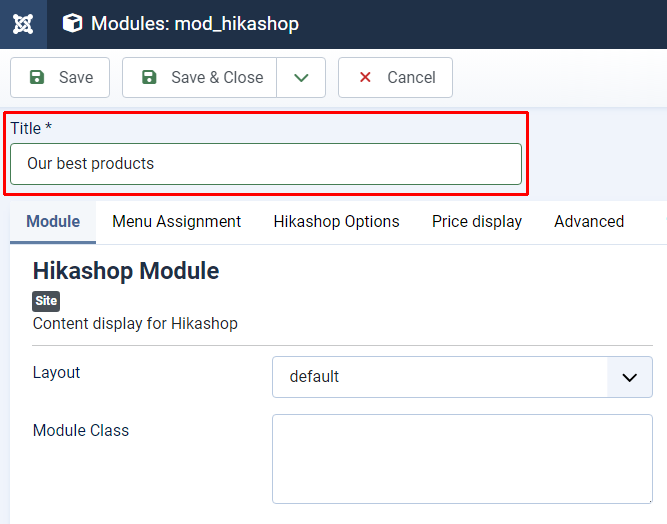
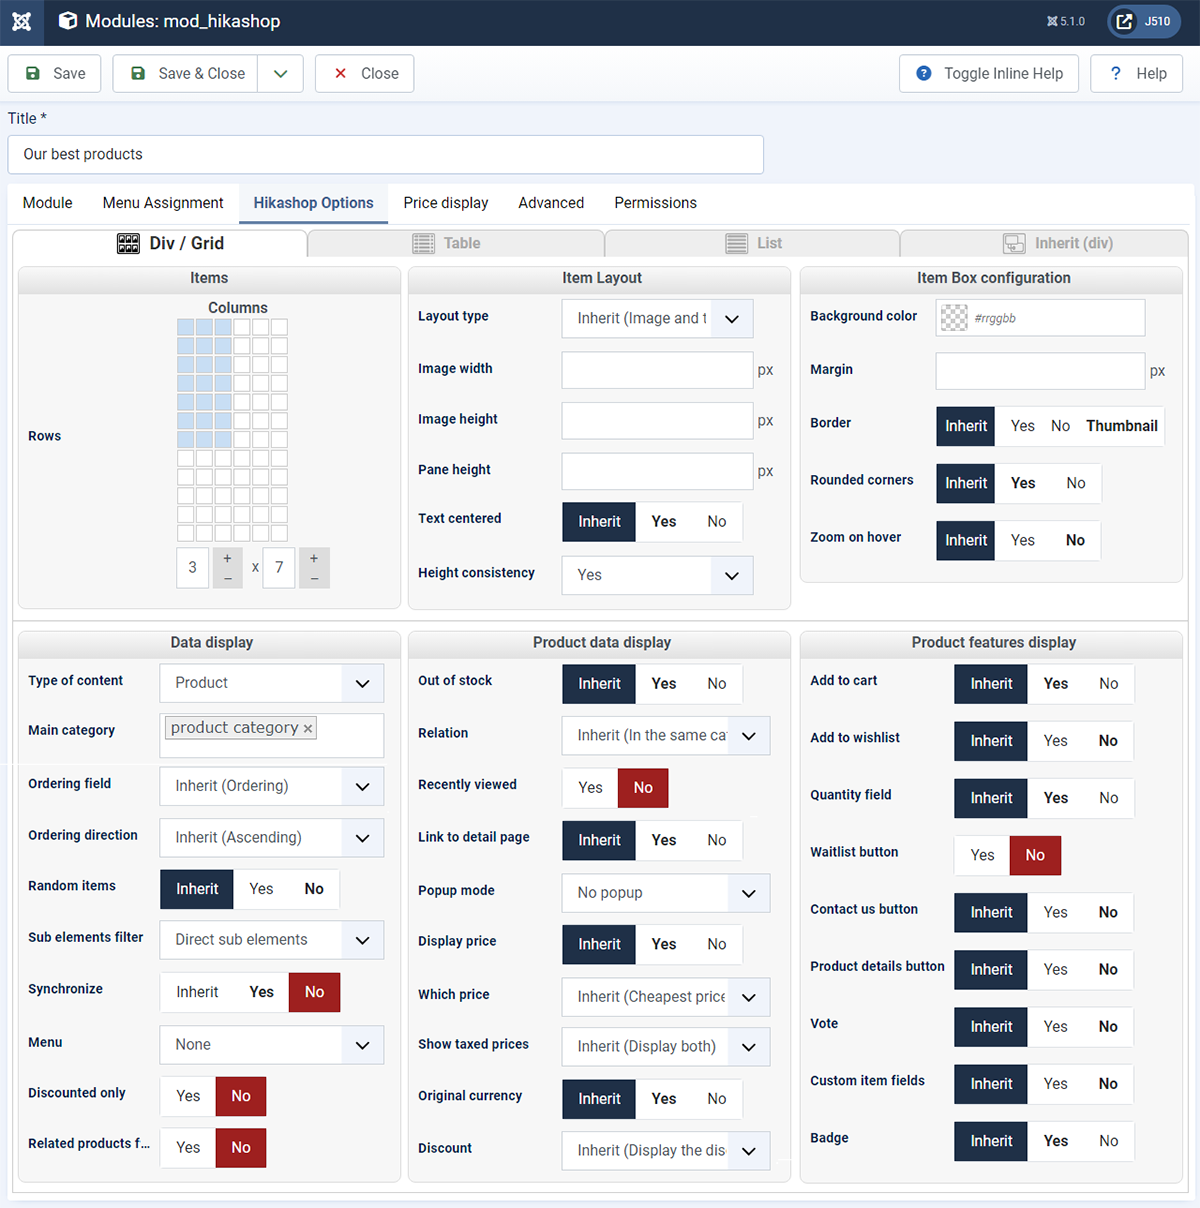
Let's start by enter a name for your new module like in our example : "Our best products".
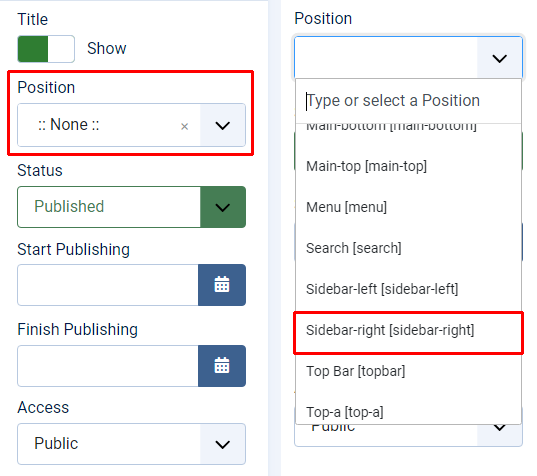
Here, we define the position on the front end right side (poistion-7).
Now, we will select the content to display in this new module, so click on "HikaShop Options".
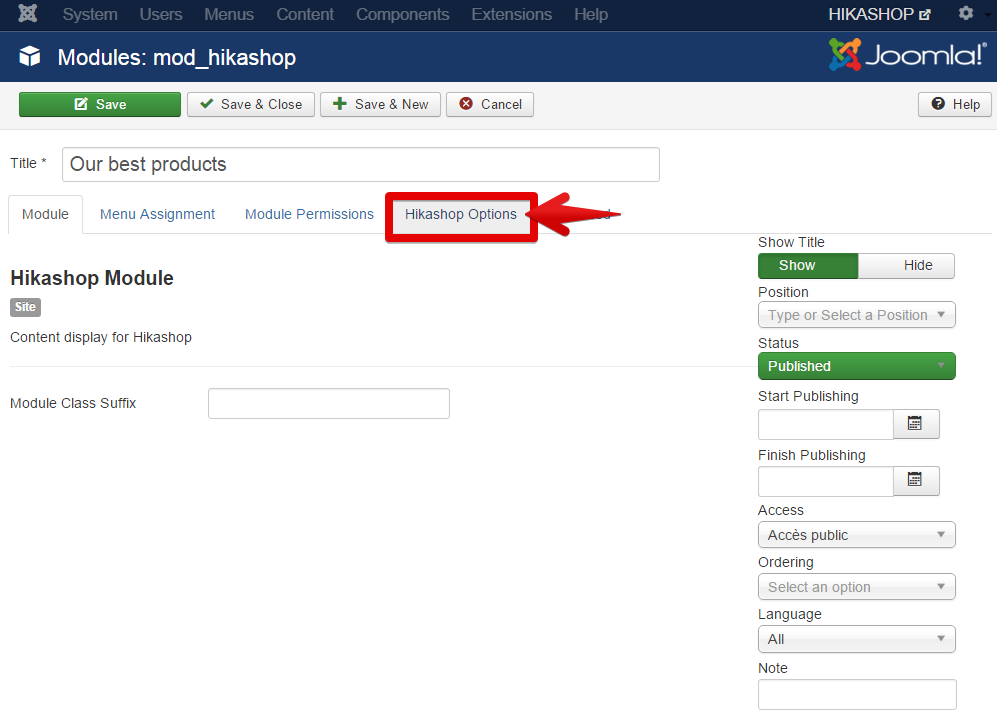
You will reach a page that will allow you to define how display your content module.
Note : Most of the parameters there are similar to the products/categories listing menu items.
To learn more about these parameters here.
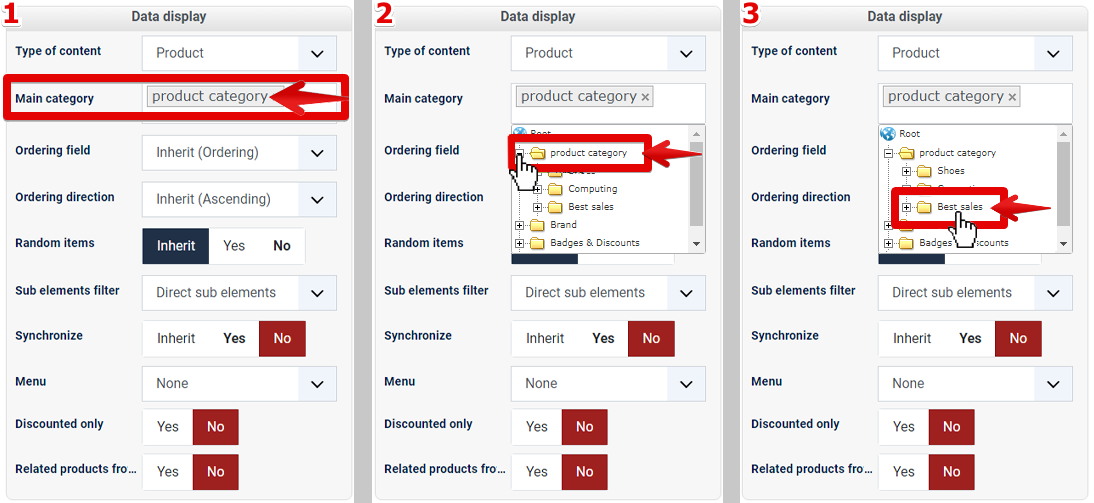
First, in "Data Display" => "Main category" click to define the category to display, here "best sales".
And in the Items part, change the way the products will be displayed on the module.

And Save all your settings.
Result on the front end :

Let's go further and let's display only the products image. Go in the Item Layout part, and change the Layout type to Image.
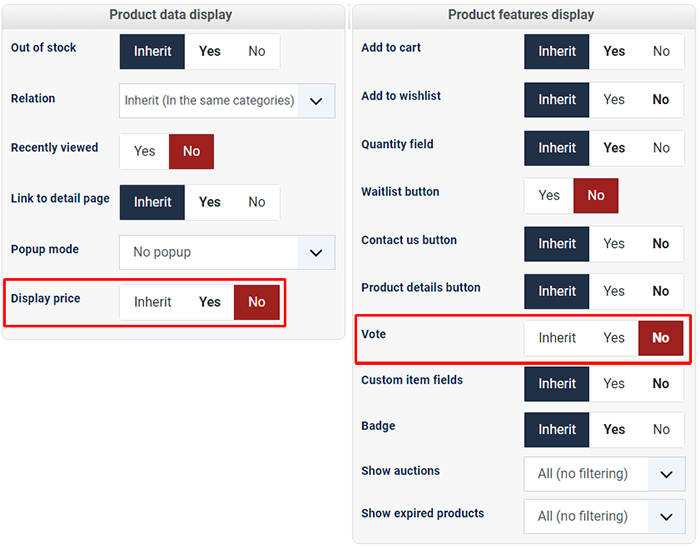
After, go in the "Product data display" part and in the Product features display" part, change following parameters :
- In the "Product data display" part, switch "Display price" to "No".
- And in the "Product features display" part, switch "Vote" to "No".
As usual, save all your settings.
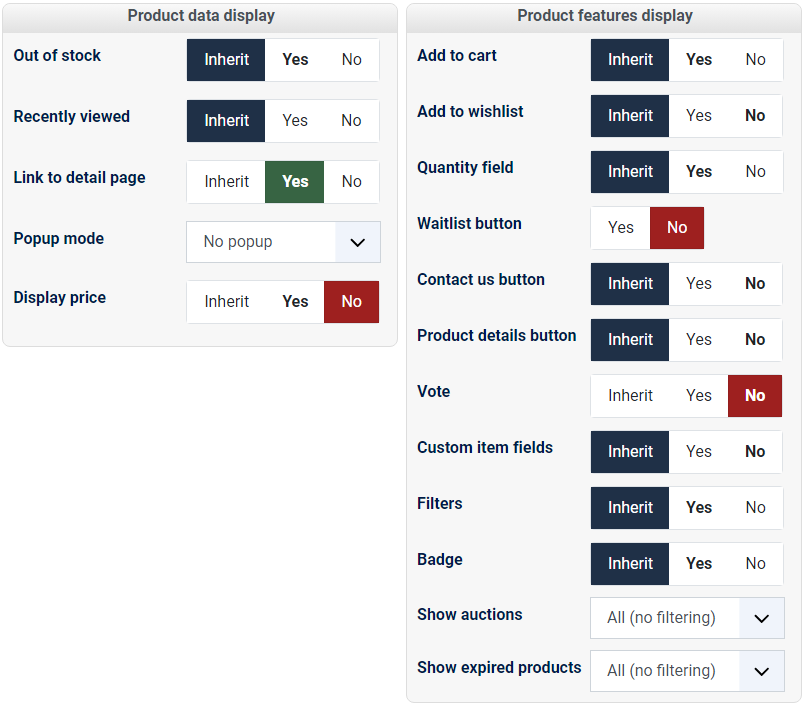
Result:
There are no more title, price or vote stars, only the image remains for each product.
Modules options Index
The modules options are roughly the same as the options for the menu items so we invite you to check the Menus options Index section.
Price display in Menus and Modules
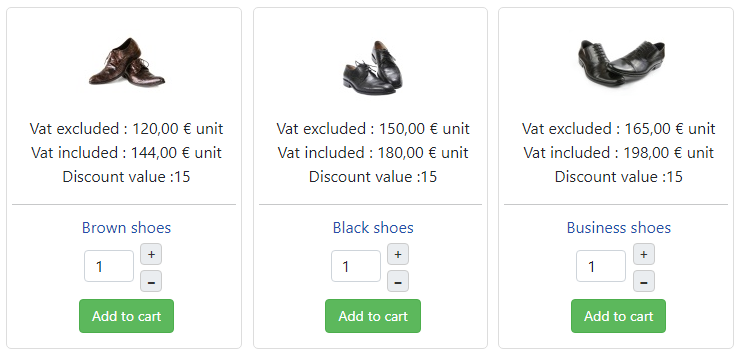
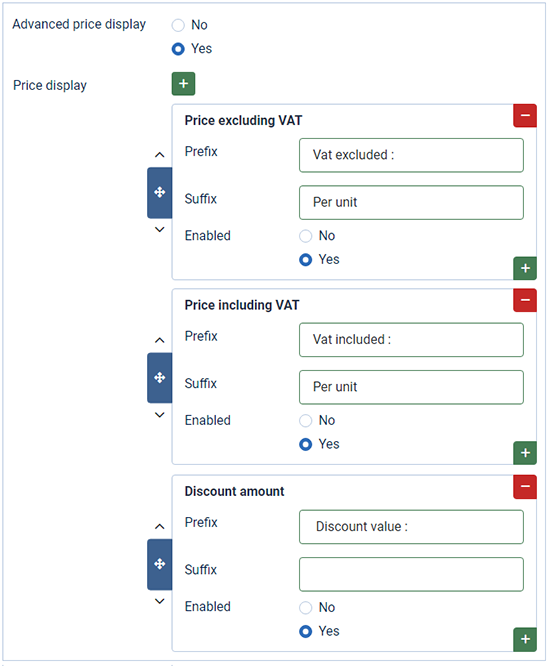
Starting with HikaShop 5.1.1, you will be able to find a new "Display price" tab which allows you to go very far in the display options for the prices of your products in your item menus & your modules.
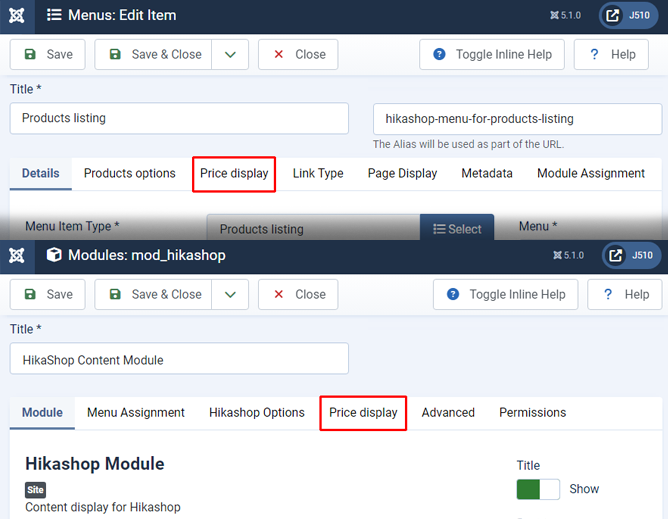
You will see the Advanced price display option, click "Yes" to display options and price entries.
Results :
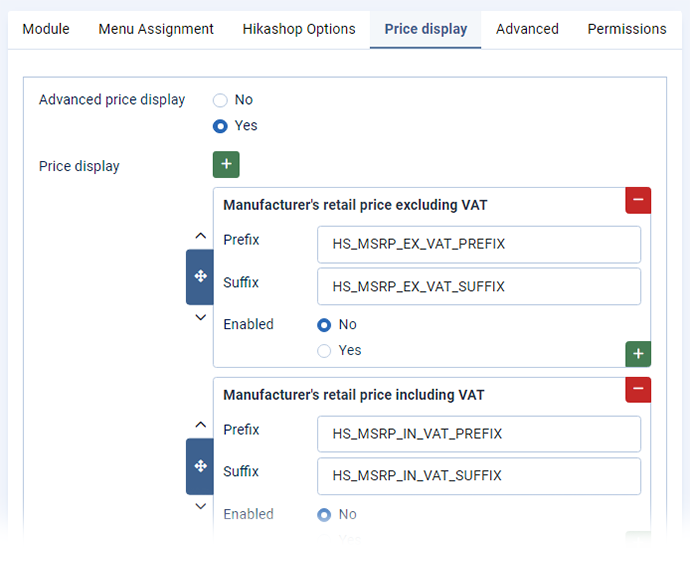
You will then see different entries and display types for your price depending on your needs.
How use it :
Each entry will be a line presenting the price of the product with or without tax, with discount or not, etc...
Note : The line will be displayed based on your settings in the menu item / module / configuration page.
This means that, for example, if your product doesn't have any taxes and you configure your entry to display the price with taxes, the entry won't be displayed.-
 Add/create a new entry
-
 Delete the relative entry
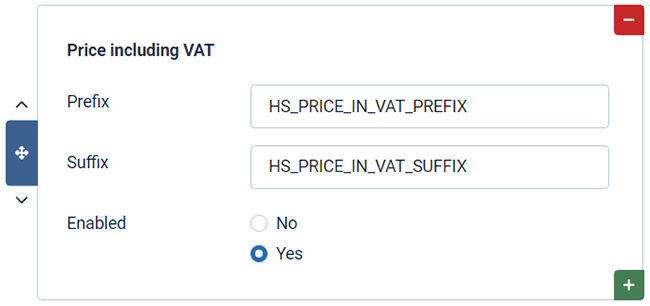
- Prefix : Define what will precede your price.
- Suffix : Define what will follow your price.
- Enabled : Activate or deactivate your price.
Concrete example :
Configuration (in Item Menu) :
Frontend results :