


|
|
Presentation
With HikaShop 3.4.0 release, we added a new checkout workflow edition interface. We worked hard on this new feature in order to enable you to setup your checkout with more liberty. This tutorial will show you how all of this works and what's possible.
Reach the Checkout Workflow
To reach and configure the checkout, follow this step by step process :
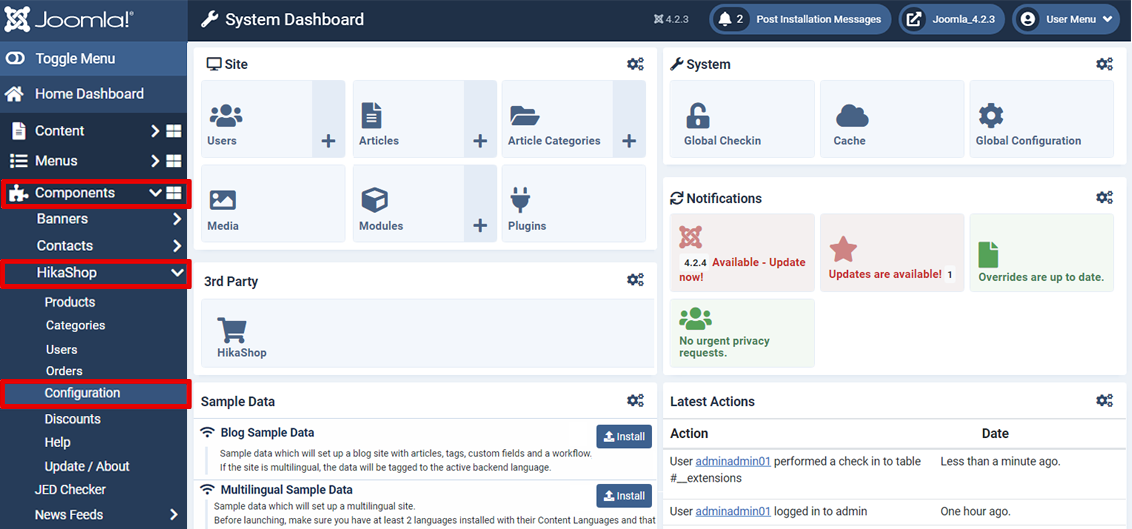
- In the Components dropdown, select HikaShop, then Configuration
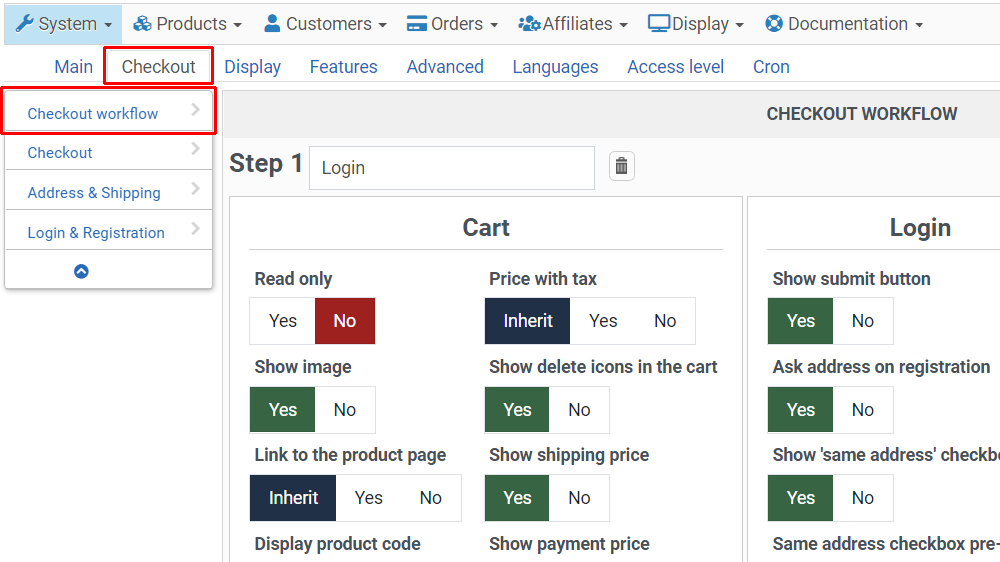
- Click on the Checkout tab and have a look at the Checkout Workflow part
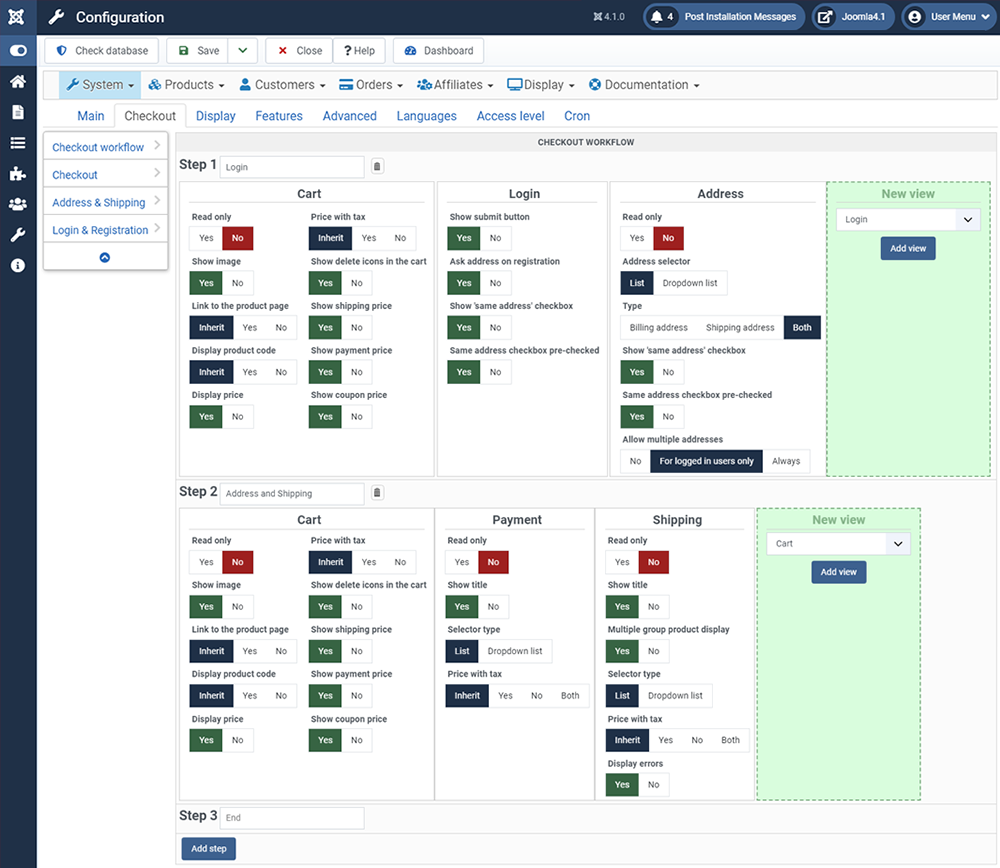
General Description
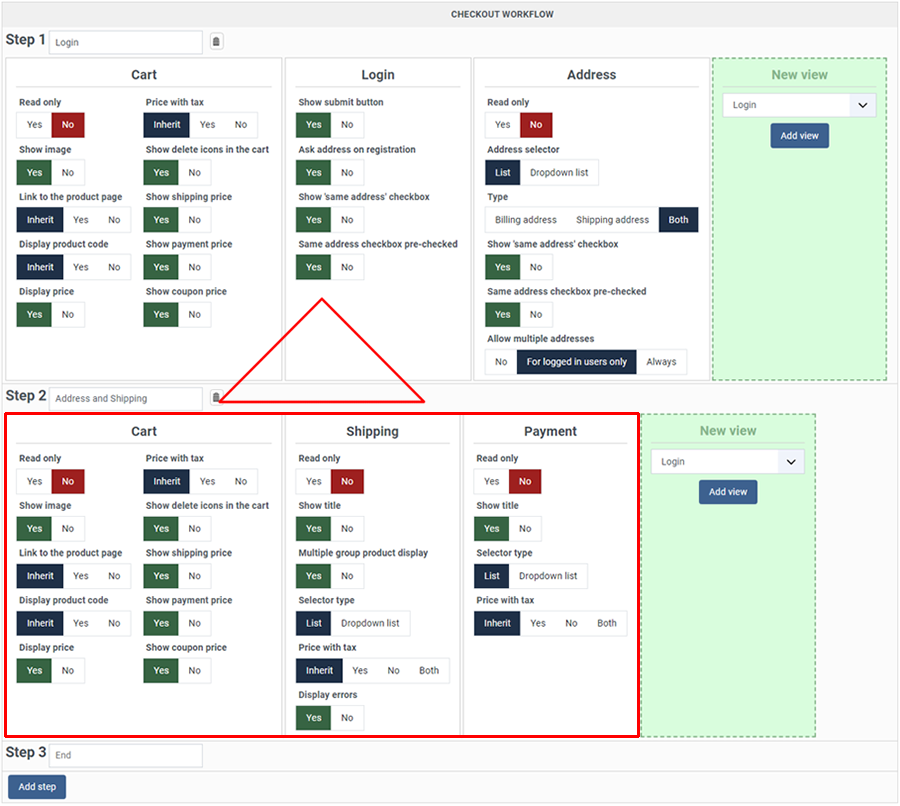
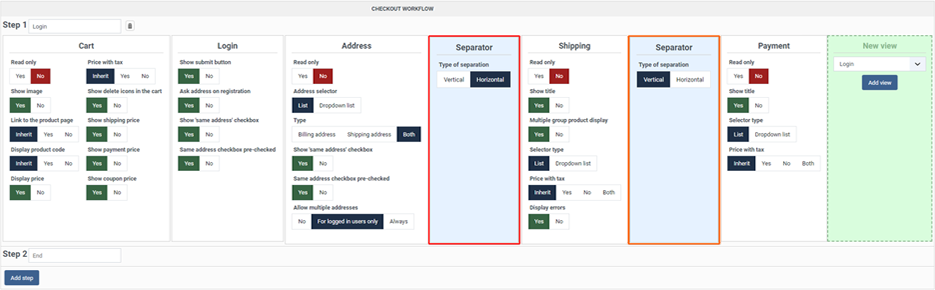
Let's check the new interface structure graphically :
 Classic HikaShop part
- New Checkout Workflow
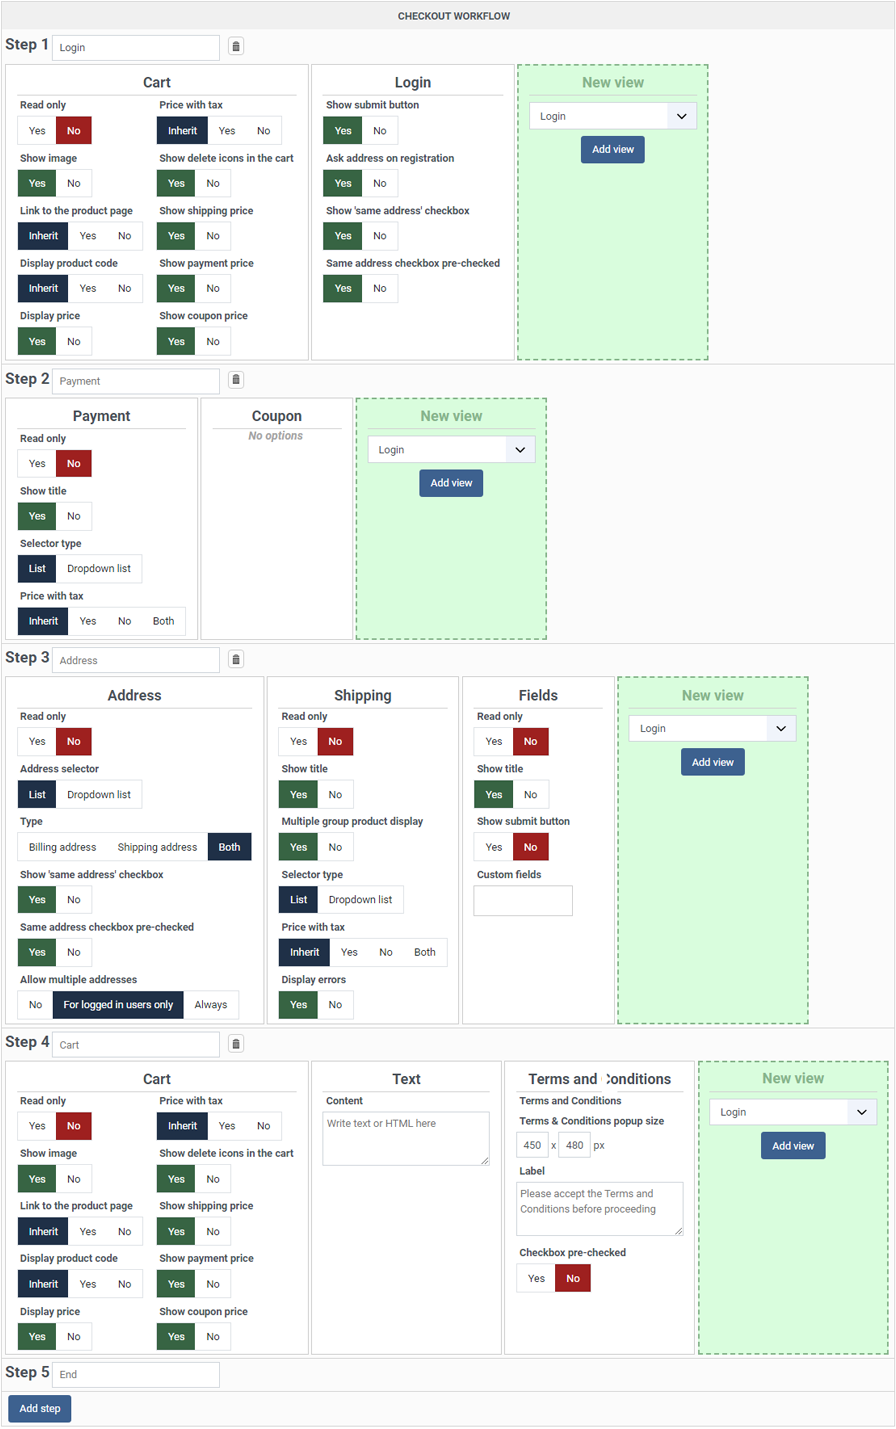
 Step 1
 Step 2
 Step 3, (End)
 Add a new Step
 Step Views
 Add a new view
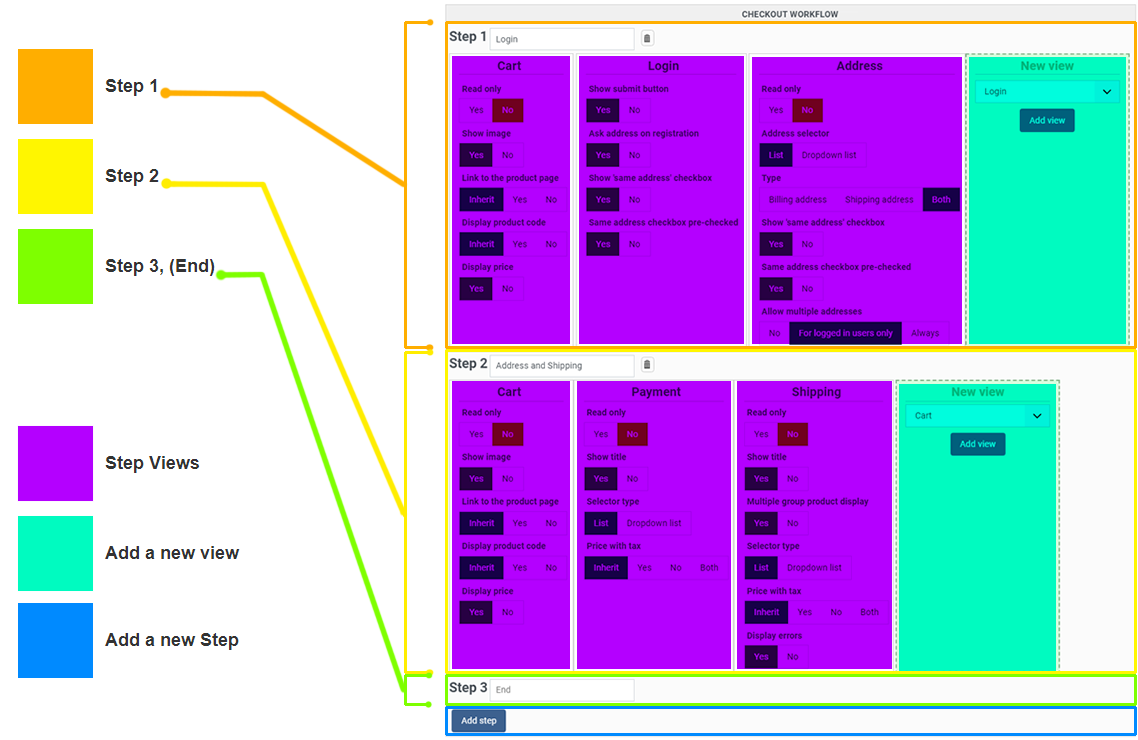
Essentials points about workflow parts
Let's add some precision in order to properly understand every workflow parts :
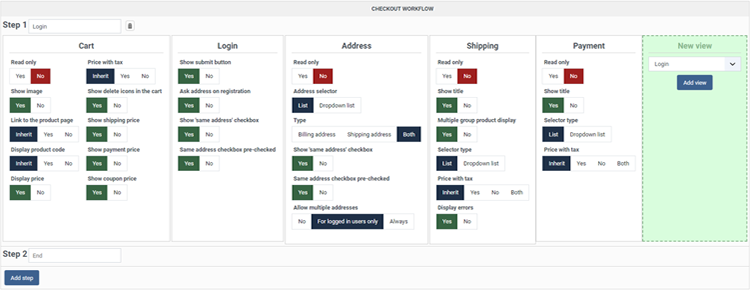
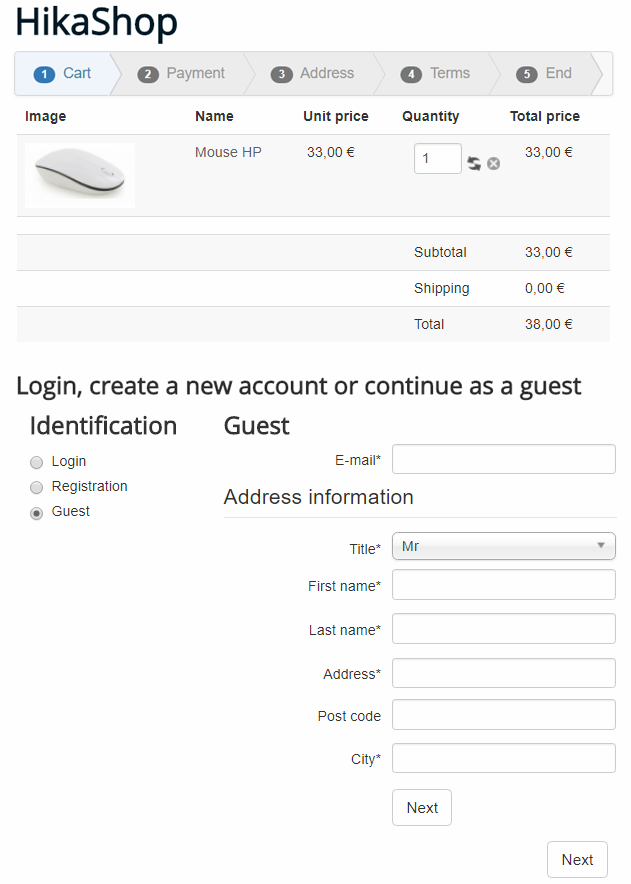
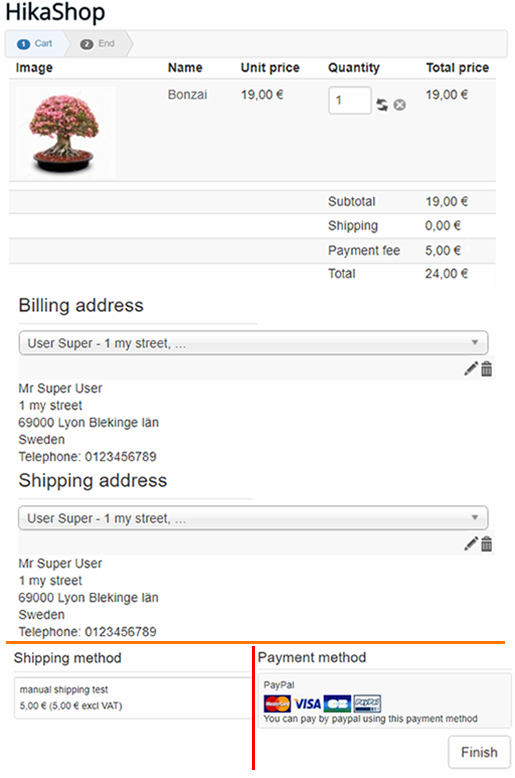
Here is a frontend view's representation of the previous color graphic.
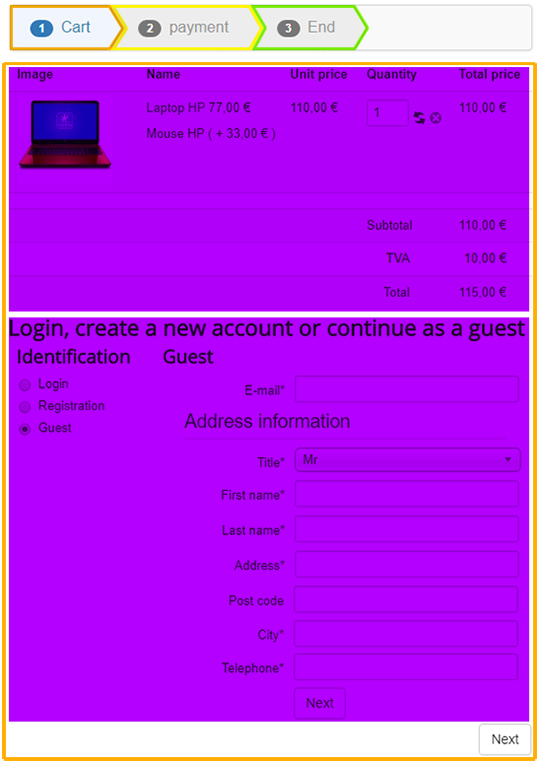
Thanks to the progress bar you can see the different checkout steps, and in purple 2 views (here, Cart and Login).
So through a checkout, you can have one or several steps (pages of the checkout). And on each step, you can have one or several views (blocks on the same page), one below the other on the page.
Views Details
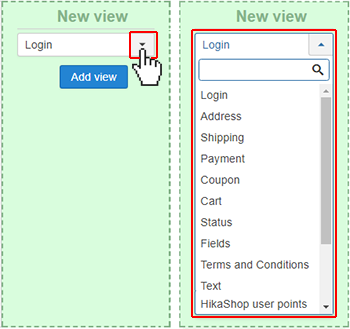
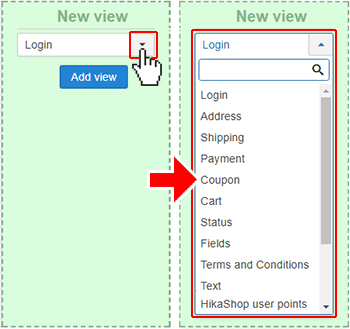
New view options
As you can expect from this view, it will enable you to add a new view's block and define its type using the dropdown. After selecting the type, you'll just have to click on "Add view".
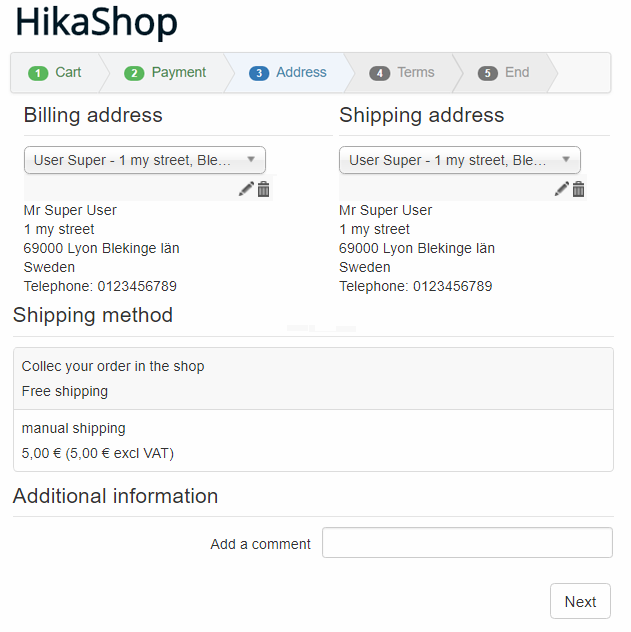
Address view

- Read only : Select "Yes" if you want to only display the selected address(es) without allowing the user to do modifications in that view.
- Address selector : Define how to display the address selection (dropdown or list).
Note : This option won't be available if the Read only option is activated. - Type : That option will enable you to choose if you want to display only the billing area or only the shipping area or both. Note that you can potentially configure several address views in your checkout workflow. For example, you could have one for each type of address in order to display them in different areas / steps of your checkout.
- Show 'same address' checkbox: With this option, you can control whether the "same address" checkbox is displayed below the address form. If displayed, then if checked, the address provided will be used for the other type of address.
- Same address checkbox pre-checked: When the option above is activated, you can control whether the "same address" checkbox is checked by default on the address form.
- Allow multiple addresses: Controls whether users can have several addresses of each type linked to their account. Options are: "No" (only one address per type), "For logged in users only" (default - registered users can have multiple addresses but guests cannot), or "Always" (all users can have multiple addresses). Note that it might not make sense to allow users in "guest checkout" mode to enter several addresses.
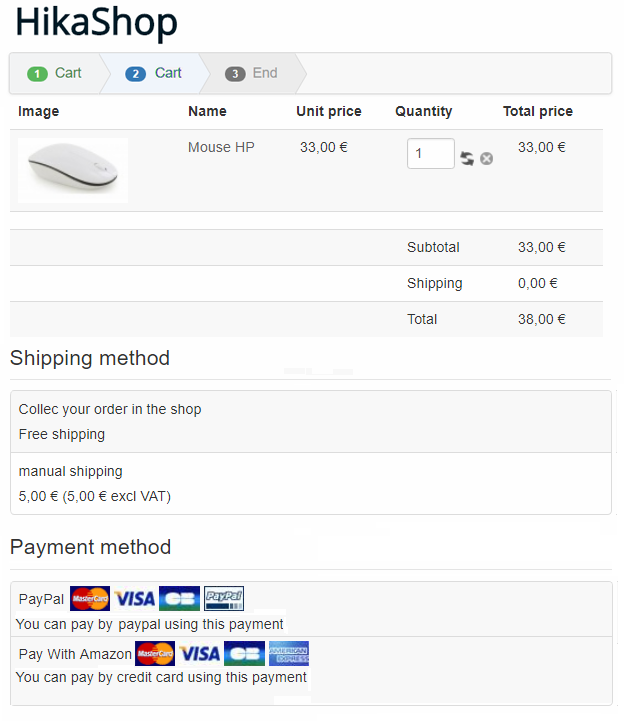
Shipping view
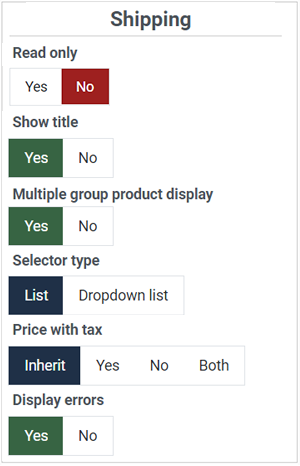
- Read only : Click "Yes" if you want to only display the (pre)selected shipping method without any possibility for the user to change it.
- Show Title : Will enable you to display the title of the view or not, on top of it.
- Multiple group product display : Select "Yes" if you want to display the products thumbnail for each shipping group (when you have different vendors with different shipping methods, or warehouses).
- Selector type : By default (list) the shipping methods can be selected with a table with a radio for each shipping method. If you switch to the "Dropdown list" mode, the shipping selection will appear as a simple dropdown. Note : This option won't be available if the Read only option is activated.
- Price with tax : The shipping costs, if configured in the shipping methods settings, will appear next to the name of the shipping method. With this setting, you can control how prices are displayed: "With tax", "Without tax", or "Both" (shows both values). You can also select "Inherit" to use the main HikaShop configuration setting.
- Display errors : You can turn off the display of error messages for when no shipping methods are found. This can be useful in some cases where you have a one page checkout and shipping methods are only available after the customer has provided his shipping address. However, in such cases, we rather recommend you split your checkout in several steps so that the shipping methods selection is placed in a step after the user has provided his shipping address. That way, you can keep this setting turned on in order to display error messages that are really relevant to the customer.
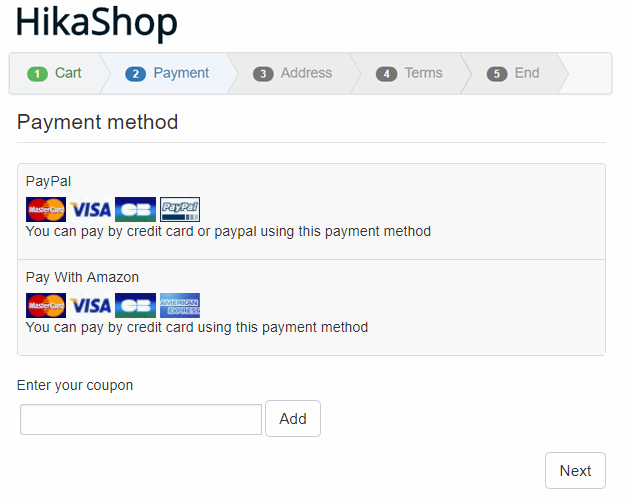
Payment view
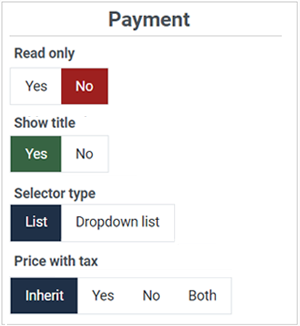
- Read only : Click "Yes" if you want to only display the (pre)selected payment method without any possibility for the user to change it.
- Show title : Will enable you to display the title of the view or not, on top of it.
- Selector type : By default (list) the payment methods can be selected with a table with a radio for each payment method. If you switch to the "Dropdown list" mode, the payment selection will appear as a simple dropdown. Note : This option won't be available if the Read only option is activated.
- Price with tax : The payment fees, if configured in the payment methods settings, will appear next to the name of the payment method. With this setting, you can control how prices are displayed: "With tax", "Without tax", or "Both" (shows both values). You can also select "Inherit" to use the main HikaShop configuration setting.
Cart view
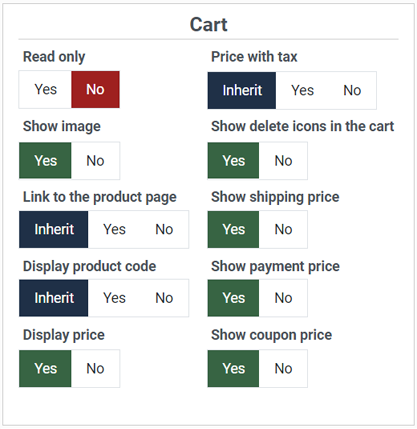
- Read only : Click "Yes" if you want to display the content of your cart without any possibility to modify it.
- Show Image : You can choose here to display the product images or not.
Or you can select "Inherit" to use instead the option of the main HikaShop Options section of the configuration. - Link to the product page : Select if you want to allow the customer to go to the product page or not.
Or you can select "Inherit" to use instead the option of the main HikaShop Options section of the configuration. - Display product code : Choose to display the product code in the cart view or not.
Or you can select "Inherit" to use instead the option of the main HikaShop Options section of the configuration. - Display price : Display or not the prices in the cart view.
- Show discounted price : You can configure here how the discounted prices should appear in the cart view. Options include: "No" (don't show discount information), "Display discount amount" (show the discount value), or "Display price before discount" (show the original price struck through). You can also select "Inherit" to use the default configuration option.
- Price with tax : Display the product prices with taxes or not.
Or you can select "Inherit" to use instead the option of the main HikaShop Options section of the configuration. - Show delete icons in the cart : Display or not the delete icon to remove products from the Cart.
Note : This option won't be available if the Read only option is activated. - Show shipping price : Display or not the shipping costs between the subtotal and the total.
- Show payment price : Display or not the payment fees between the subtotal and the total.
- Show coupon price : Display or not the coupon discount between the subtotal and the total.
Fields view
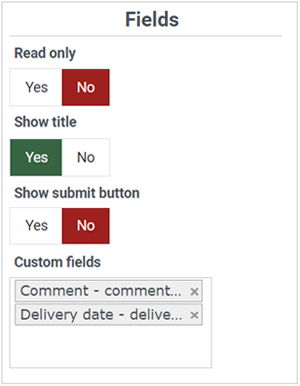
- Read only : Click "Yes" if you only want to display the selected values in the custom order fields without the possibility for the user to modify them.
- Show title : Select if you want to display the title of the view or not, on top of it.
- Show submit button : Display or not the submit button to enable users to send custom fields value without submitting the whole checkout step.
Note : This option won't be available if the Read only option is activated. - Custom fields : With this input you can select which custom fields you want to display in your view. If you don't select anything, it will display all the custom order fields possible.
This option can allow you to separate your fields form in separate steps by having it in different steps with different fields selected in each step.
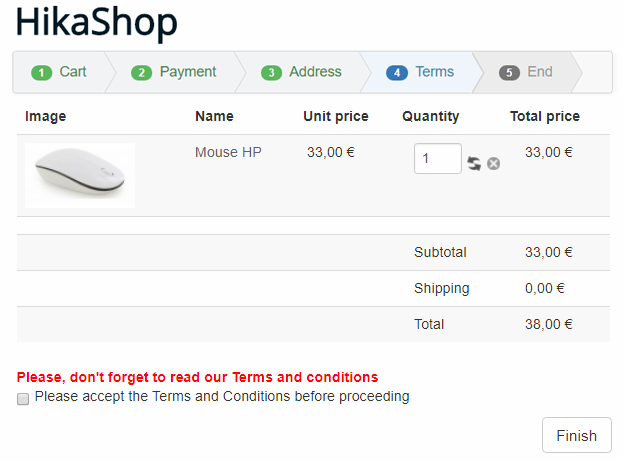
Terms and Conditions View
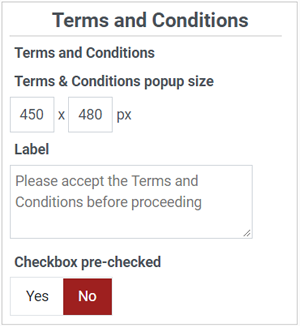
- Terms and Conditions : Select here the Joomla article that will become your Terms and Conditions.
Note that you can add this view several times to your checkout with different Joomla articles, if you want several checkboxes to be checked by the customer.
Also, if you don't select any article, the checkbox will still appear but its label won't be clickable. - Terms & Conditions popup size : Define here the popup size which will display your Terms and Conditions Joomla article.
- Label : Type here the message you want to display next to the checkbox in order to invite your customer to validate your Terms and Conditions.
- Error message : Type here the error message you want to appear if the user tries to proceed without validating your Terms and Conditions.
- Checkbox pre-checked : By default the checkbox will be unchecked and the customer will have to check it to be able to proceed. But you can also have it already checked by default by activating this setting.
Text View
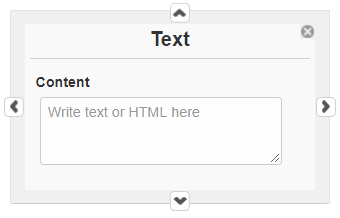
The text view will allow you to write some text to add a legend to guide customers, or separate the different views, etc.
Plus, it's also possible to use html code, inline css, javascript code blocks, or even use tags to insert elements from other plugins (modules anywhere, content anywhere, and the likes...).
This can be handy if you want to add an upsell message for free shipping. For example, you could use the text:
{hkshow maxproducts=150}Free shipping above 150€. You need {max}€ more of products to reach the threshold{/hkshow}
If the cart subtotal is below 150€, it would display the message "Free shipping above 150€. You need {max}€ more of products to reach the threshold" where {max} would be replaced by the difference between the threshold and the current subtotal of the cart.
You can read more about conditional content tags here.
- Content: This textarea allows you to enter the text or HTML content that will be displayed in the checkout. You can write plain text, HTML code, inline CSS, JavaScript blocks, or use content plugin tags like {loadposition} or HikaShop's conditional content tags.
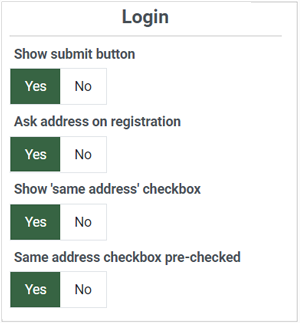
Login View
- Override registration: When activated, you'll get a textarea below to write any text/HTML you want to replace the registration area. This can be useful if you use a third party extension for the registration and you want to redirect the user there instead of using the normal registration form of the HikaShop checkout.
- Content: This text field will only appear if you activate the option above. Here you can write text or HTML to be displayed instead of the normal registration form of the HikaShop checkout.
- Show submit button: If you deactivate that option the "Register" (for the registration form) or "Next" (for the guest form) button won't be displayed for that view. This option is only available when "Override registration" is disabled.
- Ask address on registration: When activated, the registration form will include the billing address fields. This allows customers to provide their billing address during registration. This option is only available when "Override registration" is disabled.
- Show 'same address' checkbox: With this option, you can control whether the "same address for shipping" checkbox is displayed below the billing address form. If not displayed, then the system will automatically use the billing address information as the shipping address. If displayed, then if not checked, the customer will be able to provide a separate shipping address with the necessary fields on the same registration form. This option is only available when "Ask address on registration" is enabled.
- Same address checkbox pre-checked: When the option above is activated, you can control whether the "same address for shipping" checkbox is checked by default on the registration form. This option is only available when "Show 'same address' checkbox" is enabled.
About Guest Checkout: The Login view adapts its display based on your HikaShop configuration settings (System > Configuration > Checkout > Login & Registration). If you enable guest checkout, the Login view will display a guest checkout form allowing customers to proceed without creating an account. You can configure multiple registration modes (standard registration, simplified registration, guest checkout, or a combination of guest checkout and registration) and the Login view will display according to the selected mode.
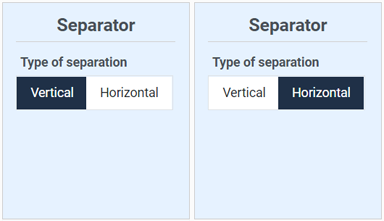
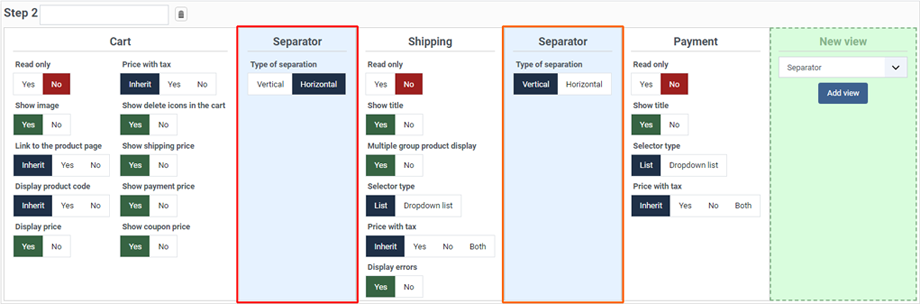
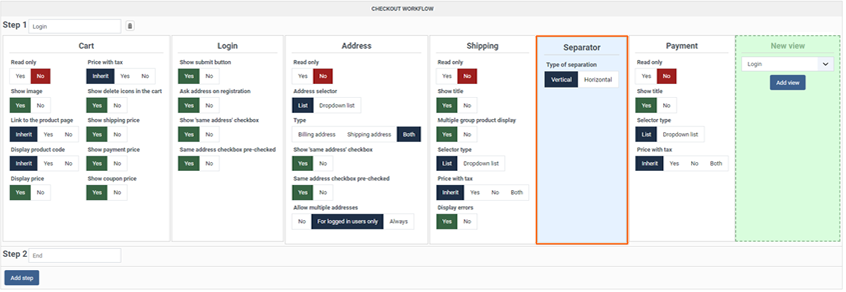
Separator view
- Type of separation : This option will enable you to define how the separator will work, Vertical or Horizontal. See the illustration :
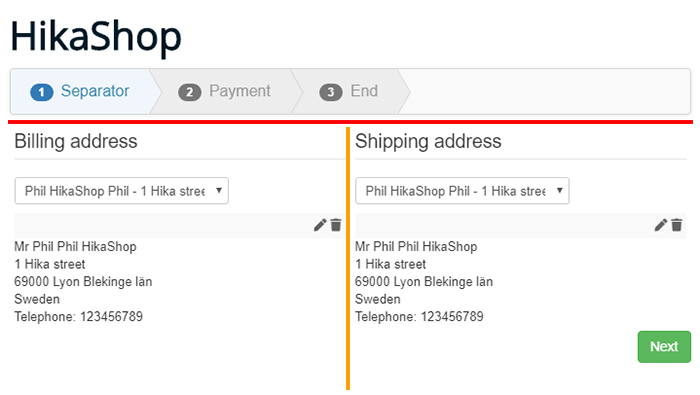
First, have a look at this checkout workflow configuration :
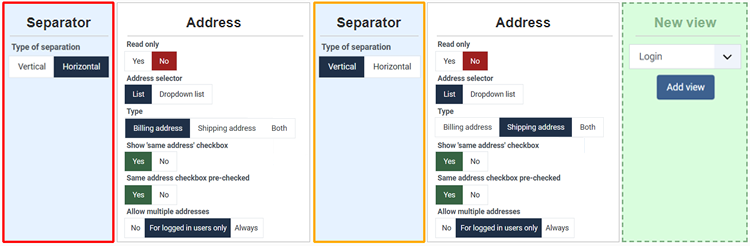
The result is :
To discover a lot more about the separator abilities, see the Concrete Examples section.
Generic view
For the other default types of views there is no specific option, and so views will be displayed like this :
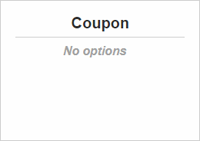
This will be the same kind of display for these views:
- Coupon: Displays a text field where customers can enter a coupon/discount code along with an "Apply" button to validate and apply the coupon to their cart. If a coupon is already applied, it will display the coupon code with an option to remove it. By default, only one coupon can be applied to the cart. If you want to allow multiple coupons, you can use the Multi Coupon Checkout plugin.
- Status: Displays the name of the currently selected shipping method and the name of the currently selected payment method.
- HikaShop user points: If you have the HikaShop User Points plugin enabled, this view allows customers to use their accumulated points to pay for part or all of their order. It displays the available points and provides controls for the customer to choose how many points to redeem. You can find more information about the HikaShop User Points plugin here.
Note: Plugins and other extensions can add their own views to the checkout workflow using our "Checkout API". So you might see more view types with possibly their own options.
For developers: If you want to create your own custom checkout view types, define custom parameters, handle AJAX events, or integrate third-party functionality into the checkout, please refer to the Checkout section of the Developer Documentation.
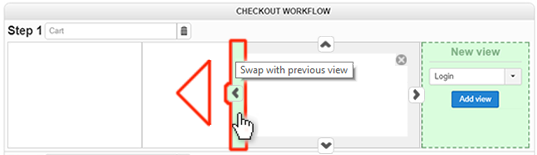
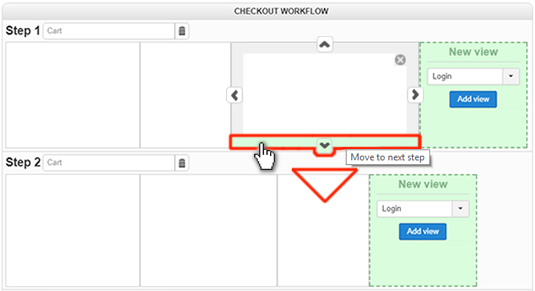
How to move Views
In order to move a view in your workflow you have some arrow buttons that will appear when you hover the view, all around the border of your view.
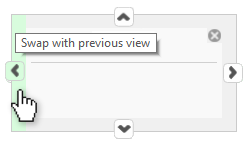
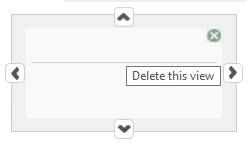
To delete a view: When you hover over a view block, you'll see a trash icon (or X) in the top right corner. Click on it to remove the view from the step. Don't worry - you can always add it back later using the "Add view" dropdown.
For example, let's swap it with the previous view.
Or to move it to the next step.
Manage steps
Adding a new step: To add a new step to your checkout workflow, click on the blue "Add step" button located at the bottom of the existing steps. The new step will be added at the end (before the "End" step), and you can then add views to it using the "Add view" dropdown.

Step options:
- Step Title: The input field shows the default title that will be used for this step in the progress bar (by default, it's the title of the first view in the step). You can type your own custom text in this field.
You can also enter a translation key here so that you can have a different title in each language of your website. - Trash icon button: This button enables you to delete the step.
Note: All steps can be deleted except the last one, the "End" step. That step is not a real step of your checkout. That's the page the customer will see after clicking on the "Finish" button of your checkout, which in most cases will redirect them to the payment gateway automatically so that they can pay for their order.
Concrete example
Let's see here some typical configuration with 2 concrete examples.
One page Checkout
Backend configuration :

First, let's consider that all the views are needed (except the second cart view), but we have to move them all to the first step
Now, we have to remove the second cart view, like shown on this screenshot :

Then, you can see that the step 2 is now empty, no need to delete it with the little trash icon, because when you will save your new configuration, the step 2 will be automatically removed and you will get this :
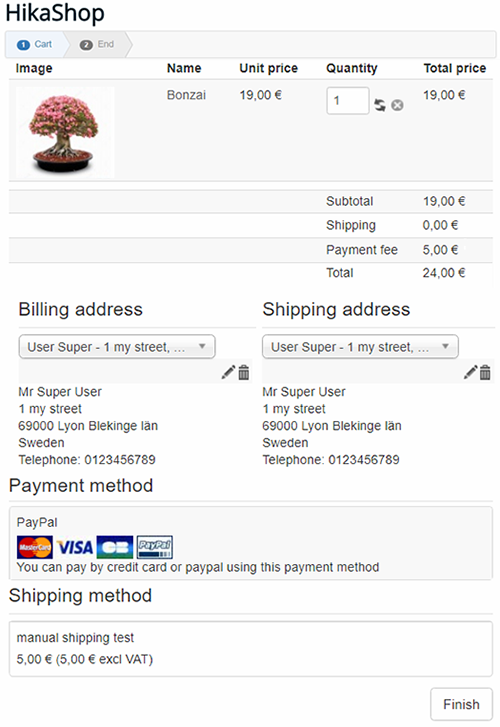
Frontend result :
As result and as expected you have now a one page checkout :
Several pages checkout
Backend configuration :
From this kind of configuration we will now move to a step by step checkout.
Move the Address view, to the next step :
Delete the Cart view in Step 2 thanks to the delete icon on the top right corner of the view.
Move Shipping and Address to Step 3.
Create a new view => Coupon
In the Step 3 : As you did for Coupon, create a Field view
Add, in the same way, Cart and Text views
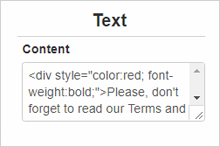
Edit your Text view with this Html code :
<div style="color:red; font-weight:bold;">Please, don't forget to read our Terms and conditions</div>
Last but not least, do not forget to edit your step title in order to fit with your Checkout workflow.

Your checkout workflow is now like this, don't forget to save :
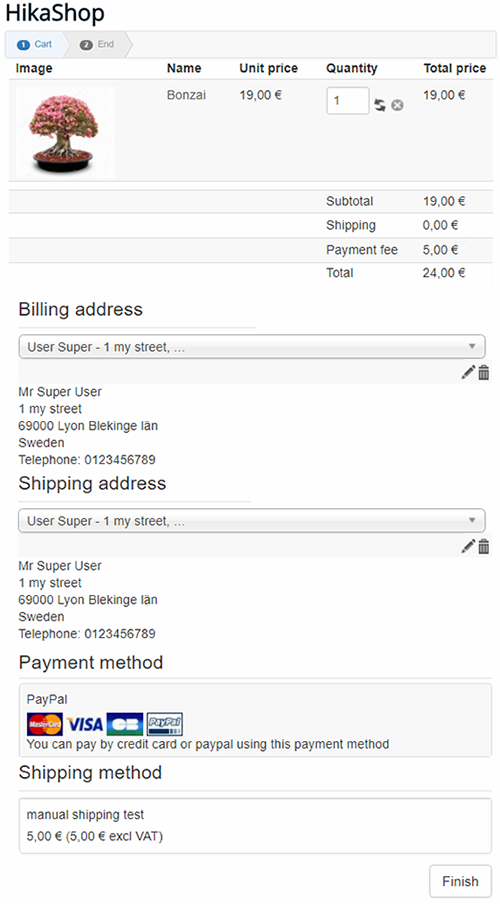
Frontend result :
As expected you have now checkout in several steps :
Note : Each step has its own title that will announces what will be displayed :
Let's play with the separator system !
We will see here, several configuration not especially to invite you to follow them but in order to show your the real possibilities of the block separator system.
First try :
Here a classic checkout workflow configuration :
And the result on the frontend :
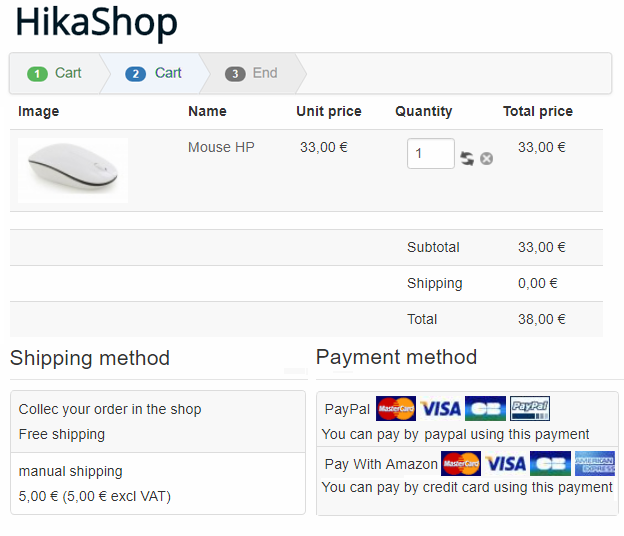
Let's now start to use separator on the step 2, to display side by side Shipping and Payment block :
Let's see the result on the frontend :
Understand the point with the Horizontal separator :
Let's imagine that, like the previous step you just want to display side by side payment and shipping method, but you have forget to use the Horizontal separator, let's see what this will leads :
Your checkout workflow is configured like this in one step.
On the frontend you get this :
And so, just add "by mistake", just 1 Vertical separator between the shipping and the payment block :
The result will be like this :
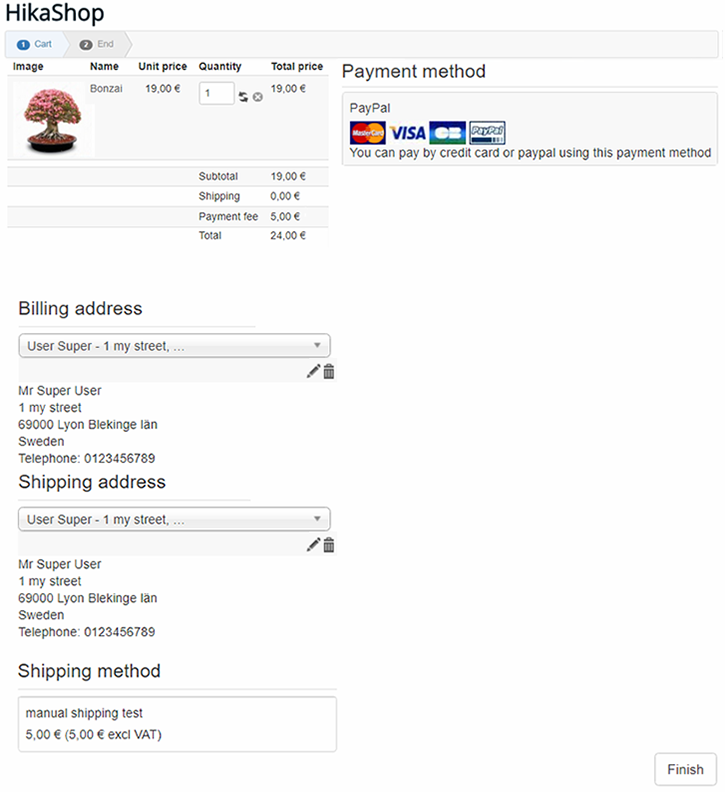
Why not, but we guess that the idea was more just to add 1 Horizontal separator like this :
In order to get this :
As you can imagine with these 2 separator blocks every configuration is possible ! The only restriction will be of course to keep readability.
Tips & Best Practices
Here are some recommendations when setting up your checkout workflow:
- Login/Registration first: Always place the Login view at the beginning of your checkout (usually in the first step). The customer needs to be identified before you can display shipping methods based on their address.
- Address before Shipping: In most cases, place the Address view before the Shipping view. Shipping methods and costs often depend on the customer's shipping address, so they need to provide it first.
- Shipping before Payment: In most cases, place the Shipping view before the Payment view. Some payment methods may depend on the shipping cost (e.g., Cash on Delivery restrictions), and the final total needs to include shipping costs.
- Use "Read only" for order review: If you want to show an order summary on the final step before payment, add a Cart view with the "Read only" option enabled. This prevents accidental quantity changes at the last moment.
- Terms & Conditions on the final step: Place the Terms & Conditions view on the last step of your checkout, just before the customer clicks "Finish". This ensures they acknowledge the terms right before placing the order.
- One-page vs Multi-step: For simple products or quick purchases, a one-page checkout can reduce friction. For complex orders or when you need to validate each step (e.g., address validation before showing shipping options), a multi-step checkout is better.
- Don't forget to save: After making changes to your checkout workflow, don't forget to click the "Save" button in the HikaShop configuration to apply your changes.

