


|
|

Description
The HikaShop plugin for Google Products enables you to download a XML file in order to add to your Google Merchant account. You can also automatically upload this file with this plugin. Additionally, the plugin can generate a JSON feed compatible with OpenAI's ChatGPT Shopping, allowing your products to appear in ChatGPT search results. This plugin is only available in our commercial editions. It is installed automatically with them. It is a great way of marketing your products by reaching all the users of the Google Products service and ChatGPT Shopping.
Once your Google Merchant account will be setup, your products will be listed in the Google Shopping service: https://shopping.google.com/
This plugin also works with Facebook's Commerce Manager in order to upload / synchronize your products with Facebook and Instagram. You can find the instructions for the setup in Commerce Manager here
Note that if you want to use the auto update, you first need to configure the cron task in your HikaShop configuration and then setup a new feed in your Google Merchant account where you will specify a file name that you will have to put in the "File Name" option of this plugin.
Please note that if you want to use the auto update feature of this plugin, you will need to make sure that your hosting company allows outgoing connections from your website, otherwise, it won't work.
Please note that this plugin is available only with the Essential and the Business editions of HikaShop.
Settings
- You can set some parameters into the HikaShop Google product plugin:
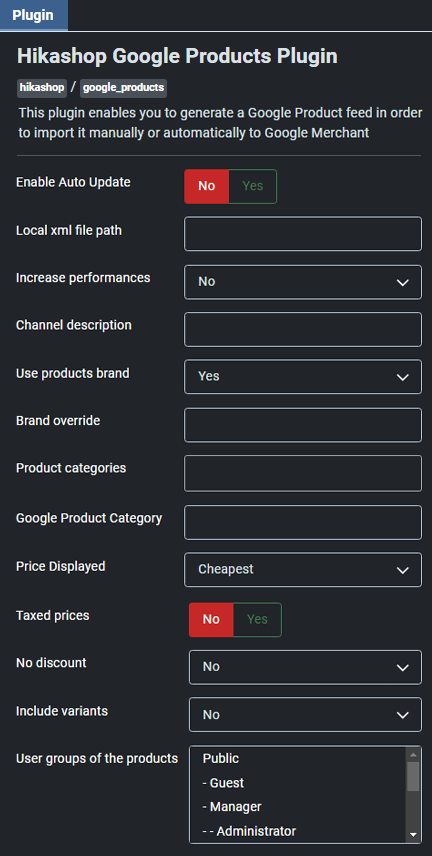
- Enable Auto Update: Automatically update your Google merchant feed via SFTP. When you use this option, you also have to complete the 3 next fields.
- Local xml file path: XML for inventory feeds path (generate an XML file of your content). For example, if you put "myfolder/myfile.xml" there and your website is https://mywebsite.com , the XML file will be available at https://mywebsite.com/myfolder/myfile.xml
- Increase performances: Use this setting if you have issues with memory limits or timeouts when using Google plugin, you can turn on that option.
- Channel description: Define the main description of your shop, you can leave it empty, the description of your website from your Joomla configuration will be automatically used.
- Use products brand: Use the brand [brand] attribute to indicate the product's brand name. The brand is used to help identify your product and will be shown to customers.
- Brand override: You can override here the products brand (the brand setting of the products won't be used). You can either enter here a brand name, or the column name of the product custom field with the brand name set for each product.
- Product categories: If you want to restrict the XML feed to only some categories, please select them in this setting
- Google Product Category: Your products' category (optional except for : 'Apparel and Accessories', 'Media', and 'Software'). If you enter here the column name of a custom product field, it will use the value of the custom field for each product allowing you to have a different category for each product. Note that you need to use the category names or ids defined by Google: https://support.google.com/merchants/answer/6324436?hl=en
- Price Displayed: Choose which price you want to provide in the XML file.
- Taxed prices: Should the prices have tax applied
- No discount: Use discount OR not.
- Include variants: If your products have variants and you want to export the variants as separate products instead of exporting only the main product data, you need to activate this option. Note that loading the variants data will require between several times and 100 times more processing for the plugin in order to generate the XML feed. So it might not be viable or require at least the increase of the performances with the corresponding setting of the plugin.
- User groups of the products: If no user group is selected here, the plugin will only list the products with their 'access level' setting set to 'all'. And if you select user groups here, it will also list products with one of these user groups selected.
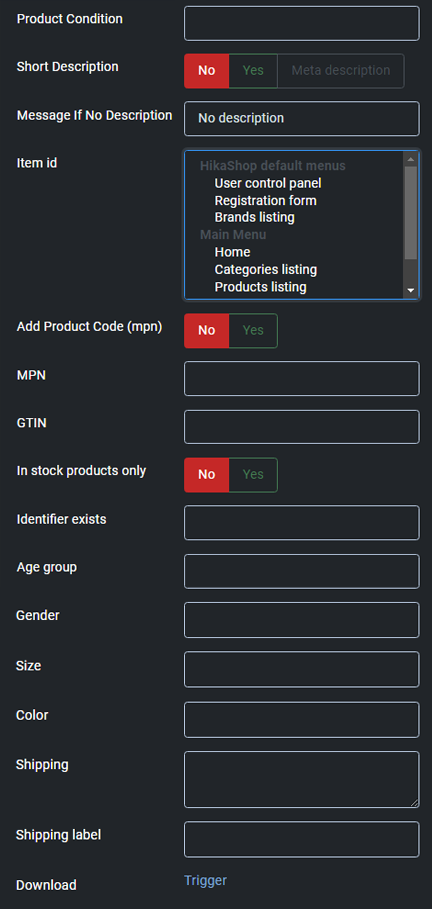
- Product Condition: Your products condition ( you can use either 'used', 'new' or 'refurbished' and no other value is allowed). If you enter here the column name of a custom product field, it will use the value of the custom field for each product allowing you to have a different condition for each product.
- Short Description: Do not add the full description of the product but only up to the read more tag.
- Message if No Description: Message displayed if a product doesn't have a description.
- Item id: If you want to display your products in a special context you can add here a menu id.
- Use product code as mpn: Display or not the product code as MPN in the XML feed
- MPN: If you enter here the column name of a custom product field, it will use the value of the custom field for each product allowing you to have a MPN for each products for which the custom field is filled. If you leave this field empty, no MPN will be added to the feed unless you turn on the 'Add Product Code (mpn)' setting above.
- GTIN: If you enter here the column name of a custom product field, it will use the value of the custom field for each product allowing you to have a GTIN for each products for which the custom field is filled. If you leave this field empty, no GTIN will be added to the feed.
- In Stock Products Only: Do not add the products without any stock to the feed.
- Identifier exists: Tells google if an identifier (brand, gtin, mpn) exists for your products (you can use either 'TRUE' or 'FALSE' and no other value is allowed). If you enter here the column name of a custom product field, it will use the value of the custom field for each product allowing you to have a identifiers for some products and not for others.
- Age Group: Your products' age group (you can use either 'Adult', 'Kids', 'Toddler', 'Infant' or 'Newborn' and no other value is allowed). If you enter here the column name of a custom product field, it will use the value of the custom field for each product allowing you to have a different age group for each product.
- Gender: Your products' gender (you can use either 'Male','Female' or 'Unisex' and no other value is allowed). If you enter here the column name of a custom product field, it will use the value of the custom field for each product allowing you to have a different gender for each product.
- Size: Your products' size. If you enter here the column name of a custom product field, it will use the value of the custom field for each product allowing you to have a different size for each product.
- Color: Your products' color. If you enter here the column name of a custom product field, it will use the value of the custom field for each product allowing you to have a different color for each product.
- Shipping: The shipping rules for your product. Rules must be separated by a comma. Each rule has four variables separated by a colon. For example, if you want two shipping methods for France, a standard one at 5 euros and an express one at 10 euros you should write: FR::Standard:5.00 EUR,FR::Express:10.00 EUR . If you enter here the column name of a custom product field, it will use the value of the custom field for each product allowing you to have different shipping rules for each product.
- Shipping label: The shipping label for your products. If you enter here the column name of a custom product field, it will use the value of the custom field for each product allowing you to have a different shipping label for each product. You can read more about shipping labels here: https://support.google.com/merchants/answer/7050921
- Download: Download the XML file. Then, you can import it manually in your Google account or Facebook Merchants central.
If you have the error message "Invalid attribute: price", it means that the main currency configured in HikaShop is not the currency of the country selected in your data feed options, in your Google Merchant center account. You either need to change the currency in HikaShop or the country in your feed.
Before setting up the synchronization, make sure that you can manually import the XML file. Google and Facebook will check that what you have in the XML file matches with your situation. Different types of products might require different fields to be filled, and it can change also based on where your shop is located. So it's important that the XML file is accepted with a manual import first. Also, before setting up the synchronization, please make sure that your cron task is up and running.
OpenAI / ChatGPT Shopping
Starting with HikaShop 6.4.0, the Google Products plugin can also generate a product feed in JSON format compatible with OpenAI's ChatGPT Shopping. This allows your products to appear in ChatGPT search results and potentially be purchased directly through ChatGPT.
The plugin reuses the same product data already loaded for the Google Shopping XML feed, so enabling this feature has minimal performance impact. When both feeds are enabled and the cron runs, the product data is loaded only once and shared between both generators.
The JSON feed is saved as a static file on your server (e.g. in the media/com_hikashop/ folder) so that OpenAI can crawl it at a publicly accessible URL. No additional frontend controller or endpoint is needed.
Setup
- Go to the Google Products plugin settings in HikaShop's plugin manager.
- In the OpenAI JSON file path field, enter a path relative to your Joomla root where the JSON feed will be saved, for example:
media/com_hikashop/openai_feed.json - Once this path is set, additional OpenAI-specific settings will appear.
- Configure the settings as needed (see below).
- Make sure your cron task is configured. The JSON feed will be regenerated each time the cron runs.
- You can also use the Download OpenAI JSON button to manually download the feed file.
- Register the public URL of your JSON file with OpenAI so that ChatGPT can index your products.
OpenAI-specific settings
- OpenAI JSON file path: The local file path where the JSON feed will be saved (relative to your Joomla root). For example,
media/com_hikashop/openai_feed.jsonwould make the feed accessible athttps://yoursite.com/media/com_hikashop/openai_feed.json. Leave empty to disable OpenAI feed generation. - Store country: The ISO 3166-1 alpha-2 country code of your store (e.g. US, FR, DE). This tells ChatGPT where your store is located.
- Target countries: A pipe-separated list of ISO 3166-1 alpha-2 country codes for the countries you ship to (e.g. FR|BE|CH). This helps ChatGPT show your products to relevant users.
- Return policy: The URL of your return policy page, or a short text describing your return policy.
- Eligible for search: Whether your products should appear in ChatGPT search results. Enabled by default.
- Eligible for checkout: Whether your products can be purchased directly through ChatGPT. Disabled by default.
- Include reviews: When enabled, the feed will include the review count and average star rating for products that have reviews. This data comes from HikaShop's built-in voting system at no additional performance cost.
- Download OpenAI JSON: Manually generate and download the JSON feed file.
Feed contents
The OpenAI JSON feed includes the following information for each product:
- Title, description, URL, and images (main image and up to 9 additional images)
- Price and currency (with sale price when applicable)
- Availability (in_stock, out_of_stock, preorder, backorder)
- Brand, MPN, GTIN, condition
- Product weight and dimensions when available
- Seller name and URL (from your Joomla site configuration)
- Store country, target countries, and return policy
- Review count and star rating (when the "Include reviews" option is enabled)
- Variant information: when the "Include variants" option is enabled, each variant is exported as a separate product entry with a
group_idlinking it to the parent product and avariant_dictcontaining the characteristic names and values (e.g.{"Color":"Red","Size":"M"})
All the existing Google Products plugin settings (product categories, price options, variant handling, custom fields, etc.) apply equally to the OpenAI feed, since both feeds share the same underlying product data.

