


|
|
Description
This screen enables you to edit an order. When a client confirms his order at the end of the checkout process the cart product list as well as all the information the customer entered during the checkout process is saved into a new order and the cart information is deleted. From this point in time, whether you change a product price, a discount price, or that the customer changes his addresses on his user account interface, it won't affect the order. You can however change manually the order information and optionally notify the customer from the change using this screen.
Toolbar

Yes, there is no save button in the toolbar, and that's normal. In the edit screen of an order, when you try to modify something, a popup will be displayed for you to input the new data also enabling you to send a notification to the customer and recording information about the modification like you IP address.
- E-mail : If you click on this button, you will be able to send an email to the customer of the order from the popup which will be displayed.
- Invoice : After clicking on this button, a popup will open with the invoice of the order displayed. An additional print icon will be available for you to print it.
- Shipping invoice : After clicking on this button, a popup will open with the shipping invoice of the order displayed. An additional print icon will be available for you to print it.
- Cancel : Return to the previous screen.
- Help : This button enables you to turn ON/OFF the help section, this screen will appear or disappear.
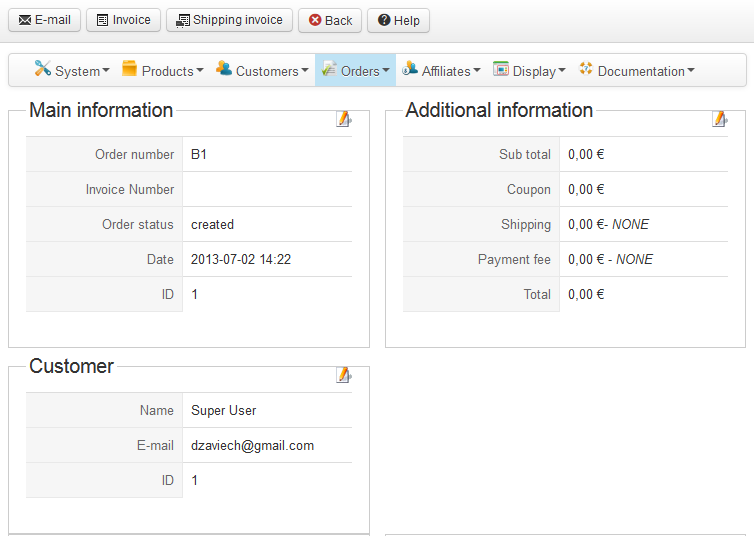
Main information
This area displays the most important information on the order. With the ability, like on the orders listing to change the order status via a popup.
- Order number : This order number is generated from the id of the order. It will be useful for the communication with your customers over their orders.
- Invoice number : This invoice number is generated from the id of the invoice.
- Order status : The status of an order is an important parameter which enables you to follow an order during its life cycle, from its creation to its shipping. Once you changed it, a popup will open asking you more information about why you are changing it (great for later reference). If you want to notify the customer of the change, a notification email interface will also be displayed in that popup.
- Date : The date on when the order was made.
- ID : This field indicates the ID of the order.
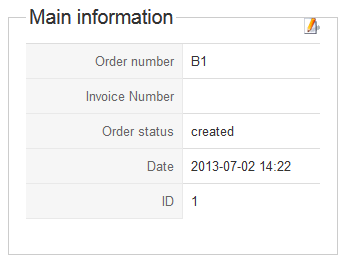
Additional Information
- Sub total : The sum of the prices of products including taxes without the coupon and shipping added.
- Coupon : The coupon value along with the code used for the customer. You can edit both by clicking on the edit icon. A popup will open asking you more information about why you are changing it (great for later reference). If you want to notify the customer of the change, a notification email interface will also be displayed in that popup.
- Shipping : The shipping price along with the shipping method selected by the customer. If you click on the edit icon you will be able to change the price. If you change the shipping method, a popup will open asking you more information about why you are changing it (great for later reference) and the new price. If you want to notify the customer of the change, a notification email interface will also be displayed in that popup. Note that if the order doesn't contain any tangible goods or that you removed the shipping view from the workflow of the checkout process, the customer will not be prompted to select a shipping method and the dropdown won't be visible.
- Payment fee: The payment fee price along with the payment method selected by the customer. If you click on the edit icon you will be able to change the price. If you change the payment method, a popup will open asking you more information about why you are changing it (great for later reference) and the new price. If you want to notify the customer of the change, a notification email interface will also be displayed in that popup. Note that if the order doesn't contain any tangible goods or that you removed the payment view from the workflow of the checkout process, the customer will not be prompted to select a payment method and the dropdown won't be visible.
- Payment method : You will see here the name of the payment method selected by the customer during the checkout process. Once you changed it, a popup will open asking you more information about why you are changing it (great for later reference). If you want to notify the customer of the change, a notification email interface will also be displayed in that popup. Note that if you removed the payment view from the workflow of the checkout process, the customer will not be prompted to select a payment method and the dropdown won't be visible.
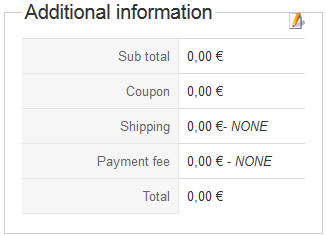
Customer
- Name : The name of the user account with which the order was made. The username will also be displayed in parenthesis
- E-mail : The email of the user account with which the order was made.
- ID : The email of the user account with which the order was made. If you click on the arrow icon, you will be transferred to the edit screen of the customer.
- IP : The IP of the computer from which the customer made the order. If you use one of our commercial versions and that you had the geolocation plugin activated while the customer made his order, you will see geolocation information based on this IP : the city, the state and the country of the user.
Partner information
Only if the customer who made the order came from one of your partners, this area will be displayed.
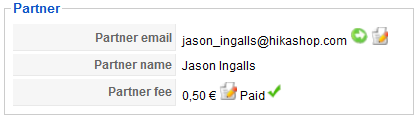
- Partner email : The partner email of the partner. If you click on the arrow icon, you will be transferred to the edit screen of the partner. If you click on the edit icon, you will be able to change the partner information of the order.
- Partner name : The name of the partner.
- Partner fee : The fee which will be paid to the partner accordingly to your affiliate program. If you click on the edit icon, you will be able to change the partner information of the order. After this edit icon, you will either see "paid" or "not paid". At first all the fees will be unpaid. But if you go to the partner edit screen and pay his fees, For all orders where this partner is involved, this fee status will be changed to "paid".
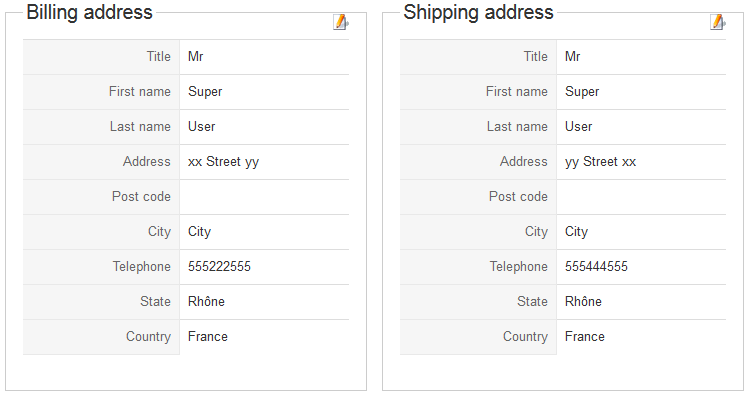
Billing and shipping information
The billing and shipping addresses will be displayed along with an edit icon if they were filled by the customer (if you remove the address view from the checkout workflow they won't be asked to the user. Also, if the order does not contain any tangible goods, the shipping address won't be asked to the customer). When no address is found, a plus icon will be displayed so that you can always add a billing or a shipping address to an order without them.
Product list
When you update the product list, the subtotal and total price will be recalculated automatically.
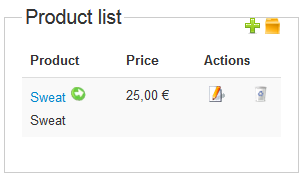
- Product : The name and code of the product.
- Files : Here you will see the list of files attached to a product and additional information about each file: Can the customer download it, the number of times he can still download it, the date until which he can download it, or the reason he can't download it. As you access this information from the back end, you will always be able to download the files.
- Unit price : The price of the product with VAT along with the VAT price.
- Quantity : The quantity bought for products.
- Price : The full price for the product : the price including the VAT times the quantity.
- Actions : Here you will find two icons. The edit icon in order to edit the information on a product of the order. And a delete icon to remove the product from the order. Note that it won't change or remove the product from your store but just change the information in the order.
Additionally, You have a plus icon in order to add an new entry in the product list. If you do so, the entry won't be linked to any product.
History
If the history plugin is activated, each time the order is modified, the modification will be recorded by the plugin. The history events will then be displayed here as an unmodifiable listing. If there are no history events for an order (it should not happen when the plugin is active as an event is recorded on creation), this listing won't be displayed.

- # : An indexing number automatically assigned for ease of reference.
- Type : The type of the event. For now it's either creation or modification.
- Order status : The order status after the modification.
- Reason : The reason for the modification (when you edit something in an order, you will be prompted for a reason.
- IP : The IP which triggered the modification.
- Date : The date of the modification.
- Information : This is currently not used, but it could be used in the future to display additional information.
Modification popup
When you try to modify some information on this screen, a modification popup will be displayed. The first part will either confirms your change or let you enter some new information. Then, you will have standard fields to specify a reason for the change and optionally send an email to the user about the modification. Only when you change the partner information, you won't have those standard fields.

- OK button : Once you're done, you can validate the change by clicking on this button.
- New order status or other fields : This will either confirms your change or let you enter some new information
- Modification reason : You can write here the reason why you did the current modification. It can be really useful to know that when you go back to the order later. You will find it on the history listing on the order edit screen along with other information on the modification.
- Notify customer : If you choose to not notify the customer, you will see the notification options appear below where you can customize the email that will be sent to the user once the modification is applied to the order.
- From Name : That's the name displayed as sender information name when your customers read the email.
- From Address : That's the address displayed as sender information address when your customers read the email.
- To Name : That's your customer name which is automatically filled in.
- To Address : That's your customer email which is automatically filled in.
- Subject : The subject of the email. It will also be automatically filled in based on the configuration of the email.
- HTML version : The HTML version of the email. It will also be automatically filled in based on the configuration of the email.
- Text version : The text version of the email. It will also be automatically filled in based on the configuration of the email.

