


|
|
Introduction
This documentation will explain you how to use the HikaShop product edition interface, how manage variants and other options like custom field, display settings, etc...
First, we will discover different parts of the product back end edition page, and after this we will see a classic product creation and finally some special cases.
IMPORTANT :
The HikaShop product edition interface will slightly change according to available or activated options, plugins or other extensions like HikaMarket. To know more about this subject go to the Special cases section.
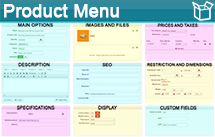
Overview of the HikaShop product edition interface without anything configured:
Toolbar

- Add to cart HTML link : You can get the HTML to use in order to have an add to cart link anywhere you can add HMTL. The link, once clicked, will add the product to the cart and then redirect the user to the checkout.
- Save : Save the current product and return to the products Management screen.
- Apply : Apply the modifications to the current product and stay on the same screen.
- Cancel : Return to the previous screen without saving the modifications.
- Help : This button enables you to turn ON/OFF the help section, this screen will appear or disappear.
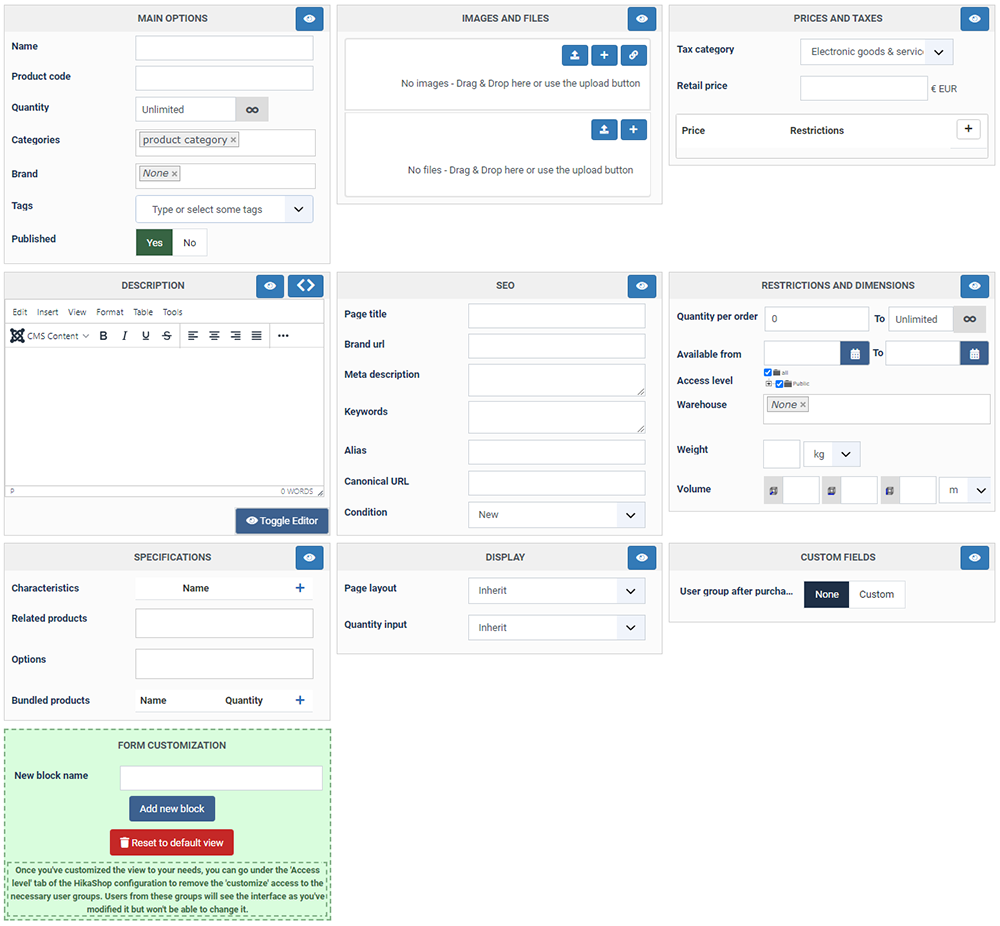
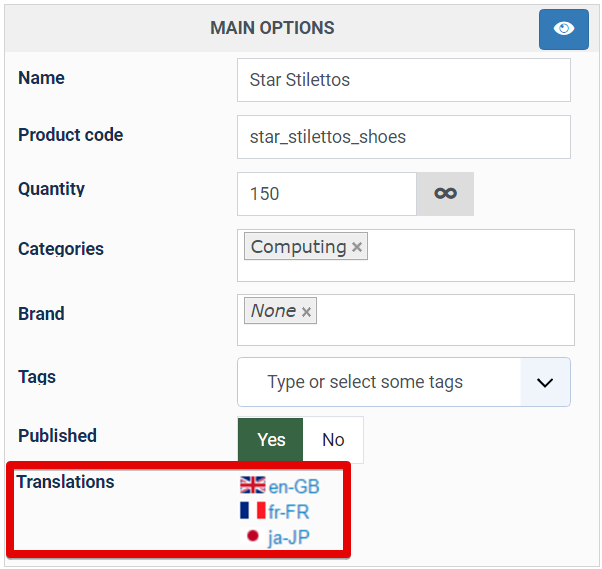
Main options
Here, you will define general information relative to your product like its name, its product code, quantity, etc...And of course the "Published" option.
- Name : Type in the input text the name of your new product.
- Product code : There you can enter the code (or SKU) of your product. If you don't set anything in it, HikaShop will transform the product name and place it there automatically when you first save your product. The code of your product must be unique. When you change the product code of a product, the variants code will also be updated automatically if possible.
- Quantity : Define here the product quantity (stock), or leave it on unlimited (especially useful for virtual goods). The "cross" icon will allow you to reset this value to unlimited.
The quantity of the product will decrease each time someone purchase the product. The stock can be decreased either when the orders are created (before the redirection to the payment gateway) or when the orders are confirmed (after the payment) thanks to the "Update the product stock on confirmed status" setting of the HikaShop configuration. Once the stock reaches 0, the product will be out of stock, and customers won't be able to purchase the product. Two things can help you handle out of stock products. First, you have the "wait list" feature that you can configure in the Features tab of the HikaShop configuration so that customers can register themselves to be notified when the product will be back in stock. And second, you have the "out of stock notification plugin" which can notify you of the out of stock (or close to be out of stock) products on your store.
- Categories : Here, you can associate your product to one or more categories. if you start writing the name of a category, you'll see appearing below so that you can easily find and select it. You can also reorder the categories by drag'n'dropping them around.
- Brand : You can link your product with his brand. The selector works like the one above, except that you can only select one brand for a product.
- Tags : This field is for use with the Joomla! tags system. You can select several tags.
- Published : This option will allow you to display the product on your frontend or not.
Note : You can see a concrete configuration of the main options part here.
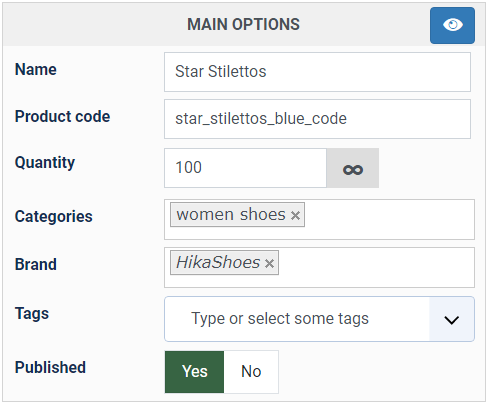
Images and files
The "Images And Files" area is for you to add to your product images (at the top) but also files (at the bottom).
In both areas, you can drag'n'drop files from your computer. The files will be uploaded automatically to your web server. Please remember that the file upload limit of your php.ini still apply to that interface. Images can also be reordered by drag'n'drop. Images will be uploaded to the "upload folder" that you selected in the HikaShop configuration of the same name and the files similarly to the "upload secure folder".
- Upload button : By clicking on this button, HikaShop will open a window in order for you to select an image or a file on your computer.

- Add button : By clicking on this button, HikaShop will open a popup where you can provide the path of the file and other settings.

- Link button : Use this if the image or file you want to add is already on your HikaShop website.
- It will open a gallery of the images / files so that you can easily select the one(s) you want to add.
Note : See a concrete configuration example of the Images and files part here
Prices and taxes
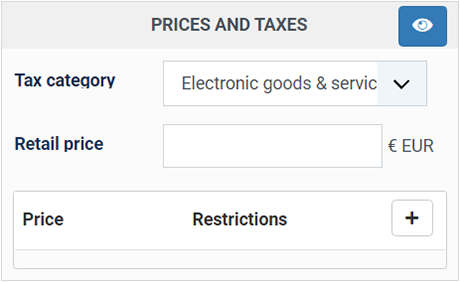
- Tax Category : Choose among your tax categories the one that you want to be used for the calculations of the taxes on your product. By default the "Default tax category" is selected. In most cases, you won't have to change that.
Note : If you select a tax category, the "Price with tax" be calculated based on your tax rules when you enter a price in a "Price" field and vice-versa.
- Retail Price : This price is only indicative and won't be used for calculations. If will be displayed on the front end product page as the Manufacturer Suggested Retail Price (MSRP).
- Price : Define your product price just by typing it in the text input. That's the value that will be saved in the database.
- Price with tax : Define the price with its tax. This value won't be saved in the database and will be calculated from the price without taxes each time it is needed.
Note that if you have the "floating tax prices" setting activated in the HikaShop configuration, that field won't appear. You'll enter the price you want in the "Price" field above and the system will substract the taxes, if any, based on the situation of the customer. - Currency : Use the dropdown to select the currency among your configured website currencies.
Note : If you want to know more about managing currencies, go here.
- Quantity: Set the minimum quantity for which the price will apply once in the cart.
- Start date: The date at which point the price will start to be taken into account (Business edition only).
- End date: The date at which point the price will won't be taken into account (Business edition only).
- Access level : You can define the user groups who will be able to see the price on the frontend shop (Business edition only).
- Users : You can define the individual users who will be able to see the price on the frontend shop (Business edition only).
- trash icon : Click on it to delete the price line.
- + Add price : Add a new price line. Thanks to that, you'll be able to configure several prices for each product. It can be used for lots of situations. For example, if you want a price for individuals and another one for professionals, or if you want different prices for different currencies, or different prices for different quantities purchased, or even combinations of these.
Note : Please, make sure that your server and website are configured with the same timezone to avoid any issue. As otherwise, you might notice discrepancies in the way the date restrictions are applied
Note : See a concrete way to configure the prices and taxes part, here
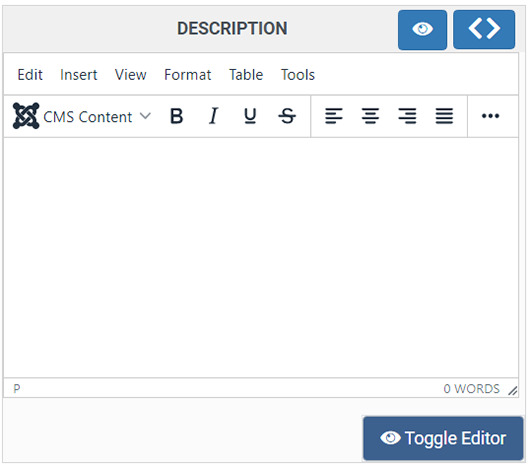
Description
You will find your classic text editor, in order to enter a text description for your product. If you add a read more tag in your description and that you use the "image and description" item box layout on your products listing, you'll get the text before the read more tag on the listing and the full text without the read more tag on the product page. Note that the editor used can be changed with the "Editor" setting of the HikaShop configuration.
SEO
This part is dedicated to Search Engine Optimization. These settings can be useful for search engines better index your products.
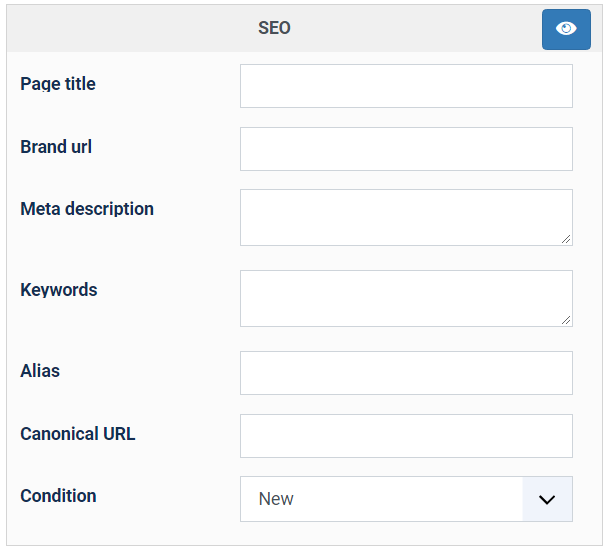
- Page title : Here, you can define the page title displayed on the browser tab.
Example with the Page title "Dreamcast sale":

- Brand url : You can add here a link to the descriptive page of the product on the brand website (if any). That link will then appear on the product page.
- Meta description : Write here a short summary of your product description.
- Keywords : Add several words that best represent your product and separate them by commas.
Note : Thanks to the "Automatic product keywords and metadescription filling" setting of the HikaShop configuration, you can have the Meta description and Keywords fields automatically filled by the system based on your product description.
- Alias : The alias is automatically filled in based on the product name if the "Alias automatic filling" setting is activated in the HikaShop configuration. The alias has to be unique and not start with a number.
- Canonical URL : The canonical URL will be filled automatically by the system when displaying the first time a link to the product page if the "Force canonical URLs on listings" setting of the HikaShop configuration is set to "Use canonical URL and generate it if missing". This URL needs to be valid. Otherwise, the link to your product page won't work. Also, we recommend you to enter the relative path from your website domain name.
Note : The alias and the canonical URL are very useful if you want optimized your search rank.
Suppose that your product has different access URLs like this :

and this :

These two different URLs for the same product can be difficult to avoid in some case but is bad SEO to keep both as they will be flagged by search engines as duplicate content and your ranking will be degraded.
Entering a canonical URL will avoid your pages from being flagged as duplicated content.
Note : To learn more about SEO and SEF features, go here.
Restrictions and dimensions
Here, you can define, on one hand, all the properties of the product relative to restrictions on the display or purchase of the product, and, on the other hand, the product weight and dimensions, which are required for all the shipping plugins besides the manual shipping plugin.
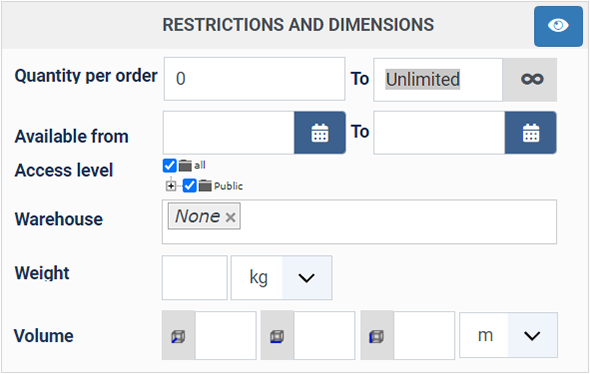
- Quantity per order : Here, you have two inputs. The first is for defining the minimum quantity a customer can set in order to purchase the product. The second is the opposite: The maximum quantity a customer can set in order to purchase the product.
- Available from : You can define dates for which your customers will be able to purchase the product. Outside those dates, the product will be displayed but no add to cart button will display. If you want to also hide the product outside of those dates, you can install and enable this plugin.
- Access level : Here you can restrict the display of the product to only some user groups. This option is only available with the Business edition.
- Warehouse : The warehouse system will allow you to associate different groups of products with different shipping methods. On the checkout, all the products of the same warehouse will be grouped together and a shipping method selection will be requested for each group, allowing you to setup a complex shipping fees structure.
- Weight : Here, you can enter the weight of the product and the unit of that weight. If a product has a weight, a shipping address and a shipping method selection will be required from the customer during the checkout. If not, the product will be handled as a "virtual good" and shipping will only be required if the "Force shipping for virtual / weightless items" setting of the HikaShop configuration is turned on. Note that the weight units can be configured in the "Weight units" setting of you HikaShop configuration.
- Volume : Define your product dimensions along with their dimensions unit :
- Depth :

- Width :

- Height :

- Unit : Select through the dropdown the dimensions unit. Note that the dimensions units can be configured in the "Dimensions units" setting of you HikaShop configuration under the Advanced tab.
- Depth :
Notes :
- Please, make sure that your server and website are configured with the same timezone to avoid any issue. As otherwise, you might notice discrepancies in the way the date restrictions are applied.
- You can see a concrete configuration of the restrictions and dimensions part here
- Shipping methods contacting the API of the carrier to request the rates available for the current cart, based on the shipping address provided by the customer, will normally require the weight of the products to be filled in, and most of the time, the dimensions too.
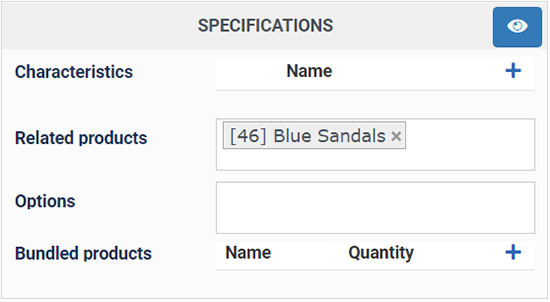
Specifications
On this area, you can add specifications to your product, like characteristics, related products, options and bundled products.
Characteristics are useful when your products have several variants. For example, you sell a table model which has 5 different colors possible. You have a stock for each color or you might have different prices, different weight, images, etc. But you want the table to be listed only once when your customers browse your shop. That's what characteristics are for. Then, on the product page, your customers will be able to change the characteristics value of the product. You can see an example of a product page with one characteristic on this page of our demo website.
First, you will have to add the characteristics you need to the characteristics management interface accessible via the main HikaShop menu Products->Characteristics. Don't forget to add all the values you need for your characteristics in the "Values" area of each one of your characteristics.
Once you're done adding your characteristics and their values, you will be able to see them here. After selecting the needed characteristics, you can go in the Variants tab in order to add all the variants (combinations of values of characteristics) you want for that product. You will be able to do that by first clicking on the "Add variants" button, then selecting the different values of each characteristic that are necessary for the current product, and finally by validating.
Note : For more information on setting up variants for your products, have a look at the Variants chapter in this tutorial, here
The variants will the appear in the listing below and you will be able to edit each one to customize them. If you don't set a value in a field of a variant, the main product value will be used. So if you don't set a weight for your variants but that you have one for the main product, the system will use the main product weight for your variants.
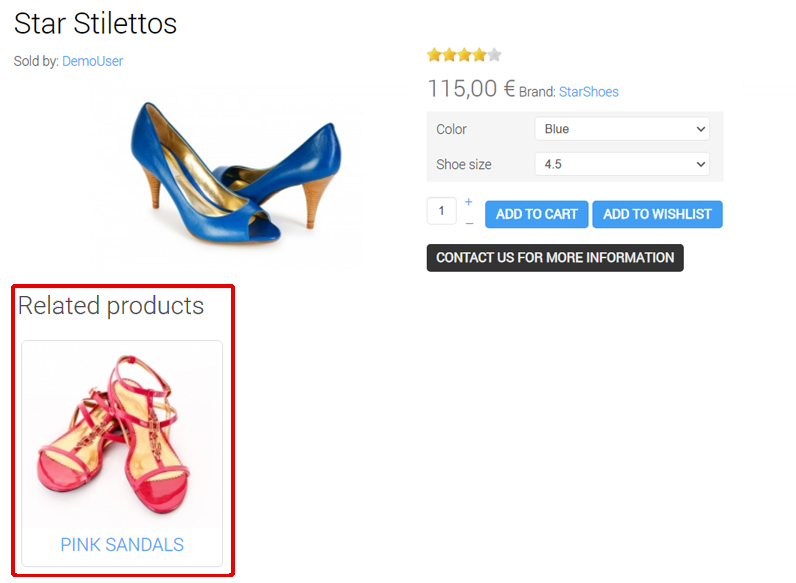
These products will then be displayed as a products listing at the bottom of the product page thanks to the "Related products" module that is pre created by HikaShop and enabled in the "Modules under the product page" setting of the HikaShop configuration. You can edit that module via the menu Display>Content modules if you want to change the display of the related products.
Also, if you activate the "Make product association in both ways" setting of the HikaShop configuration, when you add related products to a product, that product will be added in the related products setting of these products.
Here is an example of the result on the product page:
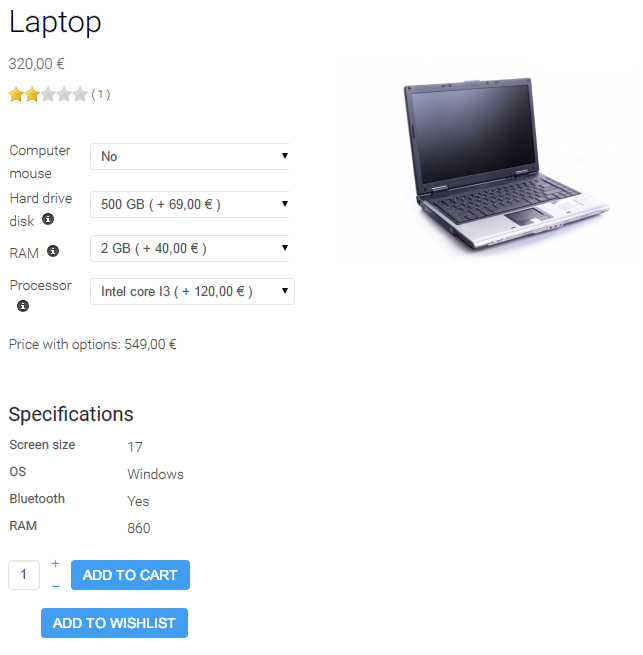
- Options : Options enable you to propose to your customers additional options for a product. For example, if you sell computers, you could ask your users whether they want more RAM, or a bigger Hard Drive Disk by paying a bit more. The total price is then updated in live so that the user can see the full price of the product + the options before adding the product with its options to his cart. Note that an option can only have ONE characteristic which will be displayed as dropdown on the main product page.
Options are only available in our commercial editions.
Before selecting an option in that interface, you will first have to create a new product (which you could put in an unpublished category if you don't want users to see it on products listings). After adding that product as an option to your main product, you will see a dropdown with 2 possibilities on the product page. If you need more or different options, you will have to add a characteristic to your option product allowing you to have one variant of the option product per choice on the dropdown. You can see such options on our demo website:
Let's take the example of the creation of the RAM option :
First, we made one characteristic called RAM quantity with the three values via the menu Products->Characteristics.
Second, we created one product option (like a normal product) that we called RAM and we added that characteristic to it.
Third, we clicked on the "Variants" tab of that option product and add the variants and set the name of each variant and its price.
Finally, we added the RAM option product as an option of the desktop computer product on the desktop computer edition screen.
Example result :

- Bundled products : Here, you can select other products and provide a quantity for each. This will lead to several things:
- When your customers look at that product on the frontend, the stock available will be the maximum possible based on the stock of all the bundled products, their quantity here, and the stock of the main product. For example, suppose I sell a table set with an unlimited stock. In it, I have added as bundled products 1 table product with a stock of 50 and 4 chairs with a stock of 100. The visible stock on the frontend for that table set product will be automatically and dynamically calculated at min(50 / 1, 100 / 4 ) = 25. Once the stock of the chairs or tables goes to 0, the table set will also become out of stock.
- When a filter "in stock" is used to filter the products of a listing, the stock of the bundled products will be taken into account.
- When the waitlist mechanism is activated (allow customers to subscribe to an out of stock product so that they'll receive an email when the product is restocked), the bundled products will be taken into account.
- After a customer purchases a product, the stock (in the "quantity" input field) will be updated if it isn't set to "unlimited". Similarly, the stock of the bundled products will be updated. In the example above with the table set, if the customer purchases 2 table sets, the table product will be updated with minus 2 products, and the chair product will be updated with minus 8 products (since there are 4 chairs in the bundle).
- After a customer purchases a product, the "product_sales" value of that product will be updated. Similarly, the product_sales value of the bundled products will be updated. In the example above with the table set, if the customer purchases 2 table sets, the table product will be updated with plus 2 sales, and the chair product will be updated with plus 8 sales (since there are 4 chairs in the bundle).
Display
This section will allow you to customize the way the product page displays. You'll see that different options might appear here based on how you configure HikaShop. These are the default options:
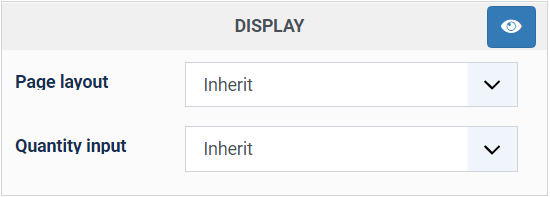
Page layout : You can select here the layout to use for the display of the product page. You can customize these layouts via the menu Display>Views (search for "show_" in the product view in order to find them).
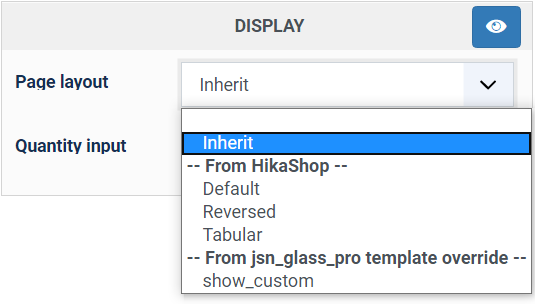
- Inherit : This is the default selection and if used, the product page layout will be the one selected in the option of the same name in the HikaShop configuration.
- Default : As the name says, that's the default layout of the product page.
- Reversed : Reversed organisation from Default display. Here is an example:
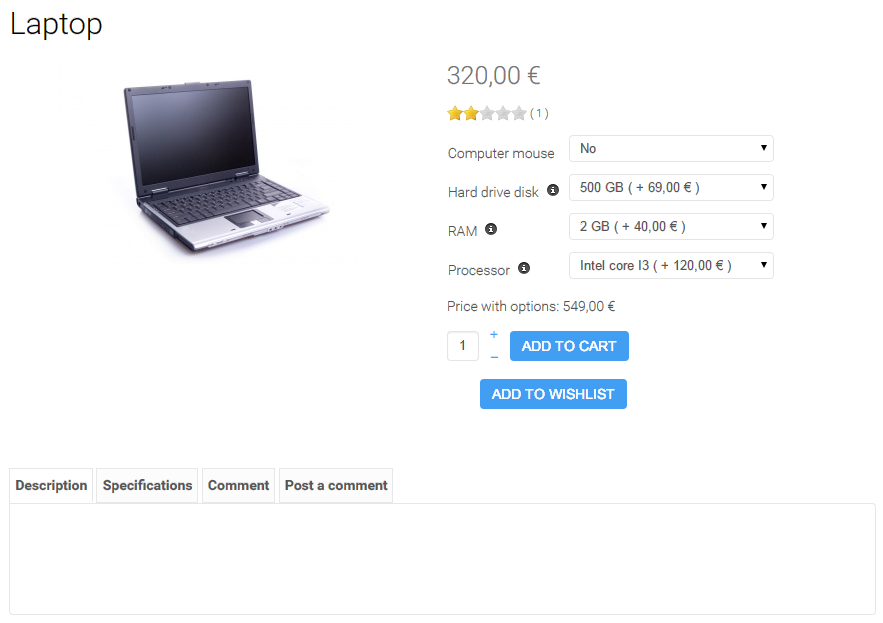
- Tabular : The product page will be organised with tabs. Here is an example:
- From XXX template override : When you edit a layout via the menu Display>Views, you can change its name. Then, when you save it, it will be saved as a new layout in your Joomla template and you'll be able to select it in that section of the dropdown.
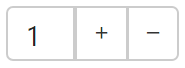
Quantity input : Here, you can configure how you want the quantity input to be handled.
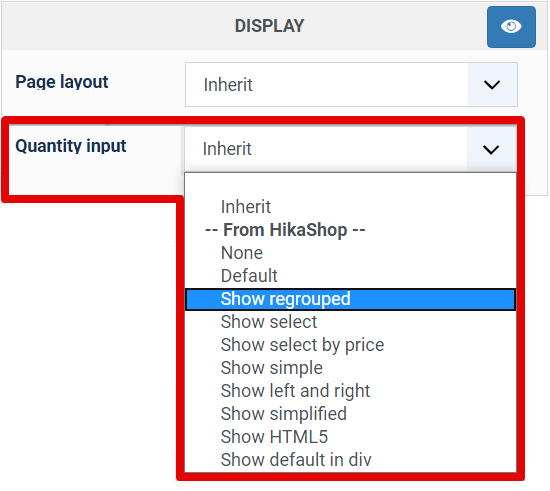
The default display will be with an input box and the - and + links in an old fashion way. If you want something more boostrap-like, you can use "Show regrouped" which will display like this:
With the "Show select" choice, you'll be able to have a dropdown of values instead of an input box. It can be useful to restrict what customer can select and thanks to the "Quantity per order" field, you can configure the increment of the values in the dropdown and its maximum value.
For more information on the other options which can display there, you can go to the "Special cases" section of the this documentation page.
Create a new product tutorial
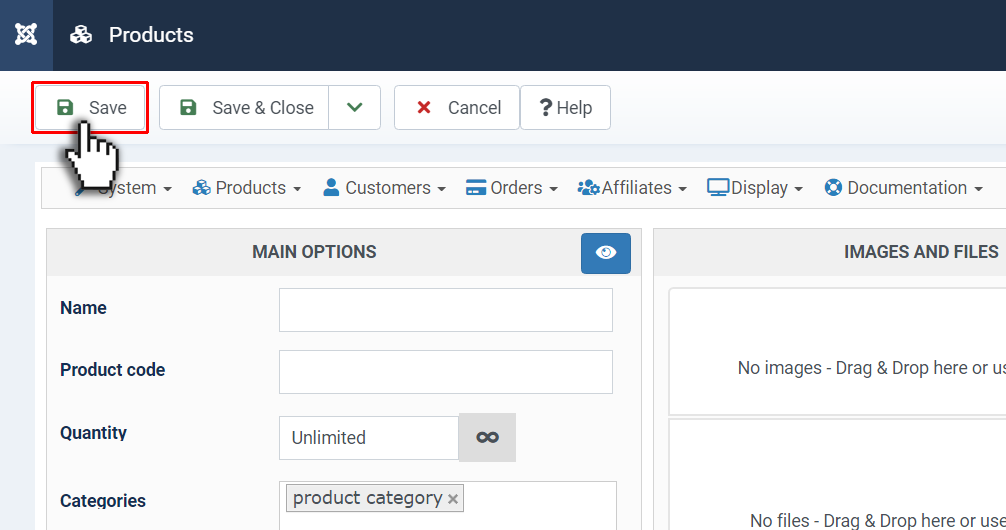
You will now follow a concrete example of how to create a new product with some options to fit the most common case on a HikaShop website. First, click on the "New" button in your HikaShop products listing:
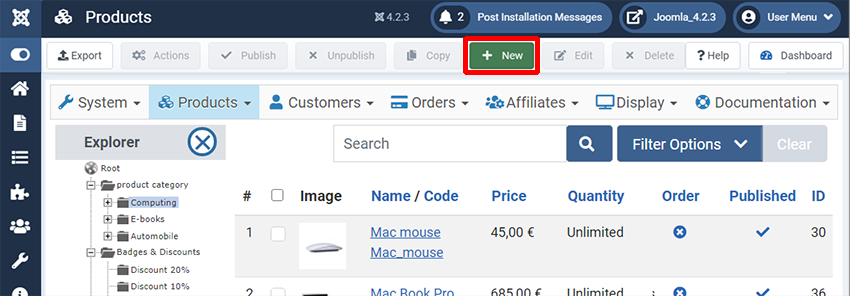
The product edition interface will look like this:
Main Options, configuration
If you want to see the detailed documentation on these options, you can click here
1° Give a name to your new product (this name will be display in the front end).
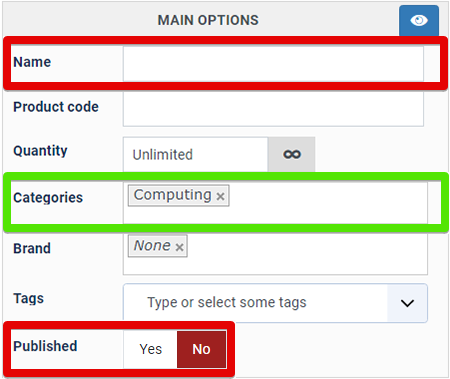
2° Associate your product to one or several categories. You must have created at least one category before, otherwise, the product will go automatically in your main product category that is there by default.
Categories purpose: Setting a category to your product in order to have different product groups and will allow you to optimize your website organisation.
Note : You have two ways to look for categories.
- By clicking in the field and selecting among your categories by clicking on them.
- Or if you have a good knowledge of your categories, you can type the category name you want. Once you have at least three letters typed in, you'll see the list of categories matching what you typed so that you can select the one you want.
If there are several categories for this product repeat the operation.

3° Don't forget to click on yes to publish your product.
Example result :

Images and files configuration
If you want to see the detailed information about this area, you can click here
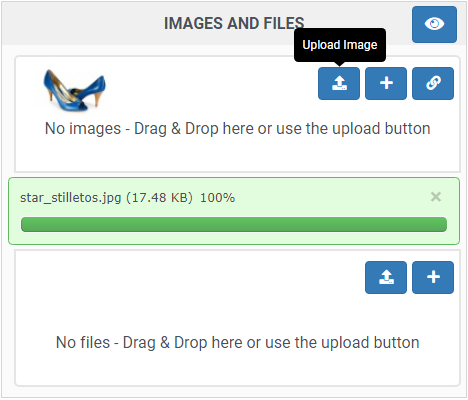
Now, we will add a picture to your product. For this, three methods are possible :
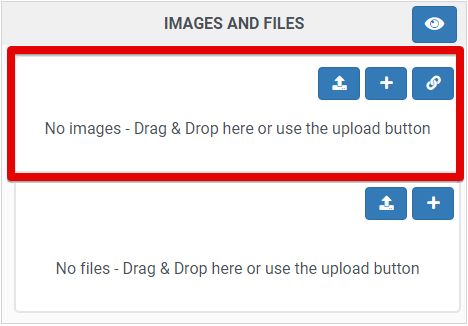
- Drag & Drop : Open the folder where your image is on your computer and drag & drop it in that area of the page. It will then automatically upload and add it.
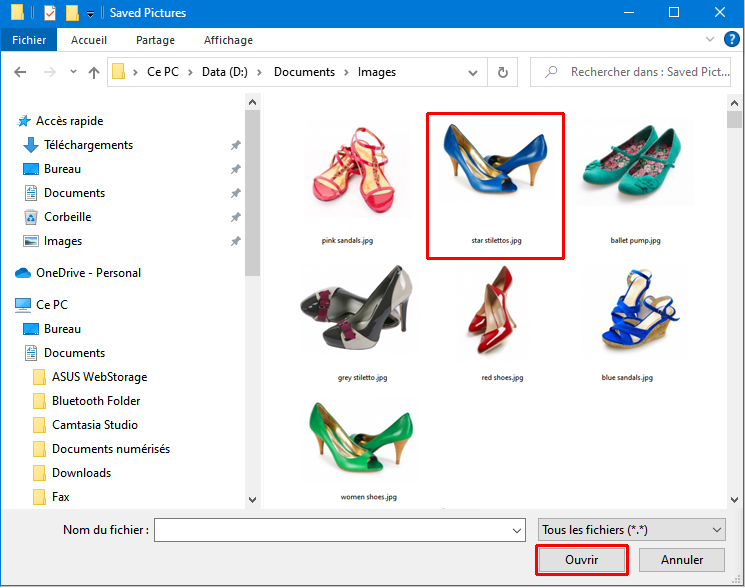
- Upload button : By clicking on this button , HikaShop will open a window in order to browse to your image path on your computer.
Select your image and click on "Open".
- Add button : Use this if your image is already on your website. It will open a window in order to show your images.
Select your image among your other HikaShop images by clicking on it.
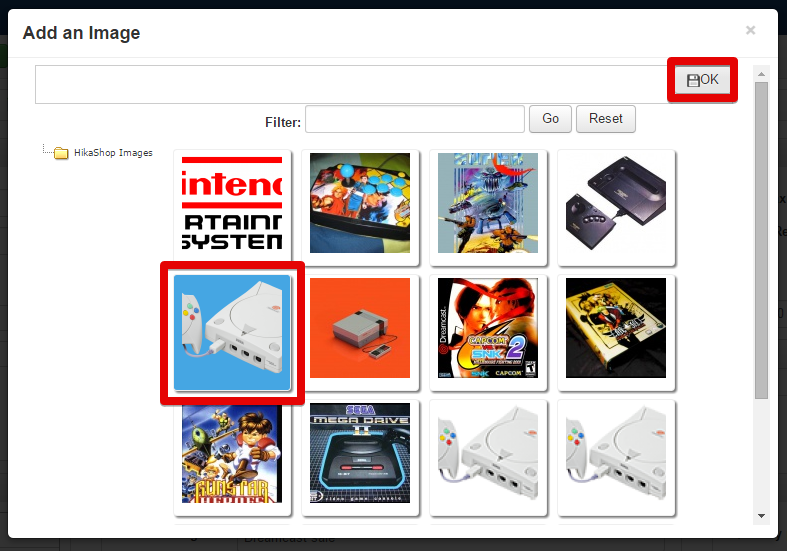
Your image will be selected and added to your product:
Note : The process to add a file will be the same as for images.
Prices and taxes configuration
See the detailed information about these settings here
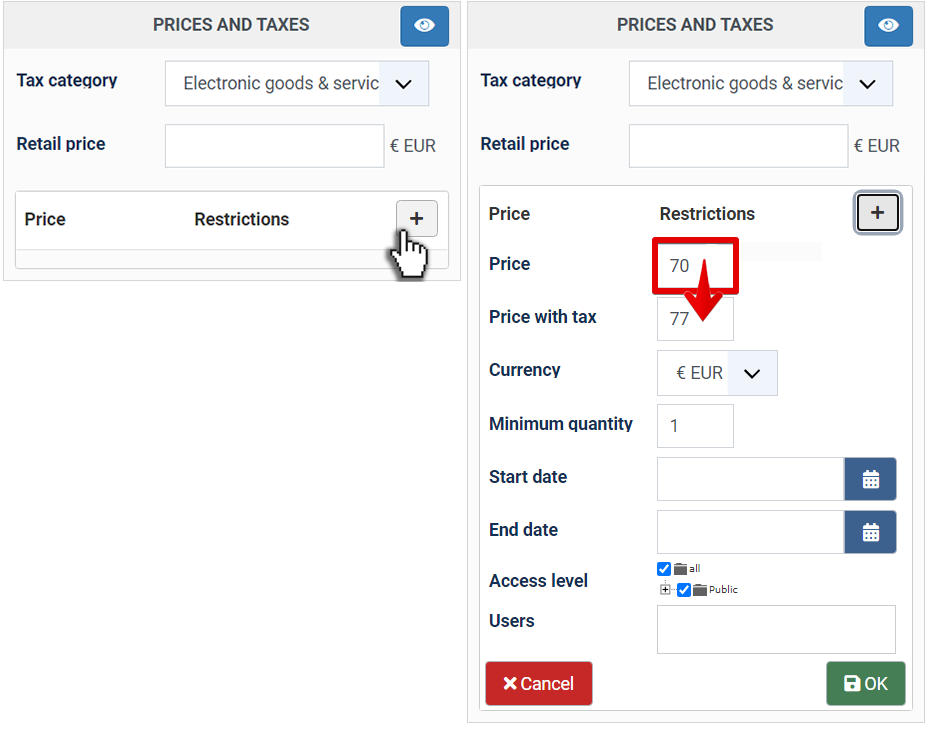
Then, we will define the price of our product.
1° If needed, select in the dropdown the required tax category among the different tax categories you have created. In most cases, you can just use the "Default tax category" and don't need to create more tax categories.

2° Now, set the price in the first input called "Price".
Note : If you have selected a tax category and that you have configured your tax rules via the menu System>Taxes, the "Price with tax" will be automatically changed in order to add the tax to the unit price.
Description
Here, just type your product description :

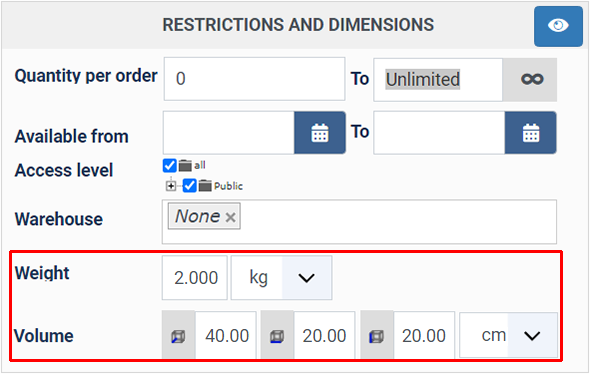
Restrictions and dimensions configuration
See the detailed information about these options here
- Weight : Use the first input field to type the weight and the dropdown to set weight unit.
- Volume : Like above, set the three dimensions of your product and use the dropdown to select the dimensions unit.
Specifications configuration
See the detailed information about this area here
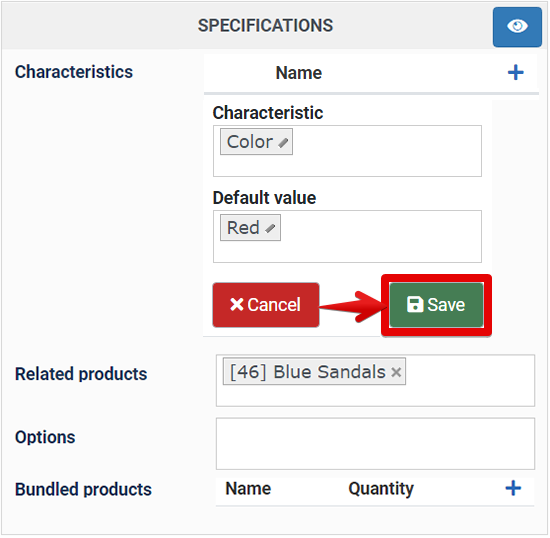
1° : First of all, create a characteristic with its values via the menu Products>Characteristics
2° : Then, click on ![]()
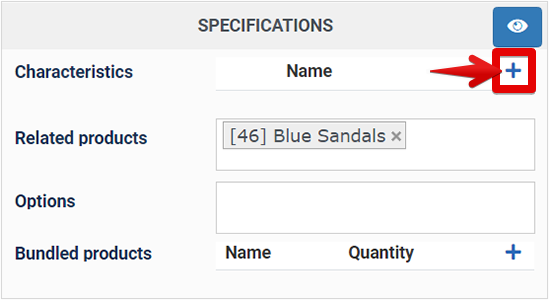
3° : Select which characteristic you want add.
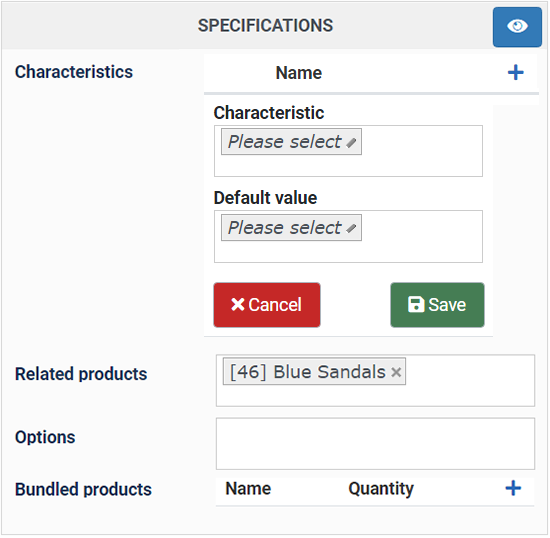
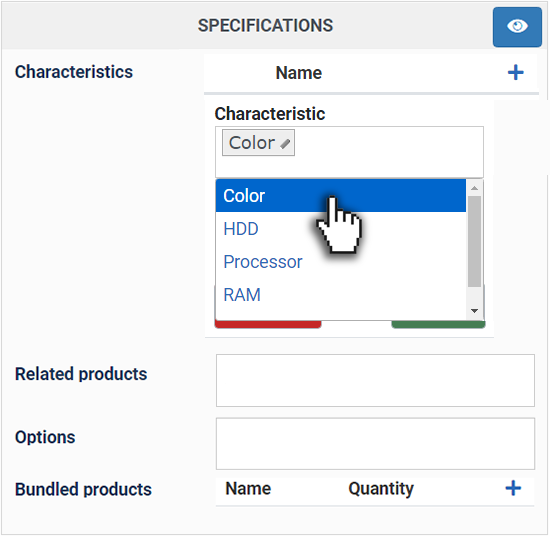
4° : And define select the characteristic default value.
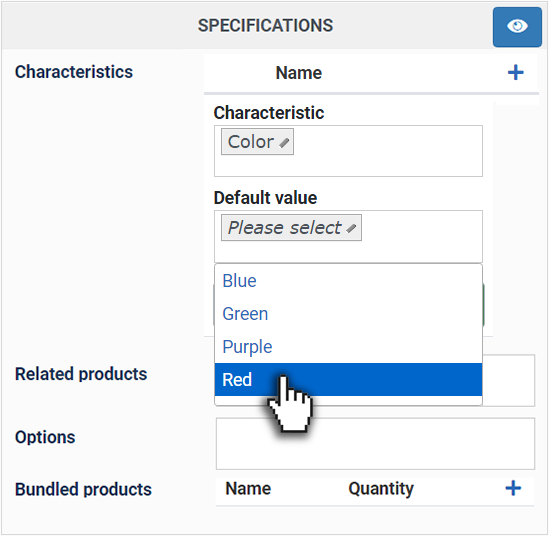
5° : Finally, you'll want to save and you'll be able to access the "Variants" tab of your product in order to add the variants you want from that characteristic.
You have now completed your product creation with minimum data to be displayed in your E-shop (with in bonus a characteristic).
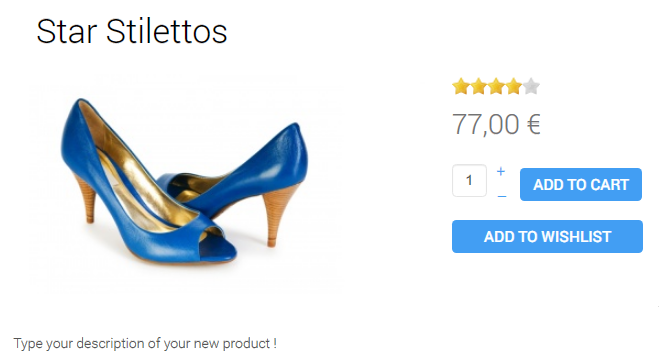
Result view on the Front end:
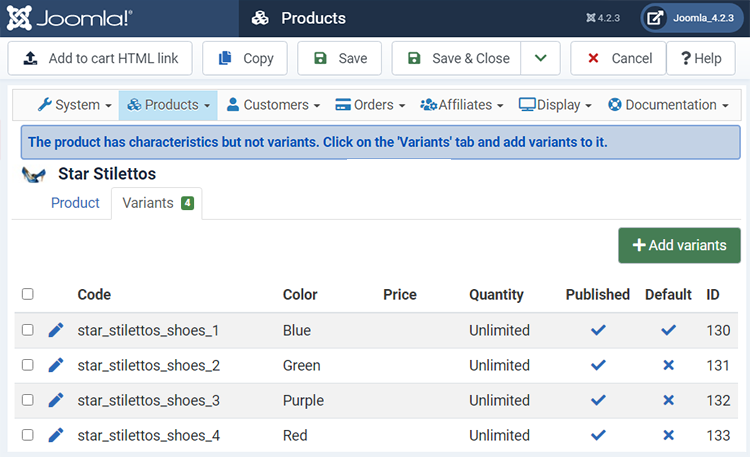
Variants
A variant is created for an existing HikaShop product based on the values of characteristics (that you can add to your product in the Specifications area of the product edition page).
For example, you have created a shoe product, and you have lots of other colors available for it. You must first create a characteristic with a value for each color via the Characteristics menu (Products->Characteristics). Then, add the characteristic to your product (See the Specifications chapter, here). And finally, you can go in the Variants tab in order to add all the variants (combinations of values of characteristics) required. Let's discover how the process looks like.
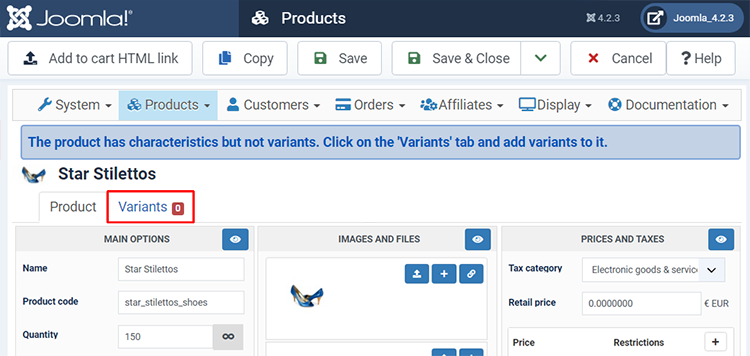
Just after you save your product, and if you have added some characteristics to it, you may notice that a tab interface will be displayed at the top of the product edition page, as you can see here :
The second, named "Variants", will allow you to manage variants for your product, so click on "Variants":
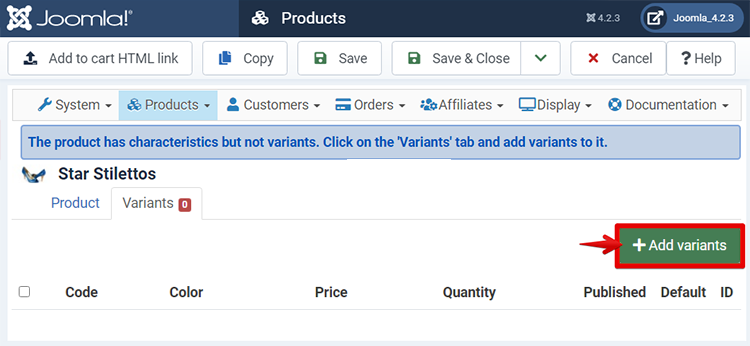
You will arrive on a new listing interface which, later, will display you all the variants of the product so that you can edit one or another.
First, click on the "Add variants" button:
Your characteristics will be displayed below. Click on the empty input just under the characteristics name.
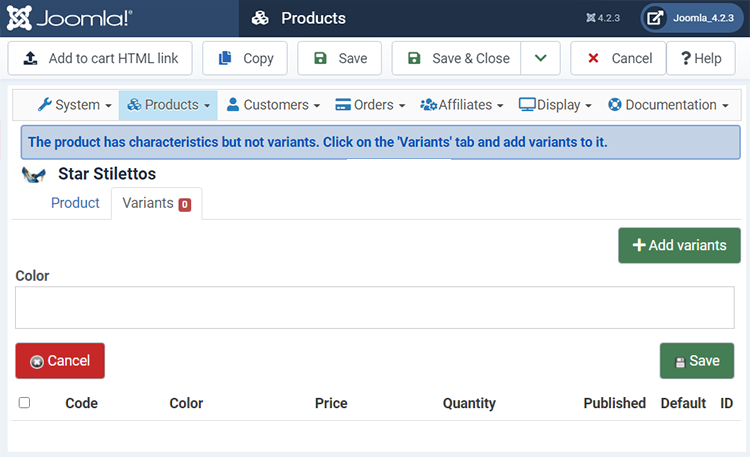
Differents values of the characteristics will be list, pick all the ones you want to be available for the current product.
When it's done for each characteristic, don't forget to save !
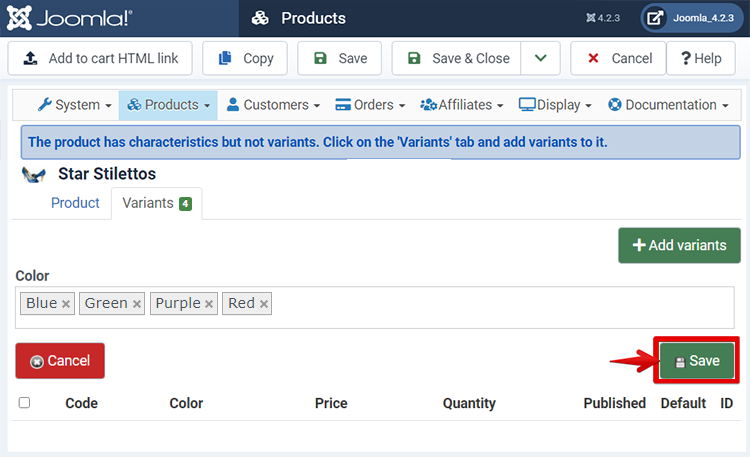
Now, you have a listing of your generated variants, and you can begin editing each one of them if you need to set different settings for each one.
The first way to manage variants is to click on the checkbox of each variant to display two new button :
- Delete : If you want remove one or several variants.
- Duplicate : If you want create a new variant directly based on others.
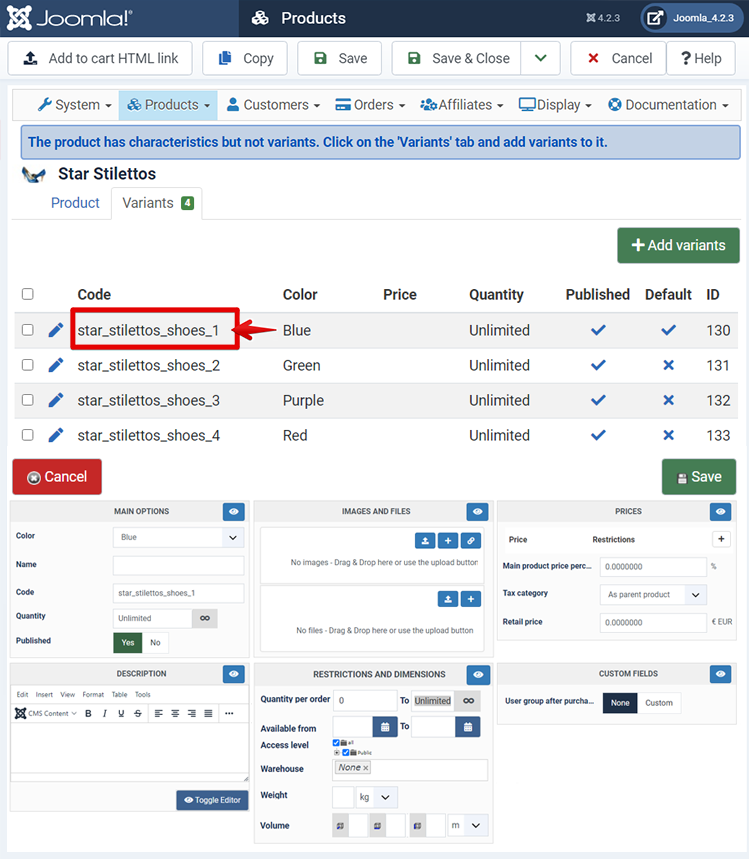
The second way to manage your variants is to click on the pen icon of a variant or directly on its name (here : "Value") .
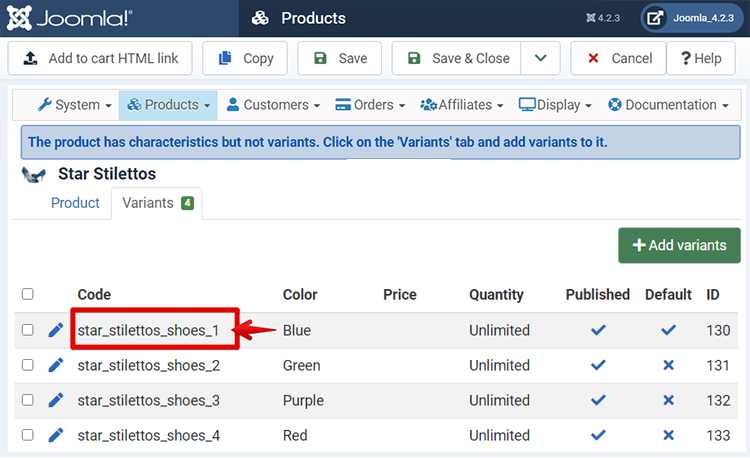
You will discover, under the variants listing, a new configuration interface, similar to main product configuration page.
And so, if you need different description or price or image, etc.. you can make the required change here.
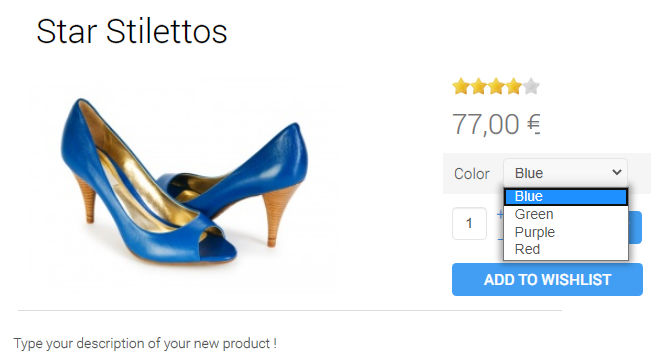
On the front end product page, you will now find the product and your characteristics :
Special cases
The product edition interface can evolve through different options that you can activated in your Hikashop configuration !
For example, if you have defined Product Custom fields via the menu Display->Custom fields, the "Custom fields" part of the interface will be displayed besides the "Display" part.
Here, for example in red this custom fields is display when you have installed HikaMarket.
After the Hikamarket custom field, you can see some different product custom fields that were created via the menu Display>Custom fields in order to add additional information to the product and display them on the product page of the product.
Note : You might want to have a look at our tutorial on custom fields here
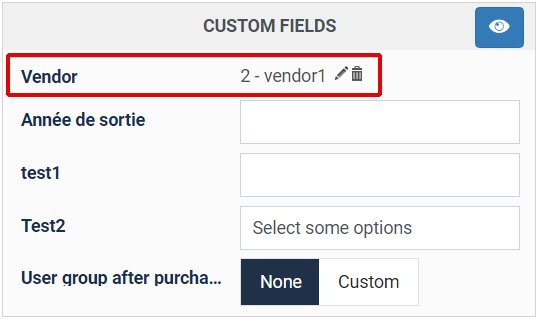
User group after purchase: This option will display if you have the Business edition and the "HikaShop user group after purchase" plugin activated (the case by default) in the Joomla plugins manager. This setting will allow you to select a user group which will be attributed to any customer purchasing that product after the order is confirmed.
Main options can change too, for example, if you install a translation extension and switch on translations, in order to manage different translations of your product.
If you want to know more about translation, have a look at our translation tutorial here
In addition to the default display options "Page layout" and "Quantity input", you can see here the "Contact button" and "Waitlist button" options:
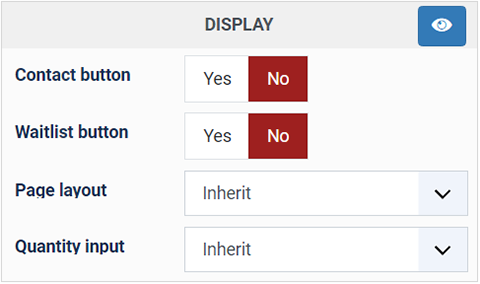
- Contact button : Displayed a contact button on the front end product page to allow customers to contact you for more information on the product. That option can be activated with the "Display a contact button on the product page" setting of the HikaShop configuration.
- Waitlist button : Displayed a button on the front end product page to allow customers to ask to be notified when an out of stock product will be back in stock. That option can be activated thanks to the "Waitlist" settings of the Features tab of the HikaShop configuration.
Note : If you want learn more about waitlist options, you can go here

