Our extensions

play HikaShop is an e-commerce solution for Joomla !
Built for simplicity and flexibility. 


Have your users purchase your products efficiently, facilitate the management of your store, increase your sales thanks to built-in marketing tools and so much more !
Quik and easy to configure, let starts your shop online today !

All features     Download

What's new ?

Main features

INTERNATIONAL
SALES


HikaShop provides an interface for handling languages, currencies, zones and advanced taxes to sell anywhere in the world.

POWERFUL
STATISTICS


Easily manage your store using the built-in dashboard and its powerful statistics capabilities.

RESPONSIVE
LAYOUT


HikaShop works on every device (laptop, tablet, smartphone..). Your shop will fit to each user's screen.

MARKETING
TOOLS


Increase your sales thanks to affiliate program support, coupons, discounts and email marketing integration.

EASY TO
CONFIGURE


User-friendly and flexible, our component is easy to use and configure. Create your own shop online in a minute !

FULLY
INTEGRATED


HikaShop is integrated with many other components and includes a lots of plugins...

ADVANCED
CUSTOMIZATION


Personalize your store: views, checkout, information fields, emails, and more to fit your website design

MULTI
VENDOR


Adding HikaMarket to HikaShop, create a multi-vendor website. Manage in one shop several sales from different people.

Our Company

BUSINESS
PARTNER

HikaShop is a complete e-commerce solution that allows you to easily create and manage your online store but also take it to the highest level.

GREAT
SUPPORT

The whole team is working to provide you with quality support. Documentation and forum are there to guide you step by step. Each issue finds an answer !

ALWAYS
ON TOP

HikaShop is constantly improving. We ensure compatibility with each new version of Joomla! And new features are added frequently.

RECEIVE
OUR NEWS

Good deals and novelties, it's here!

WARNING! : Some Shipstation options detailled here options will be only available in the "Shipstation updated" version avalaible in our Marketplace.


Description

This screen enables you to configure the ShipStation plugin. ShipStation's purpose is to enable you to manage and follow precisely all your delivery orders.

For example, after an order reaches the verified status and is to be delivery, ShipStation will follow your order and send you critical data about the delivery status, like carrier, tracking number and shipping status.

So, you can configure your plugin in order to allow data communication between your merchant site and ShipStation, that will be the point of this tutorial.


Download the ShipStation plugin


In order to get the ShipStation plugin, you need to download the plugin here : Download ShipStation Plugin


Main Information


With Shipstation on your merchant site, your HikaShop can update your orders status, and fill some order shipping data.


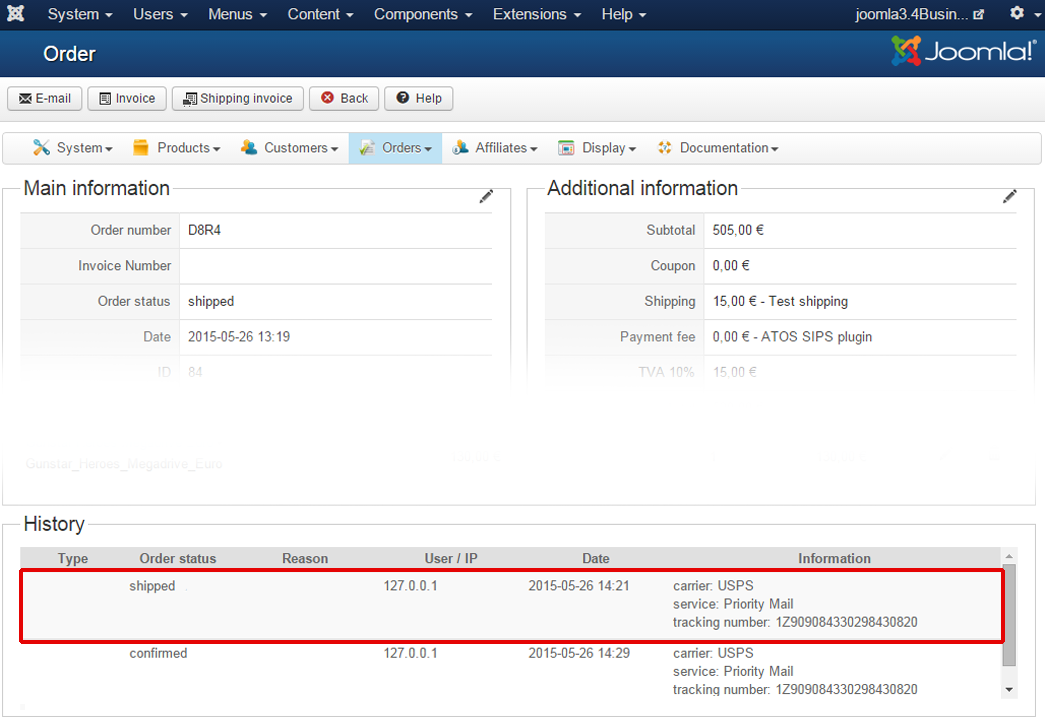
Plus, If you want to, you will be able to automatically notify your customer with an email containing the new status, the carrier and the tracking number. Let's see how to configure this different points in the following sections.


Access Hikashop Shipstation plugin settings


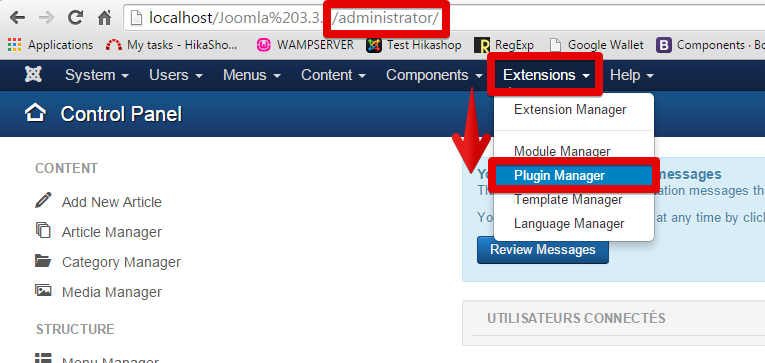
First, we have to go to the ShipStation plugin setting page. Follow the different steps :

From the administrator page, go to "Extensions" then "Plugin manager".


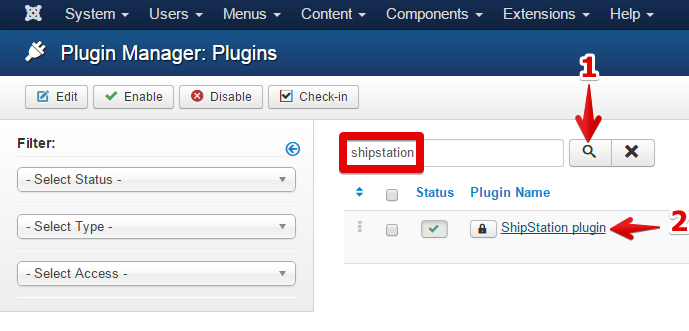
In the Plugin Manager page, use the search box, and type "shipstation".


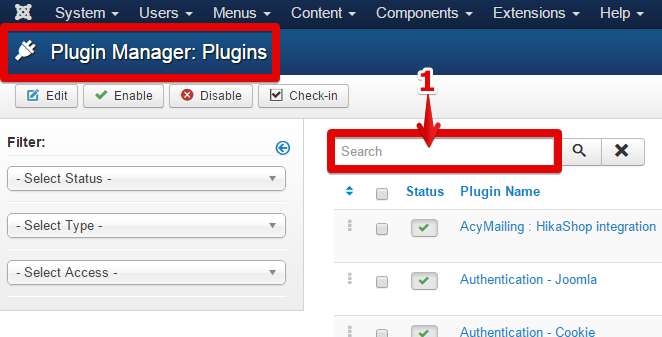
Click on search button and the shipstation plugin will appear. Click on its name.


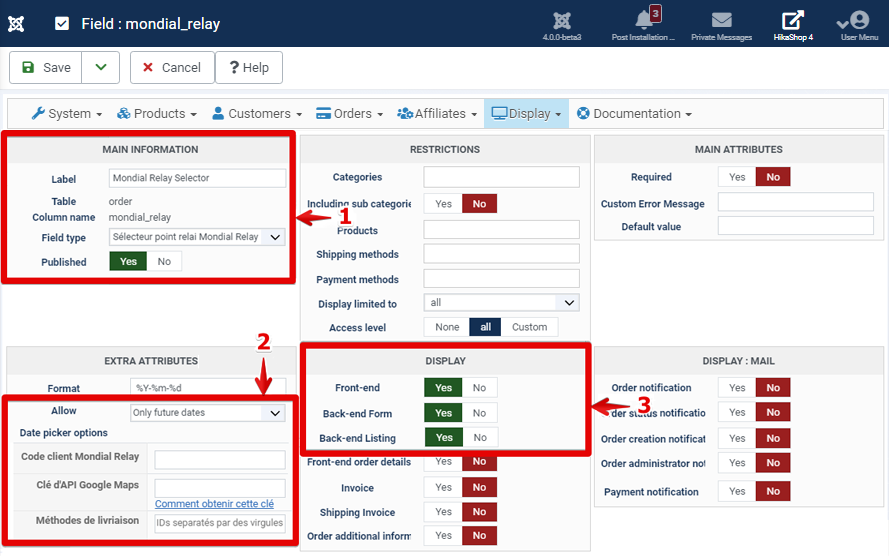
Here, in the ShipStation plugin settings, you'll see different parts that we will now describe.


Hikashop ShipStation plugin configuration
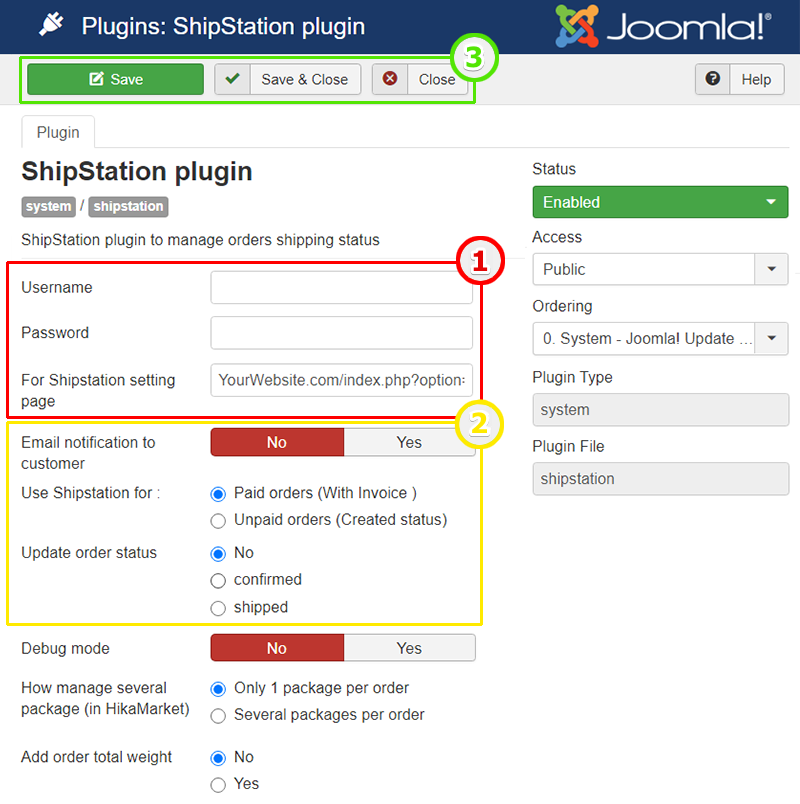
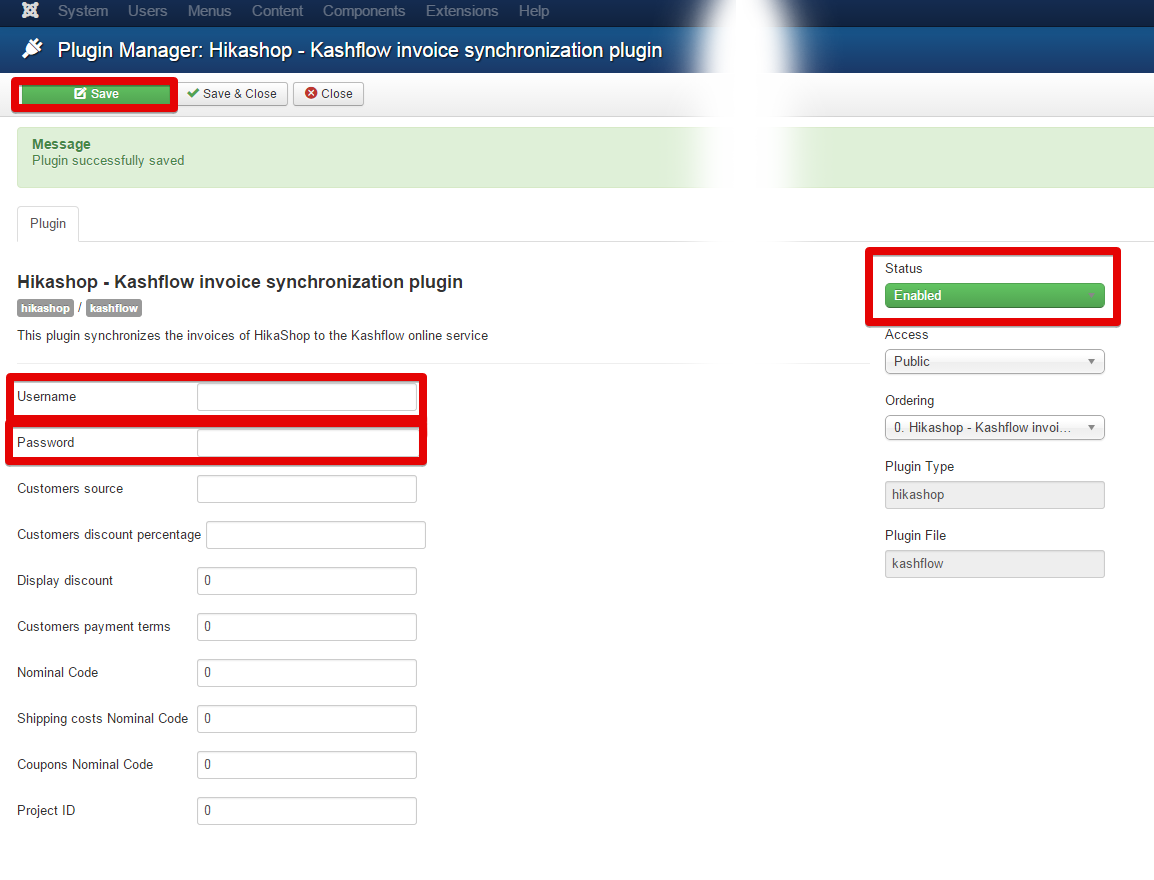


Part 1 :

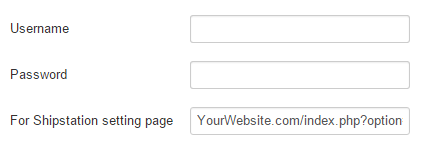
    • Username : This is where you have to type your ShipStation username.
    • Password : Same idea than above, but for your password.

NOTE : The Username & the Password is only known by you. You can access them in the Shipstation setting page. That will allow ShipStation to recognize your notification and vice-versa. So it's important that these references must be kept secret.


ATTENTION! : Due to your Shipstation plugin processing, it forbidden to define a username or a password with an "@".


  • For ShipStation setting page : keep the url path but adapt it, in details replace "YourWebsite" for your website, example "hikashop.com" and this path has to be set in your ShipStation account settings page.


Part 2 :


  • Email notification to customer : Choose if your customer will be notified when his order is getting shipped.
  • Use Shipstation for : Define which kind of order will be send to Shipstation, Switch to "Unpaid orders" if for example, you have to be pay when the shipping is arrived to the customer.

    "Paid orders"(With Invoice) will only send to Shipstation, orders which have his Invoice created.

  • NOTE :Take time to look about this option in HikaShop -> Configuration.

    Then, select Order in Main configuration.


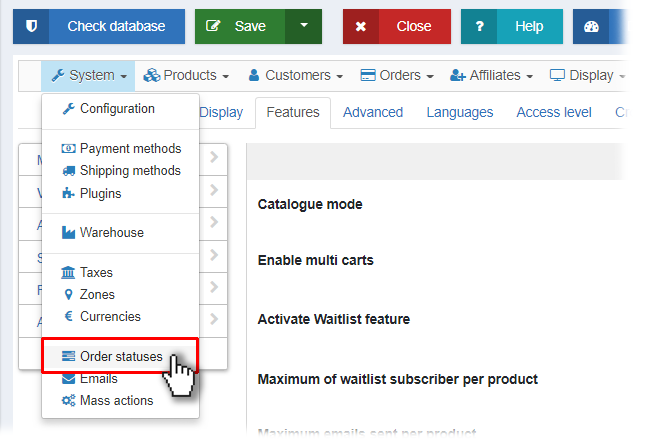
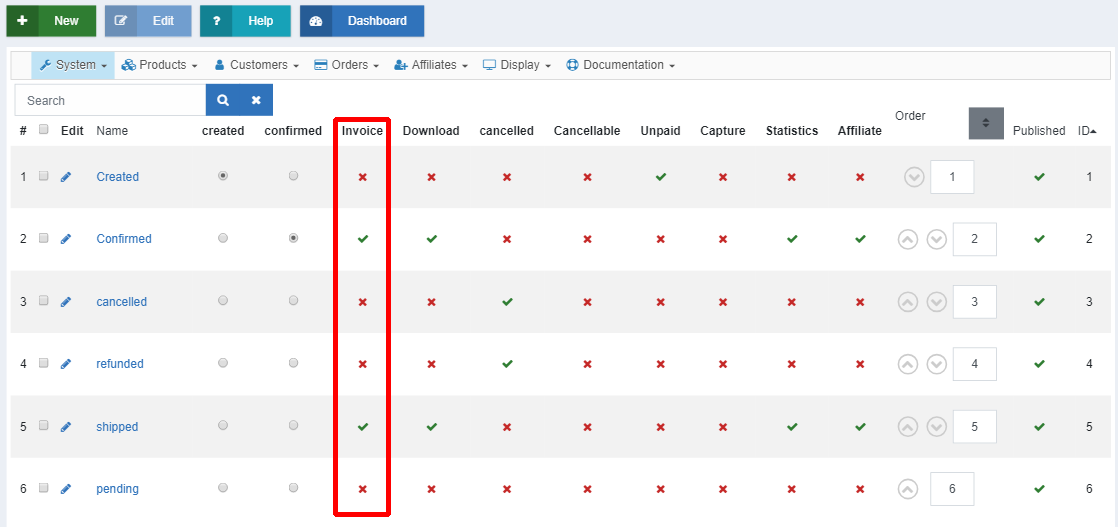
    Like this, you will define the required status to edit the order invoice, and so, the important point here, is that if you define for example "shipped".

    Orders without shipped status (and so here for the example without invoice), never be send to Shipstation.


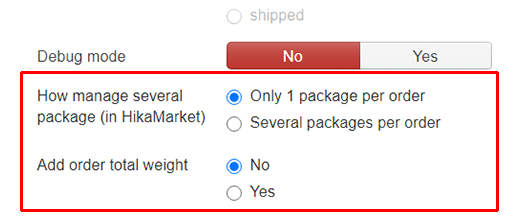
  • Update order status : Do you authorize your ShipStation plugin to change the order status (choices are "confirmed" or "shipped") or not.
  • Debug mode : Switch on ("yes") or off ("no") to allow your Hikashop ShipStation plugin to fill the log file, especially if there is any trouble. The log file is here to see  debug data. This will help in finding where the trouble is with the setup of the plugin if something doesn't work with it.

    NOTE : If you don't know how find or learn more about the log file, go here

WARNING! : Next Shipstation options will be only available in the "Shipstation updated" version avalaible in our Marketplace.

  • How manage several package (in HikaMarket) : Define how your e-commerce manage a specific HikaMarket possibilities.
    Note :
    If In an Order you have several products with differents vendor (and/or shipping methods), then 2 possibles organisations :
    1. For this case, each vendor have his own package => Several Packages per order 2. other case, there is a way to centralize orders in 1 package => Only 1 package per order
    results :
    1. => Shipstation will manage each package for the same and unique order, see relatives screenshot :

    2. => Shipstation will manage treat order shipping as a classic 1 package, like any classic order, and so be aware that all package management will be merged in one.

  • Add order total weight : define if you want that your HikaShop Shipstation plugin sent to Shipstation servers weight data.


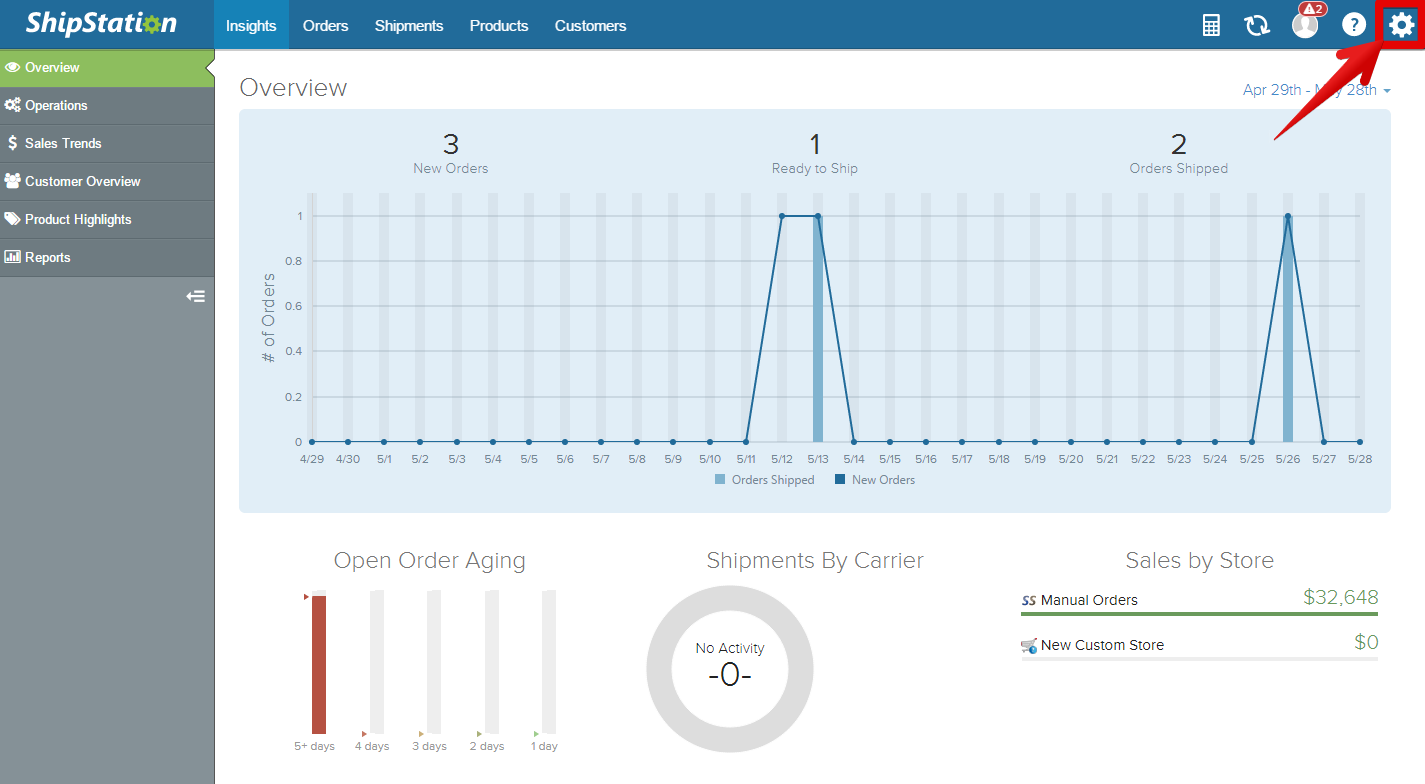
ShipStation setting configuration


Click on the cogwheel icon.


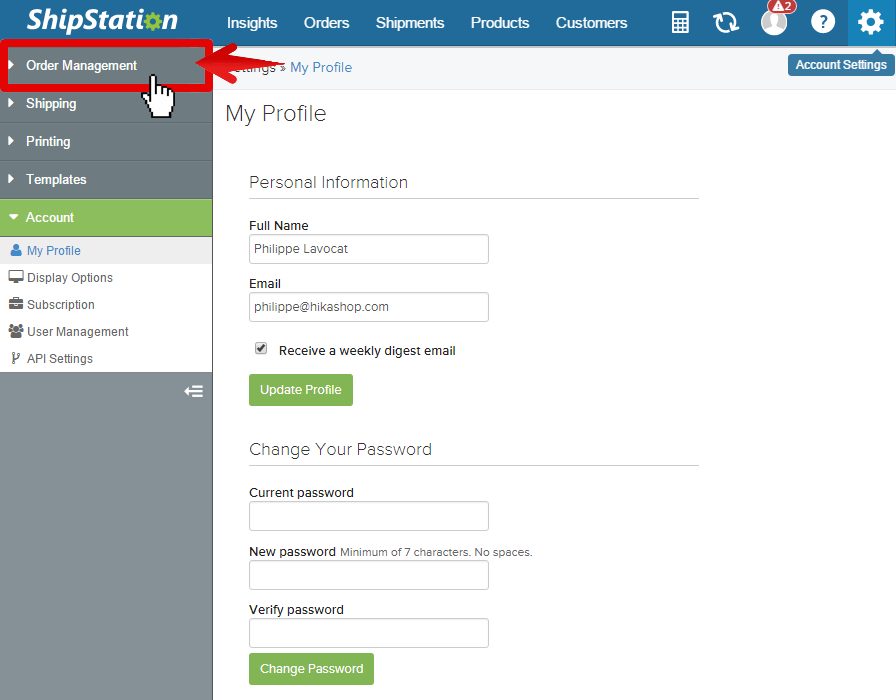
Click on "Order Management"


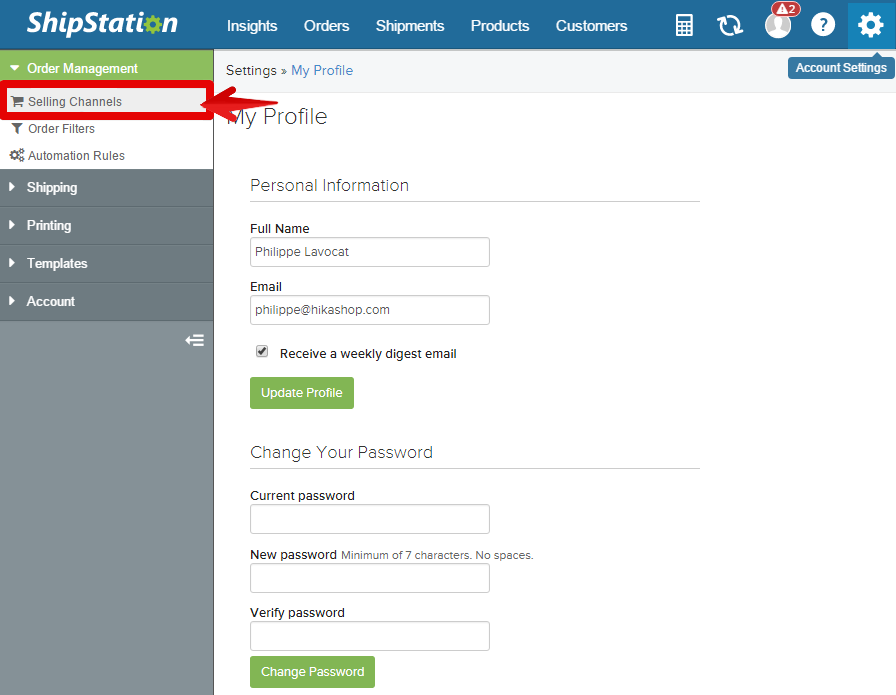
Then, go on "Selling Channels"


Go there to connect and test communication between your plugin and the shipStation Api.


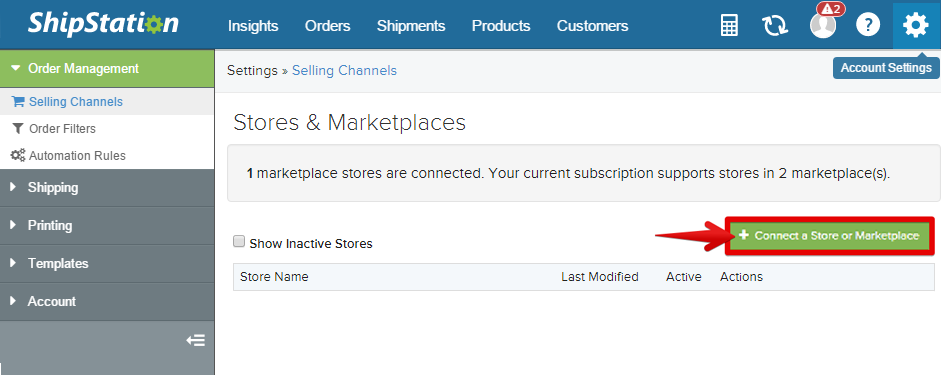
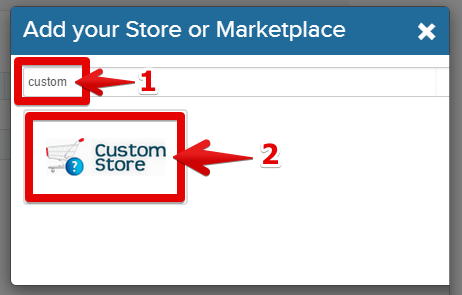
In the search input type "custom", and then click on the "custom store" icon.


Here, you have to fill your "username" and your "password", the same references than in your Hikashop ShipStation plugin, and the URL given to you in your Hikashop ShipStation plugin.


Note : For example if your website address is "www.hikashop.com", your URL to custom XML Page will be : "https:// OR http://www.hikashop.com/index.php?option=com_hikashop&ctrl=shipstation".


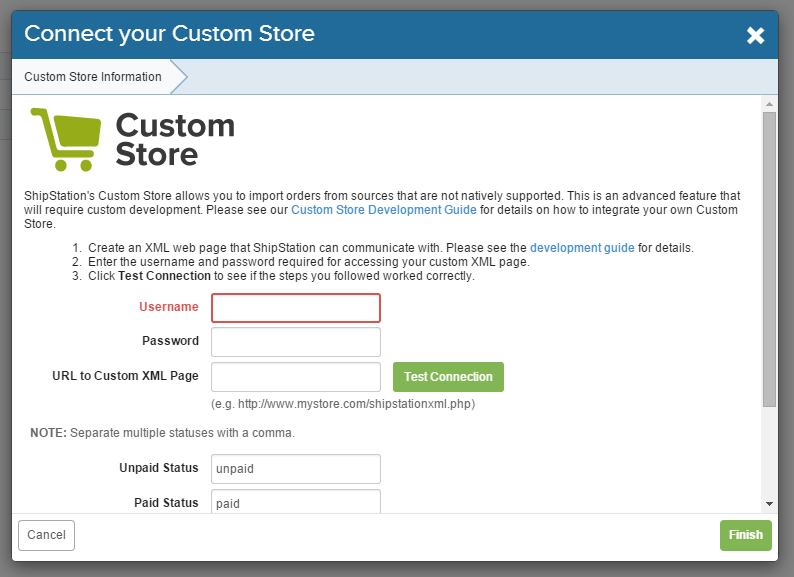
You must test your connection by clicking on the "Test Connection", and if everything goes well, you will see this!


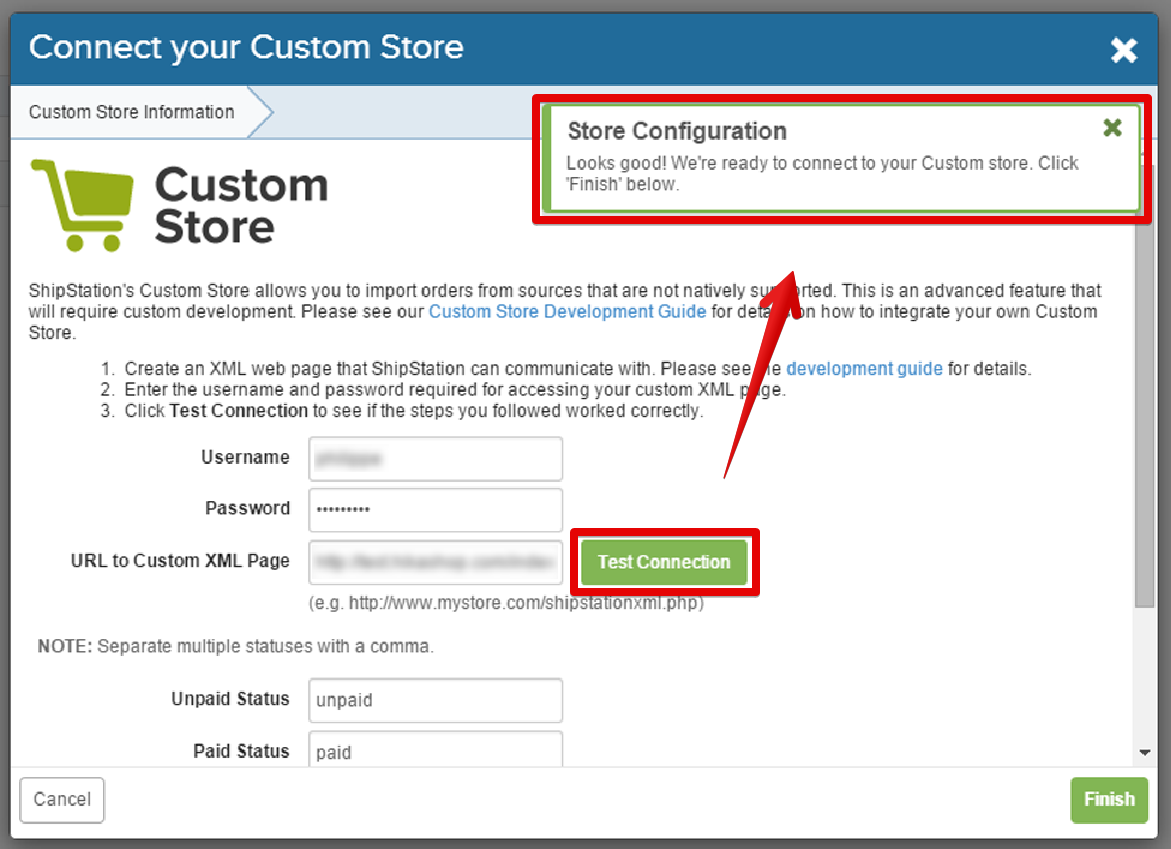
Your merchant site is now connected to ShipStation, this will allow you to manage and follow all yours orders in your ShipStation account.


Common issues

You have troubles when setting your Shipstation setting? Look among most reported errors and discover maybe the solution!

More precisely, when you enter your custom store and Test Connection instead of having this :

You have an error message, let's see how to proceed :

  • Error message : Store Configuration
    We received an error testing the Custom store: Invalid XML. Error: 'Root element is missing." We received: "

    In this case, it's possible that Shipstation can't reach your plugin.

    • Check that all your Shipstation references match.

      More precisely, Username and Password in your HikaShop Shipstation plugin (Extensions -> Plug-in Manager -> ShipStation plugin), Must be identical in ShipStation setting page.

    • Check your server configuration, it must allow access to your website from Shipstation.

  • Error message : Store Configuration
    We received an error testing the Custom store: An error was encountered while attempting to test the connection

    Check your URL to Custom XML Page.

    If your website address is "www.hikashop.com", your URL to custom XML Page will be : "https:// OR http://www.hikashop.com/index.php?option=com_hikashop&ctrl=shipstation".


Description

The HikaShop plugin for Mondial Relay enables you to display in the checkout the Mondial Relay pickup point selector. That way, the customer will be able to pick the closest Mondial Relay pickup point during the checkout.
Please note that this plugin requires the Business edition of HikaShop.

Please also note that this is an old plugin for Mondial Relay. Our partner, Obsidev, as developed a more complete and recent plugin for Mondial Relay, which works better, and doesn't require HikaShop Business nor a Google Maps account. You can find it on our markpletplace here


First of all, you must create your merchant account here : http://www.mondialrelay.fr/

Once your Mondial Relay account is setup, you will receive your id references. It will be useful to setup your Mondial Relay HikaShop Plugin.


NOTE : You can test your plugin with the test code "BDTEST  " (beware there are two spaces at the end of the test code).


Settings


NOTE : In order to configure your Mondial Relay Hikashop plugin, you must have a good knowledge of custom field configuration, here, you will find all there is to know about custom fields setup.


First, you need to download the plugin from this link.

And then, install it via the Joomla installer.


To configure the Mondial Relay HikaShop plugin, you must go to the custom field setting via one of the menus of HikaShop:


Then, go to Display -> Custom Fields


And, go to create a new custom field by clicking on the New button.


In the setting field settings screen, select in the field type "sélecteur point relai Mondial Relay".


At this point, follow the different steps:


  • 1 : fill the different inputs, the Label will appear on the front end besides the Mondial Relay Wizard.
    Select "Order" for the "Table" option to display the custom field on the checkout (when an order is created).
    Type a column name. Thanks to it you will be able to find the custom field later in the custom fields listing.
  • 2 : Select to allow only future dates for the delivery.
  • And don't forget to put your Code client Mondial Relay (or your test code: "BDTEST  ") and the key from "Google Maps JavaScript API".
  • 3 : In the Display section, activate the front end setting to have your Mondial Relay custom field on the front end.
    AND don't forget to save.

NOTE : When you will save, the custom field will create below the Display setting a preview. Please note that the Mondial Relay plugin is unable to work in the backend, and thus you'll see a classic input text.


Required


The Mondial Relay Hikashop plugin need some HikaShop settings to be able to work efficiently. Precisely, the Mondial Relay plugin needs to know the city AND the postal code of the customer to find the pickup point. So, in the custom fields settings page be sure to set the default "address_post_code" and the "address_city" custom fields on required.


To be displayed in the checkout the "fields view must be in your checkout workflow, in the checkout setting page.

Let's check this via the menu : Go to HikaShop -> Configuration -> Checkout.

Just look if the "Fields" view is in "Checkout Workflow" setting, if you have to put it in, just drag and drop it in the "Checkout Workflow" AND don't forget to save your checkout.


Front end view


If everything is well configured you will see in the checkout the Mondial Relay wizard. It will displayed directly the map with all the pickup points linked to postal code. The customer will just have to choose his pickup point, and in the input field below the map, will appear the pickup point reference for the delivery, and that's it!


Description

Please note that Akeeba Subscriptions has been discontinued by its developer several years ago. So we rather recommend to use HikaSubscriptions, which is also integrated with HikaShop for subscriptions support and developed on our end.

The Akeeba Subscriptions plugins for HikaShop enable the subscriptions management for your HikaShop products.
You can add a subscription level on a product, and when the customer purchase the product, the subscription is added to his account.


In order for these integrations to handle recurring payments, you need to install and configure the HikaShop PayPal recurring payment plugin.


The first Akeeba Subscriptions plugin is a plugin that you can use when you want to use the taxes, coupons, and product prices in HikaShop for your subscription products. It is recommended when you only want to use Akeeba Subscriptions for the subscription system but not for anything else. For example, if you want to restrict coupons per categories, you will want to use it as the coupons in Akeeba Subscriptions do not handle that.


On the other end, the second Akeeba Subscriptions plugin is a plugin that you can use when you need to use Akeeba Subscriptions' subscription level groups, subscription levels, tax rules, upgrade rules, subscription level relations, coupons or affiliate management. These plugin is basically to be used when you want to add a cart capability to Akeeba Subscriptions basically. That means that the rules of discounts and taxes in HikaShop will be ignored for subscription products with that plugin and that HikaShop coupons won't take into account the price of these products for their restrictions or percentage amounts. So keep that in mind when using it :)

With this solution we have:

  1. "Products" (HikaShop) and "Subscriptions" (Akeeba Subscriptions) will be shown through the same layout, through HikaShop, all like "HikaShop products";

  2. Customers will have just one user profile, the HikaShop user customer profile (addresses etc.);

  3. All "Products" and "Subscriptions" will be collected into the HikaShop "Orders" and "Statistics"

  4. Manage Affliates through HikaShop Affliate program.


We suggest to use the more powerful Subscription level relations than the Upgrade rules.

This second plugin is an idea developed and sponsored by eGulp!, be careful if you want to uninstall this plugin, don't forget to remove the view overrides.


Setup


On the edition page of your product, select the subscription level for the product.

When an order is confirmed or shipped, the subscription of the products in it will be activated.
You can manage the subscriptions in the Akeeba Subscriptions component.

If the order is cancelled, the subscriptions become unpublished, and are not valid anymore.
The subscriptions are not deleted and, that way, you can follow all the subscriptions of your customers.

At any time, you can change the subscriptions levels values, or subscription level for each product.
Theses modifications will not affect the already purchased subscriptions.

The customer can follow his subscriptions via his control panel page (if you have a menu of the type "hikashop user control panel" linking to it on your front end).


Be careful, the second akeeba subscription plugin will override the views:

  • Product / listing_price
  • Product / cart
  • Product / quantity
  • Checkout / listing_price
  • Checkout / cart

So if you have already customized these views, thanks to save the content in an external file, install the plugin and then put back your customizations.

We recommend too to add a limit on the products with subscriptions, to allow the purchase of only one subscription at a time.


Description

Kash Flow is a Cloud-based system, which save your business data on kash Flow secure servers, so all your order and invoice data will be available everywhere just with an internet access.

That allow you to keep important data safe, have an accurate view on your business if you use Kash Flow tools on their website, and so, if you lose your computer, there will be no trouble to find all your orders data!

This plugin, once published will allow you to send automatically all your order and invoice data to online Kash Flow servers.

Install the plugin

  • The plugin is install by default with HikaShop since HikaShop 2.3.5. You should see the "KashFlow invoice synchronization plugin" in the Joomla plugins manager of your website (menu "Extensions -> Plugins manager").
  • Go on the Kash Flow website (http://www.kashflow.com/orbit/try-orbit/) to create your account, and receive your username and password that you will need to fill in your Kash Flow plugin options.
  • Don't forget to publish the plugin and configure different plugin options like you want.


Kash Flow


  • Username : Your Kash Flow username
  • Password : Your Kash Flow password
  • Customers source : You can enter here the ID/name of the source of your customers. You can also enter a custom user field column name and the system will use automatically the value of that field for each customer.
  • Customers discount percentage : You can enter here the discount percentage of your customers. You can also enter a custom user field column name and the system will use automatically the value of that field for each customer.
  • Display discount : You can enter here either 0 or 1 to set whether your customers should see discounts (for Kash Flow). You can also enter a custom user field column name and the system will use automatically the value of that field for each customer.
  • Customers payment terms : You can enter here the delay (number of days) for invoices payment for your customers. You can also enter a custom user field column name and the system will use automatically the value of that field for each customer.
  • Nominal Code : You can enter here the nominal code of your products (for Kash Flow). You can also enter a custom product field column name and the system will use automatically the value of that field for each product.
  • Shipping costs Nominal Code : You can enter here the nominal code of your coupons (for Kash Flow).
  • Coupons Nominal Code : You can enter here the nominal code of your shipping costs (for Kash Flow).
  • Project ID : You can enter here the ID of the project to which the invoices will be attached to in Kash Flow.

Result

  • When a customer proceed to a verified purchase, Hikashop will send to Kash Flow servers all the order data to be save by Kash Flow.
  • Later, you can get your data and even see graphic and statistics about your business on the Kash Flow website and use the data for the accounting of your business within Kash Flow.


Description

The HikaShop plugin for Google Analytics enables you to report every sale made on your website on your Google analytics account. You can access its options via the Joomla plugins manager. That's a great way to produce statistics on your sales.

The plugin is unpbulished by default and is only available in the Business edition of HikaShop. You can access its options via the plugins manager of Joomla. 

Also, this plugin is for the e-commerce data of Google Analytics. You'll also need a Joomla Google Analytics plugin enabled on your website to transmit the rest of the Analytics data to your Google Account. You'll find several of them here:

http://extensions.joomla.org/category/site-management/analytics

Note that it can take several days before the sales are taken into account by Google Analytics so it's normal that you don't see anything in the Ecommerce tab of your GA account just after an order.


Settings

  • The plugin options are really simple, two options are repeated five times in order to allow you to use different currencies:
  • Google Analytics account: Type here the account number given by Google analytics. Google Analytics doesn't support multiple currencies on a single website so you have to created an account for every currency you need.
  • Google Analytics account currency: Choose here the currency of the linked account.


How to

  • How can I create a new account? Just log into Google Analytics, go in the Admin menu, and in the left dropdown, you'll get a "Create a new account" link. On the next page, specify your website address and choose the appropriate currency.

  • How can I know my Google Analytics account number? In your Google Analytics account, in the Home, you'll directly see your website account with your account number displayed next to it.