


Configuration Sections
Main Tab
This main tab contains options for the front-editing features.
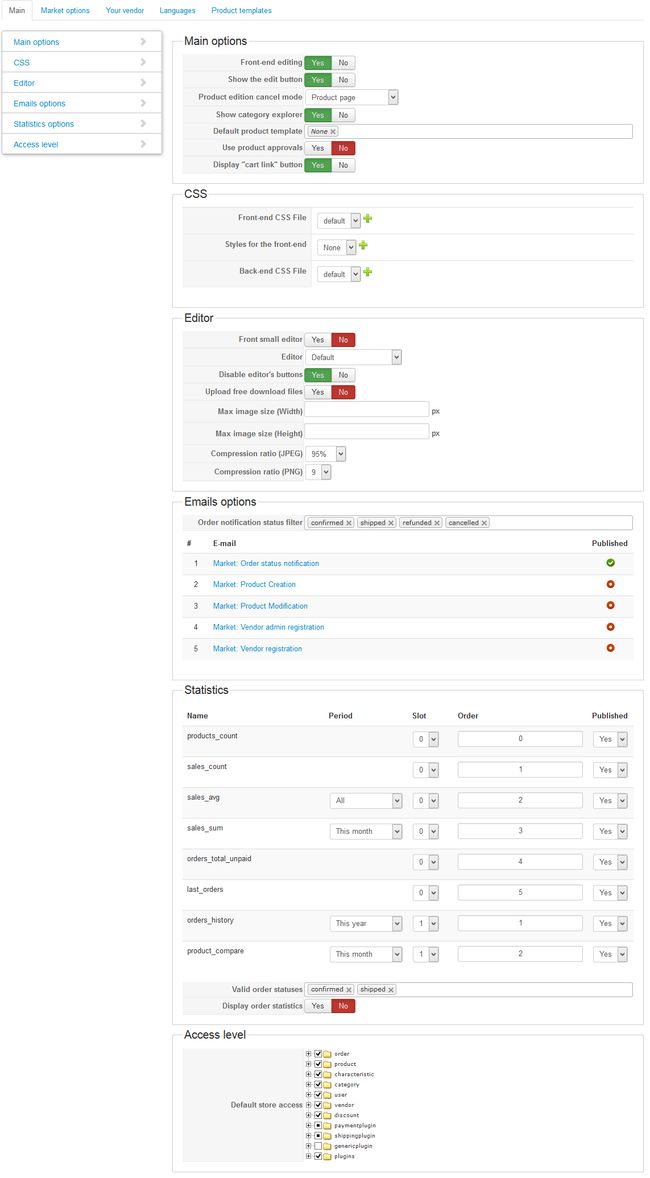
Main Tab - Main options
| Front end editing | The option enable the "front-end" editing. Without this options, all HikaMarket front-end features would be disabled. |
| Show edit button | Display the little edit buttons in the front-end. The button would be displayed in the product listing and in the product page. |
| Product edition cancel mode | You can choose how the cancel button will react in HikaMarket. You can redirect the user to the HikaShop product page, to the HikaMarket product listing or to the previous url. |
| Show category explorer | Enable or disable the category explorer in the front-end. |
| Default product template | The product template which would be used by default during product creation. You can create product template in the last tab of the HikaMarket configuration. |
| Avoid duplicate product code | If the product code already exist, a new random code will be generated and the user won't be notify about it. |
| Use product approvals |
When a vendor create a new product, the product can have a special type which will require an administrator to validate (approve) the product. Thanks to that option, vendor can have rights on the product publish state but they won't be able to create new products without an approval. |
| Display "cart link" button | Display the "cart link" button in the toolbar of the product editing. |
Main Tab - CSS
| Front-end CSS File |
You can select the CSS file for the front-end. The "+" (plus) button allow you to copy the selected file and create a new one. Only for your files, you can have an "edit" button to edit them. |
| Styles for the front-end |
You can select the CSS file for the front-end style. This file is added with the front-end file. Styles files are useful for creating specific rules without having to modify the original front-end CSS file (to continue to have the latest one with the updates). The "+" (plus) button allow you to copy the selected file and create a new one. The "edit" button allow you to edit the current selected file. |
| Back-end CSS File |
You can select the CSS file for the back-end. The "+" (plus) button allow you to copy the selected file and create a new one. Only for your files, you can have an "edit" button to edit them. |
Main Tab - Editor
| Front small editor | The html editor could be "large" or "small". |
| Default menu for product edition | The Joomla menu that you want to use for the product edition links. |
| Editor | Select the HTML editor that you want to use in HikaMarket. |
| Disable editor's buttons | You can deactivate all buttons under the editor. |
| Upload free download files | Default value for the "download files" that the vendor upload. |
Main Tab - Emails options
| Order notification status filter |
You can send the email "status notification" HikaShop email to the vendor. The email must be published in HikaShop if you want HikaMarket send it to the vendor. The filter option, when filled, will create an order status filter. So you can send email to the vendor only when the order is ":confirmed" if you want. |
| Market emails | The table display the list of the HikaMarket emails, you can publish/unpublish it directly If you have HikaShop bussiness, you can click on the email name to edit the content. |
Main Tab - Statistics options
The statistics are display in the front-end vendor dashboard.
For each element of the list, you can choose to publish (show) or not the block in the vendor dashboard.
You can also configure some options for the element, like his period, the slot (0: left column / 1: right column) and specify the ordering.
| products_count: Total products | This little block display the counter of the products the vendor have in your store. |
| sales_count: Total orders | This block display a table of the sale counter (all, year, month, week). |
| sales_avg: Average order price | This block gives the average order price for the period you choose. |
| sales_sum: Order sum | This block give the sum of the orders for the period you choose. |
| orders_total_unpaid: Orders unpaid | This block display the sum of the vendor orders unpaid and also the number of orders which are unpaid. |
| last_orders: Last orders | This block display a table with the 5 last vendor orders. |
| orders_history: Sales history | This block display a graphic of the orders for the period you choose. |
| product_compare: Products sale comparison | This block display a donut chart to compare the sales between the different products of the vendor (for the period you choose). |
If required the statistics can be override and improved using the "view override" system or using plugin.
Do not hesitate to contact the development team if you think that a report should be added by default in this list.
| Valid order statuses | You can specify the valid order statuses for the statistic processing. It allows you to exclude created or cancelled orders for the statistics. |
| Display order statistics | You can display some statistics in the order listing page ; this option allow you to activate or deactivate the feature. |
Market Tab
The Market tab is dedicated to the multivendor features. That's why this tab is only accessible in HikaMarket multivendor.
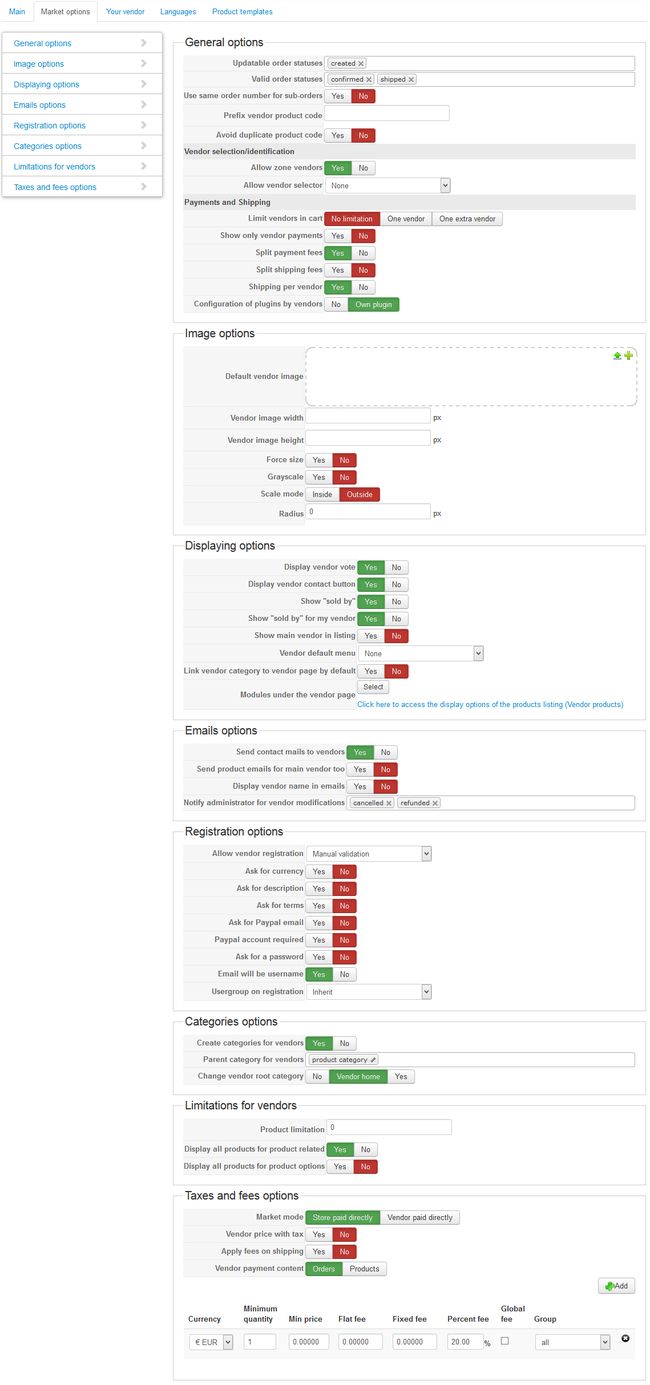
Market Tab - General options
| Updatable order statuses | List of HikaShop order statuses which are updatable for sub-orders |
| Valid order statuses | List of HikaShop order statuses which are valid for a vendor. A valid order would be include in the "pay" list. Default value is "confirmed,shipped" but you could set only "shipped" if just want to pay order which have been shipped by the vendor. |
| Use same order number for sub-orders | Do not create a unique order number for the vendor's sub-orders. So the vendors will see the same order number than you. |
| Prefix vendor product code | The vendor products created/modified in the front-end will be automatically prefix The vendor id will be put between the prefix and the product code. Place a "%d" in the prefix if you want to place yourself the vendor id. |
| Avoid duplicate product code | Use the HikaMarket system to check the duplicate product code and change the code dynamically without prompting an error When a product code will be modified, HikaMarket will send an informative message that you can personalized or hide by changing the translation value of: WARNING_DUPLICATE_PRODUCT_CODE_MODIFIED |
| Allow zone vendors |
By activating this option, you will be able to select a zone for each vendor. When a product does not have a vendor assigned, HikaMarket will determine the vendor for the product using the user address. If you want to split your orders by zone (like Europe, America...) you can set these zone to your specific vendors and they will receive the notification and will have these order attached to them. |
| Allow vendor selector |
If you create an item custom field or an order custom field using a vendor selector so you will be able to select this custom field for this option. A vendor selector item custom field let the user select the vendor for the product he put in his cart. A vendor selector order custom field let the user select the vendor for his entire order during the checkout. If such feature is used, all products which does not have a vendor assigned will be assigned to the selected vendor. |
| Limit vendors in cart |
Thanks to this option, you can forbidden the customers to put products of several vendors in their cart. It assures you that they will be only one single vendor for the entire cart/order and at this moment, you can use the "payment to vendor" feature. You can set no limitation (default value), one vendor (for one vendor) and one extra vendor (the products of one single vendor plus the products of your main vendor). |
| Show only vendor payments |
If you have the limitation of vendors in the cart, customers can pay directly the vendor (because we are sure that he is the only vendor).
This option will display only the payment methods affiliated to the vendor in the checkout. You can set the vendor of a payment method in the payment method configuration. |
| Split payment fees | Split and dispatch the payment fees for the different vendors. |
| Split shipping fees | Split and dispatch the shipping fees for the different vendors. |
| Shipping per vendor | Each vendor will have his own shipping method. |
| Configuration of plugins by vendors |
More than the ACL, if you want vendors to be able to have their own shipping/payment methods, you need to activate that option. For the moment, the vendors can just have their "own plugin" but this option can evolve in the future and maybe propose a "configuration override" system to just override the shipping/payment method you will authorize. |
Market Tab - Image options
| Default vendor image | Like the defualt product image in HikaShop, you can set a default vendor image for your vendors. The image will be display in the vendor listing and in the vendor page. |
| Vendor image with | The vendor image width for the vendor page. The default width for the vendor listing is coming from the HikaShop configuration. |
| Vendor image height | The vendor image height for the vendor page. The default height for the vendor listing is coming from the HikaShop configuration. |
| Force size | You can resize the image and keep the proportions or you can force the size. Depending the "scale mode" the image could contains some "white" which will be transparent if using PNG files. You can change it in your vendor listing configuration. |
| Grayscale | You can use an image filter to create grayscale images. You can change it in your vendor listing configuration. |
| Scale mode | The scale mode indicates if the all should be scaled inside or outside. In "inside" mode, you will see all the image and you could have some "white" ; In "outside" you won't have any "white" but some parts of the image could be outside, so not visible. You can change it in your vendor lsiting configuration. |
| Radius | You can add some rounded borders to the generated images. You can change it in your vendor lsiting configuration. |
Market Tab - Display options
| Display vendor vote | You can activate or deactivate the votes for the vendors. |
| Display vendor contact button | You can activate or deactivate the contact button in the vendor pages. |
| Show "sold by" | Display the "sold by" text in product listing and product show. The name of the vendor would be a link to his vendor page. |
| Show "sold by" for my vendor | You can deactivate the "sold by" for your main vendor. |
| Show main vendor in listing | You can decide to hide or display your main vendor in the vendor listings. |
| Vendor default menu |
When you have links to the vendor (like the "sold by",, this option will be use to generate a good SEF url. You have to select a vendor listing menu. |
| Link vendor category to vendor page by default |
If you are using category listing to display your vendors ; you can use that option to replace the link to the "vendor categories" to the vendor page instead of the category page. This option is useful when you can't use vendor listing due to special category organization. |
| Modules under the vendor page | Select the different modules that you want to display under the vendor product page.The product listing modules with the synchronization activated would be synchronize with the vendor. |
Market Tab - Emails options
| Send contact mails to vendors | When a customer use a product contact button, you can redirect the mail to the vendor of the product, or not. By default this option is activated (yes). |
| Send product emails for the main vendor too | By activating this option, your vendor will be notified too for the product creation of modification made by his users in the front-end. |
| Display vendor name in emails | You can activate that option to display the vendor name in the different order notification emails. So the customer will also have the information in the email for the product vendors. |
| Notify administrator for vendor modifications |
You can be notified by email when a vendor change manually the order status of his sub-order. This option is useful to be notified when a vendor want to cancel or refund a sub-order ; so you can process the (partial) refund of the order in your side too. |
| Notify customer when subsale update main order status |
When a vendor change an order status and it result of the modification of the customer order (since all sub-sales have the same status) Via that setting you can decide to notify or not the customer regarding the modification in its order status. |
Market Tab - Registration options
| Allow vendor registration |
Activate or deactivate the vendor registration. Without registration, vendor just could be create thanks to the backend interface.
|
| Allow vendor registration (2) |
When using the mode "vendor automatic creation" this option will be displayed. You can select the Joomla user groups which will allow the creation of the vendor. So, using this option you can create/publish/unpublish vendors depending the Joomla user group of the administrator. If a user leave the groups which allow the vendor creation, his vendor account will be unpublished. This option is useful if you want to have vendor subscription, because subscription systems allow changing the user group depending the subscription. |
| Ask for currency (during vendor registration) | Ask or not for the vendor currency during the registration. The currency could be set by the vendor on his front-end vendor panel afterwards (depending the ACL) |
| Ask for description (during vendor registration) | Ask or not for the vendor description during the registration. The description could be set by the vendor on his front-end vendor panel afterwards (depending the ACL) |
| Ask for terms (during vendor registration) | Ask or not for the vendor terms & condition during the registration. The tems & condition could be set by the vendor on his front-end vendor panel afterwards (depending the ACL). |
| Ask for Paypal email (during vendor registration) | Ask or not for the vendor paypal email during the registration. The paypal email could be set by the vendor on his front-end vendor panel afterwards (depending the ACL). |
| Paypal account required | Indicates if the paypal account is required. With automatic vendor registration, the user email will be used as paypal account if this option is set. |
| Ask for a password | Ask or not for the user password email during the registration otherwise, the password will be generated by HikaShop/HikaMarket. Since HikaMarket 1.4.2 is it possible for guest to register in HikaMarket and create a Joomla/HikaShop account in the same time. |
| Email will be username | Ask for the username during the registration, otherwise, the email will be use a username. Since HikaMarket 1.4.2 is it possible for guest to register in HikaMarket and create a Joomla/HikaShop account in the same time. |
| Link vendor group with admin | The vendor will have the same user group than the Joomla account configured as the vendor administrator. |
| Usergroup on registration |
When a vendor register thanks to the HikaMarket vendor registration page ; you can set a specific user group to that new users. Thanks to that, you can directly have a difference between classical users (who made a registration in Joomla or in HikaShop) and vendors. |
Market Tab - Categories options
| Create categories for vendors | Create automatically a category for the vendor. The category would be create in the "parent category for vendors" |
| Parent category for vendors | The parent category for vendors is the category where the "vendor categories" would be create. |
| Change vendor root category | You can change the root category for vendors. It means that vendors could only see products and categories which are in their "root category". You can deactivate it (and vendors would be able to see all products and categories of your store). You can set the "vendor home" and it would use automatically the "vendor category" previously created. You can set "yes" and at this moment, you would be able to set the default root category. The "root category" could be override per vendor. |
| Vendors default root category | This option only accessible when the previous option (Change vendor root category) is "yes". It would set the default root category for vendors. |
| Extra categories | The vendors can have extra categories where they can place products into but they can't have write access on the categories. That setting can be override per vendor. |
Market Tab - Limitations for vendors options
| Product limitation | Set a global product limitation for vendors. It counts the number of existing products, published or not. |
| Display all products for product related | You can decide if a vendor will be able to choose any product in the store for the "product related" of these products, or only from his own products. |
| Display all products for product options | You can decide if a vendor will be able to choose any product in the store for the "product options" of these products, or only from his own products. |
Market Tab - Taxes and fees options
| Market mode |
You can select the market fee/commission mode. The "Store paid directly" is also called fee mode ; it is when your vendor has fees. By default, you collect all the money and you would pay your vendors after removing your fees. The "Vendor paid directly" is also called commission mode ; it is when your take a commission on sales. Your vendor always receives all the money and they have to pay you your commission. You should always use "Store paid directly" mode unless you are only using Collect on delivery payment method and your vendors receive the payments directly from the customer. Multi-vendors payment plugins are working with the "Store paid directly" mode since if the vendor cannot be paid directly, your store receives the money to pay him later. But when the vendor can receive the money (without your fees), the transaction is marked as completed. |
| Vendor price with tax | Process vendor prices with tax. Vendors sales have a total price and a vendor price. The vendor price is the total price without fees. |
| Fees |
You can configure default fees for vendors. This configuration could be override per vendor. Please read more about the fee configuration in his dedicated documentation page. |
Your vendor Tab
The tab is like a vendor form (but with less options which are not useful).
Languages
This interface allows you to manage your HikaMarket languages and manage the language overrides, like in the HikaShop configuration.
Product templates
The product templates are special products which could be use by your vendors as a template.
When a vendor will create a product, the associated product template will be load. The vendor will see some pre-filled values in the product page.
If the vendor does have full access to the product edition, the fields that it can't edit will use the value of the product template.
So, thanks to it, you can force some values for your products or set some default one.
For example, you can remove the right to edit the quantity and create a product template which will have a quantity set to 1.
By setting this product template as the default product template (in the first tab of the configuration), all vendors will use it.
Every time a product will be create or edit, the quantity value will be use from the product template so, every products will have a quantity set to 1.
If a vendor have the right to change the product quantity, he will be able to set another value. But when he will create a new value, the quantity will be pre-filled with 1.

