Our extensions

play HikaShop is an e-commerce solution for Joomla !
Built for simplicity and flexibility. 


Have your users purchase your products efficiently, facilitate the management of your store, increase your sales thanks to built-in marketing tools and so much more !
Quik and easy to configure, let starts your shop online today !

All features     Download

What's new ?

Main features

INTERNATIONAL
SALES


HikaShop provides an interface for handling languages, currencies, zones and advanced taxes to sell anywhere in the world.

POWERFUL
STATISTICS


Easily manage your store using the built-in dashboard and its powerful statistics capabilities.

RESPONSIVE
LAYOUT


HikaShop works on every device (laptop, tablet, smartphone..). Your shop will fit to each user's screen.

MARKETING
TOOLS


Increase your sales thanks to affiliate program support, coupons, discounts and email marketing integration.

EASY TO
CONFIGURE


User-friendly and flexible, our component is easy to use and configure. Create your own shop online in a minute !

FULLY
INTEGRATED


HikaShop is integrated with many other components and includes a lots of plugins...

ADVANCED
CUSTOMIZATION


Personalize your store: views, checkout, information fields, emails, and more to fit your website design

MULTI
VENDOR


Adding HikaMarket to HikaShop, create a multi-vendor website. Manage in one shop several sales from different people.

Our Company

BUSINESS
PARTNER

HikaShop is a complete e-commerce solution that allows you to easily create and manage your online store but also take it to the highest level.

GREAT
SUPPORT

The whole team is working to provide you with quality support. Documentation and forum are there to guide you step by step. Each issue finds an answer !

ALWAYS
ON TOP

HikaShop is constantly improving. We ensure compatibility with each new version of Joomla! And new features are added frequently.

RECEIVE
OUR NEWS

Good deals and novelties, it's here!

This payment plugin is the current recommendation to integration HikaShop and PayPal together.
You can read more about what PayPal Checkout can bring to your website here.

paypalcheckout


Description

This screen enables you to edit the payment method options. Payment methods will be filtered on checkout based on the zone you set for them, if any. Then, they will be displayed to the user for him to choose which payment method he prefers for his order.

Note that the payment method can probably support only a limited number of currencies.


Toolbar


  • Save & Close : Save the payment method options and return to the payment methods Management screen.
  • Save : Apply the modifications to the payment method and stay on the same screen.
  • Cancel : Return to the previous screen without saving the modifications.
  • Help : This button enables you to turn ON/OFF the help section, this screen will appear or disappear.


Main Information

If you use one of our commercial versions, you will be able to enter the name and description in different languages. This feature requires to have joomfish installed and can be activated in the configuration page, in the display tab. The languages available will be the ones in joomfish. If you don't enter something for a translation, it will just use the default information in the Main information tab instead. After you click on save or apply an additional publish icon will appear next to the fields where you entered something in the languages tabs so that you can easily enable or disable them. The default publish status can also be changed in the configuration page of HikaShop.


Generic information


  • Published : This option allows you to publish or not the payment method.
  • Images : Select here the desired images to be displayed for this payment method. If you want to add additional images, you can upload them via FTP into the folder media/com_hikashop/images/payment/ of your website and you will then be able to select them in that option.
  • Price : You can set the payment fee in this field, and select the currency of the fee.
  • Percentage : The percentage allows you to define a payment fee depending on the total amount of the products in the cart.
  • Tax category : Select among your tax category, the category you want apply on your payment method cost.


paypal

Additional Information

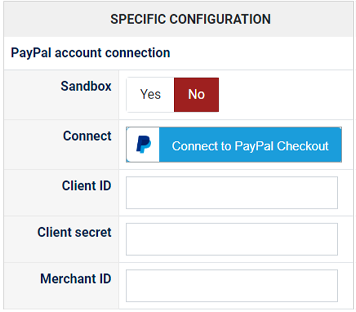
  • Sandbox : If you want to test virtual payments with this payment method, activate this setting. Please note that once you change that setting, if you already had connected this payment method with a PayPal account, you'll need to click on the "Change linked account" button below to clear the credentials and then reconnect to PayPal Checkout with an account from the sandbox/live PayPal environment.
  • Connect : Click on the button and follow the procedure to connect the payment method with your PayPal account. Alternatively, you can also manually fill the settings below. Once the 3 credentials below are filled, you'll see a message with the status of your PayPal merchant account. That way, you'll know if there is a problem or not.
  • Client ID : To access your Client ID go to https://developer.paypal.com/developer/applications/ and log in with your PayPal account credentials. Navigate to the My Apps & Credentials tab and click the Create App button in the REST API Apps section. Note that with the connect button above this setting, the plugin will automatically fill the Client ID setting for you.
  • Client secret : To access your Client secret go to https://developer.paypal.com/developer/applications/ and log in with your PayPal account credentials. Navigate to the My Apps & Credentials tab and click the Create App button in the REST API Apps section. Note that with the connect button above this setting, the plugin will automatically fill the Client secret setting for you.
  • Merchant ID : To access your Merchant ID go to your PayPal account and then in the Account Settings menu. You can find your Merchant ID under "Account options." Note that with the connect button above this setting, the plugin will automatically fill the Merchant ID setting for you.
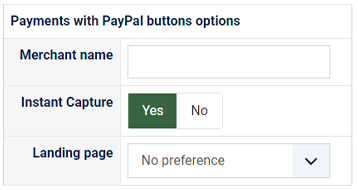
  • Merchant name : Here, you can enter the merchant name your customers will see when they purchase from you.
  • Instant Capture : This setting is activated by default. It means that payments made by your customers will be accepted automatically. If you want to manually validate each payment, you want to turn off this setting. In that case, orders in HikaShop won't be confirmed automatically after the payment. They will be only after you manuallly validate the payment.
  • Landing page : This allows you to control the behavior when a customer clicks on the PayPal Checkout button.

Disable & Enable Funding

With the Disable funding and Enable funding settings below you can select among a list of payment methods you want to display at the end of the checkout. Note that the display will also be conditioned to other parameters, like the country of the customer.
Learn more about it, with this documentation.

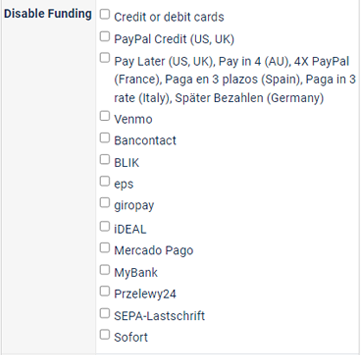
Disable Funding : At the end of the checkout, the PayPal Checkout plugin will present your customer a list of the available funding (payment) methods. With this setting, you can disable the ones you don't want to be availbale:

  • Credit or debit cards
  • PayPal Credit (US, UK)
  • Pay Later (US, UK), Pay in 4 (AU), 4X PayPal (France), Paga en 3 plazos (Spain), Paga in 3 rate (Italy), Später Bezahlen (Germany)
  • Venmo
  • Bancontact
  • BLIK
  • eps
  • giropay
  • iDEAL
  • Mercado Pago
  • MyBank
  • Przelewy24
  • SEPA-Lastschrift
  • Sofort

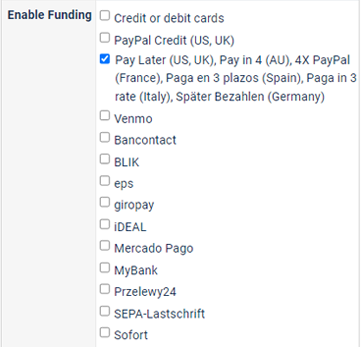
Enable Funding : At the end of the checkout, the PayPal Checkout plugin will present your customer a list of the available funding (payment) methods. With this setting, you can ask PayPal to display them. Note however that they will only appear if PayPal think it is appropriate for the current situation. For example, Venmo being enabled only in the USA, even if activated in this setting, it won't appear for customers from other countries than the USA :

  • Credit or debit cards
  • PayPal Credit (US, UK)
  • Pay Later (US, UK), Pay in 4 (AU), 4X PayPal (France), Paga en 3 plazos (Spain), Paga in 3 rate (Italy), Später Bezahlen (Germany)
  • Venmo
  • Bancontact
  • BLIK
  • eps
  • giropay
  • iDEAL
  • Mercado Pago
  • MyBank
  • Przelewy24
  • SEPA-Lastschrift
  • Sofort

Design button settings : Learn more details about these options on PayPal Documentation

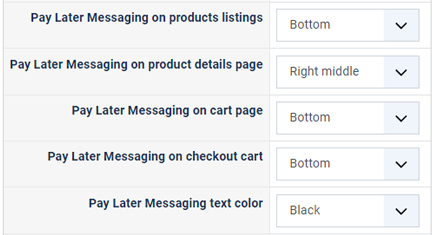
  • Pay Later Messaging on products listings : If activated, and when the "Pay Later" funding method is enabled, it will add a Pay Later message on the HikaShop products listings. You can also select the position where the message will appear on listings.
  • Pay Later Messaging on product details page : If activated, and when the "Pay Later" funding method is enabled, it will add a Pay Later message on the HikaShop product details page. You can also select the position where the message will appear on it.
  • Pay Later Messaging on cart page : If activated, and when the "Pay Later" funding method is enabled, it will add a Pay Later message on the HikaShop cart page.
  • Pay Later Messaging on checkout cart : If activated, and when the "Pay Later" funding method is enabled, it will add a Pay Later message on the cart view of the HikaShop checkout. You can also select the position where the message will appear on it.
  • Pay Later Messaging text color : Select here the color you want for the Pay Later messages.

Regular settings

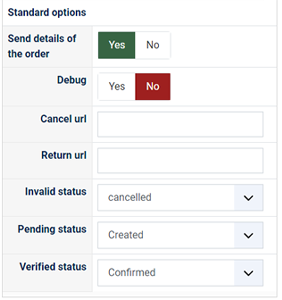
  • Debug : If you activate the debug mode, extra information about what the PayPal Checkout plugin does will be logged in the payment log file. You can see and modify the location of this file in the configuration page of HikaShop, under the Files section. Activate it if you have a problem with the plugin.
  • Cancel url : The url you want your users to be redirected to when they cancel the order from the paypal interface. By default, they will be redirected to the first step of the checkout process. We recommend leaving this setting empty.
  • Return url : The url you want your users to be redirected to when they finish their payment on the paypal interface. By default, they will be redirected to the after_end page of the checkout process which will thank them for their order, with a link to access the details of their order. We recommend leaving this setting empty.
  • Invalid status : The status you want orders to be set to when an error happened with their payment. We recommend leaving this setting to Cancelled.
  • Verified status : The status you want orders to be set to when a payment is received and valid. We recommend leaving this setting to Confirmed.


Restrictions

  • Zone : You can restrict the check payment method to a zone. By clicking on the edit icon, a popup will open enabling you to select a zone. You can also remove this limitation by clicking on the delete icon.
  • Shipping method : With this option you can select the shipping method for which this payment method will be available. For example, if you choose UPS, this payment method will only be usable if UPS is selected as shipping method. If an other shipping method is selected, this payment method will not be displayed. Note: if you selected "None" or don't select any shipping method, this payment method will always be available.
  • Currency: Choose the currencies allowed by this payment method.
  • Minimum price : The payment method can be available for only orders above a minimum price. This price uses the payment method price currency even if the price is 0.
  • Maximum price : The payment method can be available for only orders below a maximum price. This price uses the payment method price currency even if the price is 0.
  • With tax : Display the payment method only for products with tax.
  • Minimum quantity : If the order has a price lower than the price set in this field, so this payment method will not be available.
  • Maximum quantity : If the order has a price upper than the price set in this field, so this payment method will not be available.
  • Minimum weight : You can set a minimum weight so that orders below it won't be able to be paid with the current payment method. The weight of the order will be calculated based on the weight of each products in it.
  • Maximum weight : You can set a maximum weight so that orders over it won't be able to be paid with the current payment method. The weight of the order will be calculated based on the weight of each products in it.
  • Minimum volume : You can set a minimum volume so that orders below it won't be able to be paid with the current payment method. The volume of the order will be calculated based on the volume of each products in it. The volume is calculated with the width, height and length of the products.
  • Maximum volume : If the order has a volume upper than the price set in this field, so this payment method will not be available.
  • Prefix : You can restrict your payment methods to only post codes including such prefix with this option.
  • Minimum post code : You can restrict your payment methods to only post codes within a certain range whereby this is the minimum possible value
  • Maximum post code : You can restrict your payment methods to only post codes within a certain range whereby this is the maximum possible value
  • Suffix : You can restrict your payment methods to only post codes including such suffix with this option.


Access level

Plugins Columns

The ACLs are available in the business edition of HikaShop.  

  • None : When "none" is selected, the payment method will never be displayed.
  • All : "All" allow you to display the payment method for all the type of users. All groups are allowed to pay via this payment method.
  • Custom : Here you can select which groups can use this payment method. All the checked groups will be able to use this method.

Note about Access level :

  • Access level : With the business edition of HikaShop, you will be able to limit a coupon or a discount to specific users.

  • Access level : With the business edition of HikaShop, you will be able to limit a coupon or a discount to joomla groups of users.

FAQ

I don't see any payment methods during the checkout, or I don't see some of them, what is the problem ?

There are several things which you could have missed.

  • 1/ Check that the payments plugins are installed and published
  • 2/ Check that you have configured your payment plugins (edit it and save its configuration)
  • 3/ Check that your template is able to display error messages: hikashop.com/documentation
  • 4/ Check that you have the payment view in the checkout workflow option of the configuration
  • 5/ If you restricted your payment methods to zones, check that the address you're using is inside those zones ! Otherwise the payment methods will be filtered out.
  • 6/ Check that the currency you're using is supported by the payment plugins you're using. Some payment plugins only supports a limited number of currencies. You should check that with the support of the payment gateways you're using.
  • 7/ Please make sure that you didn't change the currency code of your currency. Otherwise, the payment plugins won't recognize your currency. If you want to change the display of your currency, we invite you to use the "format" option on the right of the currency options screen as well as the symbol field.
  • 8/ When you select a currency or a shipping method in the options of the payment method, the payment method won't display unless that currency or shipping method is selected during the checkout. In most cases, these parameters shouldn't be selected so make sure they are unselected. To unselect them, you need to press the ctrl key and click on the selected currencies or shipping methods. Also remember if you selected one or several shipping methods here, when you add a new shipping method later on, you will want to go in the payment plugins options and select that new shipping method or it won't display any payment method for that new shipping method.
  • 9/ Please check that you didn't set the access option of the plugin (via the plugins manager of Joomla) to something else than public.
  • 10/ It can happen that the plugin's access is not set properly in the database. Please go in the Joomla plugins manager and edit the plugin and save it. That will sett the access if not present and might help solve your problem.


This payment plugin is the current recommendation to integration HikaShop and PayPal together.
You can read more about what PayPal Checkout can bring to your website here.

paypalcheckout


Description

This screen enables you to edit the payment method options. Payment methods will be filtered on checkout based on the zone you set for them, if any. Then, they will be displayed to the user for him to choose which payment method he prefers for his order.

Note that the payment method can probably support only a limited number of currencies.


Toolbar


  • Save & Close : Save the payment method options and return to the payment methods Management screen.
  • Save : Apply the modifications to the payment method and stay on the same screen.
  • Cancel : Return to the previous screen without saving the modifications.
  • Help : This button enables you to turn ON/OFF the help section, this screen will appear or disappear.


Main Information

If you use one of our commercial versions, you will be able to enter the name and description in different languages. This feature requires to have joomfish installed and can be activated in the configuration page, in the display tab. The languages available will be the ones in joomfish. If you don't enter something for a translation, it will just use the default information in the Main information tab instead. After you click on save or apply an additional publish icon will appear next to the fields where you entered something in the languages tabs so that you can easily enable or disable them. The default publish status can also be changed in the configuration page of HikaShop.


Generic information
 

  • Published : This option allows you to publish or not the payment method.
  • Images : Select here the desired images to be displayed for this payment method. If you want to add additional images, you can upload them via FTP into the folder media/com_hikashop/images/payment/ of your website and you will then be able to select them in that option.
  • Price : You can set the payment fee in this field, and select the currency of the fee.
  • Percentage : The percentage allows you to define a payment fee depending on the total amount of the products in the cart.
  • Tax category : Select among your tax category, the category you want apply on your payment method cost.


paypal

Additional Information

  • Sandbox : If you want to test virtual payments with this payment method, activate this setting. Please note that once you change that setting, if you already had connected this payment method with a PayPal account, you'll need to click on the "Change linked account" button below to clear the credentials and then reconnect to PayPal Checkout with an account from the sandbox/live PayPal environment.
    Please also note that if you want to use the sandbox, you need to use a PayPal sandbox account, and not your live account.
  • Connect : Click on the button and follow the procedure to connect the payment method with your PayPal account. Alternatively, you can also manually fill the settings below. Once the 3 credentials below are filled, you'll see a message with the status of your PayPal merchant account. That way, you'll know if there is a problem or not.
    In case this button doesn't work properly, you can manually retrieve the client ID and client Secret of your PayPal account as explained below and fill it in the settings below. It will work the same as if you use the connect button.
  • Client ID : To access your Client ID go to https://developer.paypal.com/developer/applications/ and log in with your PayPal account credentials. Navigate to the My Apps & Credentials tab and click the Create App button in the REST API Apps section. Note that with the connect button above this setting, the plugin will automatically fill the Client ID setting for you.
  • Client secret : To access your Client secret go to https://developer.paypal.com/developer/applications/ and log in with your PayPal account credentials. Navigate to the My Apps & Credentials tab and click the Create App button in the REST API Apps section. Note that with the connect button above this setting, the plugin will automatically fill the Client secret setting for you.
  • Merchant ID : To access your Merchant ID go to your PayPal account and then in the Account Settings menu. You can find your Merchant ID under "Account options." Note that with the connect button above this setting, the plugin will automatically fill the Merchant ID setting for you.
  • Merchant name : Here, you can enter the merchant name your customers will see when they purchase from you.
  • Instant Capture : This setting is activated by default. It means that payments made by your customers will be accepted automatically. If you want to manually validate each payment, you want to turn off this setting. In that case, orders in HikaShop won't be confirmed automatically after the payment. They will be only after you manuallly validate the payment.
    In most cases, you want to keep this setting turned on.
  • Landing page : This allows you to control the behavior when a customer clicks on the PayPal Checkout button.

Disable & Enable Funding

With the Disable funding and Enable funding settings below you can select among a list of payment methods you want to display at the end of the checkout. Note that the display will also be conditioned to other parameters, like the country of the customer.
Learn more about it, with this documentation.

Disable Funding : At the end of the checkout, the PayPal Checkout plugin will present your customer a list of the available funding (payment) methods. With this setting, you can disable the ones you don't want to be availbale:

  • Credit or debit cards
  • PayPal Credit (US, UK)
  • Pay Later (US, UK), Pay in 4 (AU), 4X PayPal (France), Paga en 3 plazos (Spain), Paga in 3 rate (Italy), Später Bezahlen (Germany)
  • Venmo
  • Bancontact
  • BLIK
  • eps
  • giropay
  • iDEAL
  • Mercado Pago
  • MyBank
  • Przelewy24
  • SEPA-Lastschrift
  • Sofort

Enable Funding : At the end of the checkout, the PayPal Checkout plugin will present your customer a list of the available funding (payment) methods. With this setting, you can ask PayPal to display them. Note however that they will only appear if PayPal think it is appropriate for the current situation. For example, Venmo being enabled only in the USA, even if activated in this setting, it won't appear for customers from other countries than the USA :

  • Credit or debit cards
  • PayPal Credit (US, UK)
  • Pay Later (US, UK), Pay in 4 (AU), 4X PayPal (France), Paga en 3 plazos (Spain), Paga in 3 rate (Italy), Später Bezahlen (Germany)
  • Venmo
  • Bancontact
  • BLIK
  • eps
  • giropay
  • iDEAL
  • Mercado Pago
  • MyBank
  • Przelewy24
  • SEPA-Lastschrift
  • Sofort

Design button settings : Learn more details about these options on PayPal Documentation

  • Pay Later Messaging on products listings : If activated, and when the "Pay Later" funding method is enabled, it will add a Pay Later message on the HikaShop products listings. You can also select the position where the message will appear on listings.
  • Pay Later Messaging on product details page : If activated, and when the "Pay Later" funding method is enabled, it will add a Pay Later message on the HikaShop product details page. You can also select the position where the message will appear on it.
  • Pay Later Messaging on cart page : If activated, and when the "Pay Later" funding method is enabled, it will add a Pay Later message on the HikaShop cart page.
  • Pay Later Messaging on checkout cart : If activated, and when the "Pay Later" funding method is enabled, it will add a Pay Later message on the cart view of the HikaShop checkout. You can also select the position where the message will appear on it.
  • Pay Later Messaging text color : Select here the color you want for the Pay Later messages.

Regular settings

  • Debug : If you activate the debug mode, extra information about what the PayPal Checkout plugin does will be logged in the payment log file. You can see and modify the location of this file in the configuration page of HikaShop, under the Files section. Activate it if you have a problem with the plugin.
  • Cancel url : The url you want your users to be redirected to when they cancel the order from the paypal interface. By default, they will be redirected to the first step of the checkout process. We recommend leaving this setting empty.
  • Return url : The url you want your users to be redirected to when they finish their payment on the paypal interface. By default, they will be redirected to the after_end page of the checkout process which will thank them for their order, with a link to access the details of their order. We recommend leaving this setting empty.
  • Invalid status : The status you want orders to be set to when an error happened with their payment. We recommend leaving this setting to Cancelled.
  • Verified status : The status you want orders to be set to when a payment is received and valid. We recommend leaving this setting to Confirmed.

Potential issues

  • At the end of the checkout, the plugin will display the text "Please select a payment method:" with, below it, one button for each funding method available to the customer based on his situation, yours, and what fundings you enabled/disabled in the payment method. If no buttons shows up there, you should open the console of your browser on that page. It should contain some javascript error message(s) which will point at the problem. It could be an error from another extension, or your template preventing the browser from initializing PayPal's javascript. But it could also be the sandbox mode being turned on for a live account, or vice-versa, or some other kind of issue.
  • Supposing that the buttons are displayed, if you click on the "PayPal" button and you don't get the PayPal payment popup, it's likely you have a problem with the Cross Origin Opener Policy of your website. You need to configure your HTTP headers plugin, via the Joomla plugins manager and change its "Cross-Origin-Opener-Policy" setting to allow for it.
  • If you get an error with the text "invoice id already used" it means that you already used your PayPal account with another ecommerce website and it used the same order ids as HikaShop. You can either modify the auto_increment value of the hikashop_order table in your PHPMyAdmin to start order ids to a big number which hasn't been used by your other website, or you can navigate to https://www.paypal.com/businessmanage/preferences/payments and under "Block accidental payments" select "No, allow multiple payments per invoice ID"


Restrictions

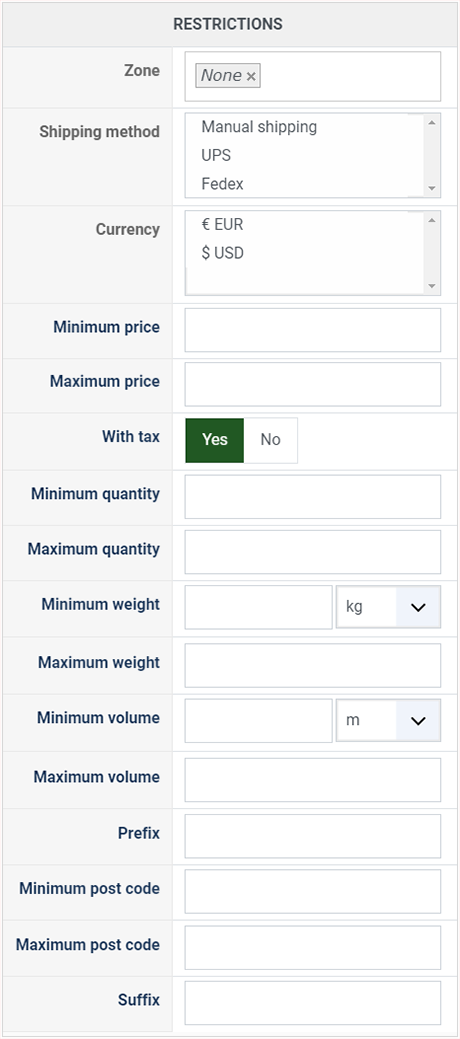
  • Zone : You can restrict the check payment method to a zone. By clicking on the edit icon, a popup will open enabling you to select a zone. You can also remove this limitation by clicking on the delete icon.
  • Shipping method : With this option you can select the shipping method for which this payment method will be available. For example, if you choose UPS, this payment method will only be usable if UPS is selected as shipping method. If an other shipping method is selected, this payment method will not be displayed. Note: if you selected "None" or don't select any shipping method, this payment method will always be available.
  • Currency: Choose the currencies allowed by this payment method.
  • Minimum price : The payment method can be available for only orders above a minimum price. This price uses the payment method price currency even if the price is 0.
  • Maximum price : The payment method can be available for only orders below a maximum price. This price uses the payment method price currency even if the price is 0.
  • With tax : Display the payment method only for products with tax.
  • Minimum quantity : If the order has a price lower than the price set in this field, so this payment method will not be available.
  • Maximum quantity : If the order has a price upper than the price set in this field, so this payment method will not be available.
  • Minimum weight : You can set a minimum weight so that orders below it won't be able to be paid with the current payment method. The weight of the order will be calculated based on the weight of each products in it.
  • Maximum weight : You can set a maximum weight so that orders over it won't be able to be paid with the current payment method. The weight of the order will be calculated based on the weight of each products in it.
  • Minimum volume : You can set a minimum volume so that orders below it won't be able to be paid with the current payment method. The volume of the order will be calculated based on the volume of each products in it. The volume is calculated with the width, height and length of the products.
  • Maximum volume : If the order has a volume upper than the price set in this field, so this payment method will not be available.
  • Prefix : You can restrict your payment methods to only post codes including such prefix with this option.
  • Minimum post code : You can restrict your payment methods to only post codes within a certain range whereby this is the minimum possible value
  • Maximum post code : You can restrict your payment methods to only post codes within a certain range whereby this is the maximum possible value
  • Suffix : You can restrict your payment methods to only post codes including such suffix with this option.


Access level

Plugins Columns

The ACLs are available in the business edition of HikaShop.  

  • None : When "none" is selected, the payment method will never be displayed.
  • All : "All" allow you to display the payment method for all the type of users. All groups are allowed to pay via this payment method.
  • Custom : Here you can select which groups can use this payment method. All the checked groups will be able to use this method.

Note about Access level :

  • Access level : With the business edition of HikaShop, you will be able to limit a coupon or a discount to specific users.

  • Access level : With the business edition of HikaShop, you will be able to limit a coupon or a discount to joomla groups of users.

FAQ

I don't see any payment methods during the checkout, or I don't see some of them, what is the problem ?

There are several things which you could have missed.

  • 1/ Check that the payments plugins are installed and published
  • 2/ Check that you have configured your payment plugins (edit it and save its configuration)
  • 3/ Check that your template is able to display error messages: hikashop.com/documentation
  • 4/ Check that you have the payment view in the checkout workflow option of the configuration
  • 5/ If you restricted your payment methods to zones, check that the address you're using is inside those zones ! Otherwise the payment methods will be filtered out.
  • 6/ Check that the currency you're using is supported by the payment plugins you're using. Some payment plugins only supports a limited number of currencies. You should check that with the support of the payment gateways you're using.
  • 7/ Please make sure that you didn't change the currency code of your currency. Otherwise, the payment plugins won't recognize your currency. If you want to change the display of your currency, we invite you to use the "format" option on the right of the currency options screen as well as the symbol field.
  • 8/ When you select a currency or a shipping method in the options of the payment method, the payment method won't display unless that currency or shipping method is selected during the checkout. In most cases, these parameters shouldn't be selected so make sure they are unselected. To unselect them, you need to press the ctrl key and click on the selected currencies or shipping methods. Also remember if you selected one or several shipping methods here, when you add a new shipping method later on, you will want to go in the payment plugins options and select that new shipping method or it won't display any payment method for that new shipping method.
  • 9/ Please check that you didn't set the access option of the plugin (via the plugins manager of Joomla) to something else than public.
  • 10/ It can happen that the plugin's access is not set properly in the database. Please go in the Joomla plugins manager and edit the plugin and save it. That will sett the access if not present and might help solve your problem.


multisafepay


Description

This screen enables you to edit the payment method options. Payment methods will be filtered on checkout based on the zone you set for them, if any. Then, they will be displayed to the user for him to choose which payment method he prefers for his order.

Note that the payment method can probably support only a limited number of currencies.


Toolbar


  • Save & Close : Save the payment method options and return to the payment methods Management screen.
  • Save : Apply the modifications to the payment method and stay on the same screen.
  • Cancel : Return to the previous screen without saving the modifications.
  • Help : This button enables you to turn ON/OFF the help section, this screen will appear or disappear.


Main Information

If you use one of our commercial versions, you will be able to enter the name and description in different languages. This feature requires to have joomfish installed and can be activated in the configuration page, in the display tab. The languages available will be the ones in joomfish. If you don't enter something for a translation, it will just use the default information in the Main information tab instead. After you click on save or apply an additional publish icon will appear next to the fields where you entered something in the languages tabs so that you can easily enable or disable them. The default publish status can also be changed in the configuration page of HikaShop.


Generic information


  • Published : This option allows you to publish or not the payment method.
  • Images : Select here the desired images to be displayed for this payment method. If you want to add additional images, you can upload them via FTP into the folder media/com_hikashop/images/payment/ of your website and you will then be able to select them in that option.
  • Price : You can set the payment fee in this field, and select the currency of the fee.
  • Percentage : The percentage allows you to define a payment fee depending on the total amount of the products in the cart.
  • Tax category : Select among your tax category, the category you want apply on your payment method cost.


multisafepay

Install the plugin

The plugin is sold on our website and was developped by Tsuki Dev.

Additional Information

  • Api Key: Your Multisafepay application Api Key
  • Sandbox : If activated, all transactions will be done through the Multisafepay's sandbox system, and no real money will be used.
  • Debug : You can activate the debug mode of the Multisafepay payment plugin. If you do so, informations about each transaction made with Multisafepay will be logged in the payment log file. You can see and modify the location of this file in the configuration page of HikaShop.
  • Return url : The url you want your users to be redirected to when they finish their payment on the Multisafepay interface. By default, they will be redirected to the after_end page of the checkout process which will thank them for their order.
  • Invalid status : Here, you can select the status to set to an order if the plugin receives an invalid notification from Multisafepay for an order.
  • Pending status : Here, you can select the status to set to an order if the plugin receives a pending notification from Multisafepay for an order.
  • Verified status : Here, you can select the status to set to an order if the plugin receives a successful completion notification from Multisafepay for an order.


Restrictions

  • Zone : You can restrict the check payment method to a zone. By clicking on the edit icon, a popup will open enabling you to select a zone. You can also remove this limitation by clicking on the delete icon.
  • Shipping method : With this option you can select the shipping method for which this payment method will be available. For example, if you choose UPS, this payment method will only be usable if UPS is selected as shipping method. If an other shipping method is selected, this payment method will not be displayed. Note: if you selected "None" or don't select any shipping method, this payment method will always be available.
  • Currency: Choose the currencies allowed by this payment method.
  • Minimum price : The payment method can be available for only orders above a minimum price. This price uses the payment method price currency even if the price is 0.
  • Maximum price : The payment method can be available for only orders below a maximum price. This price uses the payment method price currency even if the price is 0.
  • With tax : Display the payment method only for products with tax.
  • Minimum quantity : If the order has a price lower than the price set in this field, so this payment method will not be available.
  • Maximum quantity : If the order has a price upper than the price set in this field, so this payment method will not be available.
  • Minimum weight : You can set a minimum weight so that orders below it won't be able to be paid with the current payment method. The weight of the order will be calculated based on the weight of each products in it.
  • Maximum weight : You can set a maximum weight so that orders over it won't be able to be paid with the current payment method. The weight of the order will be calculated based on the weight of each products in it.
  • Minimum volume : You can set a minimum volume so that orders below it won't be able to be paid with the current payment method. The volume of the order will be calculated based on the volume of each products in it. The volume is calculated with the width, height and length of the products.
  • Maximum volume : If the order has a volume upper than the price set in this field, so this payment method will not be available.
  • Prefix : You can restrict your payment methods to only post codes including such prefix with this option.
  • Minimum post code : You can restrict your payment methods to only post codes within a certain range whereby this is the minimum possible value
  • Maximum post code : You can restrict your payment methods to only post codes within a certain range whereby this is the maximum possible value
  • Suffix : You can restrict your payment methods to only post codes including such suffix with this option.


Access level

Plugins Columns

The ACLs are available in the business edition of HikaShop.  

  • None : When "none" is selected, the payment method will never be displayed.
  • All : "All" allow you to display the payment method for all the type of users. All groups are allowed to pay via this payment method.
  • Custom : Here you can select which groups can use this payment method. All the checked groups will be able to use this method.

Note about Access level :

  • Access level : With the business edition of HikaShop, you will be able to limit a coupon or a discount to specific users.

  • Access level : With the business edition of HikaShop, you will be able to limit a coupon or a discount to joomla groups of users.

FAQ

I don't see any payment methods during the checkout, or I don't see some of them, what is the problem ?

There are several things which you could have missed.

  • 1/ Check that the payments plugins are installed and published
  • 2/ Check that you have configured your payment plugins (edit it and save its configuration)
  • 3/ Check that your template is able to display error messages: hikashop.com/documentation
  • 4/ Check that you have the payment view in the checkout workflow option of the configuration
  • 5/ If you restricted your payment methods to zones, check that the address you're using is inside those zones ! Otherwise the payment methods will be filtered out.
  • 6/ Check that the currency you're using is supported by the payment plugins you're using. Some payment plugins only supports a limited number of currencies. You should check that with the support of the payment gateways you're using.
  • 7/ Please make sure that you didn't change the currency code of your currency. Otherwise, the payment plugins won't recognize your currency. If you want to change the display of your currency, we invite you to use the "format" option on the right of the currency options screen as well as the symbol field.
  • 8/ When you select a currency or a shipping method in the options of the payment method, the payment method won't display unless that currency or shipping method is selected during the checkout. In most cases, these parameters shouldn't be selected so make sure they are unselected. To unselect them, you need to press the ctrl key and click on the selected currencies or shipping methods. Also remember if you selected one or several shipping methods here, when you add a new shipping method later on, you will want to go in the payment plugins options and select that new shipping method or it won't display any payment method for that new shipping method.
  • 9/ Please check that you didn't set the access option of the plugin (via the plugins manager of Joomla) to something else than public.
  • 10/ It can happen that the plugin's access is not set properly in the database. Please go in the Joomla plugins manager and edit the plugin and save it. That will sett the access if not present and might help solve your problem.


postfinancecheckout


Description

This screen enables you to edit the payment method options. Payment methods will be filtered on checkout based on the zone you set for them, if any. Then, they will be displayed to the user for him to choose which payment method he prefers for his order.

Note that the payment method can probably support only a limited number of currencies.


Toolbar


  • Save & Close : Save the payment method options and return to the payment methods Management screen.
  • Save : Apply the modifications to the payment method and stay on the same screen.
  • Cancel : Return to the previous screen without saving the modifications.
  • Help : This button enables you to turn ON/OFF the help section, this screen will appear or disappear.


Main Information

If you use one of our commercial versions, you will be able to enter the name and description in different languages. This feature requires to have joomfish installed and can be activated in the configuration page, in the display tab. The languages available will be the ones in joomfish. If you don't enter something for a translation, it will just use the default information in the Main information tab instead. After you click on save or apply an additional publish icon will appear next to the fields where you entered something in the languages tabs so that you can easily enable or disable them. The default publish status can also be changed in the configuration page of HikaShop.


Generic information


  • Published : This option allows you to publish or not the payment method.
  • Images : Select here the desired images to be displayed for this payment method. If you want to add additional images, you can upload them via FTP into the folder media/com_hikashop/images/payment/ of your website and you will then be able to select them in that option.
  • Price : You can set the payment fee in this field, and select the currency of the fee.
  • Percentage : The percentage allows you to define a payment fee depending on the total amount of the products in the cart.
  • Tax category : Select among your tax category, the category you want apply on your payment method cost.


postfinancecheckout

Install the plugin

The plugin is sold on our website and was developped by Tsuki Dev.

Additional Information

  • User ID: Your PostFinance Checkout application ID number
  • Space ID : Your PostFinance Checkout access token number
  • Secret ID : Your PostFinance Checkout location ID number
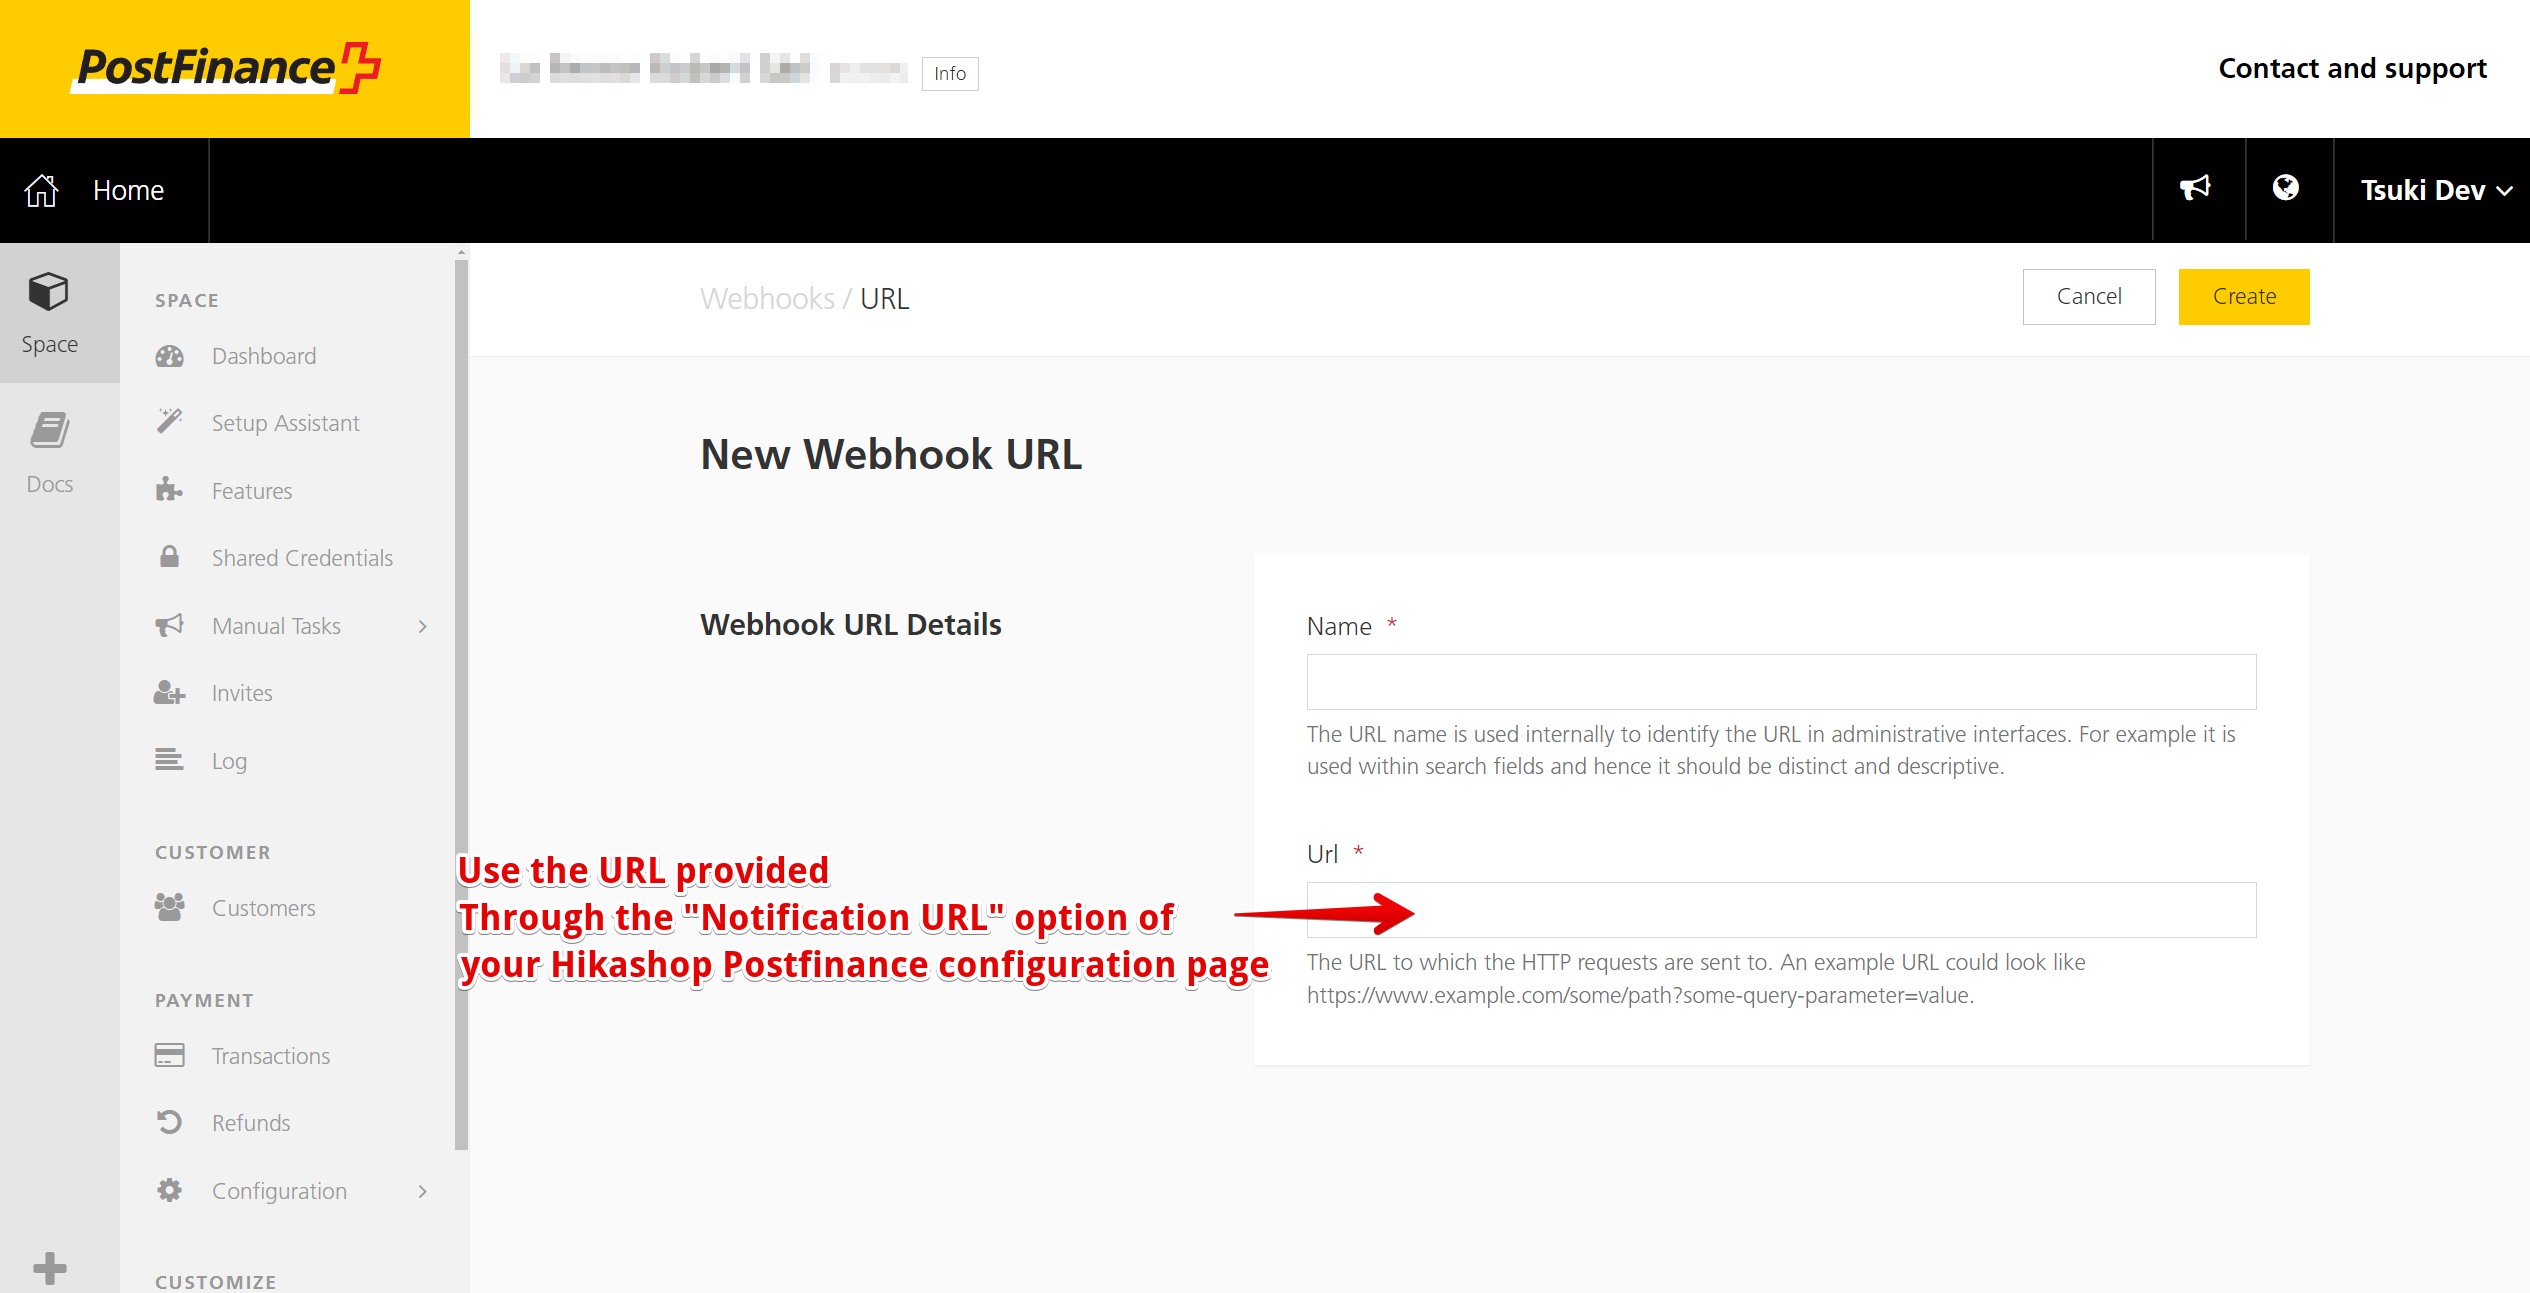
  • Notification URL : That link should be used to create a Webhook through your PostFinance merchant space
  • Debug : You can activate the debug mode of the PostFinance Checkout payment plugin. If you do so, informations about each transaction made with PostFinance Checkout will be logged in the payment log file. You can see and modify the location of this file in the configuration page of HikaShop.
  • Return url : The url you want your users to be redirected to when they finish their payment on the PostFinance Checkout interface. By default, they will be redirected to the after_end page of the checkout process which will thank them for their order.
  • Invalid status : Here, you can select the status to set to an order if the plugin receives an invalid notification from PostFinance Checkout for an order.
  • Pending status : Here, you can select the status to set to an order if the plugin receives a pending notification from PostFinance Checkout for an order.
  • Verified status : Here, you can select the status to set to an order if the plugin receives a successful completion notification from PostFinance Checkout for an order.

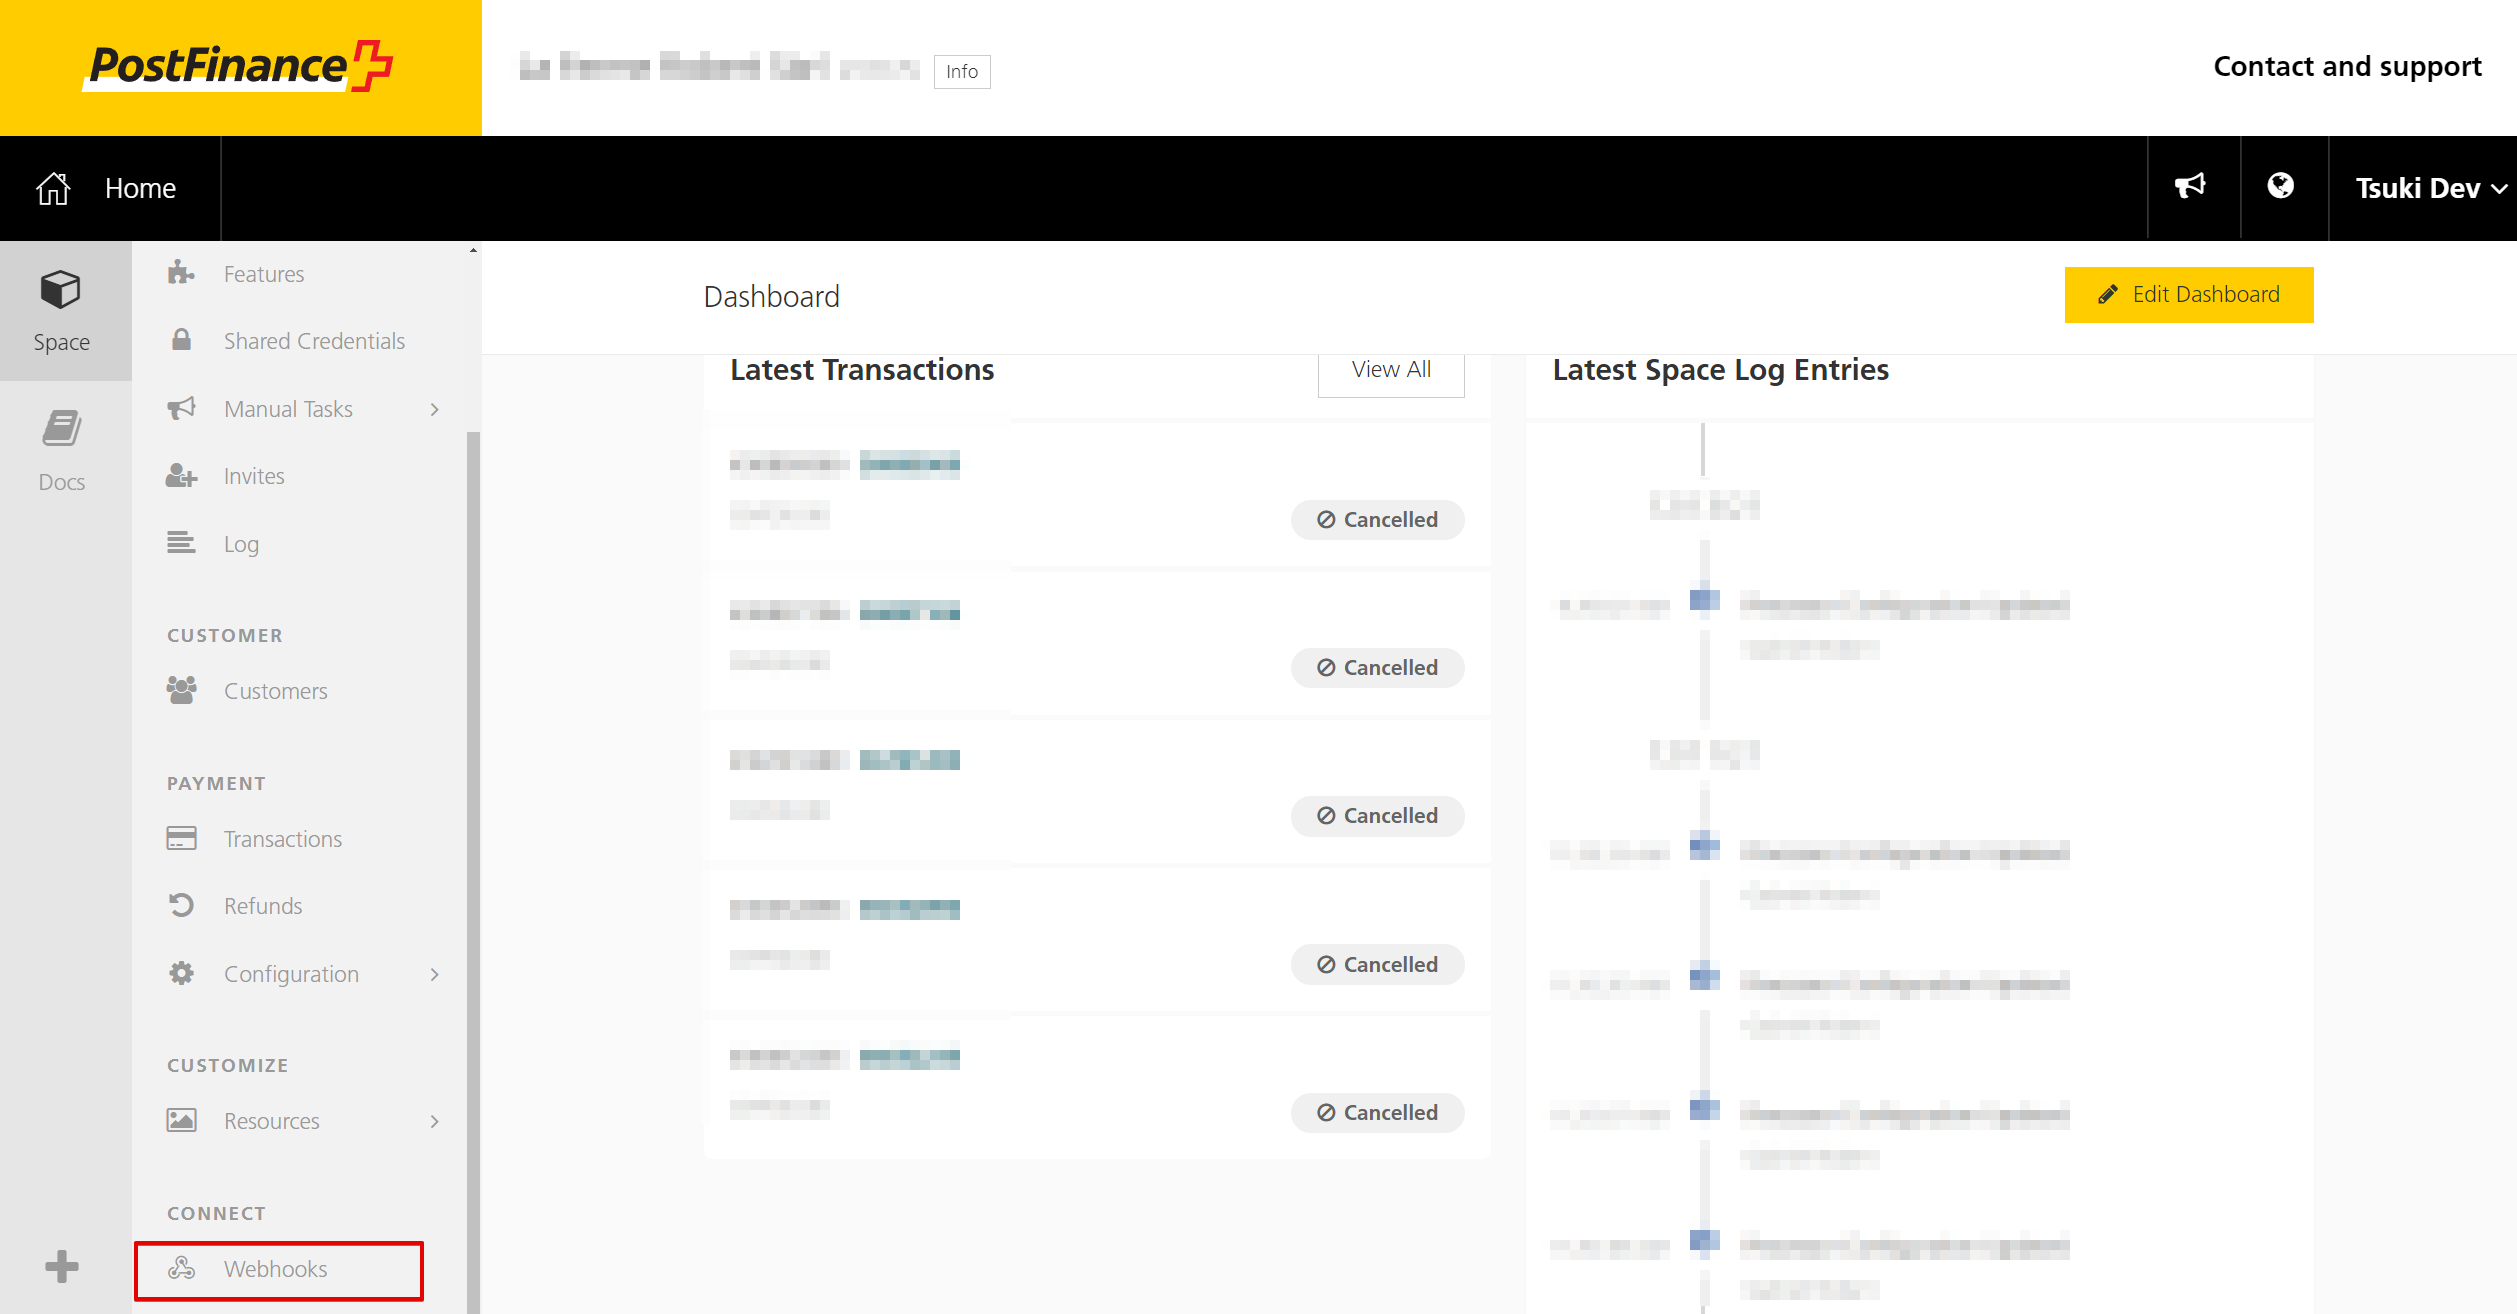
Configure the PostFinance Webhook for payment notifications

Payment notifications will enable your orders to be automatically updated by the PostFinance Checkout platform based on the payment status.

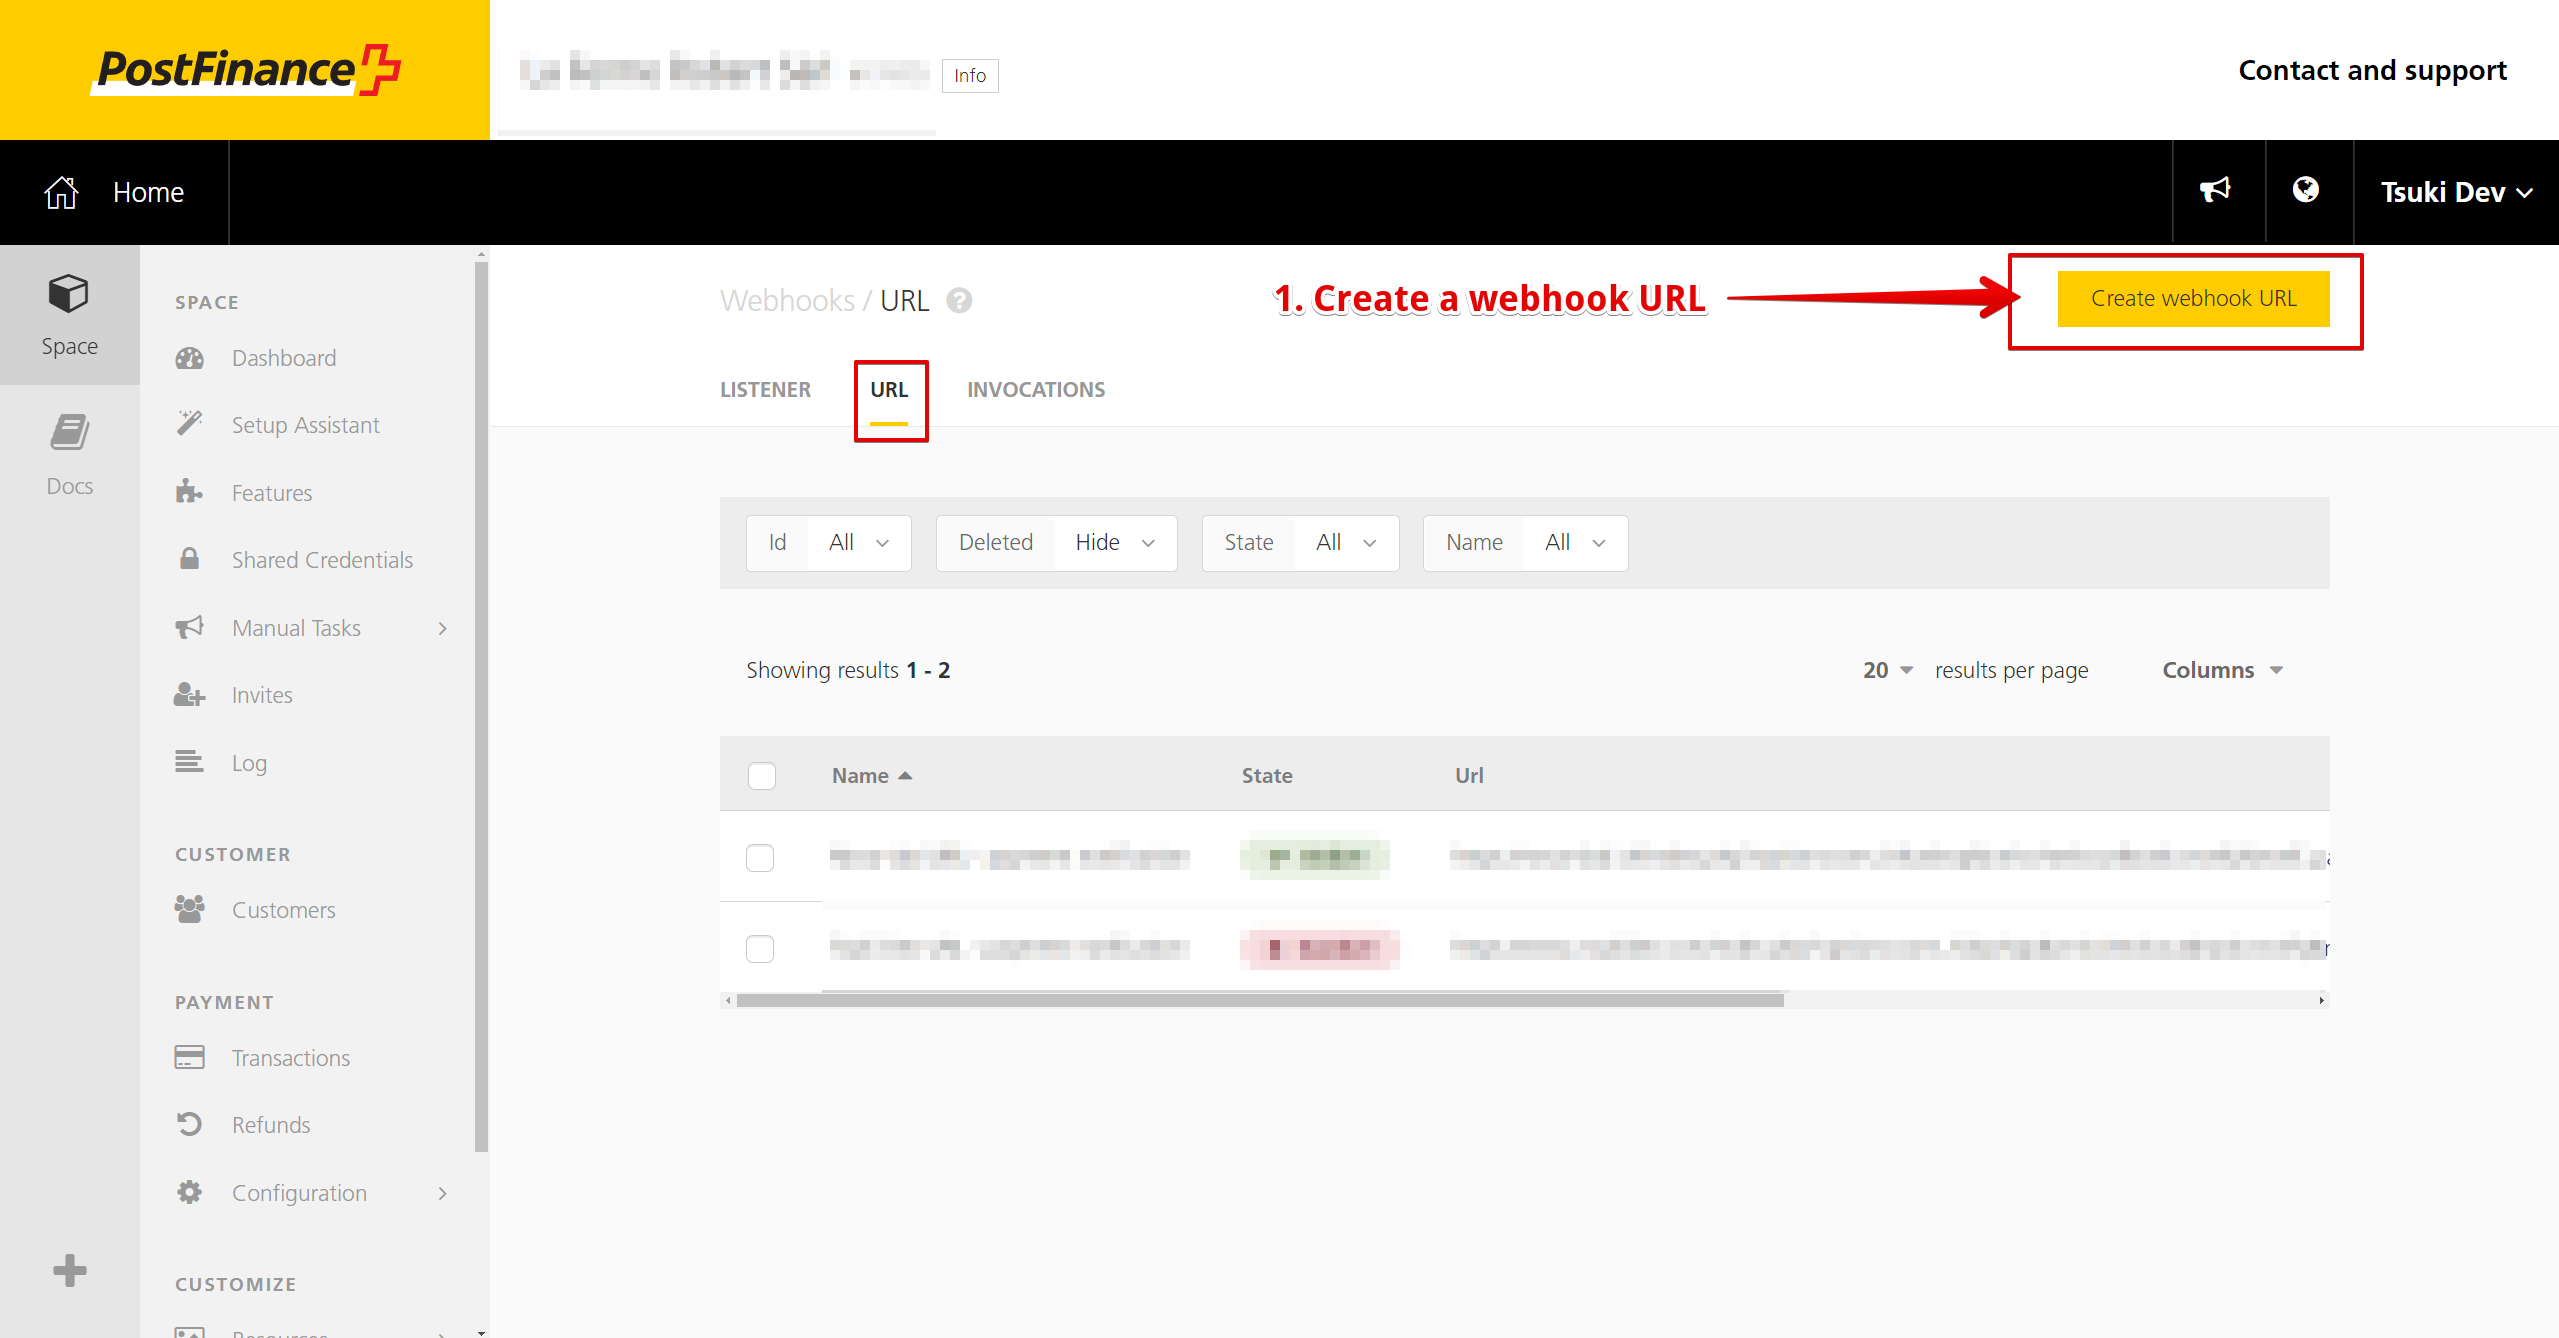
To properly configure your webhook, you'll have to do it through your PostFinance checkout merchant space by accessing the "Webhook" section :
1. Webhook URL creation

The Webhook URL creation page is accessible through that button :
To properly configure it, you'll just have to name it and set the "URL" option to the "Notification URL" value that you can find through your Hikashop PostFinance configuration page :
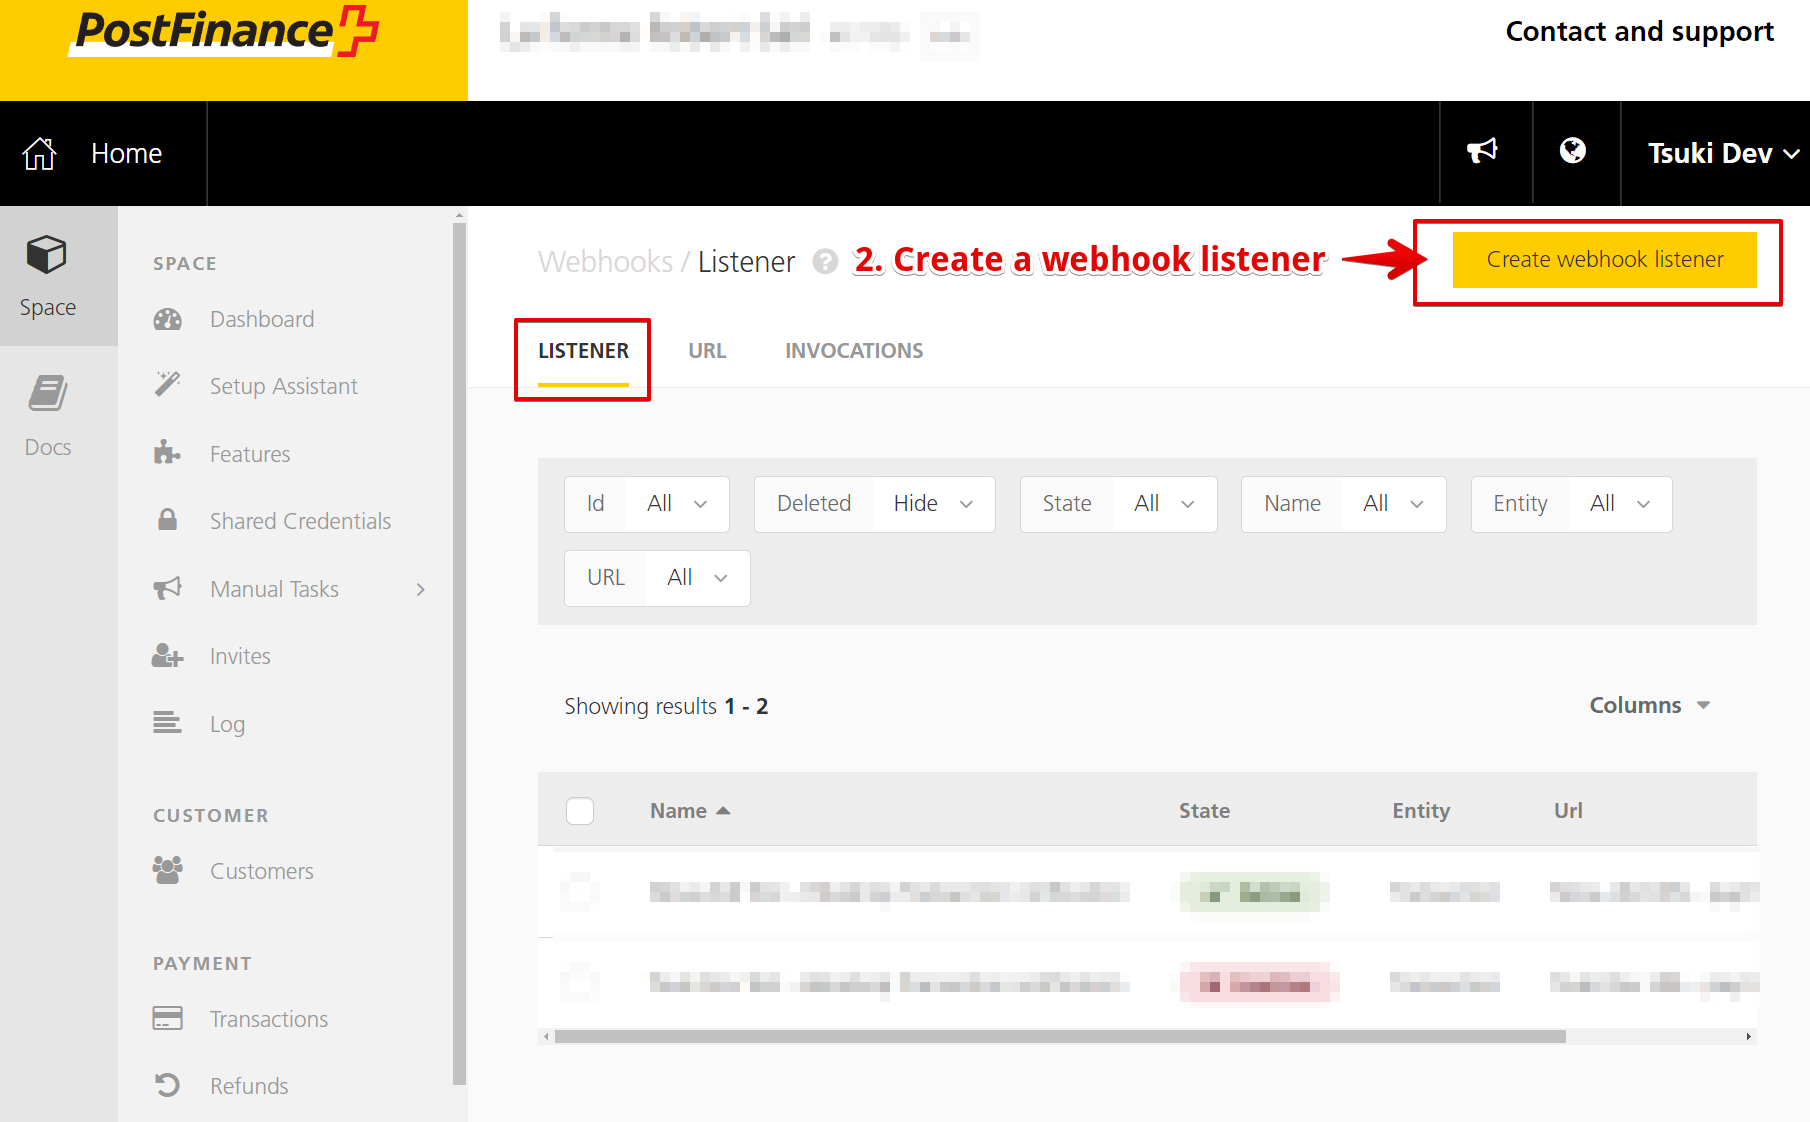
2. Webhook Listener creation

The Webhook Listener creation page is accessible through that button :
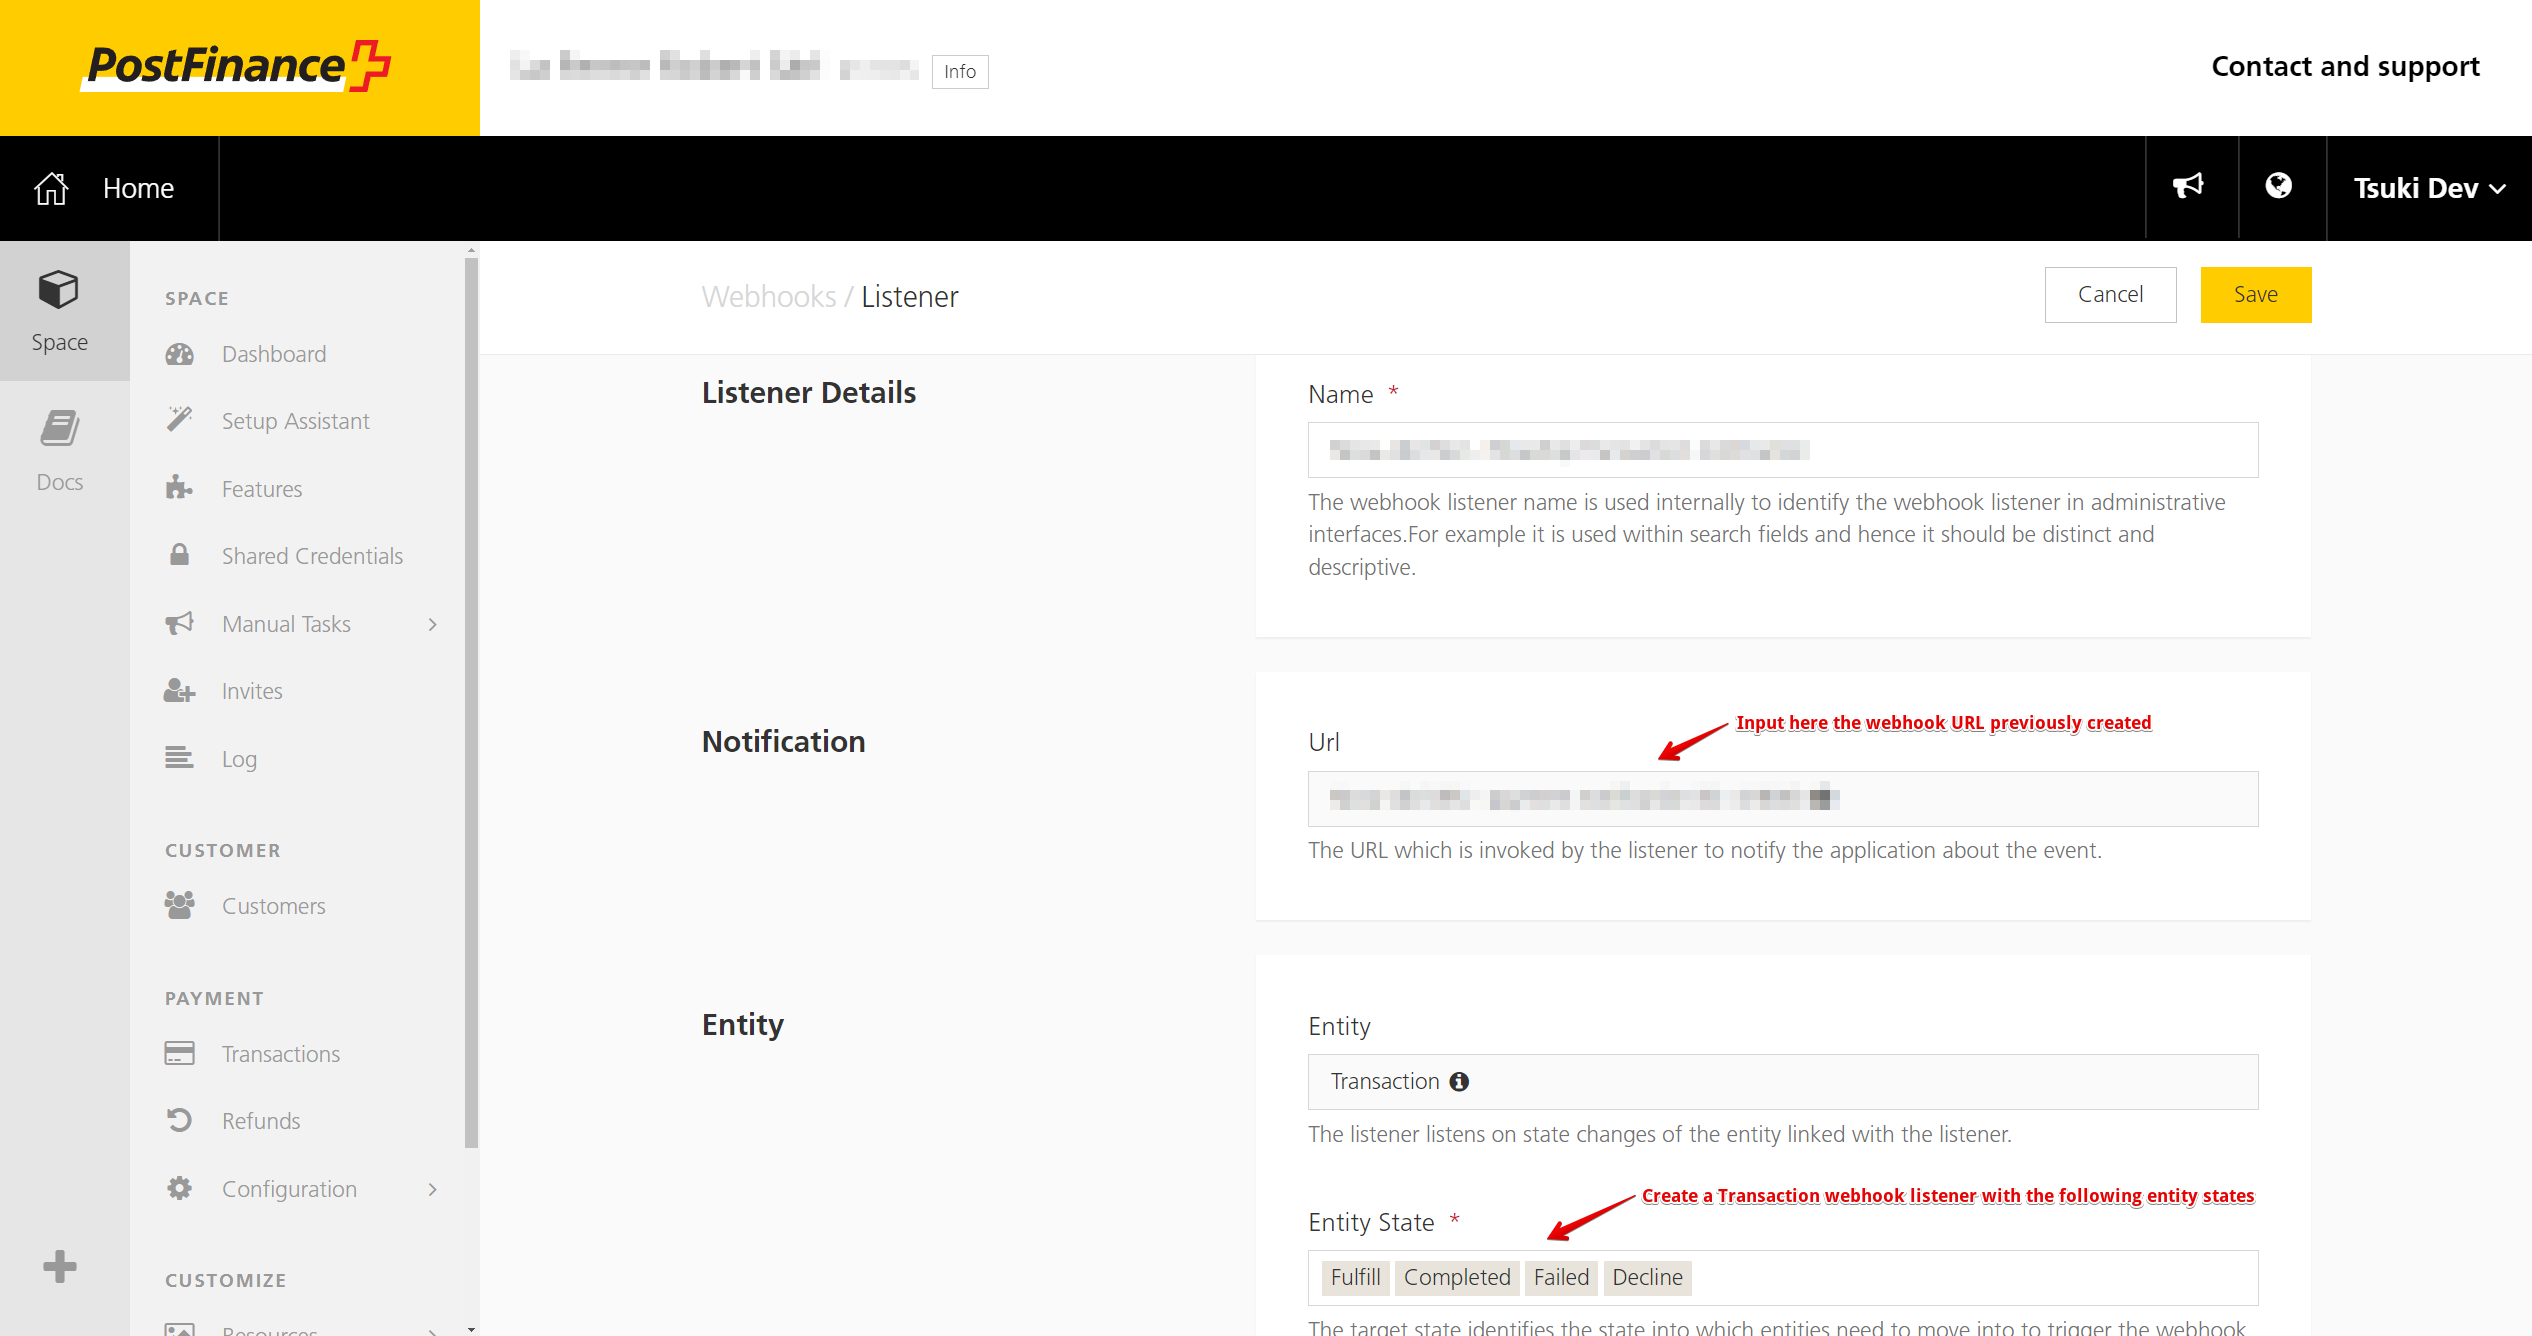
To properly configure it, you'll just have to create a "Transaction" Entity listener, and set it like this :


Restrictions
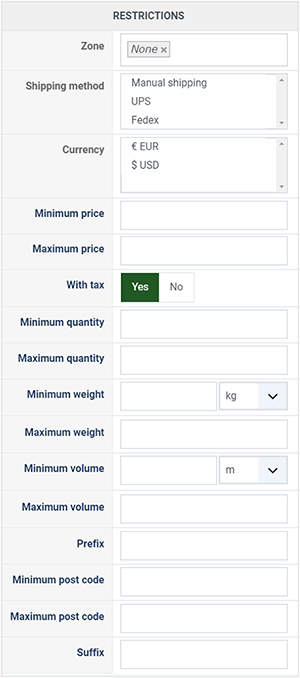
  • Zone : You can restrict the check payment method to a zone. By clicking on the edit icon, a popup will open enabling you to select a zone. You can also remove this limitation by clicking on the delete icon.
  • Shipping method : With this option you can select the shipping method for which this payment method will be available. For example, if you choose UPS, this payment method will only be usable if UPS is selected as shipping method. If an other shipping method is selected, this payment method will not be displayed. Note: if you selected "None" or don't select any shipping method, this payment method will always be available.
  • Currency: Choose the currencies allowed by this payment method.
  • Minimum price : The payment method can be available for only orders above a minimum price. This price uses the payment method price currency even if the price is 0.
  • Maximum price : The payment method can be available for only orders below a maximum price. This price uses the payment method price currency even if the price is 0.
  • With tax : Display the payment method only for products with tax.
  • Minimum quantity : If the order has a price lower than the price set in this field, so this payment method will not be available.
  • Maximum quantity : If the order has a price upper than the price set in this field, so this payment method will not be available.
  • Minimum weight : You can set a minimum weight so that orders below it won't be able to be paid with the current payment method. The weight of the order will be calculated based on the weight of each products in it.
  • Maximum weight : You can set a maximum weight so that orders over it won't be able to be paid with the current payment method. The weight of the order will be calculated based on the weight of each products in it.
  • Minimum volume : You can set a minimum volume so that orders below it won't be able to be paid with the current payment method. The volume of the order will be calculated based on the volume of each products in it. The volume is calculated with the width, height and length of the products.
  • Maximum volume : If the order has a volume upper than the price set in this field, so this payment method will not be available.
  • Prefix : You can restrict your payment methods to only post codes including such prefix with this option.
  • Minimum post code : You can restrict your payment methods to only post codes within a certain range whereby this is the minimum possible value
  • Maximum post code : You can restrict your payment methods to only post codes within a certain range whereby this is the maximum possible value
  • Suffix : You can restrict your payment methods to only post codes including such suffix with this option.


Access level
Plugins Columns

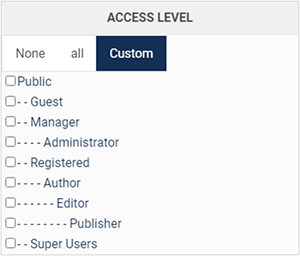
The ACLs are available in the business edition of HikaShop.  

  • None : When "none" is selected, the payment method will never be displayed.
  • All : "All" allow you to display the payment method for all the type of users. All groups are allowed to pay via this payment method.
  • Custom : Here you can select which groups can use this payment method. All the checked groups will be able to use this method.

Note about Access level :

  • Access level : With the business edition of HikaShop, you will be able to limit a coupon or a discount to specific users.

  • Access level : With the business edition of HikaShop, you will be able to limit a coupon or a discount to joomla groups of users.

FAQ

I don't see any payment methods during the checkout, or I don't see some of them, what is the problem ?

There are several things which you could have missed.

  • 1/ Check that the payments plugins are installed and published
  • 2/ Check that you have configured your payment plugins (edit it and save its configuration)
  • 3/ Check that your template is able to display error messages: hikashop.com/documentation
  • 4/ Check that you have the payment view in the checkout workflow option of the configuration
  • 5/ If you restricted your payment methods to zones, check that the address you're using is inside those zones ! Otherwise the payment methods will be filtered out.
  • 6/ Check that the currency you're using is supported by the payment plugins you're using. Some payment plugins only supports a limited number of currencies. You should check that with the support of the payment gateways you're using.
  • 7/ Please make sure that you didn't change the currency code of your currency. Otherwise, the payment plugins won't recognize your currency. If you want to change the display of your currency, we invite you to use the "format" option on the right of the currency options screen as well as the symbol field.
  • 8/ When you select a currency or a shipping method in the options of the payment method, the payment method won't display unless that currency or shipping method is selected during the checkout. In most cases, these parameters shouldn't be selected so make sure they are unselected. To unselect them, you need to press the ctrl key and click on the selected currencies or shipping methods. Also remember if you selected one or several shipping methods here, when you add a new shipping method later on, you will want to go in the payment plugins options and select that new shipping method or it won't display any payment method for that new shipping method.
  • 9/ Please check that you didn't set the access option of the plugin (via the plugins manager of Joomla) to something else than public.
  • 10/ It can happen that the plugin's access is not set properly in the database. Please go in the Joomla plugins manager and edit the plugin and save it. That will sett the access if not present and might help solve your problem.


generic


Description

This screen enables you to edit the payment method options. Payment methods will be filtered on checkout based on the zone you set for them, if any. Then, they will be displayed to the user for him to choose which payment method he prefers for his order.

Note that the payment method can probably support only a limited number of currencies.


Toolbar


  • Save & Close : Save the payment method options and return to the payment methods Management screen.
  • Save : Apply the modifications to the payment method and stay on the same screen.
  • Cancel : Return to the previous screen without saving the modifications.
  • Help : This button enables you to turn ON/OFF the help section, this screen will appear or disappear.


Main Information

If you use one of our commercial versions, you will be able to enter the name and description in different languages. This feature requires to have joomfish installed and can be activated in the configuration page, in the display tab. The languages available will be the ones in joomfish. If you don't enter something for a translation, it will just use the default information in the Main information tab instead. After you click on save or apply an additional publish icon will appear next to the fields where you entered something in the languages tabs so that you can easily enable or disable them. The default publish status can also be changed in the configuration page of HikaShop.


Generic information


  • Published : This option allows you to publish or not the payment method.
  • Images : Select here the desired images to be displayed for this payment method. If you want to add additional images, you can upload them via FTP into the folder media/com_hikashop/images/payment/ of your website and you will then be able to select them in that option.
  • Price : You can set the payment fee in this field, and select the currency of the fee.
  • Percentage : The percentage allows you to define a payment fee depending on the total amount of the products in the cart.
  • Tax category : Select among your tax category, the category you want apply on your payment method cost.


Specific Configuration

Specific configuration will change a lot from a payment plugin to another, but there are especially for HikaShop Payment plugin quite common options, note that this settings aren't required, let's details its
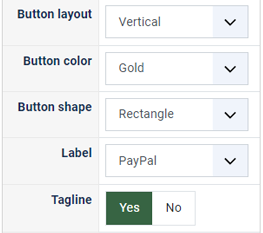
  • Debug : You can activate the debug mode of your payment method. If you do so, informations about each transaction made will be logged in the payment log file. You can see and modify the location of this file in the configuration page of HikaShop.

  • Cancel url : The url you want your users to be redirected to when they cancel the order from the SagePay interface. By default, they will be redirected to the first step of the checkout process.

  • Return url : The url you want your users to be redirected to when they finish their payment on the SagePay interface. By default, they will be redirected to the after_end page of the checkout process which will thank them for their order.

  • Invalid status : Here, you can select the status to an order if the plugin receives a invalid completion notification from payment servers for an order.

  • Pending status : Like, for "invalid status"you can set to an order if the plugin receives a pending completion notification.

  • Verified status : Same idea than "invalid" and "pending" status.

Restrictions

Plugins Columns

  • Zone : If a payment method is published it can be used by your customers and applied based on restrictions & settings.

  • Shipping method : Select image to select images to accompany your payment method name in order to inform your customer about payment standards compatibilities.
  • Currency : Define the cost of your payment methods, this will be displayed right next to the payment method name.

  • Minimum price : Define the cost of your payment methods but through a percentage of the cart total, this result will be displayed right next to the payment method name, like previous settings.
  • Maximum price : Select among your tax category, the category you want apply on your payment method cost.

  • With tax : Select among your tax category, the category you want apply on your payment method cost.

  • Minimum quantity : Define the cost of your payment methods but through a percentage of the cart total, this result will be displayed right next to the payment method name, like previous settings.
  • Maximum quantity : Select among your tax category, the category you want apply on your payment method cost.

  • Minimum volume : Define the cost of your payment methods but through a percentage of the cart total, this result will be displayed right next to the payment method name, like previous settings.
  • Maximum volume : Select among your tax category, the category you want apply on your payment method cost.

  • Prefix : Define the cost of your payment methods but through a percentage of the cart total, this result will be displayed right next to the payment method name, like previous settings.
  • Minimum post code : Select among your tax category, the category you want apply on your payment method cost.

  • Maximum post code : Select among your tax category, the category you want apply on your payment method cost.

  • Suffix : Select among your tax category, the category you want apply on your payment method cost.


Restrictions

  • Zone : You can restrict the check payment method to a zone. By clicking on the edit icon, a popup will open enabling you to select a zone. You can also remove this limitation by clicking on the delete icon.
  • Shipping method : With this option you can select the shipping method for which this payment method will be available. For example, if you choose UPS, this payment method will only be usable if UPS is selected as shipping method. If an other shipping method is selected, this payment method will not be displayed. Note: if you selected "None" or don't select any shipping method, this payment method will always be available.
  • Currency: Choose the currencies allowed by this payment method.
  • Minimum price : The payment method can be available for only orders above a minimum price. This price uses the payment method price currency even if the price is 0.
  • Maximum price : The payment method can be available for only orders below a maximum price. This price uses the payment method price currency even if the price is 0.
  • With tax : Display the payment method only for products with tax.
  • Minimum quantity : If the order has a price lower than the price set in this field, so this payment method will not be available.
  • Maximum quantity : If the order has a price upper than the price set in this field, so this payment method will not be available.
  • Minimum weight : You can set a minimum weight so that orders below it won't be able to be paid with the current payment method. The weight of the order will be calculated based on the weight of each products in it.
  • Maximum weight : You can set a maximum weight so that orders over it won't be able to be paid with the current payment method. The weight of the order will be calculated based on the weight of each products in it.
  • Minimum volume : You can set a minimum volume so that orders below it won't be able to be paid with the current payment method. The volume of the order will be calculated based on the volume of each products in it. The volume is calculated with the width, height and length of the products.
  • Maximum volume : If the order has a volume upper than the price set in this field, so this payment method will not be available.
  • Prefix : You can restrict your payment methods to only post codes including such prefix with this option.
  • Minimum post code : You can restrict your payment methods to only post codes within a certain range whereby this is the minimum possible value
  • Maximum post code : You can restrict your payment methods to only post codes within a certain range whereby this is the maximum possible value
  • Suffix : You can restrict your payment methods to only post codes including such suffix with this option.


Access level

Plugins Columns

The ACLs are available in the business edition of HikaShop.  

  • None : When "none" is selected, the payment method will never be displayed.
  • All : "All" allow you to display the payment method for all the type of users. All groups are allowed to pay via this payment method.
  • Custom : Here you can select which groups can use this payment method. All the checked groups will be able to use this method.

Note about Access level :

  • Access level : With the business edition of HikaShop, you will be able to limit a coupon or a discount to specific users.

  • Access level : With the business edition of HikaShop, you will be able to limit a coupon or a discount to joomla groups of users.

FAQ

I don't see any payment methods during the checkout, or I don't see some of them, what is the problem ?

There are several things which you could have missed.

  • 1/ Check that the payments plugins are installed and published
  • 2/ Check that you have configured your payment plugins (edit it and save its configuration)
  • 3/ Check that your template is able to display error messages: hikashop.com/documentation
  • 4/ Check that you have the payment view in the checkout workflow option of the configuration
  • 5/ If you restricted your payment methods to zones, check that the address you're using is inside those zones ! Otherwise the payment methods will be filtered out.
  • 6/ Check that the currency you're using is supported by the payment plugins you're using. Some payment plugins only supports a limited number of currencies. You should check that with the support of the payment gateways you're using.
  • 7/ Please make sure that you didn't change the currency code of your currency. Otherwise, the payment plugins won't recognize your currency. If you want to change the display of your currency, we invite you to use the "format" option on the right of the currency options screen as well as the symbol field.
  • 8/ When you select a currency or a shipping method in the options of the payment method, the payment method won't display unless that currency or shipping method is selected during the checkout. In most cases, these parameters shouldn't be selected so make sure they are unselected. To unselect them, you need to press the ctrl key and click on the selected currencies or shipping methods. Also remember if you selected one or several shipping methods here, when you add a new shipping method later on, you will want to go in the payment plugins options and select that new shipping method or it won't display any payment method for that new shipping method.
  • 9/ Please check that you didn't set the access option of the plugin (via the plugins manager of Joomla) to something else than public.
  • 10/ It can happen that the plugin's access is not set properly in the database. Please go in the Joomla plugins manager and edit the plugin and save it. That will sett the access if not present and might help solve your problem.