HikaSubscription Tutorial

Component Installation

First, you should have a Joomla! website with HikaShop installed.
The HikaShop edition does not matter, you can use HikaShop starter, HikaShop essential or HikaShop business.

HikaSerial Subscription could be installed like a classical Joomla! component, in the Extension Manger.

Once HikaSerial Subscription installed, his menu would be merged with the HikaShop menu. So at any time, in HikaShop or HikaSerial, you would have access to both component features.

Understanding the workflow

The workflow of a subscription system is based on plans and subscription.
The plan is what your customer will subscription and the subscription is the relation between the plan and the customer.
Because HikaSubscription is an add-on for HikaShop, the sell of these subscription will be made via HikaShop products.

When a customer buy a product which is related to a plan, HikaSubscription will create a subscription for that plan, associated with the customer.
Depending the order status, the subscription will be active or not.

Afterwards, your customer will be able to renew, automatically or not, his subscription.
That action can be done via recurring (when using a recurring payment plugin and a specific relation between the product and the plan) ; but also manually by letting the customer buy specific renewal products.
If you want that the renewal have a different price or different duration, you would have to use several products for that task (usage of variants is also possible).

Since the renewal of a subscription must have the information of which subscription will be renew ; the customers can just renew their subscription via the specific interface in the customer panel.

Plan relation

There is different type of relation between a plan and a product.

  • Creation will only create subscription.
    Buying multiple products in the same order will create multiple subscriptions.
  • Creation then Renewal will create subscription and can be use for renewal (manually or recurring).
    Buying multiple products in the same order will create multiple subscriptions.
  • Renewal or Creation will create subscription and can be use for renewal (manually or recurring).
    Buying multiple products in the same order will create one single subscription and extend its duration.
  • Renewal can only be use for renewal in the HikaSubscription interface.
    Buying multiple products in the same order will extend more the duration of the selected subscription.

Subscription life - Plan actions

One important part of the HikaSubscription workflow is the life of a subscription : It can be Active, expired or closed.
The difference between expired and closed is that an expired can be renewed and when it's too late, it will be change to closed.

When a subscription became active or became not active (expired or closed), the plan actions are processed.
Depending the plugins you're using for the plan, they can act differently depending the state of the subscription.
For example, the group subscriber will add the account into a specific Joomla group(s) when the subscription is active and will remove the account from the group(s) when it expires.

First configuration

The HikaSerial (Subscription) configuration screen does not contain a lot of options.
Some specific settings are in the dedicated tab, but the main tab also contains some important setting, specially regarding the Assignable order statuses.
It is important to check and configure that setting which list the order statuses defining an order as confirmed and paid by the customer.
An order with one of these status will make a subscription as active, otherwise it will mark it as expired (or closed).

Settings in the subscription tab are mostly to define the rules regarding the renewal.
You can define if you accept the customer to perform a renewal before or/and after the subscription expiration date.
In that screen you can also configure the notification emails.

For more details about the other settings, you can see the global configuration documentation page.

Creating the first plan

Unlike pack/serial, the configuration of a plan do not require to configure some plugins before. Due to its define workflow, all the settings are centralized in the plan.
By default, a random generator will be used to create the unique subscription key ; but you can configure the format of that key in the plan itself.
For more details about the format, do not hesitate to consult the random generator documentation page.

The central part of the plan are the actions that you can find in the second tab.
Most use case just requires the group subscriber features ; so the Joomla account will be put in specific user groups and you can use Joomla ACL afterwards to authorize or refuse actions (or pages) in your website.

Associate the plan with a product

Once the plan is created, you will want to associate it with one of several HikaShop product(s).
That configuration will determine how you're selling your subscription. You can have different products selling the same plan but with different duration.
You can use the Creation then Renewal if you want to use a recurring payment plugin (like paypal recurring).

Just like the association of HikaSerial packs, the association of HikaSubscription plan are in the HikaShop product interface, in a dedicated block.

You can use the "Add" button to select your HikaSubscription plan, the type of relation and the wanted duration.

Please note that you don't want to let the renewal products be visible in your shop.
Because a renewal must be related to a subscription, the selection is only made via the subscription section of the HikaShop customer control panel.
That is why the renewal products should be placed in a hidden category ; best is to create a category next to the product category so the product won't be visible in HikaShop product listings.

Here we are, HikaSubscription is configured !

Going further - Creation of a Subscription document

The plugins attach serial and pdf serial are also compatible with HikaSubscription.
So you can also create instances for these plugins if you want to add an image or a PDF in the confirmation emails

HikaSerial can be used to sell and check e-tickets. We will see in this tutorial how implement a simple e-ticket.
The configuration that we will use will require a smartphone (with Internet) for checking the validity of the e-ticket. The smartphone will scan a QRCode and display the result.
You could also use a PC and enter manually the serial code, but it is less interesting.

Main configuration

First, we have to set the HikaSerial main configuration in order to activate some useful feature.

Here the options that you have to check:

  • Forbidden consume for guests: Yes
  • Display details after consuming: Yes
  • Save history: Yes

Generator plugin configuration

Once the main configuration is done, you will have to create your generator plugin.
The generator plugin will create new serial when you will sell an e-ticket.

In the menu "HikaSerial > Plugins", select the Random - HikaSerial Generator plugin and click after that on the "New" button in the toolbar.

Choose a name for your generator, like "E-tickets Gen", put the generator as "published", and then, choose a length for your serial in the option "Serial size" (12 is a good one).
You can now save the configuration of your generator.

Pack configuration

Now we have a generator, we can create a pack which will contain your e-tickets serials.
In the menu "HikaSerial > Packs" you can create a "New" pack.

Here the options that you have to check:

  • Name: The name for your pack, like "e-ticket"
  • Pack data: Pack SQL Data
  • Pack Generator: The generator you just created, "e-ticket gen"
  • Published: Yes
  • Consumable serials: Yes
  • Consume will check/assign user: No
  • Webservice access: Yes (to authorize the consume though QRCode)
  • Status for refund serials: Unassigned
  • Unlimited quantity: Yes
  • No user assign: Yes

You can now save your e-ticket pack

Group filter configuration

After the pack creation, you will have to activate a group filtering on this pack. Thanks to it you will be the only one who could consume a serial and validate the e-ticket.

In the menu "HikaSerial > Plugin" choose the plugin "Group Filter - HikaSerial Consumer plugin" and then, click on the "New" button in the toolbar

Put a name for your filter, like "e-ticket filter", select the pack you just created and click on "Customer" for the "groups" option.
You will have to choose one (or several) joomla group, the users in this group would be able to consume the e-tickets for the validation.
The group "Manager" and "Administrator" are (for most cases) more appropriated.

If you don't want that the people who will check the e-tickets have manager rights, you can create a new Joomla user group and configure this plugin with it.

Product Assignation

In the HikaShop product page, you will find a new section for serials.

You can use the "Add" button to select your HikaSerial pack and after that, select the quantity of serials that will be send to the user will he will bought the product.

Creating a e-ticket image

With the e-ticket, you may want to include an image in the order configuration email with the special code.
The customer will receive this image, could send it to someone else or could print it.
HikaSerial includes a "attach serial" plugin which allow you to create dynamic images for your serials.

This plugin is listed with other HikaSerial plugins. Like the generator plugins, you can create several configurations for "attach serial".
Like for the two previous plugins, you have to create a new "attach serial" configuration.
The attach serial documentation page already includes a little sample configuration.

The important thing that you have to configure is the QRCode for the e-ticket consumption.

http://YOUR_WEBSITE_URL/index.php?option=com_hikaserial&ctrl=serial&task=consume&hikaserial[serial_data]={serial.serial_data}&hikaserial[format]=html
The generated QRCode will redirect the smartphone which will scan the code to your website, with the serial pre-filled. If the smartphone is already logged with the good user (the right joomla user group) it will consume the serial and display you the details of the serial (the order number, the customer, etc).

If you don't want to display the all website but just the HikaSerial content, you can add the parameter "tmpl=component" to the url.

http://YOUR_WEBSITE_URL/index.php?option=com_hikaserial&ctrl=serial&task=consume&hikaserial[serial_data]={serial.serial_data}&hikaserial[format]=html&tmpl=component

Some smartphone barcode scanner applications call the scanned url in order to check if the url exists. The result is that the serial will be consumed and you won't see the result of it in your smartphone because when you will click on the link to see the page, the serial will be already consumed by the call of the barcode scanner.
That's why we added in HikaSerial 1.8.2 the possibility to have a confirmation page when consuming a serial.

http://YOUR_WEBSITE_URL/index.php?option=com_hikaserial&ctrl=serial&task=consume&hikaserial[data]={serial.serial_data}&confirmation=1&hikaserial[format]=html
In this url, the serial data is passed in a different parameter and the parameter "confirmation" is added.

Presentation and configuration

HikaSerial have a consume feature which allow to make specific action when the customer wants to use it.
The consume feature could be configure per pack, as the webservice access one.

  • Set consume serials to yes if you want to have a consume action for this pack
  • Set Webservice access to yes if you want to use webservices

Consuming

HikaSerial contains a module for the consumption. This module will display an input box where the user will be able to enter his serial

His the serial has the right to be consume, the consuming process will be launch and some actions will be performed.

You have several "consume" plugins in HikaSerial like "group association" (which give a new group to the user), "product add" (which add a product in the user cart) or "points consumer" (which give points to the user, using HikaShop points, AlphaUserPoints or HikaPoints).
If you have some specific requirements, you can easily create your own customized plugin.

How and when consume

In order to be consume, a serial should be "assigned". When consumed, the serial will become "used".
A serial can be consume just one time but you can change his status manually if you want to reset it.

When a pack have the consumption option activated, a serial will be set "assigned" after his creation. Otherwise the serial will be set as "used".

Some consumption plugins could ask for a logged user and will refuse the consumption if it is a guest. At this moment, warning message will be displayed.

Technical integration : the consume page

If you want to consume your serial from an outside application, the next part of this documentation is right for you.

The consume html page is:

index.php?option=com_hikaserial&ctrl=serial&task=consume

Using webservices, in the front end, to check a serial, you can call an url like this:

index.php?option=com_hikaserial&ctrl=serial&task=check&hikaserial[serial]=YOUR_SERIAL_DATA&hikaserial[format]=xml

It would result this:

You can use XML, JSON and HTML formats.

The consume action

After that, there is the "consume" feature.
You can only consume serials which have "assigned" status.

For example, you can call the URL:

index.php?option=com_hikaserial&ctrl=serial&task=consume&hikaserial[serial_data]=YOUR_SERIAL_DATA&hikaserial[serial_extra_data][myUser]=YOUR_USER_NAME&hikaserial[format]=json

And receive:

The webservice is compatible with html POST request.
So you can make a post request to the url:

index.php?option=com_hikaserial&ctrl=serial&task=consume

And give the rest of the parameters by POST ( hikaserial[serial_data] / hikaserial[format] / hikaserial[serial_extra_data][] )

HikaSerial Tutorial

Component Installation

First, you should have a Joomla! website with HikaShop installed.
The HikaShop edition does not matter, you can use HikaShop starter, HikaShop essential or HikaShop business.

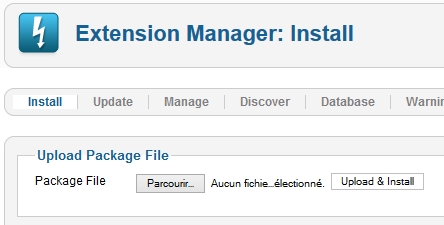
HikaSerial could be installed like a classical Joomla! component, in the Extension Manger.

Once HikaSerial installed, his menu would be merged with the HikaShop menu. So at any time, in HikaShop or HikaSerial, you would have access to both component features.

Understanding the workflow

HikaSerial is like a toolbox for HikaShop. The main feature is the assignation of unique content elements (called Serial) with HikaShop orders.
For most case, that assignation depends on the products in the orders ; but is also possible to bypass and create your own rules (thanks to plugins).

Dependins the plugins you will use, you will build your workflow to feet to your needs. Each plugin is a tool which can interact with the other tools and the main system.
It is also possible to generate serials in other context, like sending a newsletter with Acymailing.
But the common usage is to assign a pack with a product so the customer will receive its serial(s) when the order is confirmed.

First configuration

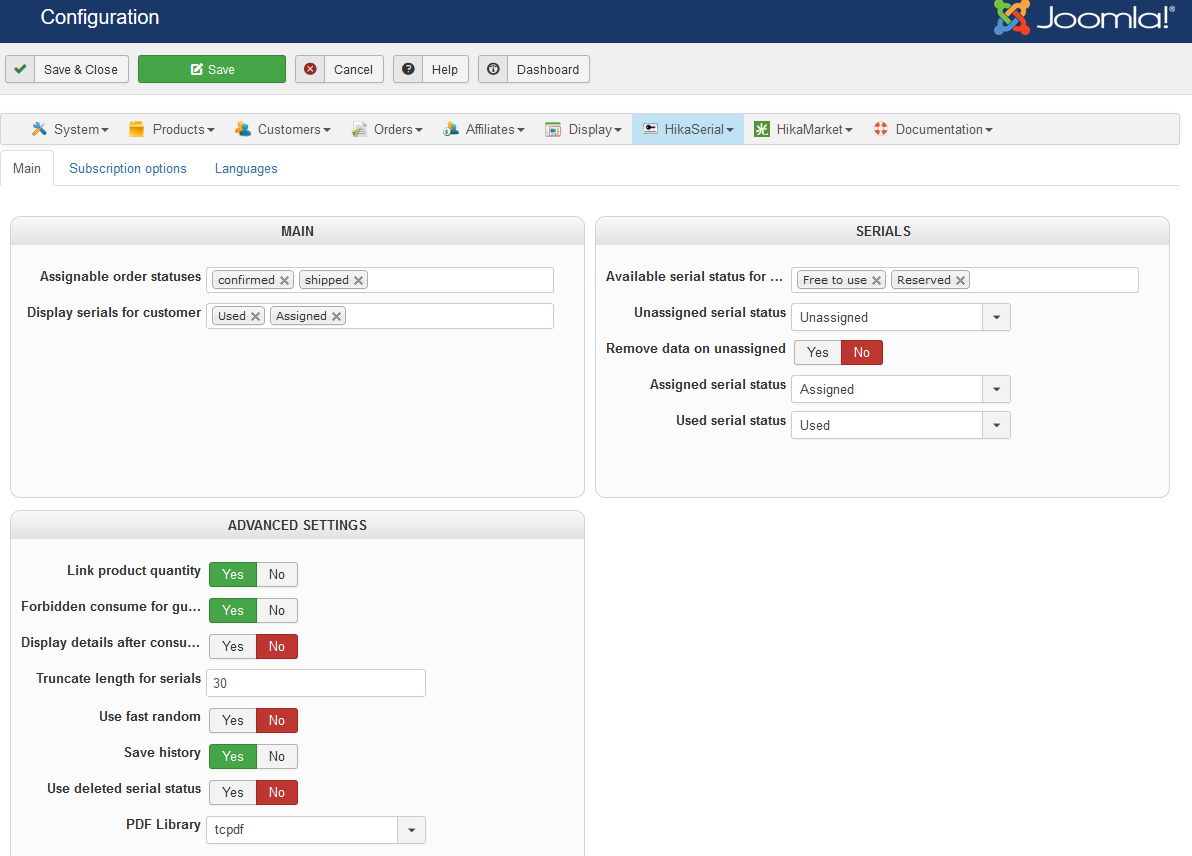
The HikaSerial configuration screen does not contain a lot of options.
You have to check that the first option Assignable order statuses is configured accordingly to your order workflow.
It lists all confirmed order status where serials will be accessible by the user in his order.
During your tests, it is important to keep in mind that a created order won't provide serials to your customers. So if you do some test orders, you will have to confirm the order manually in the HikaShop order details in the backend.

For more details about the other settings, you can see the global configuration documentation page.

Database of serials OR generation of serials

One element to determine in your workflow is to know if you want to use serials from the database or generate them dynamically.
If you want to sell coupons for your store or unique content coming from an external list (sim card numbers, code for another website), the workflow is not the same.
In case of a fixed list of data, you do not need to use a serial generator and HikaSerial will pick up the information directly from what you have imported.
Otherwise, you will have to determine which serial generator will more suit to your needs.

Creating the first generator

HikaSerial contains several different generators (and you can create your own) which have different purposes.
In the HikaSerial menu, choose "Plugins". You will see the list of the plugins (with generators, consumers...).
You have to choose one generator and create an instance of configuration.

  • Random generator for creating simple "random code" serials.
  • EAN generator for creating random code which can be display as a 3D Barcode.
  • Coupon generator for creating HikaShop discount codes (gift certificates).
  • Series generator for creating a serie of serials (1,2,3,4...).
  • Time limited generator for serial with an expiration date, when using consumption features.
  • Points generator for embed a value of points that the user will earn during the consumption.
  • Secure eBook generator for the integration with the "Secure eBook" plateform (deprecated)
  • ...

With each generator you can create several configurations.
So you can create different "random generator" configurations with different parameters and use them in different packs for different products.
But depending the tool, you will get more or less flexibility. For example the coupon generator can change the coupon value depending the product that the customer bougth.
If you want to sell gift certificates, you could use one coupon generator and use the product cost be the value of the generated coupon.

Creating the first pack

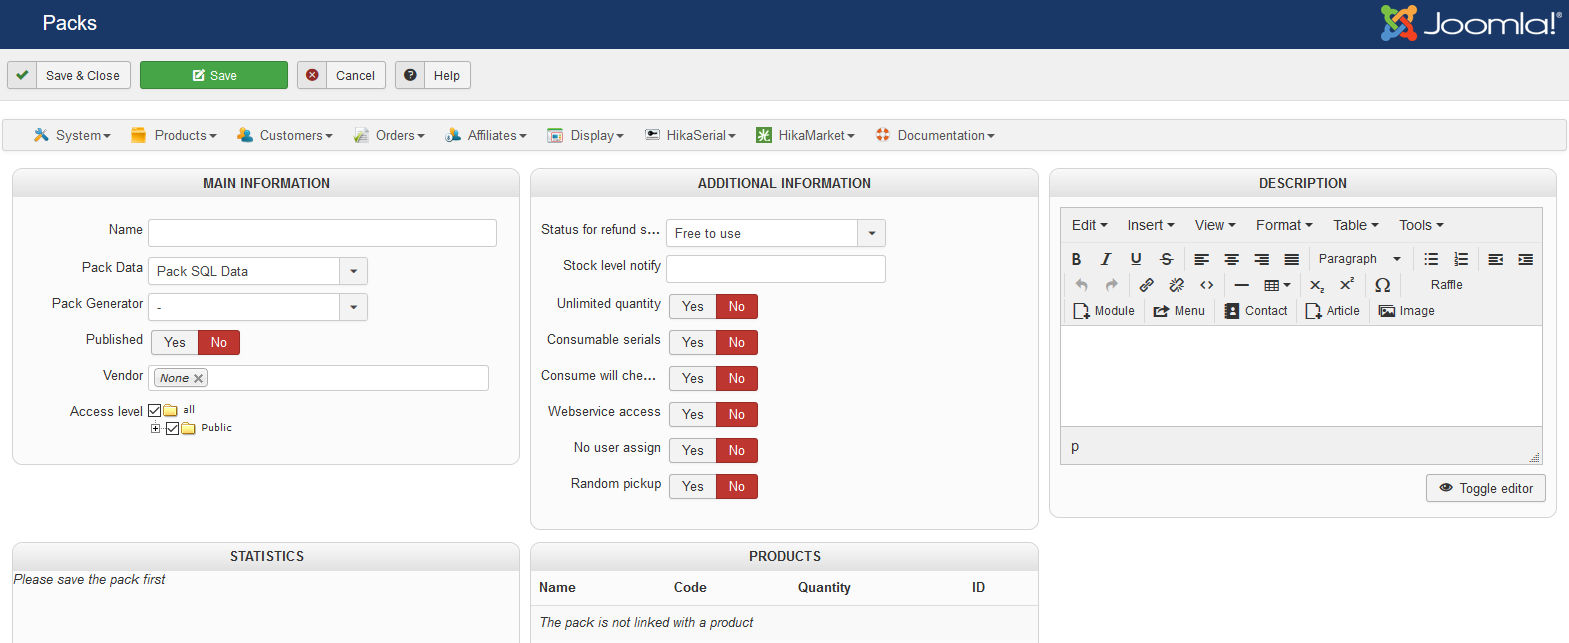
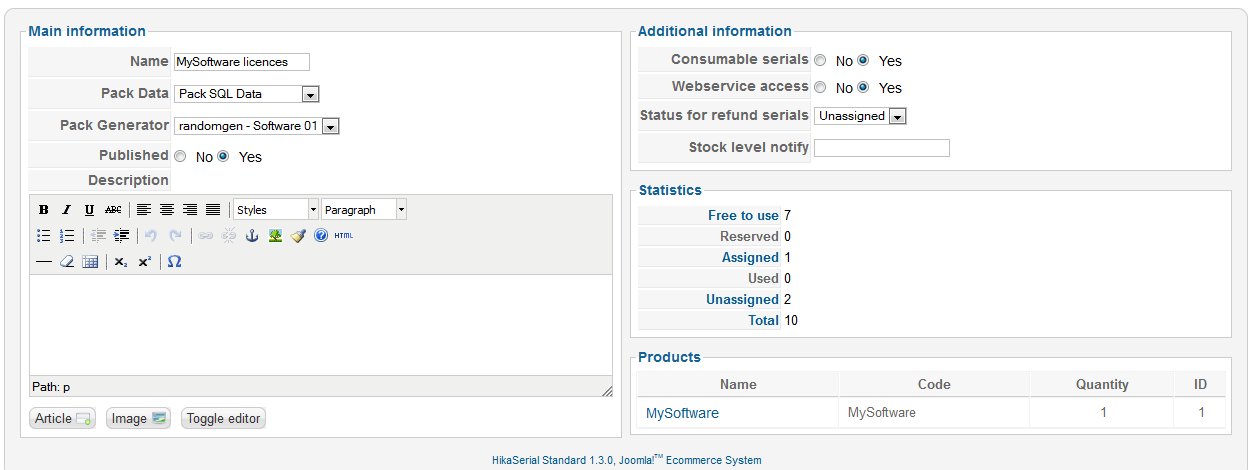
In order to work and create serials, you first need a pack. A pack is a "pack of serial", it contains serials in order to group them for a specific purpose.
So you have to create a new pack.
In the configuration of the pack, you will be able to choose the generator previously configured.

Depending your workflow, if you want your serials to be consume or not, the configuration of your pack will be different.
If you're selling a content coming from a external list or if you're using the coupon generator, you don't want to use consumption since the information is related to something else than HikaSerial (coupons will be handle directly by HikaShop for example).
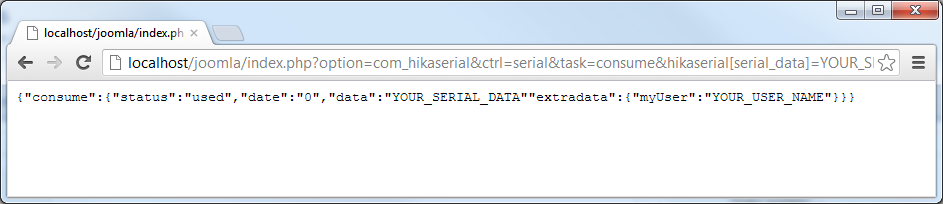
But if you're selling a serial that your customer will have to use to perform an action (enter into a concert, have a discount in a physical store, gain points, add a special product in the cart...), then you need the consumption.
Please note that, if there is someone, who is not the customer, to consume the serial (enter into a concert...) you have to activate the setting no user assign.

For more details about the other settings, you can see the pack configuration documentation page.

Associate the pack with a product

Once the pack created, you will want to associate it with an HikaShop product.
In the HikaShop product page, you will find a new section for serials.

You can use the "Add" button to select your HikaSerial pack and after that, select the quantity of serials that will be send to the user will he will bought the product.

Here we are, HikaSerial is configured !

Creating a gift certificate

If you want to sell gift certificates, in most of cases, you want to create HikaShop discount codes.
At this moment, you have to use the "coupon generator" and not the "random generator".
You can create a HikaShop coupon which will be use as template and create your first "coupon generator" configuration.
After that, you can associate this coupon generator with a new pack.
Each time a serial will be generated, a HikaShop coupon will be created too.

With the gift certificates, you may want to include an image in the order configuration email with the special code.
The customer will receive this image, could send it to someone else or could print it.
HikaSerial includes a "attach serial" plugin which allow you to create dynamic images for your serials.

This plugin is listed with other HikaSerial plugins. Like the generator plugins, you can create several configurations for "attach serial".
Each configuration is a specific image for one or several packs. The attach serial documentation page already includes a little sample configuration.