
- Details
- Written by: jobsigen
- Category: HikaShop
- Hits: 4544
|
|

Description
This screen enables you to manage all your order status. In HikaShop, orders are categorized through different statuses, or to put it another way, different states depending on the current step of the order. This enables you to easily manage all of them from the same interface.
Before going further, let's detail the classic course for an order.
Ex : .
Step 1 : Your user has a cart and enters the checkout => the order reaches the "created status"
Step 2 : Your user has paid and the payment platform notification is received => the order reaches the "confirmed status"
Other potential steps :
- You use a payment method that allow pending payment, and so the payment platform notification will leads HikaShop to mute the status to "pending"
- Or your customer for a reason or another, have abandon the payment during the process, as previously the status switch to "cancelled"
Last but not least, HikaShop allows you to create new order status to better fit your order managing needs.
Toolbar

- New : Click on this button to create your own order status
- Edit : Pick an order status via the checkbox and click on this button to edit it.
- Help : This button enables you to turn ON/OFF the help section, this screen will appear or disappear.
- Dashboard : You can go back to the control panel using this button.
Column Headers
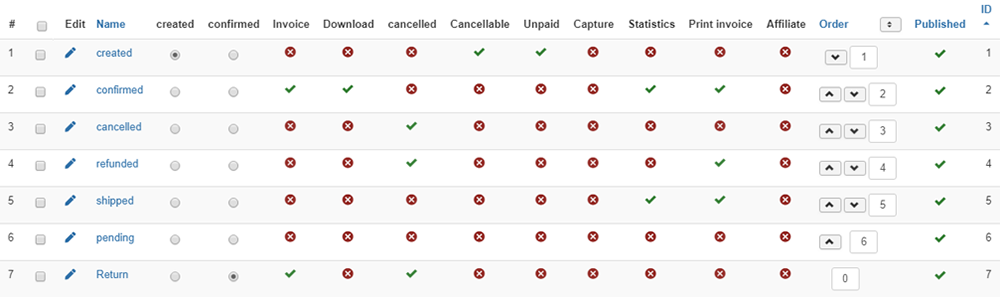
-
# : An indexing number automatically assigned for ease of reference.
-
Checkbox : Check this box to select one or more items. To select all items, check the box in the column heading. After one or more boxes are checked, click on the delete button in order to delete the selected order statuses.
- Edit : By clicking on the little pen icon, you will enter in your order status form to edit it.
- Name : The name of the order status.
- created : As the name tell it, this status define the first status for a new order.
- confirmed : Here, this status has to be classically defined for an order have recieved a positive payment notification.
- Invoice : Define when the system will create the invoice number of an order if not already set (used also for stock managment).
- Download : The statuses for which the files of products will be downloadable by the customers.
- cancelled : The order statuses identifying an order that is cancelled (used for stock management mainly).
- Cancellable : The order statuses for which the customer will see a 'Cancel' button on his orders listing. If clicked on, it will send a notification to the shop owner and will change the order status to cancelled.
- Unpaid : The order statuses for which the customer will see a 'Pay' button on his orders listing. If clicked on, the customer will be redirected to the payment gateway of the payment method of his order. This requires the option 'Payment of orders not paid immediately' to be turned on the in the HikaShop configuration.
- Capture : This status will be used in future HikaShop feature, but isn't already used yet.
- Statistics : The statistics on the dashboard will only take into account the orders with the order statuses selected here.
- Print invoice : You can select here the statuses for which the system will allow the customers to print their invoice on the frontend.
- Withdrawable : The order statuses for which the customer will be able to request a withdrawal. For example, you might want to allow withdrawal only when the order is "shipped" or "delivered". Note that in the HikaShop configuration page, you have the setting "Number of days after delivery for withdrawal window" to define the number of days during which the customer can request a withdrawal after the order status has been changed to one of the statuses marked as "withdrawable" in the menu System>Order statuses.
- Locked : The order statuses for which the order will be considered locked. When an order is in a locked status, it cannot be edited anymore in the backend, except for changing the status to another locked status.
- Affiliate : The order statuses for which the orders affiliate commission will be taken into account.
- Order : It enables you to order the Order Status of the current level the way you want.
- Published : If a Order Status is published it means that it can be used by your customers in their address and that it will be available as a choice in some settings of the administration of your shop.
- ID : This field indicates the ID of the Order Status.
Filters

- The filter caption enables you to easily search in your Order Status, if you have to look for an order status, just type its name for example.
- Details
- Written by: jobsigen
- Category: HikaShop
- Hits: 3256
|
|

Description
This screen enables you to manage all your Warehouse settings, that will allow you to organize your products as they are organized and following the real constraints. For examples :
- If you have 2 different places where your products are stocked
- If you want to restrict your shipping method between your different products
Toolbar

New: Enables you to create a new warehouse.
Edit: Select a warehouse and then click on this button in order to edit it.
Delete: Select one or several warehouses and click on this button in order to completely delete them.
Help: This button enables you to turn ON/OFF the help section. This screen will appear or disappear.
Dashboard: You can go back to the control panel using this button.
Column Headers
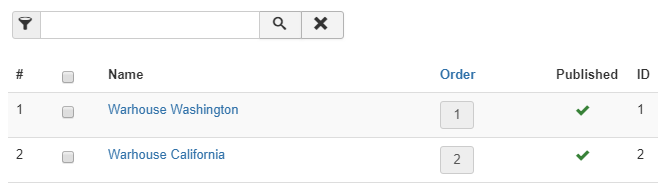
-
# : An indexing number automatically assigned for ease of reference.
-
Checkbox : Check this box to select one or more warehouses. To select all items, check the box in the column heading. After one or more boxes are checked, click on the delete button in order to delete the selected warehouses.
- Name : Name of the warehouse. You can click on it to edit it.
- Order : It enables you to order your warehouses of the current level the way you want.
- Published : If a warehouse is published it means that it can be used by your shipping method during the checkout.
- ID : This column indicates the ID of the warehouse.
Warehouse page
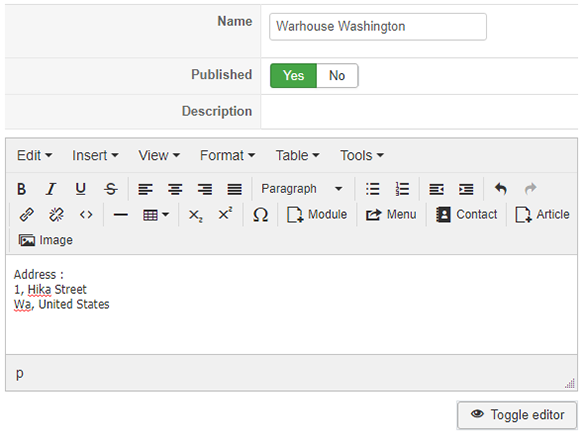
Name : Name of the warehouse. You can click on it to edit it.
Published : If a warehouse is published it means that it can be used by your shipping method during the checkout.
Description : Use this part, if you want to add some information around your warehouse.
- Details
- Written by: Lavocat
- Category: HikaShop
- Hits: 15613
|
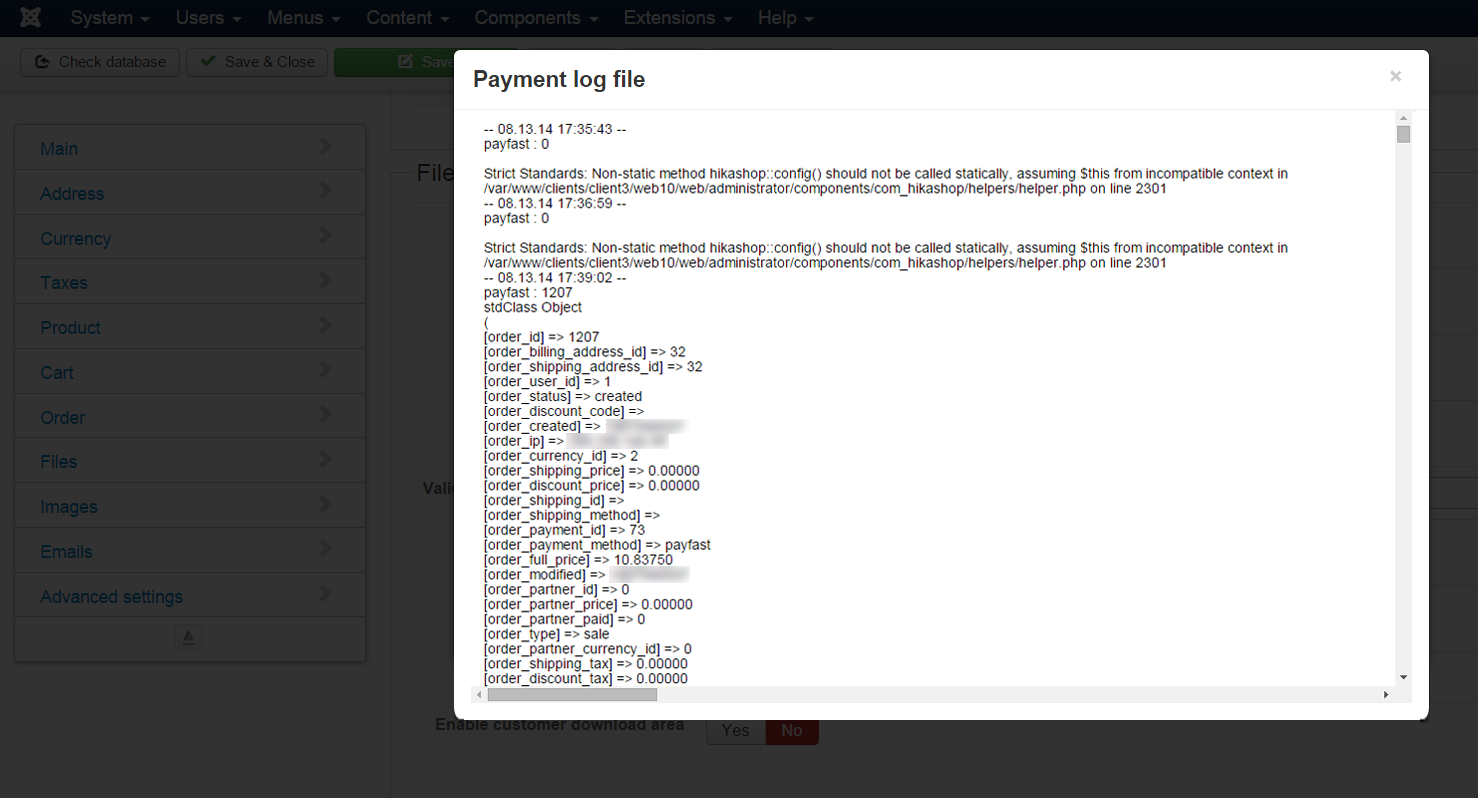
Thanks to the payment log, you will be able to read data about your payment plugin process and some errors created by the payment process. It's a file where important data is written while processing with your payment plugin (or any other type of plugin), so you will see what happened in the background, and let's hope so find the root of the trouble! |
|
To find the payment log, go to Components -> HikaShop -> Configuration.
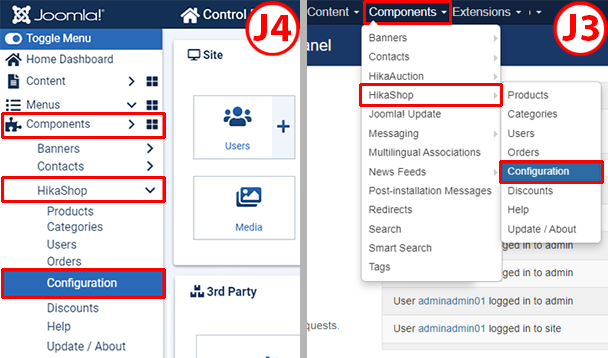
And in configuration, in the Main Tab, click on Files
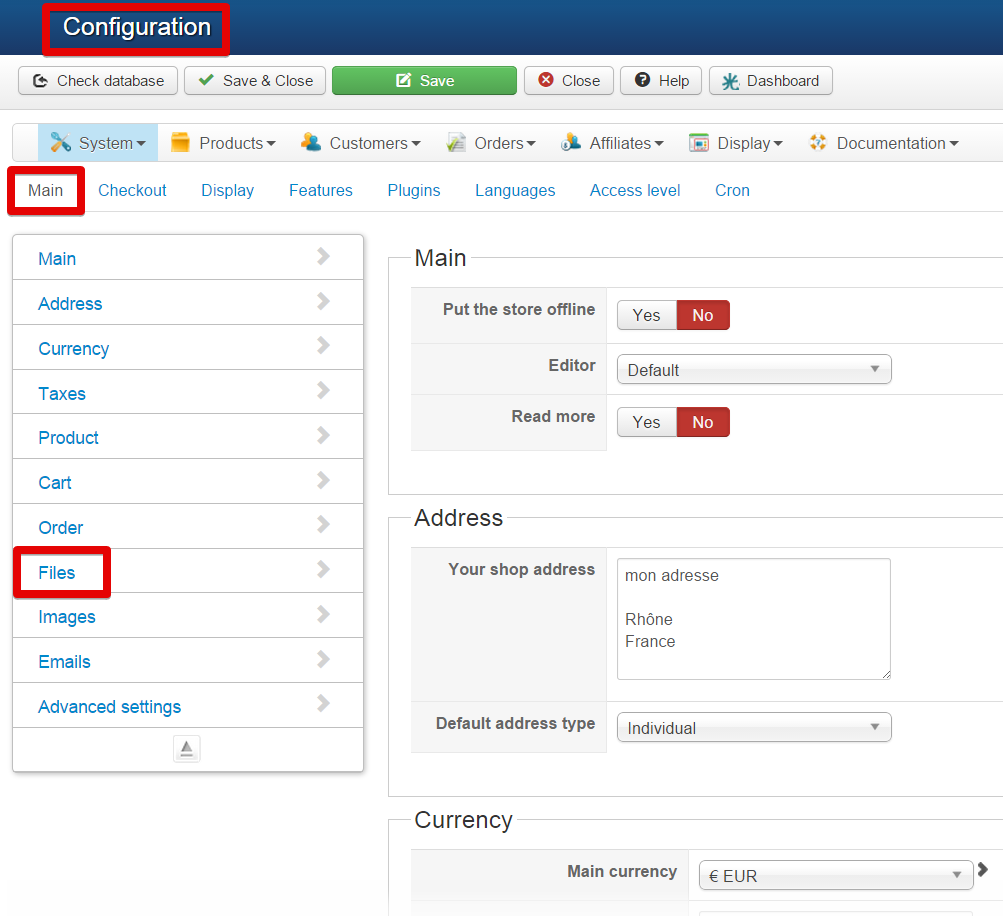
Now, you can see the "Payment log file", and its path, to read this log click on "See the report"
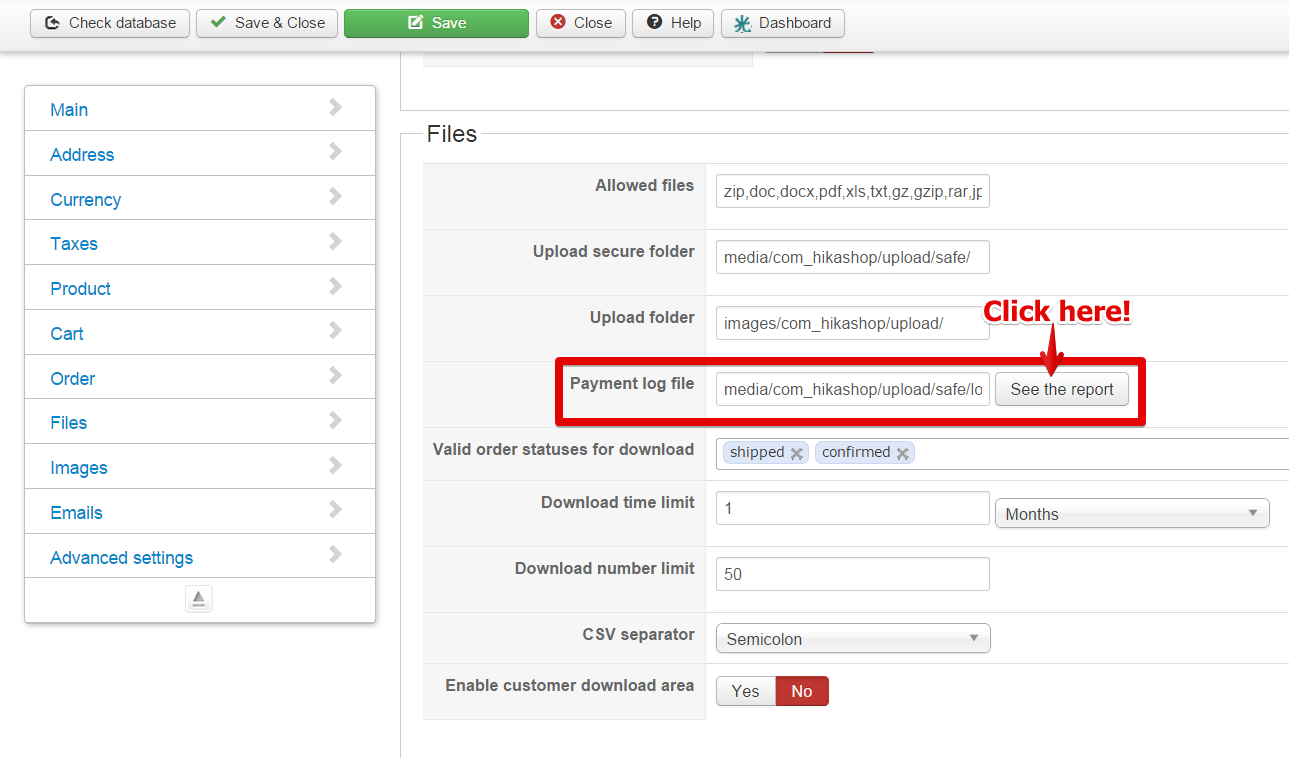
Hope this will be useful to find what's wrong with your payment plugin!
- Details
- Written by: Lavocat
- Category: HikaShop
- Hits: 26740
|
|

Find custom field options
First of all, to find the custom field option menu, go to Joomla! menu: Components -> Hikashop ->Configuration
Then, go to the Display tab menu -> Custom fields
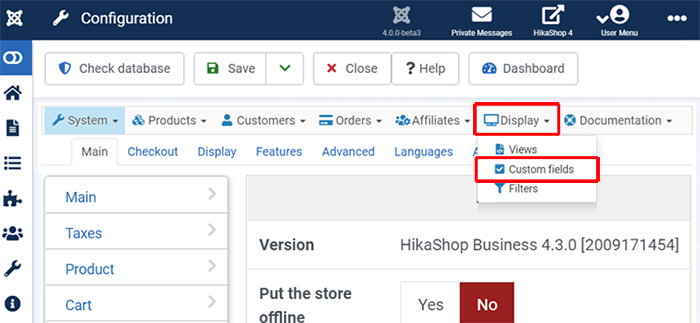
You will see this:
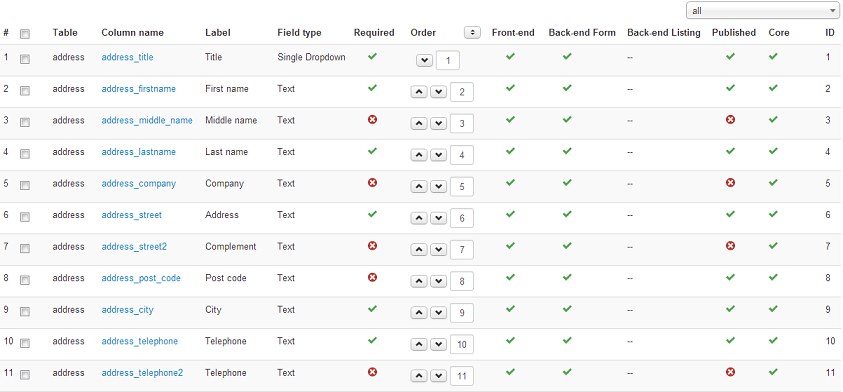
Description
This screen enables you to manage all your custom fields on the customer, his address, your categories, your products, a products in the cart/order (items), orders and on the contact form.
Plus, on the top right corner of this screen, you will find a dropdown, allowing you to filter the custom fields by type. That will prove convenient, especially if you have a lot of custom fields.
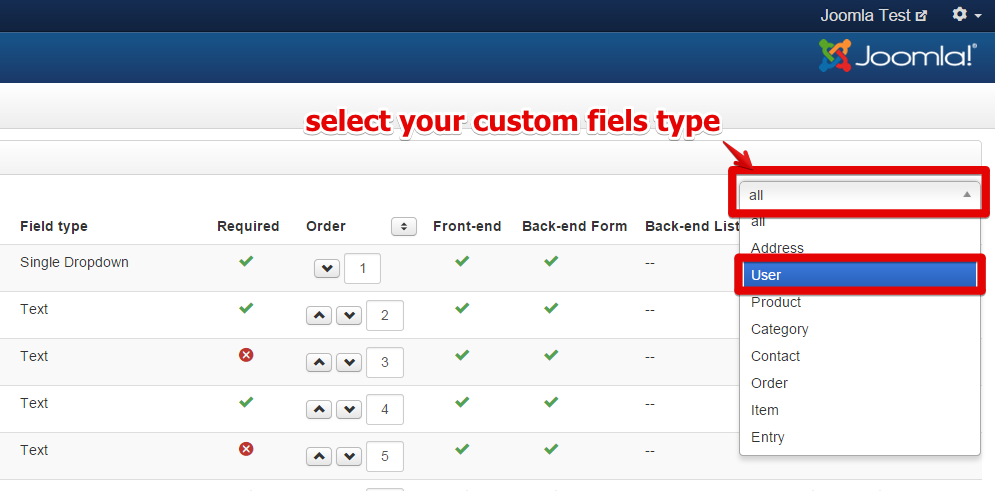
Here, you can see all these different types of custom field.
NOTE : On the screenshot below don't be surprised, there are only "address" types.
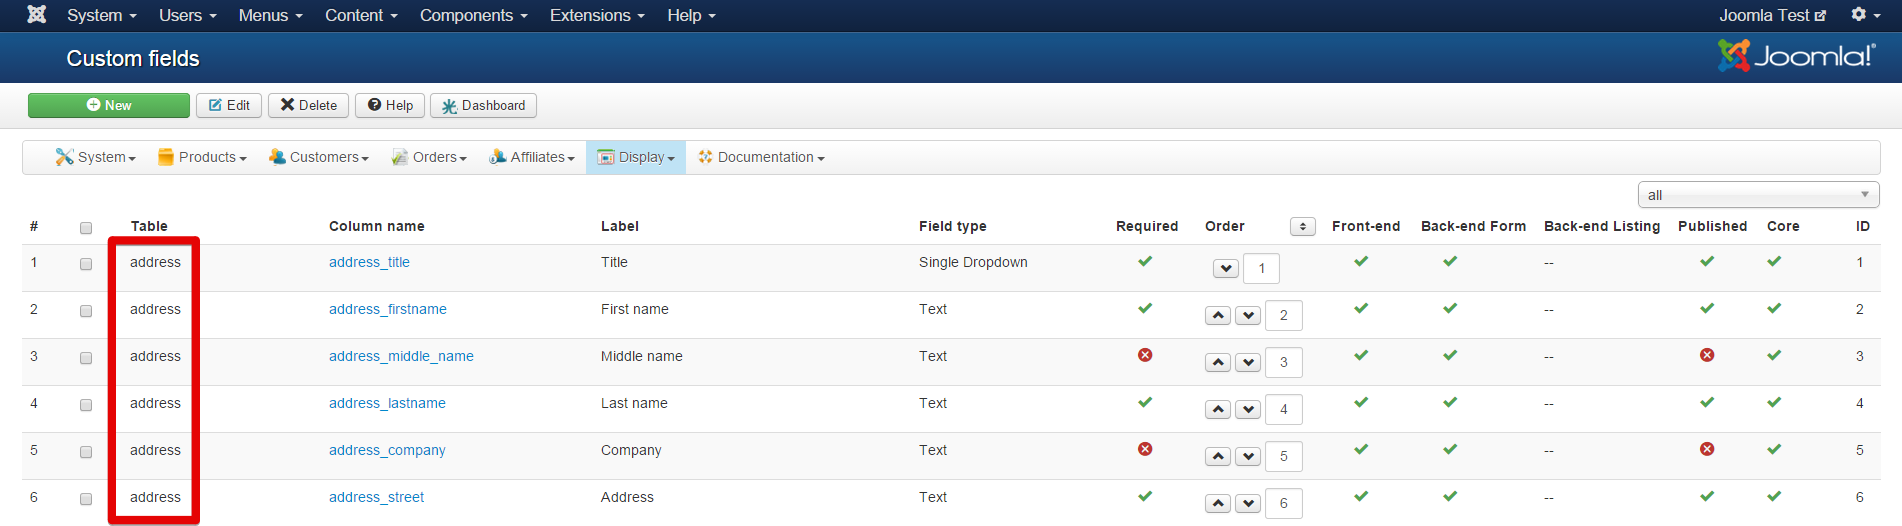
All custom fields type
NOTE : We talk about type but the setting is called "table" as it defines on which table of the database the custom field data will be added to. And the "type" setting of custom fields actually defines the way the custom field will display: radios, dropdown, text input, etc.
- Address custom fields : like on the screenshot, you will be able to personalize the information you can gather from your customers for each of their addresses. There are already custom fields available for the address so that you can easily tweak them for your needs. This is available in all versions of HikaShop.
- User custom fields: you will be able to personalize the information you can gather from your customers when they register while on the checkout process. For example, if you want to know their birthday, you can add a custom field for that. Then, thanks to the integration with AcyMailing, you will be able to send automatic emails to them based on their birthday. This is only available in commercial versions of HikaShop.
- Contact custom fields: you will be able to personalize the contact form that HikaShop displays with the "Display a contact button on the product page" setting of the HikaShop configuration activated. This is only available in commercial versions of HikaShop.
- Category custom fields: you will be able to personalize the information for your categories. Your potential customers will be able to see those on the products and categories listings if you choose to display them there. This is only available in commercial versions of HikaShop.
- Product custom fields: you will be able to personalize the information of your products. Your potential customers will be able to see those on the product page. Also, with the filtering module, in HikaShop Business, your customers will be able to filter your products using filters based on those custom fields. This is only available in commercial versions of HikaShop.
- Item custom fields: you will be able to personalize the information you can gather from your customers when they order something on your store. The custom fields will appear on the products page where you will be able to ask the user information related to the product he wants to buy. It's useful when you sell personalized goods like for example a shirts selling website where the customers can upload an image to be printed on the shirts. Then, you will find this information on the order details on the back end. This is only available in the business version of HikaShop.
- Order custom fields: you will be able to personalize the information you can also gather from your customers when they order something on your store. But the difference with the previous type of custom field is that these fields appear on the checkout in the fields view. For example, You can ask them information about the delivery or the payment or a "comments to the shop" field. Then, you will find this information on the order details and/or the orders listing on the back end. This is only available in the business version of HikaShop.
Column Headers
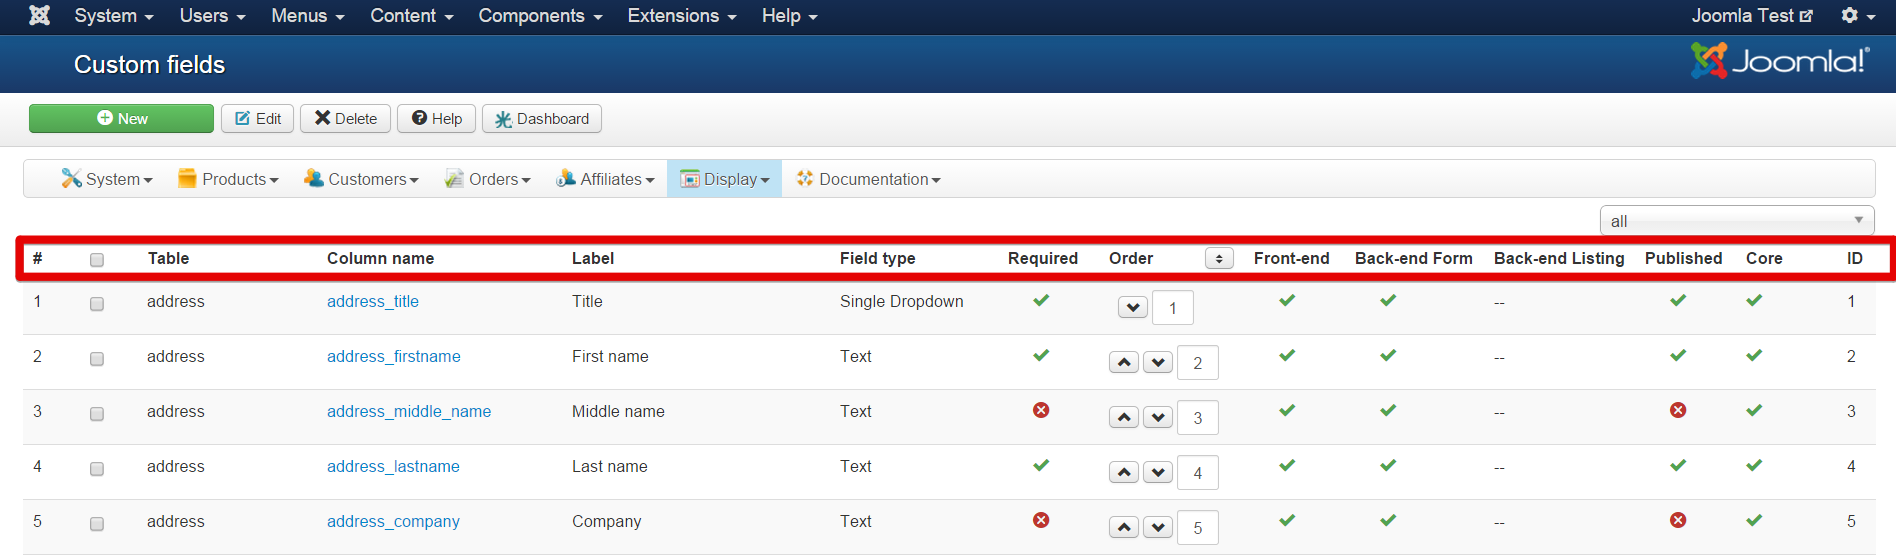
-
# : An indexing number automatically assigned for ease of reference.
- Checkbox : Check this box to select one or more items. To select all items, check the box in the column heading. After one or more boxes are checked, click on the delete button in order to delete the selected custom fields.
- Table : The type of custom fields. It will be either address, user, contact, product, item or order. It is more precisely the name of the table where the custom field column is added.
- Column name : The name of the column in the table. You should avoid as much as possible special characters for the column name. You can also use the column name in the CSV files you can import via the Products>Import menu to import data in product custom fields when importing product data.
- Label : The label of the field. You can translate it via Falang or with a translation override. Note that core custom fields (already available by default) are translated via the translation file of hikashop so that everyone can benefit of the translations. In the translation file you will find them by searching for the english label which will be uppercase and spaces replaced with _. For example, you will find "Middle name" with the key MIDDLE_NAME in the translation file. You can edit the translation files of HikaShop in the configuration page of HikaShop, under the tab languages.
- Field type : The type of the custom field. That will enable you to decide how you want to show your custom field (as a dropdown, or as an input box or as a text area, etc). Based on that, you might have additional options when editing the field's options.
- Required : This will define whether the field needs to be filled in forms. If required, the system won't allow the creation or the change of an address (or a product or a user) as long as the field is not filled.
- Order : The order will define the position of fields on forms.
- Front end : If set to yes, address and user customer fields will be used during the checkout process to ask more information about the customer. For custom fields of the tables product, item and order, you'll find more fine-grained display options in the settings of the custom fields.
- Back end Form : If set to yes, you will be able to change this information on the back end. Usually it should be always yes. For custom fields of the tables product, item and order, you'll find more fine-grained display options in the settings of the custom fields.
- Back end Listing : If set to yes, the value of the field will be displayed as an additional column on listings on the back end. For custom fields of the tables product, item and order, you'll find more fine-grained display options in the settings of the custom fields.
- Published : If a custom field is published it means that it will be used by the system, otherwise, it won't be taken into account.
- Core : It tells you whether that custom field is a field precreated by HikaShop or created by you.
- ID : This field indicates the ID of the custom field.
Edition Page Toolbar
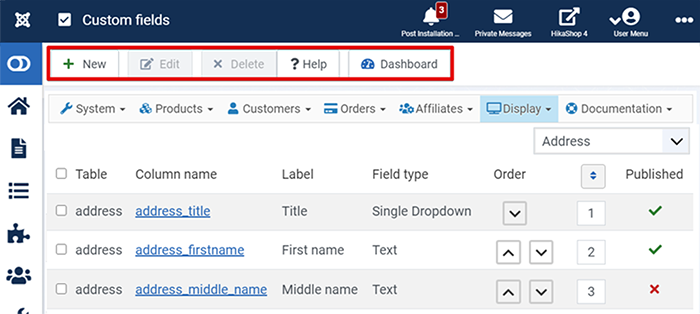
- New : Enables you to create a new custom field.
- Edit : Select a custom field and then click on this button in order to edit its information.
- Delete : Select one or several custom fields and click on this button in order to completely delete them. You can't delete core custom fields which are the custom fields there by default. You can however unpublish them. When you delete a custom field, the column in the table is removed along with all the data in it.
- Help : This button enables you to turn ON/OFF the help section, this screen will appear or disappear.
- Dashboard : You can go back to the main HikaShop control panel using this button.
Main Information

- Label : The label of the field. You can translate it via Falang or translation overrides. Note that core custom fields are translated via the translation file of hikashop so that everyone can benefit of the translations. In the translation file, you will find them by searching for the english label which will be uppercase and spaces replaced with _. For example, you will find "Middle name" with the key MIDDLE_NAME in the translation file. You can edit the translation files of HikaShop in the configuration page of HikaShop, under the tab Languages.
- Table : The type of custom fields. It will be either address, user, contact, product, item or order. It is more precisely the name of the table where the custom field column is added. As you can see, once a custom field is created, you can't change the table where it is located. If you want to do so, you will have to delete it and create a new one.
- Column name : The name of the column in the table. You should avoid as much as possible special characters for the column name. As you can see, once a custom field is created, you can't change its column name. If you want to do so, you will have to delete it and create a new one.
- Field type : The type of the custom field. That will enable you to decide how you want to show your custom field (as a dropdown, or as an input box or as a text area, etc). Based on that, you might have additional options below the Default value option. For example, the telephone field being a text custom field, it has a size option you can change. With HikaShop Business, you have the additional types "file", "image", "ajax file" and "ajax image" which will allow you to ask a file/image to be provided by the user and it will then be available with a link to it.
- Published : If a custom field is published it means that it will be used by the system, otherwise, it won't be taken into account.
Restrictions
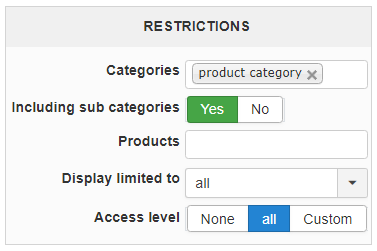
- Categories : For custom fields of the tables "Category", "Product" or "Item", you can restrict the display of the custom field to only some categories. Note that for order custom fields, the custom field will display once in the checkout as long as one of the products of one of the categories selected here is in the cart.
- Include sub categories : Base on that option, the custom field will display for the categories selected in the option above and their children categories or only these categories specifically.
- Products : For custom fields of the tables "Category", "Product" or "Item", you can restrict the display of the custom field to only some products. Note that if you set this setting the categories setting will be ignored. Note also that for order custom fields, the custom field will display once in the checkout as long as one of the products selected here is in the cart.
- Display limited to : Here, you can select another custom field of the same table and the corresponding values for which you would like the current custom field to be displayed. Note that this option is only available in the Business edition.
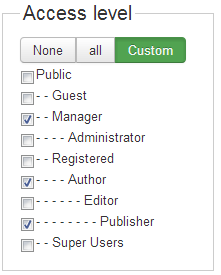
- Access level : You can restrict that custom field from being displayed to some joomla groups of users. This option is only available in the Business edition of HikaShop.
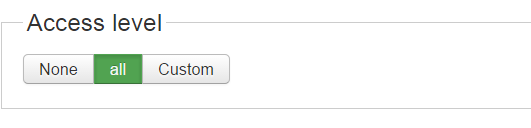
NOTE : If you select "custom", new option will appear, for be able to select different users group.
Main attributes
Generic
Contact
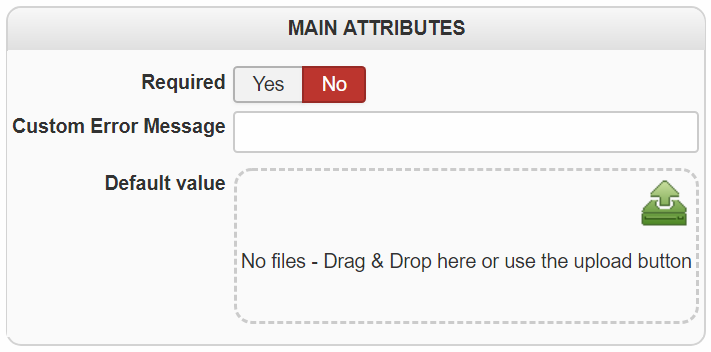
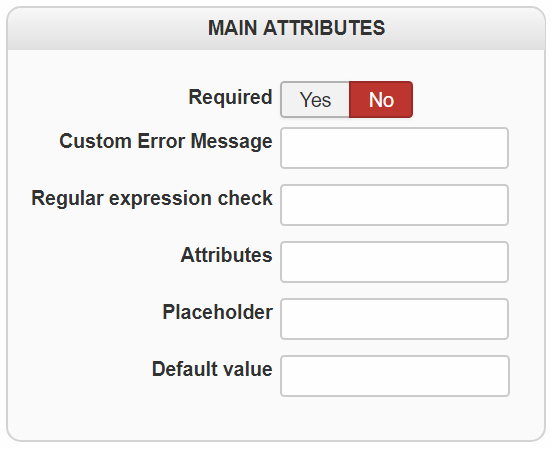
- Required : This will define whether the field needs to be filled in forms. If required, the system won't allow the creation or the change of an address (or a product or a user...) as long as the field is not filled.
- Custom Error Message : If the user does not fill a required field, or fill it with something which doesn't match the regular expression check, a standard message will be displayed. You can customize your error message in this field.
- Regular expression check : You can enter here a regular expression so that if your custom field is required, the data entered by the user in the field will have to match the regular expression here. For example, you could use the regular expression [0-9]+ to only allow integers in the field. To learn more about regular expressions, you can read this website.
- Attributes : This setting can allow you to add HTML attributes to the custom field. For example, for a text custom field, you could add the attribute autocomplete="off" so that the browser cannot use its auto complete feature on that field.
- Default value : Default value for the current field. If you change the field type, you will have to save the change before you will see the corresponding default value option. For example, if you change from a text to a zone type custom field, you will have to save the field before you will see the dropdown with all the countries in it.
- Placeholder : The placeholder attribute works with the following input types: text, search, url, tel, email, and password.
Extra attributes
Generic
Adress & User
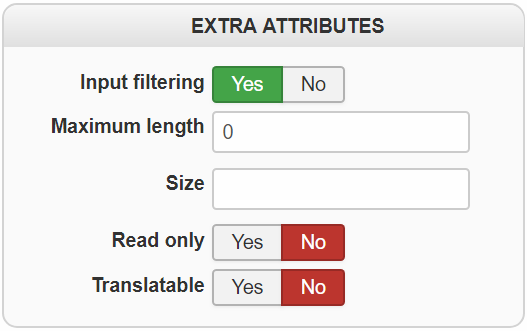
These fields, which are different for each type of field, will enable you to customize further the custom field.
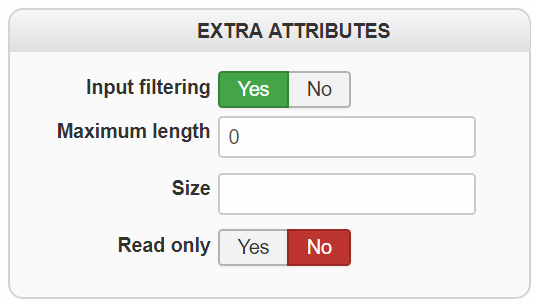
- Input Filtering : If you have a custom field of type "link", "text", "text area" or "WYSIWYG", enabling this option will filter the text entered and avoid XSS vulnerabilities.
- Maximum length : Set the number of characters to enter in a custom field of type text or textarea.
- Size : Define the number of lines to display in a dropdown.
- Read only : Used to lock the value of a text type custom field, the customer can't change it's value.
- Columns : If you choose the type "Text area", you can with this option define the number or columns (which define indirectly the width of the field)
- Rows : Set the number of line for the input.
- Zone : For the field type zone, you can set the type of address input, like Country, state, Tax zones etc...
- Add a 'Please select value' : For "Zone" and if you want to invite user to make a selection.
- Format : Only available for date fields, this option allow you to define a specific format for your dates (like d/m/Y)
NOTE : We recommend the use of the "advanced date picker" as the normal date field uses the Joomla date type and has some issues.
- Custom text : Only for "Custom text" field type, you can write some information which will be only read by default.
- Allow : For dates field type, give the possibility to select only past or future dates.
Values
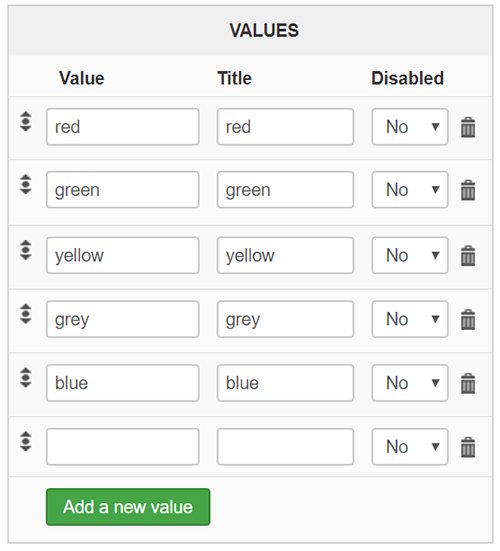 Values : Here with the field type "Radio Button", "Checkbox", "single dropdown" and "multiple dropdown", you can create your own values. The Value input is for the data stored in the database and the "title" input is for the text displayed to the customer for the choice. You can translate the titles with translation overrides. Plus you can disable some choice with the "Disabled" boolean.
Display
Generic
Address
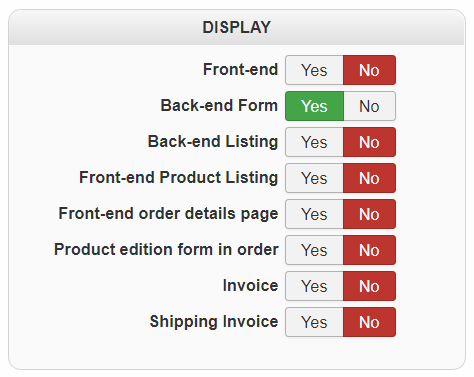
Item
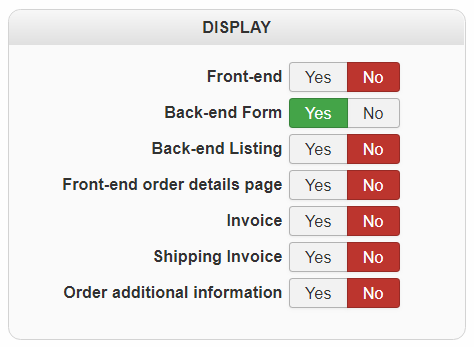
Order
Product
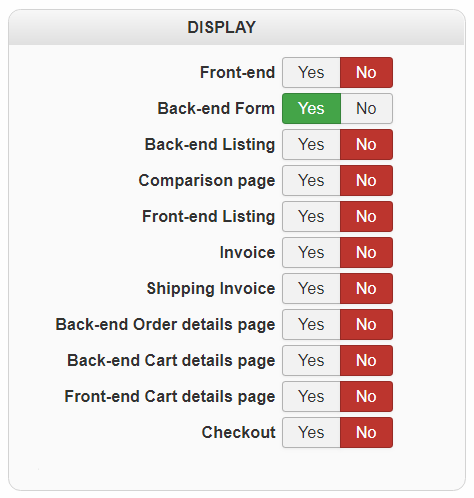
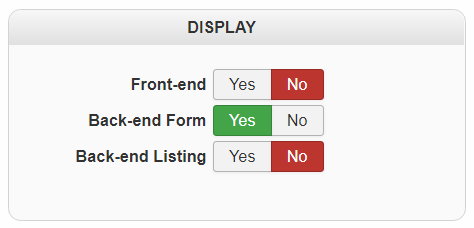
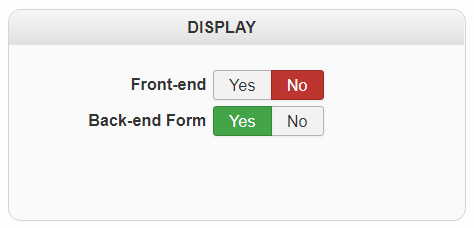
This part will able you to define where you want to display your Custom field, among several options. Note : Available display options will be different from Custom field type you are editing.
- Front end : If set to yes, address and user customer fields will be used during the checkout process to ask more information about the customer.
- Back end Form : If set to yes, you will be able to change this information on the back end. Usually it should be always yes.
- Back end Listing : If set to yes, the value of the field will be displayed as an additional column on listings on the back end.
- Front-end Product Listing : If set to yes, the value of the field will be displayed as an additional column on listings on front end
- Front-end order details page : If set to yes, the value of the field will be displayed as an additional data on your account's order page on front end
- Product edition form in order : If set to yes, the value of the field will be displayed as an additional data on your backend order edition
- Invoice : If set to yes, the value of the field will be displayed as an additional data in your Invoice.
- Shipping invoice : If set to yes, the value of the field will be displayed as an additional data in your Shipping Invoice.
- Order additional information : If set to yes, the value of the field will be displayed as an additional data in your Order additional information.
- Back-end Order details page : If set to yes, the value of the field will be displayed as an additional data in your Order back end details.
- Back-end Cart details page : If set to yes, the value of the field will be displayed as an additional data in your Cart back end details.
- Front-end Cart details page : If set to yes, the value of the field will be displayed as an additional data in your Cart front end details.
- Checkout : If set to yes, the value of the field will be displayed as an additional data in your Checkout Workflow.
Preview
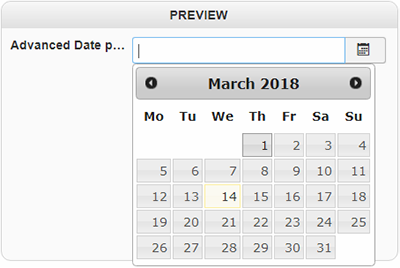
Preview : will display you an example of how the custom field will be displayed on the back end and front end forms. You will have to save the custom field in order to see your changes applied to the preview.
Advance Date picker options
NOTE : The HikaShop Team strongly recommend to prefer Advance Date picker to Simple Date picker
Now Advance Date Picker is included with all HikaShop versions and will be more consistent in its results.
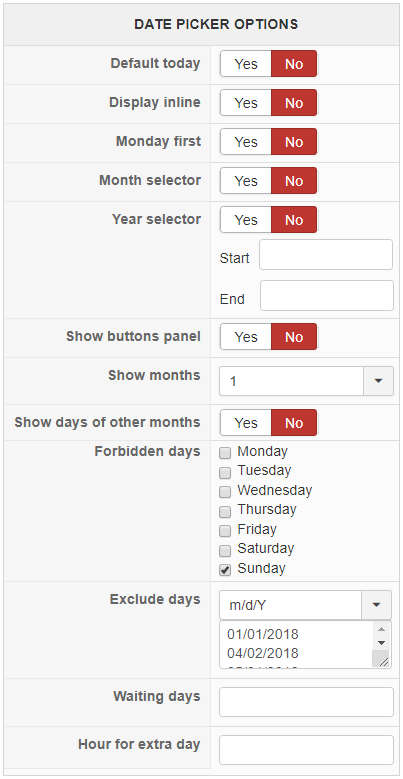
- Default today : Set "Yes" if you want to set today as the default preselected date.
- Display inline : If no, then you'll get an input field with the calendar selector appearing when you click on the input field. If yes, you'll directly get the calendar selector.
- Monday first : If set to no, the weeks will start on Sunday. If yes, they will start on Monday
- Month selector : To activate the month selection dropdbox.
- Year selector : To activate the year selection dropdbox.
- Show buttons panel : If you want to display "Today" and "Done" buttons in the Date picker selector interface.
- Show months : To choose the number of months display in the Date picker selector interface.
- Show days of other months : If you set on "No" you will only see days of the current month. On yes, you will also see the days of other months to finish the weeks of the current month displayed.
- Forbidden days : To exclude some day from the date picker selection, if for example shipping is impossible the Sunday.
- Exclude days : Before using this option, select your current date "format" above. Then type the dates you want to exclude.
- Waiting days : Block the next days for the date selection. if the shipping needs 2 days, type 2 for example so that the delivery date selected cannot be before what's actually possible.
- Hour for extra day : This option is used together with the "waiting days" setting and the "allow" setting. This allows you to consider the limit day as not selectable after a certain hour. So for example, if you only allow the selection of days in the future, if the setting is set to 15, then it won't be possible to select today once the current hour is after 15h (3pm).
Concrete Examples
In this part, we will explain some examples for useful custom field use.
NOTE : For all this example the custom field will be display in the order, while the checkout. So the must go to Hikashop => Configuration => Checkout. Then, you must check if the field is in your checkout process, if you must add it, just drag and drop it AND don't forget to save
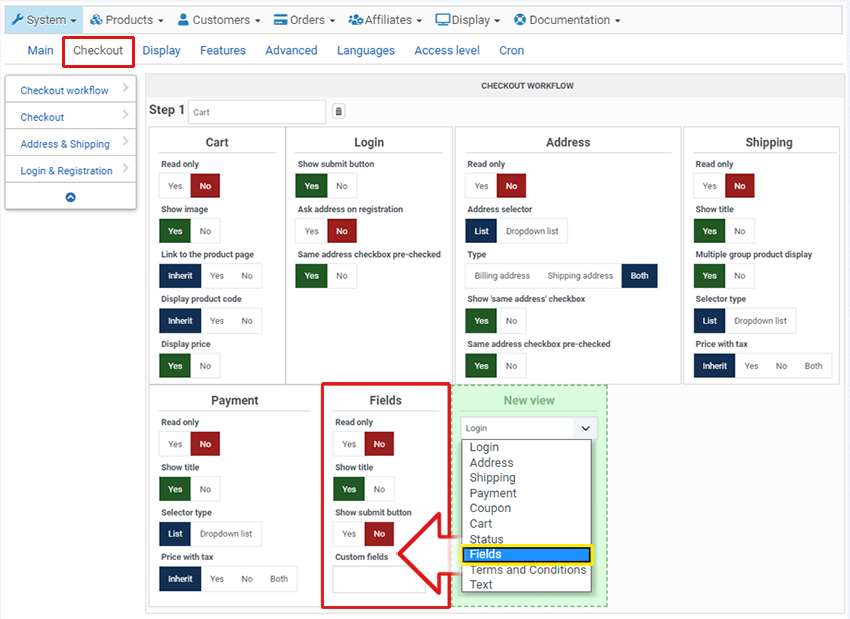
Dropdown required
Here, we will create a quite classic dropdown but all for be the most userfriendly as possible.
First step go to Hikashop => Configuration => Display => Custom fields :
and click on New :
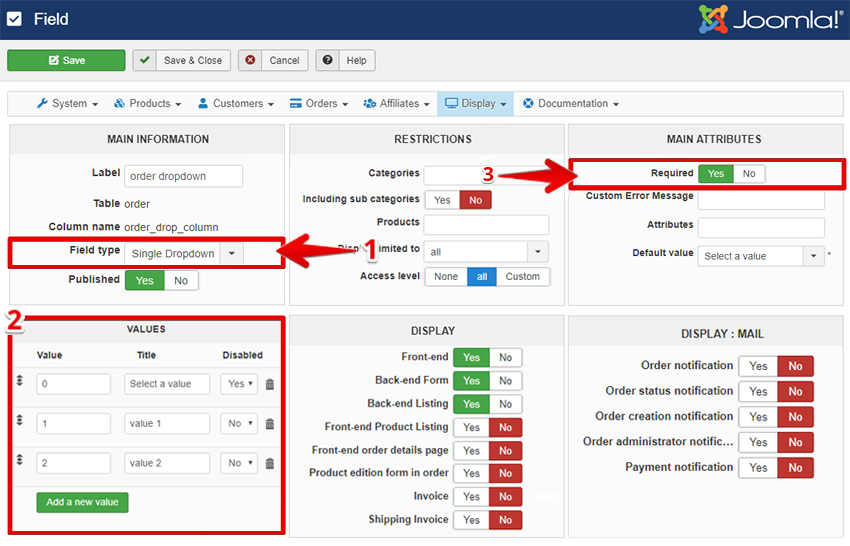
Steps :
1: Now select the Field type for Single Dropdown then, type your column name (to find it easily on the custom field table page).
2: Now let's focus on the dropdown specific part, Values.
3: And in Main Attributes as this dropdown must be selected, have a look on Required and define it to "Yes", and finally select the Default value.
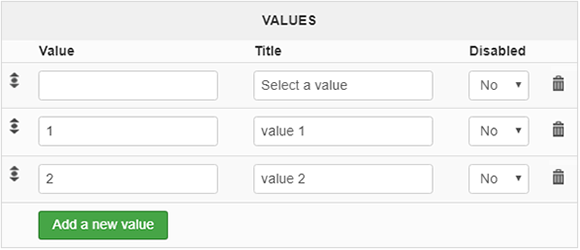
- Value : Enter the value associated with the title.
- Title : Here, you define the title or the text display on the frontend.
- Disabled: This dropdown able you to define if you want disabled or not.
As result, it won't be possible to select - Trash icon : Click on this icon to delete the line.
Zoom on Values part configuration :
NOTE : The fact that the first Value input is empty will allow us to have an entry but not a regular choice, let's see the result to better understand.
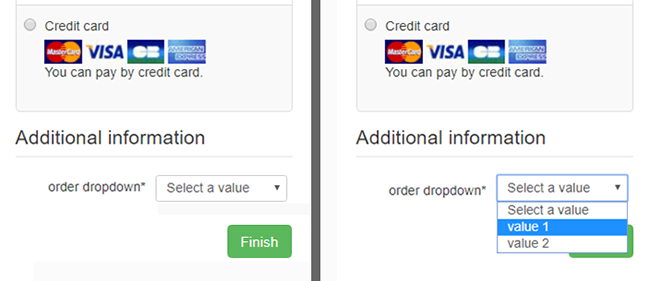
As you see by yourself, "Select a value" will be display from the start, as it's the default value but not as selectable one, so if customer don't select one there, an error message will be display
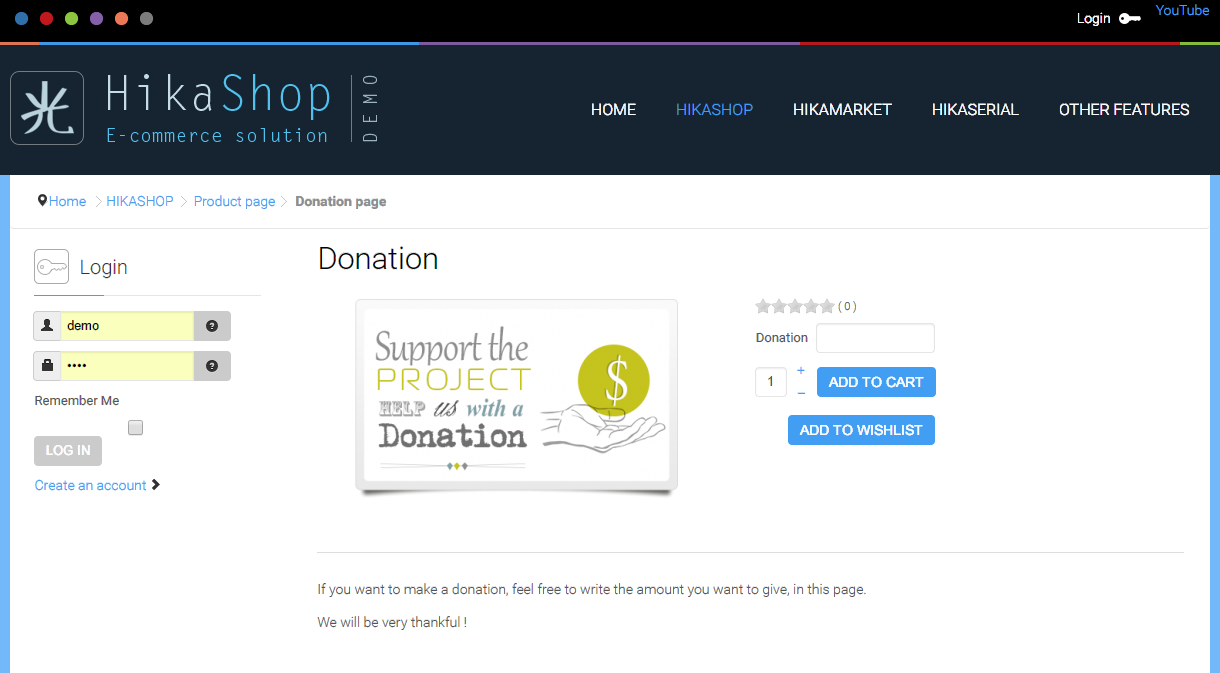
Free price
The idea is to let the customer be able to set the price, for a donation by example, first step go to Hikashop => Configuration => Display => Custom fields :
and click on New :
Steps :
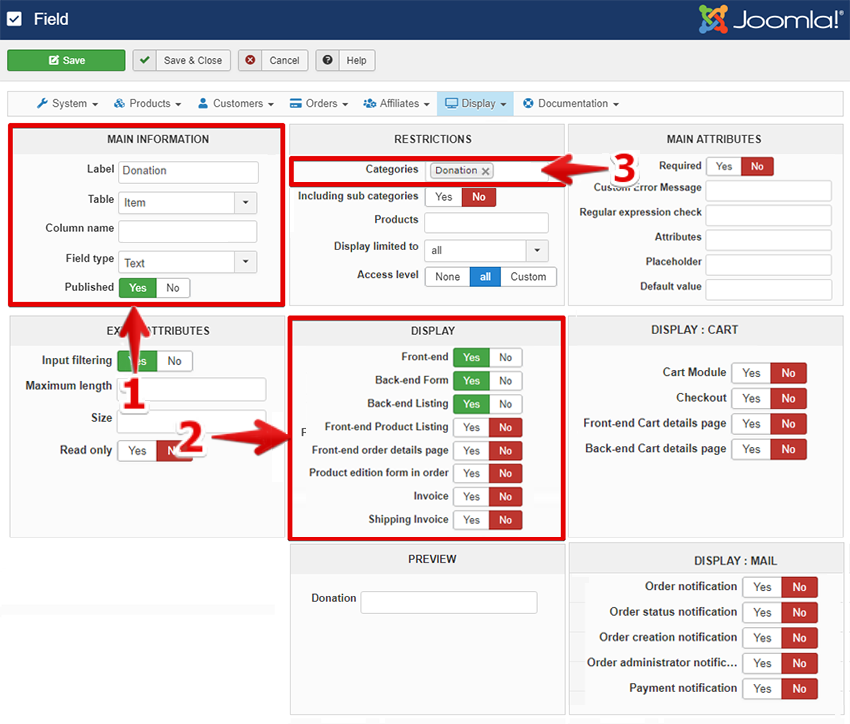
1: Now fill in the label (the "name" of your custom field on the front end, here Donation),choose your table (where your custom field will appear, here pick Item), type your column name (to find it easily on the custom field table page), and choose the field type (to define the type of input field on the front end).
2: Choose where the custom field will be display, here set all yes.
3: Categories, here you have to select a category WHERE the custom field will be use, here on product category/Donation (of course for this step, you must create this category if you don't.
NOTE : Just below categories option, you can find an interesting option for use your custom field just on the "root" categories OR on the group of categories, sub-categories include.
Here,quick explanation about create a product without price, and will use your new custom field.
Steps :
1: Choose your name for your new product.
2: Here, DON'T set the price, so basically don't touch anything! Just for people whose to used to do.
3: Define your categories, so indeed the same than your new custom field, and so create a link between the product and the custom field.

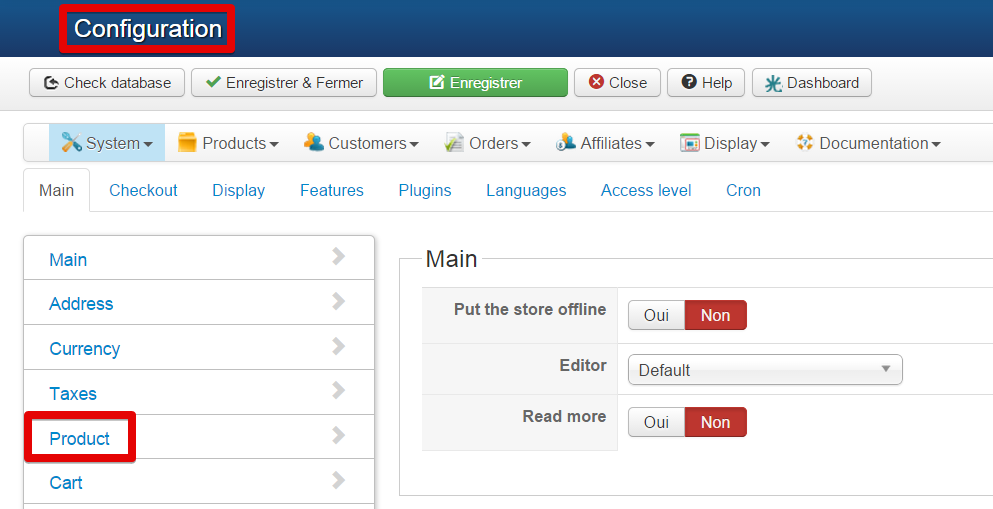
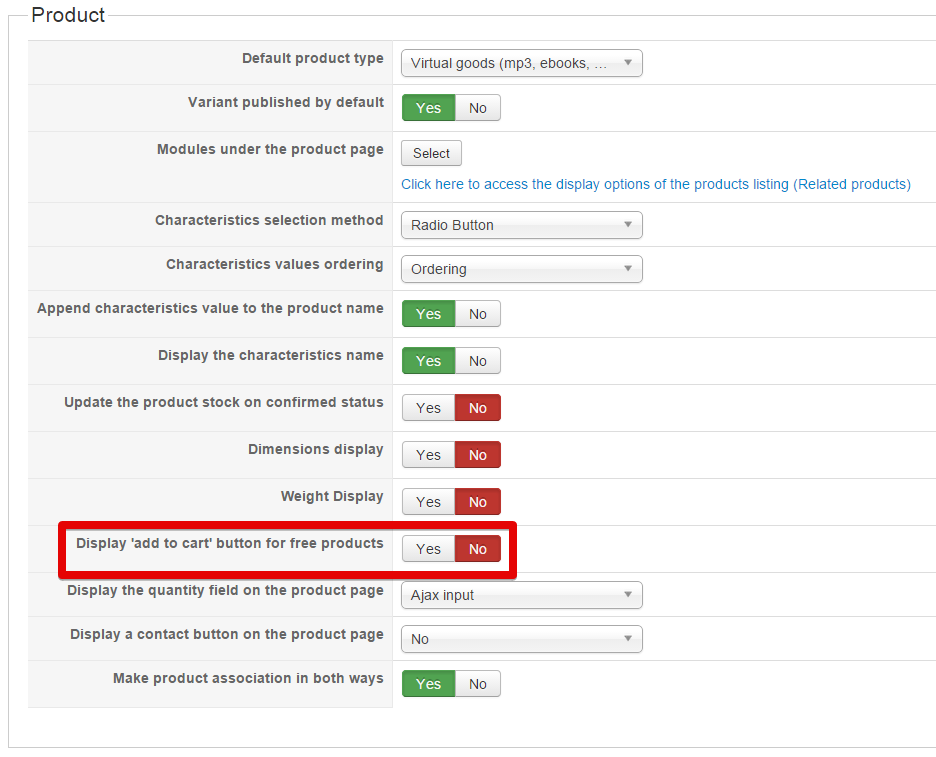
NOTE : This configuration is needed for let your "free" price product be add in the cart. Go to Hikashop => Configuration and click on product
Check if this option is on "Yes".
Result :
Note in the checkout
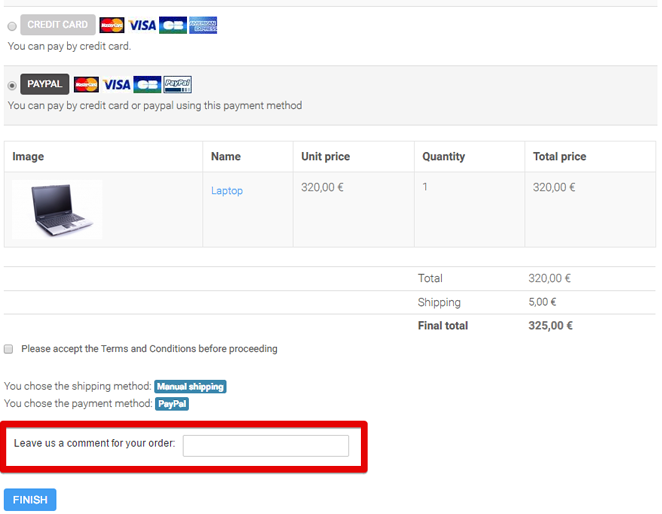
The aim, is to create a text input for let your customer leave you a message about his order.
First, go to Hikashop => Configuration => Display => Custom fields :
and click on New:
Then when you are in Custom Field Configuration follow this different steps:
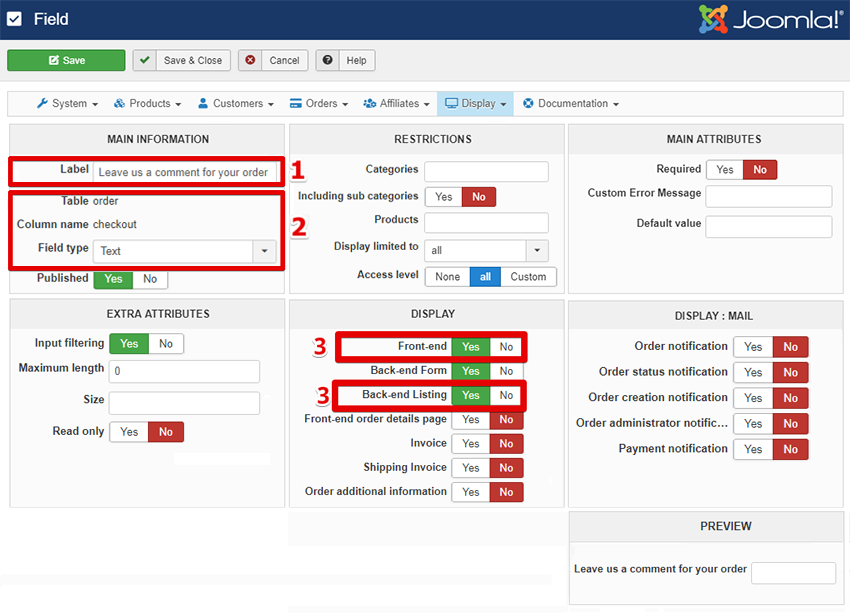
Steps :
1: Now fill in the label (the "name" of your custom field on the front end, here what you await from your customer).
Note : here, this is a preview of your new element as he will appear on the front end.
2: Choose your table (where your custom field will appear, here pick order), type your column name (to find it easily on the custom field table page), and choose the field type (to define the type of input field on the front end).
3: Choose where the custom field will be display, here set all yes.
Result :
Delivery date
For this last example, I will show you how let your customer be able to pick a delivery date for this order, watch the different steps:
First, and like last 2 examples, go to Hikashop => Configuration => Display => Custom fields :
and click on New :
Then follow these different steps.
Steps :
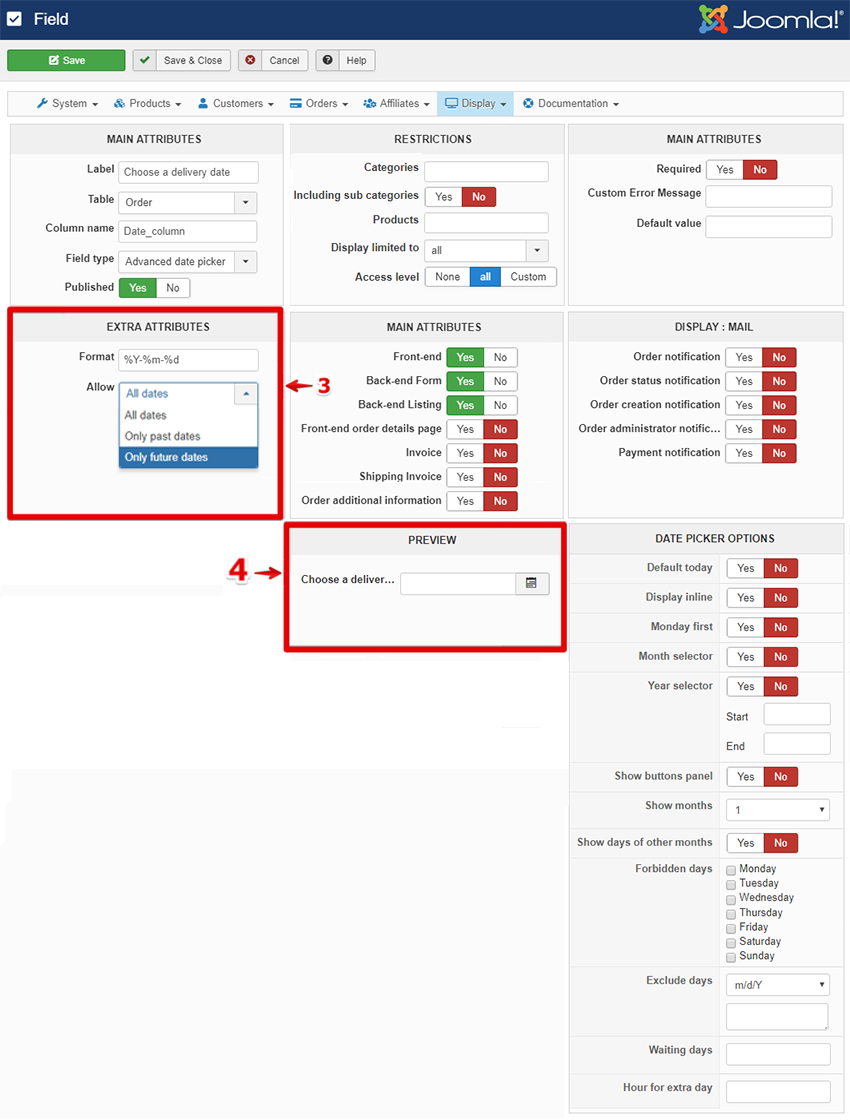
1: Type your label, this will define the title of the date picker on the front end, select order (for apply this custom field in the order like for "note in the checkout") on the table dropdown, choose a column name, and at the end on the "field type" select "Simple date picker".
2: On Display menu, select where the custom field will be display.
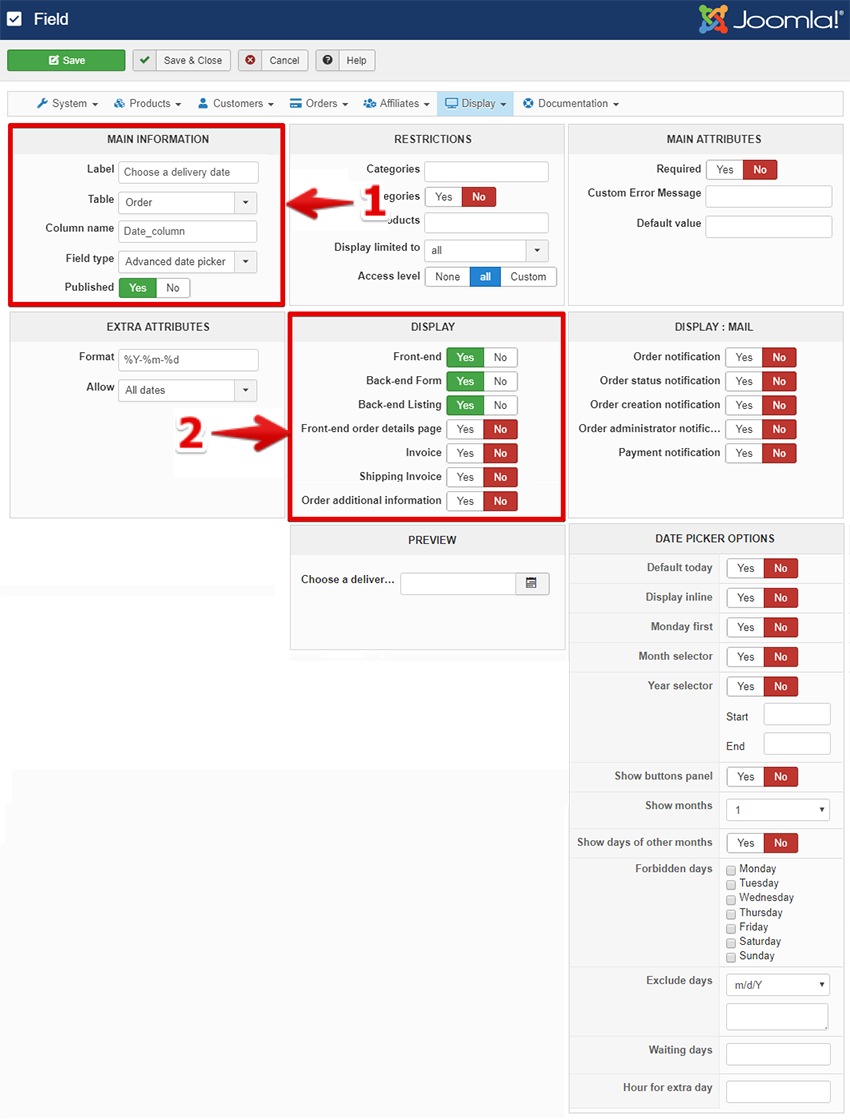
NOTE : For see the date picker "Format" and the "preview", you must save at least one time.
3: Set your date picker "format", here the format will be: Year, Month, and Day, and define which date will be authorize in your date picker input, here it's for delivery date so, only future dates fit.
4: With the Preview, you will see how the custom field will be display on the front end.
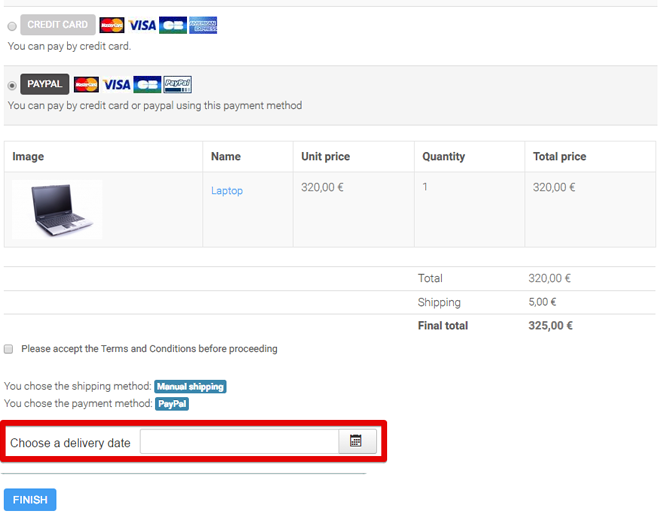
Result :
Plugin and display
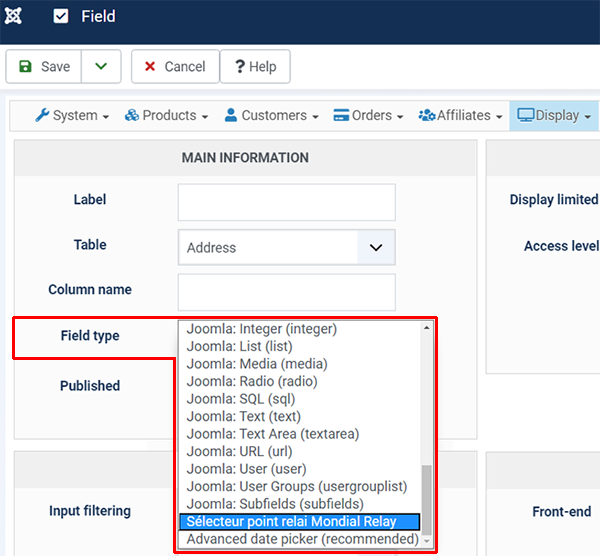
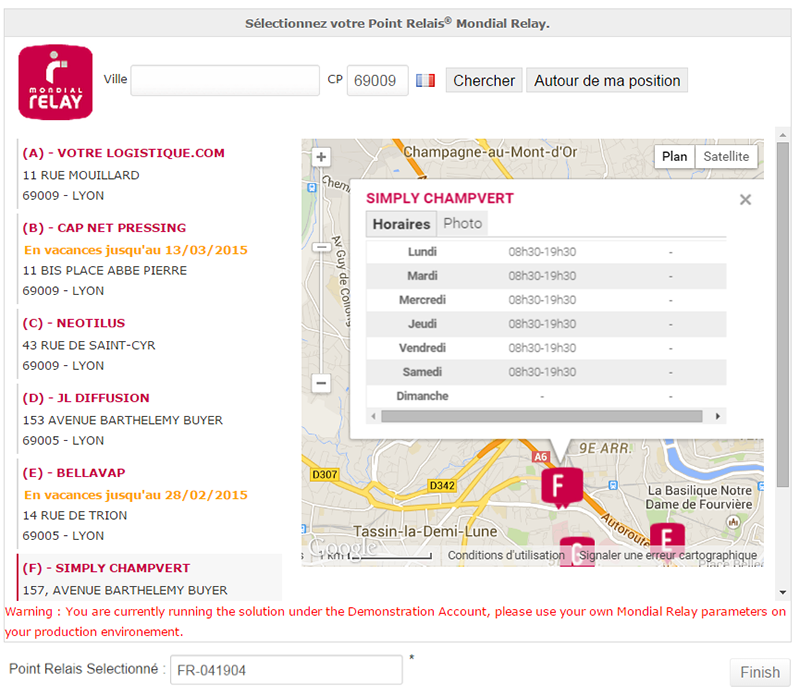
Here, I give you an example of plugin which works with the custom field system, the aim is to add a wizard generated by the plugin, here mondial relay.
This example is for mondial relay, for see this example click here
Select in Field type, in the custom field menu.
View on the mondial relay display in the checkout.
- Details
- Written by: Administrator
- Category: HikaShop
- Hits: 25971
|
|
Description
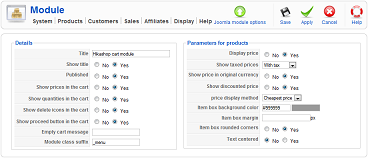
The HikaShop cart module will display a list of the products the customer has in his cart. It's a pivotal feature of an online shop.
You can activate the module by enabling it via the Joomla Modules manager of your website backend. Then, you can configure it by editing it via the menu Display->Content modules of HikaShop.
Toolbar

- Joomla module options : Go to the joomla options of the module. It will be handy for positioning the module and set restrictions of access on the module thanks to the standard joomla module options.
- Save : Save the module instance and return to the content modules listing screen.
- Apply : Apply the modifications to the content module instance and stay on the same screen.
- Cancel : Return to the previous screen without saving the modifications.
- Help : This button enables you to turn ON/OFF the help section, and this screen will appear or disappear.
Details
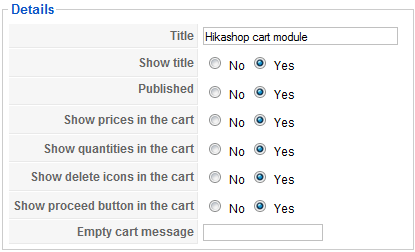
- Title : The title of the module. That is the same option as the one in the Joomla options of the module.
- Show title : You can display the module title or not with this option.
- Published : If the cart module is published it means that it will be displayed by Joomla on the position you set for it in your template.
- Mini cart : This option will enable you to switch the cart module display to a smaller interface, without listing of the products but just the number of items in the cart and a link to empty the cart's content.
- Display images in cart : You can select if you want to display the image of the products in the cart.
- Show proceed button in the cart : You can select if you want to display a proceed button in the cart.
- Show products name in the cart : You can select if you want to display the name of the products in the cart.
- Show quantities in the cart : You can select if you want to display quantities in the cart.
- Show delete icons in the cart : You can select if you want to display delete icons in the cart.
- Show coupon in the cart : You can select if you want to display the coupon value in the cart.
- Show shipping in the cart : You can select if you want to display the shipping value in the cart.
- Empty cart message : You can set here a specific message when the cart is empty. By default, there will be a message displayed which you can edit in the configuration of HikaShop in the languages tab. The key used is "CART_EMPTY".
Product options
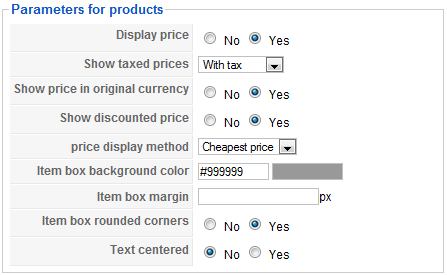
- Display price : You can choose to display or not the prices of products in the module.
- Show taxed prices : This option enables you to display either the prices without taxes, or the prices with taxes, or both.
- Show price in original currency : Based on how you configured your store, HikaShop might have to convert prices dynamically. When doing so, it can add the original price to the converted price.
- Show discounted price : If HikaShop needs to apply discounts to the prices displayed in the module, it can also show the price before the discount was applied as an incentive for your customers to buy the products.
- Price display method : When you have several prices in the same currency for the same product, the system needs to decide what to display. That will be the case for prices based on the quantity. So you will either be able to display the lowest of all the prices, or display the price for buying only one item, or the lowest and highest prices as a range of prices.
- The option below will be useful only for defining the button style of the cart if you set in the configuration to display them as rounded :
- Item box background color : The color of the button.
- Item box margin : The margin of the button.
- Item box rounded corners : Set it to yes if you want your button to have rounded corners.
- Text centered : Set it to yes if you want the text inside the button to be centered.
- Item box background color : The color of the button.