
- Details
- Written by: Administrator
- Category: HikaShop
- Hits: 16396
|
|

Description
This screen enables you to edit the USPS shipping method options. Shipping methods will be filtered on checkout based on the zone you set for them, if any. Then, they will be displayed to the user for him to choose which shipping method he prefers for his order.
This method includes a warehouse management in order to allow you to ship from different locations. You can also choose among the USPS services you want to use.
Toolbar

- Save & Close : Save the shipping method options and return to the shipping methods Management screen.
- Save : Apply the modifications to the shipping method and stay on the same screen.
- Cancel : Return to the previous screen without saving the modifications.
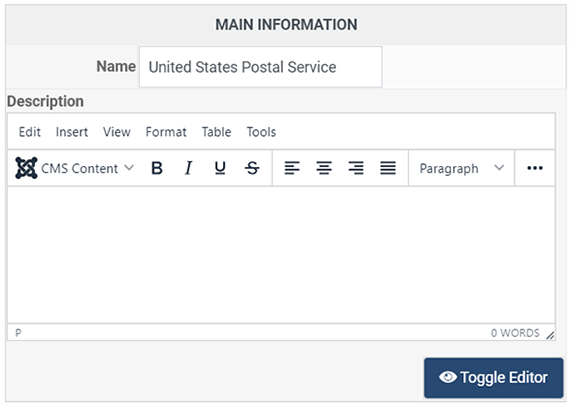
Main Information
If you use one of our commercial versions, you will be able to enter the name and description in different languages. This feature requires to have JoomFish installed and can be activated in the configuration page, in the display tab. The languages available will be the ones in JoomFish. If you don't enter something for a translation, it will just use the Default information in the Main information tab instead. After you click on save or apply an additional publish icon will appear next to the fields where you entered something in the languages tabs so that you can easily enable or disable them.
Additional Information
- Zone : You can restrict the shipping method to a zone. By clicking on the edit icon, a popup will open enabling you to select a zone. You can also remove this limitation by clicking on the delete icon.
- Images : You can click on the edit icon to select one or several images to display next to the name of the shipping method during the checkout process. Those images are stored in the folder media/com_hikashop/images/shipping so you can easily add more of them by uploading your images to this folder via FTP.
- Tax category :You can apply taxes on the shipping price. Taxes are already included in the price returned by the system. However, you can use this as a means to increase the price of the shipping to allow you some room in case the packages are a bit heavier. So you would create a special tax category for shipping apply to it a tax percentage with a tax rule and the shipping price will be increased.
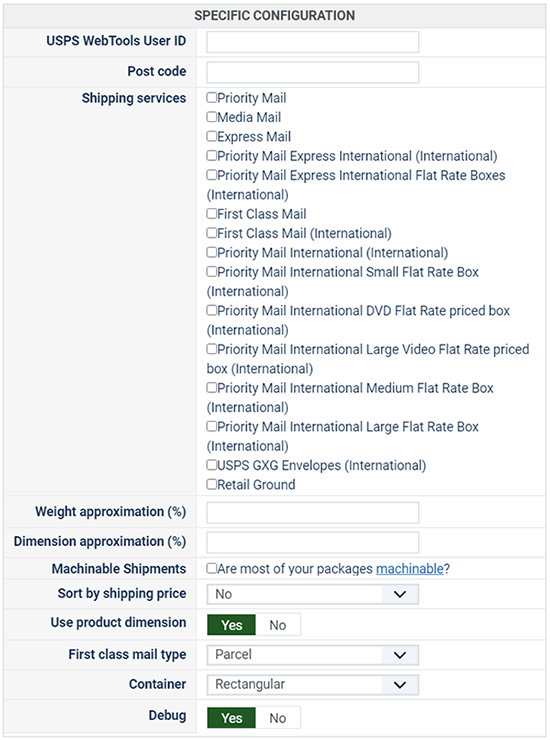
- USPS WebTools User ID: Your USPS Access Key. You can get this key by asking it to USPS if you already have a USPS account.
- Post code : Sender post code
- Shipping Services : Check here the shipping services you want to activate.
Restrictions
You can set restrictions on shipping methods. Based on the products in the cart of the user, the system will calculate which shipping methods the customer can choose from.
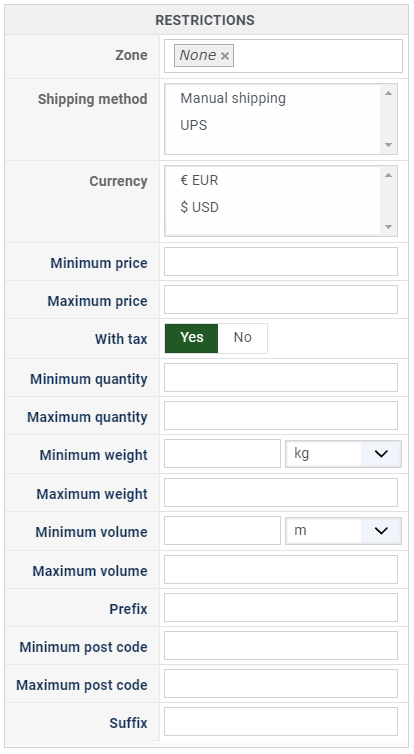
- Zone: You can restrict a shipping method to a zone. By clicking on the edit icon, a popup will open enabling you to select a zone. Only customers with a shipping address in the selected zone (or its sub-zones) will see this shipping method. You can remove this limitation by clicking on the delete icon.
- Warehouse: You can restrict the shipping method to one or more warehouses. You can also choose whether the filter is inclusive ("Only these warehouses") or exclusive ("All except these warehouses") using the radio buttons next to the selector.
- Minimum price: The shipping method will only be available for orders with a product total above this minimum price.
- Maximum price: The shipping method will only be available for orders with a product total below this maximum price.
- Include virtual products price: If you activate this option, the price of virtual goods (products without weight) is taken into account for the maximum and minimum price restrictions above as well as the percentage price calculation. Otherwise, only physical goods (with a weight) are taken into account.
- With tax: When enabled, the minimum and maximum price restrictions use the product prices including taxes. When disabled, they use the prices excluding taxes. Enabled by default.
- Minimum quantity: The minimum number of items in the cart for this shipping method to be available. The quantity is calculated as the sum of the quantity of each product in the cart.
- Maximum quantity: The maximum number of items in the cart for this shipping method to be available.
- Minimum weight: The minimum total weight of the cart for this shipping method to be available. The weight is calculated as the sum of each product's weight multiplied by its quantity. You can select the weight unit next to this field.
- Maximum weight: The maximum total weight of the cart for this shipping method to be available.
- Minimum volume: The minimum total volume of the cart for this shipping method to be available. The volume is calculated from the width, height and length of each product multiplied by its quantity. You can select the volume unit next to this field.
- Maximum volume: The maximum total volume of the cart for this shipping method to be available.
- Post code RegEx: A regular expression to match against the customer's postal code. Only customers whose postal code matches the expression will see this shipping method. For example, ^(75|92|93|94) to match postal codes starting with 75, 92, 93, or 94.
- Prefix: You can restrict the shipping method to only postal codes starting with this prefix.
- Min. postal code: You can restrict the shipping method to only postal codes within a numeric range, whereby this is the minimum value.
- Max. postal code: The maximum value of the postal code numeric range.
- Suffix: You can restrict the shipping method to only postal codes ending with this suffix.
Access Level
You can restrict which Joomla user groups can see and use this shipping method. By default, the shipping method is available to all user groups. Select specific groups to limit access. This is useful if you want to offer specific shipping options only to certain customer groups (e.g. wholesale customers, VIP members).
- Details
- Written by: Administrator
- Category: HikaShop
- Hits: 23515
|
|

Description
This screen enables you to edit the FedEx shipping method options. Shipping methods will be filtered on checkout based on the zone you set for them, if any. Then, they will be displayed to the user for him to choose which shipping method he prefers for his order.
Toolbar
- Save & Close : Save the shipping method options and return to the shipping methods Management screen.
- Save : Apply the modifications to the shipping method and stay on the same screen.
- Cancel : Return to the previous screen without saving the modifications.
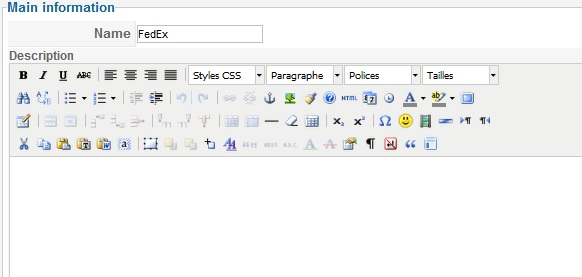
Main Information
If you use one of our commercial versions, you will be able to enter the name and description in different languages. This feature requires to have JoomFish installed and can be activated in the configuration page, in the display tab. The languages available will be the ones in JoomFish. If you don't enter something for a translation, it will just use the default information in the Main information tab instead. After you click on save or apply an additional publish icon will appear next to the fields where you entered something in the languages tabs so that you can easily enable or disable them.
Additional Information
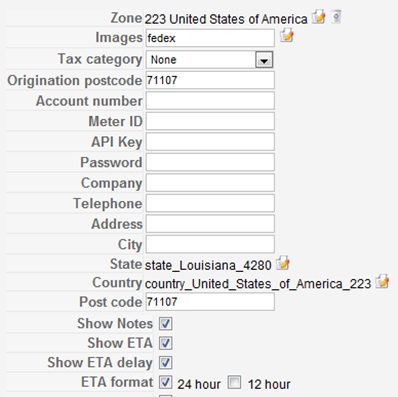
- Zone : You can restrict the shipping method to a zone. By clicking on the edit icon, a popup will open enabling you to select a zone. You can also remove this limitation by clicking on the delete icon.
- Images : You can click on the edit icon to select one or several images to display next to the name of the shipping method during the checkout process. Those images are stored in the folder media/com_hikashop/images/shipping so you can easily add more of them by uploading your images to this folder via FTP.
- Tax category :You can apply taxes on the shipping price. Taxes are already included in the price returned by the system. However, you can use this as a means to increase the price of the shipping to allow you some room in case the packages are a bit heavier. So you would create a special tax category for shipping apply to it a tax percentage with a tax rule and the shipping price will be increased.
- Origination postcode : The post code where you are sending your packets.
- Account number : Your FedEx Account number. You can get this number through your FedEx account configuration.
- Meter ID: Your FedEx Meter ID. You can get this ID through your FedEx account configuration.
- API key : Your FedEx API key. You can get this key through your FedEx account configuration.
- Password : Your FedEx password.
- Company : Sender company name.
- Telephone : Sender telephone number.
- Address : Sender Address
- City : Sender city
- State : Sender state
- Country : Sender country
- Post code : Sender post code
- Show Notes : Show descriptions of each FedEx shipping method during the checkout.
- Show ETA : Show the estimated time of arrival
- Show ETA delay : Show the delay between the estimated time of arrival and now
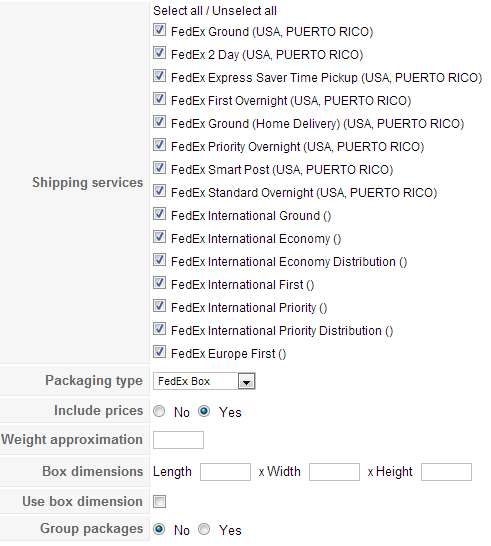
- Shipping Services : Select here the FedEx services you want to use. Note that not all the FedEx services are available to you. It depends on where your warehouses (the place from where you ship your goods) are located.
- Packaging type : Select here the Packaging type of the order that will be sent.
- Include prices: If this option is activated the price of goods is given to FedEx so that it can add the shipping insurance in the prices (more expensive).
- Weight approximation : You can add here a percentage to the weight of your products.
- Dimension approximation : You can add here a percentage to the dimensions of your products.
- Use dimension : Enables you to only use that shipping method if you have products with dimensions on your order.
- Group packages : If this option is activated, products will be grouped together. Otherwise, every product will have its own package (more expensive).
Restrictions
You can set restrictions on shipping methods. Based on the products in the cart of the user, the system will calculate which shipping methods the customer can choose from.
- Zone: You can restrict a shipping method to a zone. By clicking on the edit icon, a popup will open enabling you to select a zone. Only customers with a shipping address in the selected zone (or its sub-zones) will see this shipping method. You can remove this limitation by clicking on the delete icon.
- Warehouse: You can restrict the shipping method to one or more warehouses. You can also choose whether the filter is inclusive ("Only these warehouses") or exclusive ("All except these warehouses") using the radio buttons next to the selector.
- Minimum price: The shipping method will only be available for orders with a product total above this minimum price.
- Maximum price: The shipping method will only be available for orders with a product total below this maximum price.
- Include virtual products price: If you activate this option, the price of virtual goods (products without weight) is taken into account for the maximum and minimum price restrictions above as well as the percentage price calculation. Otherwise, only physical goods (with a weight) are taken into account.
- With tax: When enabled, the minimum and maximum price restrictions use the product prices including taxes. When disabled, they use the prices excluding taxes. Enabled by default.
- Minimum quantity: The minimum number of items in the cart for this shipping method to be available. The quantity is calculated as the sum of the quantity of each product in the cart.
- Maximum quantity: The maximum number of items in the cart for this shipping method to be available.
- Minimum weight: The minimum total weight of the cart for this shipping method to be available. The weight is calculated as the sum of each product's weight multiplied by its quantity. You can select the weight unit next to this field.
- Maximum weight: The maximum total weight of the cart for this shipping method to be available.
- Minimum volume: The minimum total volume of the cart for this shipping method to be available. The volume is calculated from the width, height and length of each product multiplied by its quantity. You can select the volume unit next to this field.
- Maximum volume: The maximum total volume of the cart for this shipping method to be available.
- Post code RegEx: A regular expression to match against the customer's postal code. Only customers whose postal code matches the expression will see this shipping method. For example, ^(75|92|93|94) to match postal codes starting with 75, 92, 93, or 94.
- Prefix: You can restrict the shipping method to only postal codes starting with this prefix.
- Min. postal code: You can restrict the shipping method to only postal codes within a numeric range, whereby this is the minimum value.
- Max. postal code: The maximum value of the postal code numeric range.
- Suffix: You can restrict the shipping method to only postal codes ending with this suffix.
Access Level
You can restrict which Joomla user groups can see and use this shipping method. By default, the shipping method is available to all user groups. Select specific groups to limit access. This is useful if you want to offer specific shipping options only to certain customer groups (e.g. wholesale customers, VIP members).
- Details
- Written by: Administrator
- Category: HikaShop
- Hits: 50637
- Joomla Messaging System
- Problems with modal popups and javascript errors
- Problems after updating HikaShop
- HTML editors
- Calendar and IE
- SEF on IIS
Joomla Messaging System
HikaShop uses the core Joomla messaging system to display messages on your website so if you don't see any message when you don't enter correct information during the checkout process, that's probably because your Joomla template does not contain the tag to display Joomla messages: <jdoc:include type="message" />
Or sometimes, your template has an option to turn that display off. So first, check about such option in your template options screen and turn it on.
If you don't find it, please edit the index.php file from your template and make sure the tag <jdoc:include type="message" /> is added to it.
If not, please add it just before the tag <jdoc:include type="component" />
This tag should already be present in all templates.
Problems with modal popups and javascript errors
These problems can manifest when there is a conflict between one of the plugins of the group system, the template or a module of your website, which uses invalid javascript or another javascript not compatible with mootools, and the standard mootools javascript library of joomla. In order to know if you're affected, you can display the javascript error console of your browser (a documentation on that for Google Chrome: http://code.google.com/intl/en/chrome/devtools/docs/overview.html ). If you see errors about javascript files, it's likely that you have that problem.
There is unfortunately nothing we can do in HikaShop regarding that as it's not a problem in HikaShop. The fact that it doesn't work is a byproduct of that conflict. The solution is to try to disable the different plugins of the group system and modules to see which one is causing the problem or to switch your template to see if it comes from that. Then, you can contact the developer of that plugin/module/template to try to solve the problem or use another one.
Known extensions which can cause such problems:
- jQuery++ integrator
- SC jQuery
- System - Core Design Scriptegrator plugin
- Scroll To Top -> there are plenty of modules to do the same out there so you should try to use another one.
- SuperFish Dropdown menu module -> There is an option in that module to activate the no conflict mode which solves the problem
- Google's mod_pagespeed can cause the action icons not to work on some of the back end screens when it is set to trim whitespaces and comments from javascript.
- Best Alias plugin can also produce such problem.
Problems after updating HikaShop
After updating HikaShop, or when creating custom fields, it's possible that you have things not functioning properly (eg. products not saving, not adding to the cart, order not creating, etc).
It always comes from the fact that the process could not update the HikaShop's tables structure during the update (or when you add a custom field). That can be caused by two things:
1. Your MySQL user does not have the ALTER privilege which is essential to the update of tables structure.
2. Your MySQL server could not run all the queries because it was limited by some resource restrictions put in place by your hosting.
How to know if it comes from that (for update issues)?
First, you should turn on the debug mode option of the configuration of joomla in your backend and deactivate the option "Use AJAX when possible for add to cart buttons" of the Checkout tab of the configuration of HikaShop. Then, reproduce the action where you have the problem. If you see a big warning with a MySQL query error, then that's your problem. The message should start with something like that:
500 - JDatabaseMySQL::query: 1054 - Unknown column 'XXXXXX' in 'where clause' SQL=SELECT * FROM.....
How to fix (for update issues)?
You should open the file administrator/components/com_hikashop/install.hikashop.php and search for that column name. You should see something like that:
$this->db->setQuery("ALTER TABLE `#__hikashop_YYYY` ADD `XXXXXXXX` .....................................................");
$this->db->query();
You need to open your phpmyadmin and run the query which is in the double quotes in your database. Don't forget to replace #__ by the prefix of your tables (it's usually jos_ for Joomla 1.5 but it is random for Joomla > 1.6 ).
For custom fields, you can just delete them and the error should disappear.
How to avoid problems later on ?
You should make sure that your MySQL user has the ALTER privilege. If you don't know how to do that, you should ask your hosting company.
HTML editors
The read more button might not work with CKEditor on some configurations. If you need it, you can easily switch to another editor like tinyMCE by changing the editor of HikaShop in the configuration page of HikaShop.
Calendar and IE
On IE, the calendar system of Joomla used by HikaShop for date fields might not work. If you have the problem, you have to change the following in the file media/system/js/calendar.js :
if(Calendar.is_ie){g.y+=document.body.scrollTop;g.x+=document.body.scrollLeft}
by
if(Calendar.is_ie){if (typeof document.body.document =="undefined") {g.y+=window.scrollY;g.x+=window.scrollX;} else { g.y+=document.body.document.documentElement.scrollTop;g.x+=document.body.document.documentElement.scrollLeft;}}
SEF on IIS
When you want to activate SEF on IIS, you usually have to follow the documentation here:
http://docs.joomla.org/Enabling_Search_Engine_Friendly_(SEF)_URLs_on_IIS/IIS6
It seems however that these rewrite rules do not support the tmpl=component parameter of Joomla which HikaShop uses a lot in order to display popups as well as some AJAX elements.
To avoid that, the rewrite rules should be changed by following the instructions on this post of our forum:
- Details
- Written by: Administrator
- Category: HikaShop
- Hits: 8809

|
Description
This documentation will explain how to create a Paypal Adaptive Application and how retrieve the information to fill the payment plugin.
Requirements
If you want to create a sandbox paypal application, you will need a classical sandbox paypal account. Thanks to it you can create paypal emails for your sandbox environement but you can also create application like the adaptive one.
In production mode, you will need a verified paypal business account with your API credentials.
The API credentials are composed of a Username, a Password and a Signature ; all provided by Paypal.
You can find these credentials in the paypal website, once logged with your Paypal account, under the tab "My Account" then "Profile", you will be able to request for API credentials in the "Account Information" section.
Sandbox - Create of the accounts
To create sandbox accounts for Paypal adaptive, you first need to go in Paypal Sandbox website : https://developer.paypal.com/webapps/developer/applications/accounts Then, you will have to go in the section "Sandbox accounts" and create a least 2 accounts.
-
One "Business-Pro" account for the store account (the one who will have the adaptive credentials).
This account must be verified. - One "Personal" account for your test vendor (and more accounts if you want to configure more vendors in your test website).
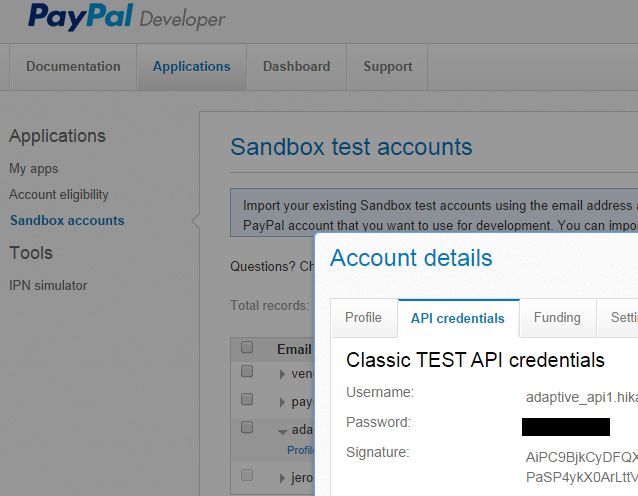
Once the Business account is configured, you can access to his "profile" and then in the tab "API credentials" you will see the sandbox credentials for the paypal adaptive plugin.
Live - Create the application
To submit an Application, you need to use go in the Paypal Application website : https://apps.paypal.com/user/my-account/applications
- Click on "My Application > New App"
- Provide a title and a description for your new application.
- In the "Servies used by App" you have to select
- Basic Payments (you can check all sub options)
- Chained Payments
-
Select the chained payment mode and the chained payment options.
You will have to choose the primary receiver. It will highly influence the rest of your website.
In most cases, you want to be the primary receiver and place your vendors as secondary receiver, specially if you will accept several vendors in a single order. - Indicate the funding sources you support, some estimation about the payment volume and the responsible for chargebacks or refunds (prefer: "Merchant")
- In the section "Adaptive Accounts", the easier is to check all features for your application.
-
For the testing information, you have to provide some information about your website, like his url.
The field "Supply test account name and passwordquot; is there to let paypal use a test account in your website to be able to login and see your website in action (and make a test purchase if required).
The "Step-by-step" text area is there to explain how to perform a test order, how find a product to add in the cart and go in the checkout to finish the order. - Once the form is ready, you can submit your paypal application !
- Details
- Written by: Administrator
- Category: HikaShop
- Hits: 104695

|
Description
This screen enables you to create or edit a currency and its locale information. The locale information enables you to configure the system to display prices the way you want for each currency.
Toolbar
- Save: Save the current currency and return to the currencies Management screen.
- Save & Close: Like previous button but just after going back to currency listing.
- Cancel: Return to the previous screen without saving the modifications.
- Help: This button enables you to turn ON/OFF the help section; this screen will appear or disappear.
Currency Information
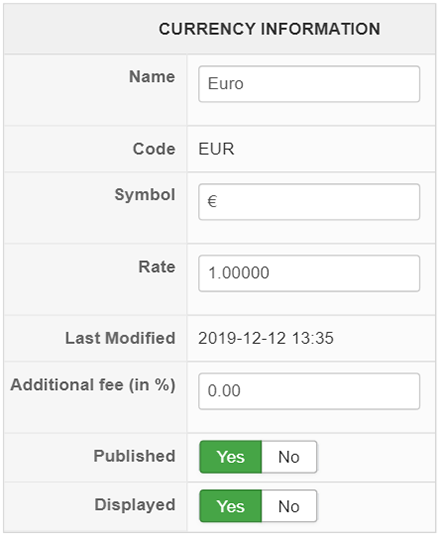
- Name: Name of the currency.
- Code: The international ISO code of the currency. Please do not change that for existing currencies as the currency restrictions of payment/shipping methods rely on that field to know whether they can or cannot be used with a particular currency.
- Symbol: The symbol used to represent the currency in the regions where it's used.
- Rate: The rate of the currency based on the main currency set in the configuration page. The main currency will always have a rate of 1. As you can see on this screenshot, the main currency is Euro.
- Last Modified: The last time the currency was modified (either manually or automatically by the auto rates updater plugin).
- Additional fee (in %): An additional fee that you can add on the conversion rate when your customers pay using this currency for a product with a price in a different currency. This can be useful, for example, when your bank charges you currency conversion fees on payments received in a currency other than the currency of your bank account.
- Published: If a currency is published, it means that it can be used by your customers to display your goods' prices in this currency but also pay their orders in this currency. The main currency is always considered published. Also, please note that each payment gateway (like PayPal or Authorize.Net) has a limited number of currencies they accept. So based on the payment plugins you use, before publishing a currency, please make sure that this currency is handled by them. Otherwise, you can still let your users see the prices in their currency while browsing your store but then pay in your main currency by turning the Displayed option to "yes" without publishing the currency.
- Displayed: If a currency is published or is the main currency, this setting will be disregarded and the currency will always be usable by your customers on the front end. Otherwise, based on this setting, you will be able to select the additional currencies in which your users will be able to display prices of your goods. Those currencies won't be used in the cart display, nor during the checkout as long as they are not published. This is useful when you want your customers to always pay you in one of several currencies but you also want them to be able to see an equivalent of the price in their own currency.
Locale Information
With HikaShop 6.3.0, the currency locale customization has been completely revamped to be more intuitive and visual. Prices can be displayed differently based on the currency used, and this section allows you to fine-tune exactly how the price appears. A Live Preview is available to instantly see the result of your settings as you change them.
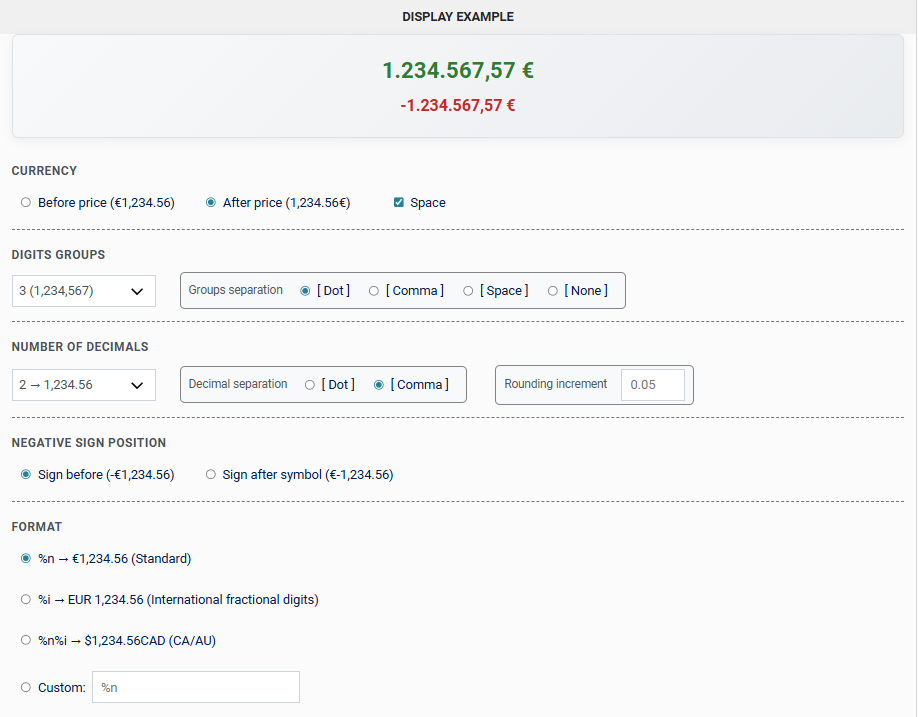
- Currency Symbol Setting:
- Position: Choose whether the currency symbol (e.g. € or $) appears Before or After the price amount.
- Add space: Check this box to insert a space between the symbol and the amount (e.g.
$ 100vs$100).
- Grouping (Thousands Separator):
- Group Size: Define how numbers are grouped.
- 3: Standard grouping (e.g. 1,000,000).
- 0: No grouping (e.g. 1000000).
- 2: Grouping by 2, used in some Asian locales like Lakhs (e.g. 1,00,000).
- 4: Grouping by 4, used in East Asian locales (e.g. 100,0000).
- Separator: Choose the character used to separate groups: Dot [.], Comma [,], Space [ ], or None.
- Group Size: Define how numbers are grouped.
- Decimals:
- Number of Decimals: Select the number of digits to display after the decimal point (from 0 to 4).
- Decimal Point: Choose the character used as the decimal separator: Dot [.] or Comma [,]. (Only visible if decimals are enabled).
- Rounding Increment: (Optional) Enter a value to which prices should be rounded (e.g.
0.05to round to the nearest 5 cents).
- Negative Sign Position:
- Sign before: The minus sign appears before the entire amount (e.g.
-€1,234.56). - Sign after symbol: The minus sign appears between the symbol and the amount (e.g.
€-1,234.56).
- Sign before: The minus sign appears before the entire amount (e.g.
- Currency Format:
- %n (Standard): Displays the price using the Currency Symbol (e.g. €1,234.56).
- %i (International): Displays the price using the International Currency Code (e.g. EUR 1,234.56).
- %n%i (Combined): Displays both symbol and code (e.g. $1,234.56CAD).
- Custom: Allows you to define a custom format string using
%n(for the standard amount with symbol) and%i(for the international code part).