
- Details
- Written by: Administrator
- Category: HikaShop
- Hits: 20127
|
|

Description
TaxCloud® is a free, easy-to-use sales tax management service for retailers in the USA. HikaShop has partnered with TaxCloud to provide a free USA sales tax compliance option for all HikaShop retailers. You can read more about the services offered by TaxCloud on their website https://taxcloud.net/
This documentation page provides details for the configuration and the use of the TaxCloud plugin installed by default on your Joomla website when you install HikaShop, so you can get started quickly.
After a customer has entered a shipping address during checkout, the TaxCloud plugin sends TaxCloud a request to calculate the sales tax due. TaxCloud returns that information to the plugin for display on the HikaShop checkout page. Once the order is completed, the plugin sends another request to TaxCloud to capture the transaction. All captured transactions are included in the sales tax reports that TaxCloud generates at the end of each month. Finally, when you refund an order in the backend of HikaShop, the plugin sends also a request to TaxCloud in order to let TaxCloud know about it.
How to configure your TaxCloud account
1-Create a TaxCloud account at www.taxcloud.net
2-On the “Location” menu , click on “add store/office”
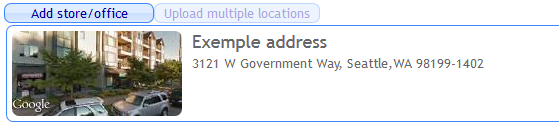
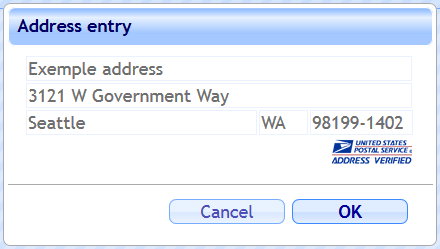
3-Fill the form with your address information (make sure it’s verified by USPS by clicking on the button “check address USPS”)
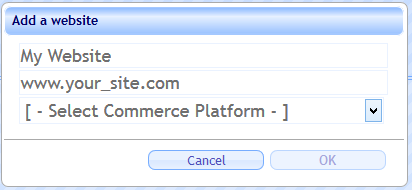
4-On the “Website” menu, click on “add Website” and fill the form with your website information
5-Copy the API ID and API key that you will have to use in the TaxCloud plugin’s settings on your HikaShop website. These can be found in your TaxCloud account on the “Websites” page. Your HikaShop store should have been added when you registered for your account. Please do not share these credentials with anyone else or use them for multiple URLs.
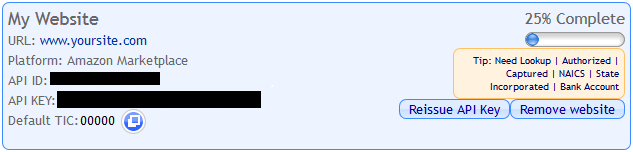
6- Set your Default TIC for your HikaShop store within TaxCloud. To ensure your customers are charged the correct rates and benefit from any available exemptions, you will want to select a Default Tax Information Code (or TIC). For the complete list of TICs, login to TaxCloud and go to the “Taxability Codes” section.
Note: Even though you have set a store-wide default TIC, you can still set item-level TICs from each Product edition page once you activate the TaxCloud plugin of HikaShop. For large volumes of products, you'll be able to use the Mass actions system of HikaShop (menu System>Mass actions), or the CSV import system (menu Products>Imports) to set that in bulk.
For more details on confirming your TaxCloud account registration (via email), entering your office address(es), HikaShop store URL, and the states where you want to collect sales tax on your Taxcloud account, we invite you to read the TaxCloud User Guide.
How to configure your HikaShop TaxCloud plugin
Once you have registered for your free TaxCloud account, enabling TaxCloud for HikaShop is very easy! You can configure your HikaShop TaxCloud plugin via the Joomla plugins manager:
1-Enter your API ID and API key given to you on TaxCloud’s website
2-Enter the same address you entered on TaxCloud.net for your store/office (where your orders are shipped from)
3-In order to verify the addresses of your customers, you will need a United States Postal Service WebTools ID (we call it a USPS ID for short). To get your USPS ID, go to USPS.com/webtools/ and click “Register Now”. Your USPS ID will be emailed to you.
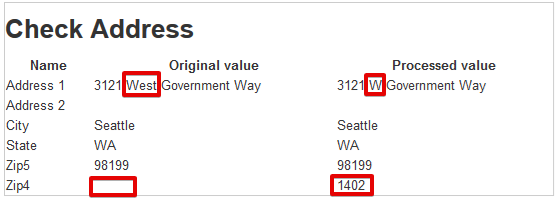
4-It’s strongly recommended to make a check on your address by clicking on the Check address trigger (before you click on it make sure you saved your configuration first. If the Original Values are different from the Processed Values, enter the processed values in the address form instead)
5-Enter the default TIC you want to apply to your products, then the TIC of the shipping methods if you plan to charge your customers for shipping your goods.
How to test that everything is working
Once you have completed these steps, try some test transactions to make sure everything is working correctly. Make sure to complete at least one test order. The test order must be purchased; it’s not enough to just add an item to your cart. Also, don’t forget to return to your HikaShop > Orders page to change the status of the order to "confirmed". To review your test order(s), log in to TaxCloud and click on the “Transactions” tab. Click on any transaction to see details about that order. Make sure that it corresponds to what you have in the HikaShop order details page.
Going live with TaxCloud
TaxCloud is in test mode until you set your account to live status. When you’re ready to go live, log in to TaxCloud, go to the “Websites” page, and click the “Go Live!” button. That’s it! If you do not see a “Go Live!” button, you’ll see a message telling you what you need to do in order to go live.
Plugin’s configuration
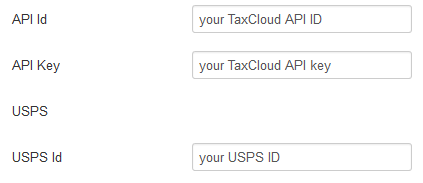
API ID : Your API identifier (given by TaxCloud)
API key : The API key associated to your API ID
USPS ID : Your USPS identifier (given by USPS)
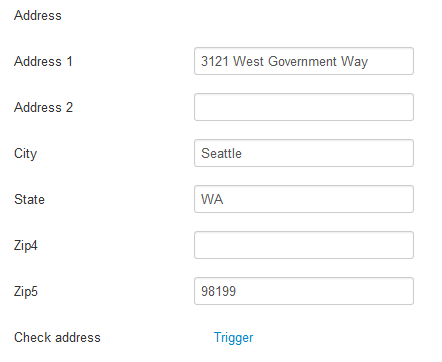
Address 1 : The first part of the address of your store/office
Address 2 : The second part of the address of your store/office
City : your store/office city
State: your store/office state
ZIP4 : your store/office ZIP4
ZIP5 : your store/office ZIP5
Check address : this link allows you to check the address you just entered via USPS in order to get the eventual missing information or to correct eventual mistakes
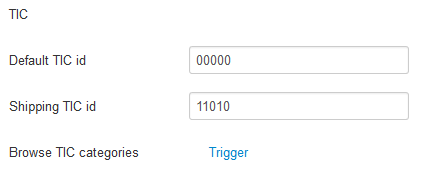
Default TIC id : this is the default TIC that will be used in your store for your products.
Shipping TIC : This is the TIC that will be applied for the shipping (usually 11010)
Browse TIC categories : this trigger allows you to find the TIC id applied to the category of product/service chosen (example: for General goods and services, the TIC id associated is 00000)
Additional features
As soon as the plugin is enabled, you will be able to set a TIC to any product of your HikaShop store. To do this, you will have to reach the configuration page of your product and find the Taxability code field.
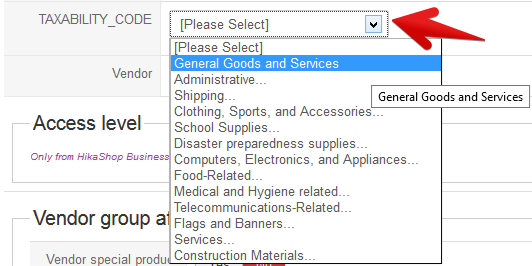

From there, you’ll just have to select the category of your product and the TIC id will be automatically associated. You can change it at any time just by clicking on the close button.
- Details
- Written by: Administrator
- Category: HikaShop
- Hits: 29856
Description
This screen enables you to manage all your shipping or payment plugins. The interface is the same so the documentation is the same on this screen, but the shipping plugins and payment plugins are accessible by two different HikaShop menus.
Toolbar

- Copy: Select one or several plugins and click on this button to copy them all.
- Generate Copies: (Shipping only) Select one or several shipping methods and click this button to open the Shipping Method Generator. This tool allows you to bulk create duplicates of the selected methods with specific modifications, such as different zones, weights, volumes, post codes, warehouses, quantities, prices, or currencies. This is useful for creating rate tables or variations efficiently.
- Publish: Select one or several plugins and click on this button to publish them all.
- Unpublish: Select one or several plugins and click on this button to unpublish them all.
- Export: (Shipping/Payment only) Export the list of methods to a CSV file. The columns can be configured in the main configuration.
- Import: (Shipping/Payment only) Import methods from a CSV file.
- New: Click to create a new plugin instance.
- Help: This button enables you to turn ON/OFF the help section.
- Dashboard: You can go back to the control panel using this button.
Column Headers
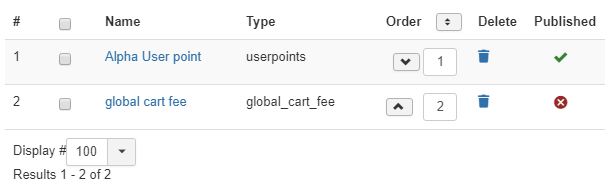
- #: An indexing number automatically assigned for ease of reference.
- Checkbox: Check this box to select one or more plugins. To select all items, check the box in the column heading. After one or more boxes are checked, click on the toolbar buttons to perform actions on the selected items.
- Name: Name of the plugin. You can click on it to edit it.
- Type: The type of plugin, for example:
- Payment plugins: e.g., HikaShop PayPal payment plugin
- Shipping plugins: e.g., HikaShop FedEx shipping plugin
- Order: Enables you to reorder your plugins within the current level.
- Delete: Click on the trash icon to remove the instance.
- Published: If a plugin is published, it can be used by customers during checkout.
Shipping Method Generator
The Shipping Method Generator is a powerful tool designed to help you quickly create multiple variations of a shipping method. This is particularly useful when you need to set up complex rate tables based on weight, zone, or other criteria without manually creating each method one by one.
How to use:
- Go to the Shipping Methods listing (System -> Shipping Methods).
- Select one or more existing shipping methods to serve as the "Source" (template).
- Click the Generate Copies button in the toolbar.
- In the popup window, select the Restriction Type you want to base your variations on (e.g., Weight, Zone, Price).
- Add rows for each variation you need. For each row, you can define:
- The restriction values (e.g., Min Weight 0 to Max Weight 5).
- The Price for this specific variation.
- A Percentage increase/decrease.
- A Formula (e.g.,
{price} + ({weight} * 0.5)).
- Click Generate. The system will create copies of your source method(s) with the specific restrictions and prices applied.
Supported Restriction Types:
- Zone: Create methods restricted to specific geographical zones.
- Product Weight: Define minimum and maximum weight limits.
- Product Volume: Define minimum and maximum volume limits.
- Shipping Zip Regex: Use Regular Expressions for advanced post code matching.
- Warehouse: Restrict methods to products from a specific warehouse.
- Product Quantity: Define minimum and maximum quantity of items in the cart.
- Price: Restrict based on the order total price (with option to include tax).
- Currency: Restrict the method to specific currencies.
FAQ
-
I don't see any payment methods during checkout, or I don't see some of them. What is the problem?
There are several things you might have missed:
- Check that the payment plugins are installed and published.
- Check that you have configured your payment plugins (edit and save the configuration).
- Check that your template is able to display error messages: Documentation.
- Check that you have the "payment" view in the checkout workflow option of the configuration.
- If you restricted your payment methods to certain zones, check that the customer's address belongs to those zones.
- Check that the currency you are using is supported by the payment plugin. Some gateways only support specific currencies.
- Ensure you haven't changed the currency code. Payment plugins rely on standard ISO codes. Use the "format" option to change the display symbol instead.
- If you selected a currency or shipping method restriction within the payment method options, ensure they match the selection during checkout. In most cases, these should be left unselected (use Ctrl+Click to deselect).
- Check that the plugin access level (via Joomla Plugin Manager) is set to Public.
- Sometimes the plugin access level is not set properly in the database. Open the plugin in the Joomla Plugin Manager and save it to reset the access level.
-
I don't see any shipping methods during checkout. What is the problem?
There are several things you might have missed:
- Check that the shipping plugin (e.g., Manual Shipping) is installed and published.
- Check that you have defined shipping methods in System -> Shipping methods.
- If using restrictions (weight, price, etc.), ensure your methods cover all possible scenarios (e.g., no gap between 10kg and 20kg if an order is 15kg).
- Check that your template is able to display error messages: Documentation.
- Check that your products have a weight. Without weight, products may be considered valid for shipping calculation or treated as virtual goods depending on settings.
- Check that you have the "shipping" view in the checkout workflow option of the configuration.
- If restricting to zones, verify the customer address matches the zones.
- Ensure you have valid units configured in the main configuration. Documentation.
- Use consistent usage of units. If your main unit is 'm' but you input dimensions in 'mm', ensure HikaShop can convert properly or change the main unit options to match your input preference (e.g., mm,m,cm).
- If using price restrictions, check the "Include virtual product prices" setting if you have virtual goods in the cart.
- Check that the plugin access level (via Joomla Plugin Manager) is set to Public.
- Re-save the plugin in Joomla Plugin Manager to ensure access levels are correct in the database.
- Details
- Written by: Xavier
- Category: HikaShop
- Hits: 8210
|
|
Description
This screen enables you to manage the waitlist of your shop. You can see the information and edit them.
To enable the waitlist, you have to activate the waitlist plugin in the main configuration of HikaShop.
Toolbar

- Save & Close: Save the current waitlist entry and go to the waitlists listing
- Save & New: Save the current waitlist entry and create a new one.
- Save: Save the current waitlist entry.
- Cancel : Cancel the changes and go back to the waitlist listing.
- Help : This button enables you to turn ON/OFF the help section, this screen will appear or disappear.
Main information
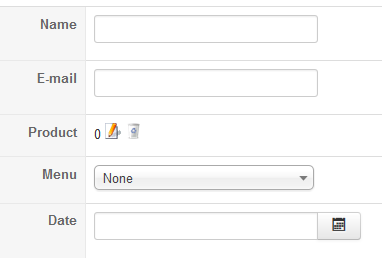
-
Name : The name set by the customer when subscribing to the waitlist.
- Email : The email of the customer, the notifications will be sent to this email address.
- Product : The product which is no longer in stock and required by the user who subscribed to this waitlist.
- Menu : Set the menu to use to display the product when clicking on the product link from the waitlist.
- Date : The date when the customer subscribed to the waitlist.
- Details
- Written by: Eliot
- Category: HikaShop
- Hits: 19401
 The mass action system included in Hikashop allows developers to write their own plugin very easily in order to process data the way they want. This documentation will give you the basis to create a mass action plugin in order to exploit the capacities of the mass action system.
Two options are offered in this tutorial, you can either create an Hikashop plugin as explained in this tutorial (and then, in this plugin, add functions as explained in the following example=) or you can download our example plugin here, including the needed element to make a usable mass action plugin. We also highly encourage you to look at the existing mass action plugins that are already by default in HikaShop and which handle all the mass actions triggers, filters and actions for products, categories, orders, users and addresses that are available when you install HikaShop.
Template
Here is a template example, a template allow you to display a new option in the triggers, filters or actions.
In this example we used the function "onMassactionTableFiltersLoad" so it will add an option in the filters.
To add an option in the triggers you have to use "onMassactionTableTriggersLoad", and "onMassactionTableActionsLoad" to add an action.
// Add a dropdown filter for the product type
function onMassactionTableFiltersLoad(&$table,&$filters,&$filters_html,&$loadedData){
	$type = 'filter';
	$massactionClass = hikashop_get('class.massaction');
	if(empty($loadedData->massaction_filters)){
		$loadedData->massaction_filters = array();
	}
	// Add the entry in the filters listing
	$filters['productType']=JText::_('PRODUCT_TYPE');
	// Set the default values here
	$loadedData->massaction_filters['__num__'] = new stdClass();
	$loadedData->massaction_filters['__num__']->type = 'product';
	$loadedData->massaction_filters['__num__']->data = array();
	$loadedData->massaction_filters['__num__']->name = 'productType';
	$loadedData->massaction_filters['__num__']->data['type'] = 'all';
	$loadedData->massaction_filters['__num__']->html = '';
		foreach($loadedData->massaction_filters as $key => &$value) {
		if($value->name != 'productType' || ($table->table != $loadedData->massaction_table && is_int($key)))
			continue;
		$value->type = 'product';
		$product = hikashop_get('type.product');
		$product->onchange='countresults(\''.$table->table.'\','.$key.');';
		// add here the output, what will be displayed after selecting the filter
		$output = $product->display('filter['.$table->table.']['.$key.'][productType][type]',$value->data['type'], 'chzn-done not-processed');
		// call the "initDefaultDiv" function to format your content
		$filters_html[$value->name] = $massactionClass->initDefaultDiv($value, $key, $type, $table->table, $loadedData, $output);
	}
}
Once you have your template, you have to create the filter, you have to create the function "onProcessProductMassFilterproductType", where "Product" is corresponding to the data, "Filter" is the type of the added functionality (it could be "trigger" or "action"), and "productType" is the name of your filter.
// Create the function
function onProcessProductMassFilterproductType(&$elements,&$query,$filter,$num){
	if(empty($filter['type']) || $filter['type']=='all') return;
	// If there is an element given, generally used when coming from a trigger
	if(count($elements)){
		foreach($elements as $k => $element){
			if($element->product_type!=$filter['type']) unset($elements[$k]);
		}
	}
	// Else there is no elements, so we get them from a request
	else{
		$db = JFactory::getDBO();
		$query->where[] = 'hk_product.product_type='.$db->Quote($filter['type']);
	 }
}
The following function count the number of results, it's displayed next to the selected filter. You have to name it "onCountProductMassFilterproductType", it's the same thing as before except that it's an onCount and not onProcess
function onCountProductMassFilterproductType(&$query,$filter,$num){
	$elements = array();
	// Call the main function to get the elements
	$this->onProcessProductMassFilterproductType($elements,$query,$filter,$num);
	return JText::sprintf('SELECTED_PRODUCTS',$query->count('hk_product.product_id'));
}
If you need to add an action or a trigger, it's working the same way.
You will just have to use the Trigger or Action functions instead of the Filter one.
To add a new data type, if you want to do mass actions on, for example, the discounts you can use the following code in your plugin:
	function onMassactionTableLoad(&$externalValues){
		$obj = new stdClass();
		$obj->table ='discount';
		$obj->value ='discount';
		$obj->text =JText::_('DISCOUNT');
		$externalValues[] = $obj;
	}
- Details
- Written by: Majri
- Category: HikaShop
- Hits: 17613
| {img} |
Description
This screen enables you to edit the payment method options. Payment methods will be filtered on checkout based on the zone you set for them, if any. Then, they will be displayed to the user for him to choose which payment method he prefers for his order.
Note that the payment method can probably support only a limited number of currencies.
Toolbar

- Save & Close : Save the payment method options and return to the payment methods Management screen.
- Save : Apply the modifications to the payment method and stay on the same screen.
- Cancel : Return to the previous screen without saving the modifications.
- Help : This button enables you to turn ON/OFF the help section, this screen will appear or disappear.
Main Information
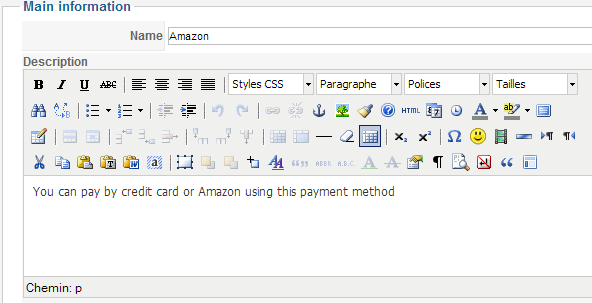
If you use one of our commercial versions, you will be able to enter the name and description in different languages. This feature requires to have joomfish installed and can be activated in the configuration page, in the display tab. The languages available will be the ones in joomfish. If you don't enter something for a translation, it will just use the default information in the Main information tab instead. After you click on save or apply an additional publish icon will appear next to the fields where you entered something in the languages tabs so that you can easily enable or disable them.
Generic information
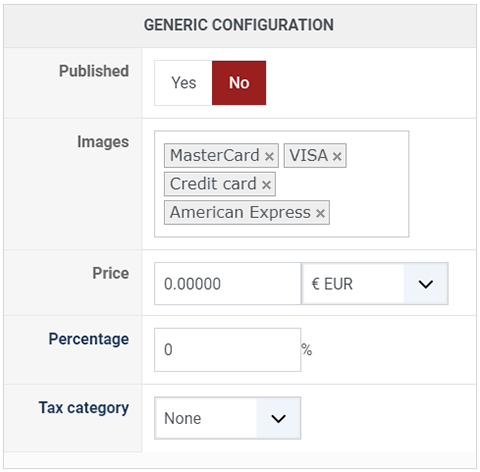
- Published : This option allows you to publish or not the payment method.
- Images : Select here the desired images to be displayed for this payment method. If you want to add additional images, you can upload them via FTP into the folder media/com_hikashop/images/payment/ of your website and you will then be able to select them in that option.
- Price : You can set the payment fee in this field, and select the currency of the fee.
- Percentage : The percentage allows you to define a payment fee depending on the total amount of the products in the cart.
-
Tax category : Select among your tax category, the category you want apply on your payment method cost.

Main Information
If you use one of our commercial versions, you will be able to enter the name and description in different languages. This feature requires to have JoomFish installed and can be activated in the configuration page, in the display tab. The languages available will be the ones in JoomFish. If you don't enter something for a translation, it will just use the default information in the Main information tab instead. After you click on save or apply an additional publish icon will appear next to the fields where you entered something in the languages tabs so that you can easily enable or disable them.
Additional Information
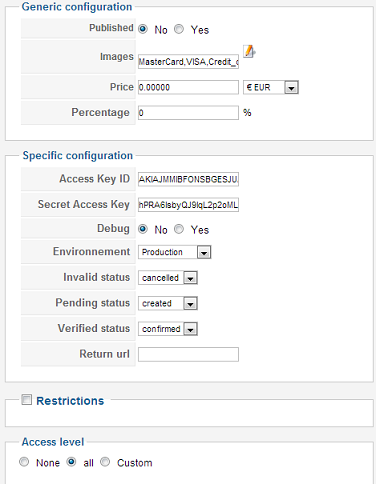
- Zone : You can restrict the Amazon payment method to a zone. By clicking on the edit icon, a popup will open enabling you to select a zone. You can also remove this limitation by clicking on the delete icon.
- Images : You can click on the edit icon to select one or several images to display next to the name of the Amazon payment method during the checkout process. Those images are stored in the folder media/com_hikashop/images/payment so you can easily add more of them by uploading your images to this folder via FTP.
- Shipping method : With this option you can select the shipping method for which this payment method will be available. For example, if you choose UPS, this payment method will only be usable if UPS is selected as shipping method. If another shipping method is selected, this payment method will not be displayed. Note: if you selected "None" or don't select any shipping method, this payment method will always be available.
- Currency : This option allows you to restrict Amazon to only some currencies. Note that on top of that, the Amazon method won't display for any currency not supported by Amazon.
- Access Key ID : Your Amazon access key ID that you'll find through your Amazon configuration pages.
- Secret Access Key : Your Amazon secret access key that you'll find through your Amazon configuration pages.
- Environment : The Sandbox environment is used for testing. Once you have tested the plugin, you can pass to a production phase and set the Environment option to Production.
- Debug : You can activate the debug mode of the Amazon payment plugin. If you do so, information about each notification received from Amazon will be logged in the payment log file. You can see and modify the location of this file in the configuration page of HikaShop
- Cancel URL : The URL you want your users to be redirected to when they cancel the order from the Amazon interface. By default, they will be redirected to the first step of the checkout process.
- Return URL : The URL you want your users to be redirected to when they finish their payment on the Amazon interface. By default, they will be redirected to the after_end page of the checkout process which will thank them for their order.
- Invalid status : Here, you can select the status to set to an order if the plugin receives a notification from Amazon for an order with an amount different from the order total or in a different currency. In that case, we highly recommend you to check your Amazon account, the order information, and maybe contact your customer, and decide yourself what to do with the order.
- Pending status : Here, you can select the status to set to an order if the plugin receives a pending notification from Amazon for an order. A pending notification means that the customer entered his payment information but that Amazon could not yet receive the funds. In that case, we highly recommend you to check your Amazon account, the order information, and maybe contact your customer, and decide yourself what to do with the order.
- Verified status : Here, you can select the status to set to an order if the plugin receives a successful completion notification from Amazon for an order.
Restrictions
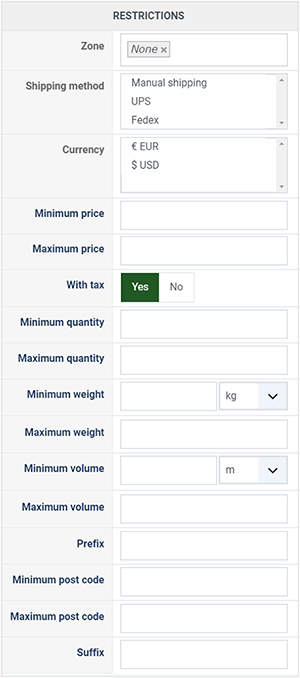
- Zone : You can restrict the check payment method to a zone. By clicking on the edit icon, a popup will open enabling you to select a zone. You can also remove this limitation by clicking on the delete icon.
- Shipping method : With this option you can select the shipping method for which this payment method will be available. For example, if you choose UPS, this payment method will only be usable if UPS is selected as shipping method. If an other shipping method is selected, this payment method will not be displayed. Note: if you selected "None" or don't select any shipping method, this payment method will always be available.
- Currency: Choose the currencies allowed by this payment method.
- Minimum price : The payment method can be available for only orders above a minimum price. This price uses the payment method price currency even if the price is 0.
- Maximum price : The payment method can be available for only orders below a maximum price. This price uses the payment method price currency even if the price is 0.
- With tax : Display the payment method only for products with tax.
- Minimum quantity : If the order has a price lower than the price set in this field, so this payment method will not be available.
- Maximum quantity : If the order has a price upper than the price set in this field, so this payment method will not be available.
- Minimum weight : You can set a minimum weight so that orders below it won't be able to be paid with the current payment method. The weight of the order will be calculated based on the weight of each products in it.
- Maximum weight : You can set a maximum weight so that orders over it won't be able to be paid with the current payment method. The weight of the order will be calculated based on the weight of each products in it.
- Minimum volume : You can set a minimum volume so that orders below it won't be able to be paid with the current payment method. The volume of the order will be calculated based on the volume of each products in it. The volume is calculated with the width, height and length of the products.
- Maximum volume : If the order has a volume upper than the price set in this field, so this payment method will not be available.
- Prefix : You can restrict your payment methods to only post codes including such prefix with this option.
- Minimum post code : You can restrict your payment methods to only post codes within a certain range whereby this is the minimum possible value
- Maximum post code : You can restrict your payment methods to only post codes within a certain range whereby this is the maximum possible value
- Suffix : You can restrict your payment methods to only post codes including such suffix with this option.
Access level
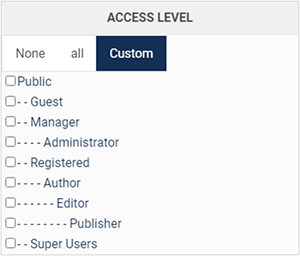
The ACLs are available in the business edition of HikaShop.
- None : When "none" is selected, the payment method will never be displayed.
- All : "All" allow you to display the payment method for all the type of users. All groups are allowed to pay via this payment method.
- Custom : Here you can select which groups can use this payment method. All the checked groups will be able to use this method.
Note about Access level :
-
Access level : With the business edition of HikaShop, you will be able to limit a coupon or a discount to specific users.
-
Access level : With the business edition of HikaShop, you will be able to limit a coupon or a discount to joomla groups of users.
FAQ
I don't see any payment methods during the checkout, or I don't see some of them, what is the problem ?
There are several things which you could have missed.
- 1/ Check that the payments plugins are installed and published
- 2/ Check that you have configured your payment plugins (edit it and save its configuration)
- 3/ Check that your template is able to display error messages: hikashop.com/documentation
- 4/ Check that you have the payment view in the checkout workflow option of the configuration
- 5/ If you restricted your payment methods to zones, check that the address you're using is inside those zones ! Otherwise the payment methods will be filtered out.
- 6/ Check that the currency you're using is supported by the payment plugins you're using. Some payment plugins only supports a limited number of currencies. You should check that with the support of the payment gateways you're using.
- 7/ Please make sure that you didn't change the currency code of your currency. Otherwise, the payment plugins won't recognize your currency. If you want to change the display of your currency, we invite you to use the "format" option on the right of the currency options screen as well as the symbol field.
- 8/ When you select a currency or a shipping method in the options of the payment method, the payment method won't display unless that currency or shipping method is selected during the checkout. In most cases, these parameters shouldn't be selected so make sure they are unselected. To unselect them, you need to press the ctrl key and click on the selected currencies or shipping methods. Also remember if you selected one or several shipping methods here, when you add a new shipping method later on, you will want to go in the payment plugins options and select that new shipping method or it won't display any payment method for that new shipping method.
- 9/ Please check that you didn't set the access option of the plugin (via the plugins manager of Joomla) to something else than public.
- 10/ It can happen that the plugin's access is not set properly in the database. Please go in the Joomla plugins manager and edit the plugin and save it. That will sett the access if not present and might help solve your problem.