
- Details
- Written by: Administrator
- Category: HikaShop
- Hits: 38269
|
|
Description
This screen enables you to manage all your products.
You can sort your products by any field, search using the "filter" box and directly modify some properties by clicking on the icons.
Toolbar

- Limit : That button is only available in the commercial editions of HikaShop. It will let you access the product limits manager which will allow you to add purchase limits for the products. For example, you will be able to limit the purchase of goods to 2 per day, or the purchase of goods to 5 per month, etc.
- Export : You can click on that button in order to export a CSV of the selected products. If no products are selected, the system will export all the products. The categories will also be exported automatically at the beginning of the CSV file.
- Publish : Select one or several products and click on this button in order to publish them.
- Unpublish : Select one or several products and click on this button in order to unpublish them.
- Copy : Select a product and then click on this button in order to duplicate one or several products.
- New : Enables you to create a new product.
- Edit : Select a product and then click on this button in order to edit its information.
- Delete : Select one or several products and click on this button in order to completely delete them.
- Help : This button enables you to turn ON/OFF the help section, this screen will appear or disappear.
- Dashboard : You can go back to the control panel using this button.
Filters

- Filter input : Here, you can type different words like product name.
- Brand filter : In this dropdown, you can restrict product listing by brand.
- Status filter : Same idea as above but to restrict published or unpublished status.
- Product type : To filter among main products or variant products.
- Which products you want to display : Select here, which products you want to display among : Direct sub elements, All sub elements and Inherit (Direct sub elements).
Column Headers
-
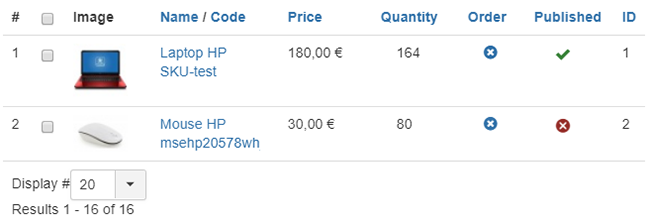
# : An indexing number automatically assigned for ease of reference.
-
Checkbox : Check this box to select one or more items. To select all items, check the box in the column heading. After one or more boxes are checked, click on the delete button in order to delete the selected products.
- Name : The name of the product. If you click on the name, you will go to the edit screen of the product.
- Code : The code of the product is a unique identifier for each product.
- Price : The price of the product. If you have prices in different currencies they will all be shown. The prices with a minimum quantity won't be shown.
- Quantity : The quantity in stock for the product. Unless the quantity is unlimited, people won't be able to buy over the stock and each time an order is made with this product, the stock will be adjusted. When an order is cancelled (there is an option in the configuration page to set the statuses involved), the stock will be restored.
- Order : This column will only be displayed if viewing the products using the filter "Direct sub elements". It enables you to order the products of the current category the way you want. We did the screenshot with the filter "All sub elements" and thus, this column is hidden.
- Published : If a product is published it means that it can be seen by your customers in your shop.
- ID : This field indicates the ID of the product.
Explorer
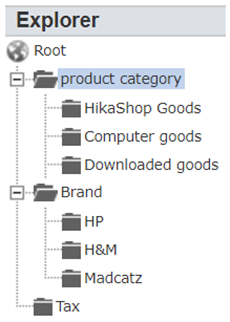
- This explorer will help you navigate in your categories similarly to what you do when browsing your computer folders. For a fast user experience, all your categories will be loaded to display it. But if you have a lot of categories (several thousands) you might encounter some slow downs. Thus, there is an option in the configuration to not display it.
- Details
- Written by: Administrator
- Category: HikaShop
- Hits: 19107
|
|

Description
This screen enables you to manage all your characteristics.
Characteristics are useful when your products have several variants. For example, you sell a table model which has 5 different colors possible. You have a stock for each color or you might have different prices, different weight, images, etc. But you want the table to be listed only once when your customers browse your shop. That's what characteristics are for. Then, on the product page, your customers will be able to change the characteristics value of the product.
You can sort your characteristics by any field and search using the "filter" box.
Toolbar

- New : Enables you to create a new characteristic.
- Edit : Select a characteristic and then click on this button in order to edit its information.
- Delete : Select one or several characteristics and click on this button in order to completely delete them. You should not delete a characteristic if some of your products have it.
- Help : This button enables you to turn ON/OFF the help section; this screen will appear or disappear.
- Dashboard : You can go back to the control panel using this button.
Column Headers
-
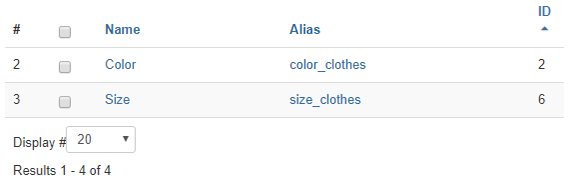
# : An indexing number automatically assigned for ease of reference.
-
Checkbox : Check this box to select one or more items. To select all items, check the box in the column heading. After one or more boxes are checked, click on the delete button in order to delete the selected characteristics.
- Name : Name of the characteristic. You can directly click on it to edit it.
- Alias : Alias of the characteristic. You can directly click on it to edit it.
- ID : This field indicates the ID of the characteristic.
- Details
- Written by: Administrator
- Category: HikaShop
- Hits: 16449
|
|
Description
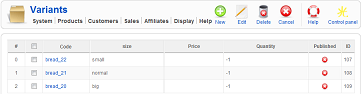
This screen enables you to manage all the variants of one product. You can access it through the Manage variants button when editing a product.
Based on the characteristics of a product you will have one variant per characteristic combination. For example, if your product can be blue or red and old or new style, your product will have 4 variants: blue and old style, blue and new style, red and old style, red and new style.
Unlike most of the listings in HikaShop, this listing displays all the variants in one page so there is no filters or pagination.
Toolbar

- New : Enables you to create a new variant.
- Edit : Select a variant and then click on this button in order to edit its information.
- Delete : Select one or several variants and click on this button in order to completely delete them.
- Cancel : This button will bring you back to the edit screen of the main product.
- Help : This button enables you to turn ON/OFF the help section, this screen will appear or disappear.
- Control panel : You can go back to the control panel using this button.
Column Headers
-
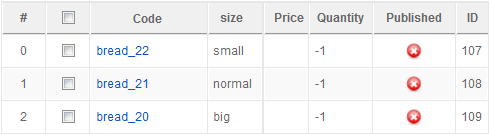
# : An indexing number automatically assigned for ease of reference.
-
Checkbox : Check this box to select one or more items. To select all items, check the box in the column heading. After one or more boxes are checked, click on the delete button in order to delete the selected variants.
- Code : The code of the variant is a unique identifier for each product. If you click on it, you will go to the edit screen of the variant. By default, when the variant is generated based on the characteristics of the product, the code uses the main product code plus the ids of the characteristics separated by an underscore. As long as you don't change it, the variant will be automatically deleted if the characteristic is removed from the main product.
- Size : This is actually an automatically generated column. You will have on this listing one column per characteristic of the main product so that you can easily see which variant has which value.
- Price : The price of the variant. If you have prices in different currencies they will all be shown. The prices with a minimum quantity won't be shown. If empty, it means the variant uses the prices of the main product.
- Quantity : The quantity in stock for the variant. Unless the quantity is unlimited, people won't be able to buy over the stock and each time an order is made with this product, the stock will be adjusted. When an order is cancelled (there is an option in the configuration page to set the statuses involved), the stock will be restored.
- Published : If a variant is published it means that it can be seen by your customers in your shop. By default, all variants are unpublished.
- ID : This field indicates the ID of the variant.
- Details
- Written by: Administrator
- Category: HikaShop
- Hits: 17731
|
|
Description
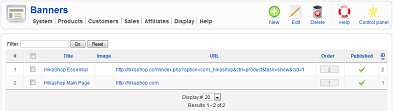
This screen enables you to manage all your banners.
Banners can be used to present examples of links to your website pages so that your partners can easily modify and include them on their websites. Then, when customers come to your website from their website, they will get a commission which will motivate them to produce high-quality content and also keep your banner on their website generating more traffic for you and thus more sales.
You can sort your banners by any field and search using the "filter" box.
Toolbar
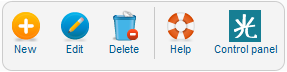
- New : Enables you to create a new banner.
- Edit : Select a banner and then click on this button in order to edit its information.
- Delete : Select one or several banners and click on this button in order to completely delete them.
- Help : This button enables you to turn ON/OFF the help section; this screen will appear or disappear.
- Control panel : You can go back to the control panel using this button.
Column Headers
-
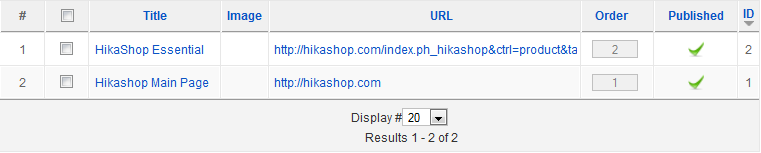
# : An indexing number automatically assigned for ease of reference.
-
Checkbox : Check this box to select one or more items. To select all items, check the box in the column heading. After one or more boxes are checked, click on the delete button in order to delete the selected banners.
- Title : Title of the banner. You can directly click on it to edit the banner. If you provide an image link, it will be the alt message of the image. Otherwise, it will be the text of the link.
- Image : An image URL for the banner. If provided, the banner will be in the form of a clickable image.
- URL : The URL you want the customers to be directed to on your website. You need to enter an absolute URL. The partner ID will be automatically added to it when displaying the banner to the partner so that it's easier for him to include the banner on his website.
- Order : This column enables you to order the banners the way you want.
- Published : If a banner is published it means that it can be seen by your partners in your shop.
- ID : This field indicates the ID of the banner.
- Details
- Written by: Administrator
- Category: HikaShop
- Hits: 17424
|
|

Description
This screen enables you to manage the emails HikaShop sends. You will be able to modify the email senders information, attachments, subject and the code generating the text and HTML content. If you only need to tweak text in the emails, you can edit the translation files via the configuration page of HikaShop and edit them there. That will allow HikaShop to send emails in the language of the customer.
Remember that emails are subject to a lot of limitations (no javascript, avoid divs, etc) because of the email clients (Outlook, windows live, gmail, thunderbird, etc).
This feature is only available in Business version of HikaShop.
Toolbar

- Help : This button enables you to turn ON/OFF the help section, this screen will appear or disappear.
- Dashboard : You can go back to the control panel using this button.
Column Headers
-
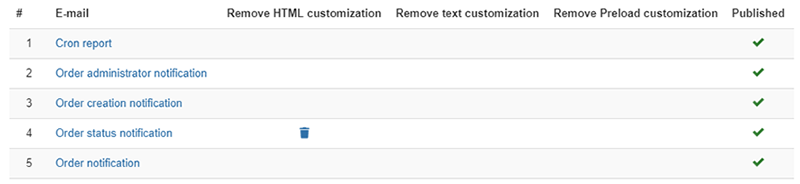
# : An indexing number automatically assigned for ease of reference.
- E-mail : The name of the e-mail. You can edit the email by clicking on this link.
- Remove HTML customization : When you save an email, the system will save the HTML version in a custom file. That will allow you to fall back to the default version by just clicking on this icon.
- Remove text customization : When you save an email, the system will save the text version in a custom file. That will allow you to fall back to the default version by just clicking on this icon.
- Remove preload customization : When you save an email, the system will save the preload code in a custom file. That will allow you to fall back to the default version by just clicking on this icon.
- Published : You can publish/unpublish an email by clicking on the icon. An unpublished email won't be sent anymore.
Emails description
- Cron report: It's the email sent by HikaShop each time a cron process is triggered and that something happened. You normally shouldn't have to change it.
- Order administrator notification : This email is sent to the shop owner (the email address can be configured in the "order administrator notification email address" option of the Emails section of the HikaShop configuration) after the order is created (potentially before it is paid).
- Order creation notification : This email is sent to the customer after the order is created (potentially before it is paid).
- Order notification : This email is sent to the customer when you use the "email" button of an order details page on the backend.
- Order status notification : This email is sent to the customer after the order is confirmed (when a payment notification is received from a payment gateway) or when you change the status of an order in the backend and activate the notification to the customer.
- User account : This email is sent to the user when he registers through the HikaShop checkout or the HikaShop registration pages. It can contain the activation link on which the user needs to click in order to validate his account.
- User account administrator notification : This email is sent to the shop owner when a user registers through the HikaShop checkout or the HikaShop registration pages. It sends it to the email address configured in the "From" setting of the Emails section of the HikaShop configuration.
- Out of stock notification : This email is sent to the shop owner when one or several products are out of stock (see the HikaShop "out of stock" plugin via the Joomla plugins manager in order to configure it). It sends it to the email address configured in the "From" setting of the Emails section of the HikaShop configuration.
- Order cancel : This email is sent to the shop owner when a customer requests a cancellation of his order (only possible if the "Cancellable orders statuses" option of the HikaShop configuration is configured). It sends it to the email address configured in the "From" setting of the Emails section of the HikaShop configuration.
- Wait list notification : This email is sent to the users who entered their email address to request a notification when a product is back in stock (see the Waitlist section of the HikaShop configuration in order to configure it).
- New comment : This email is sent to the shop owner when a customer write a new comment for a product if the "send email for new comment" is activated in the HikaShop configuration. It sends it to the email address configured in the "From" setting of the Emails section of the HikaShop configuration.
- Contact request : This email is sent to the shop owner when a customer writes a contact request for a product (see the "Display a contact button on the product page" option of the HikaShop configuration in order to configure it).
- Mass action notification : This email is sent to the shop owner when a mass action configured with an email notification action is triggered. It sends it to the email address configured in the action of the mass action.
- Wishlist sharing notification : If you activate the wishlist feature of HikaShop, in its configuration page, your users will be able to add products to a wishlist (similar to the cart mechanism which is activated by default). If wishlist sharing is activated, on their wishlist page, they will have a share button. This button will open a popup where they can enter email addresses so that HikaShop can send an email to these email addresses using this "Wishlist sharing notification". It will allow the recipients to acccess the shared wishlist so that they can potentially purchase the products listed there. This is useful for baby showers, wedding gift lists, etc.
- Withdrawal admin notification : In the menu System>Order statuses, you can enable a status under the "Withdrawable" column. After you do, orders changed to that status will have a "withdraw" button the customer can use to cancel his order as per EU-wide law. When they use this button, a withdrawal request will be logged in the Orders>Withdrawals menu of your HikaShop backend and this "Withdrawal admin notification" will be sent to you if enabled.
- Withdrawal user notification : In the menu System>Order statuses, you can enable a status under the "Withdrawable" column. After you do, orders changed to that status will have a "withdraw" button the customer can use to cancel his order as per EU-wide law. When they use this button, a withdrawal request will be logged in the Orders>Withdrawals menu of your HikaShop backend and this "Withdrawal user notification" will be sent to the user if enabled.