
- Details
- Written by: Administrator
- Category: HikaShop
- Hits: 18696
|
|

Description
This screen enables you to manage all your discounts.
In HikaShop, coupons and discounts are handled the same way. Discounts are automatically applied to products prices, while coupons are applied on the order when the customer enters the coupon code during the checkout process. In the free version only basic restrictions like start date, end date, minimum order value and quota are available while in our commercial versions, you can set more advanced restrictions like a restriction on a category, a product or a zone.
You can sort your discounts by any field and search using the "filter" box. You can also filter them to display only coupons or only discounts.
Toolbar

- Export : You can click on that button in order to export a CSV of the selected Coupons & Discounts. If no elements are selected, the system will export all Coupons & Discounts.
- Copy : Select an element and then click on this button in order to duplicate one or several Coupons (or Discount).
- New : Enables you to create a new discount.
- Edit : Select a discount and then click on this button in order to edit its information.
- Delete : Select one or several discounts and click on this button in order to completely delete them.
- Help : This button enables you to turn ON/OFF the help section; this screen will appear or disappear.
- Dashboard : You can go back to the control panel using this button.
Column Headers

-
# : An indexing number automatically assigned for ease of reference.
-
Checkbox : Check this box to select one or more items. To select all items, check the box in the column heading. After one or more boxes are checked, click on the delete button in order to delete the selected discounts.
- Code : A code number is required for coupons. Your customers will have to enter it in the appropriate field while checking out in your store in order for the coupon to be applied. Individual codes can be sent to your users via email using our integration with AcyMailing. That will result in one coupon per user, so if you have a lot of users, you might prefer using general coupons with a quota and/or an end date. You can directly click on it to edit it. Usually discounts do not need a code as they are automatically applied. However, it can be useful in order to be able to click on it on this listing in order to edit the discount in one click.
- Type : You can create either coupons or discounts.
- Start date : You can set a starting date for a coupon or a discount.
- End date : You can set an ending date for a coupon or a discount. Note that prices are recalculated on each page so prices of products can change based on discounts applied to them as long as an order is not created. Once an order is created, the products in it have their prices fixed as well as any discount applied to them or any coupon applied to the order.
- Value : It will display either an amount or a percentage. If an amount is set, the percentage won't be applied.
- If it's an amount : You can have an amount for your discount in the currency you want. If you need the coupon value in different currencies, you can create several coupons, one per currency. If a customer enters a coupon in a different currency than the one of his order, the amount will be converted.
- If it's a percentage : You can also set a percentage of discount on the order for coupons, or a percentage of discount on the price of goods for discounts.
- Quota : The maximum number of times a coupon can be used. Discounts won't be used if the quota is inferior to the number of times used but the number of times used is only incremented for coupons, so it's not really useful for discounts.
- Restrictions :
- Minimum order value : This only applies to coupons. If set, a coupon won't be accepted if the total of the products in the order is under this value. The currency used here is the one used for the flat amount field even if no flat amount is set.
- Product : You can limit a discount or a coupon to one product. For coupons, it means that you need at least once this product in your order for the coupon to be valid. For discounts, it means that the discount is applied to this product's prices only.
- Category : You can limit a discount or a coupon to one category. For coupons, it means that you need at least once a product of this category in your order for the coupon to be valid. For discounts, it means that the discount is applied to products prices in this category only.
- Include sub categories : If you limited the discount or the coupon to a category, you can limit it to products directly in this category and not in a sub category of this category.
- Zone : You can limit a coupon or discount to a zone. Based on the user billing address or shipping address (can be changed in the configuration), the coupon will be valid or not and the discount will be applied or not.
- Published : If a coupon is published it can be used by your customers. If a discount is published, it will be automatically applied based on restrictions.
- ID : This field indicates the ID of the discount.
Filters

- The filter caption enables you to easily search in your discounts.
- Using the dropdown, you will be able to switch the view between displaying all discounts and coupons, or only coupons or only discounts.
- Details
- Written by: Administrator
- Category: HikaShop
- Hits: 7117
|
|

Description
This screen enables you to manage all your tax rates which you will be able to use on the taxation rule creation and edit screen.
Toolbar

- Export : Here, this enables you to get a CSV file from your current displayed tax rates.
- New : Enables you to create a new tax rate.
- Edit : Select a tax rate and then click on this button in order to edit its information.
- Delete : Select one or several tax rates and click on this button in order to completely delete them. When deleting a tax rate be sure that it is not used anymore by any taxation rule. If you delete a tax rate and that there are taxation rules using it, the system will still use those rules and won't apply any tax to the products matching those rules.
- Help : This button enables you to turn ON/OFF the help section, this screen will appear or disappear.
- Dashboard : You can go back to the control panel using this button.
Tax rates filters

- Input filter : Type here a keyword in order to filter your order, like a tax namekey.
- From : Select the start date to filter your orders.
- To : Same idea as previous but to select the end date.
- Order Status filter : Select here, among all your order statuses to filter your orders.
Note : You don't have to set both of previous filter to get a result to your filter
Note : The 2 last columns can be multiplied for each used currency you have configured for your e-shop.
Column Headers
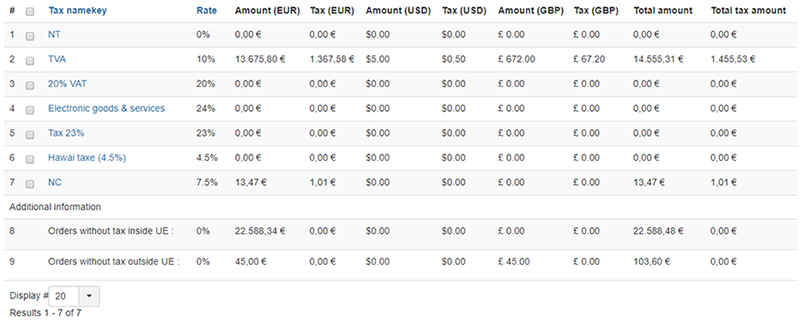
-
# : An indexing number automatically assigned for ease of reference.
- Checkbox : Check this box to select one or more items. To select all items, check the box in the column heading. After one or more boxes are checked, click on the delete button in order to delete the selected tax rates.
- Tax namekey : A namekey, for you to remember the use of the tax rate.
- Rate : The rate of the tax. It is a percentage of the price of the product.
- Amount(currency) : The order total, calculated from the total of order with the tax and in its associated currency.
- Tax(currency) : The Tax total of the order, calculated from the tax total of order in its associated currency.
- Total amount : The total order of the line, calculated from the total of order with the tax and in the main currency of the e-shop.
- Total tax amount : The total tax of the line, calculated from the total of order in the main currency of the e-shop.
Note : The 2 last columns can be multiplied for each used currency you have configured for your e-shop.
- Details
- Written by: Administrator
- Category: HikaShop
- Hits: 12771
|
|

Description
This screen enables you to customize all the HikaShop views. As you may know, HikaShop is an Open Source software thus all the code can be modified by the end-user. Moreover, it uses the standard Joomla MVC which means that you can override any view of HikaShop within your template. The big advantage of that over directly modifying HikaShop's code is that when you update HikaShop you won't lose any of your modifications and you won't have to reapply them. You can know more about that procedure on the Joomla documentation wiki: http://docs.joomla.org/How_to_override_the_output_from_the_Joomla!_core
We decided to go on step further and provide you with an interface to customize HikaShop's views so that it becomes even easier for you to customize HikaShop to your needs.
Toolbar

- Help : This button enables you to turn ON/OFF the help section, this screen will appear or disappear.
- Control panel : You can go back to the control panel using this button.
Column Headers
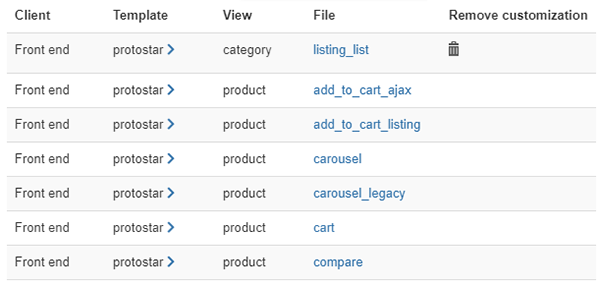
- Client : This will tell you whether the view is on the front end or the back end.
- Template : This will tell the name of the template for which you will override the view if you edit this view. You will find several lines for the same view but for different templates if you have several templates installed on your website.
- View : The name of the view. Note that in the Joomla world a view may have several files so you can customize one file of a view independently of the other files of the same view.
- File : The name of the file of the view. If you click on it, you will go to the customization page of this file.
- Remove customization : Once you save a view on the customization page a delete button will be displayed here allowing you to remove a customization. If you do so, the normal view will be used by the system again.
Tutorial
As you'll see, there are many view files you can customize and it can be overwhelming when you first arrive here. So that's why we've written a tutorial to guide you on what file to edit based on what you want to change. You'll find it on this page
Filters

- The filter caption enables you to easily search in your views.
- Using the first dropdown, you will be able to display only the customizations on one template
- Using the second dropdown, you will be able to display only the customizations on the front end or the back end. The template dropdown will be adapted to what you choose here.
- Details
- Written by: Administrator
- Category: HikaShop
- Hits: 15032
|
|
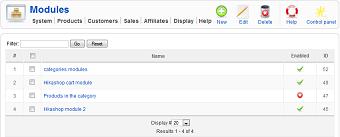
Description
This screen enables you to manage your HikaShop content module instances. HikaShop introduces a new way of creating and tweaking the front end of your store by integrated with Joomla as much as possible. Using a generic content module, which is installed by default in HikaShop, you will be able to create new instances of it, enabling you to display products or categories using lots of options. You will be able to create a module showing related products to the currently displayed product, or products in the same categories. You will be able to display a list of the main product categories of your store in another module so that customers can jump to them directly from wherever in your store. Or you might want to display 5 random products in all the categories and subcategories of the currently displayed category or a default category and its subcategories, if the user is not displaying a category page.
On top of that, you will not only be able to define the content to display, but also the way to display it with options related to the display: using a list type display or a div type, setting a number of columns, displaying prices or not, etc. Finally, you will be able to include those modules in your Joomla template, as any Joomla module, or under the product page (for related products for instance) or under a category or product listing page accessed via a Joomla menu.
You will also be able to configure the cart module which uses the same interfaces as it has a lot of common options with the content module.
Toolbar
- New : Enables you to create a new content module instance.
- Edit : Select a content module instance and then click on this button in order to edit its information.
- Delete : Select one or several content module instances and click on this button in order to completely delete them. That will of course also delete the module instance in Joomla.
- Help : This button enables you to turn ON/OFF the help section, this screen will appear or disappear.
- Control panel : You can go back to the control panel using this button.
Column Headers
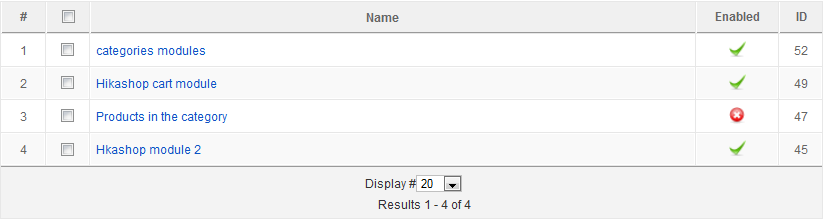
-
# : An indexing number automatically assigned for ease of reference.
- Checkbox : Check this box to select one or more items. To select all items, check the box in the column heading. After one or more boxes are checked, click on the delete button in order to delete the selected content module instances.
- Name : The name of the module instance. If you click on it you will go to the edit page of the HikaShop options for the module instance.
- Enabled : If a content module instance is enabled it means that it will be displayed by Joomla on the position you set for it in your template. Note that HikaShop won't take into account this parameter so you can still display module instances which are disabled at the bottom of your categories or products listing accessed via a menu.
- ID : This field indicates the ID of the content module instance.
- Details
- Written by: Administrator
- Category: HikaShop
- Hits: 6481
|
|
Description
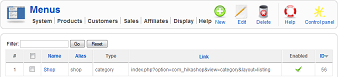
This screen enables you to manage your HikaShop content menus. Basically, it is only used for categories listing menus or products listing menus. Those are standard Joomla menus so that you can access them via the Joomla menu interface as usual.
Toolbar
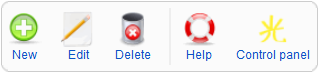
- New : Enables you to create a new content menu.
- Edit : Select a content menu and then click on this button in order to edit its information.
- Delete : Select one or several content menus and click on this button in order to completely delete them. That will of course also delete the menu in Joomla.
- Help : This button enables you to turn ON/OFF the help section, this screen will appear or disappear.
- Control panel : You can go back to the control panel using this button.
Column Headers

-
# : An indexing number automatically assigned for ease of reference.
- Checkbox : Check this box to select one or more items. To select all items, check the box in the column heading. After one or more boxes are checked, click on the delete button in order to delete the selected content menus.
- Name : The name of the menu. If you click on it you will go to the edit page of the HikaShop options for the menu.
- Alias : the alias of the menu.
- Type : The type of the menu : category or product.
- Link : The link of the menu
- Enabled : If a menu is enabled it means that it will be displayed by Joomla.
- ID : This field indicates the ID of the content menu.