Our extensions

play HikaShop is an e-commerce solution for Joomla and WordPress
Built for simplicity and flexibility. 


Have your users purchase your products efficiently, facilitate the management of your store, increase your sales thanks to built-in marketing tools and so much more !
Quik and easy to configure, let starts your shop online today !

All features     Download

AI

HikaShop speaks the language of AI. The UCP plugin lets AI assistants discover your products, create orders, and process payments through a standardized API. ChatGPT users can find your products through a dedicated shopping feed. Claude and other AI models can connect directly via MCP. One store, every AI platform.

Main features

INTERNATIONAL
SALES


HikaShop provides an interface for handling languages, currencies, zones and advanced taxes to sell anywhere in the world.

POWERFUL
STATISTICS


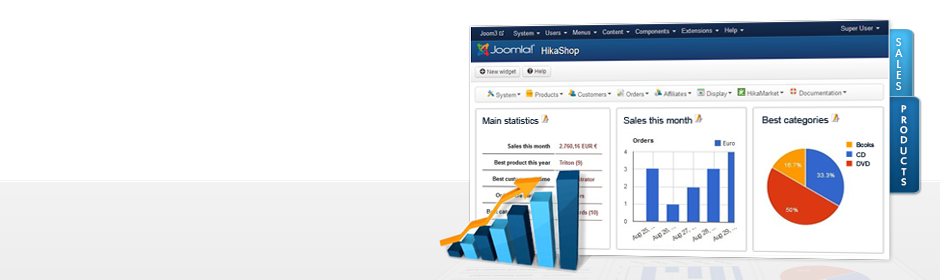
Easily manage your store using the built-in dashboard and its powerful statistics capabilities.

RESPONSIVE
LAYOUT


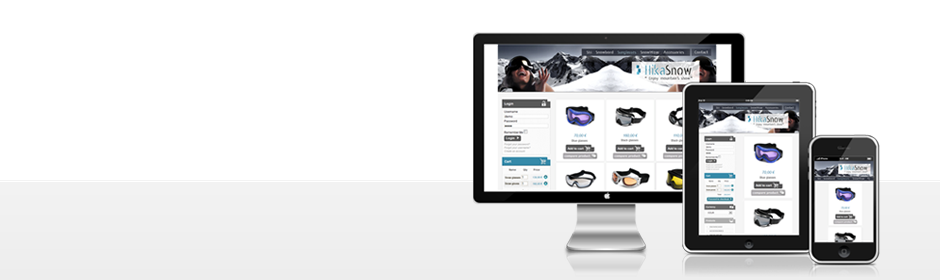
HikaShop works on every device (laptop, tablet, smartphone..). Your shop will fit to each user's screen.

MARKETING
TOOLS


Increase your sales thanks to affiliate program support, coupons, discounts and email marketing integration.

EASY TO
CONFIGURE


User-friendly and flexible, our component is easy to use and configure. Create your own shop online in a minute !

FULLY
INTEGRATED


HikaShop is integrated with many other components and includes a lots of plugins...

ADVANCED
CUSTOMIZATION


Personalize your store: views, checkout, information fields, emails, and more to fit your website design

MULTI
VENDOR


Adding HikaMarket to HikaShop, create a multi-vendor website. Manage in one shop several sales from different people.

Our Company

BUSINESS
PARTNER

HikaShop is a complete e-commerce solution that allows you to easily create and manage your online store but also take it to the highest level.

GREAT
SUPPORT

The whole team is working to provide you with quality support. Documentation and forum are there to guide you step by step. Each issue finds an answer !

ALWAYS
ON TOP

HikaShop is constantly improving. We ensure compatibility with each new version of WordPress and Joomla! And new features are added frequently.

RECEIVE
OUR NEWS

Good deals and novelties, it's here!

The HikaShop application on a phone

Description

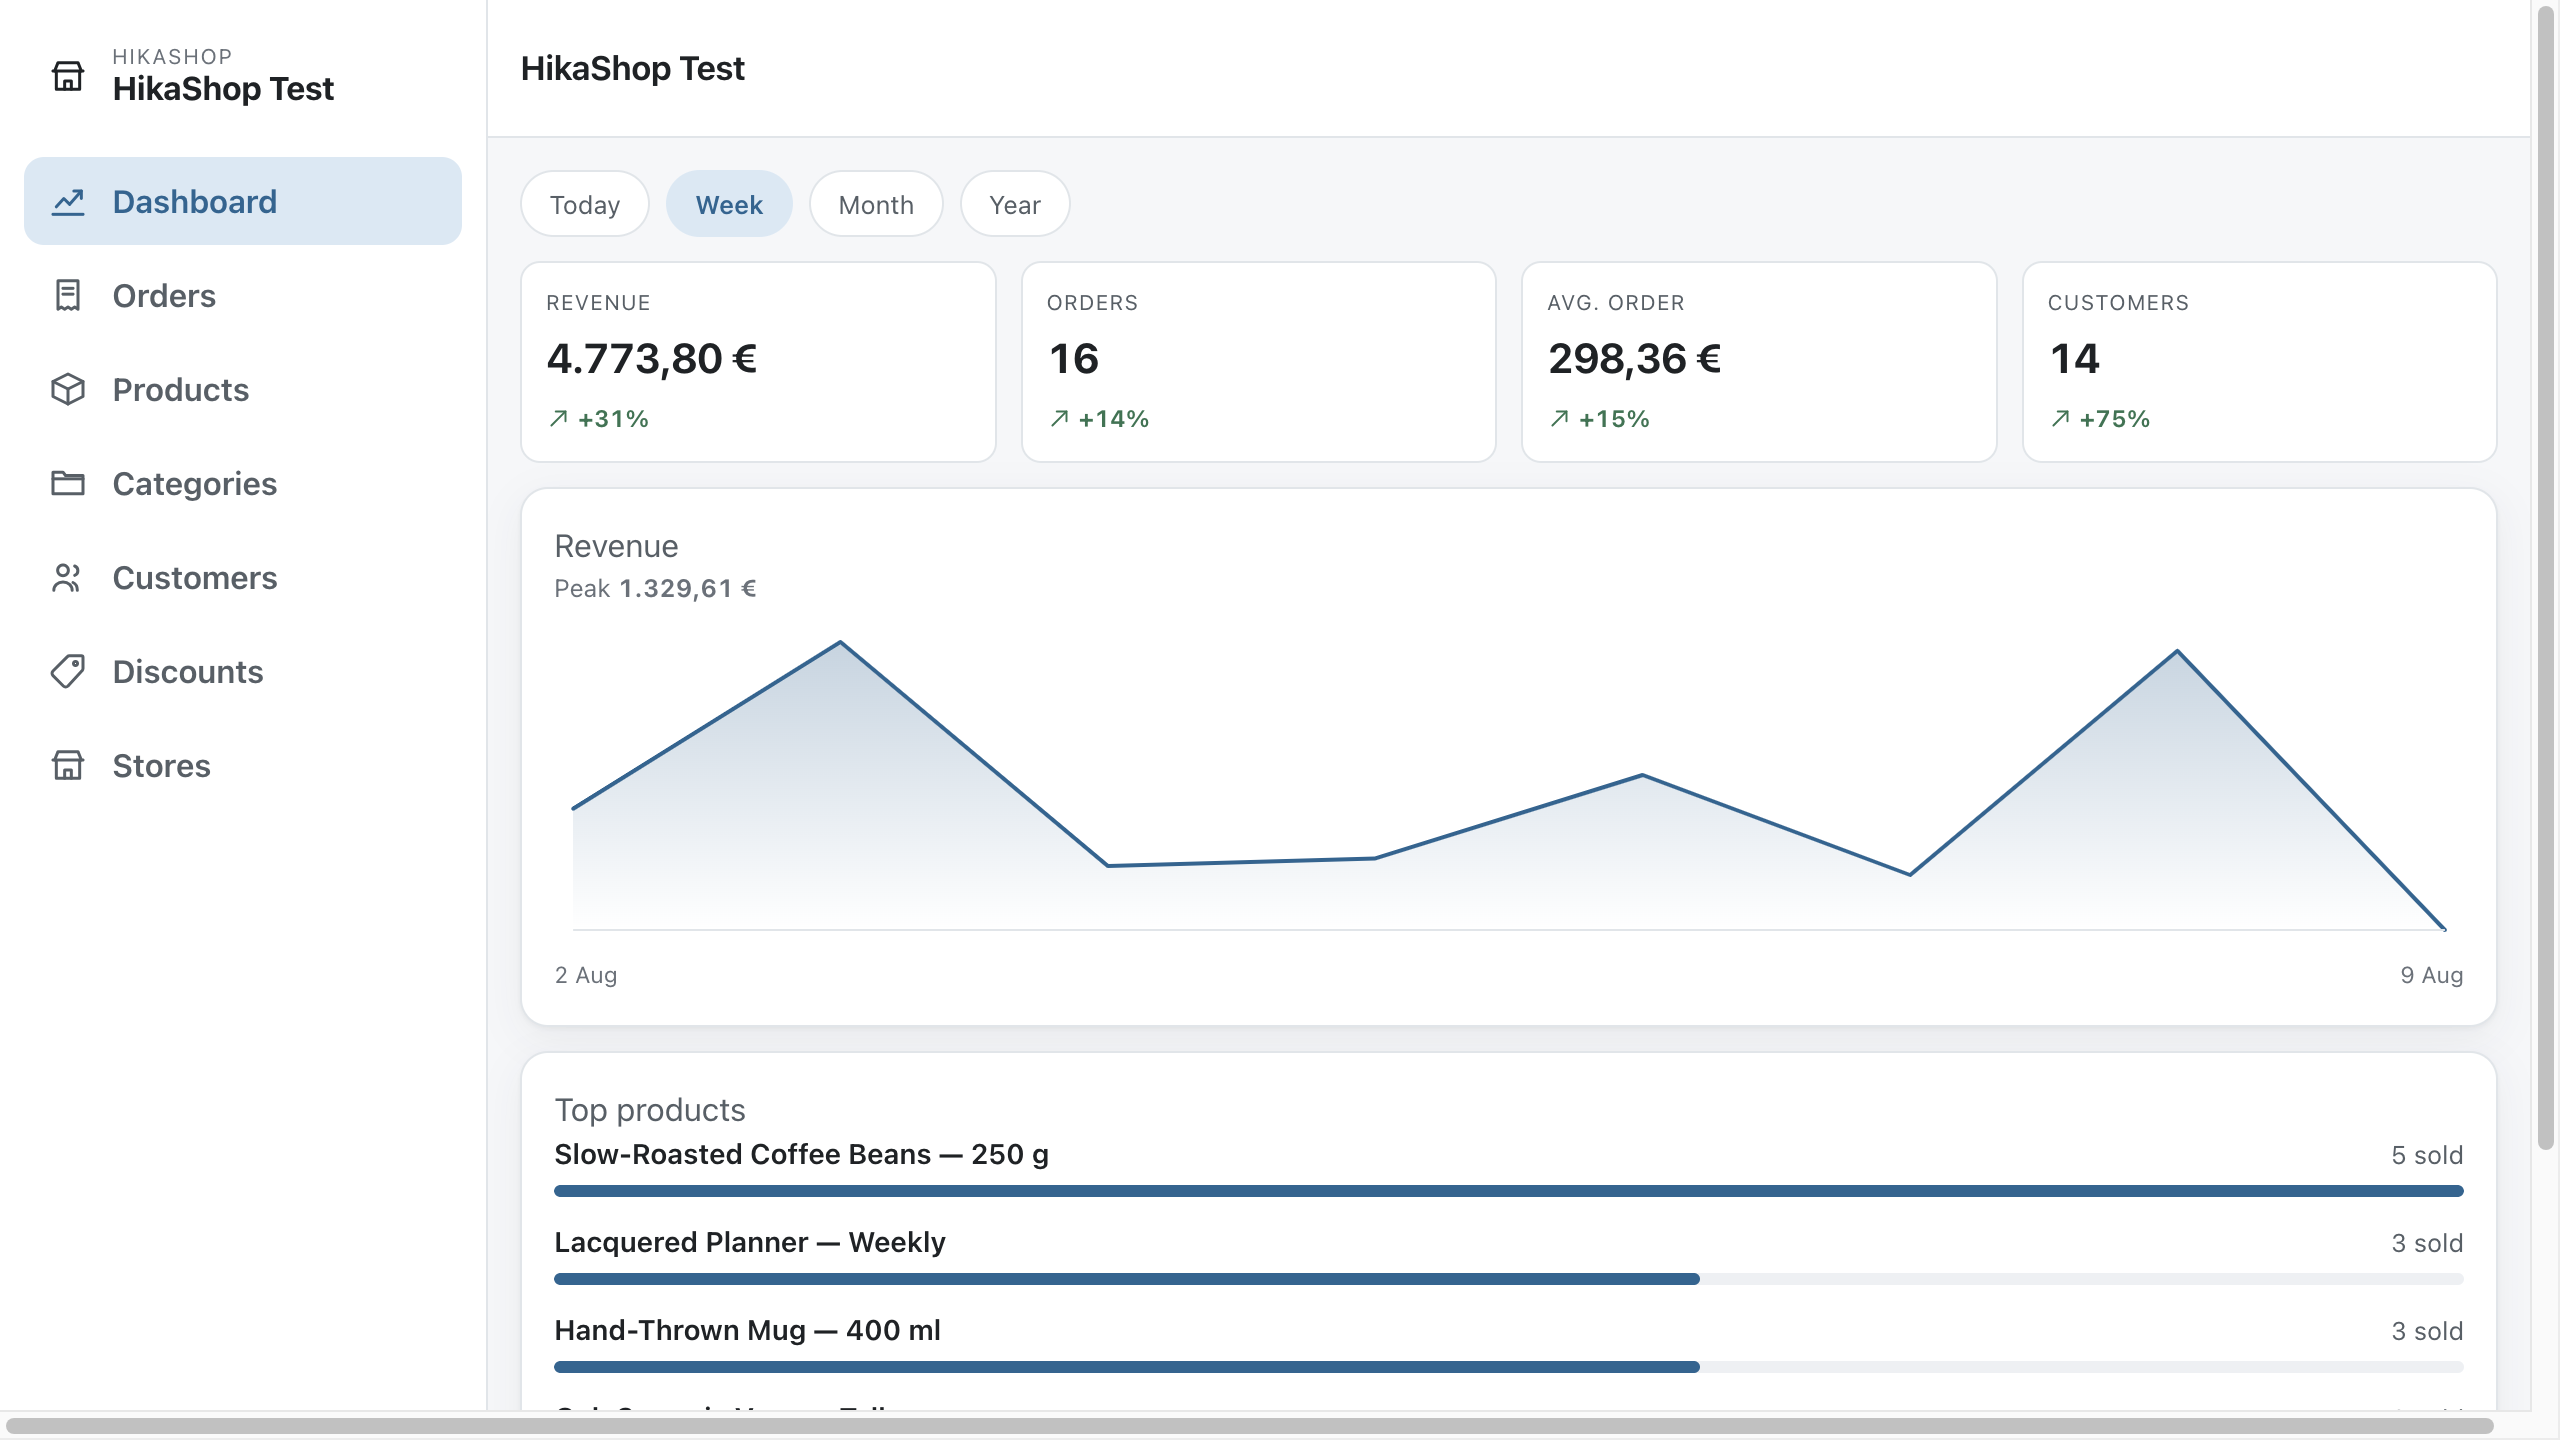
The HikaShop application runs your shop from your phone, your tablet or any browser: your orders, your products, your categories, your customers, your discounts and what sold this week, without opening the Joomla or WordPress administration.

It is free, and it talks to your own site directly. There is no account to create, no service in the middle, and nothing about your shop is stored anywhere except on your server and on the device you paired.

The application is not needed to run your shop, and it changes nothing on your site until you pair a device with it.

The dashboard of the application on a tablet

What you need

  • HikaShop Business 6.6.0 or newer, on Joomla or on WordPress. The application talks to a plugin which ships inside the Business package, so Essential and Starter shops do not answer it. There is nothing to install: the plugin is already there and stays dormant until a device is paired.
  • HTTPS on your shop. Connecting sends a single use code and the reply carries that device's own key, which every request afterwards carries too. A shop served over plain http exposes that key to anyone on the same network.

Getting the application

On Android, get it on Google Play. If you would rather not go through the store, the same build is published as an APK on the latest release, and Android warns you when installing from outside the Play Store.

On a computer, or on any phone, open the web version. It installs itself from your browser's menu, like any other application, and behaves the same way as the Android one.

The application is open source under the same licence as HikaShop. Its code, its issues and its releases are on GitHub.

Connecting it to your shop

Your password is never typed into the application. Instead, your backend hands it a key of its own, by way of a QR code which lasts five minutes and works once.

In your backend, go to the HikaShop menu System>App Devices, and click on New.

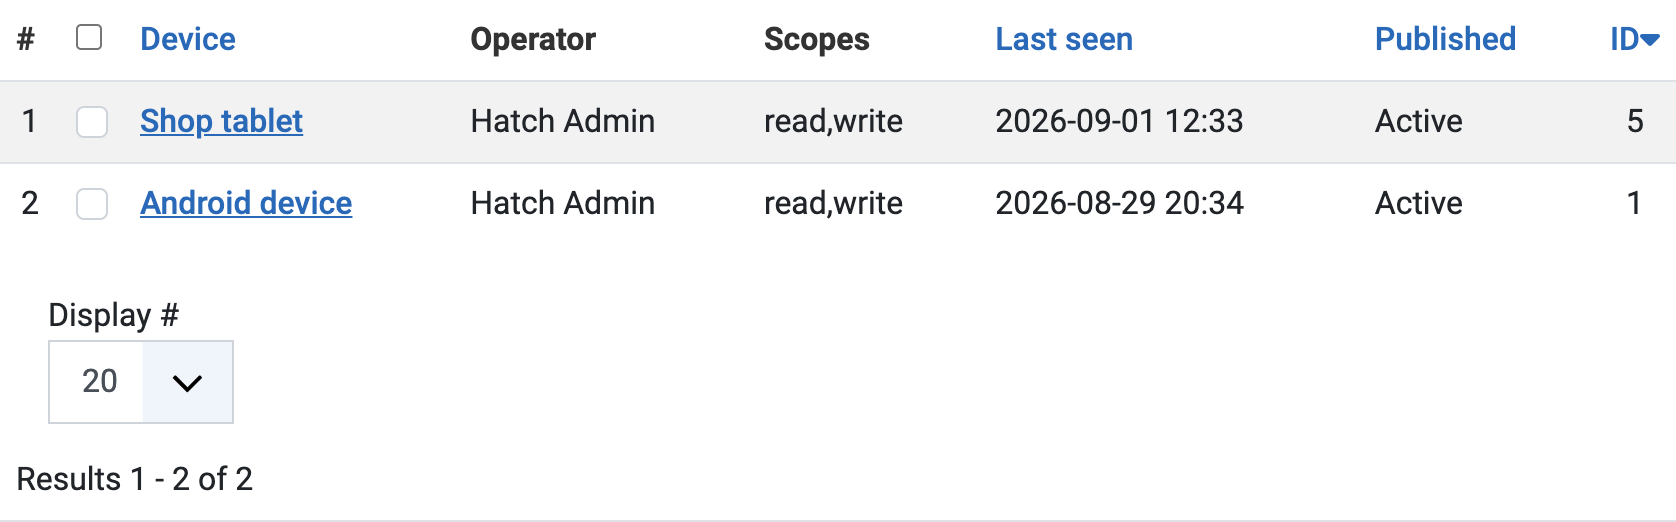
The App Devices listing

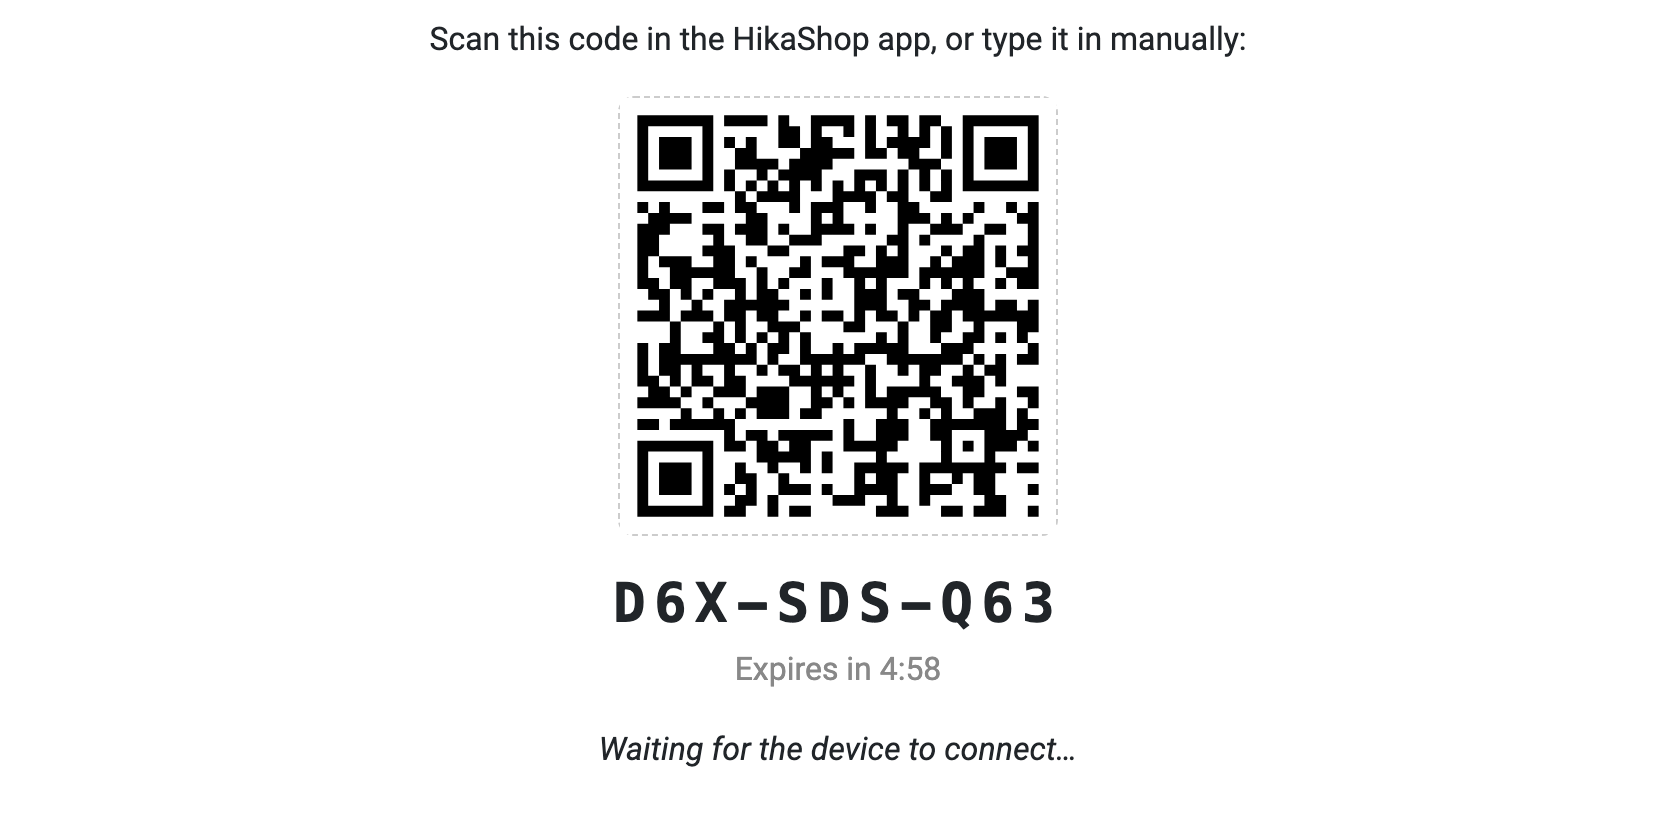
The page tells you which account the device will act as, yours, and what it will be allowed to do: read your shop and change it. Click on the button and a QR code appears, with the same code written out underneath for a device which has no camera, and a countdown.

The pairing code and its QR code

In the application, add a shop, scan the code, and the two are connected. The backend page notices on its own and returns to the listing, where the device now appears under the name the application gave it, with the date it was last used.

If the five minutes run out before you get to it, the code simply stops working: make another one. A code which has been redeemed cannot be redeemed a second time, so a photograph of your screen is of no use to anybody.

What each person can see

A paired device acts as the person who paired it. What it may read and change comes from the access levels of your Joomla or WordPress site and from the "Access levels" tab of the HikaShop configuration, exactly as it does in the backend.

So an employee paired with their own device gets the shop you gave them and nothing more, and you did not have to configure anything twice. On top of that, each device is given only what you ticked when you created it, which can be less than the person is allowed, never more.

This is what makes the application useful to a web agency: a client who is not technical gets their orders, their products and their customers on their phone, without the administration around it, and without you giving them a backend account with more in it than they need.

Following your sales

The dashboard shows your revenue, your number of orders, your average basket and your number of customers, for today, this week, this month or this year, with your best sellers underneath and the shape of the period as a curve.

The figures are your shop's own: they are computed on your site, in the currency that shop uses and rounded the way that shop rounds it.

Orders

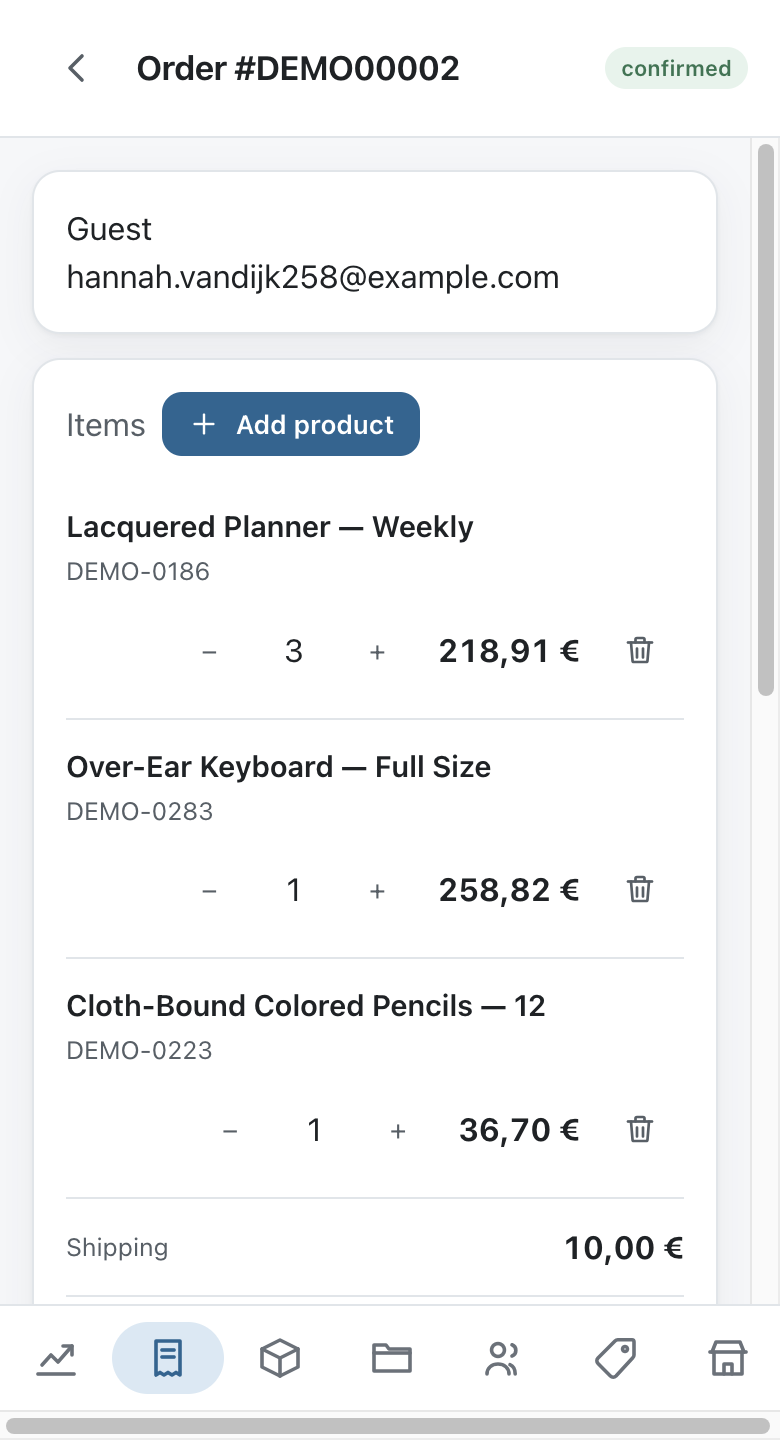
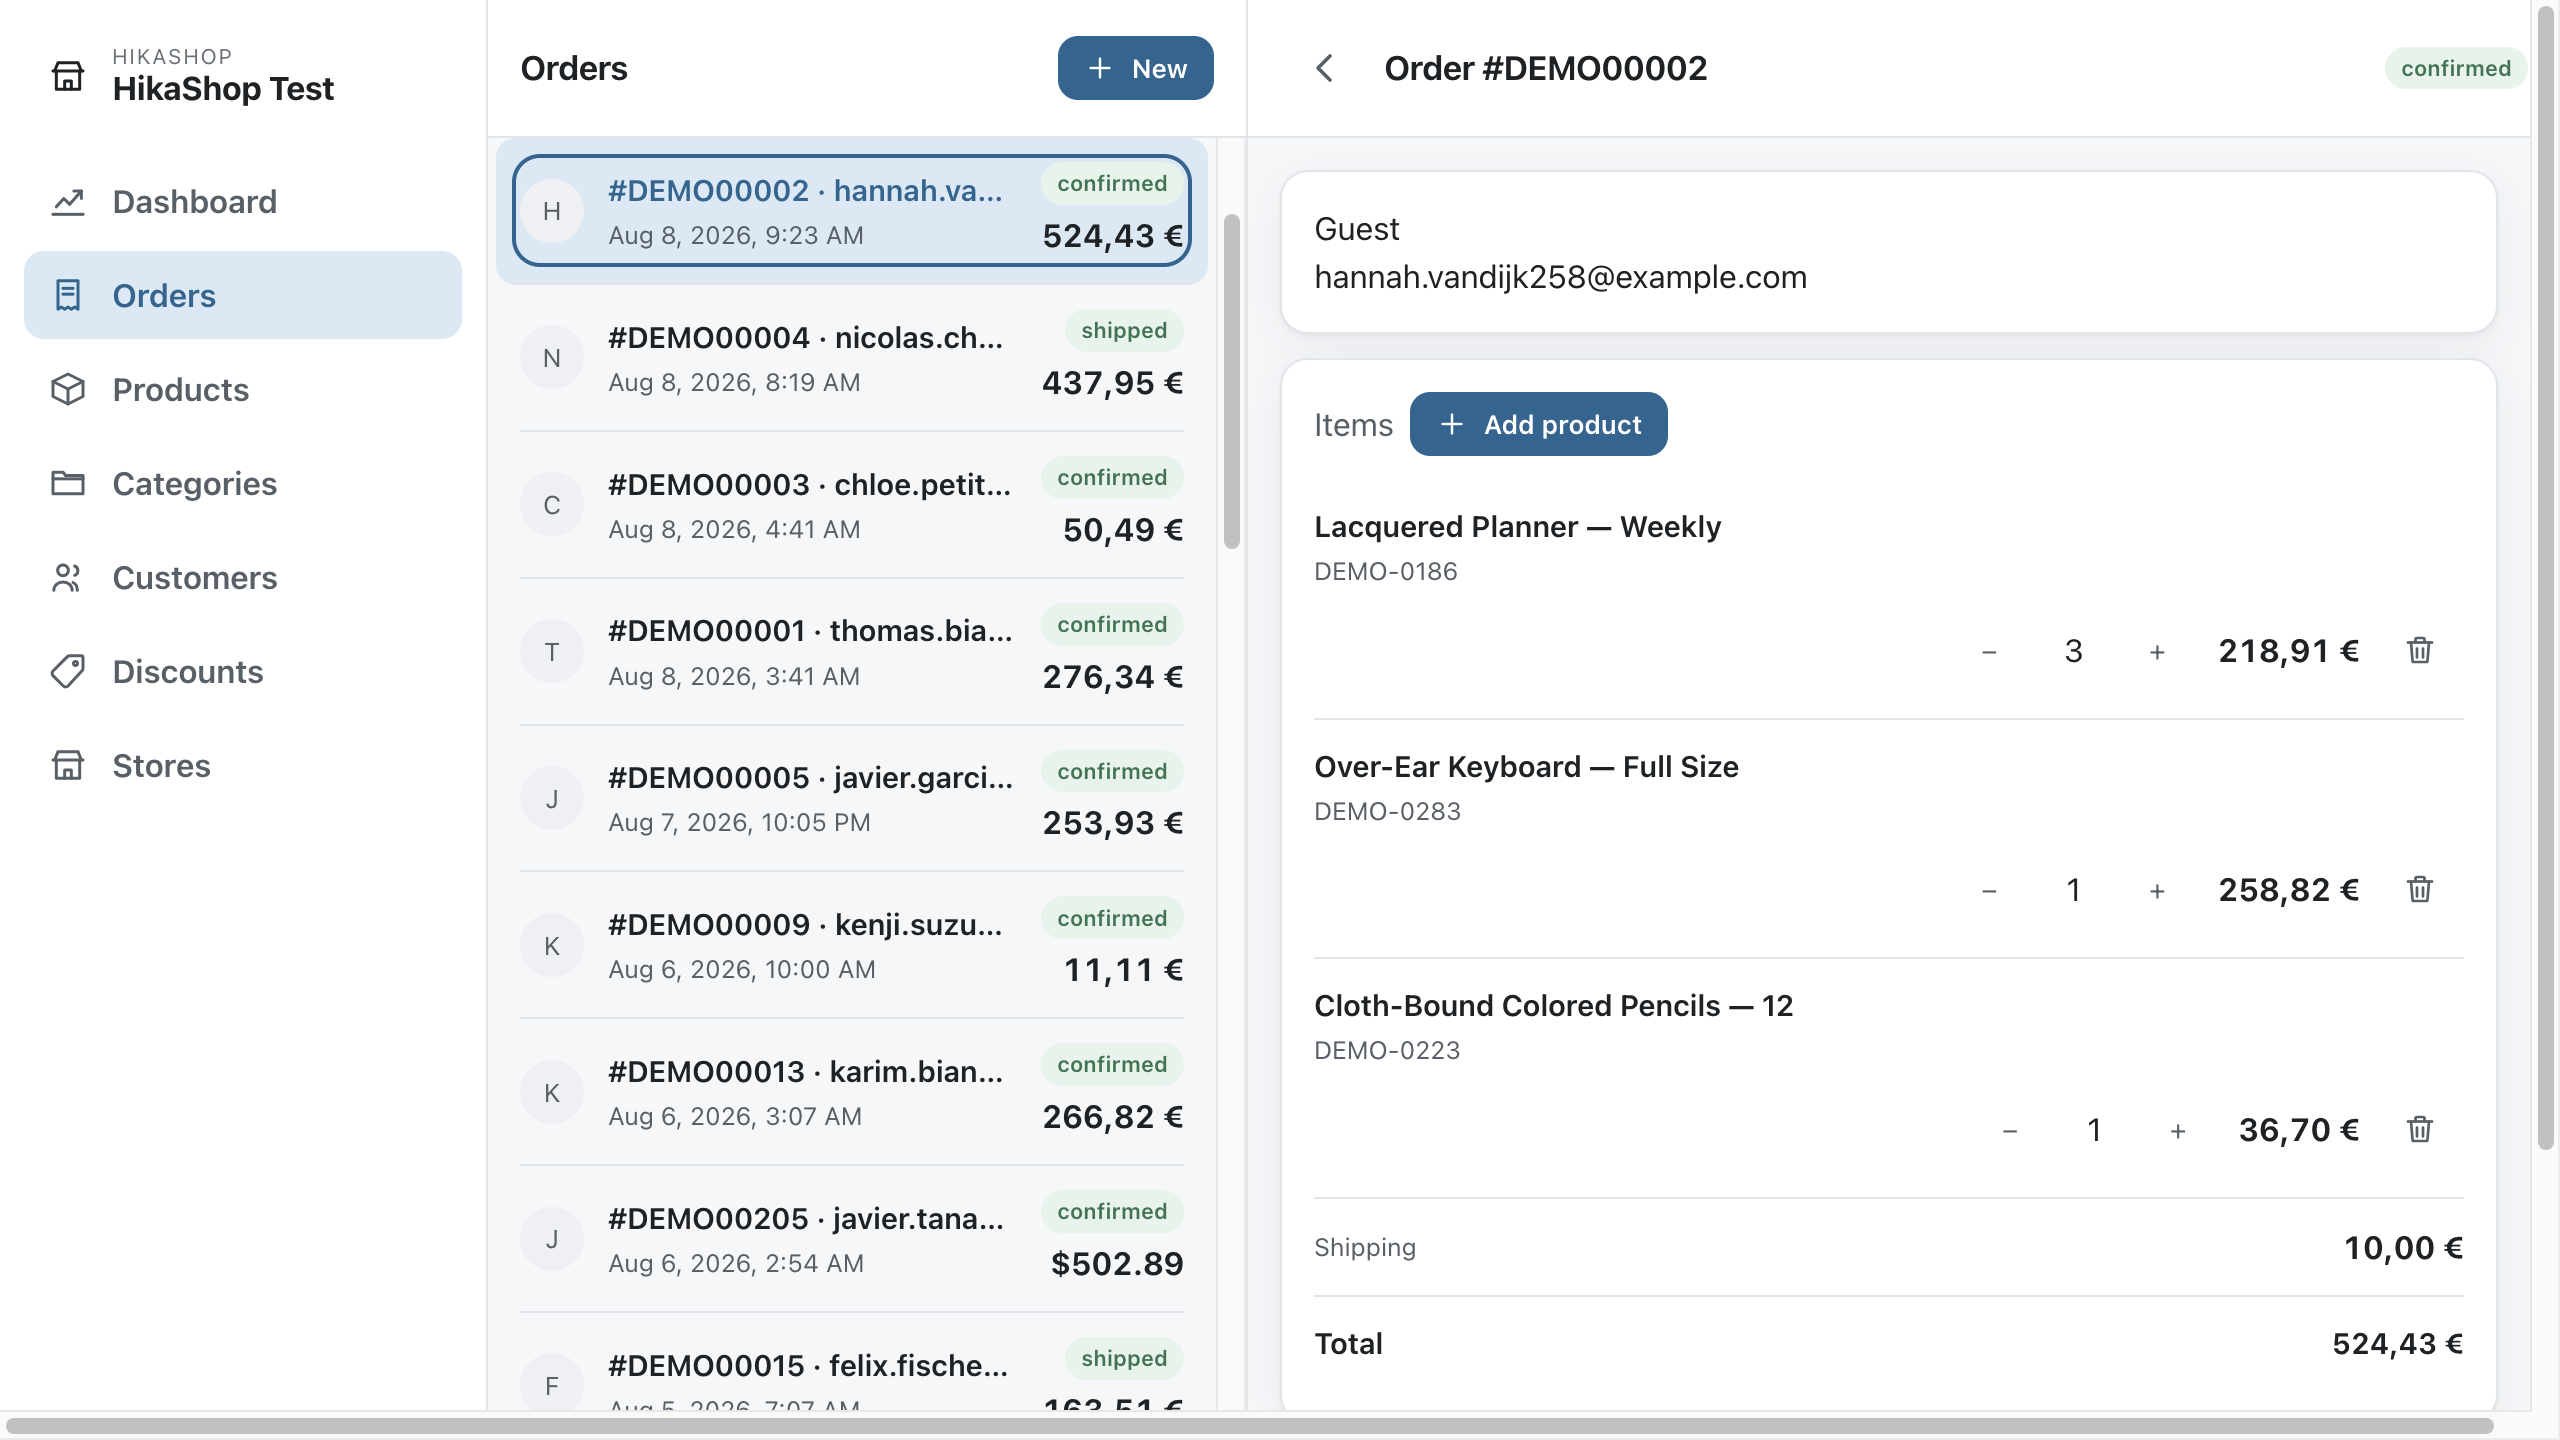
Read them, search them and filter them by status, open one and change its status, edit its addresses, its products and its shipping and payment fees, or write an order by hand for a customer who called you.

The order listing of the application

Changing a status sends the same emails your shop already sends, because it is your shop doing the work. The application asks; nothing about your order logic lives in it.

Products, stock and barcodes

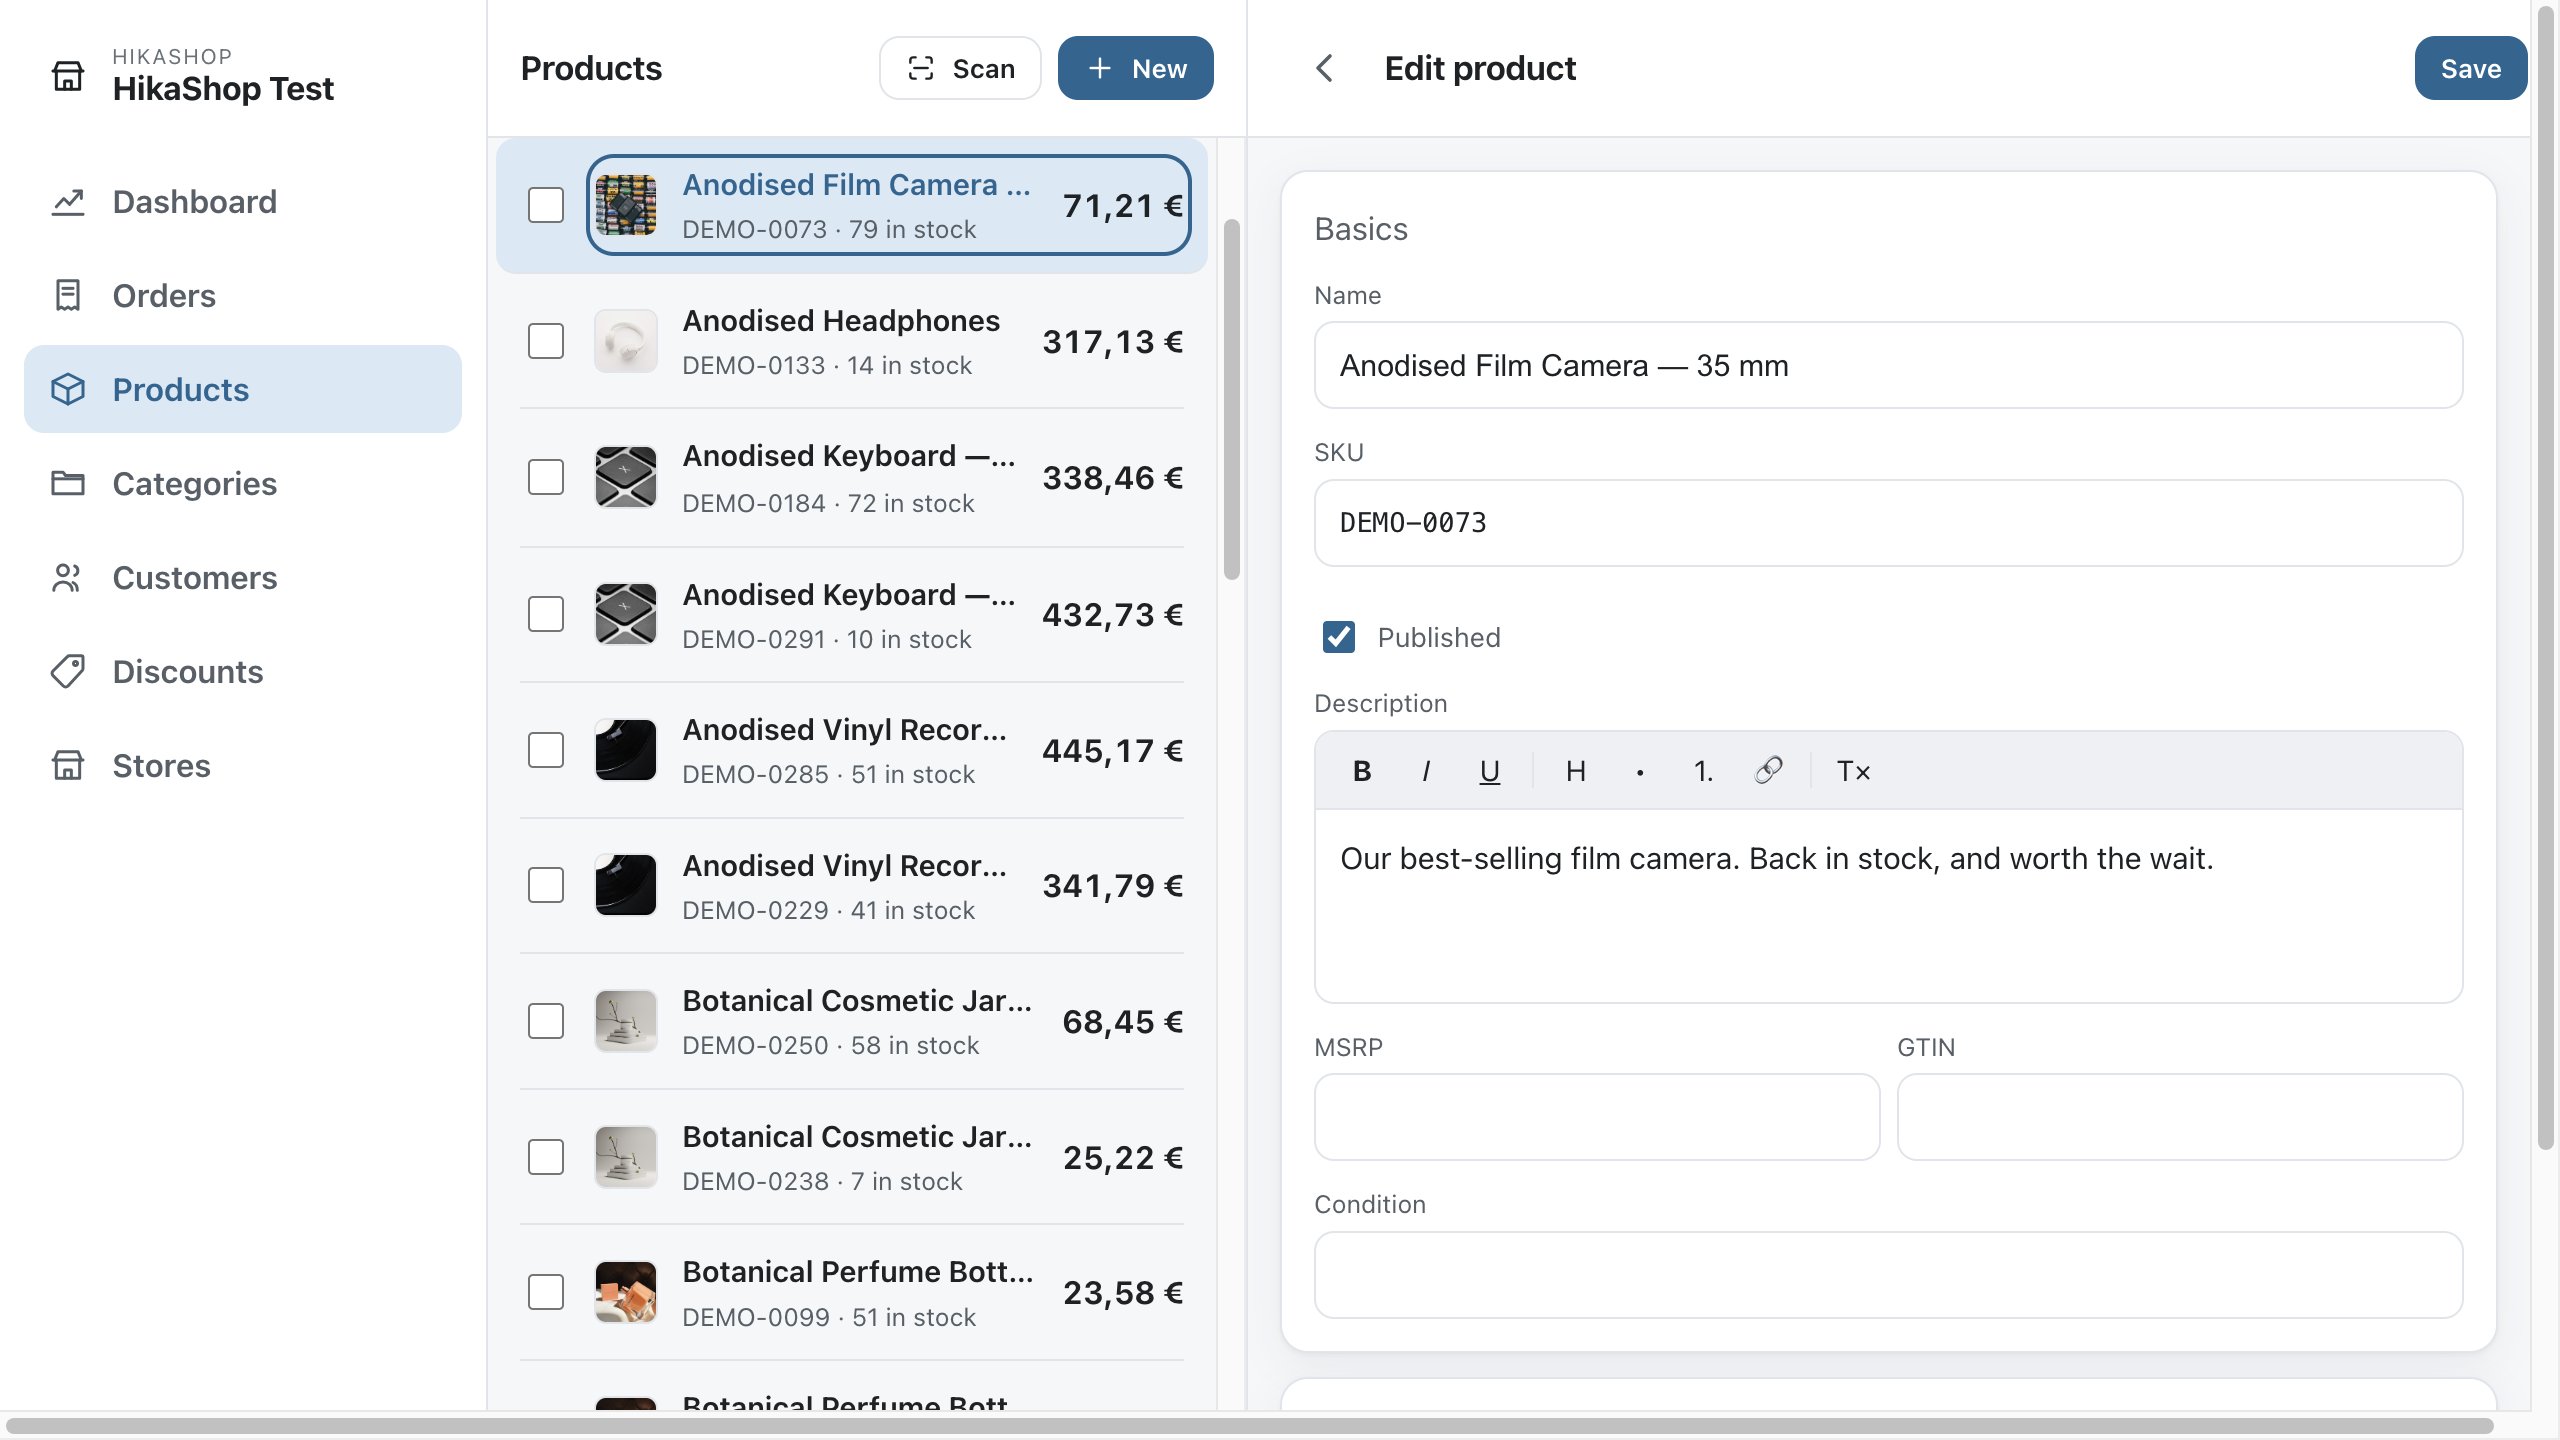
Products can be edited in full: images, prices, variants, characteristics, related products, files and your own custom fields. An image can be cropped, zoomed and rotated before you attach it. On a multilingual shop, the name, the description and your translatable custom fields can be written in each of your languages without leaving the application.

Editing a product in the application

For stock, press Scan and point the camera at the barcode on the box: the product comes up with its quantity ready to change. It works with a plugged-in barcode reader too, the sort which types for you, so a tablet by the stockroom door becomes a stock terminal. Without a camera and without a reader, type the barcode, the code or the name.

For a batch at once, the mass actions you have set to appear on a listing of your backend appear in the application as well: tick the products, choose the action, and it runs on your shop exactly as it would there.

Several shops at once

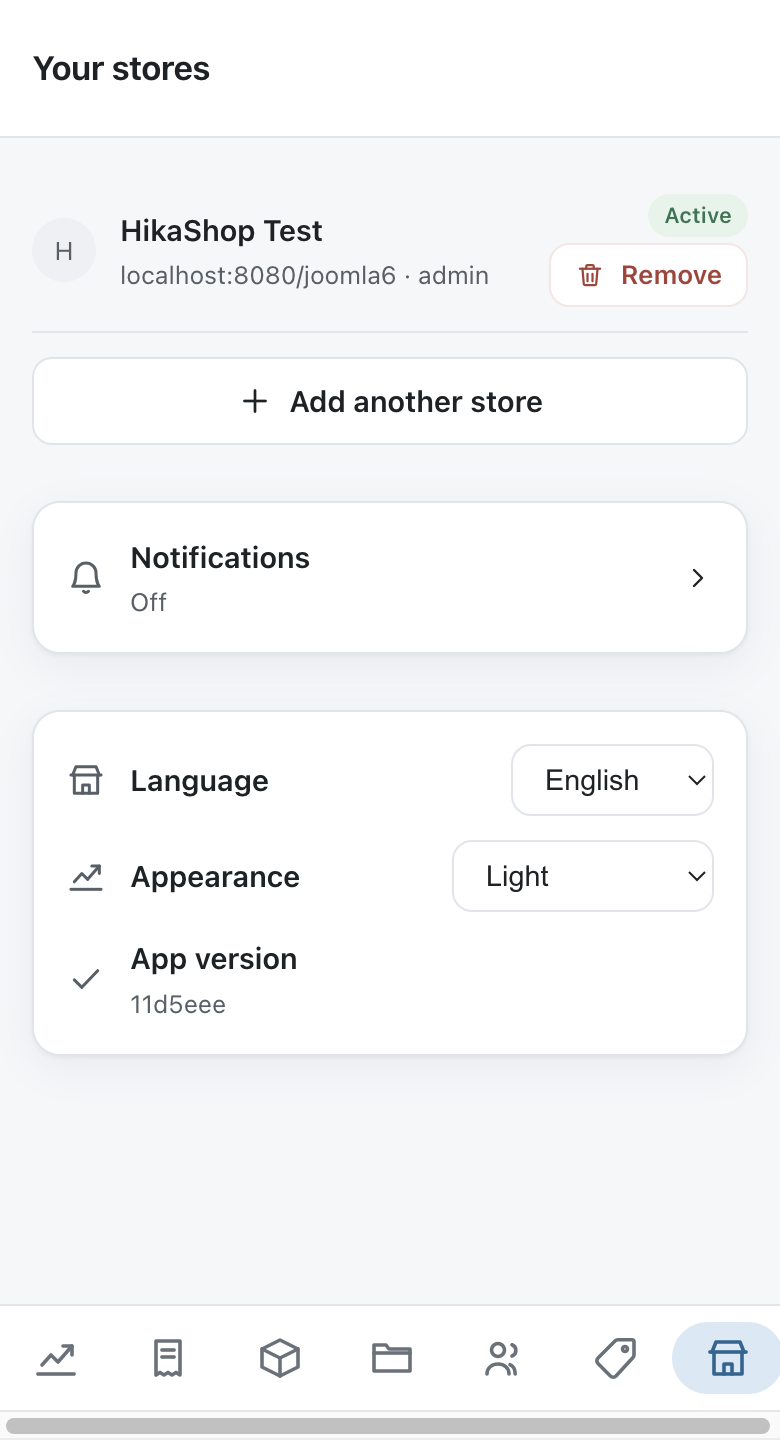
Pair as many shops as you like and switch between them from the top of the menu. They can sit on different servers, on Joomla and on WordPress, in different languages and in different currencies.

Switching between shops

Each shop keeps its own key and remembers its own filters and searches, so you come back to a shop as you left it.

Notifications

Turn notifications on and the application watches the shop you have open, raising a notification with the order number, the customer and the total, and a short chime for a sale. Tap it and you are looking at the order. You choose what is worth interrupting you for: new orders, stock running low, or both, and at which stock level.

It is worth being straight about how this works, because it changes what to expect. The application asks your shop every thirty seconds; your shop does not push to the application. While it is open, or left open on a counter tablet or an office screen, you hear about a sale within half a minute. Once a phone puts the application to sleep, Android decides how often anything may run in the background, which is usually every fifteen minutes or so. If you want a screen which tells you the moment a sale lands, leave the application open on it.

In your own language

The application is offered in every language HikaShop is translated into, fifty-eight of them counting the regional variants, and it starts in the one your phone or your browser is set to. You can pick another on the shops screen, and it stays picked on that device.

What your shop calls things comes from your shop. Your order statuses, the labels of your custom fields and the wording of your address forms are read from the HikaShop translation installed on that site, so they read as they do in your backend rather than being translated a second time.

Revoking a device

Every device you have paired is listed in System>App Devices with the date it was last used. Unpublishing one revokes its key immediately, and the application on that device stops being answered by your shop from the next request onwards. Deleting it does the same and removes the line.

This is what you do when a phone is lost or when somebody leaves, and it touches nobody else: the other devices keep working, and no password has to be changed.

Where your data is

The application keeps your shop's address and one key per shop, on the device, in the phone's secure storage on Android. Nothing is sent anywhere except to your own shop. There is no analytics of any kind, no account, and nobody in the middle.

That also means the application is only as reachable as your site: if your shop is behind a maintenance page or a firewall which your phone cannot cross, the application cannot cross it either.

What EU Directive 2023/2673 requires

Directive (EU) 2023/2673 of the European Parliament and of the Council of 22 November 2023 amends Directive 2011/83/EU on consumer rights. Although its main scope is distance financial services contracts, the new provision on the "withdrawal function" applies to all distance contracts concluded through an online interface that are subject to the right of withdrawal under the Consumer Rights Directive, which covers the vast majority of B2C e-commerce in the European Union.

Member States must transpose the Directive by 19 December 2025 and the rules apply from 19 June 2026.

In practice, the Directive requires that when a distance contract is concluded through an online interface, the trader must provide a withdrawal function which is:

  • easily legible and prominently displayed,
  • easily accessible,
  • labelled "withdraw from contract here" (or similarly unambiguous wording),
  • continuously available throughout the legal withdrawal period.

The legislator's stated intention is that consumers should be able to withdraw from an online contract just as easily as they were able to conclude it. After the withdrawal is submitted, the trader must send an acknowledgement of receipt on a durable medium (typically an email).

Official sources and further reading:

How HikaShop covers the directive

Since HikaShop 6.2.0, HikaShop provides a full withdrawal workflow with several permanent access points on the storefront user interface, independent of the order confirmation email. The email link to the withdrawal form is only a convenience on top of the following access points:

  1. On the customer's "My orders" listing page, each eligible order has a Withdraw from contract entry in its Actions dropdown.
  2. On the customer's single order details page, the same Withdraw from contract button is shown in the order's toolbar.
  3. For guest orders (no customer account), a dedicated Joomla menu item type called Withdraw from contract form page displays a standalone withdrawal form on the website. On that page, the customer enters their order number and the email they used when ordering, and HikaShop matches those against the order to authenticate them. No login and no email link are required - the whole flow happens on the website interface.

Once the withdrawal is submitted, HikaShop automatically sends two email notifications on a durable medium: one to the store administrator and one to the customer confirming the receipt of the withdrawal request. This matches the "acknowledgement of receipt" obligation introduced by the Directive.

Step-by-step configuration

The withdrawal feature works out of the box with sensible defaults (withdrawal allowed on delivered orders, 14-day window). The only step that is strictly required to be fully compliant with the Directive is step 1 below: adding the permanent menu item to the website so that the withdrawal function is always accessible on the user interface. Steps 2 and 3 are optional adjustments of the default configuration.

1. Create the withdrawal form page (required)

On Joomla: go to Menus and open the menu where you want the link (typically the footer menu, where legal pages such as terms and privacy are usually placed). Click New, then for the menu item type, pick HikaShop > Withdraw from contract form page. Set a title like "Order withdrawal" or "Withdrawal form" and save.

On WordPress: go to the WordPress admin menu HikaShop > Pages > Add New HikaShop page. Enter a title like "Order withdrawal" or "Withdrawal form" and pick Withdrawal from contract in the "Page type" dropdown, then save. The page is now available at its WordPress permalink. To make the link visible on the site, go to Appearance > Menus (or use the block editor for a block theme) and add that page to the menu of your choice (the footer menu is usually the most convenient place).

In both cases, the resulting page displays the standalone withdrawal form on a permanent URL that customers can reach at any time, with or without a customer account, by providing their order number and the email they used when ordering.

2. Adjust the withdrawable order statuses (optional)

By default, only the delivered status allows a withdrawal. If your workflow needs other statuses to be withdrawable as well (for example if you do not use the delivered status and want to allow withdrawal directly from shipped, or even earlier from confirmed), go to the backend top menu System > Order statuses. You will see the list of order statuses with several toggle columns, including one labelled Withdrawable. Click the toggle in that column for each additional order status for which a customer should be able to initiate a withdrawal.

3. Adjust the withdrawal window (optional)

The default withdrawal window is 14 days, which matches the EU Consumer Rights Directive's minimum. If the regulations that apply to you require a longer period, or if you want to take into account some delay between the confirmation /shipping of the order and the actual delivery when the countdown is supposed to start, open the HikaShop configuration (on Joomla: backend top menu System > Configuration; on WordPress: HikaShop admin sidebar under HikaShop > Configuration), and on the Main tab find the setting labelled Number of days after delivery for withdrawal window and adjust the value.

Automating the "delivered" status

The default configuration allows withdrawal only when an order is in the delivered status. It is important to note that HikaShop does not automatically move orders to shipped or delivered: these are statuses that reflect real-world events, and HikaShop has no way of knowing on its own when an order was physically shipped or physically delivered to the customer.

Some shipping plugins (for example shipping plugins connected to a carrier API that can return a tracking status) can update the order status automatically. In most cases, however, the change from confirmed to shipped, and from shipped to delivered, has to be done by the merchant.

If you don't want to change the status manually, you can automate the transition using a HikaShop mass action. A common setup is to move orders from shipped to delivered after a delay that matches your typical shipping time. For example, to automatically move shipped orders to delivered three days after they were marked as shipped:

  • Go to the backend menu System > Mass actions and create a new mass action.
  • Set a trigger like Hourly so that the mass action runs once per hour via your HikaShop CRON.
  • Add a filter on the order status equal to shipped.
  • Add a filter on the order_shipped column with operator < and value {time}-259200 (259200 seconds = 3 days).
  • Add an action to change the order status to delivered.

This way the legal withdrawal window starts counting from a realistic "delivered" date without you having to touch each order manually. See the HikaShop CRON task documentation for the URL that needs to be called regularly for time-based mass actions to run.

Alternatively, if your workflow does not distinguish between shipping and delivery, you can also add the confirmed and/or shipped statuses to the Withdrawable column on the Order statuses page, so that the withdrawal button becomes available earlier.

FAQ: why the withdrawal button does not appear

?

If a customer reports that the Withdraw from contract button is not displayed on their order, it is normally due to one of the following points:

  • The withdrawal window has expired. HikaShop will not display the button once the number of days configured in Number of days after delivery for withdrawal window has passed since the reference date of the order. Check the configuration setting and the date on which the order reached the relevant status.
  • The order's status is not marked as withdrawable. On the System > Order statuses page, only statuses whose Withdrawable toggle is enabled allow withdrawal. By default, only delivered is enabled. If your orders stay in confirmed or shipped and never reach delivered, the button will never appear. Either enable the button on those statuses, or make sure your workflow moves orders to delivered in time.
  • The order never reached the "delivered" (or "shipped") status. HikaShop does not change these statuses automatically by default. Some shipping plugins connected to a carrier API can do it. In most cases, it is up to the merchant to change the status manually, or to set up a mass action that does it automatically based on a delay (see the previous section).
  • The customer is looking at the order page from the email without being logged in, and is landing on a different page. In that case, the dedicated Withdraw from contract form page menu item is the right entry point (see step 1 of the configuration above).
  • The storefront view has been overridden by the Joomla template and not kept in sync with recent HikaShop updates. Check the Display > Views page in HikaShop's configuration for outdated overrides on the order listing or order view.


Description

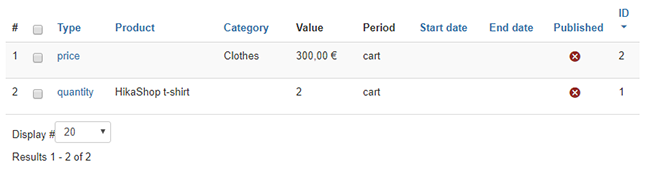
The limit system able you to define a filter in order to set a limit through different parameters, so you can choose your period (like Cart, Daily, Weekly etc...) and the limit type (like Quantity, Price, Weight) for each limit, plus you can limit different order status type. When the limit is reached, a message will be display in the checkout to inform the customer.

This screen can be accessed via the menu Products->Limit on your backend.

Toolbar


New: Enables you to create a new Limit.
Edit: Select a badge and then click on this button in order to edit it.
Delete: Select one or several badges and click on this button in order to completely delete them.
Help: This button enables you to turn ON/OFF the help section. This screen will appear or disappear.
Dashboard: You can go back to the control panel using this button.


Column Headers

Categories Columns

  • # : An indexing number automatically assigned for ease of reference.

  • Checkbox : Check this box to select one or more items. To select all items, check the box in the column heading. After one or more boxes are checked, click on the delete button in order to delete the selected categories.

  • Type : By clicking on the edit icon, you will be able to edit the category.
  • Product : Your limit will be applied on this product(s).
  • Category : Your limit will be applied on this category(ies).
  • Value : Here, you will see the limit value in different unit, currency, weight or quantity.
  • Period : Here, define the period among Cart, Daily, Weekly, Monthly, Quarterly, Yearly and Forever.

    Example :

    You have a define as Period "Quantity" and the Value as 2, as result, you will get only 2 possible sales products per month.

    .
  • Start date : The date where your limit process have to start.
  • End date : Same idea as previous, but the date where your limit process have to end.
  • Published : If a category is published it means that it can be seen by your customers in your shop.
  • ID : This field indicates the ID of the category.

Filters

Category Filters

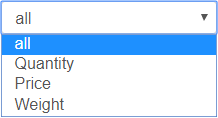
Dropdown filter: Here, you can select to restrict listing display among "all", "Quantity", "Price" & "Weight".

Universal Commerce Protocol


What is UCP?

The Universal Commerce Protocol (UCP) is an open standard co-developed by Google, Shopify, Etsy, Wayfair, Target, Walmart and endorsed by over 40 companies including Stripe, PayPal, Visa, Mastercard, Best Buy, Macy's and many more.

UCP establishes a common language for AI agents, platforms and businesses to interact. It allows AI assistants (such as Google Gemini, ChatGPT, Claude and others) to discover products on your store, create carts, process checkout and handle payments on behalf of their users : all through a standardized API.

In practice, this means a customer can say to their AI assistant "find me a blue jacket under $100" and the AI can search your store, show matching products, and guide the customer through checkout without them ever needing to visit your website directly.

HikaShop implements UCP through a system plugin that exposes the necessary API endpoints. Once enabled and configured, your store becomes discoverable and purchasable by any UCP-compatible AI agent.


How it works

UCP works through a set of REST API endpoints that your store exposes. AI agents interact with these endpoints to perform commerce operations. Here is an overview of the different components and how they communicate:

┌──────────────┐     ┌──────────────┐     ┌──────────────────────┐     ┌──────────────────┐
│              │     │              │     │                      │     │                  │
│   Customer   │     │   AI Agent   │     │   Your HikaShop      │     │ Payment Gateway  │
│              │     │  (Gemini,    │     │   Store + UCP Plugin │     │ (Stripe,         │
│              │     │   Claude,    │     │                      │     │  Worldline)      │
│              │     │   etc.)      │     │                      │     │                  │
└──────┬───────┘     └──────┬───────┘     └──────────┬───────────┘     └────────┬─────────┘
       │                    │                        │                          │
       │  "Find me a        │                        │                          │
       │   blue jacket"     │                        │                          │
       │───────────────────>│                        │                          │
       │                    │                        │                          │
       │                    │  GET /.well-known/ucp  │                          │
       │                    │───────────────────────>│                          │
       │                    │  Discovery response    │                          │
       │                    │<───────────────────────│                          │
       │                    │                        │                          │
       │                    │  POST /ucp/v1/search   │                          │
       │                    │  { "query": "blue      │                          │
       │                    │    jacket" }           │                          │
       │                    │───────────────────────>│                          │
       │                    │  Product results       │                          │
       │                    │<───────────────────────│                          │
       │                    │                        │                          │
       │  "Here are 3       │                        │                          │
       │   options..."      │                        │                          │
       │<───────────────────│                        │                          │
       │                    │                        │                          │
       │  "I'll take the    │                        │                          │
       │   second one"      │                        │                          │
       │───────────────────>│                        │                          │
       │                    │                        │                          │
       │                    │ POST /checkout-sessions│                          │
       │                    │  { items, buyer,       │                          │
       │                    │    shipping address }  │                          │
       │                    │───────────────────────>│                          │
       │                    │  Session with totals   │                          │
       │                    │<───────────────────────│                          │
       │                    │                        │                          │
       │  "Total is $79.    │                        │                          │
       │   Confirm?"        │                        │                          │
       │<───────────────────│                        │                          │
       │                    │                        │                          │
       │  "Yes, pay with    │                        │                          │
       │   Google Pay"      │                        │                          │
       │───────────────────>│                        │                          │
       │                    │                        │                          │
       │                    │  POST /complete        │                          │
       │                    │  { payment credential }│                          │
       │                    │───────────────────────>│                          │
       │                    │                        │  Process payment         │
       │                    │                        │─────────────────────────>│
       │                    │                        │  Payment confirmed       │
       │                    │                        │<─────────────────────────│
       │                    │  Order confirmed       │                          │
       │                    │<───────────────────────│                          │
       │                    │                        │                          │
       │  "Done! Order      │                        │                          │
       │  #1234 placed."    │                        │                          │
       │<───────────────────│                        │                          │
       │                    │                        │                          │


The purchase flow

Here is a closer look at what happens during each step of the UCP purchase flow between the AI agent and your HikaShop store:

  AI Agent                                           HikaShop UCP Plugin
     │                                                       │
     │  ┌─────────────────────────────────────────────────┐  │
     │  │ STEP 1: DISCOVERY                               │  │
     │  │ The AI agent discovers your store's capabilities│  │
     │  └─────────────────────────────────────────────────┘  │
     │                                                       │
     │  GET /.well-known/ucp                                 │
     │──────────────────────────────────────────────────────>│
     │                                                       │  Reads plugin config,
     │                                                       │  detects Google Pay gateway,
     │  {                                                    │  builds capability list
     │    "ucp": {                                           │
     │      "version": "2026-01-11",                         │
     │      "capabilities": [                                │
     │        "dev.ucp.shopping.catalog",                    │
     │        "dev.ucp.shopping.checkout",                   │
     │        "dev.ucp.shopping.payment"                     │
     │      ]                                                │
     │    },                                                 │
     │    "payment": { "handlers": ["com.google.pay"] }      │
     │  }                                                    │
     │<──────────────────────────────────────────────────────│
     │                                                       │
     │  ┌─────────────────────────────────────────────────┐  │
     │  │ STEP 2: PRODUCT SEARCH                          │  │
     │  │ The AI searches for products matching the       │  │
     │  │ customer's request                              │  │
     │  └─────────────────────────────────────────────────┘  │
     │                                                       │
     │  POST /ucp/v1/search                                  │
     │  { "query": "blue jacket", "limit": 10 }              │
     │──────────────────────────────────────────────────────>│
     │                                                       │  Searches products,
     │  {                                                    │  applies stock/access
     │    "products": [                                      │  filters, formats
     │      { "id": "gid://site/Product/42",                 │  prices in cents
     │        "name": "Classic Blue Jacket",                 │
     │        "price": { "amount": 7900, "currency":"USD" }, │
     │        "availability": "in_stock",                    │
     │        "images": [...] }                              │
     │    ],                                                 │
     │    "total": 3                                         │
     │  }                                                    │
     │<──────────────────────────────────────────────────────│
     │                                                       │
     │  ┌─────────────────────────────────────────────────┐  │
     │  │ STEP 3: CREATE CHECKOUT SESSION                 │  │
     │  │ A cart is created with the selected products,   │  │
     │  │ buyer info, and shipping address                │  │
     │  └─────────────────────────────────────────────────┘  │
     │                                                       │
     │  POST /ucp/v1/checkout-sessions                       │
     │  {                                                    │
     │    "line_items": [                                    │
     │      { "item": { "id": "gid://.../42" },              │
     │        "quantity": 1 }                                │
     │    ],                                                 │
     │    "buyer": {                                         │
     │      "email": "john@example.com",                     │
     │      "first_name": "John" },                          │
     │    "fulfillment": {                                   │
     │      "methods": [{                                    │
     │        "type": "shipping",                            │
     │        "destinations": [{                             │
     │          "country": "US",                             │
     │          "postal_code": "10001",                      │
     │          "street_address": "123 Main St" }]           │
     │      }]                                               │
     │    }                                                  │
     │  }                                                    │
     │──────────────────────────────────────────────────────>│
     │                                                       │  Creates UCP cart,
     │  {                                                    │  assigns user,
     │    "id": "gid://site/Checkout/99",                    │  calculates taxes
     │    "status": "incomplete",                            │  and shipping options
     │    "totals": [                                        │
     │      { "type": "subtotal", "amount": 7900 },          │
     │      { "type": "tax", "amount": 632 },                │
     │      { "type": "fulfillment", "amount": 500 },        │
     │      { "type": "total", "amount": 9032 }              │
     │    ],                                                 │
     │    "fulfillment": {                                   │
     │      "options": [                                     │
     │        { "id": "5", "name": "Standard", ... },        │
     │        { "id": "8", "name": "Express", ... }          │
     │      ]                                                │
     │    }                                                  │
     │  }                                                    │
     │<──────────────────────────────────────────────────────│
     │                                                       │
     │  ┌─────────────────────────────────────────────────┐  │
     │  │ STEP 4: COMPLETE CHECKOUT                       │  │
     │  │ The order is created and payment is processed   │  │
     │  └─────────────────────────────────────────────────┘  │
     │                                                       │
     │  POST /ucp/v1/checkout-sessions/99/complete           │
     │  { "payment_method_id": "gid://.../7",                │
     │    "payment_data": {                                  │
     │      "handler_id": "com.google.pay",                  │
     │      "credential": { "token": "..." }                 │
     │    }                                                  │
     │  }                                                    │
     │──────────────────────────────────────────────────────>│
     │                                                       │  Creates order from cart,
     │  {                                                    │  sends payment token to
     │    "status": "completed",                             │  gateway, confirms order
     │    "order": {                                         │
     │      "id": "gid://site/Order/1234",                   │
     │      "permalink_url": "https://..." }                 │
     │  }                                                    │
     │<──────────────────────────────────────────────────────│
     │                                                       │


Payment flows

UCP supports two different payment flows depending on how the payment gateway works:

Direct token flow (Google Pay)

The AI agent's platform (e.g., Google) obtains a payment token from the customer's wallet and sends it directly in the checkout completion request. The payment plugin processes the token server-side without any customer redirect. This is the fastest and most seamless flow.

  AI Agent              HikaShop              Payment Gateway
     │                     │                        │
     │  POST /complete     │                        │
     │  { token: "..." }   │                        │
     │────────────────────>│                        │
     │                     │  Charge token          │
     │                     │───────────────────────>│
     │                     │  Payment confirmed     │
     │                     │<───────────────────────│
     │  Order confirmed    │                        │
     │<────────────────────│                        │
     │                     │                        │

Hosted checkout flow

When no payment token is available, the AI agent receives a hosted checkout URL from the payment gateway. The customer is redirected to the gateway's secure page to complete payment. After payment, the gateway notifies HikaShop via webhook.

  AI Agent              HikaShop              Payment Gateway        Customer
     │                     │                        │                   │
     │  POST /complete     │                        │                   │
     │  { method_id only } │                        │                   │
     │────────────────────>│                        │                   │
     │                     │  Create hosted session │                   │
     │                     │───────────────────────>│                   │
     │                     │  Hosted checkout URL   │                   │
     │                     │<───────────────────────│                   │
     │  continue_url       │                        │                   │
     │<────────────────────│                        │                   │
     │                     │                        │                   │
     │  Redirect customer  │                        │                   │
     │─────────────────────────────────────────────────────────────────>│
     │                     │                        │   Customer pays   │
     │                     │                        │<──────────────────│
     │                     │  Webhook notification  │                   │
     │                     │<───────────────────────│                   │
     │                     │  Order confirmed       │                   │
     │                     │                        │                   │


Setting up UCP on your website

Setting up UCP on your HikaShop store involves enabling the plugin, configuring a few settings, and making sure you have a compatible payment method. Here are the steps:

1. Install and enable the plugin

The UCP plugin is included with HikaShop. Go to Extensions > Plugins in your Joomla backend and search for "HikaShop UCP". Enable the plugin by clicking on the status icon.

On WordPress, go to Plugins and make sure the HikaShop UCP plugin is activated.

2. Configure the plugin

Open the plugin settings and configure the following:

  • API Keys: Add one API key per client (AI platform or agent) that will access your store. Each entry has a client name (for your reference) and a secret key value that the client sends via the X-API-KEY header. If no keys are configured, the API is accessible without authentication (not recommended for production as it can lead to spam orders on your shop).
  • Base Path: The URL path for the REST API endpoints. Default is /ucp/v1. You generally don't need to change this.
  • Privacy Policy URL and Terms of Service URL: Links to your store's legal pages. These are included in the UCP discovery response so that AI agents can present them to customers. These should be provided.

Google Pay settings

If you want to enable Google Pay as a payment handler (recommended), configure these additional settings:

  • Enable Google Pay: Set to Yes.
  • Environment: Use TEST for development, switch to PRODUCTION for your live store.
  • Merchant ID: Your Google Pay merchant ID from the Google Pay Business Console.
  • Merchant Name: Your business name as it should appear in Google Pay.
  • Card Networks: The card types you accept (Visa, Mastercard, Amex, Discover, JCB).
  • Auth Methods: PAN_ONLY (cards saved in Google Account) and/or CRYPTOGRAM_3DS (device tokens from Android phones).

3. Set up a compatible payment plugin

You need at least one UCP-compatible payment plugin installed and configured. Currently, two payment plugins support UCP:

See the Compatible payment plugins section below for details on each.

4. Verify your setup

Once the plugin is enabled and configured, you can verify your setup by accessing the discovery endpoint in your browser:

https://www.yoursite.com/.well-known/ucp

You should see a JSON response listing your store's UCP capabilities, the supported services, and the available payment handlers. If Google Pay is properly configured, you should see it listed under the payment.handlers section.


Connecting to AI platforms

Once UCP is set up on your store, AI platforms need to know about it. The process differs depending on the platform.

Google (Gemini, Search AI Mode)

Google is one of the first platforms to support UCP natively for shopping. To connect your HikaShop store to Google's AI surfaces (Gemini, Search AI Mode), you need to:

  1. Set up Google Merchant Center: You need a Google Merchant Center account in good standing with approved products listed for free listings. Configure your shipping settings, return policies, and customer support information.
  2. Configure the HikaShop Google Products plugin: This plugin generates the product feed that Google Merchant Center uses to index your products. Make sure it is installed, enabled, and properly configured. See the Google Products plugin documentation for setup instructions. When the UCP plugin is enabled, the Google Products plugin automatically adds the native_commerce attribute to all products in the feed, which signals to Google that they are eligible for UCP checkout.
  3. Set up Google Pay: Create a business account in the Google Pay & Wallet Console. Note your Google Pay Merchant ID : you will need it for the UCP plugin's Google Pay settings.
  4. Join the Google UCP program: Google requires merchants to go through an approval process before their UCP integration can go live. Visit the Google UCP developer guide to fill out the interest form and get in contact with Google's team.
  5. Google discovers your store automatically: Once approved, Google crawls your /.well-known/ucp endpoint to discover your store's capabilities, available services, payment handlers, and product catalog. You do not need to paste any token or URL into Google Merchant Center : the discovery is automatic based on your domain.

Note: Authentication between Google and your store uses cryptographic signing keys (JWK format) published in your /.well-known/ucp manifest, not the API key from the plugin settings. Google verifies webhooks and messages using these public keys. The UCP plugin handles this automatically.

Other AI agents

For other AI platforms and agents that support UCP (or any custom integration), the process is simpler:

  1. Create an API key: In the UCP plugin settings, add an API key entry for the platform (give it a recognizable client name). Share the key value with the platform so their agent can authenticate against your store's REST API via the X-API-KEY header.
  2. Provide your discovery URL: Give them your store's discovery endpoint: https://www.yoursite.com/.well-known/ucp. The AI agent will call this to discover your store's capabilities and API endpoints.
  3. MCP-compatible agents: If the AI agent supports MCP (Model Context Protocol) : like Claude : you can enable the MCP endpoint in the plugin settings and provide the MCP URL instead (see MCP support).

Since UCP is an open standard, any AI platform that implements the specification can interact with your store. As more platforms adopt UCP, your store will be accessible to a growing number of AI agents without any additional configuration.

ChatGPT Shopping (product feed)

ChatGPT Shopping uses a different approach than UCP. Instead of a real-time API, OpenAI crawls a static product feed file (JSON) hosted on your website. This feed allows your products to appear in ChatGPT search results.

The Google Products plugin can generate this JSON feed alongside the existing Google Shopping XML feed. See the OpenAI / ChatGPT Shopping section of the Google Products plugin documentation for setup instructions.


Plugin settings reference

Setting Description Default
API Keys Repeatable table of API keys for authenticating requests. Each row has a Client name (label for your reference, e.g. "Google", "Claude") and an API Key value sent by the client via the X-API-KEY header. Configure one key per AI platform or agent. Leave empty to disable authentication (not recommended for production). empty
Base Path URL path prefix for all REST endpoints (e.g., /ucp/v1). /ucp/v1
Enable MCP Enables the Model Context Protocol (MCP) JSON-RPC endpoint for AI-native integration. See MCP support. No
MCP Slug URL slug for the MCP endpoint (e.g., /ucp-mcp). ucp-mcp
Privacy Policy URL Link to your privacy policy. Included in the discovery response. empty
Terms of Service URL Link to your terms of service. Included in the discovery response. empty
Enable Google Pay Advertise Google Pay as a payment handler in UCP discovery. No
Google Pay Environment TEST for sandbox testing, PRODUCTION for live payments. TEST
Google Pay Merchant ID Your merchant ID from the Google Pay Business Console. empty
Google Pay Merchant Name Business name displayed in Google Pay. empty
Card Networks Accepted card types for Google Pay. VISA, MASTERCARD
Auth Methods PAN_ONLY (cards in Google Account) and/or CRYPTOGRAM_3DS (device tokens). PAN_ONLY, CRYPTOGRAM_3DS


Compatible payment plugins

For UCP to process payments, you need a payment plugin that supports at least one of the UCP payment flows: the direct token flow (for Google Pay) and/or the hosted checkout flow (for redirect-based payments). Currently, two plugins support UCP:

Stripe Checkout

Available on the HikaShop marketplace

The Stripe Checkout plugin supports both UCP payment flows:

  • Direct token flow: Processes Google Pay tokens via the Stripe PaymentIntents API. Supports 3D Secure challenges when required by the card issuer.
  • Hosted checkout flow: Generates a Stripe Checkout Session URL where the customer can pay using any method supported by Stripe (cards, Apple Pay, Google Pay, bank transfers, etc.).

Setup for UCP: Make sure your Stripe plugin is configured with a valid Publishable Key and Secret Key. The publishable key is automatically used as the Google Pay gateway merchant ID. No additional UCP-specific configuration is needed in the Stripe plugin itself : UCP support is built-in.

Note: The Stripe Checkout plugin uses the gateway identifier stripe for Google Pay tokenization. Stripe handles all PCI compliance and token decryption on their servers.

Worldline Direct

Available on the HikaShop marketplace

The Worldline Direct plugin (formerly Ingenico Direct) also supports both UCP payment flows:

  • Direct token flow: Processes Google Pay encrypted tokens via the Worldline CreatePayment API. Automatically handles 3D Secure authentication for PAN_ONLY tokens. Supports redirect-based 3DS challenges when required.
  • Hosted checkout flow: Generates a Worldline hosted checkout page URL where the customer can pay using cards and other methods supported by Worldline.

Setup for UCP: Make sure your Worldline Direct plugin is configured with a valid PSPID, API Key, API Secret, and Webhook Secret. The PSPID is automatically used as the Google Pay gateway merchant ID. No additional UCP-specific configuration is needed in the Worldline plugin itself.

Note: The Worldline Direct plugin uses the gateway identifier worldline for Google Pay tokenization. Worldline uses product code 320 for Google Pay payments.

Making other payment plugins UCP-compatible

Payment plugin developers can add UCP support to their plugins by implementing up to three methods in their payment plugin class:

  • getPaymentURL(&$order, &$method) : Return a hosted checkout URL for the order.
  • onUcpPaymentProcess(&$order, &$paymentContext, &$paymentResult) : Process a payment token directly.
  • getUcpGooglePayConfig() : Return the Google Pay gateway configuration (gateway name and merchant ID).

All three methods are optional. A plugin can support just the hosted checkout flow, just the direct token flow, or both. You can base yourself on the example payment plugin.


MCP support

In addition to the REST API, HikaShop's UCP plugin can optionally expose an MCP (Model Context Protocol) endpoint. MCP is a JSON-RPC based protocol designed for AI models to interact with external tools natively. It is the protocol used by AI assistants like Claude to call external tools.

When MCP is enabled, AI agents can interact with your store using MCP tools instead of REST calls. The following tools are available:

  • create_checkout : Create a checkout session
  • get_checkout : Retrieve a checkout session
  • update_checkout : Update a checkout session
  • complete_checkout : Complete checkout and create an order
  • cancel_checkout : Cancel a checkout session
  • list_payment_methods : List available payment methods

To enable MCP, set Enable MCP to Yes in the plugin settings and configure the MCP Slug (default: ucp-mcp). The MCP endpoint will be available at https://www.yoursite.com/ucp-mcp.


Security

The UCP plugin includes several security mechanisms:

  • API key authentication: All REST and MCP endpoints (except the discovery endpoint at /.well-known/ucp) require a valid API key sent via the X-API-KEY header. You can configure multiple API keys (one per client) so that each AI platform or agent has its own credentials. We strongly recommend setting API keys for production stores.
  • Opaque session IDs: Checkout session IDs use random opaque tokens (e.g., gid://site/Checkout/ucp_1773956959_c5c89f9d586ac6da) instead of sequential database IDs. This makes session URLs unguessable and prevents enumeration of other sessions.
  • Idempotency: The plugin supports an Idempotency-Key header on checkout session creation. Sending the same key within 24 hours returns the existing session instead of creating a duplicate, preventing double orders from network retries.
  • Payment security: Payment tokens (such as Google Pay tokens) are encrypted by the payment gateway and can only be decrypted by the gateway's servers. HikaShop never sees or stores raw card details.


FAQ

Do customers need an account on my store?

No. The UCP plugin automatically creates a HikaShop user from the buyer's email address provided by the AI agent. If a user with that email already exists, the existing account is used.

Which AI assistants support UCP?

UCP is an open standard supported by a growing number of AI platforms. Google Gemini and Google Search AI Mode are among the first to support UCP natively for shopping. Any AI agent that implements the UCP specification can interact with your store.

Can I use UCP without Google Pay?

Yes. Google Pay is optional. Without it, the hosted checkout flow is still available: the AI agent receives a payment URL and redirects the customer to the payment gateway's page to complete payment.

Does UCP work with product variants?

Yes. Product variants are returned in search results with their own IDs, prices, and availability. AI agents can add specific variants to the cart.

Are discount codes / coupons supported?

Yes. AI agents can apply a discount code when creating or updating a checkout session. The discount is validated and applied just like it would be during a normal checkout.

What is the difference between UCP and the ChatGPT Shopping feed?

UCP is a real-time API that allows AI agents to search products, create carts, and process payments directly. The ChatGPT Shopping feed is a static JSON file that OpenAI crawls to index your products in ChatGPT search results. UCP enables a full purchase flow within the AI conversation, while the ChatGPT feed links customers back to your website to complete their purchase. Both can be used simultaneously. See the Google Products plugin documentation for the ChatGPT Shopping feed setup.

Where can I learn more about the UCP specification?

Visit ucp.dev for the full specification, or browse the GitHub repository for technical details and code samples.


Presentation

With HikaShop 3.4.0 release, we added a new checkout workflow edition interface. We worked hard on this new feature in order to enable you to setup your checkout with more liberty. This tutorial will show you how all of this works and what's possible.

Reach the Checkout Workflow

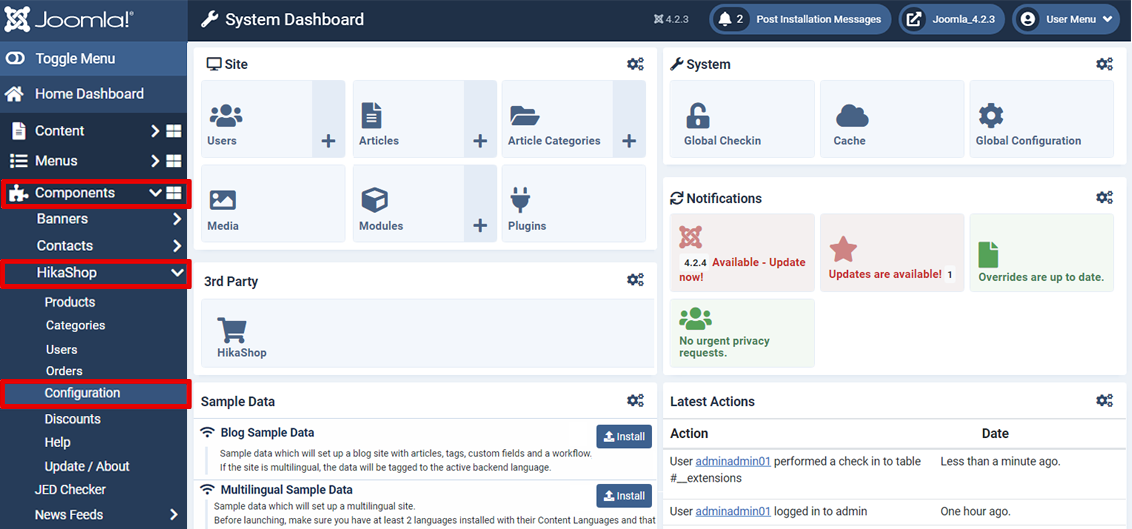
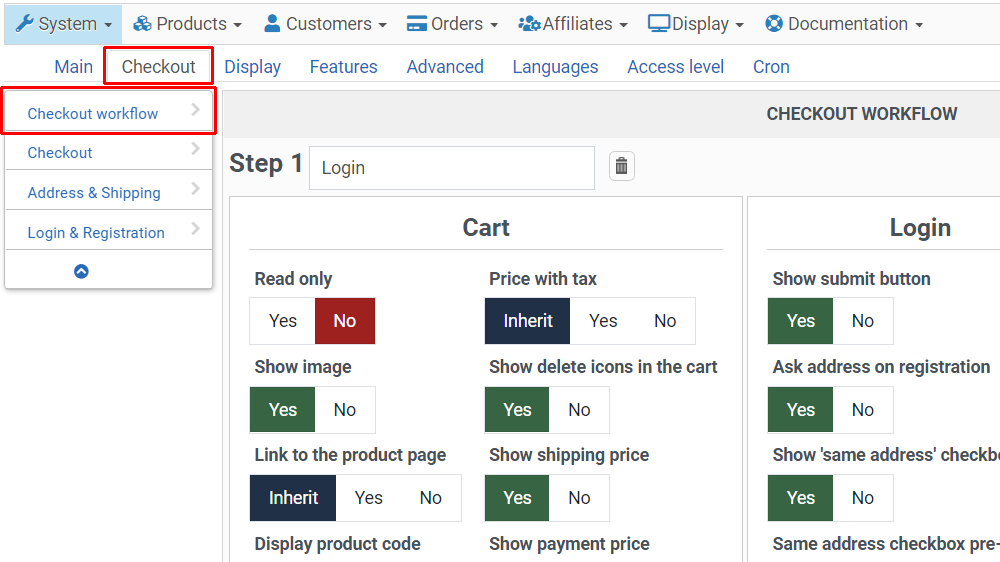
To reach and configure the checkout, follow this step by step process :

  • In the Components dropdown, select HikaShop, then Configuration

  • Click on the Checkout tab and have a look at the Checkout Workflow part

General Description

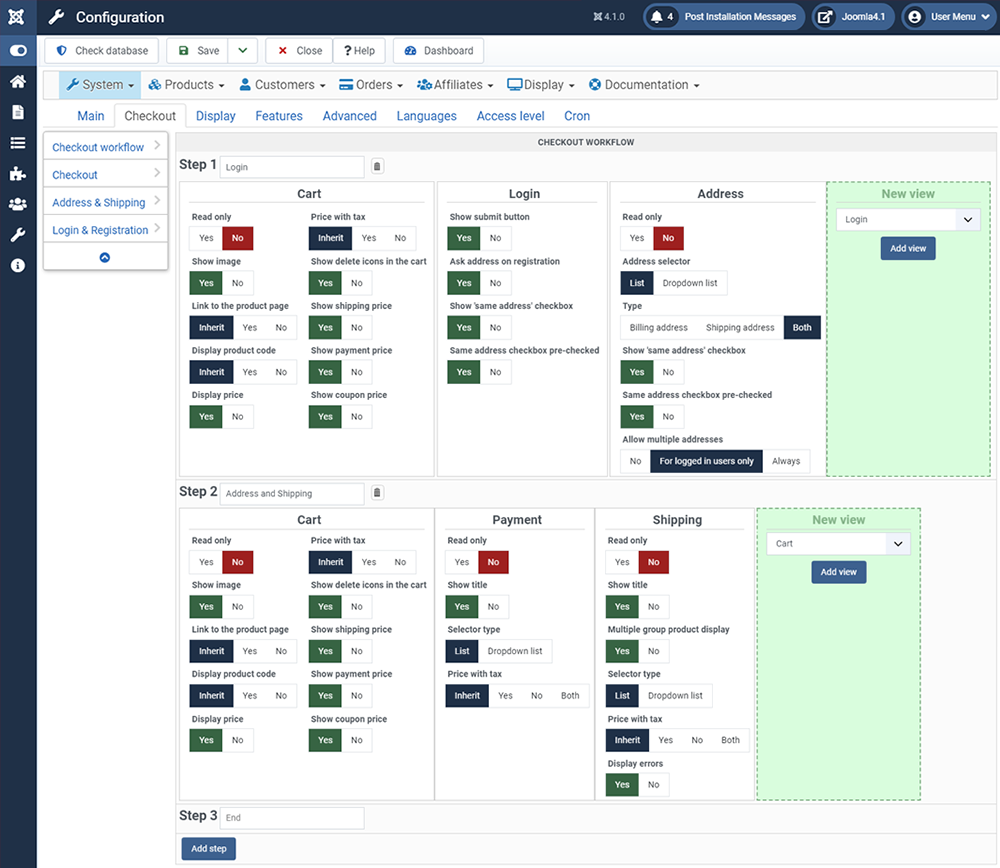
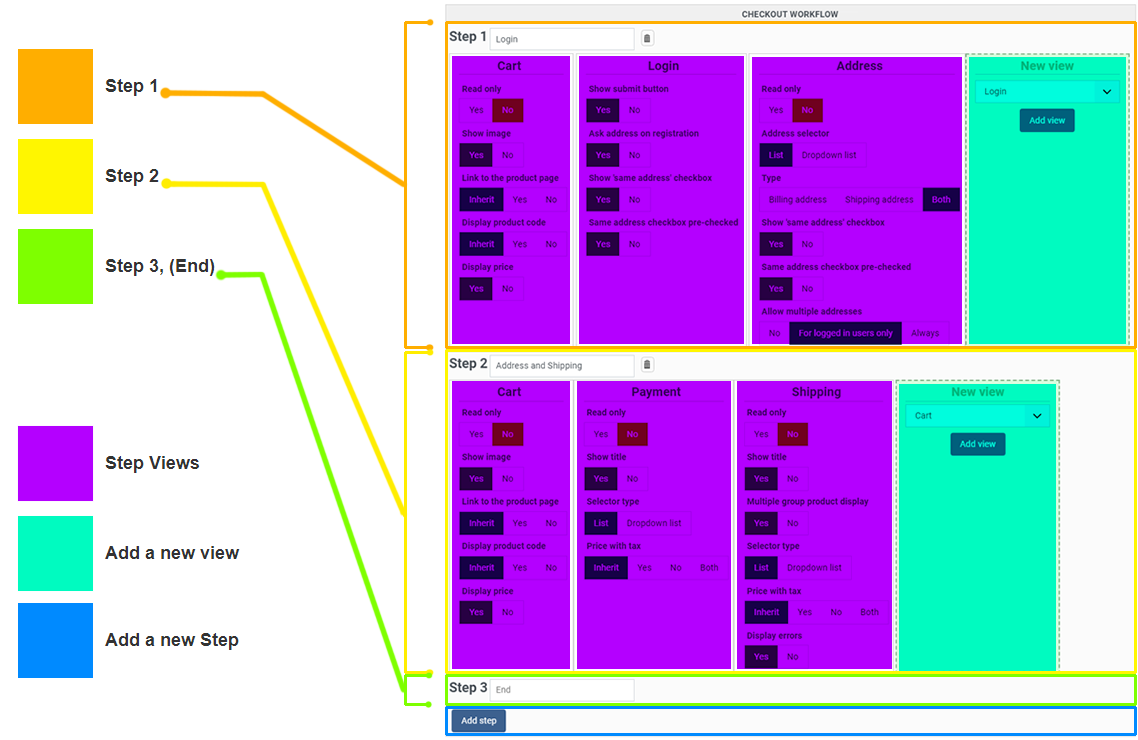
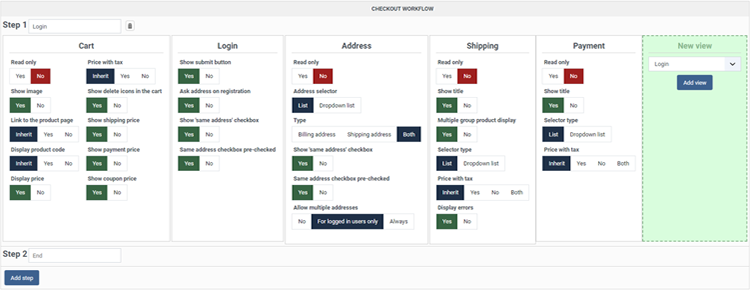
Let's check the new interface structure graphically :

  • Classic HikaShop part
  • New Checkout Workflow
  • Step 1
  • Step 2
  • Step 3, (End)
  • Add a new Step
  • Step Views
  • Add a new view

Essentials points about workflow parts

Let's add some precision in order to properly understand every workflow parts :
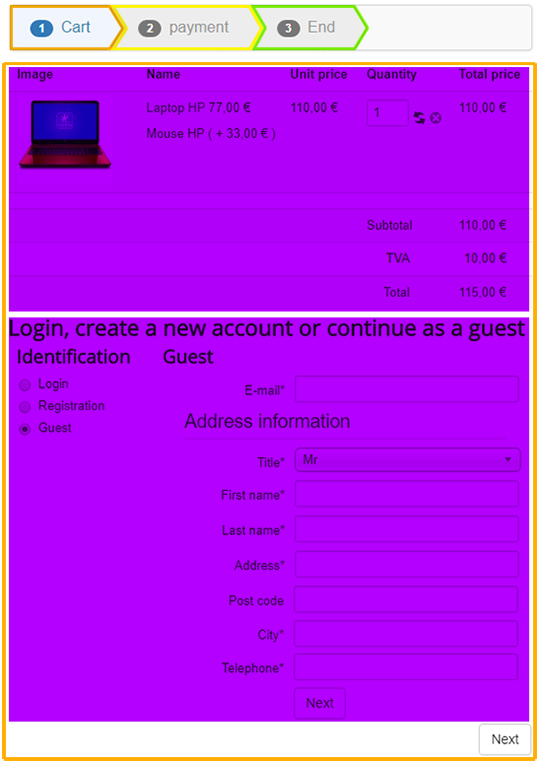
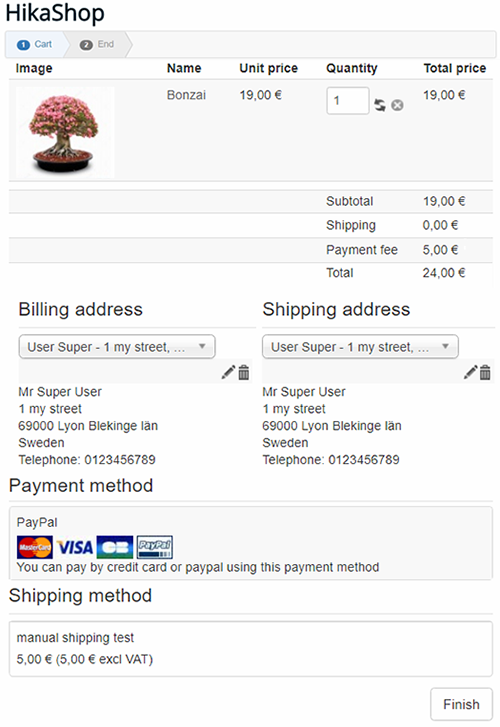
Here is a frontend view's representation of the previous color graphic.

Thanks to the progress bar you can see the different checkout steps, and in purple 2 views (here, Cart and Login).
So through a checkout, you can have one or several steps (pages of the checkout). And on each step, you can have one or several views (blocks on the same page), one below the other on the page.

Views Details

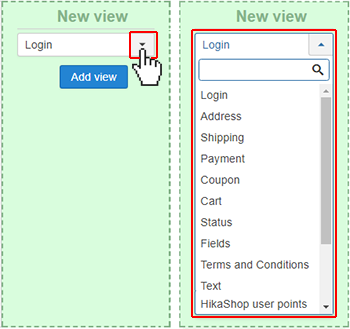
New view options

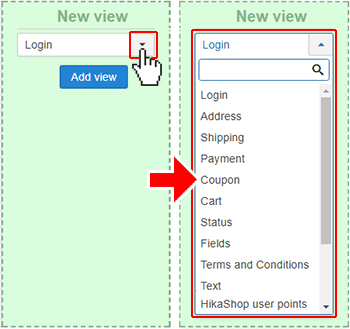
As you can expect from this view, it will enable you to add a new view's block and define its type using the dropdown. After selecting the type, you'll just have to click on "Add view".

Address view

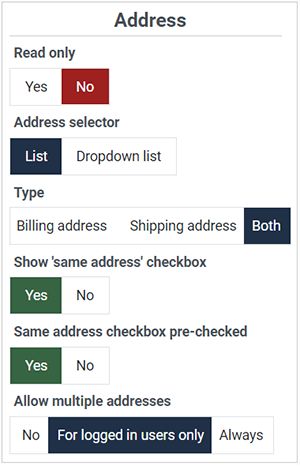
  • Read only : Select "Yes" if you want to only display the selected address(es) without allowing the user to do modifications in that view.
  • Address selector : Define how to display the address selection (dropdown or list).
    Note : This option won't be available if the Read only option is activated.
  • Type : That option will enable you to choose if you want to display only the billing area or only the shipping area or both. Note that you can potentially configure several address views in your checkout workflow. For example, you could have one for each type of address in order to display them in different areas / steps of your checkout.
  • Show 'same address' checkbox: With this option, you can control whether the "same address" checkbox is displayed below the address form. If displayed, then if checked, the address provided will be used for the other type of address.
  • Same address checkbox pre-checked: When the option above is activated, you can control whether the "same address" checkbox is checked by default on the address form.
  • Allow multiple addresses: Controls whether users can have several addresses of each type linked to their account. Options are: "No" (only one address per type), "For logged in users only" (default - registered users can have multiple addresses but guests cannot), or "Always" (all users can have multiple addresses). Note that it might not make sense to allow users in "guest checkout" mode to enter several addresses.

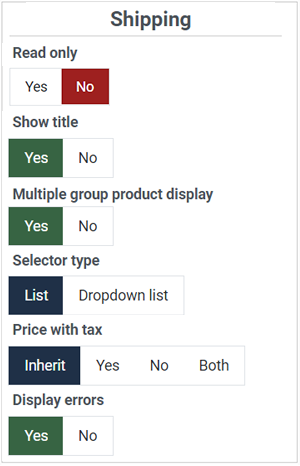
Shipping view

  • Read only : Click "Yes" if you want to only display the (pre)selected shipping method without any possibility for the user to change it.
  • Show Title : Will enable you to display the title of the view or not, on top of it.
  • Multiple group product display : Select "Yes" if you want to display the products thumbnail for each shipping group (when you have different vendors with different shipping methods, or warehouses).
  • Selector type : By default (list) the shipping methods can be selected with a table with a radio for each shipping method. If you switch to the "Dropdown list" mode, the shipping selection will appear as a simple dropdown.
  • Note : This option won't be available if the Read only option is activated.
  • Price with tax : The shipping costs, if configured in the shipping methods settings, will appear next to the name of the shipping method. With this setting, you can control how prices are displayed: "With tax", "Without tax", or "Both" (shows both values). You can also select "Inherit" to use the main HikaShop configuration setting.
  • Display errors : You can turn off the display of error messages for when no shipping methods are found. This can be useful in some cases where you have a one page checkout and shipping methods are only available after the customer has provided his shipping address. However, in such cases, we rather recommend you split your checkout in several steps so that the shipping methods selection is placed in a step after the user has provided his shipping address. That way, you can keep this setting turned on in order to display error messages that are really relevant to the customer.

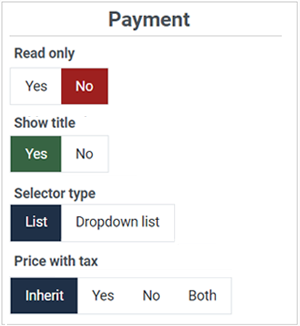
Payment view

  • Read only : Click "Yes" if you want to only display the (pre)selected payment method without any possibility for the user to change it.
  • Show title : Will enable you to display the title of the view or not, on top of it.
  • Selector type : By default (list) the payment methods can be selected with a table with a radio for each payment method. If you switch to the "Dropdown list" mode, the payment selection will appear as a simple dropdown.
  • Note : This option won't be available if the Read only option is activated.
  • Price with tax : The payment fees, if configured in the payment methods settings, will appear next to the name of the payment method. With this setting, you can control how prices are displayed: "With tax", "Without tax", or "Both" (shows both values). You can also select "Inherit" to use the main HikaShop configuration setting.

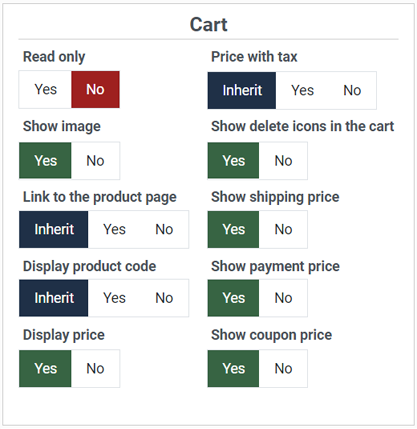
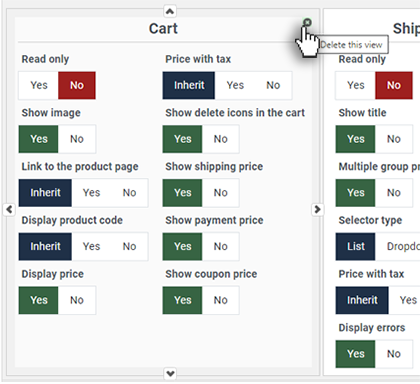
Cart view

  • Read only : Click "Yes" if you want to display the content of your cart without any possibility to modify it.
  • Show Image : You can choose here to display the product images or not.
    Or you can select "Inherit" to use instead the option of the main HikaShop Options section of the configuration.
  • Link to the product page : Select if you want to allow the customer to go to the product page or not.
    Or you can select "Inherit" to use instead the option of the main HikaShop Options section of the configuration.
  • Display product code : Choose to display the product code in the cart view or not.
    Or you can select "Inherit" to use instead the option of the main HikaShop Options section of the configuration.
  • Display price : Display or not the prices in the cart view.
  • Show discounted price : You can configure here how the discounted prices should appear in the cart view. Options include: "No" (don't show discount information), "Display discount amount" (show the discount value), or "Display price before discount" (show the original price struck through). You can also select "Inherit" to use the default configuration option.
  • Price with tax : Display the product prices with taxes or not.
    Or you can select "Inherit" to use instead the option of the main HikaShop Options section of the configuration.
  • Show delete icons in the cart : Display or not the delete icon to remove products from the Cart.
    Note : This option won't be available if the Read only option is activated.
  • Show shipping price : Display or not the shipping costs between the subtotal and the total.
  • Show payment price : Display or not the payment fees between the subtotal and the total.
  • Show coupon price : Display or not the coupon discount between the subtotal and the total.

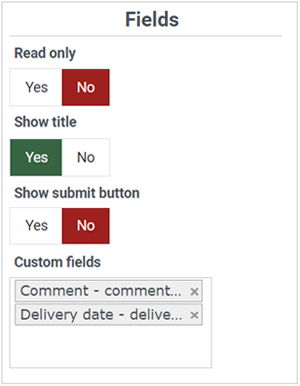
Fields view

  • Read only : Click "Yes" if you only want to display the selected values in the custom order fields without the possibility for the user to modify them.
  • Show title : Select if you want to display the title of the view or not, on top of it.
  • Show submit button : Display or not the submit button to enable users to send custom fields value without submitting the whole checkout step.
    Note : This option won't be available if the Read only option is activated.
  • Custom fields : With this input you can select which custom fields you want to display in your view. If you don't select anything, it will display all the custom order fields possible.
    This option can allow you to separate your fields form in separate steps by having it in different steps with different fields selected in each step.

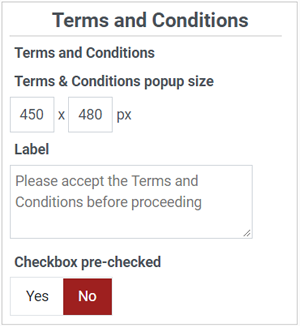
Terms and Conditions View

  • Terms and Conditions : Select here the Joomla article that will become your Terms and Conditions.
    Note that you can add this view several times to your checkout with different Joomla articles, if you want several checkboxes to be checked by the customer.
    Also, if you don't select any article, the checkbox will still appear but its label won't be clickable.
  • Terms & Conditions popup size : Define here the popup size which will display your Terms and Conditions Joomla article.
  • Label : Type here the message you want to display next to the checkbox in order to invite your customer to validate your Terms and Conditions.
  • Error message : Type here the error message you want to appear if the user tries to proceed without validating your Terms and Conditions.
  • Checkbox pre-checked : By default the checkbox will be unchecked and the customer will have to check it to be able to proceed. But you can also have it already checked by default by activating this setting.

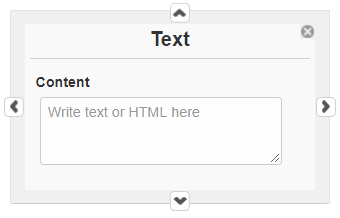
Text View

The text view will allow you to write some text to add a legend to guide customers, or separate the different views, etc.
Plus, it's also possible to use html code, inline css, javascript code blocks, or even use tags to insert elements from other plugins (modules anywhere, content anywhere, and the likes...).
This can be handy if you want to add an upsell message for free shipping. For example, you could use the text:
{hkshow maxproducts=150}Free shipping above 150€. You need {max}€ more of products to reach the threshold{/hkshow}
If the cart subtotal is below 150€, it would display the message "Free shipping above 150€. You need {max}€ more of products to reach the threshold" where {max} would be replaced by the difference between the threshold and the current subtotal of the cart.
You can read more about conditional content tags here.

  • Content: This textarea allows you to enter the text or HTML content that will be displayed in the checkout. You can write plain text, HTML code, inline CSS, JavaScript blocks, or use content plugin tags like {loadposition} or HikaShop's conditional content tags.

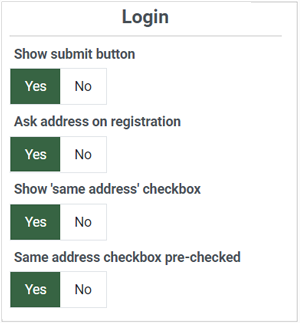
Login View

  • Override registration: When activated, you'll get a textarea below to write any text/HTML you want to replace the registration area. This can be useful if you use a third party extension for the registration and you want to redirect the user there instead of using the normal registration form of the HikaShop checkout.
  • Content: This text field will only appear if you activate the option above. Here you can write text or HTML to be displayed instead of the normal registration form of the HikaShop checkout.
  • Show submit button: If you deactivate that option the "Register" (for the registration form) or "Next" (for the guest form) button won't be displayed for that view. This option is only available when "Override registration" is disabled.
  • Ask address on registration: When activated, the registration form will include the billing address fields. This allows customers to provide their billing address during registration. This option is only available when "Override registration" is disabled.
  • Show 'same address' checkbox: With this option, you can control whether the "same address for shipping" checkbox is displayed below the billing address form. If not displayed, then the system will automatically use the billing address information as the shipping address. If displayed, then if not checked, the customer will be able to provide a separate shipping address with the necessary fields on the same registration form. This option is only available when "Ask address on registration" is enabled.
  • Same address checkbox pre-checked: When the option above is activated, you can control whether the "same address for shipping" checkbox is checked by default on the registration form. This option is only available when "Show 'same address' checkbox" is enabled.

About Guest Checkout: The Login view adapts its display based on your HikaShop configuration settings (System > Configuration > Checkout > Login & Registration). If you enable guest checkout, the Login view will display a guest checkout form allowing customers to proceed without creating an account. You can configure multiple registration modes (standard registration, simplified registration, guest checkout, or a combination of guest checkout and registration) and the Login view will display according to the selected mode.
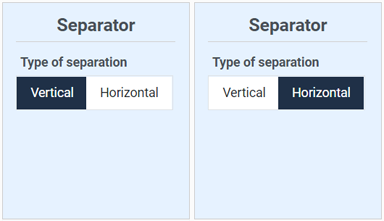
Separator view

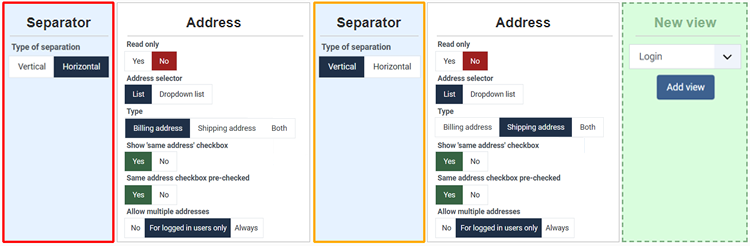
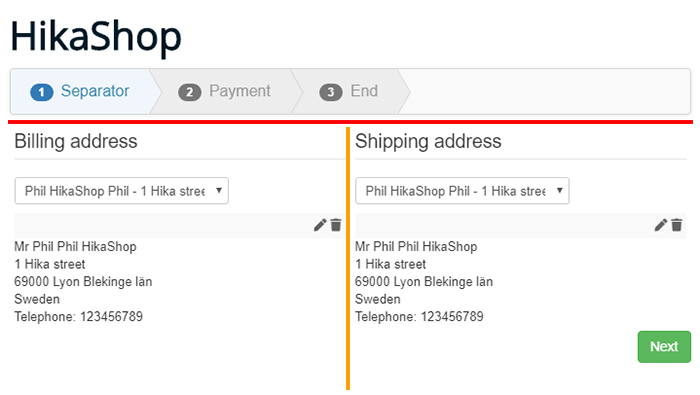
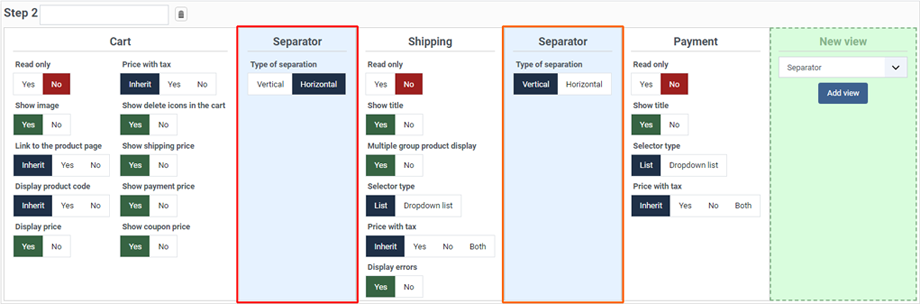
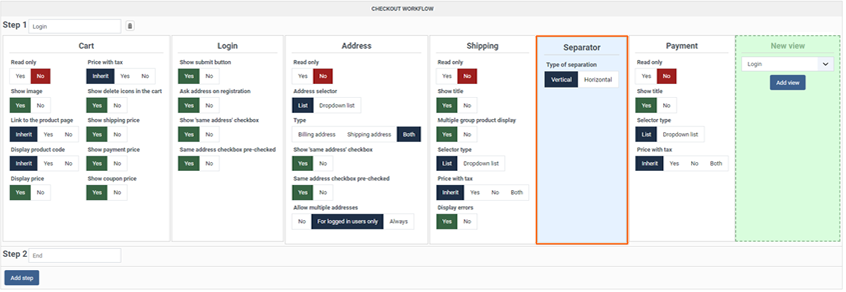
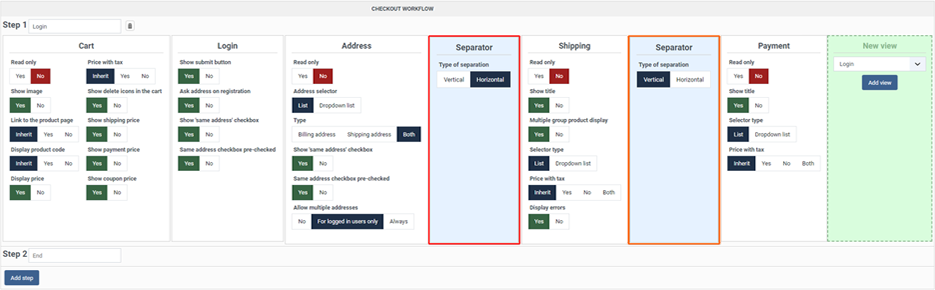
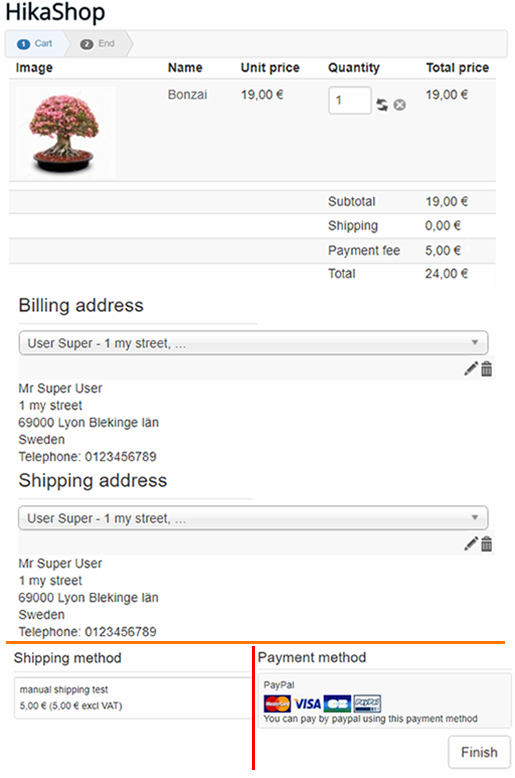
  • Type of separation : This option will enable you to define how the separator will work, Vertical or Horizontal. See the illustration :

First, have a look at this checkout workflow configuration :

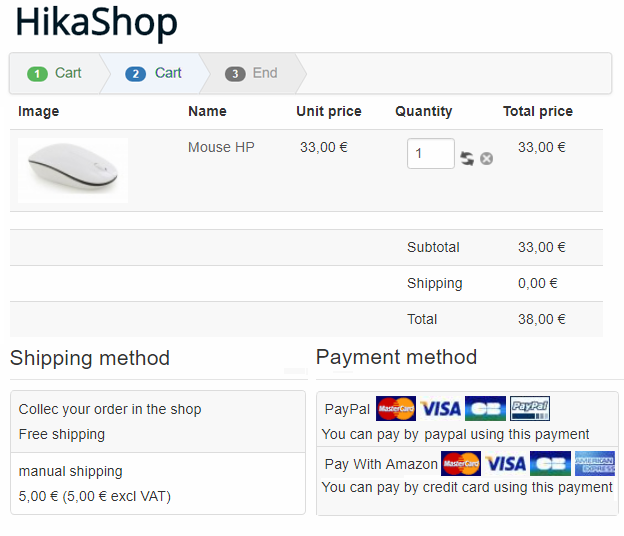
The result is :

To discover a lot more about the separator abilities, see the Concrete Examples section.

Generic view

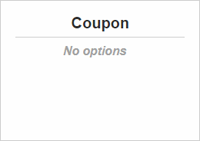
For the other default types of views there is no specific option, and so views will be displayed like this :

This will be the same kind of display for these views:

  • Coupon: Displays a text field where customers can enter a coupon/discount code along with an "Apply" button to validate and apply the coupon to their cart. If a coupon is already applied, it will display the coupon code with an option to remove it. By default, only one coupon can be applied to the cart. If you want to allow multiple coupons, you can use the Multi Coupon Checkout plugin.
  • Status: Displays the name of the currently selected shipping method and the name of the currently selected payment method.
  • HikaShop user points: If you have the HikaShop User Points plugin enabled, this view allows customers to use their accumulated points to pay for part or all of their order. It displays the available points and provides controls for the customer to choose how many points to redeem. You can find more information about the HikaShop User Points plugin here.

Note: Plugins and other extensions can add their own views to the checkout workflow using our "Checkout API". So you might see more view types with possibly their own options.

For developers: If you want to create your own custom checkout view types, define custom parameters, handle AJAX events, or integrate third-party functionality into the checkout, please refer to the Checkout section of the Developer Documentation.

How to move Views

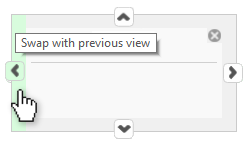
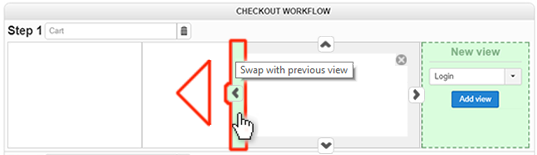
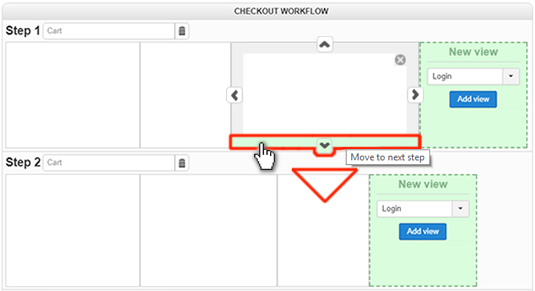
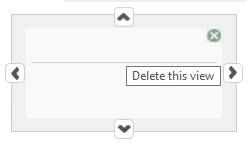
In order to move a view in your workflow you have some arrow buttons that will appear when you hover the view, all around the border of your view.

To delete a view: When you hover over a view block, you'll see a trash icon (or X) in the top right corner. Click on it to remove the view from the step. Don't worry - you can always add it back later using the "Add view" dropdown.

For example, let's swap it with the previous view.

Or to move it to the next step.

Manage steps

Adding a new step: To add a new step to your checkout workflow, click on the blue "Add step" button located at the bottom of the existing steps. The new step will be added at the end (before the "End" step), and you can then add views to it using the "Add view" dropdown.

Step options:

  • Step Title: The input field shows the default title that will be used for this step in the progress bar (by default, it's the title of the first view in the step). You can type your own custom text in this field.
    You can also enter a translation key here so that you can have a different title in each language of your website.
  • Trash icon button: This button enables you to delete the step.
    Note: All steps can be deleted except the last one, the "End" step. That step is not a real step of your checkout. That's the page the customer will see after clicking on the "Finish" button of your checkout, which in most cases will redirect them to the payment gateway automatically so that they can pay for their order.

Concrete example

Let's see here some typical configuration with 2 concrete examples.

One page Checkout

Backend configuration :

First, let's consider that all the views are needed (except the second cart view), but we have to move them all to the first step

Now, we have to remove the second cart view, like shown on this screenshot :

Then, you can see that the step 2 is now empty, no need to delete it with the little trash icon, because when you will save your new configuration, the step 2 will be automatically removed and you will get this :

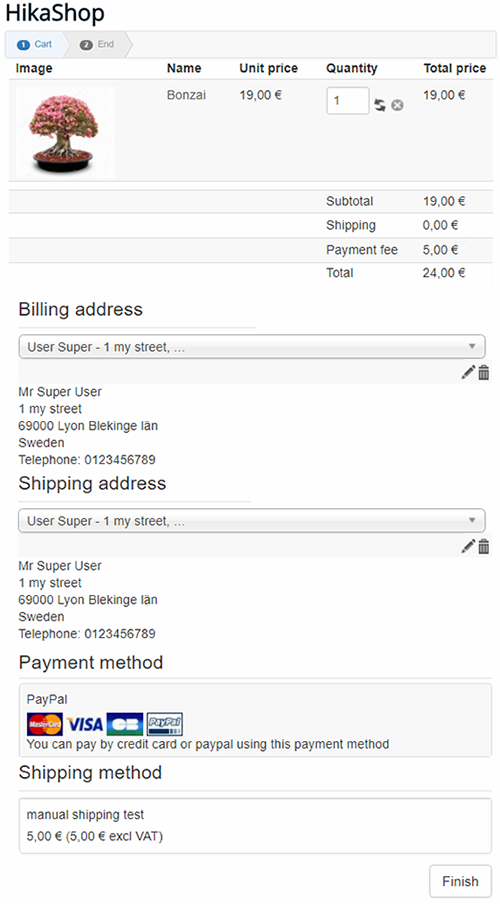
Frontend result :

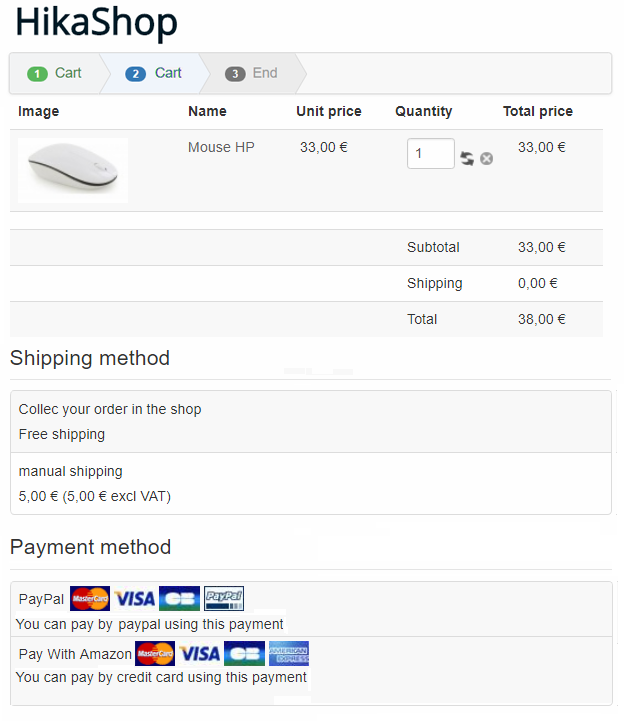
As result and as expected you have now a one page checkout :

Several pages checkout

Backend configuration :
From this kind of configuration we will now move to a step by step checkout.

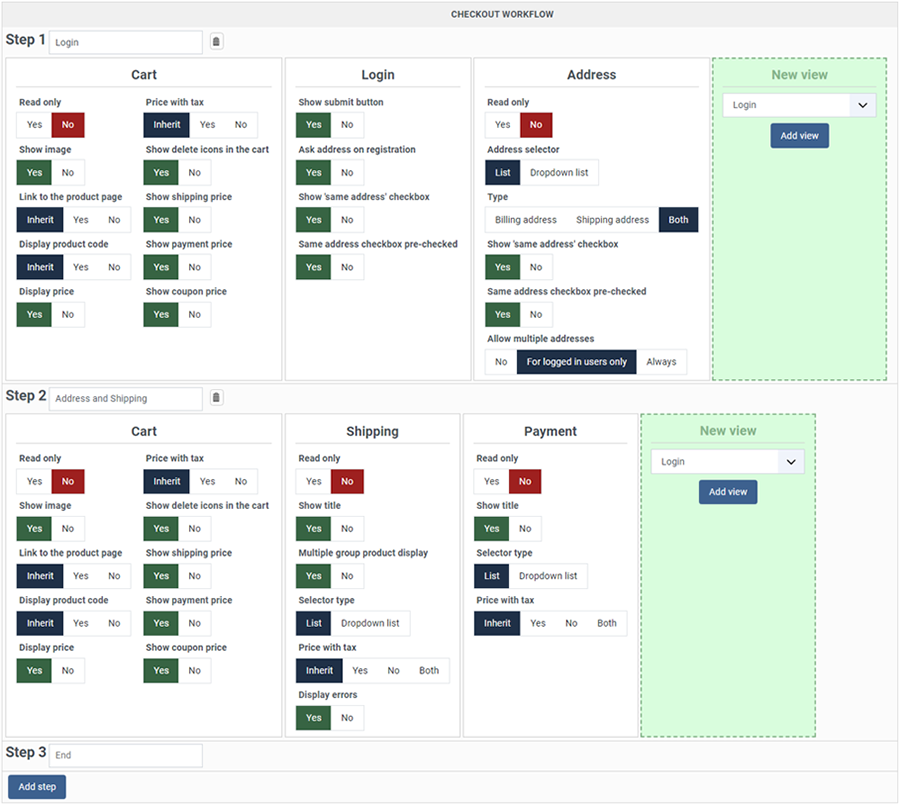
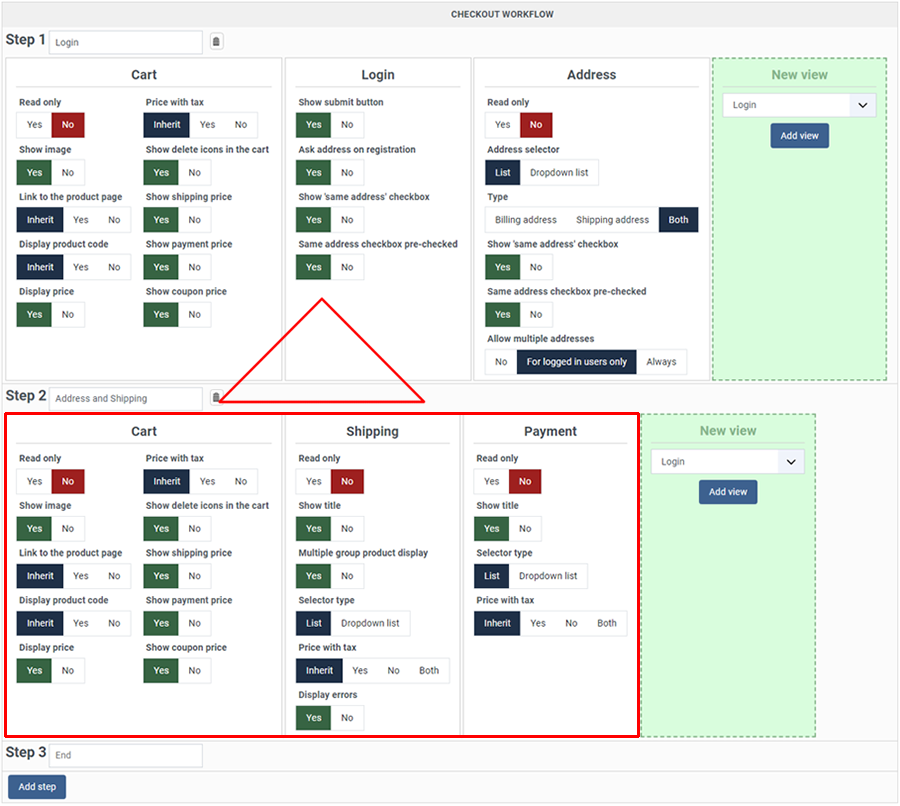
Move the Address view, to the next step :

Delete the Cart view in Step 2 thanks to the delete icon on the top right corner of the view.

Move Shipping and Address to Step 3.

Create a new view => Coupon

In the Step 3 : As you did for Coupon, create a Field view

Add, in the same way, Cart and Text views

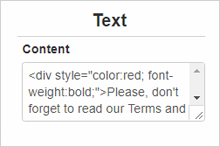
Edit your Text view with this Html code :
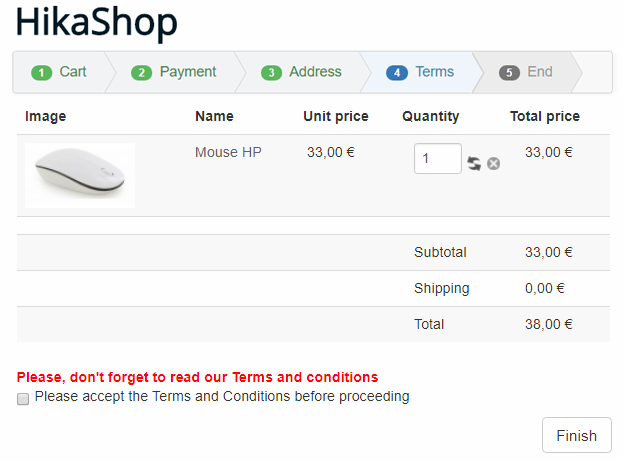
<div style="color:red; font-weight:bold;">Please, don't forget to read our Terms and conditions</div>

Last but not least, do not forget to edit your step title in order to fit with your Checkout workflow.

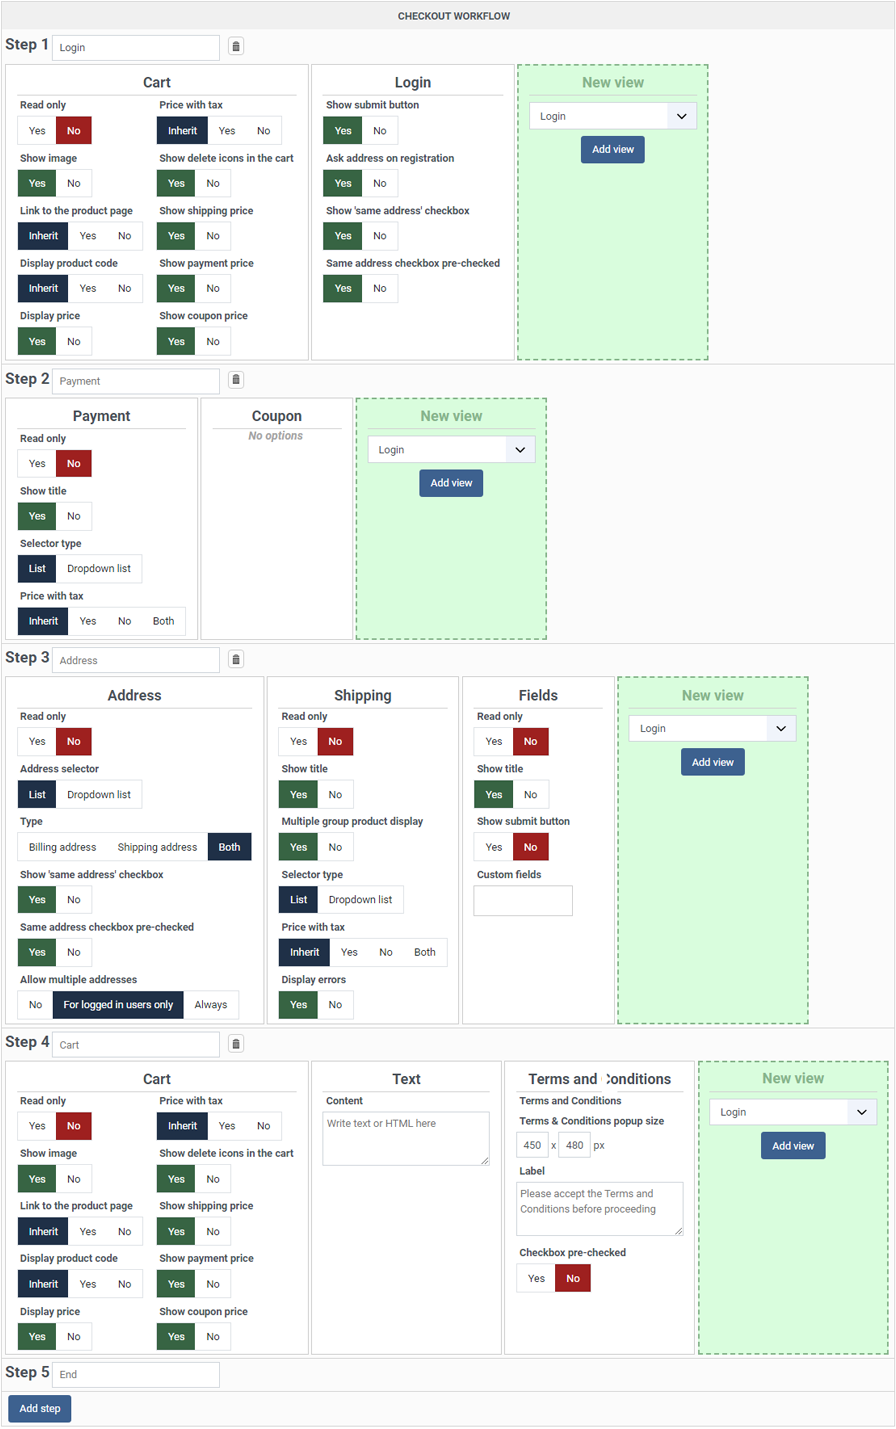
Your checkout workflow is now like this, don't forget to save :

Frontend result :

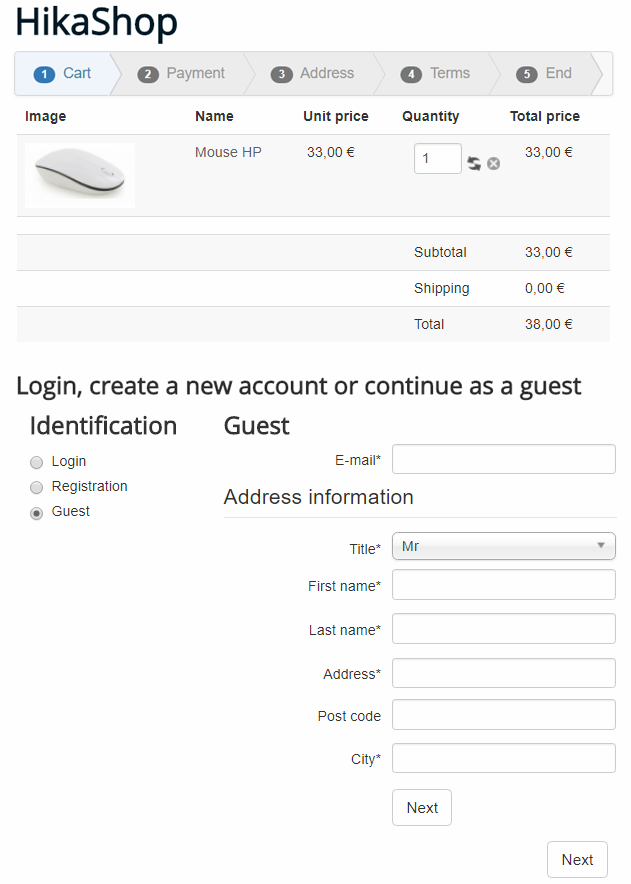
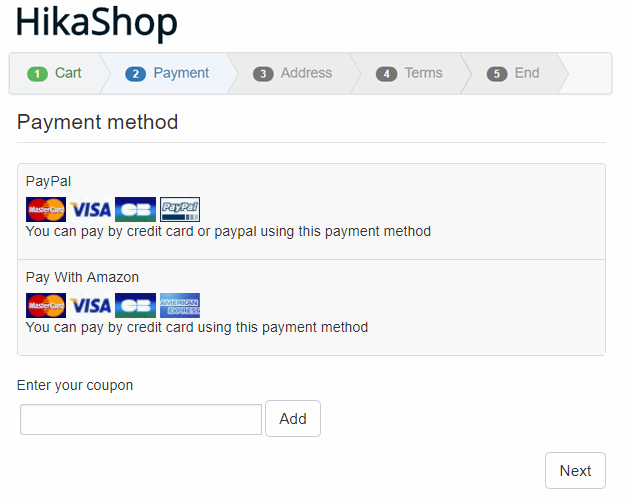
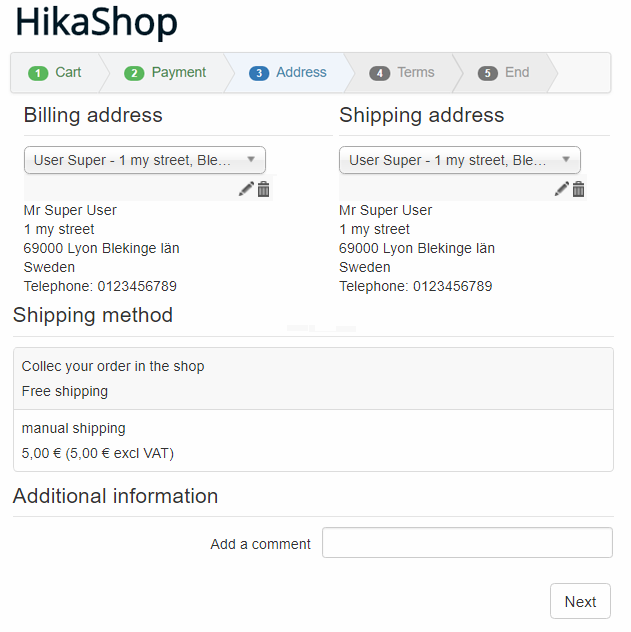
As expected you have now checkout in several steps :

Note : Each step has its own title that will announces what will be displayed :

Let's play with the separator system !

We will see here, several configuration not especially to invite you to follow them but in order to show your the real possibilities of the block separator system.

First try :

Here a classic checkout workflow configuration :

And the result on the frontend :

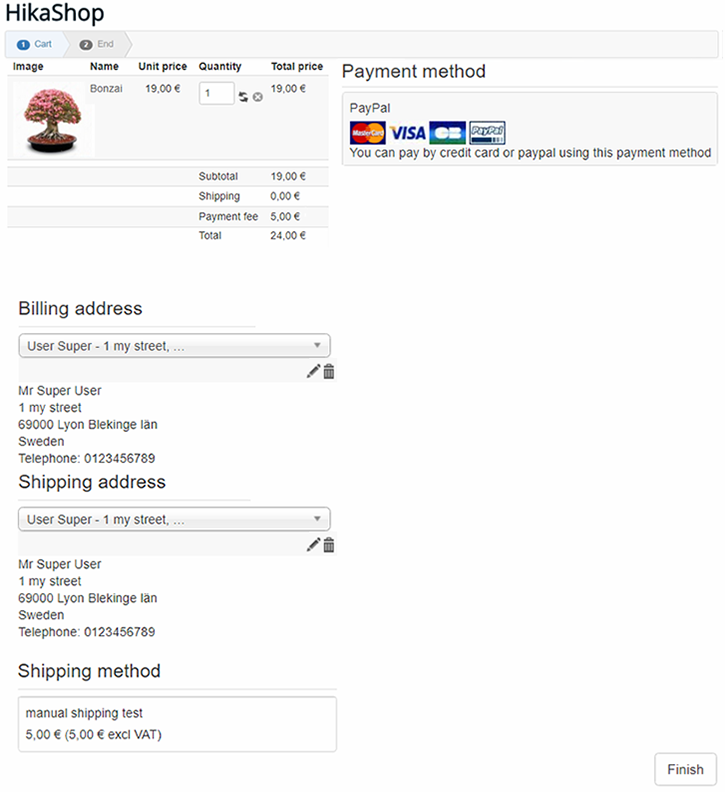
Let's now start to use separator on the step 2, to display side by side Shipping and Payment block :

Let's see the result on the frontend :

Understand the point with the Horizontal separator :

Let's imagine that, like the previous step you just want to display side by side payment and shipping method, but you have forget to use the Horizontal separator, let's see what this will leads :

Your checkout workflow is configured like this in one step.

On the frontend you get this :

And so, just add "by mistake", just 1 Vertical separator between the shipping and the payment block :

The result will be like this :

Why not, but we guess that the idea was more just to add 1 Horizontal separator like this :

In order to get this :

As you can imagine with these 2 separator blocks every configuration is possible ! The only restriction will be of course to keep readability.

Tips & Best Practices

Here are some recommendations when setting up your checkout workflow:

  • Login/Registration first: Always place the Login view at the beginning of your checkout (usually in the first step). The customer needs to be identified before you can display shipping methods based on their address.
  • Address before Shipping: In most cases, place the Address view before the Shipping view. Shipping methods and costs often depend on the customer's shipping address, so they need to provide it first.
  • Shipping before Payment: In most cases, place the Shipping view before the Payment view. Some payment methods may depend on the shipping cost (e.g., Cash on Delivery restrictions), and the final total needs to include shipping costs.
  • Use "Read only" for order review: If you want to show an order summary on the final step before payment, add a Cart view with the "Read only" option enabled. This prevents accidental quantity changes at the last moment.
  • Terms & Conditions on the final step: Place the Terms & Conditions view on the last step of your checkout, just before the customer clicks "Finish". This ensures they acknowledge the terms right before placing the order.
  • One-page vs Multi-step: For simple products or quick purchases, a one-page checkout can reduce friction. For complex orders or when you need to validate each step (e.g., address validation before showing shipping options), a multi-step checkout is better.
  • Don't forget to save: After making changes to your checkout workflow, don't forget to click the "Save" button in the HikaShop configuration to apply your changes.