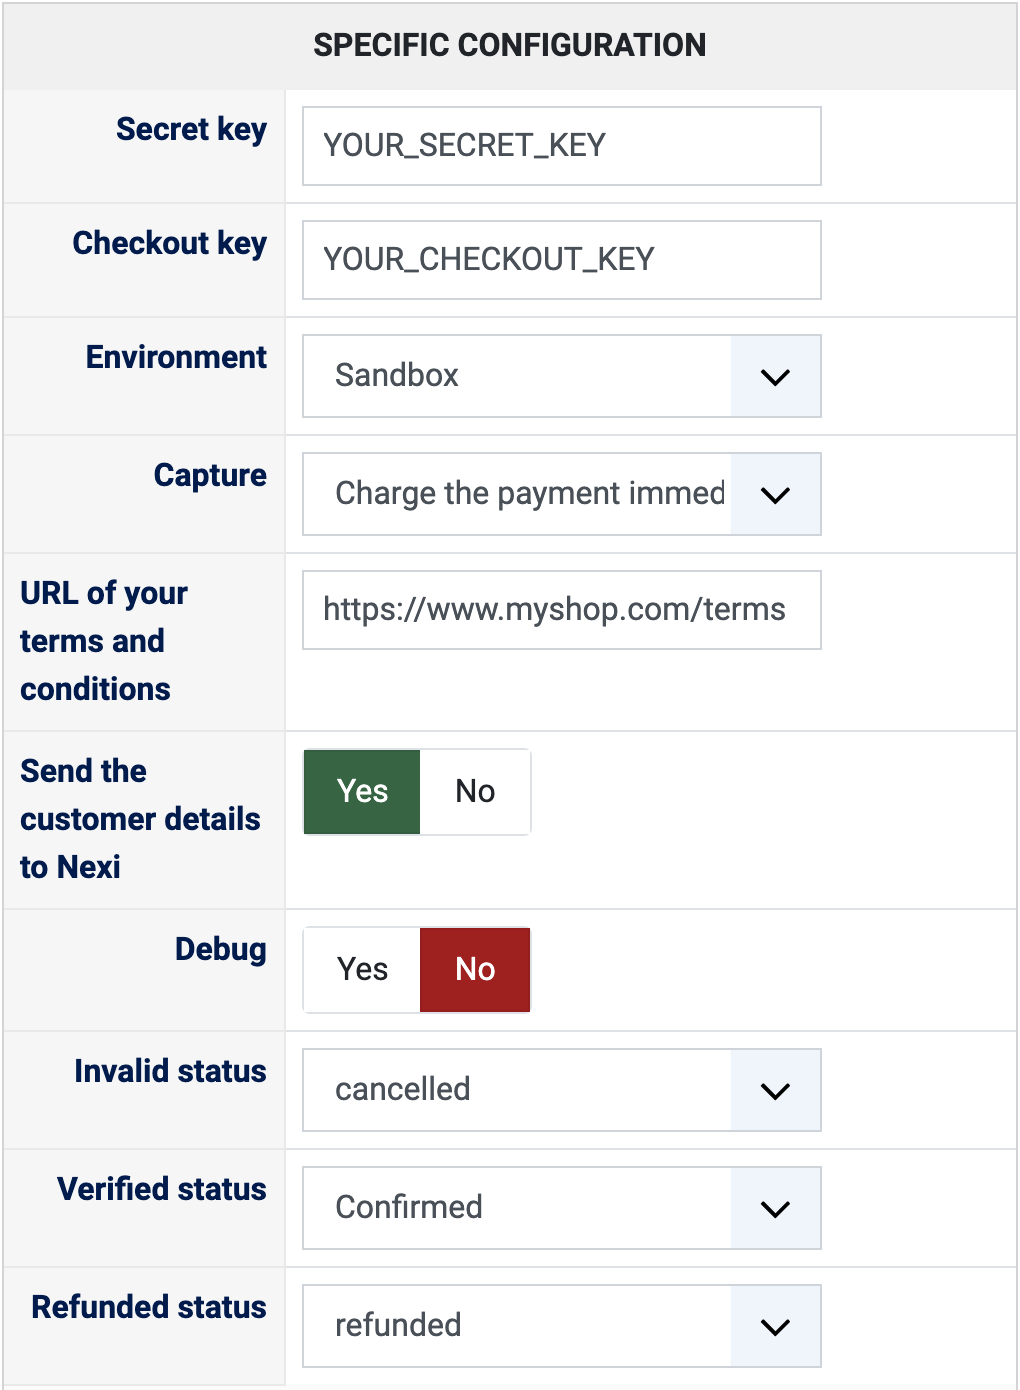
1) You need a Nexi Checkout merchant account (Nexi Checkout was previously called Nets Easy). In the "Company" section of your Nexi merchant portal, get your Secret key and your Checkout key. The test keys only work with the Sandbox environment and the live keys only work with the Production environment.
2) Install this plugin on your Joomla or WordPress website: in Joomla with the extension installer, in WordPress with the "Install Plugin" button of HikaShop's payment plugins page.
3) In HikaShop, go to System > Payment methods, click "New" and choose Nexi Checkout.
4) Fill in the settings below, set "Published" to Yes and save.
5) Your shop has to be reachable over HTTPS from the internet so that Nexi can notify it of the payments. The currency of the order has to be supported by your Nexi account: the method is hidden at the checkout for a currency Nexi does not accept (DKK, SEK, NOK, EUR, GBP, USD and PLN are accepted by the plugin).
The customer chooses among the payment methods activated in your Nexi account on the Nexi payment page, then comes back to your thank you page.
Configuration
Secret key: the Secret key of your Nexi account. Left empty, the method cannot take payments.
Checkout key: the Checkout key of your Nexi account.
Environment: Sandbox while you try the payments with the test keys, Production with the live keys.
Capture: "Charge the payment immediately" takes the money at once. "Reserve, and charge when the order reaches the capture status" only reserves the amount and charges it when the order reaches the status you chose for the capture in the HikaShop configuration.
URL of your terms and conditions: the address of your terms and conditions page. Nexi requires it and shows it on the payment page.
Send the customer details to Nexi: Yes sends the name, email, phone and address of the customer so they do not have to type them again. No sends nothing about the customer.
Debug: Yes writes every exchange with Nexi to the HikaShop payment log. Turn it on to look into a problem, then off again.
Invalid status: the status of an order whose payment failed ("cancelled" by default).
Verified status: the status of a paid order ("confirmed" by default). Choose the status that sends your customer the confirmation email.
Refunded status: moving an order to this status in the backend refunds the payment on Nexi ("refunded" by default). If Nexi refuses the refund, the status of the order is left unchanged.
The other settings of the page (name, description, images, price, zone, currency, restrictions) are the same as for every HikaShop payment method.
Troubleshooting
Turn Debug on and open the payment log (System > Configuration, Files, "See the report" next to "Payment log file").
"The Nexi Checkout payment method is not configured. Please enter your secret key in its settings.": type the Secret key in the payment method.
"The payment could not be started. Please try again or select another payment method.": Nexi refused to create the payment. The payment log gives its answer; check that the keys match the Environment and that the terms and conditions address is filled in.
"The refund was refused by Nexi, so the order status was not changed. Please check the HikaShop log file.": look at the payment log, then make the refund in your Nexi merchant portal if needed.
The method does not appear at the checkout: the currency of the order is not one Nexi accepts.
Orders paid but still unconfirmed: Nexi could not notify your shop. Check that your website is reachable over HTTPS.